Bobtot B901D User manual

Scan the QR code to access how-to videos, the
user’s manual, and other important information
you may need to get the most of your item
Quick Setup Guide
B901D
5.1 CHANNEL HOME THEATER SYSTEM
WITH LED LIGHT EFFECTS

What’s in the box
Like our product?
Share your experience with our customers on your page!
*
*Satellite Speakers(Center & FL & FR & SL & SR)
5PCS
*RCA Video Audio Cables 3PCS
*3.5mm to RCA Audio Stereo Cable 1PC
*TV ARC Cable 1PC
*Optical Audio Cable 1PC
*Coaxial Cable 1PC
*Remote Control 1PC
*FM Antenna Cable 1PC
*User Manual 1PC
Subwoofer Speaker 1PC
Having troubels?
Contact us: service@bobtot.net

Table of Contents
What's in the box..................................................................................... 3
Important Saftety Instructions.................................................................. 3
Front Panel of Subwoofer......................................................................... 5
Back Panel of Subwoofer......................................................................... 6
Remote Control Function......................................................................... 7
Best Placement for 5.1 Home Theater System......................................... 8
Set Up Center & Front & Rear Speakers................................................... 8
........................................ 9
SYSTEM CONNECTION DIAGRAM....................................................... 10
-How to use the wireless BT.............................................................. 10
-How to connect your device by TV ARC Cable................................. 11
-How to connect your device by Optical Cable.................................. 11
-How to connect your device by Coaxial Cable.................................. 11
-How to connect your device by RCA Stereo Audio Cable................. 12
-How to connect your device by 3.5mm to RCA Audio Stereo Cable..12
-How to connect your device by 3RCA Audio Stereo Cable................12
-How to use FM radio by Antenna...................................................... 13
-Microphone for Karaoke ................................................................. 13
Product Specifications........................................................................... 13
Certification............................................................................................14
Need Help.............................................................................................. 15
Mounting Instructions......................................

5
12345678
9
10
11
12
12
INPUT
SD/DVD/FM/BT/OPTICAL/COAXIAL/TV ARC mode.
-------------- Input function key, switch among AUX/USB/
ST.BT---------------Stand by function by pressing it 3 secs in
/SD/FM/BT/OPTICAL/COAXIAL/TV ARC mode;
AUX/SUB
5.1/2.1------------- 5.1/2.1 function key.
CH-/ ------------ Previous” function key.Previous song when USB/SD
input;Previous channel when FM input.
“
CH+/ ------------ Next” function key.Next song when USB/SD input;
Next channel when FM input.
“
AUTO/ ----------
when the automatic search and save the radio station.
USB/SD Pause/Play function key; When the FM state
VOL- -------------- Decrease the volume button.
10 U DISK------------- USB socket(max file size 64Gb)
VOL+ -------------- Increase the volume button.
11 SD/MMC CARD----SD card socket(max file size 64Gb)
Digital Display
12 MIC 1/2------------ MIC socket.
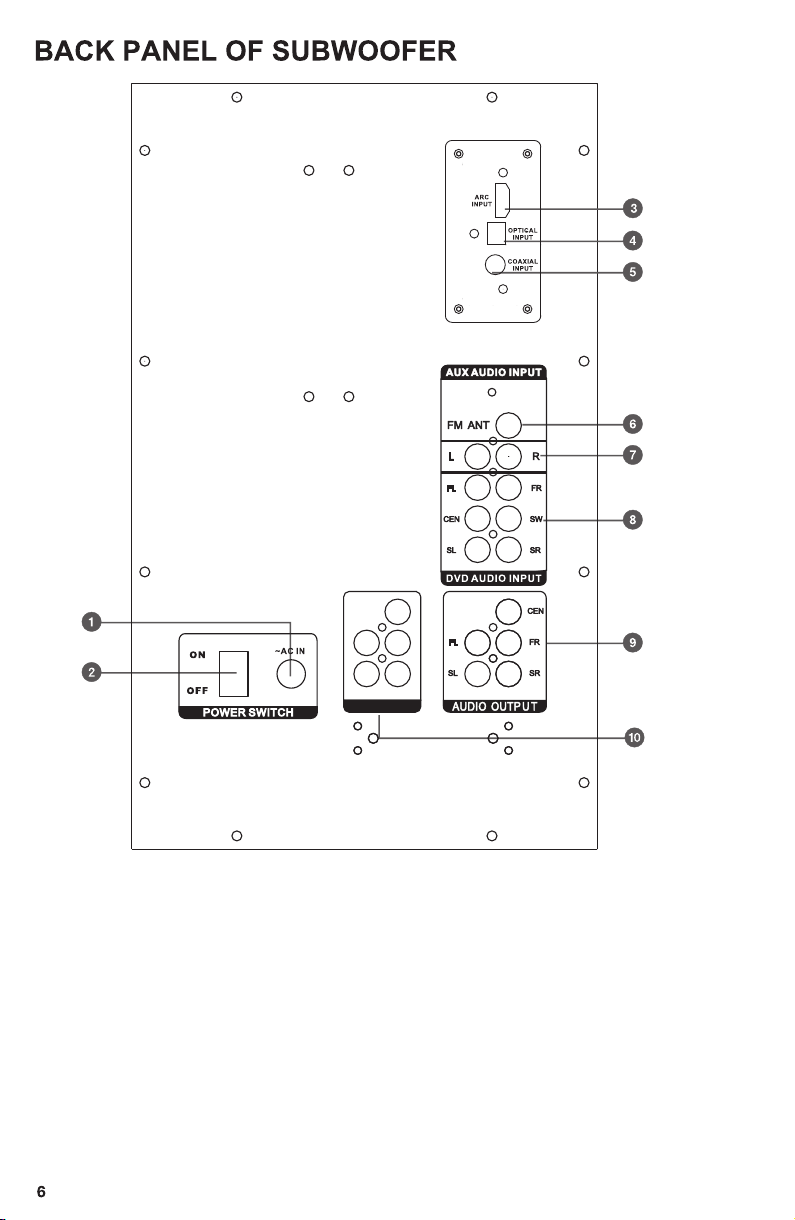
7.RCA to RCA or RCA to 3.5mm AUX audio input
8.3PCS RCA DVD audio input (front L&R/center/subwoofer/rear L&R)
9.Center speaker/Front L/R audio outputspeakers speakers /Rear L/R
1.Power input
2.Power switch
3.TV ARC audio input
4.Optical audio input
5.Coaxial audio input
6.FM antenna
LED POWER
10.LED power output

7
5.1/2.1: Channel mode select
SLEEP: Setting the sleep time
LED LIGHT: Long press to turn on/off the LED light of
5 small speakers;
Short press to change the Subwoofer's
light modes or turn light off.
SAVE: Save stations to unit memory
TUNE+/-: Manually tune FM stations
AUTO: Automatic station search
FL+/-: Front left speaker volume control
FR+/-: Front right speaker volume control
SW+/-: Subwoofer volume control
CEN+/-: Center speaker volume control
VOL+/-: Master volume control
SL+/-: Rear satellite left speaker volume control
SR+/-: Rear satellite right speaker volume control
0-9: Number pad used to direct select tracks when
in USB/SD mode
REPEAT: Repeat one song/repeat all songs/shuffle
RESET: Reset volume level
MIC+/-(EQ+/-):when a pair of microphone are connected,
these buttons will control the mic volume. In USB/SD mode,
they will allow you to navigate the 5 preset EQ curves. Please
note: connecting mics will override the EQ+/- function.
ECHO+/-(DISP+/-):when a pair of microphone are connected,these buttons
will control the echo effect. If there are no mics connected,
they will control the display brightness. Please note:
connecting mics will override the DISP+/- function.
INPUT: Switch between input modes:USB/SD/FM/
AUX/DVD/OPT/COA/TV ARC/BT
MUTE: Mute all output
: Play/Pause in USB/SD/BT modes
CH-/ :Previous FM station/previous track(USB/SD)
CH+/ :Next FM station/next track(USB/SD)
: Power/Standby
NOTE:
1. Turn on the unit, please press the "Power" button before selecting the input mode.
2. If the remote control does not work, please replace the batteries and try again.
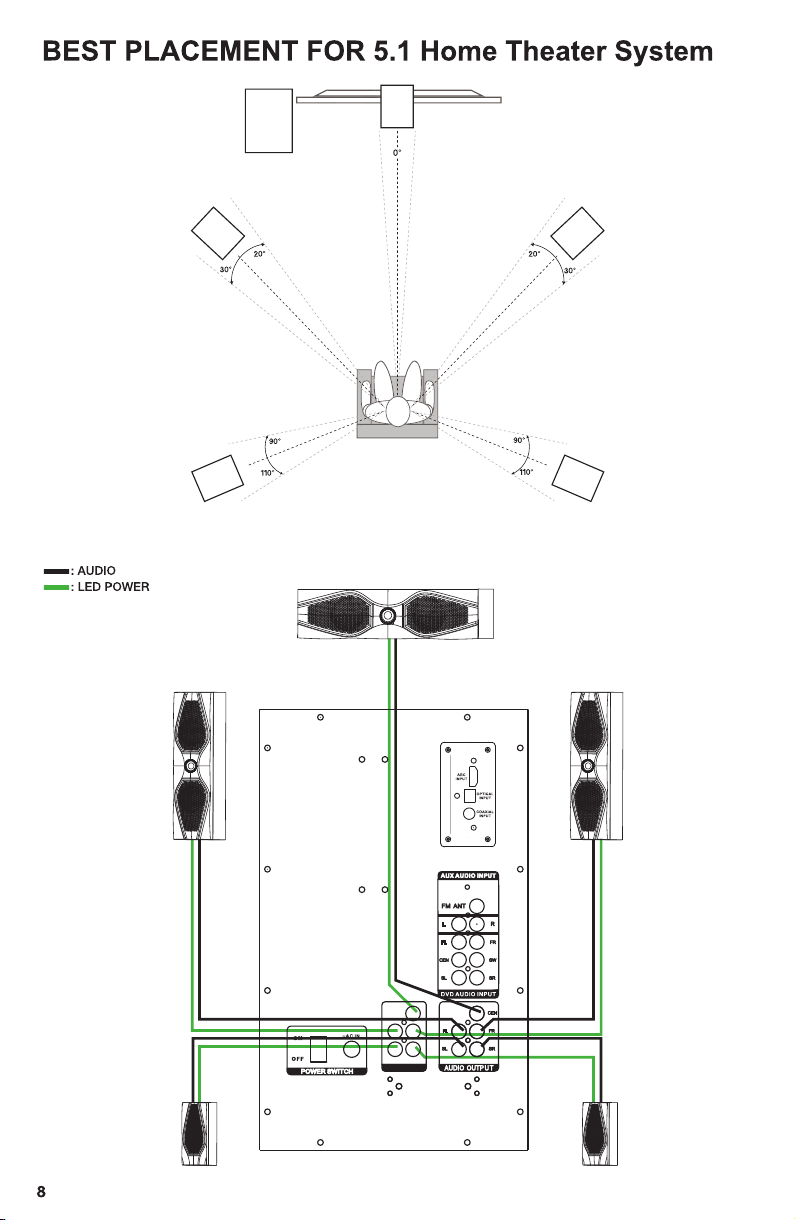
Subwoofer
Center
FL FR
SL SR
SET UP CENTER & FRONT & REAR SPEAKERS
LED POWER
Center speaker
Cable:157.48inch
FR speaker
Cable:157.48inch
FL speaker
Cable:157.48inch
SL speaker
Cable:374.02inch
SR speaker
Cable:374.02inch
* mounting brackets and screws included)(
* speaker cable (built-in, included)
* wall hooks ( not included)
* screwdriver (not included)
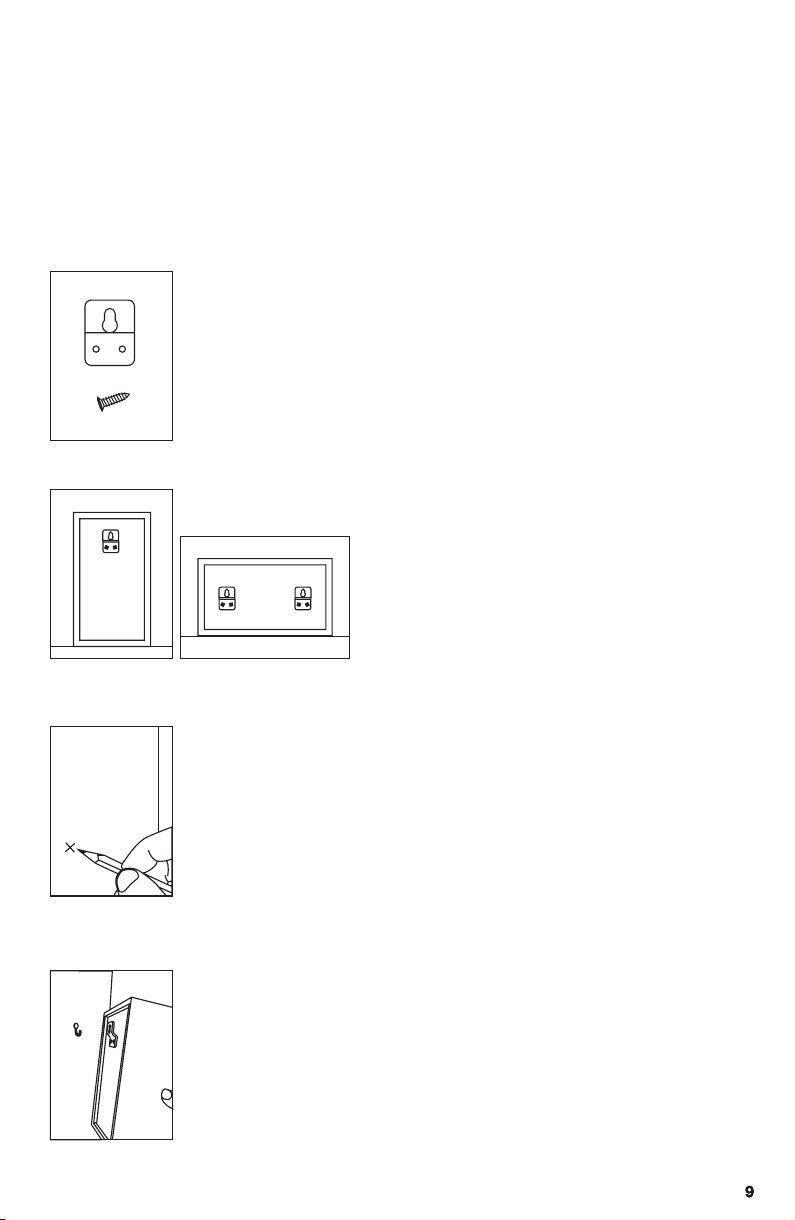
MOUNTING INSTRUCTIONS
Make sure you have all the necessary screws and brackets.
There are five brackets and one bag of screws.
If any of these items are missing, please contact Bobtot.
Vertical installation: using two screws, secure
one bracket to the back of each speaker you
wish to mount the position.
Vertical
Horizontal installation: using two brackets with
four screws for each speaker to mount the wall.
Horizontal i
-Now mark on the wall the place where you will be mounting your
speakers.
-Use the diagram from the position the speakers section to
determine the best location.
-FL & FR speakers and SL & SR speakers should be at the
same height.
-Keep speakers at least two feet away from corners, to ensure
enough wire to reach the mounting location.
-You can use a screw or a mounting hook to hang the speakers.
-Use a screw with a drywall insert or drive it into a wall stud to
ensure that it is securely fastened to the wall.
-Use a stud finder to locate the stud and to make sure that there
are no wires or cable lines located in that area.
-You can mount the speakers now.
Verify that your device can be used to input sound from audio/video for
other external sound source devices, and ensure your device have an
available jack to match the appropriate port on the subwoofer.
B901D
BT device
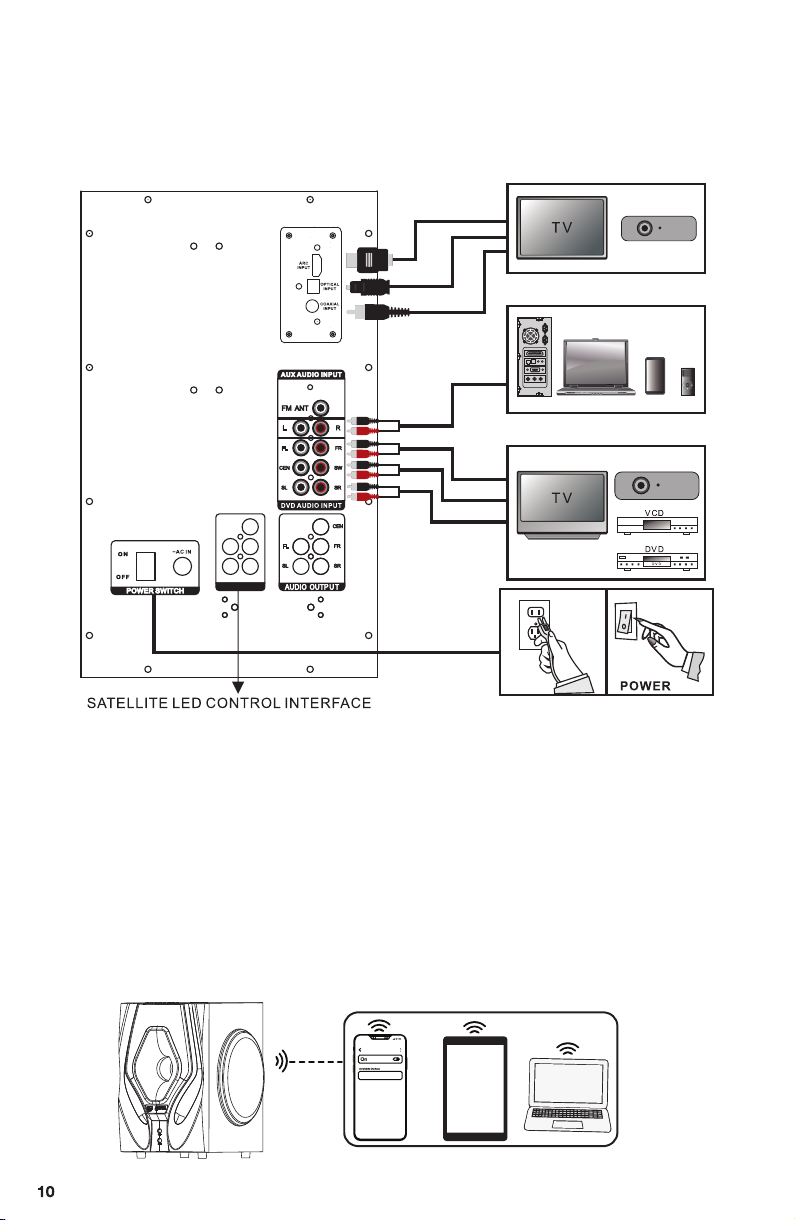
How to use the wireless BT
SYSTEM CONNECTION DIAGRAM
1. Make sure the 5pcs speakers are plugged into the audio output sockets of
subwoofer and power " ON " status.
2. Press the " ST.BY" button before selecting the mode.
3. Press the "INPUT" button to switch mode to“ BT ”status, which is showing
in the LED display of the subwoofer.
4. Search BT device with name" B901D "
5. Connect the BT
Note: If your BT device is below 2.0 version, input password " 0000 "
when connecting.
LED POWE R
PROJECTOR
PROJECTOR
AUX INPUT
TV ARC/OPT/COA INPUT
DVD AUDIO INPUT
MENU
COMPUTER
PC Mp3
PHONE

How to connect your device by TV ARC Cable
How to connect your device by Optical Cable
How to connect your device by Coaxial Cable
1. Plug the TV ARC cable into the ARC Input socket in back of the subwoofer,
another port plug into the slot of your TV.
2. Make sure the 5pcs speakers are plugged into the audio output sockets of
subwoofer and power " ON" status.
3. Press the " ST.BY " button before selecting the mode.
4. Press the "INPUT" button to switch mode to" ARC "status, showing in the
LED display of the subwoofer.
5. TV setting: Sound output --- Select " TV ARC ".
6. TV setting: Expert Setting --- Digital output audio format--Select " PCM ".
Note: B901D ARC output only supports LPCM 2.0 audio format.
1. Take off the transparent cover of Optical Cable before plugging in.
2. Plug the Optical cable into the Optical Input socket in back of the subwoofer,
another port plug into the slot of your TV.
3. Make sure the 5pcs speakers are plugged into the audio output sockets of
subwoofer and power " ON " status.
4. Press the " ST.BY " button before selecting the mode.
5. Press the "INPUT" button to switch mode to" OPT "status, showing in the
LED display of the subwoofer.
6. TV setting: Sound output --- select " Optical ".
7. TV setting: Expert Setting --- Digital output audio format--Select " PCM ".
1. Plug the Coaxial cable into the Coaxial Input socket in back of the subwoofer,
another port plug into the slot of your device.
2. Make sure the 5pcs speakers are plugged into the audio output sockets of
subwoofer and power " ON " status.
3. Press the " ST.BY " button before selecting the mode.
4. Press the "INPUT" button to switch mode to" COA "status, showing in the
LED display of the subwoofer.
5. TV setting: Sound output --- Select " Coaxial ".
6. TV setting: Expert Setting --- Digital output audio format--Select " PCM ".
OPTICAL CABLE
OPTICAL
COAXIAL
COAXIAL CABLE
TV ARC Plug
ARC
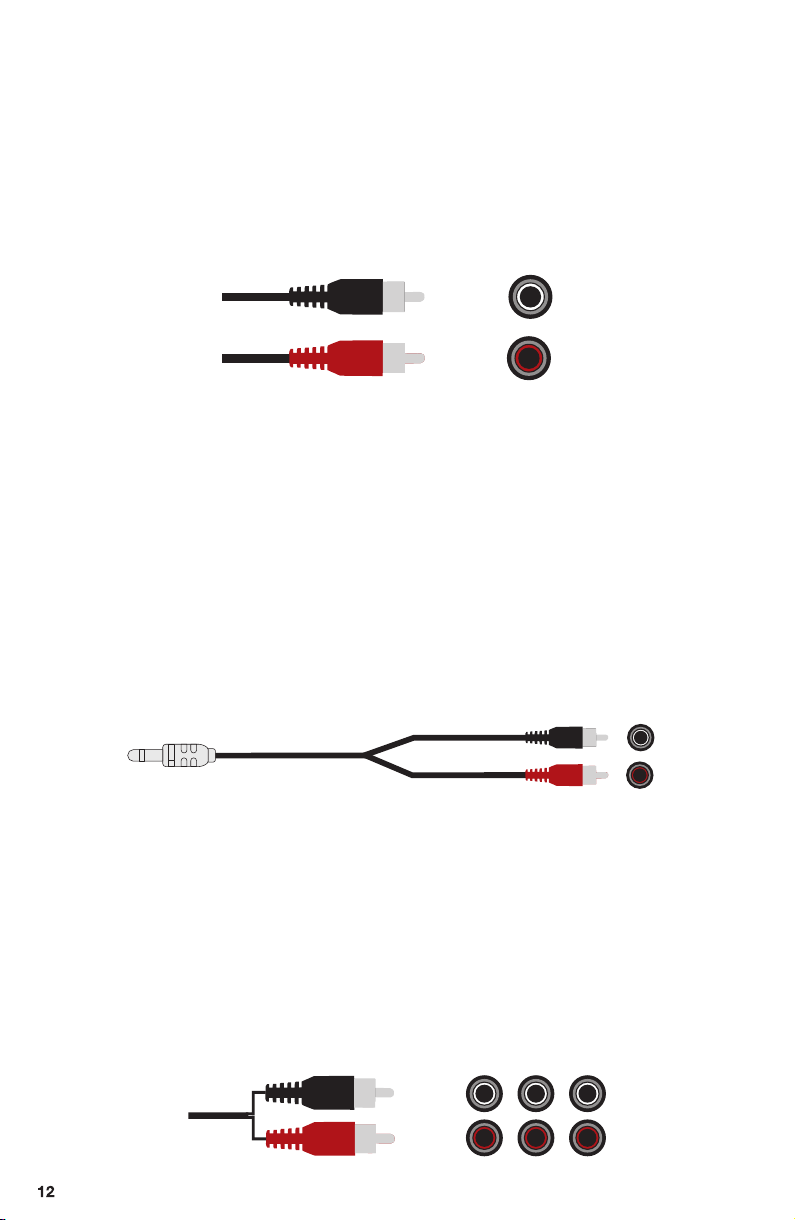
1. Plug the RCA Stereo Audio cable in back of the subwoofer. White to White
Connector, Red to Red Connector, another (White/Red) port plug into the
L&R Output slots of your device.
2. Make sure the 5pcs speakers are plugged into the audio output sockets of
subwoofer and power "ON" status.
3. Press the " ST.BY " button before selecting the mode.
4. Press the "INPUT" button to switch mode to" AU "status, showing in the
LED display of the subwoofer.
1. Plug the RCA L/R Stereo Audio cable in back of the subwoofer, White to White
Connector, Red to Red Connector, and 3.5mm AUX port plug into the
Headphone Output slot of your device.
2. Make sure the 5pcs speakers are plugged into the audio output sockets of
subwoofer and power "ON" status.
3. Press the " ST.BY " button before selecting the mode.
4. Press the "INPUT" button to switch mode to" AUX "status, showing in the
LED display of the subwoofer.
1. Plug the 3RCA Stereo Audio cable in back of the subwoofer, White to White
Connector, Red to Red Connector
2. Make sure the 5pcs speakers are plugged into the audio output sockets of
subwoofer and power "ON" status.
3. Press the " ST.BY " button before selecting the mode.
4. Press the "INPUT" button to switch mode to" DV "status, showing in the LED
display of the subwoofer.
How to connect your device by 3.5mm to RCA Audio
Stereo Cable
How to connect your device by RCA Stereo Audio Cable
How to connect your device by 3RCA Audio Stereo Cable
R
L
X 3
X 3
SW SL FL
CEN SR FR
3.5mm AUX Plug
R
L

1. Plug the white Antenna cable into the back of the subwoofer.
2. Make sure the 5pcs speakers are plugged into the audio output sockets of the
subwoofer and power "ON" status.
3. Press the " ST.BY " button before selecting the mode.
4. Press the "INPUT" button to switch mode to" FM "status, showing in the LED
display of the subwoofer.
5. Long press the "AUTO" button about 3seconds, it will be automatically
searching for radio stations.
6. Press the "TUNE+/TUNE-"button to search for a station you like.
Press the "CH-/CH+"button to select the broadcast channel you like.
Press the "SAVE" button, it saves the radio channel, and you can see " good "
shows in the subwoofer display.
B901D home theater systems support wireless or wired microphone by 1 or 2
mics jack together.
1. Wireless microphone: plug the mic receiver into the mic jack of the
subwoofer.
2. Wired microphone: plug in and play it.
3. Control the mic volume: press the " MIC+/ MIC-" button by remote.
4. Control the mic echo effect: press the " ECHO+/ ECHO- " button by remote.
How to use FM radio by Antenna
Microphone for Karaoke
Product Specifications
5.1 Channel Home Theater System
1200 Watts Peak Power
500 Watts Program Power
250 Watts Continuous RMS Power
BT Version: 5.0+EDR
Input Voltage: AC 120V/60Hz
System Impedance: 10": 8Ohm /3" driver: 4 Ohm
Frequency Response: 20Hz - 20KHz
Amplifier: Class AB,very efficient amplifier with top components
Signal to Noise Ratio: ≥70dB (Maximum output with THD+1<1%)

Certification
FCC Warning
This device complies with part 15 of the FCC Rules. Operation is subject
to the following two conditions:
(1) This device may not cause harmful interference, and
(2) this device must accept any interference received,
including interference that may cause undesired operation.
Any Changes or modifications not expressly approved by the party
responsible for compliance could void the user's authority to operate
the equipment.
Note: This equipment has been tested and found to comply with the limits
for a Class B digital device,pursuant to part 15 of the FCC Rules.
These limits are designed to provide reasonable protection against
harmful interference in a residential installation.
This equipment generates uses and can radiate radio frequency energy
and, if not installed and used in accordance with the
instructions, may cause harmful interference to radio communications.
However, there is no guarantee that interference will not occur in a
particular installation. If this equipment does cause harmful interference
to radio or television reception, which can be determined by turning the
equipment off and on, the user is encouraged to try to correct the
interference by one or more of the following measures:
-Reorient or relocate the receiving antenna.
-Increase the separation between the equipment and receiver.
-Connect the equipment into an outlet on a circuit different from that to
which the receiver is connected.
-Consult the dealer or an experienced radio/TV technician for help.
This equipment complies with FCC radiation exposure limits set forth for
an uncontrolled environment.
This equipment should be installed and operated with minimum
distance 20cm between the radiator & your body.

bobtot.net
Need Help ?
Customer Care Guide
At our company, we strive to provide exceptional customer care to every
one of our clients. We believe that building strong relationships with our
customers is essential to the success of our business. To help us achieve
this goal, we have put together the following customer care guide.
Time
We understand that our customers' time is valuable, so we will respond to
any inquiries within 24 hours.
Feedback
We know that our customers are the heart of our business so we value your
feedback. We encourage you to share your thoughts and ideas with us.
Solutions
If our customers encounter any issues, we will try our best to find a quick
and efficient solution that meets your needs.
Here at Bobtot, we take customer care very seriously. Our customers are
our first priority, and we are committed to providing the highest quality
service. If you have any questions or concerns, please don't hesitate to
reach out to us. We will be happy to assist you:
Call or Message: +1(888)572-1718
Email: service@bobtot.net

Other manuals for B901D
1
Table of contents
Other Bobtot Home Theater System manuals


