Download full manual - Téléchargez la notice complète - Umfassende Handbuch - Manual completo :
>> www.bodet-time.support <<
OUTDOOR HARMONYS - HARMONYS EXTERIEUR - HARMONYS AUSSENBEREICH - HARMONYS EXTERIOR
quick start guide - GUIDE DE DEMARRAGE RAPIDE -
Schnellstartanleitung - Guía de inicio rápido
140
194
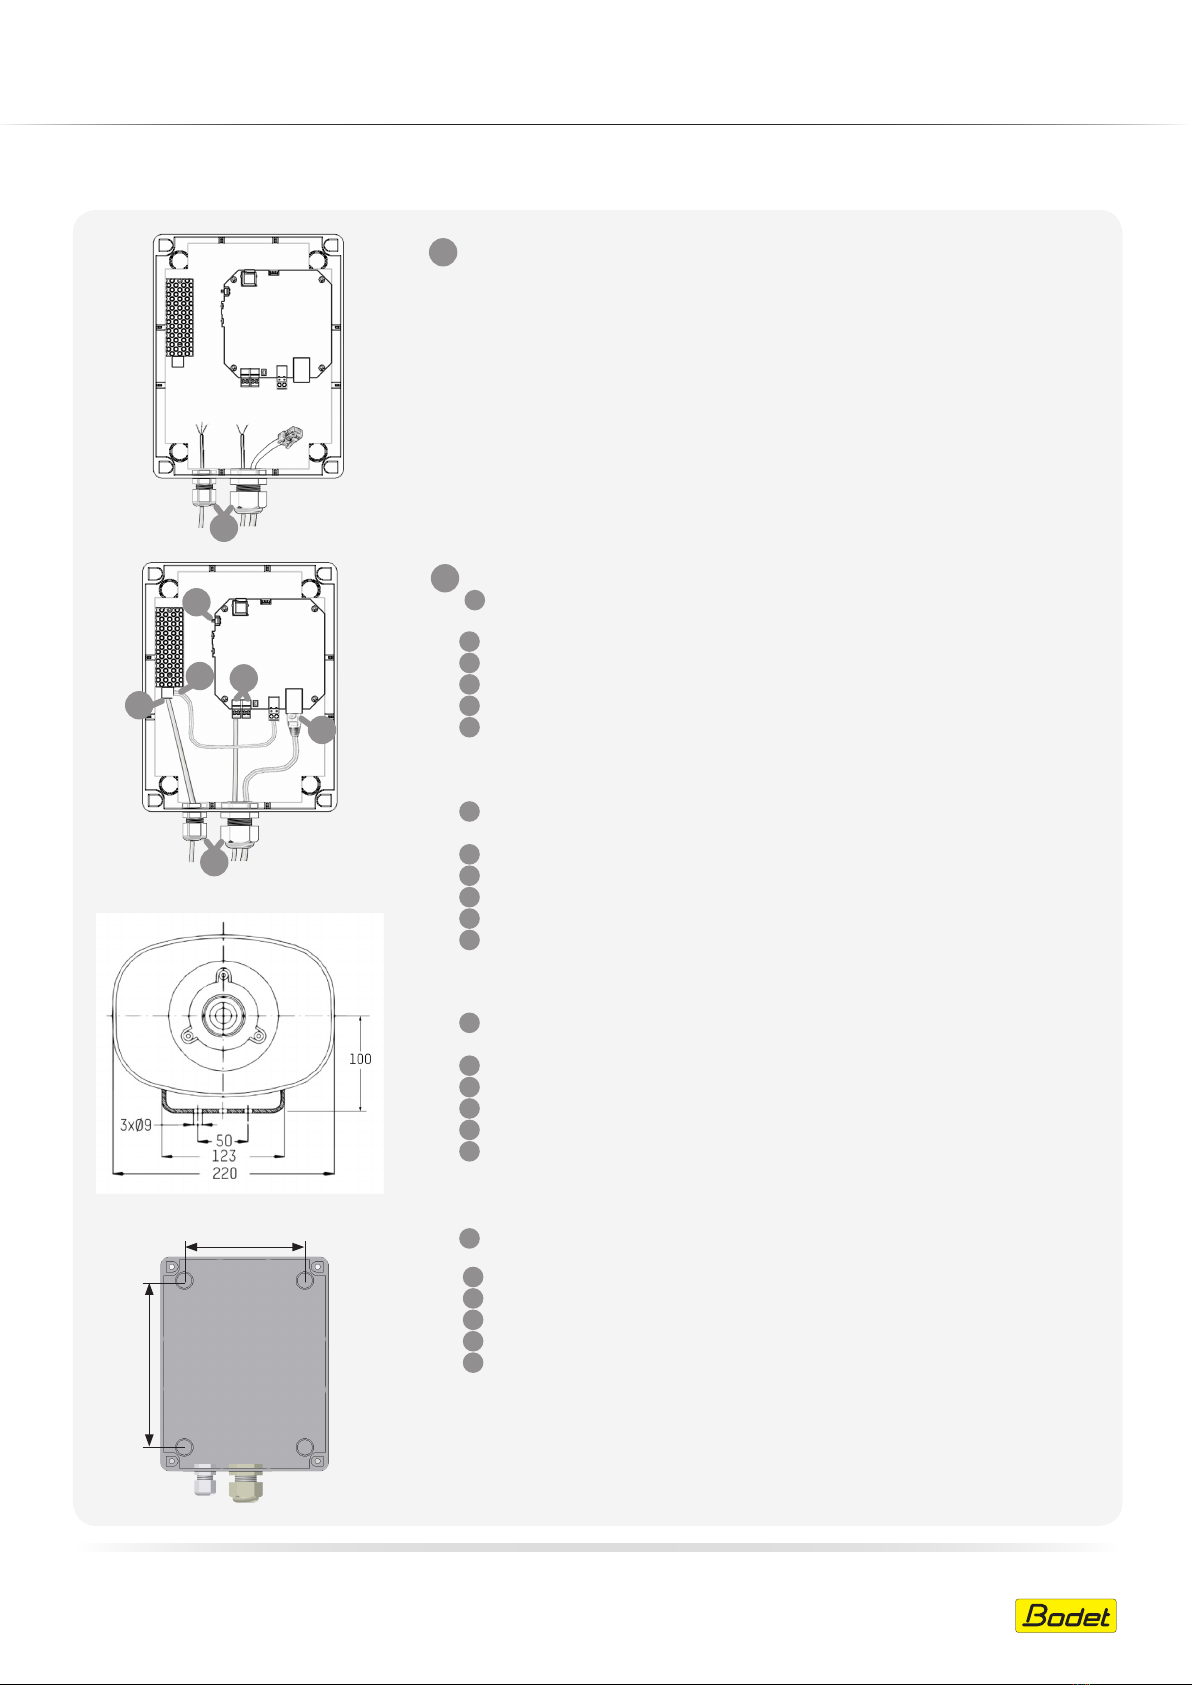
1
EN: Secure the unit base using 4 x Ø4mm wall plugs and screws (not supplied). Unscrew the cable
glands and feed through the power cable, the connecting cable(s) for the speaker(s) and the RJ45
Ethernet cable.
FR : Installer le fond du boîtier à l’aide de 4 chevilles et vis Ø4mm (non fournies). Desserrez les
presses-étoupes et prévoir le passage des câbles d’alimentation, du ou des câbles pour la liaison
avec le(s) haut(s) parleur(s) et le câble Ethernet RJ45.
DE: Den Gehäuseboden mit 4 Dübeln und Schrauben mit 4 mm Ø (nicht inbegriffen) anbringen. Die
Kabelverschraubungen aufschrauben und den Durchgang der Versorgungskabel sowie des/der
Verbindungskabel(s) mit dem/den Lautsprecher(n) und dem Ethernetkabel RJ45 berücksichtigen.
ES: Instale el fondo de la caja sirviéndose de 4 tacos y tornillos Ø4mm (no suministrados). Afloje los
pasamuros y tenga en cuenta por dónde pasarán los cables de alimentación y el/los cable/s de
conexión con el/los altavoz/altavoces y el cable Ethernet RJ45.
2
EN: AConnect the mains cable to the product power connector (3 wires / polarity as indicated on
the power terminals).
BConnect the circuit board to the power supply.
CConnect the speaker(s) to the circuit board.
DConnect the RJ45 Ethernet cable to the circuit board.
EAfter connecting all the cables, tighten the cable glands.
FCheck that the installation is correct: the LEDs on the RJ45 sockets at either end should light
up, as well as the power and network LEDs on the circuit board. The speaker should emit a
beep when the Test button is pressed.
Fit the cover by tightening the 4 captive screws.
FR : AConnecter le câble secteur sur l’alimentation du produit (3 fils / polarité indiquée sur les
bornes de l’alimentation).
BConnecter l’alimentation de la carte électronique sur le bloc alimentation.
CConnecter le(s) haut(s) parleur(s) sur la carte électronique.
DConnecter le câble réseau Ethernet RJ45 sur la carte électronique.
EAprès avoir connecter l’ensemble des câbles, serrez les presses-étoupes.
FVérifier que l’installation est conforme : LED aux extrémités de la prise RJ45 doivent être
allumées ainsi que la LED d’alimentation et la LED de témoin réseau présentent sur la carte
électronique. Le haut parleur doit émettre un bip lors de l’appui sur le bouton Test.
Installer le capot en vissant les 4 vis imperdables.
DE: ANetzkabel des Geräts anschließen (3-adrig / Polarität auf den Versorgungsanschlüssen
angegeben).
BStromversorgung der Platine an die Stromversorgungseinheit anschließen.
CLautsprecher an die Platine anschließen.
DDas Ethernetkabel RJ45 an die Platine anschließen.
ENach dem Anschließen aller Kabel die Kabelverschraubungen festziehen.
FKonformität der Installation prüfen: LEDs zu beiden Seiten des RJ45-Steckers leuchten
ebenso wie die Stromversorgungs-LED und die Netzwerk-Kontroll-LED auf der Platine.
Der Lautsprecher sendet beim Betätigen des Testknopfs ein Piepgeräusch aus.
Haube durch Verschrauben der 4 unverlierbaren Schrauben befestigen.
ES: AConecte el cable de corriente a la alimentación del producto (3 hilos / polaridad indicada
en las tomas de alimentación).
BConecte la alimentación de la tarjeta electrónica a la fuente de alimentación.
CConecte el altavoz/los altavoces a la tarjeta electrónica.
DConecte el cable de red Ethernet RJ45 a la tarjeta electrónica.
ETras conectar los cables, apriete los pasamuros.
FCompruebe que la instalación es correcta: deben estar encendidos los LED de los extremos
de la toma RJ45, el LED de alimentación y el LED indicador de red de la tarjeta electrónica.
El altavoz debe emitir un pitido al pulsar el botón Test.
Coloque la cubierta fijando los 4 tornillos imperdibles.
A
BC
D
F
Ref.: 607917B 06/20
1
E


