BodyPerfect JINTREPID User manual
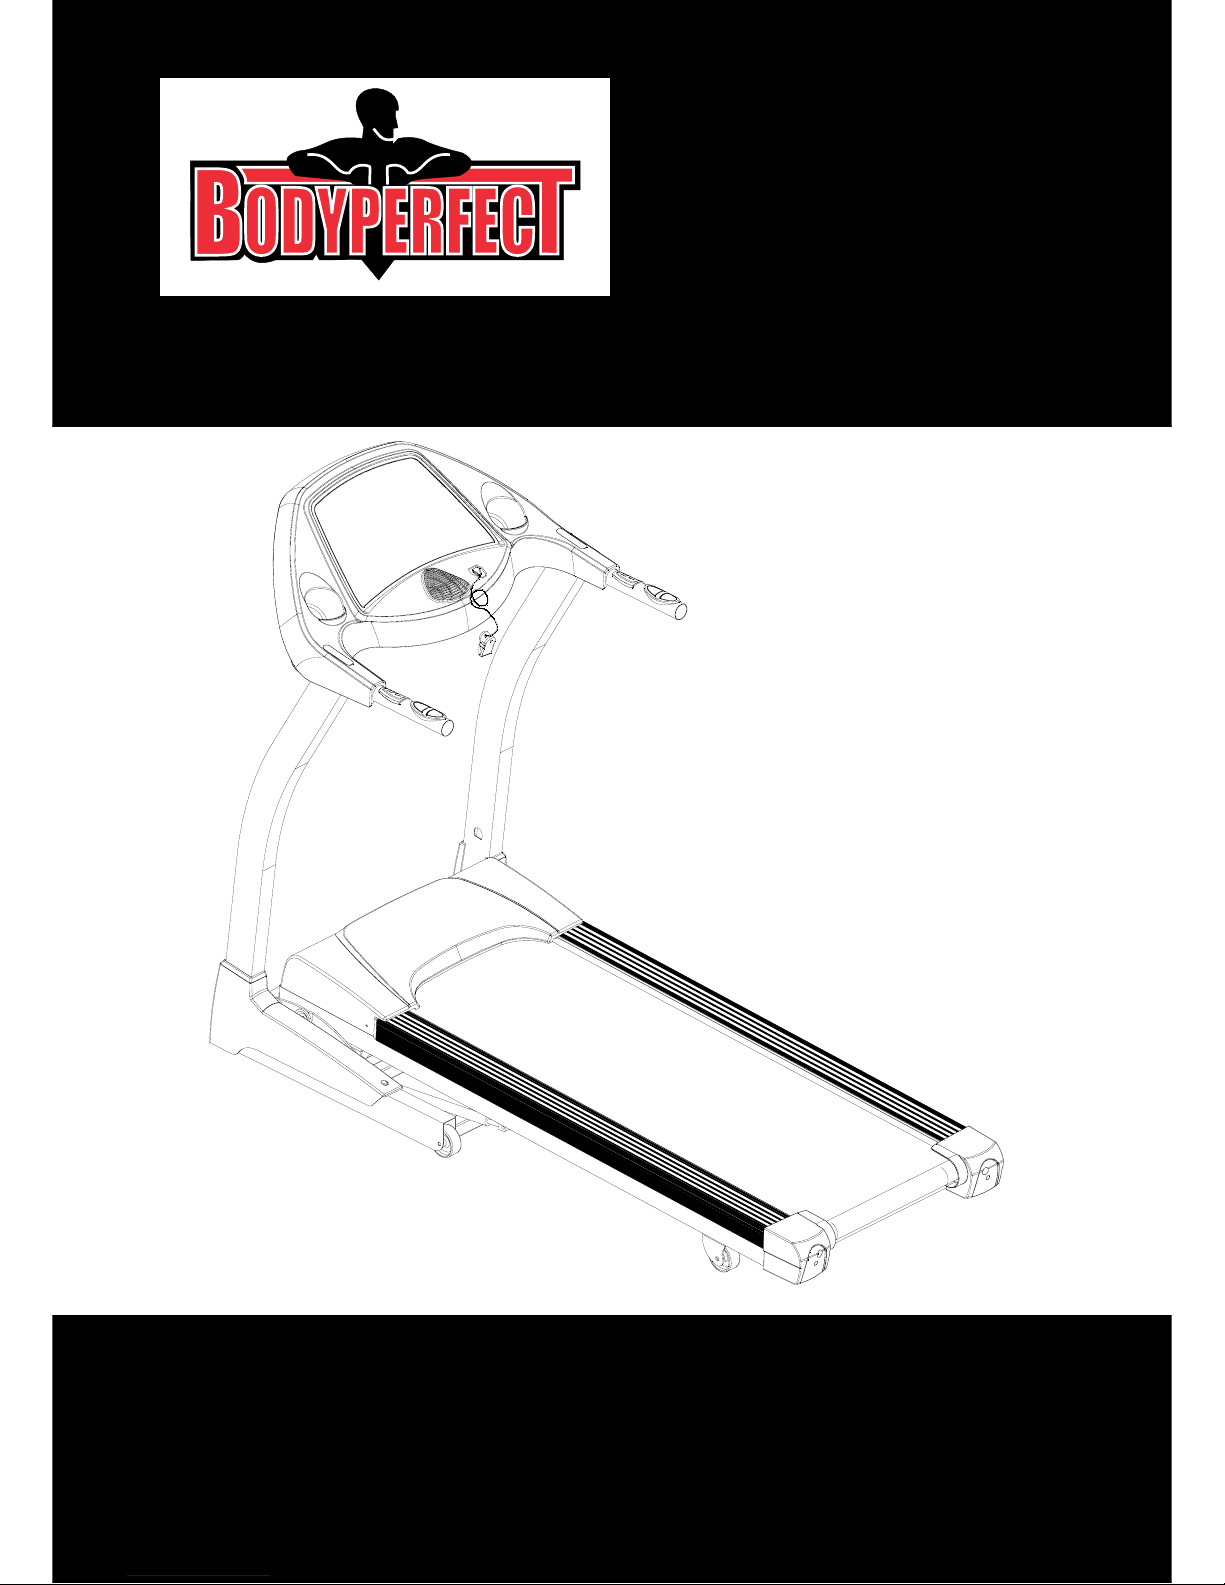
Treadmill
1
Retain this owner’s manual for future reference
Read and follow all instructions in this owner’s manual
Version A
Owner’s Manual
Model No: JINTREPID
T H E F I T N E S S E Q U I P M E N T

- 1 -
INDEX
1. OVERVIEW DRAWING..............................................................................2
2. IMPORTANT SAFETY INSTRUCTION ....................................................3
3. GROUNDING INSTRUCTION...................................................................4
4. PRE-ASSEMBLY CHECK LIST.................................................................5
5. ASSEMBLY STEPS.....................................................................................6
6. CAUTION ....................................................................................................8
7. MAINTENANCE.........................................................................................9
8. COMPUTER OPERATION INSTRUCTIONS..........................................10

- 2 -
1. OVERVIEW DRAWING
過載保護開關
電源開關
電源線
底座
機台主架
安全插銷/夾子
電子錶
Computer
Safety Key/Clip
Power Switch
Circuit Breaker Power
Cord
Frame
Base

- 3 -
2. IMPORTANT SAFETY INSTRUCTION
When using this product, basic precautions should always be followed, including the
following:
Please read the instruction carefully before starting to use this product.
Danger– To reduce the risk of electric shock:
1. Always unplug this product from the electrical outlet immediately after using and before
cleaning.
Warning – To reduce the risk of burns, fire, electric shock, or physical injury:
1. The product should never be left unattended while plugged in. Unplug the product from the
outlet when not in use.
2. Close supervision is necessary when this product is used by or near children, invalids, or
disabled persons.
3. Be sure to use the product only for its intended use as described in this manual. Do not use any
attachment not recommended by the manufacturer in order to avoid any danger or accidents.
4. Never operate the product if it has a damaged cord or plug, if it is not working properly, if it
has been damaged, or dropped into water. Please return the product to the service center of
seller for examination and repair.
5. Do not carry this product by the supply cord or use the cord as a handle.
6. Keep the cord away from hot surfaces or ground.
7. Never operate the product with the air vents blocked. Keep the air vents free of lint, hair, etc.
8. Never drop or insert any objects into any openings.
9. Do not use or operate outdoors.
10. Do not operate where aerosol (spray) products are being used or where oxygen is thin.
11. Before turning the product power off, turn all controls to the off position then remove the plug
from the outlet.
12. Connect the product to a properly grounded outlet only.
13. If the power cord is damaged, be sure to ask the manufacturer for replacement to avoid
accidents .The seller and correlative qualified professionals are as well as eligible.
- 4 -
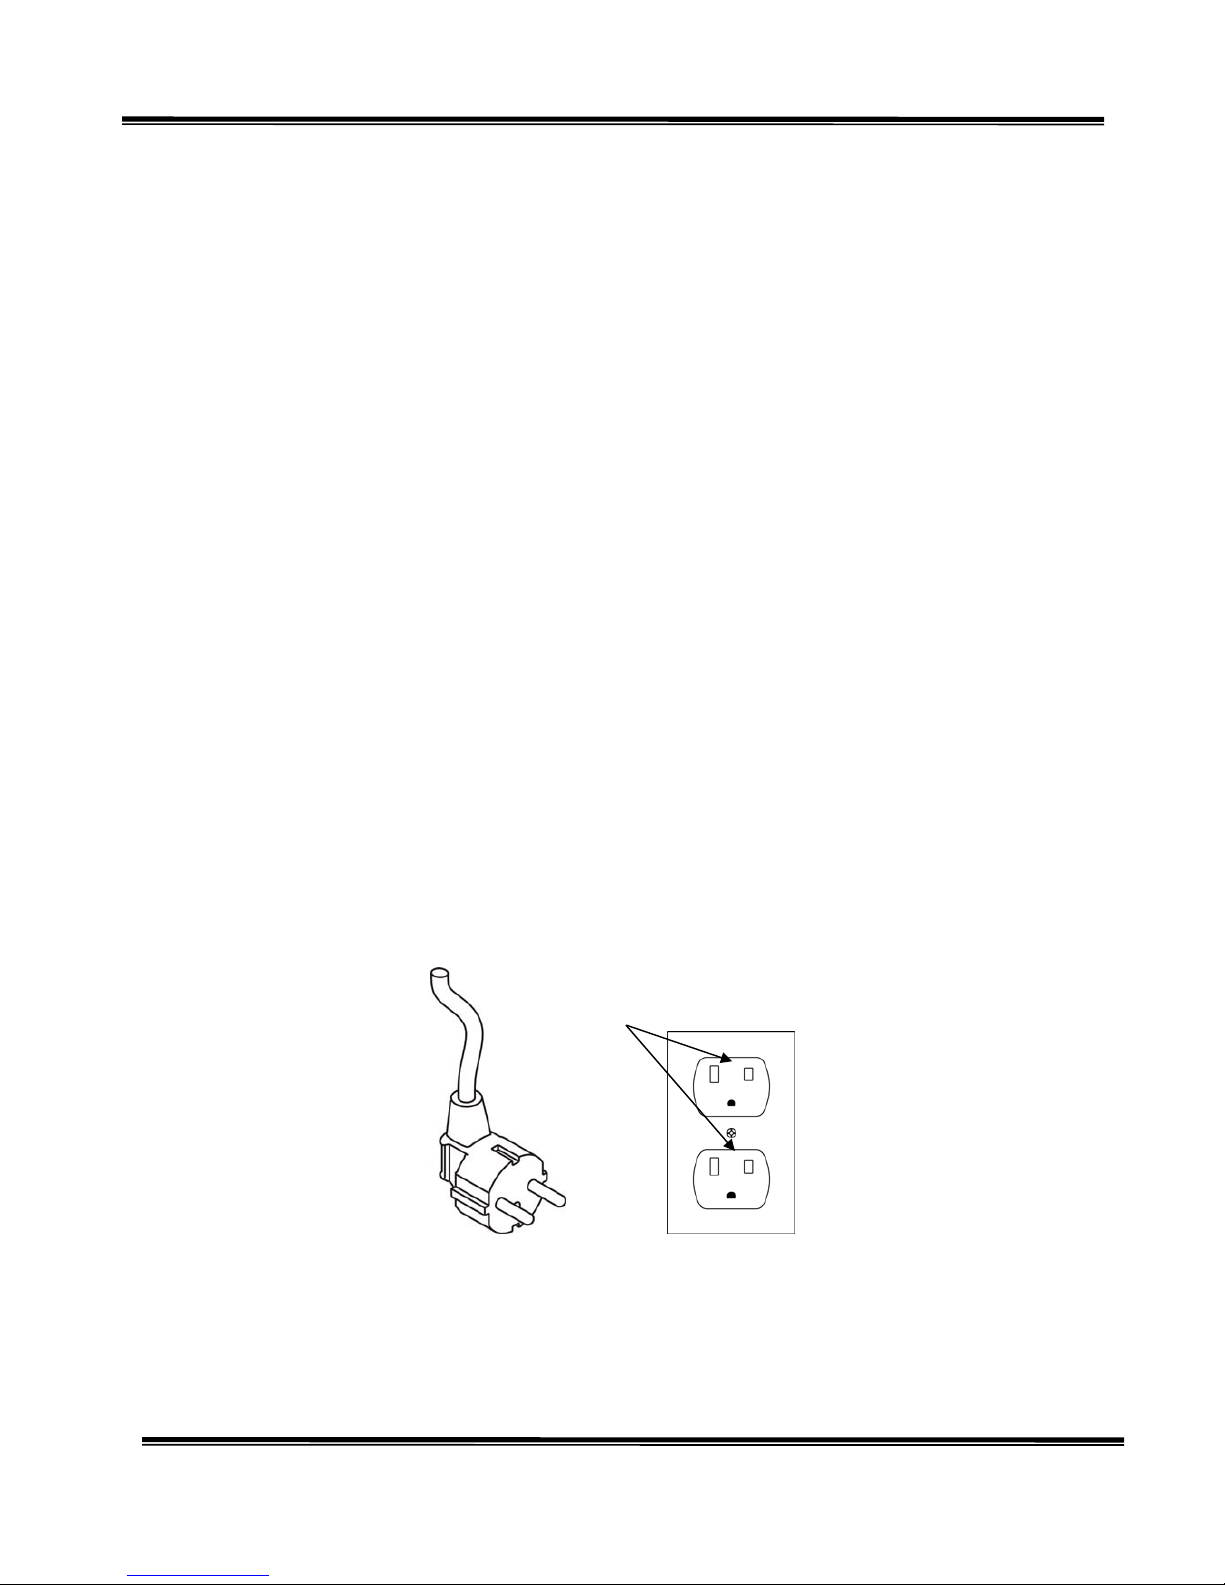
3. GROUNDING INSTRUCTIONS
The products must be grounded first. If malfunction or breakdown occurs, proper grounding will
reduce the risk of electric shock.
The product is equipped with a grounding plug.
The plug must be plugged into an appropriate outlet that is properly installed and grounded in
accordance with local ordinances.
Danger
Improper connection of the grounding plug can result in the risk of electric shock. Check with a
qualified electrician or serviceman if you are in doubt as to whether the products are properly
grounded. Do not modify the plug provided with the product – If it will not fit the outlet, have a
proper outlet installed by a qualified electrician.
The product is for use on nominal 220-240 volt and has a grounding plug that looks like the plug
illustrated in the figure. Make sure that the product is connected to an outlet having the same
configuration as the plug.
There is no need to use any adapter for this product.
Figure
Grounding methods
GROUNDED
OUTLET
- 5 -
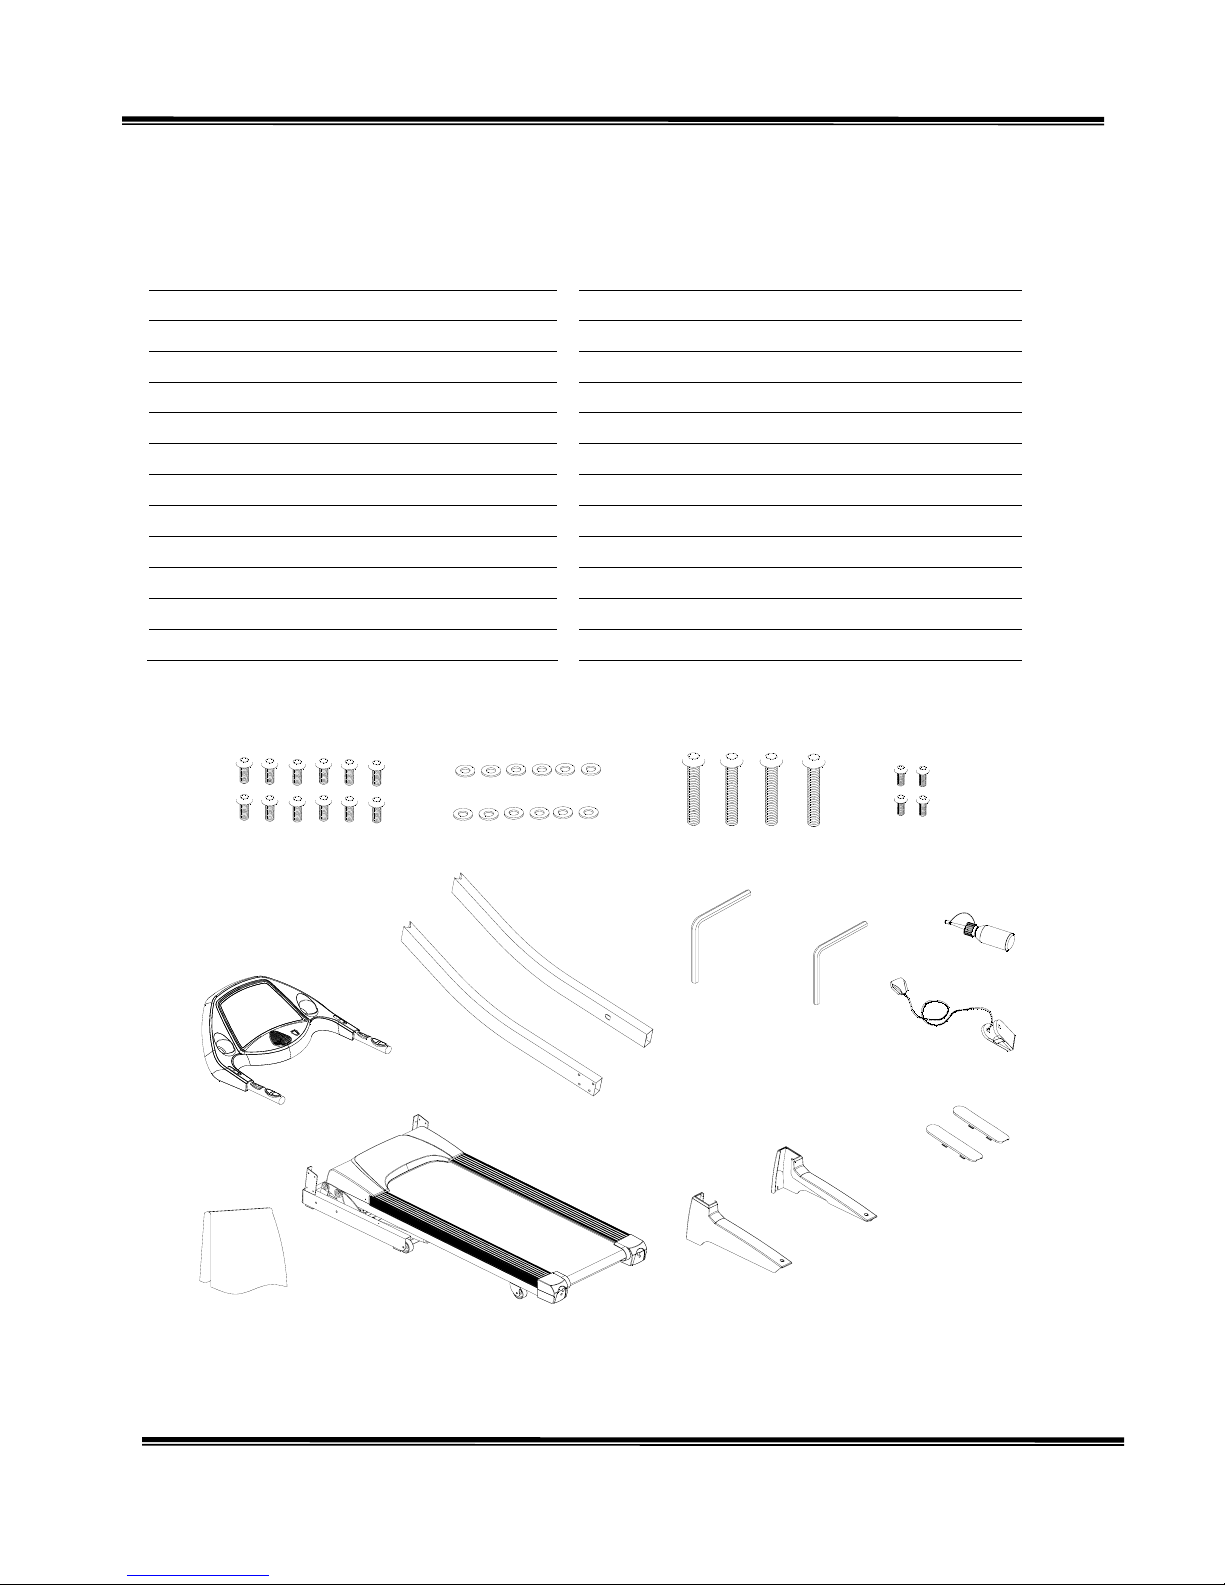
4. PRE-ASSEMBLY CHECK LIST
a
C
D
b
h
g
f
c
A
B
E
F
G
e
d
H
ITEM Description Qty ITEM Description Qty
A Computer Console 1 a Hex Screw M8xP1.25x15 12
B Frame 1 b Washer Ø8xØ16x1.5t 12
C Left Upright 1 c Hex Screw M8xP1.25x60 4
D Right Upright 1 d Philips Screw M5xP0.8x18 4
E Cover 2 e SILICON 1
F Decoration Cover (Left) 1 f Hex Wrench 5mm(80mmx80mm) 1
G Decoration Cover (Right) 1 g Hex Wrench 6mm(80mmx80mm) 1
H Towel 1 h Safety Key/Clip 1
- 6 -
5. ASSEMBLY STEPS
Two persons are required to finish the
assembly steps.
(Caution!! Please follow the assemly
procedure below to aviod injury . )
1. Attach the control wire-lower section
from the frame (B) to the guide thread
from the right Upright (D), then pull
the control wire into the Upright , clip it
with protecting ring and fasten it inside
of the Upright. (As shown in the circle of
the picture.)
2. After finished above steps, put the right
and left Upright (C、D) on the Frame.
Secure with Hex Screw (a), Washer (b).
(As shown in the picture)
Ps.1. To avoid unexpected accidents,
assemble the treadmill with one or two
assistants.
Ps.2. During assembling the Uprights, one
person is needed to hold the Uprights
to avoid falling.
3. After the Uprights are tightened, pull out
the Control Wires which have been
threaded into the Upright to the month of
the Uprights. Put the Computer Console
above the Uprights then connect the
control wire of the Frame with the
control wire of Computer Console (A).
After connecting, tighten them with Hex
Screw (c) shown in right drawing.
Ps.1. To avoid unexpected accident, always
assemble the treadmill with an
assistant, do not assemble by oneself.
Ps.2. When tighten the screws, make sure not
to damage the control wires in the tube.
A
C
D
c
c
- 7 -
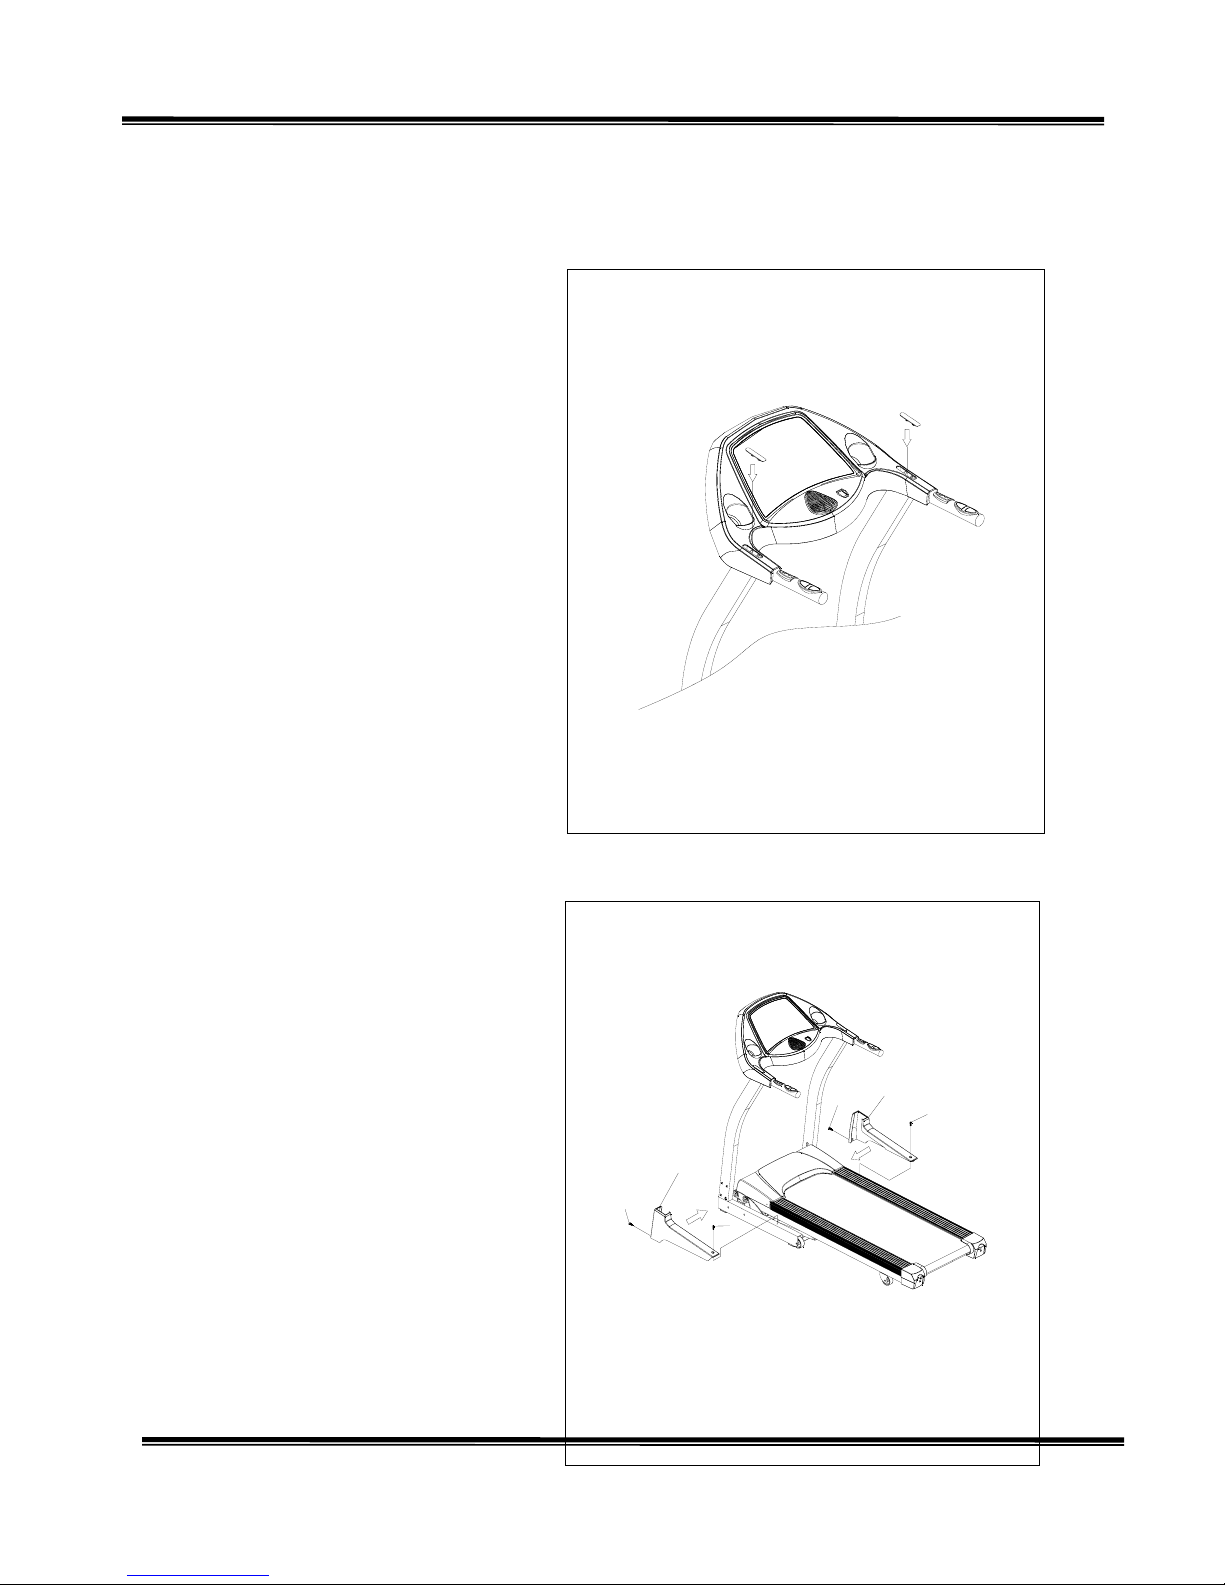
4. After the above steps are finished, cap the
Handrail Cover (E) onto the Handrail.
E
Then cap the left and right Decoration Cover
(F, G) to the frame and tighten with Philips
Screw (d) according to the right drawing.
d
dd
d
F
G

- 8 -
6. CAUTION
Note 1: The Cylinder is made of high pressure,
so be extra careful not to make an
impact on it with other object that may
cause deformation.
Note 2: The cylinder may be damaged and not
be smooth in use when it is hit. The
damage may also result in the fall of
the treadmill when folding.
This treadmill has the foldable mechanism for
storage. Stop all the movements (including stop the
running belt and take off the power cord) before
storage, then fold the main frame as the direction
shown in the right picture. Be sure the fixing plate
inserts the tube of base frame. On the contrary, if
you want to use treadmill, step on the fixing plate
as the direction shown in the right drawing. When
it disjoins from tube of base frame, pull down the
main frame as shown at the right drawing. Please
stand beside the treadmill and the main frame will
be slowly landing to the ground automatically.
( Ps.1. To prevent from danger, be careful if the
kids are around. If you want to move the
treadmill, fold the treadmill at first, hold the
rear adjust cap with your hands, then lean the
treadmill and do not move the treadmill until
the roller can be moved smoothly.)
(Ps.2. Do not move the treadmill on uneven
ground.)
(Ps.3. To avoid the injury, do not stand under the
frame when the frame is descending.)

- 9 -
7. MAINTENANCE
If the belt tends to move off the center, stop the treadmill. Take
the Hex Wrench 6mm and adjust the Hex Screw in the Rear
End Cap. For example, if the running belt is moving towards
the left side, tighten the left Hex Screw about 1/4
turn(clockwise); if the running belt is moving towards the
right side, tighten the right Hex Screw about 1/4
turn(clockwise); Turn on the treadmill after it has been
adjusted. If you find that the belt has not moved to the proper
position, please repeat the steps above. Don’t use the treadmill
until the running belt returns to the center position.
(Ps.1. This action is very important, if the belt is not in the
center, be sure to follow above steps.)
(Ps.2. The position of running belt might not stay precisely in
the center with slightly towards the left and right sides,
and the situation varies with how end-users use and the
weight of end-users. No need to adjust the belt if it doesn’t
rub against the parts aside.)
2. Depending on the usage of the product, please apply
SILICON on the board according to the below chart. Use
the Hex Wrench 6mm to unscrew the bolt inside the Rear
Roller. Then pull the belt up and daub some SILICON to
the center of the board. After that, adjust the belt to the
center of the deck, followed by tightening the screw to the
original set.
(Ps. When the belt is sliding, please follow the above method
to lubricate the running belt. )
Speed(KGS) Interval
1~6 km 1 year
6~12 km 6 months
12~16 km 3 months
- 10 -
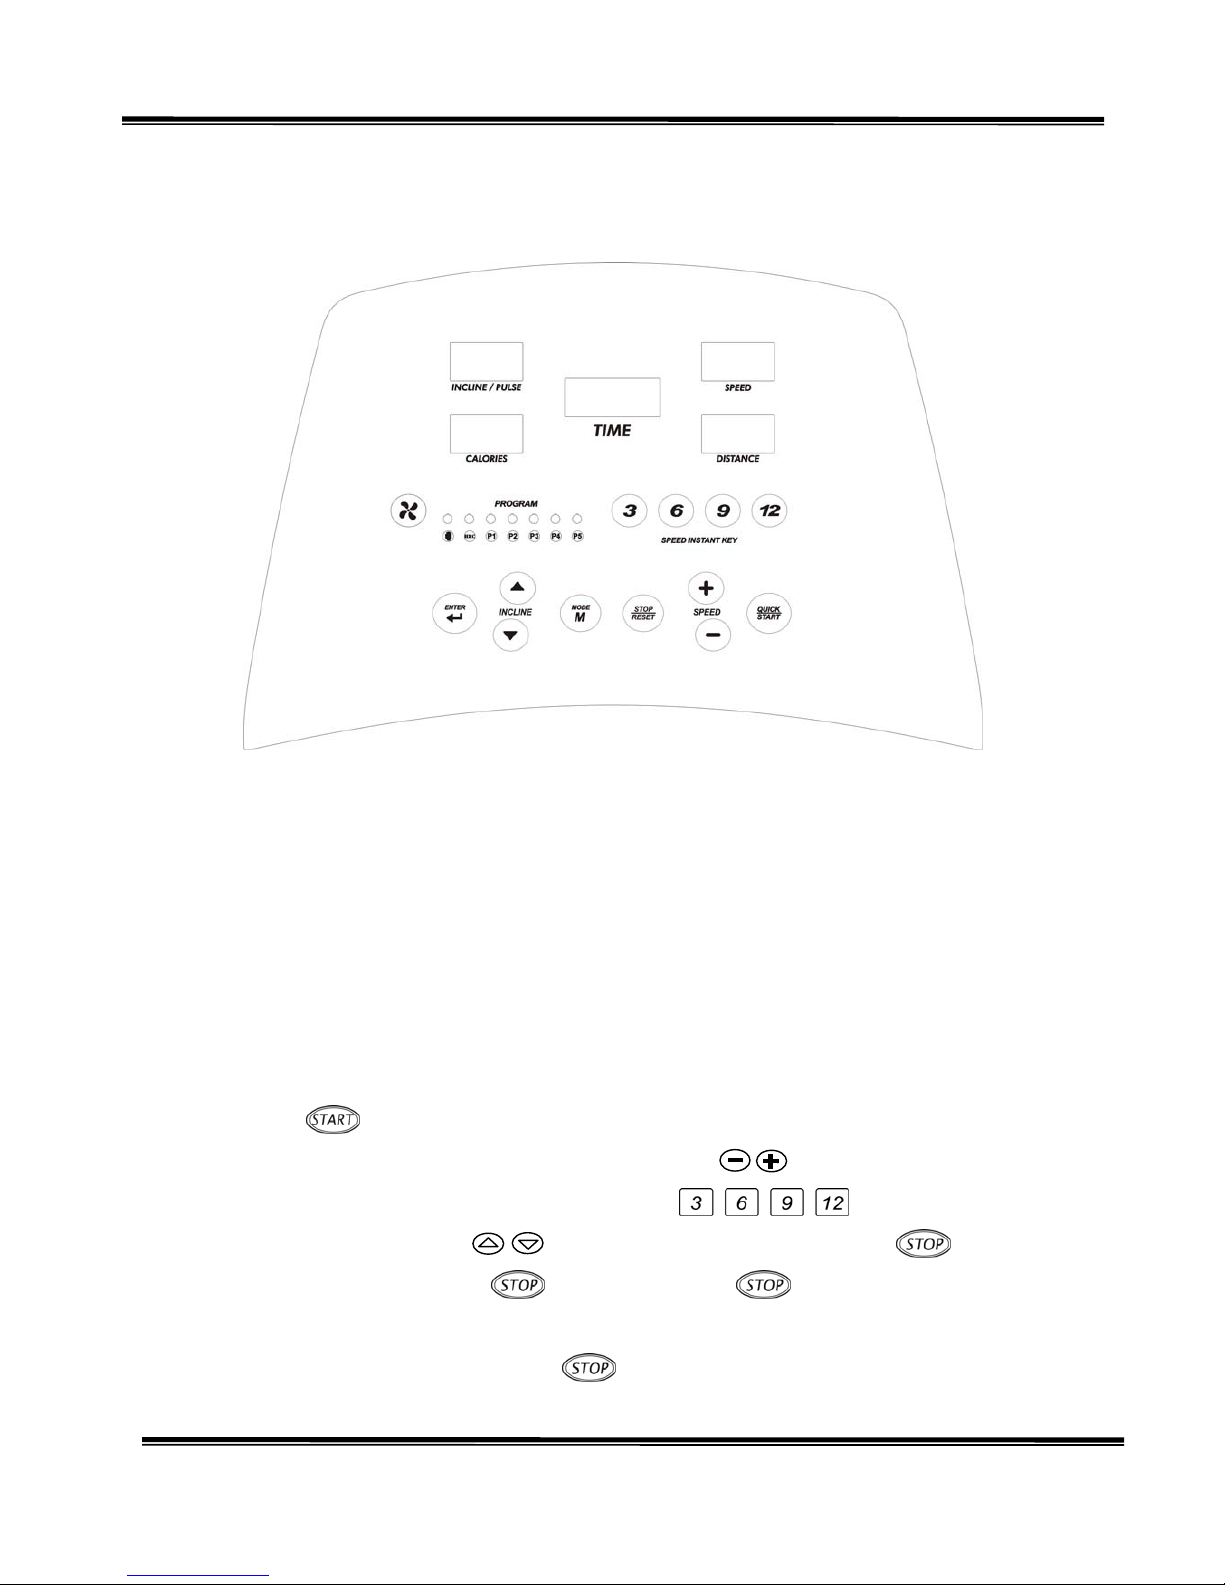
7. COMPUTER OPERATION INSTRUCTIONS
I. General Operation
1. Turn on the treadmill.
2. Put the safety key in the recess of the console.
The beeper will sound and the window will display □
0, which present the treadmill has
been entered the START/READY state, under this state, user can hold the grip pulse sensor to
detect heart rate value directly.
3. Press to start treadmill, MANUAL indicator will light and the treadmill will start
with a speed of 1.0km/hr. During exercise, press “"
to increase/ decrease
speed(you can also press the speed instant key to select the desired
speed), or you can press to control the inclination, when press , the
treadmill will stop ( press once, it will display image, at this time all the
values will stop changing, the treadmill will be paused for 60 seconds and then come back to
the START/ READY state, if press once, then press the second time and hold it for
3 seconds, the treadmill will automatically Reset to the START/READY state.)
- 11 -
** Range of speed:1.0~16 km/hr,Step is 0.1 km/hr
Range of inclination:0~15 Level,Step is 1 Level
4. You can also enter other functions by pressing under the Start / Ready state.
5. Press to start fan at once. Press this key again to stop fan.
6. Except the buttons on the Computer, the switches on the Handrails can also be used to
adjust the speed and angle, the left ones are used to adjust the inclination, the right ones
are used to adjust the speed.
** If the safety key is not placed in the recess of the console, all windows will display “-----".That
means the treadmill has not entered the start/ready state.
MODE Function Key
7. Press under Start/Ready state, the MANUAL LED light flashes, at this time you
have entered the Function Selection Mode, press “ or "to switch
among MANUAL, P1~P5 and HRC LED.
8. MANUAL Functions:
8.1. When MANUAL indicator flashes, press ,the MANUAL indicator stops flashing
and keeps on lighting, the TIME LED light flashes and at this time you can adjust the time.
8.2. If press ,the motor will start at the speed of 1.0 km/hr,at this time you can
press “or " to adjust the speed and inclination of the treadmill.
9. P1~P5 Program Control Function (each PROGRAM has 15 stages)
9.1. When the MANUAL LED flashes, press “or "until the desired
LED light of P1~P5 flashes, press to confirm, after you enter the program
control function, the corresponding light will keep on lighting.
9.2. At this moment, the CALORIES window will display the exercise intensity
level(L1~L5), you can press “or "to select the desired level,
after you have selected the level press to confirm.
- 12 -
9.3. After the level is selected, the TIME window flashes, at this time you can press
“or "to change the time, after the desired time is set, press
and then TIME window will stop flashing.
** Time preset value:25(min)
Range of time:5~99(min)
9.4. Press and the treadmill will run according to the preset value of the program,
the speed and inclination of program’s 15 stages will change circularly according to
the preset values. At the first time, the first stage will last for 2 minutes, then the
following will each last for 1 minute, when the time is achieved, speed and
inclination will change directly. (During exercise, you can press “or
" to directly change the speed).
9.5. During the function setting of P1~P5, if press ,
the treadmill will start to run at
once, the unedited are preset values, press “or "and then you
can change the preset values of PROGRAM
,
but in the next stage, the values will be
reset to the original values of the PROGRAM .
9.6. For this treadmill,P1 is a defined program, the meaning is shown below:
P1 9 HOLE:this program is based on 3500m, after you run 3500m according to the
program, the program is finished, then the treadmill will stop changing. This mode
simulates the landform of a golf course,the difficult degree will be decided by the
change of upgrade and downgrade.
9.7. In each PROGRAM,there will be one minute for the warm up exercise before
L1~L3 is executed, the speed is defined by the start speed of each LEVEL.
- 13 -
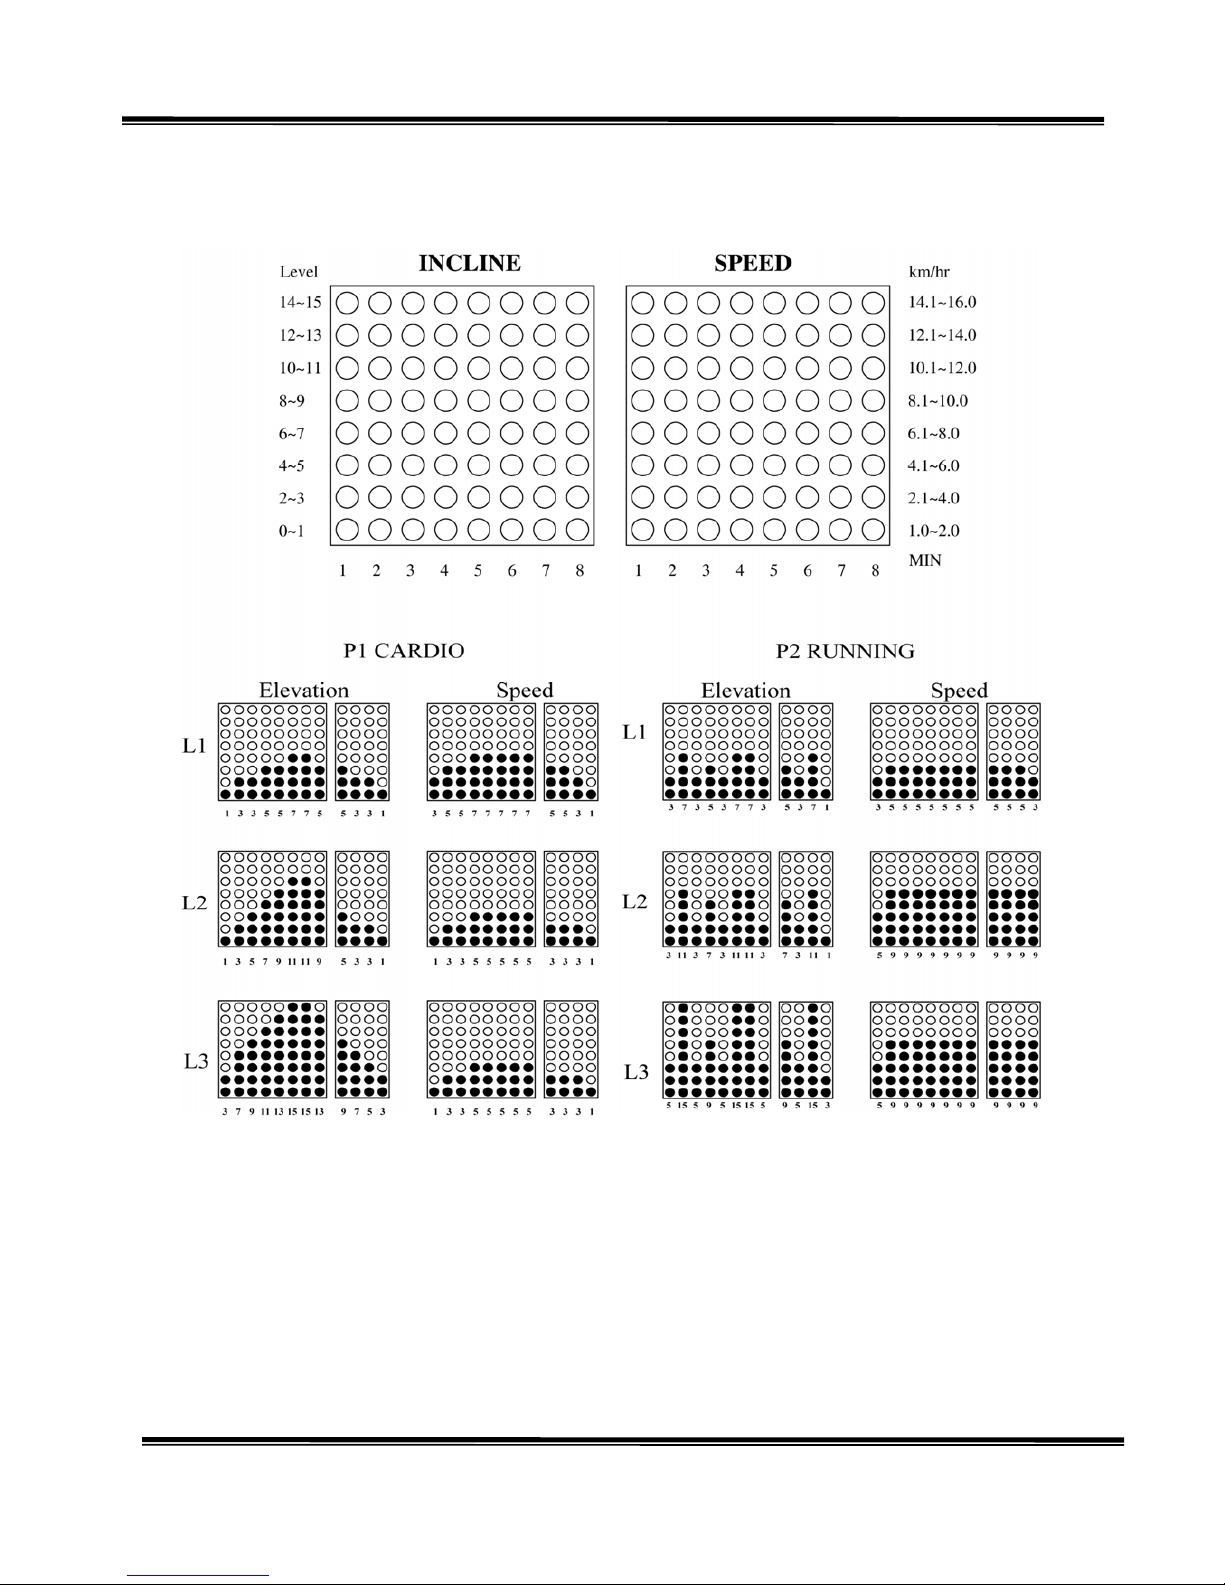
Refer to the below chart for the preset parameters of PROGRAM:

- 14 -

- 15 -
10. HRC function:(This function must be attached with heart beat to finish)
10.1. The program aims to exercise heartbeat. When operating, the heartbeat value is equal
to the pre-set value, the angle and speed will keep steady to maintain the heartbeat
value in certain range to achieve the exercising effect.
10.2. When the MANUAL LED is blinking, press “or "until the
HRC LED you want stops blinking. Press to make sure. At this time, LCD
of HRC will stop blinking and continue to light. The program will order you to put
in value according to operating style below:
10.3. LCD of AGE light flashes, you can press or to adjust age. After
setting, press to another position.
Age pre-set:30;range of age: 13~80,Step 1.
10.4. At this time LCD of PULSE light flashes, the mode will request you to put in
heartbeat value. The value will change according to the age and please refer to the
attached table in the rear of this indication. Then select the suitable value in the table.
You can press or to adjust heartbeat value. If you don’t make any
change, press and mode will start according to pre-set value and turn to next
position.
10.5 TIME window starts flashing, mode will request you to put in time value. You can
press or to set sport time you need. Or press directly to start
move with no count back.
*Range of time value:5~99 min

- 16 -
** The chart below will show the relationship between different age and heart rate of this product of
HRC function:
BPM BPM BPM BPM
Age H Pre-set LAge H Pre-set LAge HPre-set LAge H Pre-set L
13 197 124 124 31 180 113 113 49 162 103 103 67 145 92 92
14 196 124 124 32 179 113 113 50 162 102 102 68 144 91 91
15 195 123 123 33 178 112 112 51 161 101 101 69 143 91 91
16 194 122 122 34 177 112 112 52 160 101 101 70 143 90 90
17 193 122 122 35 176 111 111 53 159 100 100 71 142 90 89
18 192 121 121 36 175 110 110 54 158 100 100 72 141 90 89
19 191 121 121 37 174 110 110 55 157 99 99 73 140 90 88
20 190 120 120 38 173 109 109 56 156 98 98 74 139 90 88
21 189 119 119 39 172 109 109 57 155 98 98 75 138 90 87
22 188 119 119 40 171 108 108 58 154 97 97 76 137 90 86
23 187 118 118 41 170 107 107 59 153 97 97 77 136 90 86
24 186 118 118 42 169 107 107 60 152 96 96 78 135 90 85
25 185 117 117 43 168 106 106 61 151 95 95 79 134 90 85
26 184 116 116 44 167 106 106 62 150 95 95 80 133 90 84
27 183 116 116 45 166 105 105 63 149 94 94
28 182 115 115 46 165 104 104 64 148 94 94
29 181 115 115 47 164 104 104 65 147 93 93
30 181 114 114 48 163 103 103 66 146 92 92
Table of contents
Other BodyPerfect Treadmill manuals


