Zaap TX-1000 User manual

Please ensure you read the User Manual and Safety
Instructions carefully prior to operating this treadmill.
Motorized Treadmill
TX-1000

TABLE OF CONTENTS
Technical Specs.................................................................................................... 1
Product Features..................................................................................................1
What’s in the Box..................................................................................................2
Tool Kit..................................................................................................................2
Safety Instructions................................................................................................ 3
Assembly Instructions........................................................................................... 5
Folding Instructions ..............................................................................................6
Operating Instructions .......................................................................................... 7
Running Board/Belt Maintenance.......................................................................10
Maintenance....................................................................................................... 11
Troubleshooting..................................................................................................12

• Model: TX-1000
• UL power cord
• User Manual
• Handrests with padded foam
• Running surface 34*100CM
• Speed range: 1-10KM/H
• 12 pre-set programs / 1 manual
• 5 Speed Quick Start Keys
• 2 Water Bottle Holders
• Safety Key (emergency stop)
• Transport wheels
• Easy to Use Control Pad displaying Speed, Time, Distance, Calories and Pre-set Programs
• Maximum user weight: 120kg
PRODUCT FEATURES
Product Dimensions
(Unfolded) 126x60x120CM Motor Power 750W – 1.0Hp
Product Dimensions
(Folded) 120x60x68CM Rated Voltage/
Frequency
220V
50 / 60Hz
Max User Weight 120KG (17 stone) Machine Weight 24KG
LCD Display Speed, Time, Distance, Calories
TECHNICAL SPECS

WHAT’S IN THE BOX
TOOL KIT
Remove the treadmill and other components from the packaging – save the packaging until
you have fully assembled and tested the treadmill. Note, returns must be returned in the
original packaging for safety reasons.
If any of the components are missing, damaged in transit or simply don’t work, please
contact the Customer Care team immediately for further instructions. Note, do not try to
resolve any issues yourself as this could lead to further damage or injury.
• Allen Key x 1
• Lubricant x 1
• Safety Key (emergency stop) x 1
• Decorative Handrest Cover x 2
• Safety Locks (to fold and unfold) x 1
• Control Pad Locks x 2
1. Treadmill Frame 2. Handrests and Control Pad 3. Tool Kit

SAFETY INSTRUCTIONS
Please read carefully prior to using this product.
You should consult a physician before beginning any exercise program this is especially
important if you are pregnant, sick injured or have a pre-existing medical condition.
If whilst using the treadmill you feel dizzy, faint, short of breath or any pain STOP using the
treadmill immediately and consult a physician.
When using electrical products, you should follow normal safety procedures, especially
if there are children or pets around.
1
2Avoid placing the treadmill on thick carpet – it should be placed on a
-
heating the motor.
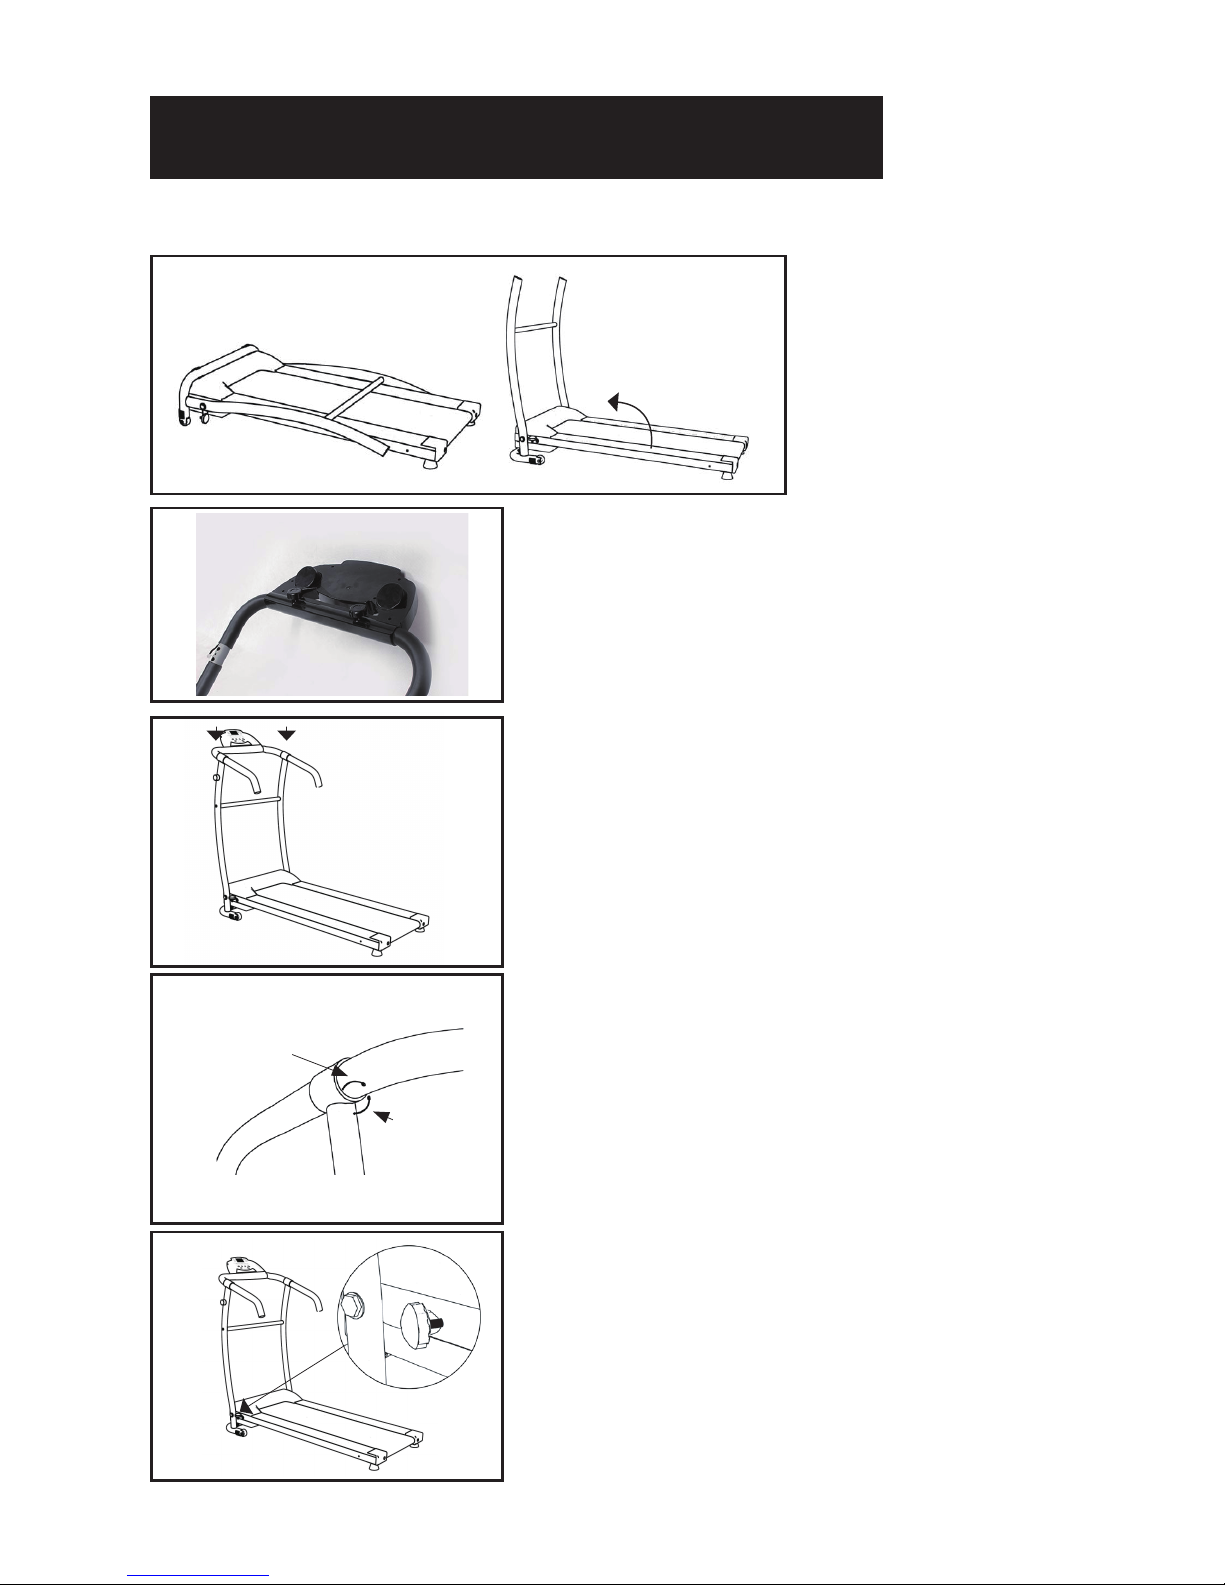
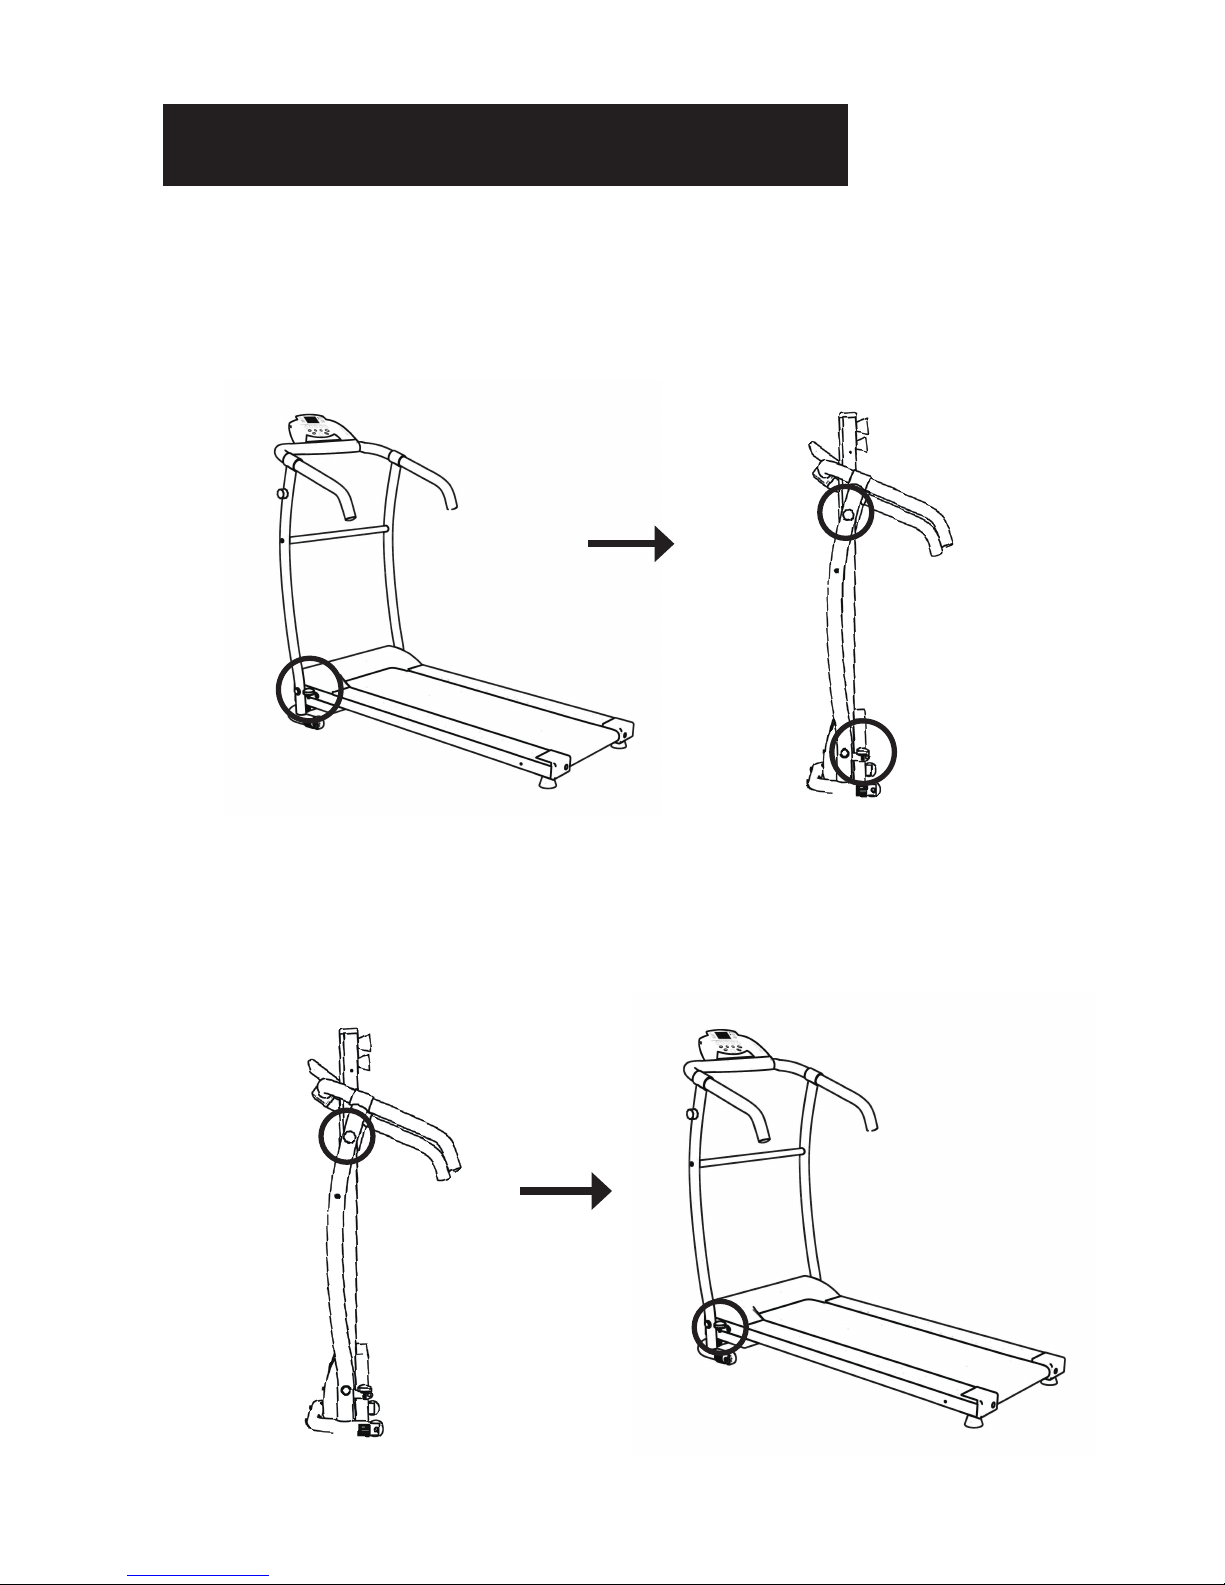
3To fold and unfold the treadmill, refer to the Folding Instructions section
below.
4To turn on the treadmill, connect the power cord to the wall and turn on
the red switch at the back of the treadmill and avoid sharing the
power outlet with other electrical products.
5Grounding electrical equipment is important and reduces the risk of
electrical shock. The electrical cord and plug provided with the tread-
mill are grounded therefore a grounded power outlet must be used to
avoid injury.
6Always check the running belt alignment each time you use the treadmill -
the running belt will move to one side with use – to align the running belt
correctly and tighten it when it becomes sticky under foot and loose, refer
to the Belt Alignment section below
It’s important you do this correctly to avoid injury.
7To start the treadmill, place the safety key on the yellow circle on the
Control Pad and attach the clip to your clothing. Note, the treadmill will
not start unless you do this.

8START the treadmill at the lowest speed and hold onto the handrests.
Note, there should be a 3 second countdown before the running belt
begins to move.
9In the event the treadmill malfunctions, PULL the safety key from the
Control Pad – the treadmill will stop immediately, turn OFF the red power
switch at the back of the treadmill, disconnect the power, and contact the
customer care team for further instructions.
10 Regular maintenance will prolong the life of your treadmill and prevent
injury – refer to the Troubleshooting section below.
11 Always use proper lifting techniques and/or assistance when lifting or
moving the treadmill to avoid injury.
12 Never leave the treadmill unattended or plugged in especially if there are
young children around.
13 Always turn the treadmill OFF at the wall and remove the plug when it’s
not in use – this applies when you are cleaning or moving the treadmill.
14 The treadmill is not suitable for children under 14 years of age or for peo-
ple with physical conditions unless supervised by an adult.
15 The treadmill is designed for home use only and should only be used
indoors in a clean dry area.
16 Maximum user weight:120KG

ASSEMBLY INSTRUCTIONS
5 easy steps to assemble your treadmill then you’re ready to workout.
1.Place the Treadmill
frame on the ground
and open the frame.
2. Adjust the Control Pad to the correct position for
you and then screw the Control Pad Locks in place on
the back of the Control Pad.
3. Fix the handrests and Control Pad onto the frame
using the bolts/washers provided and place the
decorative covers over the bolts.
4. Connect the Control Pad signal cable (A) to the
signal cable on the frame (B).
5. Screw the safety lock in place to keep the frame
upright and secure.
A
B

FOLDING INSTRUCTIONS
TO FOLD
After use, unscrew the safety lock on the bottom frame and place it in the safety lock holder,
fold the treadmill and pull the expandable safety lock out from the upper frame and release
to lock the treadmill in an upright position.
TO UNFOLD
Release the expandable safety lock and lower the bottom frame to the ground. Screw the
safety lock to the bottom frame to lock the upper frame in an upright position.

OPERATING INSTRUCTIONS
Safety key
To start the treadmill, the Safety Key must be attached to the Control Pad (yellow circle) and
your clothing. Note, the treadmill will not start unless you do this.
You can STOP the treadmill at any time by pulling the Safety Key
treadmill will STOP immediately.
Starting the treadmill
Turn the power on at the wall and turn the red power switch on at the back of the treadmill
and place the Safety Key on the Control Pad.
Now press the START key - the Control Pad will beep and the LCD display will light up – the
treadmill is now in Standby Mode.
Now select the Manual Mode or a Pre-set Program by referring to the instructions below.
Selecting the PRE-SET programs
There are 12 pre-set programs for you to choose – refer to table below and the Charts on the
SPEED
TIME
DISTANCE
CALORIES
QUICK START SPEEDS
PRE-SET PROGRAMS
SPEED (-)
SPEED (+)
MANUAL MODE
PLACE SAFETY KEY HERE
START
STOP

Control Pad
1. To select a pre-set program, keep pressing the PROG key to switch between programs.
2. Now change the TIME by using the Speed + and Speed – keys then press the START key
to start the treadmill and a 3 second countdown will begin.
Note, a 3 second countdown will begin each time the program is ready to change speeds.
and pull the Safety Key to stop the treadmill if you feel unstable or fall.
Note
The speed changes every minute as per the table below –
Manual Mode
To select the Manual Mode, press the MODE key.
Use the Speed + and Speed – keys to change the default TIME or DISTANCE.

Now press the START key and a 3 second countdown will begin.
To change the speed, use the Quick Start Speedkeys or the Speed + and Speed – keys.
Stopping the treadmill
To stop the treadmill at any time, simply press the STOP key or remove the Safety Key from
the Control Pad.
STOP key, turn the red power switch OFF at the back of the
treadmill, turn the power OFF at the wall, and remove the plug from the wall.
Refer to the Maintenance section for more information on how to maintain your treadmill.

RUNNING BOARD/BELT MAINTENANCE
The treadmill running belt has been pre-lubricated prior to leaving the factory.
With use the running belt will move to the left or right and become loose. In order to
protect your investment and prolong the life of your treadmill it’s important to know how to
lubricate, tighten and align the running belt correctly.
RUNNING BOARD/BELT LUBRICATION
How often you lubricate the running board/belt will depend on how often you use the
the bottle of lubricant provided or with a silicone spray.
The recommendation is to lubricate the running board/belt after 80 hours of use.
RUNNING BELT ALIGNMENT
We strongly recommend you check the alignment of the
running belt when you take it out of the box to ensure it hasn’t
moved during transit and before or after each workout to
avoid injury.
Adjust the left and right sides at the same time to keep the
running belt tight and centered.

ADJUST A LOOSE RUNNING BELT
With use, the running belt will become loose. A simple way to check if the running belt is loose it is will
bunch up in the middle of the belt. If you are running on the belt and it feels unstable (wobbly) or your
feet are sticking to the belt, STOP the treadmill immediately and tighten the belt to avoid injury.
1.
2. To adjust the tightness of the belt, STOP the
treadmill.
3. Use the Allen key provided and turn the end cap
screw a ¼ turn clockwise – see illustration C.
4. START the treadmill on a medium speed - check
the belt is centered, if not keep turning the screw
a ¼ turn clockwise at a time until the belt is
centered.
MAINTENANCE
Regular maintenance will prolong the life of your treadmill and prevent injury. We strongly recommend
that you do the following on a regular basis –
1. Remove the power cord from the wall after use, especially if children are around.
2.
and free of dust and dirt to avoid increased wear and tear and possible damage to the treadmill.
3. Clean the treadmill after use with a dry cloth to clean the Control Pad and areas around the Power
Switch Running Belt.
4. Check the running belt alignment each time you use the treadmill (it will move with use) - refer to
the Adjusting the Running Belt section above.
5. Keep the running belt lubricated – refer to the Running Belt Maintenance section above.
6. Keep the treadmill in a safe dry place away from heat and water.

TROUBLESHOOTING
REF PROBLEM SOLUTION
1THERE IS NO
DISPLAY ON THE
CONTROL PAD.
Check the power outlet and the switch at the
back of the treadmill are turned ON.
Check the Control Pad sensor wires are
connected to the frame (A) and (B) – refer to
the Assembly instructions above.
Place the Safety Key magnet on the yellow
circle on the Control Pad and attach the safety
cord to your clothing.
Press the START key on the Control Pad –
the running belt should move after 3 seconds.
outlet.
Note, the Control Pad will automatically turn
Failing this, call Customer Care.
2THE CONTROL PAD
IS ON AND THE
MOTOR IS NOT
FUNCTIONING.
Check the voltage – it could be too low.
Check the Safety Key is attached to the
Control Pad.
If there is no change, call Customer Care.
3THE RUNNING BELT
IS LOOSE.
Refer to the Running Belt Maintenance
section above.
If there is no change, call Customer Care.
4THE RUNNING BELT
HAS MOVED TO THE
RIGHT OR LEFT.
Refer to the Running Belt Maintenance
section above.
If there is no change, call Customer Care.
5THE ANTI-STATIC
AGENT HAS WORN
OFF
Lubricate the treadmill after
approximately 80 hours of use or try the
test of rubbing your hand between the
board and the belt to see if it is dry.
Refer to the Running Belt Maintenance
section above.
If there is no change, call Customer Care.

TREADMILL
This product is not intended to be used by persons including children with reduced physical
abilities unless supervised.
person in order to avoid injury or damage.
Please call the Customer Care team for assistance.
Control Pad
Handrests
Control Pad Sensor Wires
Motor Cover
Running Belt Safety Rails
Rubber Feet
Transport wheels
Running Belt
Safety Lock Holder
Safety Lock
Upper Frame
Safety Lock
(Expandable)
Emergency
Safety Key

Distributed globally by
UK & Europe
Shop 247
Units 3 & 4 Lower Park Farm
Storrage Lane
Alvechurch, Worcestershire B48 7ER
United Kingdom
Telephone: 01527 598388
USA – West Coast
Shop247.com Inc
Suite 110-120
16 Sunset Way
Henderson, Nevada 89014
Telephone: 1-800-603-0004
USA – East Coast
Shop247.com Inc
6965-K Northpark Blvd,
Charloe,
North Carolina 28216
Telephone: 1-800-603-0004
AUS/NZ
Shop247.com.au Pty Ltd
Unit 7/350 Edgar Street
Condell Park, NSW 2018
Australia
Phone: 1300 795 828
Table of contents
Other Zaap Treadmill manuals