bohm Sempra User manual
1

2
SINFONIA500SE / EMPRIO 600SE OWNERS MANUAL
Böhm SINFONIA 480/500SE / EMPORIO 600SE user manual
version 1.1 provisional
art.-nor. 65510E
state: 06.03.2019
The information contained in this documentation is subject to change without notice and does not
constitute a commitment on the part of Keyswerk Musikelektronik GmbH.
The description is based on the information available at the time of printing.
The display images shown in this manual are examples only and may differ from the actual displays
on your instrument.
We reserve the right to make changes to technical details in relation to the descriptions,
specifications and illustrations in this manual.
Keyswerk Musikelektronik GmbH cannot accept any liability for program errors and for incorrect
information in the documentation and their consequences.
© Keyswerk 2019
All rights reserved
Responsible for the content:
BÖHM Orgeln
KEYSWERK Musikelektronik GmbH & Co. KG
Warbersche Str. 32
31675 Bückeburg
Tel.: 05722 905088
Internet http://www.keyswerk.de
E-Mail info@keyswerk.de

3
SINFONIA500SE / EMPRIO 600SE OWNERS MANUAL
Content
Congratulations!...................................................................................................................................... 7
Installation of the organ.......................................................................................................................... 9
Switching the organ on and off ............................................................................................................. 10
Turn on the SEMPRA: ........................................................................................................................ 10
Turn off the SEMPRA:........................................................................................................................ 11
Notes for organs with Cloud Studio .................................................................................................. 11
Lightning................................................................................................................................................ 12
Panel Overview:..................................................................................................................................... 14
Connectors ............................................................................................................................................ 19
The Touch Display ................................................................................................................................. 20
The BMC Menu...................................................................................................................................... 24
First playing on the SINFONIA/EMPORIO SE ......................................................................................... 27
Select SONGS and PRESETS ............................................................................................................... 28
The preset names.............................................................................................................................. 29
Searching SONGS by name................................................................................................................ 30
Filter SONG list .................................................................................................................................. 31
How to select and divide Sounds ...................................................................................................... 34
Select Sounds .................................................................................................................................... 35
Drawbar organ (RealOrgan) .................................................................................................................. 40
Activating the RealOrgan for the manuals or the pedal.................................................................... 41
Setting the “real” drawbars............................................................................................................... 42
Setting the drawbars in the drawbar menu ...................................................................................... 42
Rotary effect (Leslie/Phasing) ........................................................................................................... 44
Organ Types in the RealOrgan........................................................................................................... 44
Selecting organ types ........................................................................................................................ 46
Further RealOrgan functions:............................................................................................................ 47
Setting the overall volume of the drawbar sound ........................................................................ 47
Envelope Functions ....................................................................................................................... 47
Chorus/Vibrato.............................................................................................................................. 48
Rotary settings (Leslie / Phasing) .................................................................................................. 49
Percussion ..................................................................................................................................... 51
Key click......................................................................................................................................... 52
Drive and distortion....................................................................................................................... 53
Reverb ........................................................................................................................................... 53

4
SINFONIA500SE / EMPRIO 600SE OWNERS MANUAL
Chorus............................................................................................................................................ 53
Key zone ........................................................................................................................................ 54
Octave - / Octave +........................................................................................................................ 54
RealOrgan Presets ............................................................................................................................. 55
Calling up Presets .......................................................................................................................... 55
Save your own RealOrgan Presets................................................................................................. 56
Delete RealOrgan Presets.............................................................................................................. 57
Play with Styles...................................................................................................................................... 58
Select styles and other companions.............................................................................................. 60
The style/pattern functions........................................................................................................... 63
Tempo functions............................................................................................................................ 64
Accompaniment functions ............................................................................................................ 65
Solochord........................................................................................................................................... 69
Adjusting volumes................................................................................................................................. 72
Keyboard split........................................................................................................................................ 75
Set split point................................................................................................................................. 76
Cancel manual split ....................................................................................................................... 77
Special features lower manual split .............................................................................................. 78
The Part Editor Setting sounds and their playing parameters ............................................................. 79
Calling the Part Editor........................................................................................................................ 79
Sound selection ............................................................................................................................. 82
Setting the Part parameters.......................................................................................................... 85
Key Zones –Define individual split zones for parts....................................................................... 94
Define a key zone: ......................................................................................................................... 94
Part Options................................................................................................................................... 96
Part Setup...................................................................................................................................... 99
Initialize Part................................................................................................................................ 101
SONGS and Global Presets .................................................................................................................. 104
3-D Presets ...................................................................................................................................... 104
Organization of the SONGS / Global Presets................................................................................... 105
Save SONGS / Global Presets .......................................................................................................... 107
Edit SONG........................................................................................................................................ 111
Re-sort global presets in SONG ....................................................................................................... 112
Delete SONGs / Global Presets........................................................................................................ 113
Copying Global Presets to Another SONG....................................................................................... 114

5
SINFONIA500SE / EMPRIO 600SE OWNERS MANUAL
USB Functions - Data Backup .............................................................................................................. 115
The USB socket(s)............................................................................................................................ 115
Overview of the USB menu ............................................................................................................. 116
Folders and Files.......................................................................................................................... 117
USB sticks..................................................................................................................................... 119
Format ......................................................................................................................................... 119
Save / load data........................................................................................................................... 121
File Types......................................................................................................................................... 123
Show all ....................................................................................................................................... 123
Delete files................................................................................................................................... 123
Installation of factory data.............................................................................................................. 124
Themes (Albums)......................................................................................................................... 126
Songs ........................................................................................................................................... 129
Styles ........................................................................................................................................... 132
Playbacks ..................................................................................................................................... 136
Sound presets.............................................................................................................................. 141
Setups.......................................................................................................................................... 142
MIDI files...................................................................................................................................... 146
MIDI Styles (loading Yamaha Styles) ........................................................................................... 148
AMADEUS sound data................................................................................................................. 150
"Old" data.................................................................................................................................... 155
Total backup of all user data (backup)........................................................................................ 158
Update of the SEMPRA firmware (operating software)...................................................................... 163
Performing the Firmware Update on the SEMPRA......................................................................... 163
Appendix 1: System settings ............................................................................................................... 165
1. Calibrating the Touch Display.................................................................................................. 166
2. Calibration of pitch and modulation wheels, sill and aftertouch............................................ 167
3. Setting the basic touch velocity per keyboard........................................................................ 169
4. Setting the time/date.............................................................................................................. 172

6
SINFONIA500SE / EMPRIO 600SE OWNERS MANUAL

7
SINFONIA500SE / EMPRIO 600SE OWNERS MANUAL
Congratulations!
You have decided on an innovative, modern and sonorous musical instrument - a SINFONIA 480/500SE
or EMPORIO 600SE organ from BÖHM. With the new SEMPRA technology, we are breaking new
ground and introducing a new level of playing comfort that was previously unknown from an organ.
An overview of the special features of SEMPRA:
Extremely fast - The fastest start time of all current organs: SEMPRA is ready to play in just 5 seconds!
With the SEMPRA Realtime Performance OS, we are introducing a state-of-the-art industrial standard
to organ building for the first time. The result is ultra-fast performance in all functions that would not
be possible with a Windows or Linux-based PC organ system.
Easy to use - The completely redesigned, easy-to-understand user interface makes playing and
registering a pure pleasure.
TOUCH or button - Virtually all functions are accessible either via the pin sharp 9'' Wide View Touch
Display or via the operating buttons and controls on the panel. The choice is yours!
3D PRESETS - New and innovative: Up to 6 individual Global Presets (overall settings) incl. style or
playback accompaniment (Midifile) etc. for your music pieces are clearly arranged in SONGS - in
simplified terms: small collective folders. You can sort and catalogue these SONGS directly according
to various criteria at any time using the corresponding control buttons, or you can summarise and call
them up individually in ALBUMS and THEMES. So you can find and retrieve your settings at lightning
speed at any time, even among hundreds and thousands. This completely new preset system provides
a special playing comfort.
EASY STYLE CREATE - Styles can be edited flexibly and at lightning speed using the new EASY STYLE
EDITOR, and this even includes the quick recording of new tracks, patterns or additions. Styles in
Yamaha® format (up to Tyros 5/Genos) can be previewed directly and loaded, optimized and stored in
the style library of your SEMPRA.
INTERACTIVE PLAYBACKS –To control Midifiles as flexibly as styles - this dream becomes reality with
SEMPRA. Midifiles can not only be adapted in their instrumentation, but also provided with so-called
markers and thus divided into up to six sections such as Intro, Verse, Chorus, Bridge, etc. These sections
or patterns can then be called up at any time in any order using the Style Pattern buttons, allowing you
to flexibly control the flow of the midifile and thusof your piece of music. You get a perfect song related
accompaniment like only a midifile can offer, but you are not restricted in the course of your
presentation like with a conventional file player.
LATEST STORAGE TECHNOLOGIES - What you store in your SEMPRA remains stored. There is no RAM
memory left that could be lost. All your data is captured directly and at lightning speed in the internal
flash memory until you delete it from there yourself. Factory data cannot be lost. Data can be
saved/loaded onto connected USB storage media (sticks) at lightning speed.
USER ACCOUNTS - This is how every SEMPRA becomes your SEMPRA. Your family or friends want to
play on your SEMPRA too, but with their own registrations, styles, playbacks, etc.? No problem:
Multiple user accounts can be created on the organ. Own data will then be saved in the currently
activated user account. Every player who uses the organ can keep his own data in his personal account.
And best of all: user accounts can be exported to a USB stick and then the complete organ can be
played from the stick. In this way, for example, your friend, who has also a SEMPRA, can save his organ
data to a stick which can be used in your organ without altering your own user data settings.

8
SINFONIA500SE / EMPRIO 600SE OWNERS MANUAL
RealOrgan –A drawbar system with 9 footages - anyone can do that! In addition to that classic
Hammond configuration, the new SEMPRA drawbar organ offers various other legendary organ
simulations, with expandable foot position range (up to 15 choirs!) and sensational sound. Of course,
all typical effects of the respective organ type such as full percussion over all foot positions, Leslie or
Phasing Rotor, Celeste, Vibrato and Chorus are realistically reproduced. The RealOrgan comes
standard with several organ types. With extension packages you can also add the drawbar characters
of many further vintage organ types. You won't find such a versatile and sounding drawbar system as
the BÖHM RealOrgan with any other organ - a dream for all friends of the legendary sound.
MULTI-SOLOCHORD –A well-known effect: Depending on the notes played on the accompaniment
manual, the solo chord adds further voices to the melody in its own sound. For example, play a solo
clarinet with just one finger of your right hand and add a polyphonic saxophone movement via solo
chord... so far these or similar functions are known from other manufacturers.
With the SEMPRA, the possibilities go even further: you can turn any manual or pedal instrument into
a solo chord instrument. And each of these instruments can also play with one of over 20 different
Solochord types. On the right the Miller set, on the left a choir with a trio, on the right of the lower
keyboard the octaviated strings... no problem. This innovative feature gives you completely new
creative freedom in playing and arranging!
CLOUD STUDIO INTEGRATION –If your SEMPRA is equipped with the optional Böhm Cloud Studio, you
will find its sounds integrated into the respective sound groups and categories. This allows you to play
virtual instruments and sample libraries such as those from the pre-installed Steinberg
Halion6/Absolute 3 package in parallel with the AMADEUS sounds of the SEMPRA. At the same time,
the Cloud Studio's large touch display can show you the notes to your piece of music. If desired, the
note can also be called up automatically with the SONG-/Preset call on the organ. It couldn't be more
comfortable!
The functions mentioned here and many more of your SEMPRA are described in the following
chapters. Many functions are self-explanatory. Nevertheless, we ask you to read through these
instructions thoroughly and to follow the explanations directly at the SEMPRA. This is the best way
to get to know and appreciate the many exciting possibilities. Have fun!
Your
BÖHM Team
ATTENTION: The illustrations in these instructions usually show the EMPORIO 600SE model. The
explanations apply accordingly to the SINFONIA 500SE and 480SE, which differ from the EMPORIO
primarily in the absence of the solo manual and a correspondingly slightly modified layout in the
control panel and drawbars.

9
SINFONIA500SE / EMPRIO 600SE OWNERS MANUAL
Installation of the organ
Your SINFONIA 480/500SE or EMPORIO 600SE consists of several parts:
The organ consists of the stand with active
loudspeaker system (not for "concert edition"),
the console and the 30 keys full pedalboard (17
or 25 pedal keys for the SINFONIA 480SE).
•Place the console on the stand with an
assistant. The electrical connections are
made automatically via a multi-pole
plug/socket in the lower right corner of
the sidewall or in the console. Carefully
place the upper part on top so that the
plug and socket engage and the wooden
pins in the side rails of the stand slide
into the corresponding holes in the side
rails of the console. Attention: Pay
attention to your fingers and those of
the assistant - danger of jamming!
•Now insert the music stand into the provided mounting bolts or - if your organ has the
illuminated acrylic music stand - into the mounting slot.
If the organ has the optional Cloud Studio, you will find a slot behind the music stand for the
necessary cable connections for the display music stand. Connect the USB cable coming from
the music stand to the socket on the right in the lead-through (under the cover brush), the
cables coming from the upper part (HDMI and mains cable) in the lead-through plug into the
corresponding sockets on the underside of the plastic cover on the back of the music stand.
•Place the pedal in front of the stand and insert the connecting cable into the socket provided
on the right in the foot box of the stand.
•Now carefully insert the pedal into the foot box of the underframe. Make sure that the unit
does not jam to avoid pressure points in the housing.
•Plug the power cord into a wall outlet.
•Place the bench in front of the organ and adjust the seat height to a comfortable level.
•The organ is now ready to play.
Note: All necessary connections for operation are made automatically via the plug connector between
the top and the stand of the organ. If you want to connect the organ to other components, you will find
the corresponding connections at the bottom right on the back of the pedal box.

10
SINFONIA500SE / EMPRIO 600SE OWNERS MANUAL
Switching the organ on and off
Turn on the SEMPRA:
•The main power switch of the organ is located at the bottom right of the
pedal box on the connection plate. It can remain switched on when the
organ is in a fixed position. Before disassembling the organ for transport
or during thunderstorms, the organ should be switched off completely
with this switch.
•On the right side profile you will find the power switch to turn on/off the
organ when using it. Switch on the organ by briefly pressing the button.
•The start screen appears on the display
for approx. 5 seconds:
•If several user accounts are installed,
you will be asked which account you
want to use during the startup process.
Select the desired account by tapping
on the display and then tapping on the
ENTER button on the display or by
turning the [data wheel] to the right of
the display and confirming the selected
account with the [ENTER] button below.
•The display changes to the basic screen,
the organ is now ready to play:

11
SINFONIA500SE / EMPRIO 600SE OWNERS MANUAL
Note: After switching on, the "BASIC SONG" (list on the left of the display) and the "CLEAR
REG." preset are always displayed first (lower of the 6 fields on the right of the display), or, if
you have created further "Cl.Reg" presets, the uppermost one is selected. This is a basic preset
that sets the organ to a defined initial state and serves as a starting point for new registrations
to be created. The corresponding CLEAR REG. Preset can also be called up at any time by
pressing the [CLEAR REG.] button on the upper left-hand side control panel.
Turn off the SEMPRA:
•To switch off the organ, also press the [Power] button. The organ is shut
down and a backup of the last data changes is automatically saved. Then
the organ is finally switched off.
Notes for organs with Cloud Studio:
•The organ is switched on and off in the same way as described above.
•In these cases, the integrated Cloud Studio is also switched on or off with the organ.
Please note:
•When the instrument is switched on, the organ itself is already playable after approx.
5 seconds, when the basic screen appears. The Cloud Studio, on the other hand, takes
about 1.5 minutes to play, since the sample material must first be loaded into the main
memory of the PC system.
•We recommend that you only start playing after the Cloud Studio has finally booted
up, or that you call up the first SONG preset with Cloud Studio Sounds, so that the
system can boot properly first. Further details can be found in the separate Cloud
Studio user manual.
Power synchronization of organ and Cloud Studio
If you turn the SEMPRA off and on again too quickly - before the Cloud Studio has also been
completely shut down and turned off - it can happen that the Cloud Studio does not restart
with the organ, because the shutdown process is still running while the organ is already
restarting. The Cloud Studio is then shut down further in the background and is therefore not
ready to play. Rather, it would start when you switch the organ off again via the mains switch,
as it reacts to the switching impulse.
In such a case, to synchronize organ and Cloud Studio again with regard to the switching on/off
process, please press the [Power] button on the right of the control panel for approx. 7
seconds. Only when the light on the console has gone out do you release the button, the organ
and the Cloud Studio will now be switched off.
Afterwards, organ and Cloud Studio can be started again together via the [Power] button.

12
SINFONIA500SE / EMPRIO 600SE OWNERS MANUAL
Lightning
Your organ has several lights for the console, the pedalboard and the music stand. The lighting for the
console (Light 1 and 2) is automatically activated when the organ is switched on. The lighting for the
music stand or the pedal room can be switched on as required. All lights can be switched separately
via the corresponding push-buttons:
Desktop: music stand
Light 1: middle panel
Light 2: left and right upper panel
Pedal: pedalboard
When the buttons are pressed, a display is also shown on which you can dim the individual lighting
sections, i.e. change the brightness. Simply tap on the corresponding slider on the display and then use
the data wheel to set the desired brightness. Exit the menu with the [ESC] button.

13
SINFONIA500SE / EMPRIO 600SE OWNERS MANUAL

* currently not assigned
14
SINFONIA500SE / EMPRIO 600SE OWNERS MANUAL
Panel Overview:
button group ACC FUNCTION
ACC ON: Switching the accompaniment on/off
ACC easy: Activate the EASY accompaniment modes
(press button longer to select the desired
accompaniment mode: One-finger Boehm, One-finger
Other, Organist or Pianist)
Low Bass: The bass of the automatic accompaniment
plays the lowest chordal tone, depending on the chord
inversion.
Man. Bass: Coupling of the pedal bass to the
accompanying manual. The bass (fundamental) sounds
in the set pedal sound to the played chord.
Memory: Hold function for the LOWER tone (or other
manual instruments that are switched to Memory). The
tones continue to sound even after the keys are
released.
Solochord: Switching the Solochord function on/off
Option 5: *
Arr. editor: opens the editor menu for editing the
current style or playback (midifile) in the display
button group MIXER/EFFECTS:
MIXER: calls up the mixer menu
Reverb: calls the reverb and chorus functions (DSP
effects of the Crystal Mixer preamplifier).
Effect Menu / Option 6 / Mixer Pres. 1-2 / Rev. Short-
long / Chorus-Phase / Flanger-Delay: currently not
assigned
button group PRESET FUNCTION
Cancel Reg: With this button you can "clean up" the
SEMPRA at any time. The "Basic Song" and the preset
"Clear Reg." will be called. With this preset, all settings
are set to a defined initial state, ideal as a starting point
for completely new songs/presets.
Style Couple / Lower Couple / One Touch: currently nor
assigned
button group KEYBOARD FUNCTION
Split:For direct input of the main split point for the
upper/middle or lower manual. After entering a split
point via this button, the "right" parts of the respective
manual are located to the right of the split point, the
"left" parts to the left.
Attention: There is no main split point for the solo
manual of the EMPORIO 600SE!
Key Transpose: To transpose directly to a specific key,
press the button and then, on any manual or pedal,
press the key for the key you want to transpose to.
Transpose - / Transpose +: This allows you to change the
overall transposition (key) of the organ in semitone steps

* currently not assigned
15
SINFONIA500SE / EMPRIO 600SE OWNERS MANUAL
in descending or ascending order. If you press both
buttons simultaneously, the SEMPRA will return to the
initial pitch C.
In the Preset Couple Settings , you can specify whether
global transposition should be performed directly or
with the next key played on one of the manuals (not
pedal).
In the Part Editor, you can use these two buttons to
change the octave position of the currently selected part
directly in octave steps in ascending or descending order
button group ALBUM SELECT
If the SONG filter type for the song list is set to
“ALBUM“and you have assigned your own albums via
the menu (as described later in a separate chapter), up
to 100 SONG albums with up to 6 SONGS each can be
called up via this button group. There are 5 albums each
(buttons A...E) in 20 banks (buttons 1/11...10/20), i.e. all
100 albums of the current theme are directly accessible.
The up to 6 songs of the selected album can then be
recalled via the 6 SONG fields on the left of the display.
button group ARPEGGIO*
Arpeggio on, Arpeggio 1…4, currently not
assigned, yet.
SONG FILTER
The song list on the left side of the display can be
displayed either completely (button [No Filter] selected)
or according to the criteria bank, style (category), genre
(musical styles) or in albums (own cataloging of up to 6
songs each in up to 100 albums).
Pressing one of the buttons once determines the type of
filtering, pressing it again allows the selection within the
respective filter category (see selection list in the
display).
Preset Couple
Specifies which stored settings are actually recalled
when the Global Presets are recalled. For example, you
can specify whether the accompaniment (style/playback)
should be switched or not, whether the button/knob
assignments should change with the preset change or
not, and so on.
The effect of the global transposition can also be
determined here, either immediately by entering a
transposition, or not before the next note has been
played on a manual (not pedal).
The button with it’s two LEDs allows four different
coupler configurations to be called up:
1: both LEDs are light up
2: only LED Couple 1 lights
3: only LED Couple 2 lights
4: both LEDs off
If the button is pressed longer in one of the four settings,
the type of preset switching functions can be set.
Tempo - / Tempo +
Step-by-step or continuous (keep button pressed)
decrease or increase of the accompaniment tempo.
The tempo can also be adjusted using the data dial
while one of the [SHIFT] or [SHIFT Lock] buttons is on.
2 x 6 soft-buttons on both sides
of the display
The 6 buttons to the right and left of the display are
assigned their function via the display. You can either
touch the corresponding functions or fields directly in
the display, or select them using the 2 x 6 buttons.
9“ Touch Display
For display or direct setting of registration, game and
menu functions on the display.
8 F-buttons (F = function buttons)
The 8 F-buttons below the display are assigned their
function in the individual display menus via the lower
display bar. For the basic screen, the functions of these
buttons can be defined by the user (functions, effect
sounds, etc...)
Shift / Shift Lock
In many display menus there are two assignment levels
for the 8 F buttons. With [Shift] you can temporarily
switch to the second level (as long as the key is pressed),
[Shift Lock] switches permanently to the second level.
Pressing [Shift Lock] again releases the function and
switches back to the basic level. When entering names,
etc. via the number/letter keypad , the Shift keys can
be used to switch between upper and lower case.
Page -, Page +, Edit
Page- / Page +: Some display menus consist of several
pages. With these two buttons you can switch between
the display screens. Alternatively, you can also touch the
corresponding "tabs" in the display directly.
Edit: If an input is required for a function in the display
or various setting options are offered, the LED in the
[Edit] button flashes. After pressing [Edit], the desired
value can be entered or selected.
Store
The [Store] button is always used to store settings.
These can be SONGS or presets in the basic screen, mixer
presets in the mixer menu, style changes in the style
editor, etc...
* currently not assigned
16
SINFONIA500SE / EMPRIO 600SE OWNERS MANUAL
Cursor buttons
With these four arrow buttons the cursor (marker for
the currently selected field or the selected function in
the display) can be moved within the display.
Alternatively, you can of course make the selection by
tapping directly on a field in the display.
data wheel, Menu, Esc, Enter
With the data wheel (endless wheel), parameter values,
lists, etc. can be moved through and set particularly
quickly in the display. The data wheel also has a push
function that can be used to trigger the [Enter] function
(confirm entries, call functions, etc.)
Menu: Opens the BMC (Böhm Music Computer) menu in
the display, which takes you to various functional areas
of the SEMPRA.
Esc (Escape): Use this button to cancel entries or always
return from the current menu to the next higher level.
Enter: Used to confirm entries and call functions.
SOUND SELECT
The 12 category buttons [Piano]...[Bass] select the
corresponding sound categories. In the basic screen they
are first assigned to the part UPPER 1 right. The sounds
that are called up when the buttons are pressed can also
be defined by the user.
Within the sound lists in the display, these buttons can
also be used to switch within the sound categories. The
respective subgroups per category and the individual
sounds are selected via the display.
Manual/Part Selector
Use these buttons to open the Part-Overview or Part-
Editor for the manual you want to register. The display
then shows all parts for the referred manual, and these
can be assigned with sounds or the function settings can
be made for the individual parts.
Upper: Part selector Upper- (Middle) manual
Lower: Part selector Lower
Pedal/Solo: Part selector pedalboard and
Solo manual (upper manual der Emporio)
User 1 / 2: self-configurable user part selection
MIDI In: Part selector for the 16 MIDI-In parts
Letter/Number pad
Similar to a mobile phone, you can use this button group
to enter names and descriptions for presets, styles, etc.
that you have created or edited yourself, or for presets
that you want to search for while saving. Press one of
the buttons several times to switch through the letters,
numbers and special characters belonging to the button.
Use the [Cursor keys] right/left to switch between the
digits. [Shift] or [Shift Lock] switch to upper case.
USB
displays, when a USB storage device (stick) is connected,
the menu to save/load data to/from the USB device.
button group LIGHT
(on the 480SE you will find the corresponding buttons on the panel to
the right of the keyboards)
Here you can switch the individual lighting sections for
the console (desktop = music stand, Light 1, Light 2 and
pedal) on and off.
When one of these buttons is pressed, a display menu is
also shown, in which you can additionally adjust the
brightness of the individual lighting sections (dimming).
For details see page 13.
button group Keyboard Control
[Pedal Sustain] button: Turns on/off the sustain function
for the pedal sounds. The effect intensity depends on
the registered sounds and their sound parameters.
All other buttons in this group are (still) without
function.
Keyboard Couple
(manual- and pedal couple)
The couple functions are not yet integrated.
button group DRAWBAR SETTING
(on the 480SE you will find the corresponding buttons on the panel to
the right of the keyboards)
The RealOrgan Drawbar organ can be played on the
lower and upper manual (respect. middle manual of the
EMPORIO) as well as on the pedal.
The buttons [Upper/Middle], [Lower] and [Pedal] switch
the RealOrgan on and off for the corresponding
manual(s).
If you press the [Lower] button repeatedly, you can
assign the drawbar system of the lower manual to either
the left (upper LED in the button lights up) or the right
(lower LED in the button lights up) split area.
After switching on the RealOrgan for the referred
manual, you can set the registration of the drawbars
directly via the corresponding drawbar set .
You can use the two drawbars DRAWBARS to set the
total volume of the drawbar systems for the submanual
or the middle/upper manual.
Use the [Drawb. Menu] button to access the RealOrgan
display menu. Here the drawbar settings of all manuals
and many other parameters and functions can be set via
the touch display. The virtual drawbars on the display
react to your gestures at lightning speed.
In the Drawbar menu you can also set different organ
types, effects such as percussion or chorus and vibrato
(C1...C3 or V1...V3), envelopes, key-click, distortion, etc.
In addition, you can call Sinus Presets for the individual
organ types or create your own.
* currently not assigned
17
SINFONIA500SE / EMPRIO 600SE OWNERS MANUAL
The buttons [Rotor] and [Fast] on the left of the Style
control panel are used to switch on the rotary effect or
to switch between the slow (LED Fast off) and the fast
(LED Fast on) rotary speed.
sound buttons LOWER, PEDAL
These button groups are currently without function
Power button
Here you can switch your organ on and off (page 11).
HEADPHONES/ MICROPHONE
Here you can connect headphones or a microphone.
If headphones are connected, any built-in loudspeakers
are automatically switched off.
You will find a separate mixer input for the microphone
in the Mixer Display , where you can set the level and
tone control for the microphone.
MUTE ACC / DRUM MUTE
Drums…Combo3:Mute the companion groups: If the
LED in the respective button lights up, the respective
group is muted.
Bassdrum…Percussion 2: The corresponding percussion
instrument groups can be switched on and off
individually (the corresponding group is muted when the
corresponding button is lit). If all keys are activated (all 8
LEDs light up), no drums can be heard any more.
Fade in/out, Ritardando, Sync Start/Stop,
Tempo Hold, Semi-Automatic
Fade (in/out): Activated during ongoing accompaniment
Fade out, i.e. the accompaniment and organ are
gradually softened and faded out.
Activated when accompaniment is stopped: Fade in, i.e.
organ and accompaniment are gradually faded in when
the accompaniment is started.
Ritardando./Tap: Activated during ongoing
accompaniment a fill is played, the tempo slows down
and the rhythm is stopped.
Activated when accompaniment is stopped the tempo
can be set by pressing the button several times. To do
this, strike the button several times at the desired tempo
according to the time signature of the selected style,
then the accompaniment starts at the specified tempo.
Sync. Start: The accompaniment starts with the first
chord recognition of the accompaniment manual. Sync
start can also be assigned to any manual/pedal part.
Sync. Stop: The accompaniment stops with the "1" of
the next bar
Tempo Hold: The current style tempo is maintained,
even if the style or preset is changed. The [Tempo -] /
[Tempo +] buttons can still be used to change the
tempo.
Semi-Automatic: When playing on the accompanying
manual or pedal, up to two percussion instruments can
be heard. If the button is pressed a little longer, the
instruments can be selected.
ACCOMPANIMENT SELECT
16 buttons for the selection of the accompaniments.
If one of the buttons is pressed, the display shows the
corresponding selection list, sorted by categories and
subgroups, depending on the currently selected
accompaniment type (Style, Midi Playback, Arpeggio*,
Sideline*).
Variation 1...4
Toggle style variations. If the Auto Fill function is also
activated, a Fill Up or Fill Down will sound when
switching between two variations
Pattern- and Start/Stop functions
Intro/Ending 1…4: The styles have up to four
Intros/Endings.
Pressed when accompaniment is stopped: The current
style starts with the corresponding intro.
Pressed 1x during ongoing accompaniment: The
corresponding ending is played, then the
accompaniment stops.
Pressed 2x during ongoing accompaniment: The
corresponding intro is played and then the basic
accompaniment is played again.
Bridge: When playing with Interactive Midi Playbacks,
this button can be used to recall the corresponding
bridge sections within the playbacks. For Styles, the
button calls the Bridge1 pattern
Break: Calling a Drum Solo (Break1 Pattern)
Accompaniment type
Style 1…4: to select the type of accompaniment:
Style 1 = Style
Style 2 = Playback (Midifile)
Style 3 = Arpeggio*
Style 4 = Sideline*
Depending on the type of accompaniment selected here,
the corresponding selection list is shown in the display
when one of the 16 category buttons is pressed.
Start/Stop
For direct starting or stopping of the accompaniment
Rotor, slow/fast
The buttons [Rotor] or [Fast] are used to switch on the
rotary effect of the ReaOrgan or to switch between the
slow (LED Fast off) and the fast (LED Fast on) rotary
speed.
4 USB sockets
Via these 4 equal sockets you can plug in USB sticks or
connect a USB keyboard.
* currently not assigned
18
SINFONIA500SE / EMPRIO 600SE OWNERS MANUAL
Pitch-/Modulation wheels
PITCH: Pitch diffraction by +/- up to a full octave. The
wheel has a central detent and automatically returns to
its initial position.
MODULATION: Modulation for the upper manual.
However, the wheels can also be individually assigned a
variety of functions.
SUBMIX ACC
Drawbar for adjusting the volume for the
accompaniment groups Combo 1...3, Bass, Drums.
SUBMIX ORGAN (manuals, pedal)
You can use these drawbars to set the total volume
levels for:
Upper: Upper manual (or Solo manual on Emporio)
Middle: Upper (middle) manual right on Emporio
Lower: Lower manual left
Pedal: pedalboard
Solochord: Solochord instrument on Upper/Solo manual.
Note: If other parts are used as solo chords (multi solo chords), these
parts may have to be placed on this Solochord submixer in the part
options so that they can be adjusted in volume. More about this later in
the chapter Part-Editor.
Sequencer/Volume: When the basic screen is active, you
can control the volume of any Midi playback that is
running here. When the Part Editor is activated, this
Drawbar always adjusts the volume of the currently
selected part in the display.
INSTRUMENT VOLUME
Hier können Sie die Einzellautstärken der Haupt-
Instrumente/Parts auf den Manualen einstellen:
UPPER (Emporio): Parts 1-3 Solo manual
UPPER (Sinfonia): Upper Parts 1-2 right and 1 left
MIDDLE (Emporio): Upper Parts 1-2 right and 1 left
LOWER: Lower Parts 1-2 left and 1 right
All other instrument/part volumes can be edited in the
part editor with the drawbar SEQUENCER/VOL. or
directly in the display.
RealOrgan drawbars
These drawbar groups belong to the RealOrgan drawbar
organ section of your SINFONIA/EMPORIO SE.
Use the two left drawbars to set the total volume for
the drawbar sets of the upper and lower manual.
9 drawbars Upper manual
2 drawbars Pedal
9 drawbars Lower manual
MASTER Volume
With this drawbar you can adjust the overall volume of
your organ. We recommend that you adjust the drawbar
to the middle position before playing on the organ for
the first time, and then gradually increase the overall
volume if necessary.

19
SINFONIA500SE / EMPRIO 600SE OWNERS MANUAL
Connectors
The connectors are located at the rear of the pedal box on the lower part of your organ.
The required electrical connections between top and stand of the organ are made via a stable contact
plug in the right lower side part or in the right side cheek of the upper part. The upper part can easily
be removed or reattached for transport.
The upper part should only be removed or placed on the organ when the organ is switched off!
Main Power Switch
With this switch the power supply is basically established
or interrupted. Switching on with the mains switch on
the control panel is only possible if this switch is
switched on.
Netzanschluss
Plug in the mains cable here and connect it to an
electrical outlet.
0dB OUT Rear
Stereo line output for the two rear stereo channels
(when using the quadrophony option).
Here you can connect active loudspeakers, external
mixers or amplifiers to play the rear channels of the
organ. Further details on quadrophony can be found in
the chapter "Mixer/DSP".
0dB OUT Front
Stereo line output for the two front stereo channels.
Here you can connect active speakers, external mixers or
amplifiers to play the SEMPRA over them. If you do not
operate your organ quadrophonically, please select the
two stereo channels for external
amplification/reproduction here.
MIDI IN
Connect devices from which the organ is to receive MIDI
data here.
MIDI OUT
This jack allows you to transfer MIDI data to another
instrument or computer
Note: You can also make MIDI connections via the USB sockets
on the front of the console. The SEMPRA works on these sockets
like a PC as MIDI master! Therefore, a MIDI adapter must be
used for connection to a PC. USB to USB connection is not
possible
I/O (0dB IN)
Usually this pair of sockets is connected as stereo line
input. Here you can connect other sound sources such as
instruments, CD or MP3 players etc. and play them back
via the organ.
In exceptional cases, these jacks can also be configured
as separate outputs for certain sounds
USB CLOUD STUDIO (not pictured)
If you have a Cloud Studio, you will find a USB port at the
front below the gaming table which you can use to
connect USB storage media to the Cloud Studio PC.
20
SINFONIA500SE / EMPRIO 600SE OWNERS MANUAL
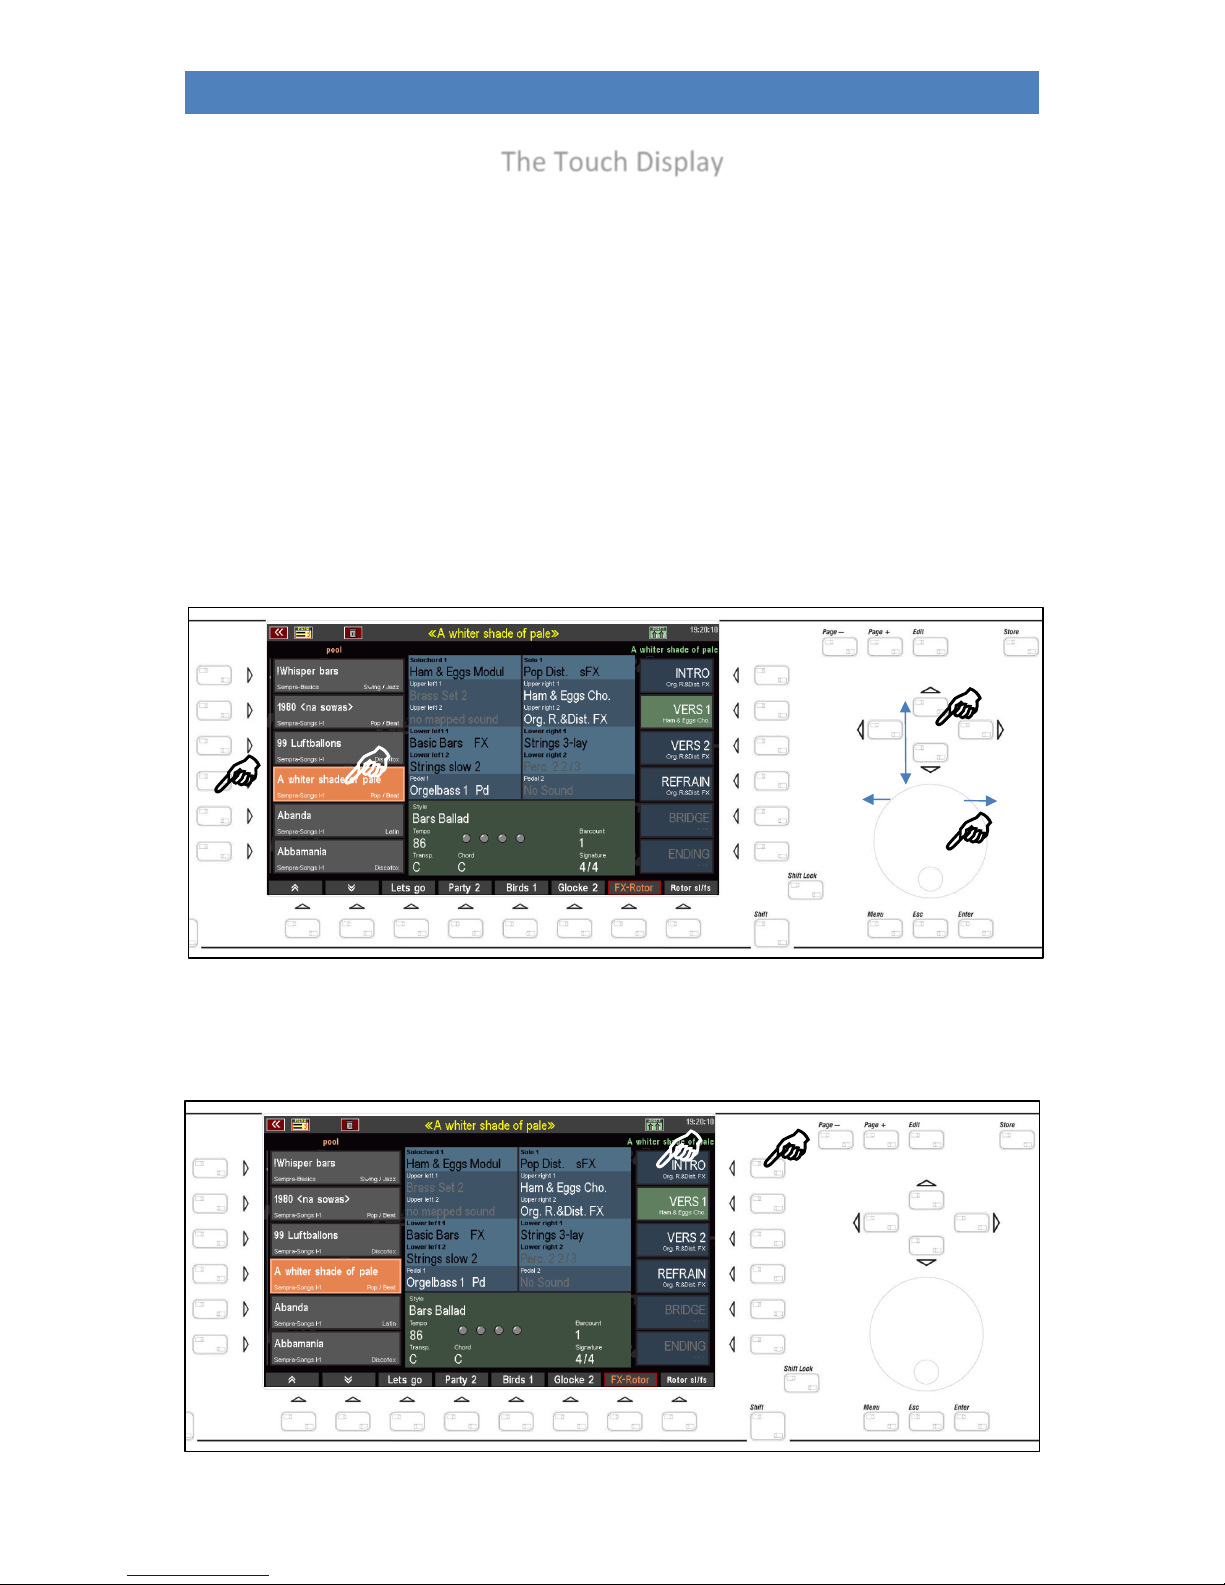
The Touch Display
Even though we deliberately designed SEMPRA so that most of the functions can be accessed via the
display as well as via the buttons, drawbars etc. on the control panel, the large 9" touch display is of
course the "control centre" of your organ. Because it always informs you about the current
configuration or registration and allows in many cases even the most direct access.
You have various options for selecting the display fields:
•Tap directly on the desired field in the display to call it up, e.g. one of the SONG fields in the
list on the left of the display.
•Alternatively, you can also call up the fields of the SONG list using the 6 [F buttons] to the left
of the display.
•The cursor keys [UP]/[DOWN] also allow scrolling through the song list, as does the data
wheel.
•You can call up the individual up to 6 GLOBAL PRESETS of the current SONGS either by tapping
directly on the desired field in the list on the right of the display or by pressing the
corresponding button on the right of the display:
Other manuals for Sempra
1
This manual suits for next models
3
Table of contents
Other bohm Musical Instrument manuals


