Bolymedia BG500 series User manual
MMS/GPRS Security Camera
User’s Manual
BG500 series
For Model:BG500L-HD/BG500K-HD

Content
1 Product Feature...............................................................................1
1.1 General Description..............................................................1
1.2 Camera Overview..................................................................1
1.3 Shooting Information Display..............................................2
1.4 Product Feature ....................................................................4
2Cautions ........................................................................................5
3Quick Start ....................................................................................6
3.1 TF card and SIM card...........................................................6
3.2 Battery and Power Adapter..................................................6
3.3 Quick Start ............................................................................ 7
4Advanced Operations ................................................................. 11
4.1 Mount the Camera.............................................................. 11
4.2 Three Camera Statuses....................................................... 11
4.3 Change Camera Settings via Control Panel....................... 12
4.4 Use the Remote Control ..................................................... 15
4.5 Load or Remove a Wireless Sensor.................................... 16
4.5.1 Change the Settings via Android APP or SMS............. 17
4.5.2 User Level ..................................................................... 18
4.5.3 Set Administrator Phone Number............................... 18
4.5.4 Get On Spot Photo........................................................ 19
4.5.5 Use Android APP .......................................................... 19
4.5.6 SMS Command List...................................................... 21
5 Declaration of Conformity......................................................... 22
Appendix I: Error Code................................................................... 23
AppendixⅡ: Technical Specifications............................................ 25
AppendixⅢ: Parts List .................................................................... 26

BG500 series 1 Product Feature
1
1 Product Feature
1.1 General Description
The BG500 series security camera is a mini
MMS/GPRS alarm system, based on MMS (Multimedia
Messaging Service), GSM SMS (Short Message Service)
and GSM voice technologies. When it is activated, it will
send MMS (pictures) alerts to your mobile phone or e-mail
address immediately once the monitored region is
abnormal. Also, it has two way communication functions.
You can let the MMS/GPRS alarm system send pictures to
you any time.
The BG500 series can monitor your home, office, shop,
store, warehouse or factory by your mobile phone from
everywhere and any time.
The MMS/GPRS alarm system BG500 series security
camera can be programmed by PC programmer tool
through TF card, USB cables or SMS command. This is a
worldwide new solution.
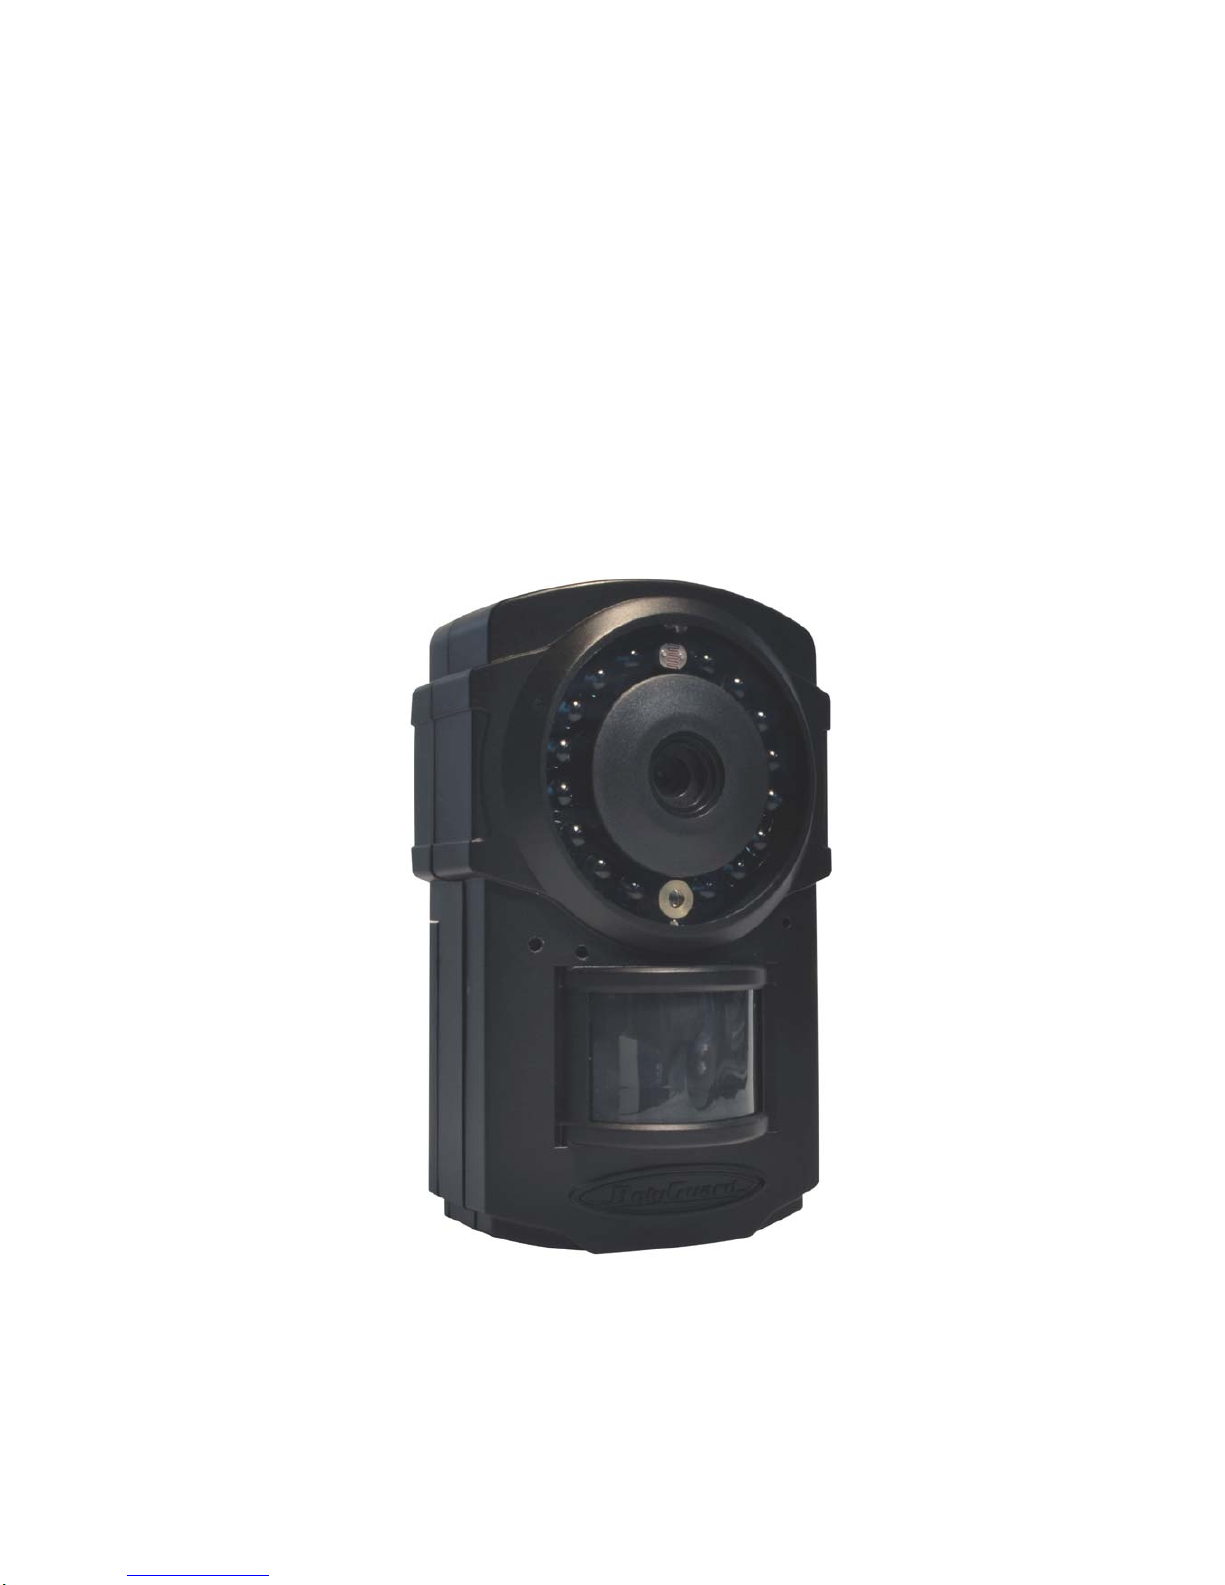
1.2Camera Overview
The camera has a LCD display for easy setup and has the
following I/O interfaces: Power/USB connector, Micro SD
card slot, and SIM card slot.
Take a few moments to familiarize with the camera
controls and displays. It is helpful to bookmark this section
and refer to it when you read through the rest of the
manual.

BG500 series 1 Product Feature
2
Fig 1 Front and side view
Fig 2 Back view
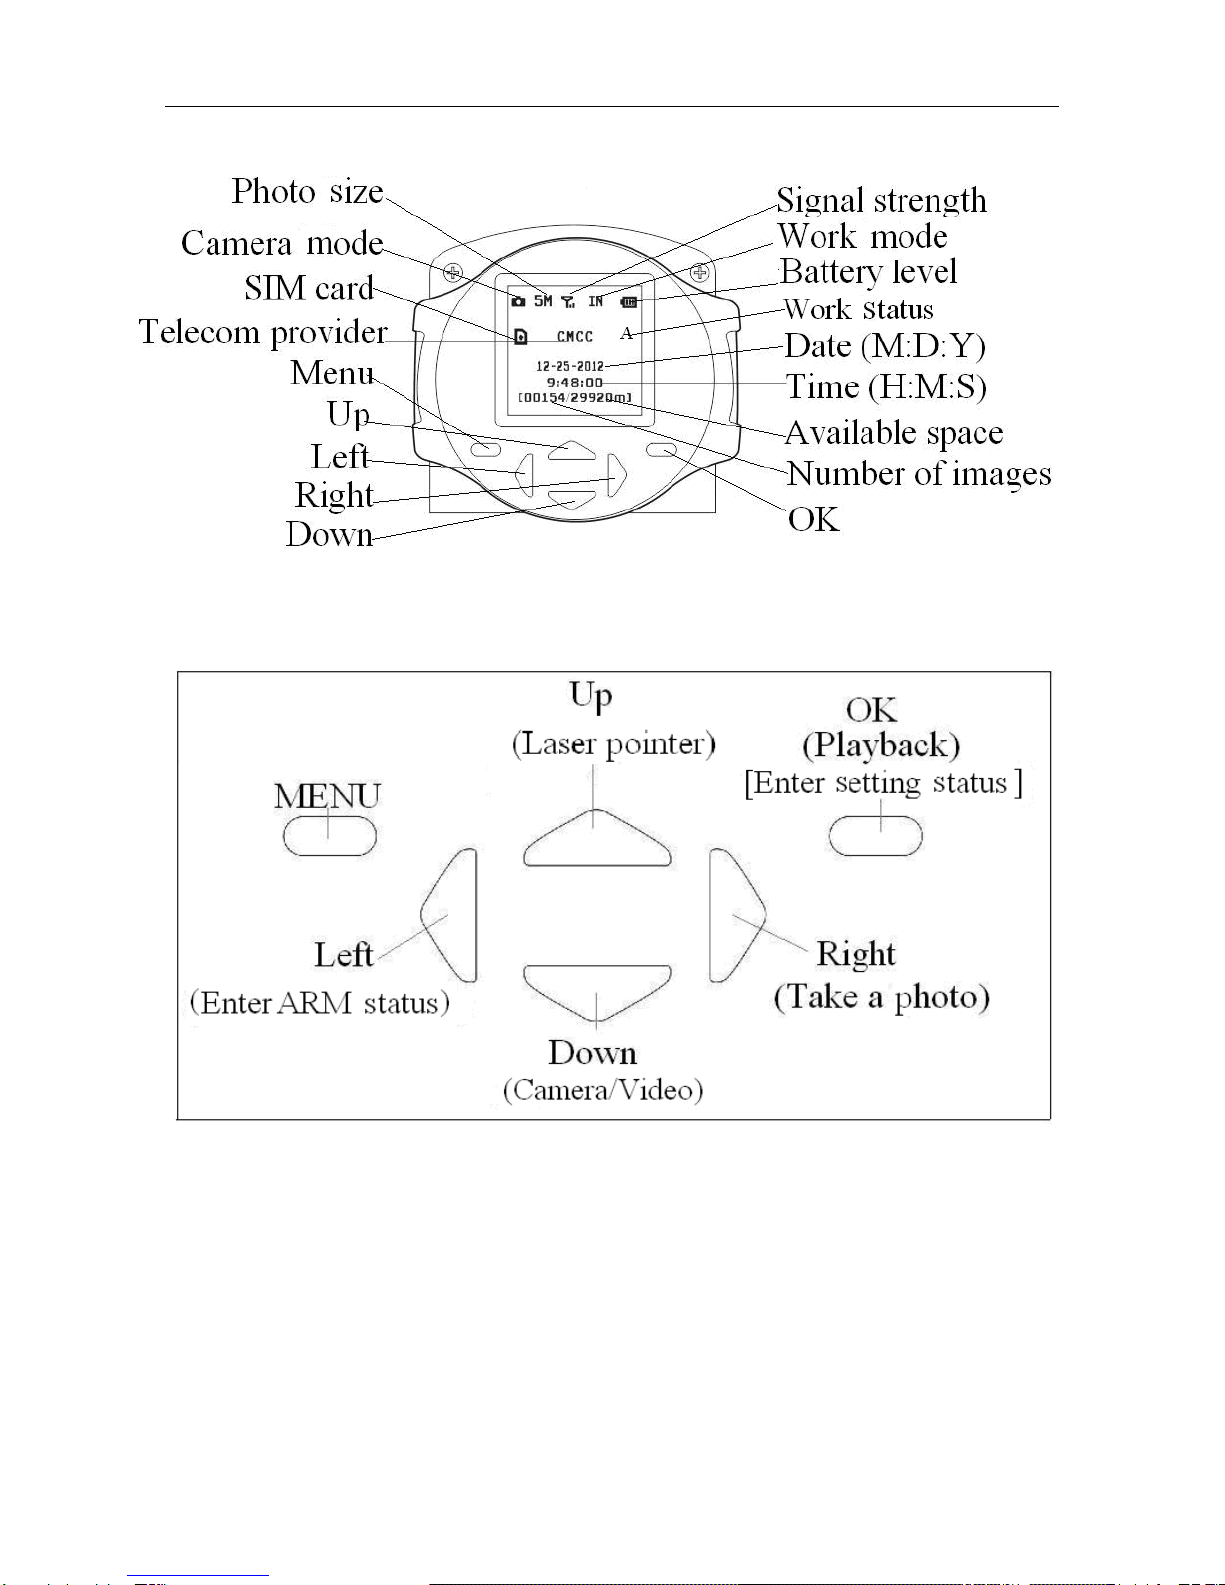
1.3Shooting Information Display
When the camera is turned on (the power switch is slid
to ON position), the camera setting information will be
displayed in the monitor.
BG500 series 1 Product Feature
3
Fig 3 Control panel
Fig 4 Key description
*The function in ( ) can work only in Setup status
*The function in [ ] can work only in Arm status.

BG500 series 1 Product Feature
4
Fig 5 Remote control
1.4Product Feature
1. This camera can take 5 megapixel photos and 720p HD
videos.
2. It uses TF card (Micro SD card) to store images and
videos.
3. It can send MMS images to the mobile phone or to an
e-mail address. It also can give a call to you when the
camera is triggered.
4. It uses integrated PIR detector to provide precise and
timely alarm.
5. It is equipped with infrared LED. So even in dark
environment, this camera can get clear B&W images.
6. It supports SMS remote control. Users can control the
camera by SMS command or calling.
7. Listen in the monitoring area: call the device number to
listen in the monitoring area. (Only pre-set number to
dial the camera)
8. Schedule monitor: user can set the camera’s working
time as the preset schedule.
9. Built-in lithium battery: Rechargeable battery ensures
operation in case of external power failure.
10. Easy installation: wireless connection, suitable for
home use.

BG500 series 2 Cautions
5
2Cautions
″Please use this product according to the law. Respect
other’s privacy. Do not monitor other people’s home or
privacy. We hold no responsibility for the illegal use of
this product.
″We don’t guarantee for the document veracity, reliability
or any content except regulated in proper laws.
″We hold no responsibility for any loss of data or income;
or any special, incidental, consequential or indirect
damages howsoever caused.
″The contents of this document are provided “as is”.
Except as required by applicable law, no warranties of
any kind, either clear or implied, including, but not
limited to the accuracy, reliability or contents of this
document. We reserve the right to revise this document
or withdraw it at any time without prior notice.

BG500 series 3 Quick Start
6
3Quick Start
3.1TF card and SIM card
Open the battery cover and
Insert TF card and SIM card
into the card slot in
accordance with the direction
shown. Follow the right
direction.
Please make sure that
your SIM card has opened the
GPRS data business before
use.
Fig 6 TF and SIM card slot
3.2 Battery and Power Adapter
Open the battery cover.
Find the spare lithium
battery connector and
insert the lithium battery.
Connect the power
adapter into the
Power/USB interface for
power supply and slide the
power switch to ON
position.
Fig 7 Battery connector and Power/USB interface
Please note that it’s recommended to use the adapter
to supply power and use the lithium battery to be a power
backup.

BG500 series 3 Quick Start
7
If your camera’s Work Mode is Indoor Mode, please
supply with power adapter.
3.3 Quick Start
STEPS:
Step1: Confirm Cards Status
Confirm the TF card and SIM card are inserted
correctly. You can see the card status on the display.
means the SIM card is inserted and works well.
Settings must be done
1) Must set an administrator number to the security
camera.
2) Must correctly set the network parameters for
MMS and e-mail.
3) Must have at least one receiving phone number
and one receiving e-mail address.
4) Must correctly set your Work Mode: Indoor (Power
adapter) or Outdoor (Lithium battery).
5) Must choose a proper Send to Mode: Phone[MMS],
Email[GPRS], Call,Local.
*[1-4 can be set on computer via profile.txt file or
mobile phone via SMS]
BG500 series 3 Quick Start
8
means no SIM card or the SIM card is not properly
inserted.
TF Capacity means how many pictures can be
stored. It should be a nonzero number.
Step2: Do the Camera Settings
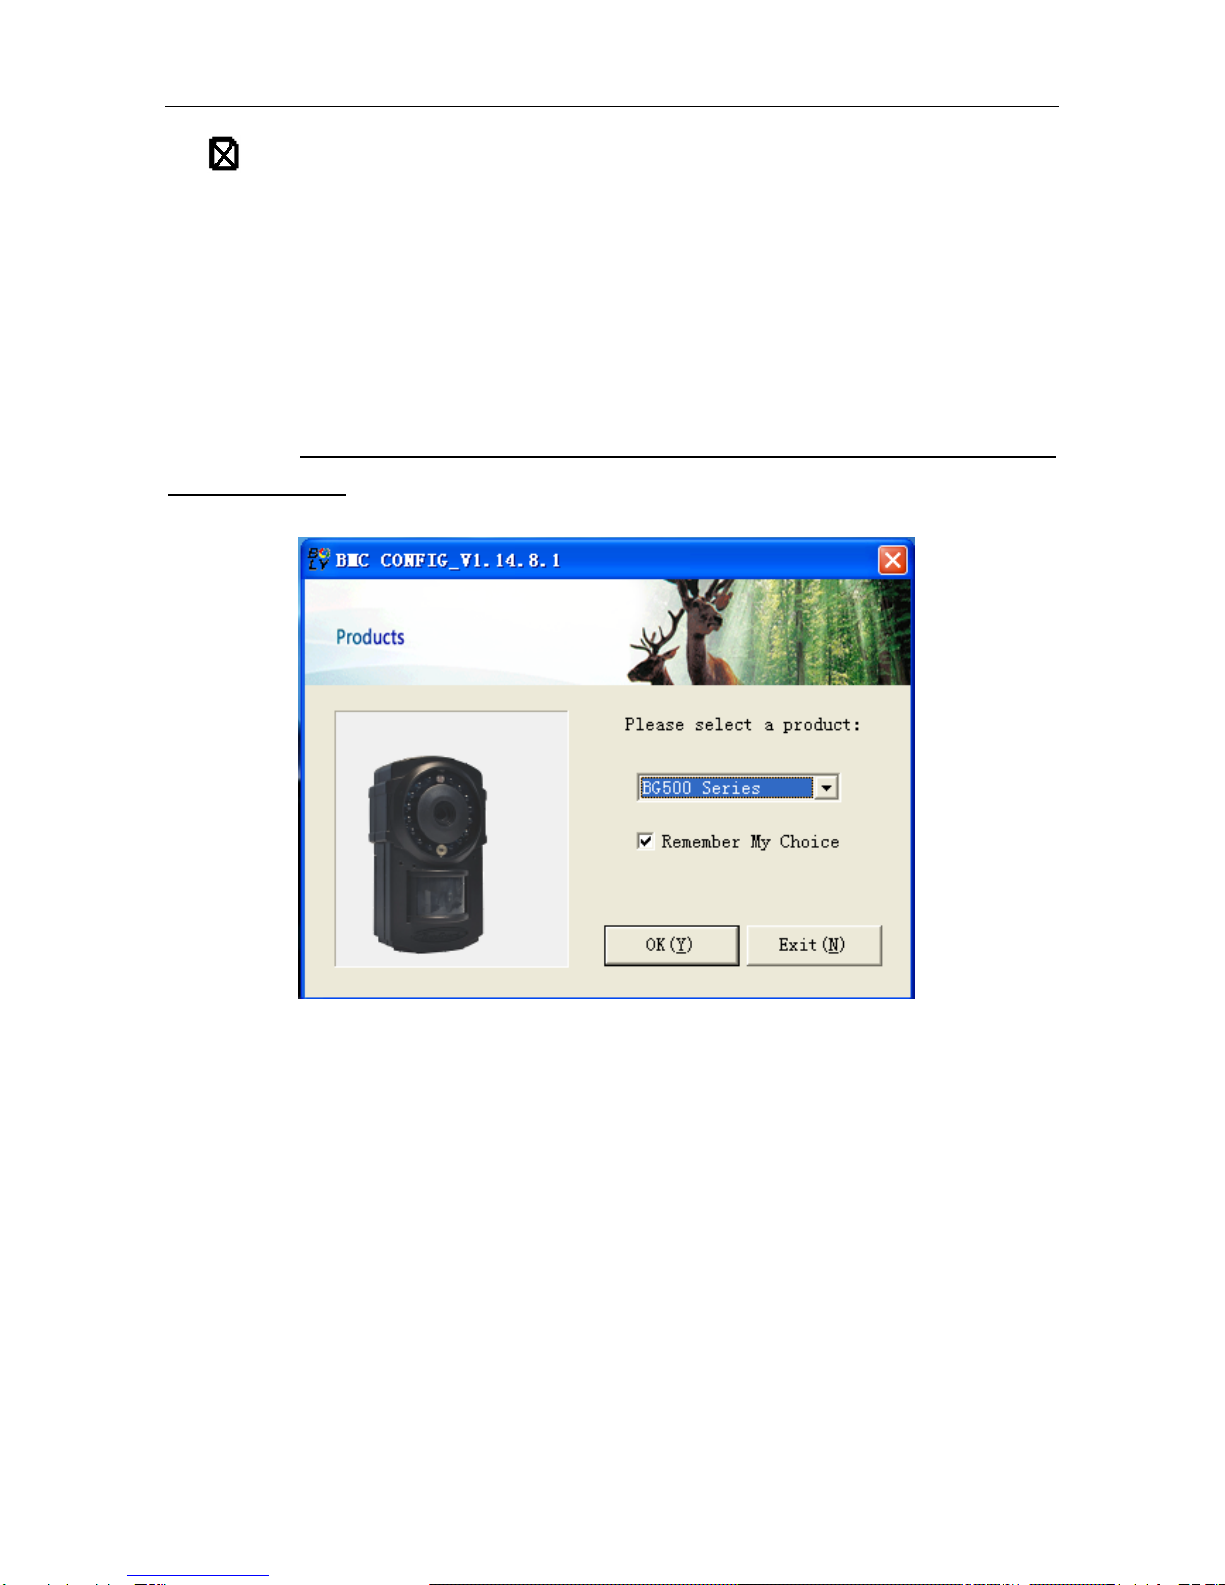
Down load the camera set up software from our
website.
The specified website is written in the last page of
the manual.
1) Open the software and select camera model:
BG500 series 3 Quick Start
9
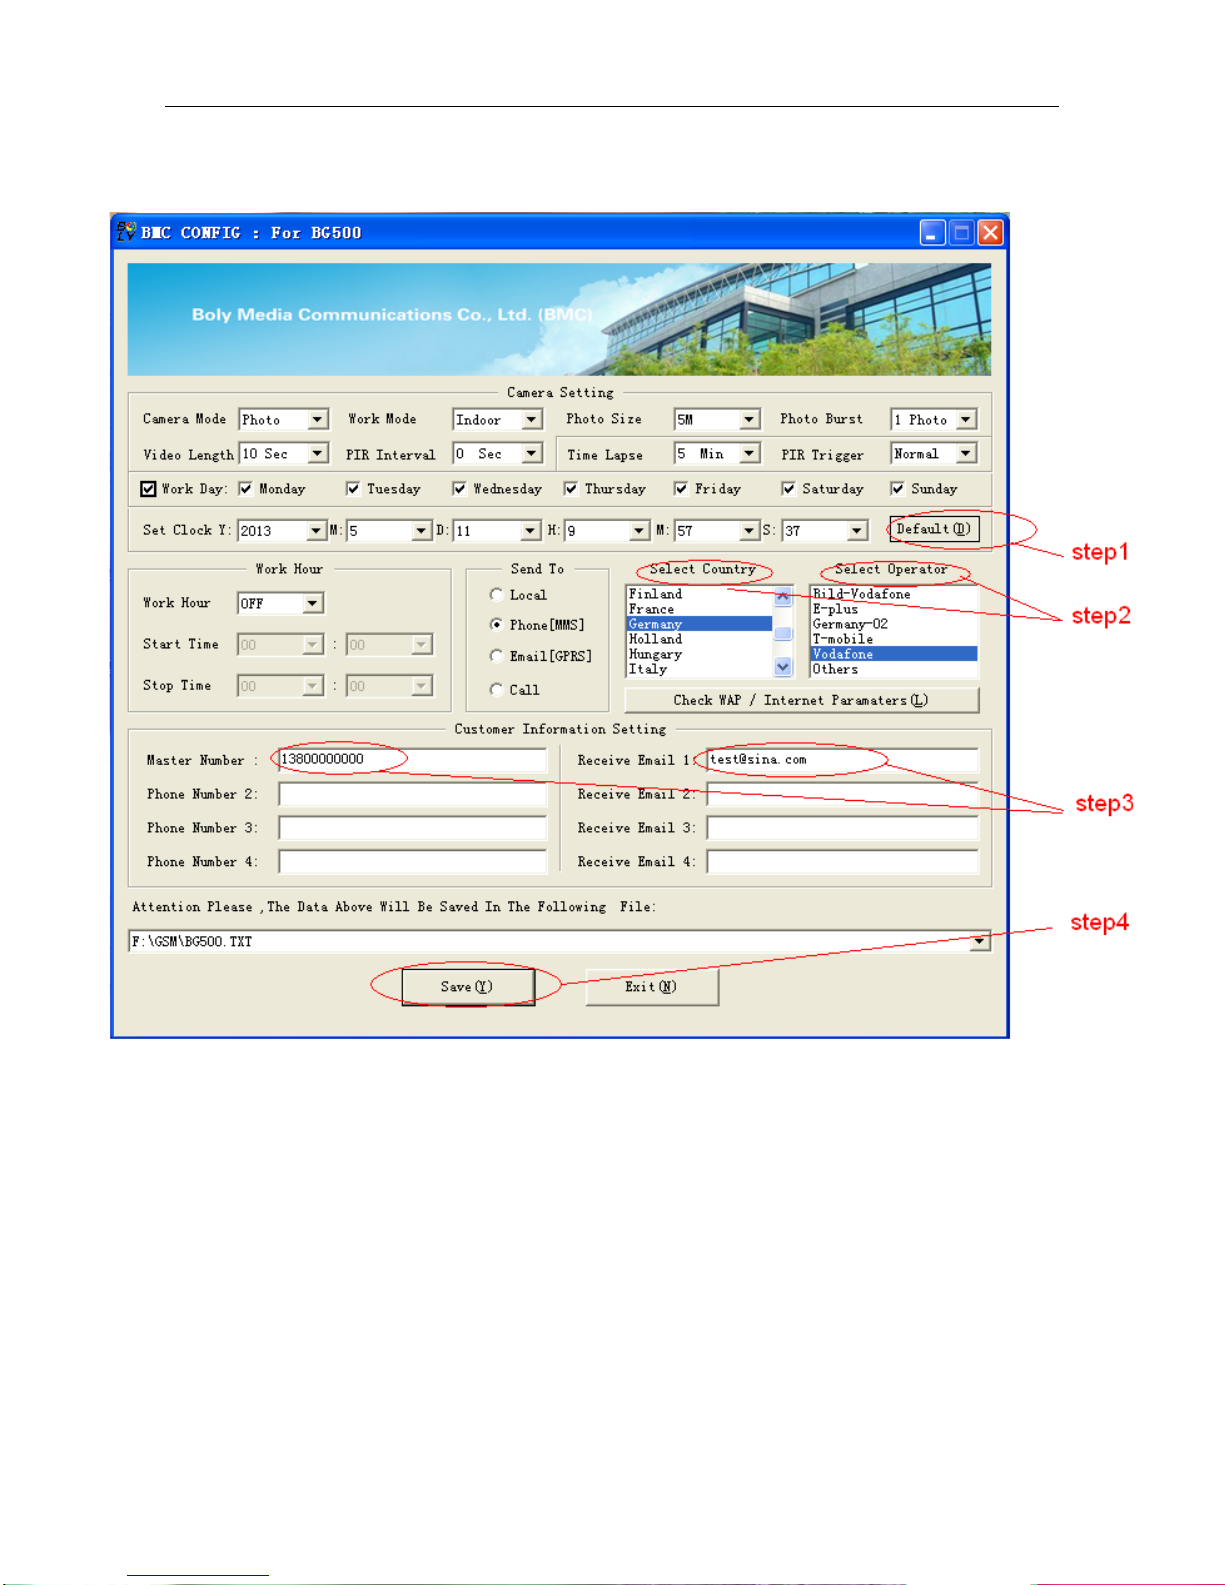
2) Set the camera parameters
For first time use we suggest you to use default
settings (step1). Then select your country and carriers
(step2) according to your SIM card and input your receive
phone number in “administrator number” and receive
e-mail address in”Receive Email 1”(step3)
After finishing settings, please save the GSM folder to
the root directory of your SD card (step4).

BG500 series 3 Quick Start
10
Step3: Manually Send a MMS or GPRS Photo
After the camera acquires the signal and the SIM card
icon appears, target an object and press “right” to take
a photo manually.
After the number of image changes, press “OK” to
playback the photos, press “▲” and “▼” to switch to
previous or next photo. Then press “MENU” and you can
see a send Phone [MMS] interface (you can press “▲” and
“▼” to enter the delete mode to delete the pictures in this
interface), press “OK” to send out the MMS.
After a few seconds, you will receive a MMS in your
phone.
Step4: Go to Arm Status
Arm status is the normal work status. If the camera is
in Setup status, you can press “left” key to switch to arm
status. To find the detail of the three status, please refer to
4.2.
Setup status Arm Status Disarm tatus
Step5: Get On Spot Images via SMS
When the camera is armed and the Send to Mode is
Phone [MMS], you can send text message “#T#” or use our
android application tools to your camera’s SIM card
number to get an on spot image.
BG500 series 4 Advanced Operations
11
4Advanced Operations
4.1Mount the Camera
Camera can be mounted on a wall or put down on any
suitable horizontal surface.
1. In accordance with a base board installing hole, make
holes on the wall with a power drill.
2.Fix base board with the host by connecting screw hole.
3. Press “▲” button to open or close the laser pointer for
helping adjust the shot area.
4.2 Three Camera Statuses
From the basic operations of the camera in the previous
chapter, we know that the camera has three basic operation
statuses:
SetupStatus ArmStatus DisarmStatus
Setup Status: you can change or check the camera settings
in this status. You also can change camera settings via SMS
when it’s in Arm status and Indoor Mode.
Arm Status: it’s the work status. When there is an intruder,
the camera will take photos and send the on shot photos to
your phone or e-mail.
Disarm Status: the camera will not be triggered and can’t
take photos in disarm status.

BG500 series 4 Advanced Operations
12
4.3 Change Camera Settings via Control Panel
To view the camera settings menu, press MENU in the
Setup status. The setup menu will be shown on the LCD.
Submenu Description
Camera
Mode There are two camera modes: Camera and
Video.
USB
Storage
After you set USB storage, your camera can
be used as a U-disk. You can edit your MMS
settings under USB mode.
Work
Mode
Indoor Mode:
You need to use the power adapter to power
supply. The lithium battery can be just a backup
for urgency. Otherwise, the lithium battery will
be quickly consumed.
Outdoor Mode:
You can use the lithium battery as power
supply for several days. But you need to set the
camera work mode as outdoor mode. It’s a
power-saving mode, so all 433 wireless sensors
including the remote control will not function in
outdoor mode.
Note: please fully charge the lithium battery
when you first use.
Set Clock Set date and time.
Photo Size You can choose 5 megapixel or 3 megapixel
for picture size.
Photo
Burst
It means Continuous Capturing Number.
This parameter affects the number of pictures
taken for each triggering in Camera mode. It has
3 values: “1 Photo” to “3 Photos”.
Video Size You can choose 1280x720(720p HD) or
640x480(VGA).

BG500 series 4 Advanced Operations
13
Video
Length It extends from 5 to 60 seconds with a step
of one second.
Time Lapse
Time lapse means the camera can capture
images or videos at a preset time intervals
regardless of whether motions are detected. The
default parameter is Off which means the timer
function is disabled. Changing this parameter to
a non-zero value turns on the Time Lapse mode,
and camera will take photos at given time
interval.
Please note that if the PIR trigger is set to
Off, then time lapse can’t be set to Off.
PIR Trigger
This parameter defines the sensitivity of the
PIR. There are four parameters: High, Normal,
Low and Off. The default value is “Normal”. The
higher degree indicates that the Camera is more
easily to be triggered by motion, taking more
pictures or recording more videos. It is
recommended to use high sensitivity degree in
room or environment with little interference
and to use lower sensitivity for outdoor or
environment with lots of interference like hot
wind, smoke, near window, etc. Furthermore,
the sensitivity of the PIR is strongly related to
the temperature. Higher temperature leads to
lower sensitivity. Therefore it is suggested to set
a higher sensitivity for high temperature
environment.
Please note that if time lapse is set to Off,
then PIR trigger can’t be set to Off.

BG500 series 4 Advanced Operations
14
PIR
Interval
This parameter means how long the PIR
(Passive Infrared motion sensor) will be
disabled after each triggering in ON mode.
During this time the PIR of the device will not
react to the motion of human (or animal). The
minimum interval is 0 second. It means the PIR
works all the time. The maximum interval is 1
hour. It means the PIR will be disabled for 1
hour after each triggering. The default value is 0
second. Press “◄” and “►” to decrease or
increase the value.
Send to
There are 4 Send to modes:
1Phone [MMS]: send images to mobile
phone.
2Email [GPRS]: send images to e-mail
address.
3Call: calling your preset phone number
when it is triggered.
4Local: just store images in the TF card, do
not send out.
You should set your receiving phone
number or your receiving e-mail address in the
BG500.TXT file to function it.
Work Day Choose the days of the week to let the
camera work.
Work Hour
Choose a time period of a day to let the
camera work. The camera will awake at the
setting time duration in a day. In the rest of the
time the camera is sleeping. Set Work Hour as

BG500 series 4 Advanced Operations
15
Off means the camera works all day.
Study Code
This camera supports to connect with
433MHz wireless device, such as infrared body
sensor, wireless door magnet, wireless smoke
detector, etc. The devices can be set as alarm
sensors of the camera. All the device should be
studied with this camera first. Please see 4.5 to
find the method to connect or remove a wireless
sensor.
Format SD
Format the SD card. All the data including
images and videos in the SD card will be
deleted.So, make sure that you have made a
backup of important data.
Default Set Restore customer settings to default values.
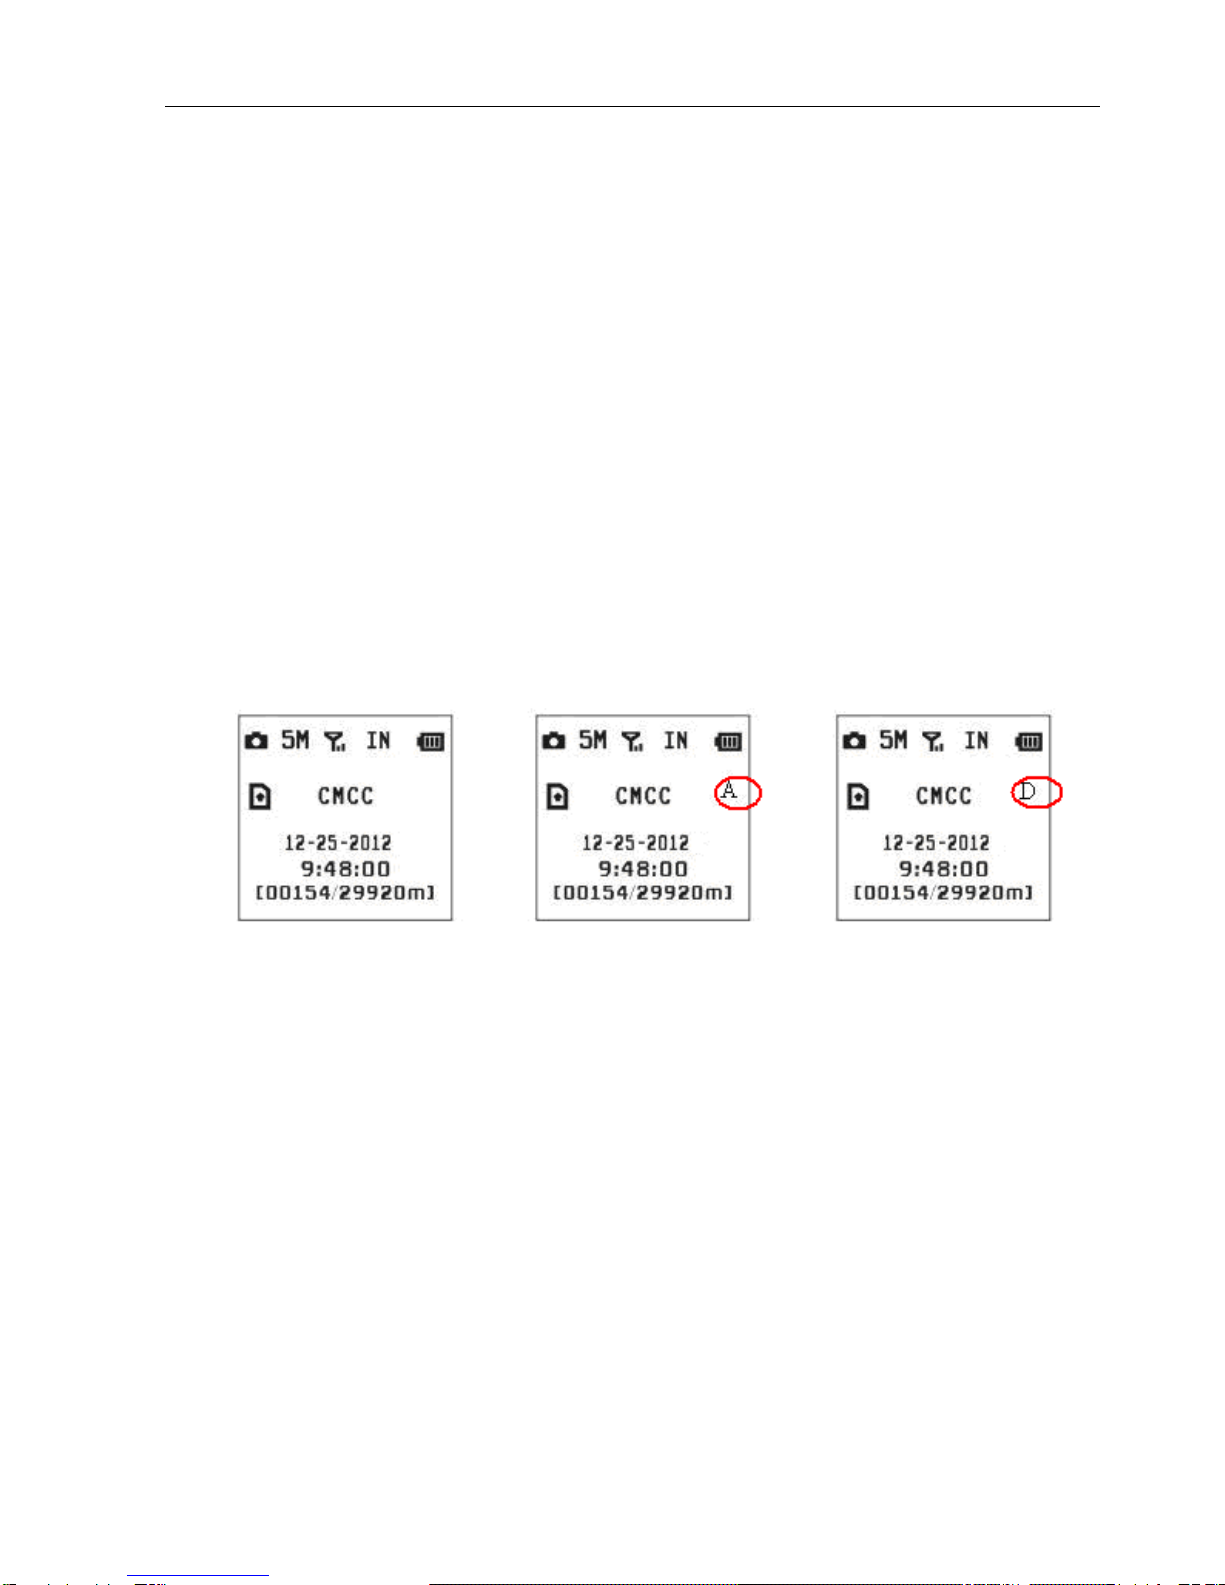
4.4 Use the Remote Control
When it’s in Indoor Mode, you can use the remote control
to easily arm (button A) or disarm (button D). Also you can
dial the emergency numbers via button C in case of
emergency. Press button B can open or close the laser (you
can easily mount the camera with the help of the laser
pointer).
Button A: Arm the camera;
Button D: Disarm the camera
Button C: Emergency call button

BG500 series 4 Advanced Operations
16
Button B: Laser pointer
Setup status Study Code Menu Study Code Menu
Method to add remote control(s) to the camera:
Enter the Setup status, press Menu and enter the Study
Code submenu. Choose “RCH”, press OK button, then press
button A of the remote control. When it's successful, there will
be a "*” before RCH.
Please note that the remote control just can be used in
Indoor Mode. In Outdoor Mode, the remote control will not
function.
4.5 Load or Remove a Wireless Sensor
Any 433MHz wireless sensor, such as infrared body
sensor, wireless door magnet, wireless smoke detector,
etc,can be set as an alarm sensor of the camera.
Method to load or remove a wireless sensor:
1. Power on the wireless sensor.
2. Enter the Setup status, press Menu and enter into the
Study Code submenu. Choose a zone, for example Zone1,
press OK button, then trigger the wireless sensor to check if
the sensor is loaded successfully. When it's successful, there
will be a "*” before the zone number.

BG500 series 4 Advanced Operations
17
Setup status Study Code Menu Study Code Menu
Wireless Sensor
3. When you want to remove the wireless sensor, please
enter the study code menu, press LEFT button to cancel the
“*”. If there is not a “*” before the zone, it means the sensor
has been removed from the camera.
4.5.1 Change the Settings via Android APP or SMS
When you are far away from your house, you can get spot
photos or change camera settings via our Android application
tools or SMS.

BG500 series 4 Advanced Operations
18
4.5.2 User Level
There are two user levels: administrator and normal
users. Each user has a different authorization level:
Functions User Level
Set administrator number Only administrator’s
password
Set administrator’s password administrator
Set camera parameters administrator
Set normal user administrator
Receive emergency calling administrator, normal user
Send SMS for on spot picture administrator, normal user
Call the camera to listen in live
voice administrator, normal user
Receive MMS when triggered administrator, normal user
Check camera status administrator, normal user
Get help information administrator, normal user
4.5.3 Set Administrator Phone Number
You should set an administrator’s phone number to
receive MMS or change settings when you first use this
camera.
Send #BG500#0000#administrator’s phone number# to
your camera’s SIM card.
The following chart shows the meaning of each field.
This manual suits for next models
2
Table of contents
Other Bolymedia Security Camera manuals


