Prestel HD-PTZ420HSU3 User manual

USER MANUAL
Prestel HD-PTZ420HSU3
1080P HD PTZ Camera

Copyright
All contents of this manual, whose copyright belongs to our corporation, cannot be cloned, copied or
translated without the permission of our corporation.
Notice
Product specifications and information which were referred to in this document are for reference only. We
may change, delete, or update any content at any time and without prior notice.
FCC NOTICE (Class A)
This product complies with Part 15 of the FCC Rules. The operation is subject to the
following two conditions: (1) this device may not cause harmful interference, and (2) this
device must accept any interference received, including interference that may cause
undesired operation.
This product has been tested and found to comply with the limits for a Class Adigital device, pursuant to Part
15 of the FCC Rules. These limits are designed to provide reasonable protection against harmful interference
in a residential installation. This equipment generates uses and can radiate radio frequency energy and, if not
installed and used in accordance with the instructions, may cause harmful interference to radio
communications. However, there is no guarantee that interference will not occur in a particular installation. If
this equipment does cause harmful interference to radio or television reception, which can be determined by
turning the equipment off and on, the user is encouraged to try to correct the interference by one or more of
the following measures:
Reorient or relocate the receiving antenna.
Increase the separation between the equipment and receiver.
Connect the equipment into an outlet on a circuit different from that to which the receiver is connected.
Consult the dealer or an experienced radio/television technician for help.
ClassAITE
Class AITE is a category of all other ITE which satisfies the class A ITE limits but not the class B ITE limits.
Such equipment should not be restricted in its sale but the following warning shall be included in the
instructions for use:
Operating this equipment in a residential environment may cause radio interference.
European Community Compliance Statement (ClassA)
This product is herewith confirmed to comply with the requirements set out in the Council
Directives on the Approximation of the laws of the Member States relating to
Electromagnetic Compatibility Directive 2014/30/EU.
Note
Warning

1080P HD PTZ Camera User Manual
Catalogue
1Safety Precautions1
2Packing List1
3Quick Start1
4Video Format3
5About Product3
5.1 Features3
5.2 Specifications3
5.3 Interface and Switch5
5.4 Dimension6
5.5 Installation7
5.6 Remote Control8
6GUI Settings9
6.1 Menu9
6.2 Exposure9
6.3 Color9
6.4 Image10
6.5 Display10
6.6 P/T/Z Setting10
6.7 Setting11
6.8 Version11
6.9 Default11
7WEB Settings11
7.1 Access Camera11
7.2 Control Camera11
7.3 Video Settings13
7.4 Image Settings13
7.5 Audio Settings14
7.6 System Settings14
7.7 Network Settings14
7.8 Device Information15
7.9 Download Upgrade Program15
8Troubleshooting15

1080P HD PTZ Camera User Manual
1
1Safety Precautions
During the installation and use of the
equipment, all electrical safety regulations of
the country and region of use must be strictly
observed.
Please use the power adapter that comes
standard with this product.
Please do not connect multiple devices to the
same power adapter (exceeding the capacity of
the adapter may generate excessive heat or
cause a fire).
Do not rotate head of the camera by hand,
otherwise it may cause mechanical failure.
When installing this product on a wall or
ceiling, secure the device securely. When
installing, make sure that there are no obstacles
within the rotation range of the gimbal; do not
turn on the power until all installations are
completed.
To avoid heat build-up, keep ventilation around
the device smooth.
If the device emits smoke, smells, or makes
noises, please turn off the power immediately
and unplug the power cord, and contact the
dealer in time.
This device is not waterproof, please keep the
device dry.
This product has no user serviceable parts,
damage caused by disassembly by the user is
not covered by the warranty.
Specific frequencies of electromagnetic field
may affect the image of the camera!
2Packing List
Name
Quantity
Camera
1
Power Adapter
1
Power Cable
1
RS232 Cable
1
USB Cable (Optional)
1
Remote Control
1
User Manual
1
3Quick Start
1) Please check connections are correct before starting.
Notice

1080P HD PTZ Camera User Manual
LINEIN LINEOUT
SYSTEM
SELECT RS485
IN RS232 OUT
LAN HDMI 3G-SDI USB 3.0 DC12V OFF
ON
Computer, TV,VCR wi t h
audio input jack,
Routers or Switches,
Speaker Microphone,etc.
RS232 Cable (Supplied)
RS232 Cable (Not Supplied)
RS485 Cable (Not Supplied)
3.5mm AudioCable(Not Supplied)
HDMI Cable(Not Supplied)
DC12VIN Power Cable (Supplied)
AC Ad apter (Supplied)
Network Cable(Not Supplied)
3G-SDI Cable (Not Supplied)
USBCable (Optional)

1080P HD PTZ Camera User Manual
3
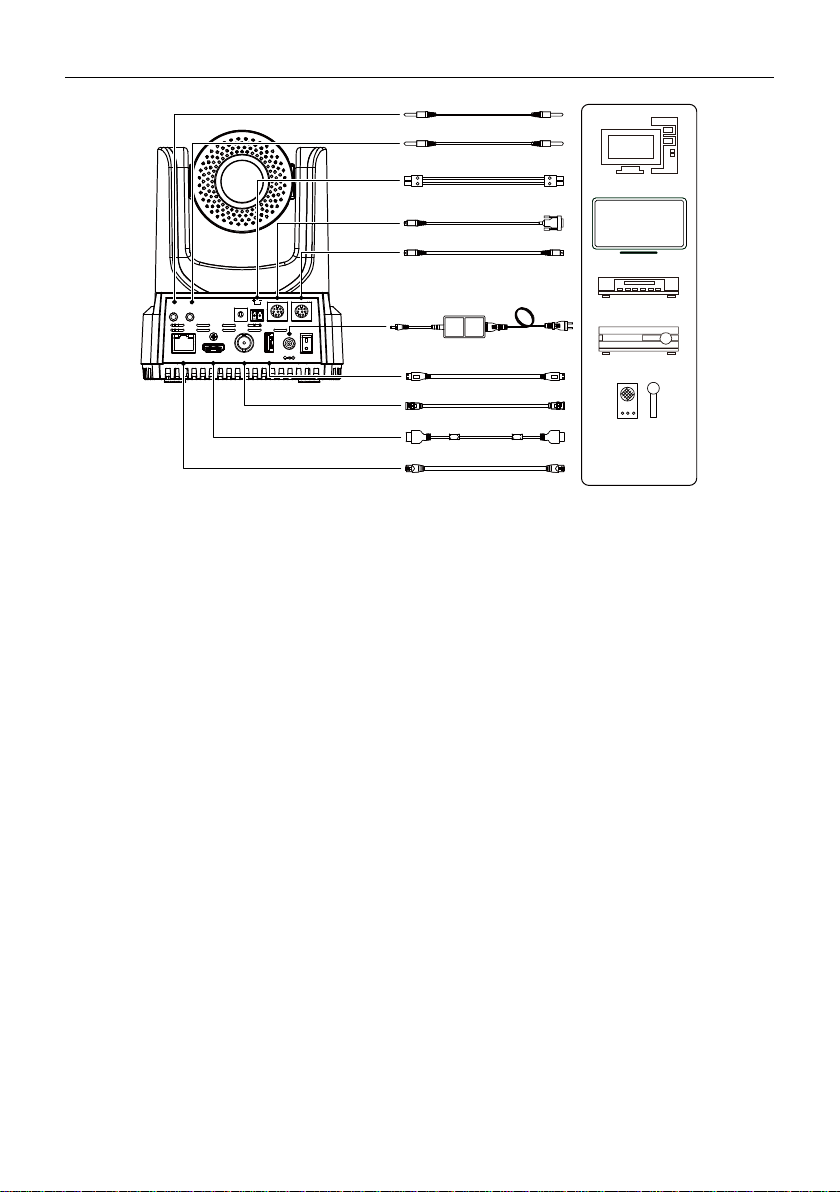
2) Connect the power adapter to the power
connector on the rear panel of the camera. The
power indicator on the front panel of the
camera is on.
3) After the camera is powered on, it starts to
initialize, right up to the limit position, and
then both horizontal and vertical go to the
middle position, the motor stops running, and
the initialization is completed.
(Note: If preset 0 is saved, PTZ will be move
to preset 0)
4Video Format
Video Format
0
1080P60
8
-
1
1080P50
9
-
2
-
A
-
3
-
B
-
4
720P60
C
-
5
720P50
D
-
6
1080P30
E
-
7
1080P25
F
-
5About Product
5.1 Features
60.7° Wide-angle Lens + 20x Optical Zoom
60.7° high-quality ultra-wide-angle lens, optical
zoom up to 20x, support 16x digital zoom.
1080P Full HD
Using 1/2.8-inch high-quality HD CMOS sensor
with effective 2.07 million pixels, it can achieve
high-quality images with a maximum resolution of
1920x1080.
New ISP Image Processing Algorithm
The new generation of ISP image processing
algorithm provides more complete white balance
and automatic exposure functions, which
significantly improves the image output
performance of the camera, and the imaging effect
is also better. Widely used in education recording
and broadcasting, distance education, video
conferencing, live broadcasting, broadcasting and
other industries.
Leading Auto Focus Technology
Using advanced focusing algorithm, the lens can
focus quickly, accurately and stably.
Low Light
The application of 2D and 3D noise reduction
algorithm greatly reduces image noise. Even under
the condition of ultra-low illumination, it still keep
the picture clean and clear, and the SNR of image
is as high as 55dB.
Multiple Interfaces
Support HDMI and 3G-SDI interface, effective
transmission distance of 3G-SDI is up to 150
meters (1080P30). HDMI, 3G-SDI, LAN can
output three HD digital signals at the same time.
Remote Control
Through the RS232 and RS485 serial ports, the
camera can be controlled remotely.
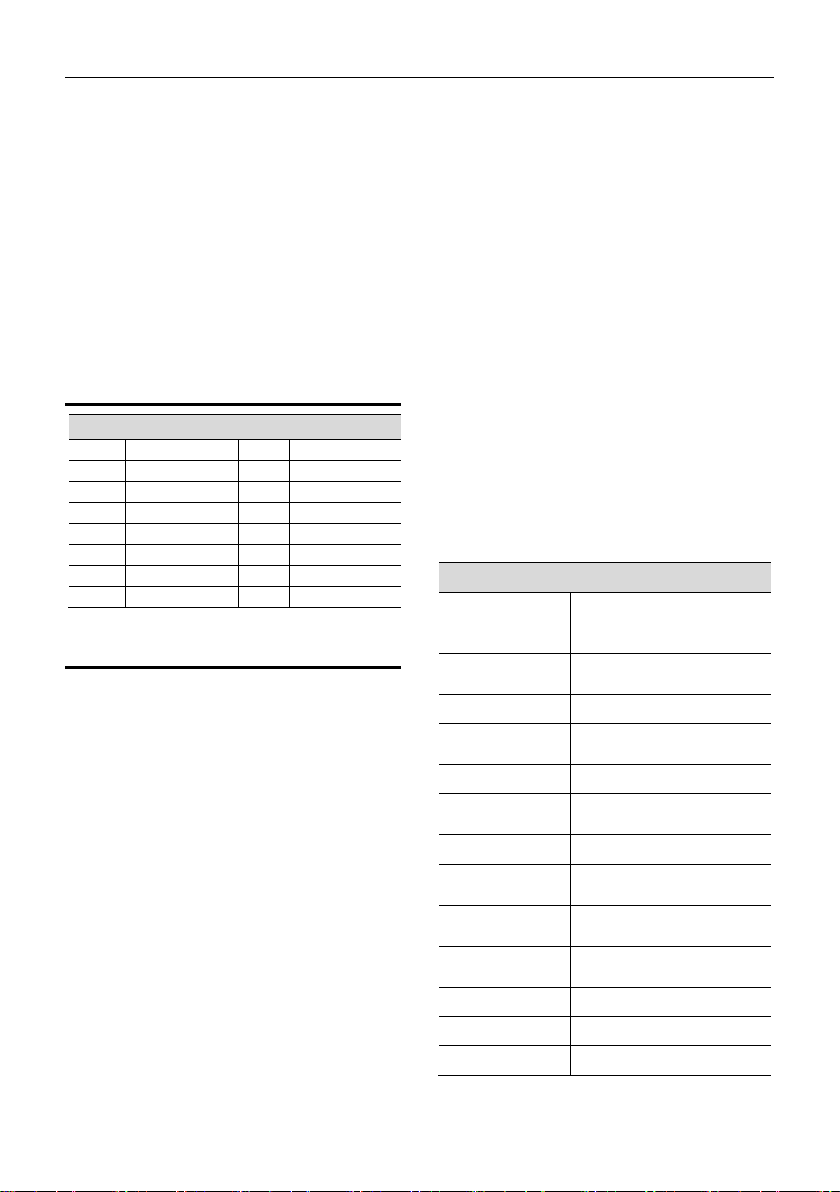
5.2 Specifications
Camera
Signal System 1080P60, 1080P50,
1080P30, 1080P25, 720P60,
720P50
Sensor
1/2.8 inch, CMOS,
Effective pixels: 2.07M
Scanning Mode Progressive
Lens
20x, f = 4.42mm ~ 88.5mm,
F1.8 ~ F2.8
Digital Zoom 16x
Minimum
Illumination
0.5 Lux @ (F1.8,AGC ON)
Shutter 1/30s ~ 1/10000s
White Balance
Auto, VAR, Manual,
One Push, Indoor, Outdoor
Backlight
Compensation
Support
Digital Noise
Reduction
2D & 3D Digital Noise
Reduction
SNR ≥55dB
Horizontal FOV 60.7° ~ 3.36°
Vertical FOV 34.1° ~ 1.89°

1080P HD PTZ Camera User Manual
4
Pan Angle ±170°
Tilt Angle -30° ~ +90°
Pan Speed 1.7° ~ 100°/s
Tilt Speed 1.7° ~ 69.9°/s
Image Flip Support
Image Freeze Support
Preset Position 255
Preset Accuracy 0.1°
Audio Features
Microphone
Array
Built-in dual microphones,
100Hz to 16KHz frequency
response
Audio Input Support LINE IN audio input
Audio Output
Support LINE OUT, HDMI,
USB and other audio output
USB Features
Operate System Windows 7/8/10, Mac OS X,
Linux, Android
Color System /
Compression
YUY2/MJPEG/H.264
USB Audio Support
USB Video
Protocol
UVC 1.1/UVC 1.5
UVC PTZ
Control
Support
Network Features
Video
Compression
H.264/H.265
Video Stream
First Stream,
Second Stream
First Stream
Resolution
1920x1080, 1280x720,
1024x576, 960x540,
640x480, 640x360
Second Stream
Resolution
1280x720, 1024x576,
720x480, 640x360, 480x272,
320x240, 320x180
Video Bit Rate 32Kbps ~ 20480Kbps
Bit Rate Control CBR, VBR
Frame Rate 1fps ~ 60fps
Audio
Compression
AAC
Audio Bit Rate 96Kbps, 128Kbps, 256Kbps
Protocols TCP/IP, HTTP, RTSP,
ONVIF, RTMP/RTMPS,
DHCP, SRT, Multicast, etc.
Interfaces
LINE IN
Interface
1 x LINE IN: 3.5mm Audio
Interface
LINE OUT
Interface
1 x LINE OUT: 3.5mm
Audio
Interface
Communication
Interface
1 x RS485: 2pin phoenix
port, Max Distance:
1200m, Protocol: VISCA/
Pelco-D/Pelco-P
1 x RS232 IN: 8pin Min
DIN, Max Distance: 30m,
Protocol: VISCA/Pelco-D/
Pelco-P
1 x RS232 OUT: 8pin Min
DIN, Max Distance: 30m,
Protocol: VISCA network
use only
Network Interface
1 x LAN: 10M/100M
Adaptive Ethernet Port
HDMI Interface 1 x HDMI: Version 1.3
3G-SDI Interface 1 x 3G-SDI: BNC type,
800mVp-p, 75
Ω
. Along to
SMPTE 424M standard
USB Interface 1 x USB 3.0: Type A
Power Jack JEITA type (DC IN 12V)
General Specifications
Input Voltage DC 12V
Input Current Max. 1.2A
Operating
Temperature
0°C ~ 40°C
Storage
Temperature
-40°C ~ 60°C
Power
Consumption
Max. 15W
Dimension
169mm x 141.5mm x
176mm
Net Weight About 1.5Kg
Product specifications and parameters
are subject to change without notice.
Note

1080P HD PTZ Camera User Manual
5
5.3 Interface and Switch
Item Description
1 LINE IN Interface
2 LINE OUT Interface
3 System Select Switch
4 RS485 Interface
5 RS232 IN Interface
6 RS232 OUT Interface
7 LAN Interface
8 HDMI Interface
9 3G-SDI Interface
10 USB 3.0 Interface
11 DC 12V Interface
12 Power Switch
LINEIN LINEOUT
SYSTEM
SELECT RS485
IN RS232 OUT
LAN HDMI 3G-SDI USB 3 . 0 DC12V OFF
ON
1
9
2 3 4 5 6
7810 11 12

1080P HD PTZ Camera User Manual
6
5.4 Dimension
STANDBY POWER
176
140
Ø141.5
151
169
141.5

5.5 Installation
The installation diagram is for reference only. The brackets and screws are not standard.
For packing accessories, please refer to the actual product.
Wall-Mount
1
2
3
4
Ceiling-Mount
1
2
3
4
Note

1080P HD PTZ Camera User Manual
8
5.6 Remote Control
Key Description
1. Standby Key
Press to enter standby mode
2. Number Key
Press to set preset or call preset
3. *Key
Use with other keys
4. PRESET Key
Set preset: [PRESET] + Number key (0-9)
5. HOME Key
Confirm selection or press to turn PTZ back to the
middle position
6. Return Key
Press to return to the previous menu
7. ZOOM Key
SLOW: Zoom In [+] or Zoom Out [-] slowly
FAST: Zoom In [+] or Zoom Out [-] fast
8. L/R SET Key
Standard: Simultaneously press L/R SET + 1
Reverse: Simultaneously press L/R SET + 2
9. FOCUS Key
Auto/Manual/Far/Near focus
10. CAMERA SELECT Key
Press to select and control the camera
11. # Key
Use with other keys
12. IR Remote Control Key
[*]+[
#
]+[F1]: Address 1
[*]+[#]+[F2]: Address 2
[*]+[#]+[F3]: Address 3
[*]+[
#
]+[F4]: Address 4
13. RESET Key
Clear preset position: [RESET] + Number key (0-
9)
14. PTZ Control Key
PTZ moved according to the arrow indicates
15. MENU Key
Press to enter or exit OSD Menu
16. BACKLIGHT Key
Backlight ON/OFF: Press repeatedly to enable or
disable the backlight compensation.
NOTE:
Effective only in auto exposure mode.
If there is a light behind the subject, the
subject will become dark, press the backlight
key to enable the backlight compensation.
Press again to disable this function.
17. P/T RST (PTZ Reset) Key
PTZ starts to self-test after pressed it
Shortcut Set
[*]+[
#
]+[1]: OSD menu default English
[*]+[#]+[3]: OSD menu default Chinese
[*]+[#]+[4]: Display current IP address
[*]+[#]+[6]: Quickly recover the default
[*]+[#]+[8]: View the camera version
[*]+[#]+[9]: Quickly set up inversion
[*]+[
#
]+[MANUAL]: Restore default IP address
0
987
654
3
21
#
1 2 43
F2 F3 F4
PRESET
CAMERA SELECT
STD REV
RESET
MENU
SLOW
BACKLIGHT
FOCUS
ZOOM FAST
F1
/ /
1
9
2
3
4
5
6
7
8
10
11
12
13
14
15
16
17

1080P HD PTZ Camera User Manual
9
6GUI Settings
6.1 Menu
Press [MENU] key to display the main menu on
the normal screen, using arrow key to move the
cursor to the item to be set. Press the [HOME] key
to enter the corresponding sub-menu.
Menu
ENG/中文
ENG
Video Format
1080P60
Style
Default
Exposure
->
Color
->
Image
->
Display
->
PTZ Setting
->
Setting
->
Version
->
Default
->
[MENU] Return / [HOME] Enter
ENG/中文: ENG, 中文.
Video Format: 1080P60, 1080P50, 1080P30,
1080P25, 720P60, 720P50.
Style: Default, Cold, Warm, Clear, Soft, User1,
User2, User3.
6.2 Exposure
Move the main menu cursor to [Exposure],
and press [HOME] key enter the exposure
page, as shown in the following figure.
Exposure
>
AE
Auto
Flicker
50Hz
Expcomp Mode
On
Expmode
2
Backlight
Off
Gain Limit
15
DRC Mode
Off
[MENU] Return / [HOME] Enter
AE: Auto, Manual, Iris Priority, Shutter Priority,
Bright Priority.
Flicker: Off, 50Hz, 60Hz (Effective only inAuto,
Iris Priority, Bright Priority mode).
Expcomp Mode: On, Off (Effective only inAuto,
Iris Priority mode).
Expmode: -7~7 (Effective only in Expcomp Mode
to On).
Backlight: On, Off (Effective only in Auto, Iris
Priority mode).
Bright: 0~99 (Effective only in Bright Priority
mode).
Gain Limit: 0~32 (Effective only inAuto, Iris
Priority, Bright Priority mode).
Iris: F1.8, F2.0, F2.4, F2.8, F3.4, F4.0, F4.8, F5.6,
F6.8, F8.0, F9.6, F11, Off (Effective only in
Manual, Iris Priority mode).
Shutter: 1/30, 1/50, 1/60, 1/90, 1/100, 1/125,
1/180, 1/250, 1/350, 1/500, 1/725, 1/1000, 1/1500,
1/2000, 1/3000, 1/4000, 1/6000, 1/10000 (Effective
only in Manual, Shutter Priority mode).
Gain: 0~31 (Effective only in Manual, Shutter
Priority mode).
DRC Mode: Manual, Auto, Off.
DRC: 0~14 (Effective only in DRC Mode to
Manual).
6.3 Color
Move the main menu cursor to [Color], and press
[HOME] key enter the color page, as shown in the
following figure.
Color
>
AWB
Auto
Sens
Low
R-Tuning
0
B-Tuning
0
Hue
50
Saturation
100
[MENU] Return / [HOME] Enter
AWB: Auto, VAR, Manual, One Push, Indoor,
Outdoor.
Sens: Low, Middle, High.
R-Gain: 0~1023 (Effective only in Manual,
One Push mode).
B-Gain: 0~1023 (Effective only in Manual,

1080P HD PTZ Camera User Manual
10
One Push mode).
R-Tuning: -128~128 (Effective only in Auto,
Temp, One Push mode).
B-Tuning: -128~128 (Effective only in Auto,
Temp, One Push mode).
Hue: 0~99.
Saturation: 0~200.
Temp: 2000 ~ 8500 (Effective only in Temp
mode).
6.4 Image
Move the main menu cursor to [Image], and press
[HOME] key enter the image page, as shown in the
following figure.
Image
>
Brightness
50
Contrast
50
Sharpness Mode
Auto
Gamma Mode
Manual
Gamma
Ext
NR-2D Mode
Auto
NR-3D Mode
Auto
[MENU] Return / [HOME] Enter
Brightness: 0~99.
Contrast: 0~99.
Sharpness Mode: Manual, Auto.
Sharpness: 0~25 (Effective only in Sharpness
Mode to Manual).
Gamma Mode: Manual, Auto.
Gamma: Ext, 0.45, 0.5, 0.54, 0.56, 0.63 (Effective
only in Gamma Mode to Manual).
NR-2D Mode: Manual, Auto.
NR-2D: 0~99 (Effective only in NR-2D Mode to
Manual).
NR-3D Mode: Manual, Auto.
NR-3D: 0~15 (Effective only in NR-3D Mode to
Manual).
6.5 Display
Move the main menu cursor to [Display], and press
[HOME] key enter the display page, as shown in
the following figure.
Display
Display
>
OSD-Dir
0
HDMI Mode
HDMI
SDI Mode
Level A
Flip-H
Off
Flip-V
Off
Freeze
Off
[MENU] Return / [HOME] Enter
OSD-Dir: 0, 90, 180, 270.
HDMI Mode: HDMI, DVI.
SDI Mode: Level A, Level B.
Flip-H: On, Off.
Flip-V: On, Off.
Freeze: On, Off.
6.6 P/T/Z Setting
Move the main menu cursor to [P/T/Z Setting], and
press [HOME] key enter the P/T/Z setting page, as
shown in the following figure.
P/T/Z Setting
>
AF-Sense
High
AF-Zone
Front
Focus Limit
Off
LR Mode
STD
Motion Sync
Off
Horizontal Speed
23
Vertical Speed
19
Zoom Speed
7
PTbyZoom
On
[MENU] Return / [HOME] Enter
AF-Sense: High, Normal, Low.
AF-Zone: Front, Top, Center, Bottom.
Focus Limit: On, Off.
Near Focus Limit: 1M, 1.5M, 2M, 3M, 4M, 5M,
6M, 8M, 10M, 15M, 20M (Effective only in Focus
Limit to On).
Far Focus Limit: 15M, 20M, Infinity (Effective
only in Focus Limit to On).
LR Mode: STD, REV.
Motion Sync: On, Off.
Horizontal Speed: 0~23.
Vertical Speed: 0~19.

1080P HD PTZ Camera User Manual
11
Zoom Speed: 0~7.
PTbyZoom: On, Off.
6.7 Setting
Move the main menu cursor to [Setting],
and press [HOME] key enter the setting page,
as shown in the following figure.
Setting
>
Visca Addr
1
Visca Mode
Series
Baud Rate
9600
DHCP
Off
IPAddr
192.168.100.8
8
MAC
d4e08e548d13
[MENU] Return / [HOME] Enter
Visca Addr: 1~7 (Effective only in VISCA
protocol).
Visca Mode: Serial, Paral.
Baud Rate: 2400, 4800, 9600, 19200, 38400,
57600, 115200.
DHCP: On, Off.
IPAddr: 192.168.100.88.
MAC: d4e08e548d13.
6.8 Version
Move the main menu cursor to [Version], and press
[HOME] key enter the version page, as shown in
the following figure.
Version
Main
X8.02.15
AF
14.04.04
Date
2022-08-18
Code
VF1
[MENU] Return / [HOME] Enter
Main: Display the version number of the main
program of the camera.
AF: Display the camera autofocus version number.
Date: Display the burning date of the main
program version of the camera.
Code: Display the camera code.
6.9 Default
Move the main menu cursor to [Default], press
[HOME] key enter default page, as shown in the
following figure.
Default
>
Reset
No
[MENU] Return / [HOME] Enter
Reset: Yes, No.
GUI menu and parameters are subject
to change without notice.
7WEB Settings
7.1 Access Camera
Access http://192.168.100.88 to pop up the login
window, then input username (default: admin) and
password (default: admin). After login, it will show
as below:
7.2 Control Camera
All pages include two menu bars:
Real time monitoring: displaying video image
Parameter setup: with function buttons.
A. Video Viewing Window
Video viewing window must be same as video
resolution, the bigger the resolution is, the bigger
the playing area is. Double click viewing window,
will show full-screen, double click again, will
return to initialized size.
Status bar in viewing window shown as below:
Note
Video
Image
Audio
System
Network
ZoomIn ZoomOut
Focus In FocusOut
23
19
Pan Speed
Tilt Speed
Live
Information
4:48

1080P HD PTZ Camera User Manual
12
1) Video playback pause button: control real-time
video pause, stop the last picture, click
recoverable video again.
2) Audio control buttons: can adjust the volume
or set silent mode.
3) Full screen switch button.
B. PTZ Setup
1) Pan and Tilt Control
Up, Down, Left and Right arrows and the home
button allow you to manually drive the camera to
the desired position.
2) Zoom
Zoom In and Zoom Out buttons allow for wide or
narrow view of the space.
3) Focus
Focus In and Focus Out buttons allow for fine
manual focus adjustment if the camera has any
problems auto focusing on the difficult object.
4) PTZ Speeds
Pan speed can be set at any rate between 1 ~ 24,
Tilt speed can be set at any rate between 1 ~ 20.
Zoom and Focus speeds can be set at any rate
between 1 ~ 7.
5) PTZ Presets
After manually setting up a shot that you would
like to return to later, you can save presets for
quick recall of these positions. Type a number
between 0 and 254 into the Preset box. Click the
“Set” button to save the current location with that
preset number. Click the “Call” button to cause the
camera to return to that position. This enables
smooth, quick and convenient control without the
need to manually drive the camera.
You can set up preset that user want as below.
Method: Type preset number into the Preset box.
Preset: Optional items: 0 ~ 254.
6) PTZ/OSD Dropdown
From the dropdown menu, clicking the OSD
option will open the on-screen display menu of the
camera giving you control from within the IP
interface.
C. Language Selection
Click either “Chinese”, “English” or “Russian” to
change the language of the webpage.
Zoom In Zoom Out
FocusIn FocusOut
23
19
Pan Speed
Tilt Speed
7
Zoom Speed
7
FocusSpeed
Set Call
Preset
PTZ Back
Set Call
Preset
Language
中文(简)
Русский
English

1080P HD PTZ Camera User Manual
13
7.3 Video Settings
1) Video Format
Support Dial Priority.
2) Low Latency Mode
Turn On/Off low latency mode, the OSD function
will not be enabled after it is turned on.
3) Encode Level
Support baseline, mainprofile, highprofile and svc-
t four levels.
4) Encode Protocol
Support H.264 and H.265 protocols.
5) Resolution
First stream support 1920x1080, 1280x720,
1024x576, 960x540, 640x480, 640x360. Second
stream support 1280x720, 1024x576, 720x480,
640x360, 480x272, 320x240, 320x180; The bigger
resolution is, the clearer the image will be, more
network bandwidth will be taken.
6) Bit Rate
The user can specify the bit rate. Generally
speaking, the larger of the bit rate, the clearer of
the image. However, the configuration of the bit
rate needs to be combined with the network
bandwidth. When the network bandwidth is narrow
and the bit rate is configured larger, the video
stream cannot be transmitted normally, and the
visual effect is worse.
7) Frame Rate
User can specify the size of the frame rate,
generally, the frame rate greater, the image more
smooth; Frame rate is smaller, the more sense of
beating.
8) I Key Frame Interval
Set interval between 2 I frame, the bigger interval
is the response will be lower from viewing
window.
9) Bit Rate Control
Code stream control way:
CBR (Constant Bit Rate): Video coder will be
coding according to preset speed.
VBR (Variable Bit Rate): Video coder will adjust
the speed based on preset speed to gain the best
image quality.
10)Slice Split Enable
Enable or disable slice split function.
11)Slice Size
Set the size of slice.
7.4 Image Settings
Video Settings
First stream
Encode Level
mainprofile
23
SliceSize
H264
EncodeProtocol
1920x1080
Resolution
8192
BitRate
60
FrameRate
50
I Key Frame Interval
CBR
Bit RateControl
off
SliceSplit Enable
Submit Cancel
Secondstream
mainprofile
Encode Level
23
SliceSize
H264
EncodeProtocol
640x360
Resolution
1024
BitRate
30
FrameRate
30
I Key Frame Interval
CBR
Bit RateControl
off
SliceSplit Enable
LowLatencyMode On
Dial Priority
VideoFormat
Off
(TheOSDfunction will not beenabled after it isturned on)
Saturation +
-
100
Brightness +
-
50
Contrast +
-
50
Sharpness +
-
20
Hue +
-
50
Flip On Off
Mirror On Off
Submit Cancel Default

1080P HD PTZ Camera User Manual
14
1) Brightness
Brightness of image: 0~99 (Default value is 50).
2) Saturation
Saturation of image: 0~200 (Default value is 100).
3) Contrast
Contrast of image: 0~99 (Default value is 50).
4) Sharpness
Sharpness of image: 0~99 (Default value is 20).
5) Hue
Hue of image: 0~99 (Default value is 50).
6) Flip
Turn On/Off the Flip function.
7) Mirror
Turn On/Off the Mirror function.
7.5 Audio Settings
1) Audio Switch
Turn On/Off audio switch.
2) Audio Type
Optional items: AAC.
3) Sample Rate
Optional items: 32K, 48K.
4) Bit Rate
Optional items: 96K, 128K, 256K.
5) Input Type
Optional items: LINE IN, MIC.
6) Input Vol L
The volume of the left channel.
7) Input Vol R
The volume of the right channel.
7.6 System Settings
1) Reboot
Click the “Reboot” button, system restart.
2) Username and Password
The user can modify the password (letters and
Numbers only).
7.7 Network Settings
Submit Cancel
Audio Settings
On
Audio Switch
AAC
Audio Type
96K
BitRate
2
Input Vol L
48K
Sample Rate
LINEIN
Input Type
14
Input Vol R
Initialize
Reboot
Reboot
User
UserName
admin
Passwd
guest
Guest
Passwd
Submit Cancel
IPConfiguration Type
Manual
IPAddress
192.168.100.88
Subnet Mask
255.255.255.0
Gateway
192.168.100.1
DNS Add ress
8.8.8.8
MACAddress
D4:E0:8E:A9:73:45
Submit Cancel
Lan Settings
NTPSettings
Server Address
cn.ntp.org.cn
Time Zone
(GMT+08:00)Fuzhou,China
TimeShow
On Off
Position
X10 Y100
SubtitleDisplay
On Off
SubtitleContent
Beijing Meeting Room
Submit Cancel
RTSP Port
554
TCP Por t
5678
UDP Port
1259
Sony Visca
52381
HTTP Port
80
PortSettings

1080P HD PTZ Camera User Manual
15
1) Lan Settings
Default the IP address is 192.168.100.88, the MAC
address cannot be modified.
2) NTP Settings
Setting NTP Time Zone and Server Address. Turn
On/Off Time Show, set the position of the Time
Show. Turn On/Off Subtitle Display, set the
Subtitle Content of the camera screen.
3) Port Settings
A. HTTP Port
IP address identifies network device, the device
can run multiple web applications, each network
program using network port to transmit data, so
data transmission to be carried out between the
port and port. Port setting is to set up web server
program using which port to transmit. When port
mapping, need to be consistent with the port
number (default port: 80).
B. RTSP Port
The camera support RTSP protocol, use the VLC
tools broadcast, default port: 554.
C. TCP Port
Support TCP connection then control camera,
default port: 5678.
D. UDP Port
Support UDP protocol, default port: 1259.
E. Sony Visca
Support Sony Visca, default value: 52381.
4) RTMP(S) Settings
Turn On/Off first stream or second stream, setting
the MRL of RTMP.
5) SRT Settings
Turn On/Off SRT, Setting the SRT Port,
SRT Encry and SRT Password.
6) RTSP Settings
Turn On/Off RTSPAuth.
7) ONVIF Settings
Turn On/Off ONVIF and ONVIF Auth.
7.8 Device Information
7.9 Download Upgrade Program
If you need the camera upgrade program, please
contact the manufacturer.
WEB interface and parameters are
subject to change without notice.
8Troubleshooting
Image
The monitor shows no image
1) Check that the camera power supply is
connected, the voltage is normal, and the
power indicator light is always on.
2) Turn off the power switch to check whether
the camera is self-testing.
3) Check the cable of video platform and TV
whether correct connection.
RTMP(S) Set tings
First Stream On Off
MRL
rtmp://192.168.100.138/live/stream0
Second Stream
MRL
rtmp://192.168.100.138/live/stream1
SRT Set tings
SRT On Off
SRT Port
4578
SRT Password
1234564913131
SRT Encrypt ion
None
RTSP Set tings
RTSP Aut h On Off
ONVIFSettings
ONVIF On Off
ONVIF Aut h On Off
On Off
Submit Cancel
Information
HDCamera
Device ID
V.F1
Device Type
v1.5.5
WebwareVersion
X8.02.15
Software Version
Submit Cancel
X6v19260f6c9
Device Serial Number
Note

1080P HD PTZ Camera User Manual
16
The video image displayed by the camera lens
is jittery
1) Check whether the camera installed position
be stabled.
2) Check whether have vibrating machinery or
object near the camera.
There is no video image in Browser
IE browser does not support H5, you need to use
VLC plug-in to view videos. Please access VLC
website (http://www.videolan.org/vlc) download
and install the 32-bit VLC media player, after it
installed, access camera will have normal image
display. Other mainstream browsers already
support H5 and do not need to install the VLC
plug-in.
Unable to access camera through Browser
1) Using PC to access the network to test whether
the network access can work properly, first of
all, the network fault caused by the PC virus
can be eliminated, until the PC and camera can
communicate with each other Ping.
2) Disconnect the network, connect camera and
PC separately, and reset the IP address of PC.
3) Check IP address, subnet mask, and gateway
settings for camera.
4) Check whether the MAC address is conflicts.
5) Check whether the web port is modified.
The default web port is 80.
Forget the IP address or login password
Please remember (The default IP address:
192.168.100.88; default user name: admin; default
password: admin).
Control
Remote control cannot control
1) Check and replace the new battery for the
remote controller.
2) Check whether the camera working mode is
correct.
3) Check whether the address of remote control
can match the camera.
Serial port cannot control
1) Check whether the camera protocol, address
and baud rate such is the same.
2) Check whether the control line is connected
well.
Table of contents
Other Prestel Security Camera manuals