Bonnet INO 81 Instruction Manual

DISHWASHER INO 81 Code NU271706-02/04
TECHNICAL
Hood
Dishwasher
INO 81
BUILDER’S SPECIFICATIONS
INSTRUCTIONS FOR THE USER
•Utilisation
•Maintenance
•GUARANTEE
To allow us to guarantee this equipment (See the Chapter 5-4), we advise you to observe the
BUILDER’S SPECIFICATIONS for use, and regular maintenance set out in these instructions.
Parts subject to wear are at the user’s expense.
However, if you are not in a position to service and carry out the requested maintenance, local
network for installation and servicing is entirely at your disposal to elaborate a personalized
servicing contract for you.
•FOREWORD
The material delivered to you complies with the standards in force. In case of transformation, the
participant shoulders the responsibility of the builder. The builder will not be held responsible if
the material is used for purposes other than those for which the machine has been designed.
This dishwasher is for professional use only; it must be used by qualified personnel.
Read this document carefully before using the dishwasher.
Keep your documents.
9

DISHWASHER INO 81 Code NU271706-02/04
Chap. 1 – Page 1
USER’S INSTRUCTIONS – USER’S INSTRUCTIONS – USER’S INSTRUCTIONS
DISHWASHER INO 81
SUMMARY
1. Technical characteristics
2. Installation
3. Putting in service
4. Practical recommendations for use
5. Maintenance
6. Electrical diagrams
7. Hydraulic circuits
8. Other parts necessary for after sales
9. Emergency parts

A220625 HOT – A220626 COLD
DIMENSIONS
Length (mm) : 670 - Width (mm) : 760 - Height (mm) : 1600
Table entry height (mm) : 666 - (ht 754)
COLISAGE
Length (mm) : 860 - Width (mm) : 930 - Height (mm) : 1600
TOTAL INSTALLED POWER (kW)
INO 81 hot water (55°C) = 11 kW
INO 81 cold water (20°C) = 18.5 kW
Wash pump = 2 kW – Rate : 700l/min Ö42m³/h
Option : drain pump = 0.09 kW
Tank heating element = 3 kW
Voltage (50 Hz) : 400 V 3N ~ connectable to 230 V 3 ~
WATER CONNECTION
- Min. pressure: 200kpa (2 bars) – Max. pressure : 400kpa (4 bars)
- Supply 20 x 27 F TH 5 à 7° - Temperature EC 55° C / EF 20°C – 1000mm to hose provided.
- Drain 40x49 – 550mm to hose provided.
- Option : drain pump ø 20x27 – ø 40 open connection – 1800mm to hose provided
ELECTRICAL CONNECTION
- Electrical supply at500mm above the floor.
- Allow for isolator, a circuit breaker and a supply protection device in compliance with NFC 15100 standard.
Non contractual document C271706 - 01/04
BONNET GRANDE CUISINE
Siège social:
Rue des Frères Lumière - ZI Mitry Compans
77292 MITRY MORY Cedex
INO 81
672
772
400
760
1993
890 à 930
167
650
1600,46
246
500
560
290
435
220
V
V1
V1
V
800 mini
1000 maxi
150
V
200
V
150200
560
290
Optional drainage pump
(1800mm hose provided)
Electrical supply
Water supply
(1000mm hose provided)
Drain
(550mm hose provided)
A220625 EC – A220626 EF
Code
Net weight (kg) 120
Gross weight (kg) 135

DISHWASHER INO 81 Code NU271706-02/04
Chap. 2 – Page 1
2. INSTALLATION - INSTALLATION - INSTALLATION - INSTALLATION - INSTALLATION
Regarding the nature and position of connections, refer to “Technical characteristics” at the beginning of
the instructions, chapter 1.
2.1 GENERAL REQUIREMENT
The installation, modification or repair of the device must be carried out in a workmanlike manner by a
specialist.
2.2 HANDLING
The machine must only be handled by adapted lifting devices.
If the device has to be transported, this will be ensured by using its original pallet and in no case will it be
stacked on other devices.
When moving a dishwasher in the absence of its pallet, the dishwasher has to be carried and not shifted or
pulled.
2.3 UNPACKING
- Unstrip the cardboard.
- Remove the dishwasher from its pallet.
- Remove the polystyrene wedges.
- Pull out the hydraulic hose and the electrical supply
cable located at the rear.

DISHWASHER INO 81 Code NU271706-02/04
Chap. 2 – Page 3
2.4 CONNECTION
Electrical connection
* Electrical connection
Before connecting the dishwasher, make sure that the voltage and frequency of the electrical network
correspond to those indicated on the manufacturer’s nameplate fitted on the dishwasher.
Before connecting to the electrical network, make sure that the supply line is not switched on.
Efficient earthing, imposed by the preventive standards in force, is a safety measure for the
operator and the dishwasher.
It is necessary to verify this basic principle. In case of doubt, a careful check of the installation must be
made by the qualified personnel who have been called in to connect the machine to the network.
Additionally the dishwasher has to be included in an equipotential system where the connection is
made by means of a screw marked by the symbol Ø. The equipotential conductor must have a
10mm² cross section.
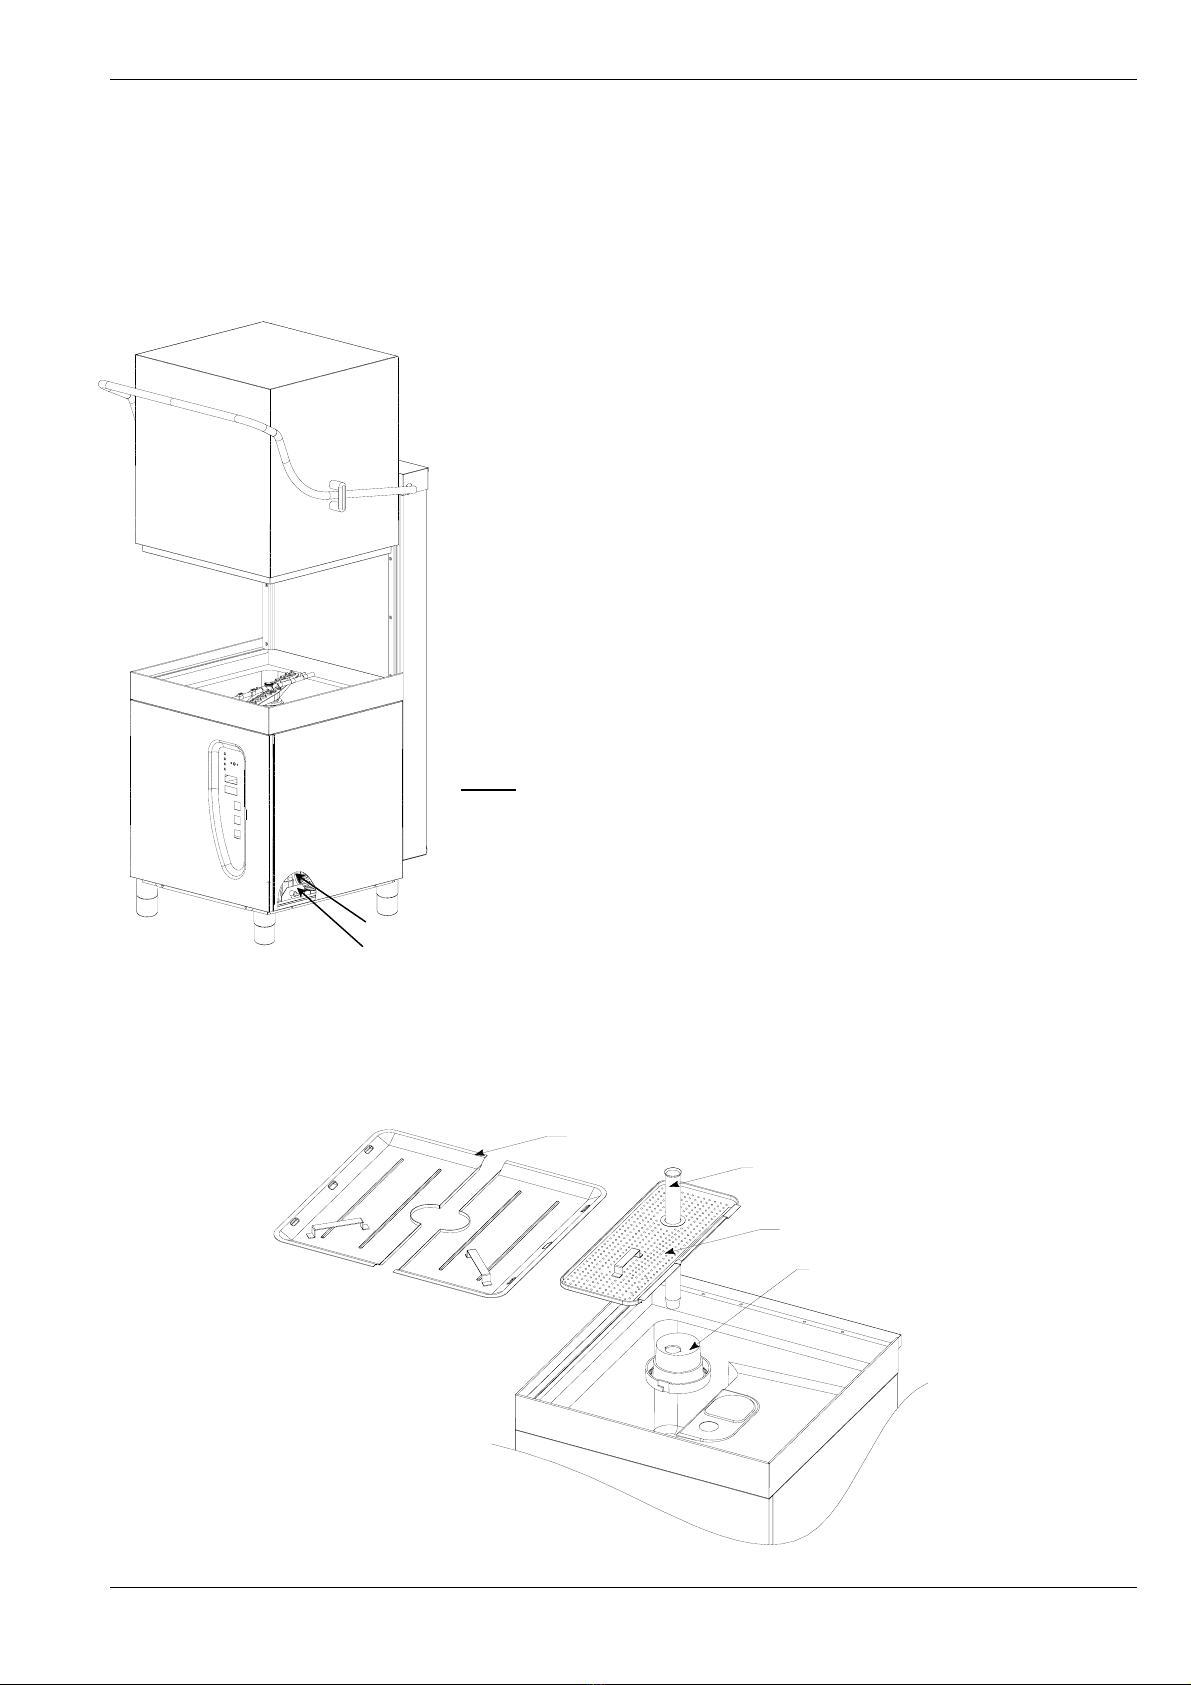
The equipotential stud is located behind the dishwasher on the bottom right side.
Connect the dishwasher according to the type of voltage required; refer to the firm plate (located on the
bottom right of the right side trimming) to check of the voltage type of the dishwasher.
Your dishwasher is delivered with a 2 metres long cable; the dishwater may be connected to :
- 400 V3N~50 Hz
- 230 V3~50 Hz
The supply cable can only be replaced by a cable having the same section of the HO7RN.F type.
Allow for an omnipolar separation device homologated for personal safety, (with an opening
distance between contacts of at least 3mm).
THE INSTALLATION MUST BE COMPLIANT WITH THE NFC 15100 STANDARD.
Hydraulic connection
Before connecting the dishwasher, make sure that a valve has been inserted between the water supply
network and the dishwasher so as to be able to shut off supply whenever needed or in case of repair.
The minimum supply pressure measured at the water inlet to the dishwasher on final rinsing (rate
pressure), even when other taps are open on the same line, must correspond to the chart of technical
characteristics Chap. 1 - 1.

DISHWASHER INO 81 Code NU271706-02/04
Chap. 2 – Page 3
Minimum 15 mm
Drainage connection
Drainage pump option:
When connecting the drainage flexible hose, take the following precautions:
•The bend in the flexible hose must be located between 800 to 1000 mm above the floor.
•The endings of the flexible hose must be above the water level in the tank.
•The length of the flexible hose must be adjusted so as to reduce the load loss and the creation
of a trap.
•The network / flexible hose drainage link MUST NOT BE WATERTIGHT.
The diagram above is valid for dishwashers with hood and front opening.
Because drainage of the tank is by gravity, evacuation must be located at a low level at the bottom of
the tank.
In case of evacuation to the wall for the dishwashers equipped with a drainage pump, make sure the
height of the drainage connection is included within at least 0.80 m and 1 metre maximum above the
ground.
Under 0.80 metre, the tank may empty by itself.
NOTE : See the diagram above.
Connection of detergent products
No opening of the tank can be drilled above electrical systems.
In no case must the electrical connection hinder the functioning of the dishwasher, allow for an auxiliary
relay to isolate the solenoid valve of the dosing unit.
See the assembly instructions NM14001 attached.
Height 800 to 1000
Water level in
the tank (filling)
Floor
Draina
g
e s
y
stem
Flexible drainage hose

DISHWASHER INO 81 Code NU271706-02/04
Chap. 3 – Page 1
3. PUTTING IN SERVICE – PUTTING IN SERVICE – PUTTING IN SERVICE – PUTTING IN SERVICE
3.1 DESCRIPTION OF THE CONTROL PANEL
SELECTOR : POS.c
-PUTTING IN SERVICE
-CYCLE SELECTION
POS.i
CONTINUOUS WASHING
OPTION : POS j
DRAINAGE CONTROL SWITCH.
POS.dON/OFF LIGHT INDICATOR
POS. eHEATING INDICATOR
POS. fCYCLE INDICATOR
POS. kDRAINAGE INDICATOR
POS. gWASHING TEMPERATURE
POS. hRINSING TEMPERATURE

DISHWASHER INO 81 Code NU271706-02/04
Chap. 3 – Page 2
3.2. AT THE BEGINNING OF THE SERVICE, MAKE SURE THAT:
•The supply of rinsing product is sufficient.
•The water inlet valve is opened.
•The drainage control knob POS. 7 (option) is in the OUT position.
•The filters and the overflow tube are properly installed.
3.2.1. DOSER OF RINSING PRODUCT.
- Located behind the right side panel.
- The dosing device of tensio-active product is factory-adjusted. It is possible to
modify the adjustment by actuating the adjustment screw of the dosing device.
(See the sketch on left).
- Screw up to reduce the quantity injected;
- Unscrew to increase the quantity injected.
- Make a first adjustment according to the recommendations of the product
manufacturer.
- Correct if necessary depending on the results obtained with the dishes washed.
NOTE : To prime the dosing unit quickly, activate the adjustment screw with
a few pumping movements (afterwards, so as to avoid unpriming of the
dosing unit by lack of product in the receiver, check the product level).
3.2.2. FILTERS AND OVERFLOW TUBE.
Tube surverse
Filtre intermédiaire
Filtre inférieur
Filtre supérieur
Doser
Adjustment screw
Upper filter
Intermediate filter
Lower filter
Overflow tube

DISHWASHER INO 81 Code NU271706-02/04
Chap. 3 – Page 3
3.3. BEFORE THE SERVICE.
Carry out these operations BEFORE washing the first rack of dirty dishes:
•15 minutes beforehand (if your machine is supplied with hot water)
•1 hour before (if your machine is supplied with cold water).
Close the lid.
Set the selector POS.1 to fill. The white light indicator POS.2 in on.
The machine fills with water, then heating starts. The light POS.3 switches off, water temperature is reached
and the machine is ready to work.
3.4. IN SERVICE.
Open the lid.
If your machine is equipped with an external washing dosing unit, introduce a dose of detergent product by
following the quantity recommended by the Manufacturer. (Tank capacity = 43 litres).
Prepare the racks and dishes. (Refer to the Chapter 4 "Practical recommendations for use). Introduce a rack of
dirty dishes.
Position the cycle selector POS.1 to the washing time desired.
Close the lid
The cycle automatically starts. The cycle light operating indicator POS.4 is on.
At the cycle end (the light indicator switches off), open the lid. Remove the rack of clean dishes. Introduce
another rack of dirty dishes. Close the lid and start a new cycle.
If your machine is not equipped with an external washing dosing unit, every 4 racks, introduce a dose of
detergent corresponding to the consumption of 40 litres water.
NOTE : During a long-lasting standstill period between the washing of two racks, it is recommended to close the
door to limit electrical consumption.

DISHWASHER INO 81 Code NU271706-02/04
Chap. 3 – Page 4
3.5. AT THE END OF SERVICE.
Open the hood.
Remove the overflow tube without pulling it out of the filter ; if the dishwasher is equipped with the optional
tank drainage pump, press the drainage control knob POS. 8 (position “ON”).The drainage light indicator POS.
9 turns on.
Remove possible waste remaining in the tank. Remove and wash the filters.
Push the drainage control knob POS. 8 to stop position (option). The drainage light indicator POS. 9 switches
off.
Put the filters and the overflow tube back, then wash the tank with a disinfectant. For this purpose, refill the
tank and start a washing cycle.
A THE END OF THE CYCLE, open the hood. Check that the washing arms turn freely. If a nozzle is choked, refer
to the Chapter "Dismantling of washing arms".
Tank drainage.
Put the OFF switch POS.1 to "O". The light indicator POS. 2 switches off.
Carefully wipe the tank with a sponge.
Switch off electrical supply at the main circuit breaker. Close the water supply valve.
Check the levels in the holders:
-rinsing product,
-washing product,
Top up if necessary.
Leave the hood open to help the dishwasher to dry.

DISHWASHER INO 81 Code NU271706-02/04
Chap. 4 – Page 1
4. PRACTICAL RECOMMENDATIONS FOR USE – PRACTICAL RECOMMENDATIONS FOR USE
4.1 WASHING DISHES
Remove all food waste or remains or other from the dishes.
Empty the recipients. Certain dishes with food stuck in
them must be previously soaked to remove it.
Arrange the dirty dishes in the racks. To obtain the best
results, it is necessary to follow the following points :
Place each item in the proper rack;
Avoid overfilling the racks;
Place hollow objects upside down and never stack
them.
Use compartment racks for washing glasses in inclined position;
Preferably place cutlery in buckets (with handles down).
4.2 INCIDENTS MET.
ANOMALIES CAUSES & REMEDIES
Dishes are not clean after washing.
Residue on dishes Insufficient soaking;
Insufficient washing time;
Insufficient concentration of detergent product;
Washing of rinsing nozzles choked.
White stains on glasses Hard water; have a water softener installed; or carry out
a regeneration programme.
Glasses are not sufficiently “clear” after several
washings.
Water heavily mineralized; use a descaling agent.
Drying time too long Verify the presence of product and consumption of
tension active product
Marks of detergent on dishes. Too much detergent.
Insufficient rinsing (choked nozzles).
Stained cutlery (caused by different acids in the
composition of food).
Regularly carry out a renovation with adequate product.
Marks caused by the cutting side of knives on
certain quality dishes; food particles become
incrusted in scratches and tarnish dishes.
Regularly carry out a renovation with adequate product.
Too much foam. Temperature of washing water lower than 50°C.
Dosing of rinsing product too high.
Filter choked.
Too many milk products in the washing bath.
Racks for plates
or trays
Racks for glasses
or cups

DISHWASHER INO 81 Code NU271706-02/04
Chap. 5 – Page 1
5 MAINTENANCE - MAINTENANCE - MAINTENANCE - MAINTENANCE - MAINTENANCE -
To enable us to guarantee this equipment, it is necessary to carry out the following maintenance operations:
5.1. RECOMMENDATIONS
5.1.1. At the end of the week in addition to the daily operations
Brush and wash the interior of the machine to remove the greasy film which may adhere to the walls. It is
also possible to use special descaling products as per the instructions for use by the manufacturer. In this
case, it is imperative to operate several rinsing cycles. Clean the external trimming of the dishwasher with a
product appropriate for stainless steel to eliminate all trace of product
5.1.2. Once a month
Run your dishwasher for 5 to 10 mn with a special descaling and desinfecting product for dishwashers.
Empty the tank and rinse abundantly. Check cleanliness and clean, if necessary, the interior of the
machine and the door baffle.
5.1.3. Once a year
* Have the functional parts checked by our approved agent and exchange the worn parts, if necessary
* Bearing blocks and shells of the rotary arms hubs.
* Tube of product dosing unit(s).
5.1.4.Important recommendations
* This machine is strictly reserved for washing dishes. Do not use it for other purposes.
* This dishwasher complies with the safety requirements in force. The repairs have to be made by our
approved agent. Incorrect repairs may cause serious danger for the user.
* In case of transformation, the builder declines all responsibility.
* This machine must be connected to a wall switch combined with calibrated fuses. Switch off the
electrical supply to the dishwasher before any work. Make sure that your dishes are appropriate for
washing in a dishwasher.
* Use detergents for professional dishwashers exclusively.
* Do not use solvents for cleaning purposes, nor abrasive pads which could scratch stainless steel and
serigraphy.
* Do not wait until the receiver of the rinsing product is empty before topping it up, otherwise it will be
necessary to prime the dosing unit.
* Do not wash the dishwasher with a water jet.
* Do not touch the heating resistance immediately after having emptied the receiver, you could burn
yourself.
* The detergents being highly aggressive, follow the requirements of the manufacturer. Take care when
handling them. Do not leave them in prolonged contact with stainless steel to avoid the formation of
stains; run the dishwasher immediately after having introduced a detergent.
* Do not drink water from the tank!
* Do not lean on the open door, the dishwasher could tilt and be damaged.
* Do not leave untrained personnel to handle the dishwasher.
* An air vent being located behind the dishwasher, it is necessary to provide sufficient aeration in the
piece of furniture in case of built-in assembly.
* For correct functioning of the dishwasher when on, the supply pressure of water must be lower than 4
bars. See Chapter 1 – 1.
* Model without softener. Maximum hardness of water must be within 5and 7° TH. Greater hardness
may cause poor washing results, accelerated scaling of the dishwasher and may cause destruction of the
heating elements.

DISHWASHER INO 81 Code NU271706-02/04
Chap. 5 – Page 2
To enable us to guarantee this equipment, it is necessary to carry out the following maintenance operations:
5.1.5 Dismantling of the rotary arms to free a choked nozzle
* Partly unscrew the nut, pull the rotary arm by bearing on the nut then finish unscrewing the nut and remove the rotary
arm. Free the choked nozzle in question and clean the rotary arm. Drive the rotary arm on its conical pin and screw
on the nut.
5.2. PREAMBLE RELATING TO STAINLESS STEELS
* Stainless steel is a grade of steel designed so that a thin protecting layer covers the metallic surface
and protects it against corrosion. (Oxide film resulting from the chemical reaction of oxygen on the metal
surface).
Any element hindering the formation of this layer or facilitating its part destruction (food residues,
overflow, stagnant liquids...) diminishes the resistance of stainless steel to corrosion.
* If the composition of certain stainless steels enables them to resist to certain chemical aggressions
better than classical steels, you must not imagine that “stainless steel” is indestructible.
3 main factors of corrosion are to be closely checked:
The chemical environment. In general : Brines (salt concentration, sauerkraut...)
Chloride, contained especially in:
cleaning products, bleach.
The temperature: The aggressiveness of any chemical environment as
designated above to stainless steel increases
considerably with temperature.
The duration: The longer the contact time between stainless steel
and the chemical environment, the more the
consequences of corrosion will be noticeable.
The combination of these three factors may lead to the destruction of the walls, even if they are
manufactured with very high quality stainless steel.
Note that when stainless steel is corroded, it is extremely rare that this is due to the steel itself.
Generally speaking, unadapted or wrongly used maintenance products, defective maintenance or
extreme conditions of use, are often at the origin of the damage met.
WARNING!
The builder will not be held responsible for cases of corrosion met in these conditions, and no
guarantee will then apply.
A list of the most frequent cases met is given hereunder in order to enable you to identify as
accurately as possible these bad conditions of use, and to operate your equipment as long as
possible.

DISHWASHER INO 81 Code NU271706-02/04
Chap. 5 – Page 3
5.3. THE MOST CURRENT CASES OF CORROSION.
Cleaning tiling.
The cleaning of tiling (at completion of a building yard or on regular cleaning) is often done with very
aggressive products. If such products are carelessly sprayed under pressure, splashes at the bottom of
the machines lead to the corrosion of bottom and trimmings.
Even worse, the vapour issuing from these products, if the room is not immediately properly ventilated, by
falling and settling on the equipment succeeds in extending corrosion to the entire surfaces.
Unadapted maintenance product (bleach, acids, soda).
When unadapted products, such as bleach, acid and soda solutions (all these products are not specially
designed for maintaining stainless steel) are used, an irreversible attack occurs on the stainless steel
surfaces.
Maintenance product badly rinsed
Once cleaned, if the walls are not abundantly rinsed to eliminate any trace of maintenance product, the
latter will continue its action, which in time, leads to the risk of generating the start of corrosion.
Stagnation of cleaning products
In the same manner, any part that can withhold cleaning products, especially gutters and siphons, are to
be submitted to careful and abundant rinsing. (Use a nylon brush to reinforce the rinsing action with clear
water).
5.4. STAINLESS STEEL SURFACE
1. EXTERNAL SURFACES
It is necessary to carefully maintain the external surface to eliminate dust, metallic particles and residues
of any kind that could alter the protective layer mentioned above.
For this purpose, just wash these surfaces with water and soap or any neutral and non-abrasive
detergent product. Rinse carefully and wipe the surfaces.
Never scrub stainless steel with metal wool, but only and if this is necessary, with a “scotch brite” pad or
equivalent product by following the polishing direction of the stainless steel surface.
2. INTERNAL SURFACES
The general principle consists in not letting substances susceptible to concentration or modification
accumulate and so become very corrosive in certain parts.
For this purpose, clean the dishwasher thoroughly.
-Cleaning after each washing operation (Refer to the paragraph 3.4.) At completion of service)
-Verify the nozzles regularly.
-The washing nozzles should not choke, except with lack of precautions on preparing the dishes to be
washed or when installing the filter.
-The rinsing nozzles are choked due to scaling; in this case, soak the rinsing ramps in a descaling
solution.
-Verify monthly the presence of gaskets normally installed on the base of the ramp water supply.

DISHWASHER INO 81 Code NU271706-02/04
Chap. 5 – Page 4
THE USE OF A WATER JET OR A HIGH PRESSURE HOSE IS STRICTLY PROHIBITED : IN NO CASE MUST THE DISHWASHER
BE WASHED WITH A WATER JET.
THE GUARANTEE CANNOT COVER THE PROBLEMS IN CONNECTION WITH THE NON-OBSERVANCE OF THE RULES FOR
MAINTENANCE MENTIONED ABOVE.
BEFORE A PROLONGED STANDSTILL OF THE DISHWASHER. CARRY OUT A FULL CLEANING PROCEDURE WITH A
DISINFECTANT; IN CASE OF FROST RISK, DRAIN THE OVERHEATER AS WELL AS THE PUMP.
GUARANTEE
NO GUARANTEE IS UNCONDITIONAL
Our guarantee only applies for a normal use. That means when strictly following the recommendations
indicated in our instructions for use and maintenance.
The guarantee will also be valid only insofar as the periodical visits recommended for maintenance and/or
control have been ensured by our technicians.
All our apparatus is normally guaranteed for the duration of one year, with all proper reserves indicated
above, as from its date of invoicing. In case of breakdowns due to defects or apparent or hidden
manufacturing defects, our apparatus will be repaired free of charge, labour and parts included, during the
one year guarantee.
To benefit from our guarantee, our apparatus must not be modified or repaired with any parts that are not
originally manufactured and approved by our services, or by personnel who are not qualified or trained by
our services.
In case of breakdown or damage, the buyer is to inform us in writing, as soon as he is aware of the defects
attributed to our apparatus. In no case can the buyer remedy these defects himself or by a third party.
Our periodical maintenance is the essential condition of the good functioning and reliability of our equipment.
Maintenance can and must only be ensured by our technicians who are perfectly qualified and prepared for
this task. They have at their disposal the specific tools, original parts and their ongoing training. Current
periodical maintenance is indispensable; it is ensured in return for payment, but it is a guarantee for the
reliable functioning of our apparatus.
The periodicity relates to normal conditions of use. In case of heavier conditions of use, it is necessary to
have certain operations carried out at shorter intervals.
WARNING!In no case will the damage caused to our apparatus due to a wrong connection to a network not
compliant with the firm plate (voltage, phase/neutral inverted) as well as the wrong order of phases
connected (which is important for three-phase motors, direction of ventilation, jacks...) be covered by this
guarantee.
This is the reason why we recommend connecting the material only after the voltage available has been
checked at the location of the material.

DISHWASHER INO 81 Code NU271706-02/04
Chap. 6 – Page 1

DISHWASHER INO 81 Code NU271706-02/04
Chap. 6 – Page 2

DISHWASHER INO 81 Code NU271706-02/04
Chap. 7 – Page 1

DISWASHER INO 81 Code NU271706-02/04
Chap. 8 – Page 1
OTHER APRTS NECESSAY FOR AFTER SALE SERVICE
10 907535 White light indicator
9907534 Amber li
g
ht indicato
r
19 989301 Rivet of mass 8907533 Green li
g
ht indicato
r
18 907510 Wire
p
rotection rin
g
7900054 Switch not maintained
17 900073 Rela
y
6900053 Maintained switch
16 906152 Yellow /
g
reen terminal 5900086 Chan
g
e-over switch
15 906101 Blue terminal 908140 Self-adhesive front
(
Di
g
it
)
14 900130 Contacto
r
4908139 Self-adhesive front
13 900119 Contacto
r
3900055 Su
pp
ort
12 906100 Gre
y
terminal 2901018 Thermomete
r
11 905041 Pro
g
ramme
r
1900056 Ke
y
Rep Code Désignation Rep Code Désignation
Modifications:
TECHNICAL SHEET N° FT 14023 /
FAMILLE: DISHWASHER TYPE : INO 81 UK Date : 27/07/04
Des. par : T.D
S/E: CONNECTION BOX Vérif. par : F.F
This diagram remains our property ; all rights of reproduction reserved. Document not contractual

DISHWASHER INO 81 Code NU271706-02/04
Chap. 8 – Page 2
8. OTHER PARTS NECESSARY FOR AFTER SALE
20 917054 Grooved bush
19 916206 Tube
18 916150 Suction
p
i
p
e
17 916147 U
pp
er deliver
y
elbow
16 916148 U
pp
er deliver
y
p
i
p
e
15 U
pp
er rotar
y
arm flat
g
asket
14 983654 Flushin
g
p
i
p
e connecto
r
13 981268 Water su
pp
l
y
inlet
12 983563 Rotar
y
arm sto
p
button
11 231454 Rotar
y
arm
10 981262 Rotar
y
arm su
pp
ort
9981263 Lower bearin
g
8983560 Lower water inlet
p
i
p
e
7983562 Thrust on su
pp
ort
26 904034 Pum
p
6966084 O’rin
g
25 981257 U
pp
er bearin
g
5983607 Filter su
pp
ort
24 983561 U
pp
er water inlet
p
i
p
e 4 981259 Lower extension
23 916149 Lower deliver
y
p
i
p
e 3 983559 Rinsin
g
sleeve
22 983083 Dam
p
ene
r
2966085 O’rin
g
21 916151 Deliver
y
branch
p
i
p
e 1 981261 Lower water inlet
Rep Code Désignation Rep Code Désignation
Modifications:
TECHNICAL SHEET N° FT 14024 /
FAMILLE: : DISWASHER TYPE : INO 81 UK Date : 27/07/04
Des. par : T.D
S/E: WASHING SYSTEM Vérif. Par : F.F
This diagram remains our property ; all rights of reproduction reserved. Document not contractual
16
1
7
18
19
20 1
2
3
4
5
6
7
8
7
9
10
11
12
13
14
15
21
6
7
7
10
11
12
22 23
24
25
26
Table of contents
Other Bonnet Dishwasher manuals