Boolatek MD-4030S User manual

Model
:
MD-40305
UNDERGROUND
UNDERGROUND
METAL
DETECTOR
|
METAL
DETECTOR


MD-4030
Updated
Version
Metal
Detector
ALL
METAL
-
Lets
you
search
for
all
different types
of
metal
with
auto
ground
balance
and
high
sensitivity.
It’s
the
best
operation
mode.
DISC
—
Discriminates
what
kind
of
metal
is
being
detected.
Volume
—
To
adjust
the
volume
level
of
speaker
and
headphone.
Earphone
Jack
—
Lets
you
connect
headphones
(not
supplied)
to
the
detector.
View
Meter
and
Pointer
—
The
meter
pointer
swings
to
the
right
if
metal
is
found.
Waterproof
Search
Coil
—
Lets
you
search
for
metal
objects
under
shallow
water.
Note
:
The
search
coil
is
waterproof,
but
the
control
housing
is
not.
Adjustable
Stem
—
Lets
you
adjust
the
detector’s
length.
Operates
on
two
9V
alkaline
batteries
(not
supplied).

CONTENTS
Features
oooeoo..0oe0000000..0.9.0.090.9.900eo0e.eeoe0.0.0.0.0.0.0....00.
4
Preparation
Parts
of
the
detector
vv
sooo
o0000
0000000000022
00000000.
5
Assembling
the
detector
seeeeerrseeccccccccccccccceccces
5
Adjusting
the
search
coll
evvvoooo000000000
0000000000000
00.
7
Installing
the
batteries
e00000
00000000
EEE EEE
EEE
E00
E00
000000
7
Using
the
headphones
**eeeeeeeececscccccccccccccccccese
8
Functions
and
Indications
Parts
of
the
control
box
*e*eeeeeeeeeeeeeeeecccccecccecescecccccce
9
Displays
**eeeeeecessceccceccccsccccccccscccccccsccceccers
|()
Operation
Using
the
detector
esererececcccecccecccccccccccccccccccceces
|()
Search
coil
sweeping
hints
s*+eeeesesesecceccccccccccccccoccee
|]
Factors
that
affect
the
detecting
*seseesessereccccececcccccccece
J]
Care
and
maintenance
e00
000000
EEE
EEE
EEE
EEE EEE
EEE
EEE
EEE
EEE
00
12
°
When
searching
in
highly
mineralized
area,
the
unit
will
sound
even
if
there’s
no
metal.
In
this
case,
you
can
lower
the
sensitivity
and
increase
the
height
between
the
search
coil
and
the
ground
until
the
false
signal
disappears.
If
necessary,
reset
the
DISC.
°
When
searching
in
trash
area,
it’s
better
to
set
the
DISC
to
11:00
position,
so
that
the
unit
can
notch
most
of
invaluable
metals
such
as
nails
and
small
trashy
iron.
°
Move
away
any
metal
digging
tool
when
searching.
°
Sensitivity
level
is
generally
in
contradiction
with
that
of
the
Discrimination.
The
higher
the
sensitivity
level
is,
the
worse
discrimination
will
be.
But
you
can
lower
the
sensitivity
to
have
better
discrimination.
CARE
AND
MAINTENANCE
Your
metal detector
is
an
example
of
superior
design
and
craftsmanship.
The
following
suggestions
will
help
you
care
for
your
metal
detector
so
you
can
enjoy
it
for
years.
Handle
the
detector
gently
and
carefully.
Dropping
it
can
damage
circuit
boards
and
can
cause
the
detector
to
work
improperly.
Use
the
detector
only
in
normal
temperature
environments.
Temperature
extremes
can
shorten
the
life
of
electronic
devices,
causing
internal
damage
to
the
detector.
Keep
the
detector
away
from
dust
and
dirt,
which
can
cause
premature
wear
and
tear
of
parts.
Wipe
the
detector
with
a
damp
cloth
occasionally
to
keep
it
looking
new.
Do
not
use
harsh
chemicals,
cleaning
solvents,
or
strong
detergents
to
clean
the
detector.
12

straight
forward
away
from
you
and
straight
back
towards
you
a
couple
of
times.
Meantime
slowly
rotate
the
DISC
control
clockwise
away
from
ALL
METAL
until
the
unit
does
not
sound
or
sounds
short
tone.
You
can
identify
what
kind
of
metal
is
detected
according
to
the
setting
position
of
DISC.
A
reference
for
you
to
know
what
kind
of
metal
is
rejected
depending
on
the
DISC
setting.
Setting
of
DISC
Metal
Rejected
Near
11:00
Iron
Near
12:00
Nickel
coin
(5
¢
),
pull
tab
Near
13:00
Zinc
coin
(1
¢_
87
version)
Near
15:00
Copper
coin
(1
€
76
version)
When
the
DISC
control
is
set
to
the
clockwise
end
most
of
metal
is
rejected,
except
silver
(25¢,50¢
and
$1).
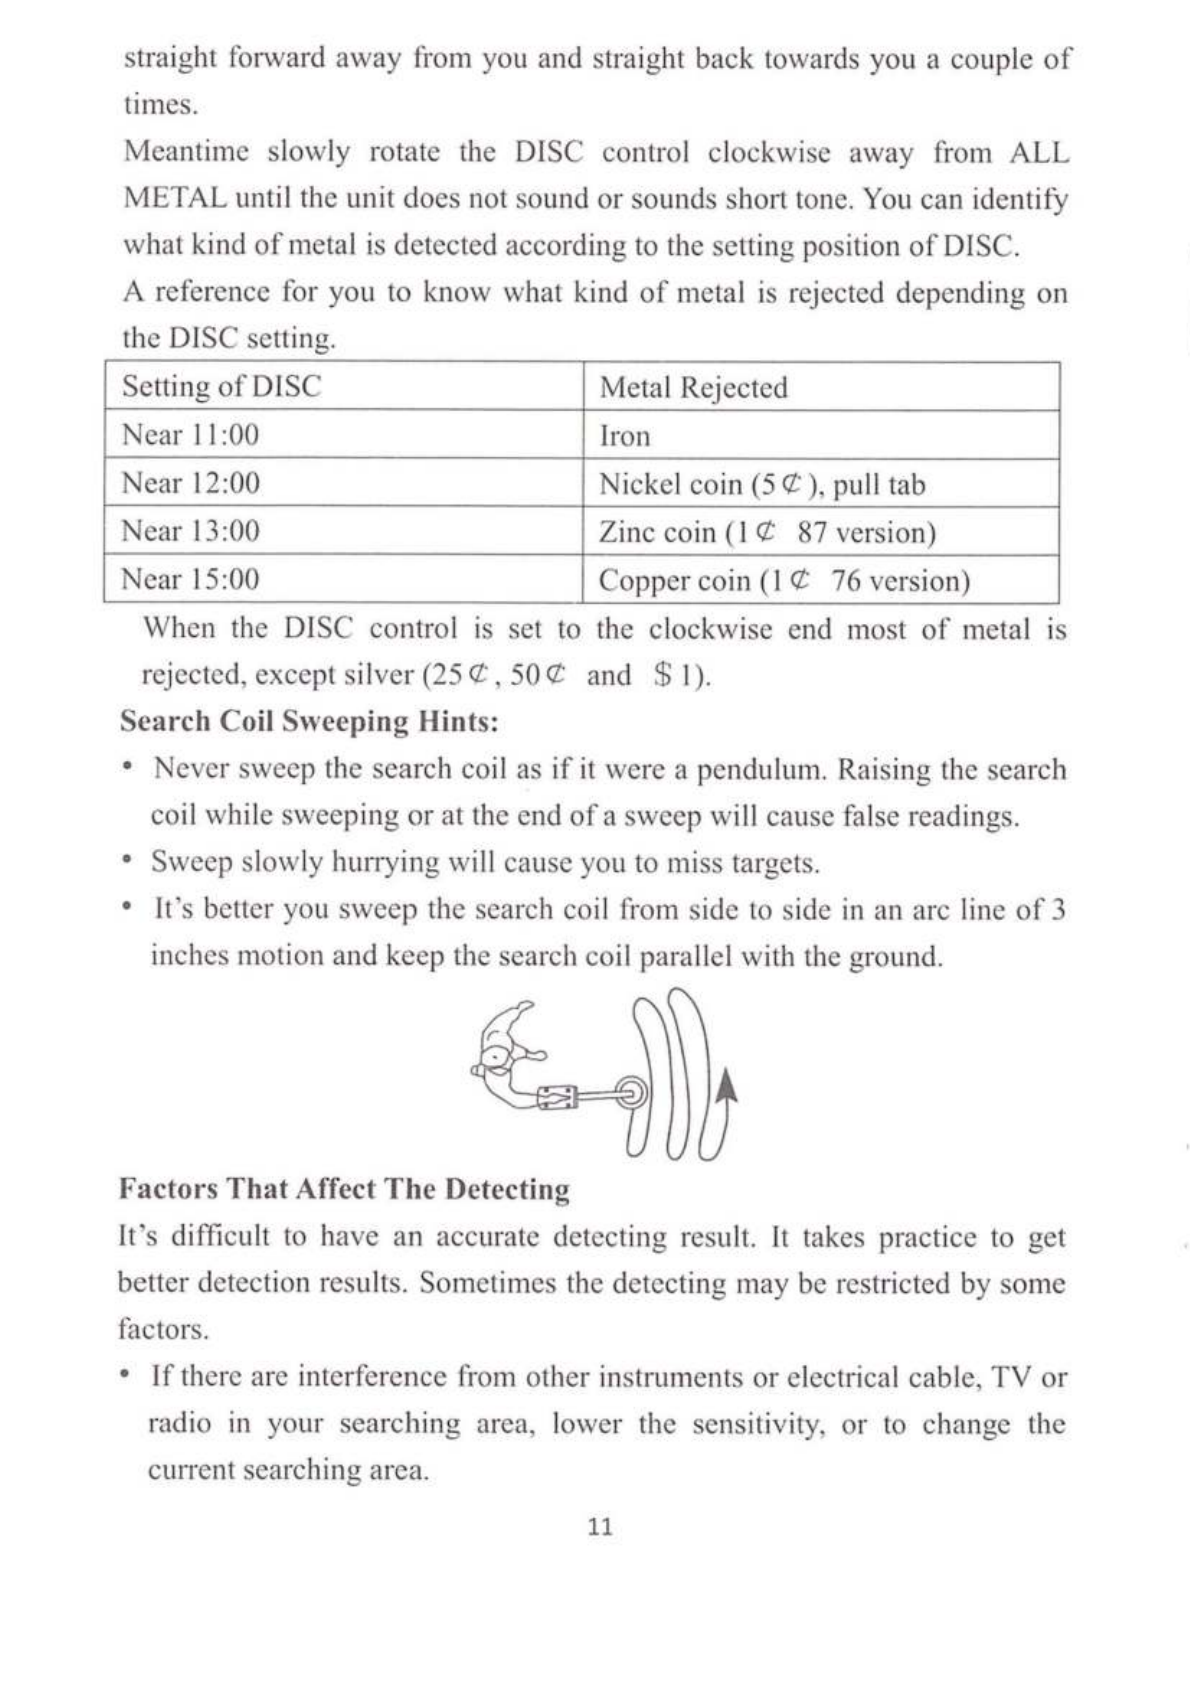
Search
Coil
Sweeping
Hints:
¢
Never
sweep
the
search
coil
as
if
it
were
a
pendulum.
Raising
the
search
coil
while
sweeping
or
at
the
end
of
a
sweep
will
cause
false
readings.
°
Sweep
slowly
hurrying
will
cause
you
to
miss
targets.
°
It’s
better
you
sweep
the
search
coil
from
side
to
side
in
an
arc
line
of
3
inches
motion
and
keep
the
search
coil
parallel
with
the
ground.
Factors
That
Affect
The
Detecting
It’s
difficult
to
have
an
accurate
detecting
result.
It
takes
practice
to
get
better
detection
results.
Sometimes
the
detecting
may
be
restricted
by
some
factors.
°
If
there
are
interference
from
other
instruments
or
electrical
cable,
TV
or
radio
in
your
searching
area,
lower
the
sensitivity,
or
to
change
the
current
searching
area.
11
FEATURES
With
your
metal
detector,
you
can
hunt
for
coins,
relics,
jewelry,
gold,
and
silver
just
about
anywhere.
This
metal
detector
is
versatile
and
easy
to
use.
Features
include:
Two
Operation
Modes:
All
Metal,
Disc
ALL
METAL
-
Lets
you
search
for
all
different
types
of
metal
with
auto
ground
balance
and
high
sensitivity.
It’s
the
best
operation
mode.
DISC
-
Discriminates
what
kind
of
metal
is
being
detected.
Volume
—
To
adjust
the
volume
level of
speaker
and
headphone.
Earphone
Jack
—
Lets
you
connect
headphones
(not
supplied)
to
the
detector.
View
Meter
and
Pointer
—
The
meter
pointer
swings
to
the
right
if
metal
is
found.
Waterproof
Search
Coil
—
Lets
you
search
for
metal
objects
under
shallow
water.
Note:
The
search
coil
is
waterproof,
but
the
control
housing
1s
not.
Adjustable
Stem
—
Lets
you
adjust
the
detector’s
length.
Operates
on
two
9V
alkaline
batteries
(not
supplied).
TREASURE
HUNTER’S
CODE
OF
ETHICS
A
few
basic
rules
you
should
follow
while
using
your
detector.
°
Always
get
permission
before
searching
any
site.
°
Respect
the
rights
and
property
of
others.
°
Observe
all
national,
state
and
local
laws
when
treasure
hunting.
°
Never
destroy
historical
or
archaeological
treasures.
If
you
are
not
sure
about
an
object
you
have
found,
contact
a
museum
or
historical
society
in
your
area.
°
Leave
the
land
vegetation
as
is,
and
fill
in
any
holes
you
dig.
°
Use
the
detector
only
in
safe
areas.
4
°
Dispose
of
any
junk
you
may
find,
only
in
approved
areas.
Do
not
leave
it
for
the
next
treasure
hunter
find.
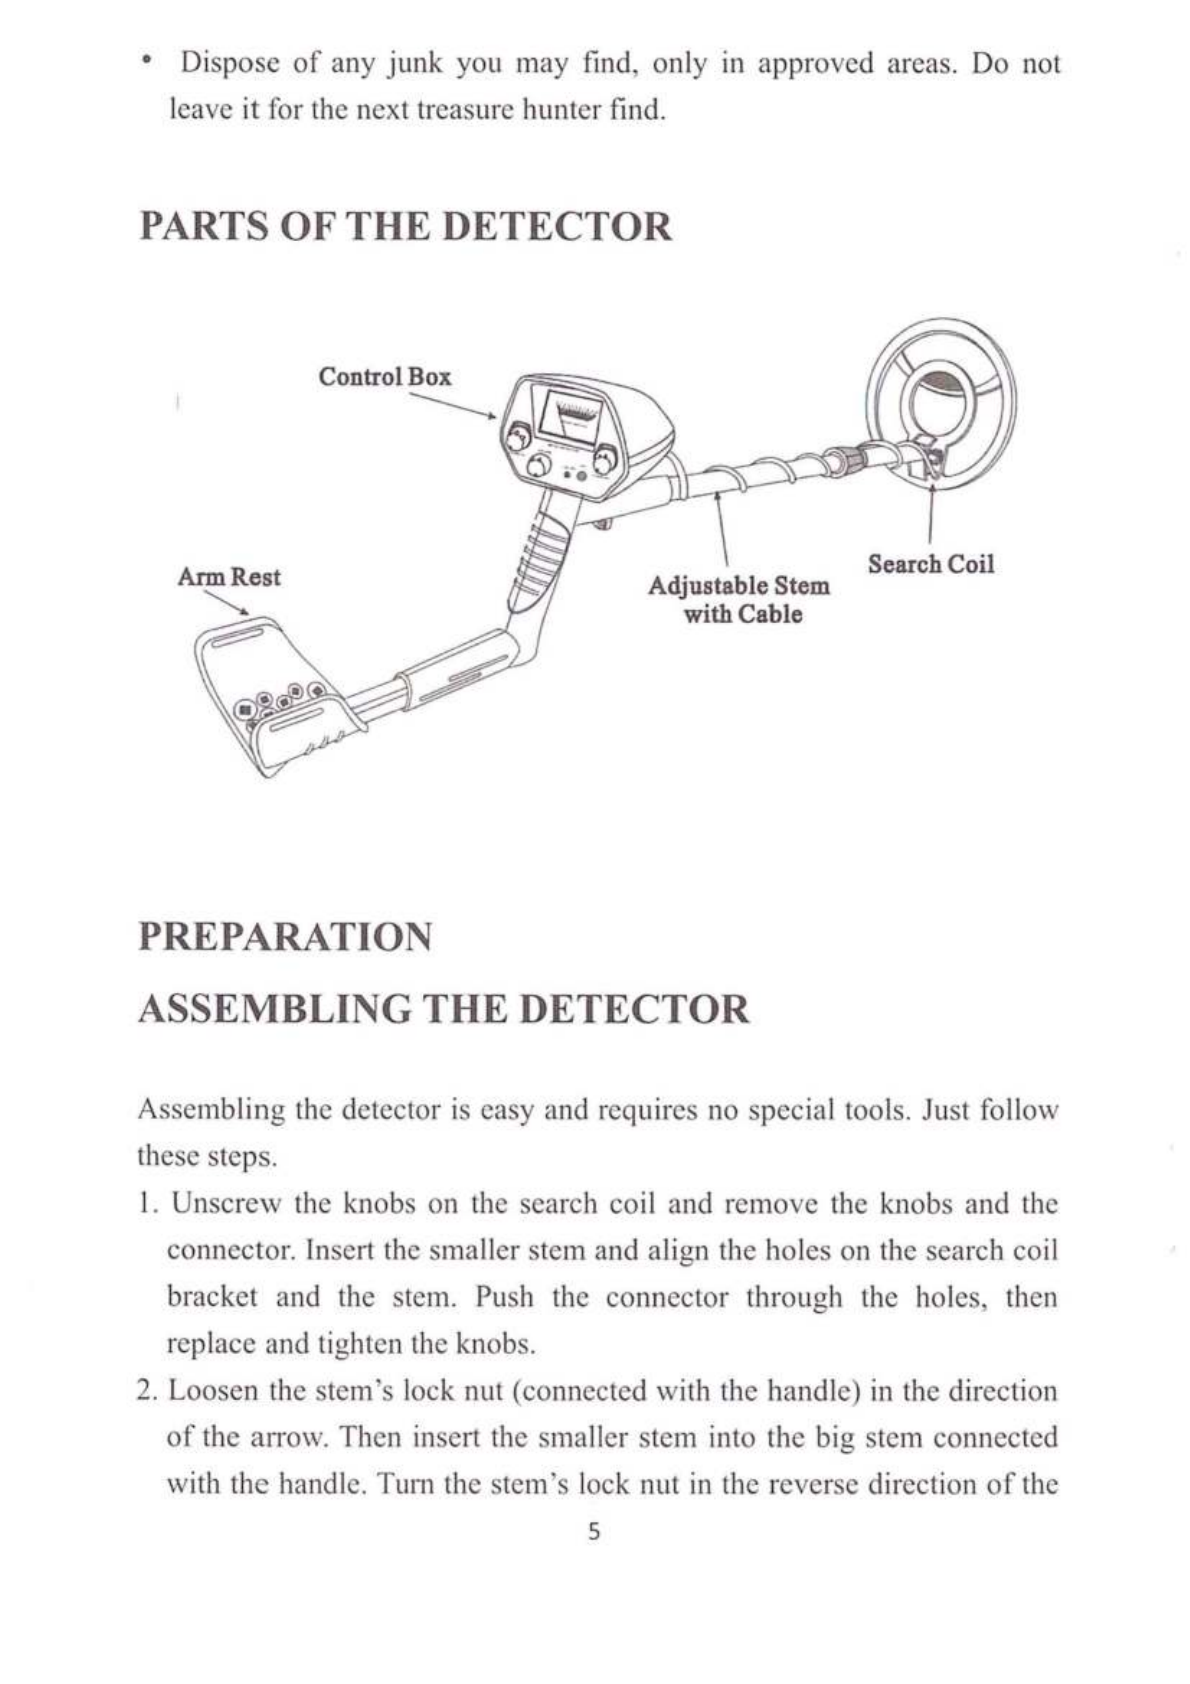
PARTS
OF
THE
DETECTOR
Control
Box
Search
Coil
Adjustable
Stem
ArmRest
u.
with
Cable
PREPARATION
ASSEMBLING
THE
DETECTOR
Assembling
the
detector
is
easy
and
requires
no
special
tools.
Just
follow
these
steps.
1.
Unscrew
the
knobs
on
the
search
coil
and
remove
the
knobs
and
the
connector.
Insert
the
smaller
stem
and
align
the
holes
on
the
search
coil
bracket
and
the
stem.
Push
the
connector
through
the
holes,
then
replace
and
tighten
the
knobs.
2.
Loosen
the
stem’s
lock
nut
(connected
with
the
handle)
in
the
direction
of
the
arrow.
Then
insert
the
smaller
stem
into
the
big
stem
connected
with
the
handle.
Turn
the
stem’s
lock
nut
in
the
reverse
direction
of
the
5
a.
DISC
—
Rotate
the
control
clockwise
away
from
ALL
METAL
to
get
DISC
mode.
The
DISC
mode
comes
with
auto
ground
balance.
Rotate
the
control
slowly
and
clockwise
to
eliminate
different
trash
objects.
Rotate
the
control
counter
clockwise
to
the
end
to
get
ALL
METAL
mode.
ALL
METAL
also
comes
with
auto
ground
balance.
It’s
used
to
find
not
only
ferrous
metal,
but
also
non-ferrous
one
(see
more
details
below).
b.
SENS
—
Rotate
the
control
counter
clockwise
to
the
end
to
power
off
the
unit.
Rotate
the
control
clockwise
to
power
on
the unit.
Continue
rotating
it
clockwise
to
get
higher
sensitivity.
c.
VOLUME
-—
Rotate
the
control
clockwise
to
get
higher
level
or
to
get
lower
volume
level
by
rotating
it
counter
clockwise.
d.
LOW
BAT
-
Low
battery
indicator.
When
LOW
BAT
indicator
lights,
user
should
replace
the
batteries
at
once.
e.
EAR
—
3.5mm
headphone
jack
for
connecting
headphones.
f.
VIEW
METER
-
When
unit
finds
any
metal
target,
the
meter
pointer
swings
to
the
right.
TESTING
AND
USING
THE
DETECTOR
This
metal
detector
has
two
operation
modes:
ALL
METAL
&
DISC.
ALL
METAL
-
is
used
to
find
all
kinds
of
metal
targets.
DISC
-
Is
used
to
discriminate
the
metal
type.
Set
the
operation
mode
to
ALL
METAL,
DISC
to
counter
clockwise
end,
SENS
to
high
position.
Then
hold
the
search
coil
parallel
with
the
ground
about
5-2
inches
/
1-5cm
above
the
surface.
Sweep
the
search
coil
from
side
to
side
in
an
arc
line
of
2.75
inches
/
7cm
motion.
When
the
detector
detects
a
buried
target,
it
sounds
a
tone.
Make
a
visual
note
of
exact
spot
on
the
ground
where
the
detector
beeps.
Then
stop
the
search
coil
directly
over
this
point
on
the
ground.
Move
the
search
coil
10

LISTENING
SAFELY
To
protect
your
hearing,
follow
these
guidelines
when
you
use
earphones.
°
Set
the
volume
to
the
lowest
setting
before
you
begin
listening.
°
After
you
begin
listening,
adjust
the
volume
to
a
comfortable
level.
°
Do
not
listen
at
extremely
high
volume
levels.
Extended
high
volume
listening
can
lead
to
permanent
hearing
loss.
°
Once
you
set
the
volume,
do
not
increase
it.
Over
time,
your
ears
adapt
to
the
volume
level,
so
a
volume
level
that
does
not
cause
discomfort
might
still
damage
your
hearing.
Traffic
Safety
DO
NOT
wear
headphones
while
operating
your
detector
near
high-traffic
areas.
Even
though
some
earphones
are
designed
to let
you
hear
some
outside
sounds
when
listening
at
normal
volume
levels,
they
still
can
present
a
traffic
hazard.
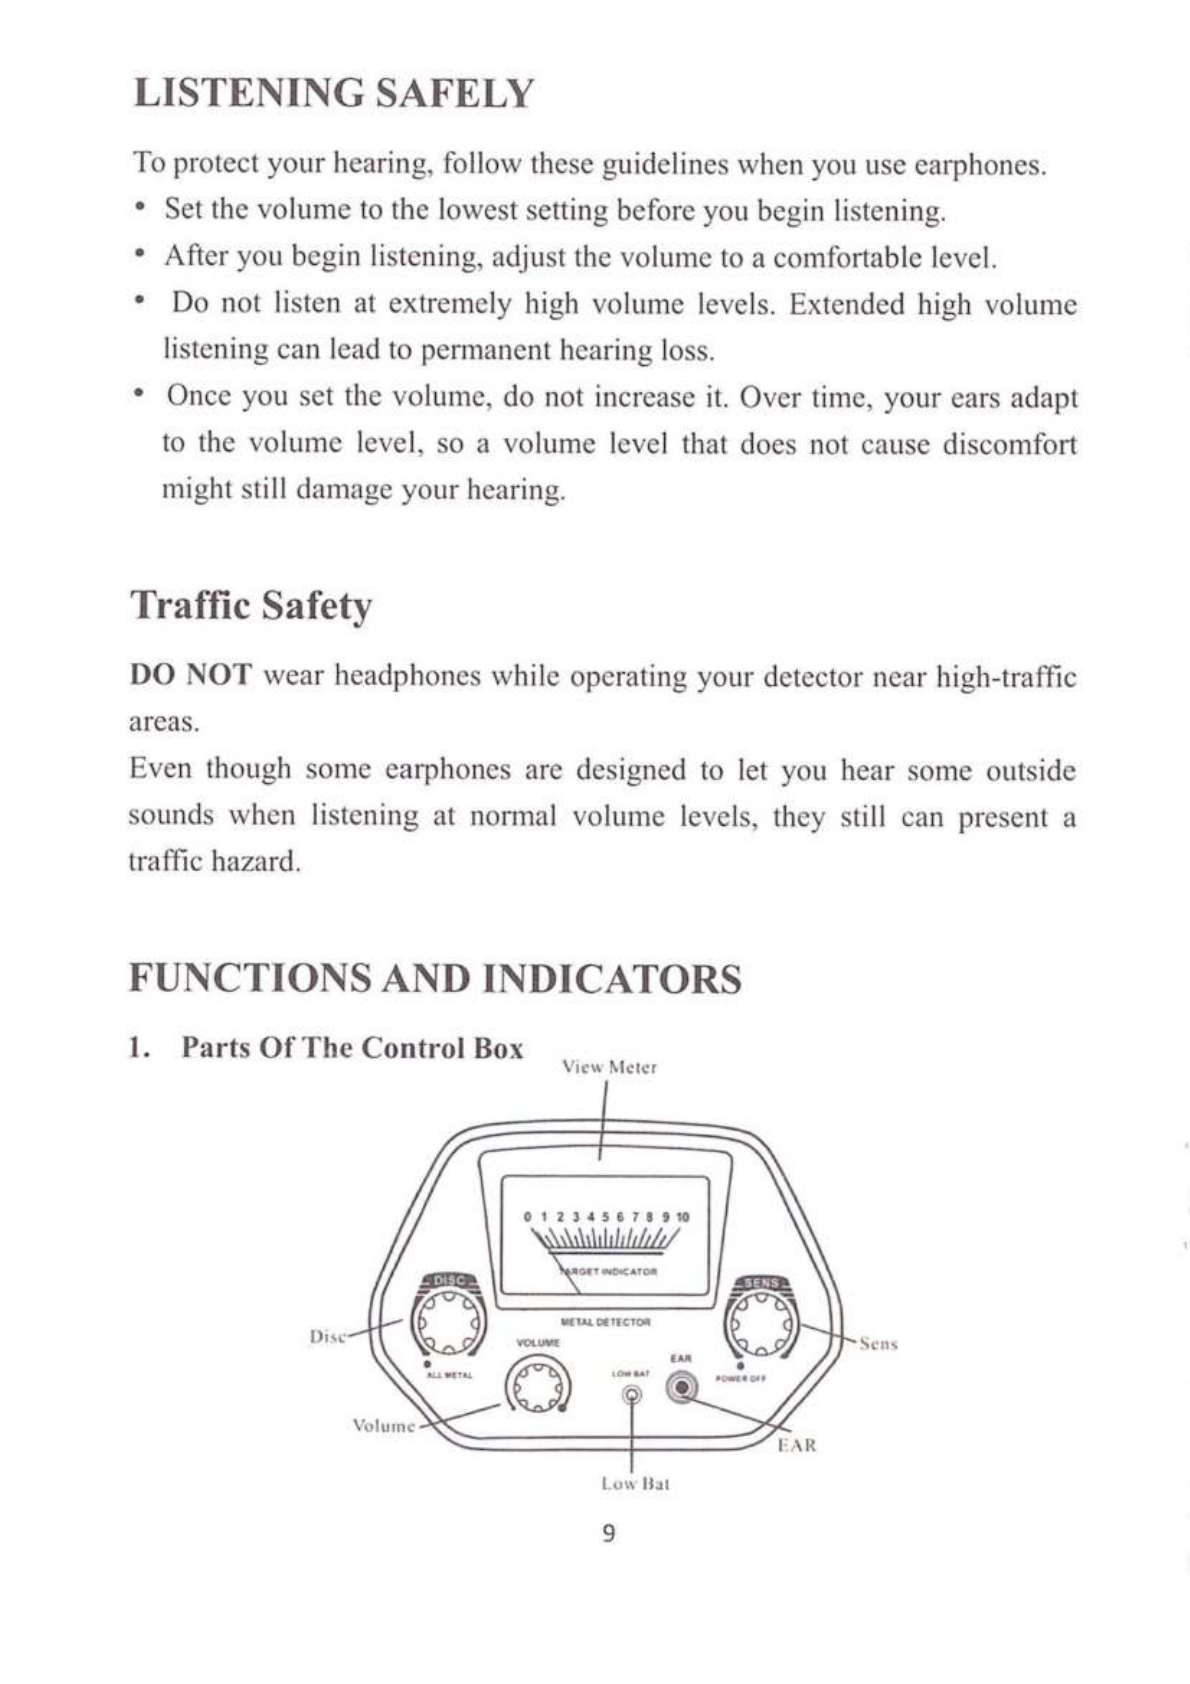
FUNCTIONS
AND
INDICATORS
1.
Parts
Of
The
Control
Box
View
Meter
012345678910
Disc
Low
Bat
9
arrow
to
lock
it
in
place
Lock
Nut
3.
Insert
the
latch
on
the
top
of
the
handle
into
the
assembly
hole
on
the
bottom
of
the
control
box.
Then
slightly
push
the
control
box
in
the
direction
of
IN
on
the
handle
to
fix
the
latch
in
place.
Control
Box
Fixing
Screw
——
Fixing
Screw
Assembly
Hole
4.
Tighten
the
fixing
screw.
5.
Insert
the
search
coil
cable
plug
into
the
five
pin
jack
on
the
front
control
box’s
housing.
6.
Lengthen
or
shorten
the
stem,
so
when
you
stand
upright
with
the
detector
in
your
hand,
the
search
coil
is
level
with
and
about
5~2
inches
/
1~Scm
above
the
ground.
After
that
tighten
the
lock
nut.
Caution:
°
The
search
coil
cable
plug
fits
into
the
connector
only
one
way.
DO
NOT
force
the
plug
or
you could
damage
it.
6
°
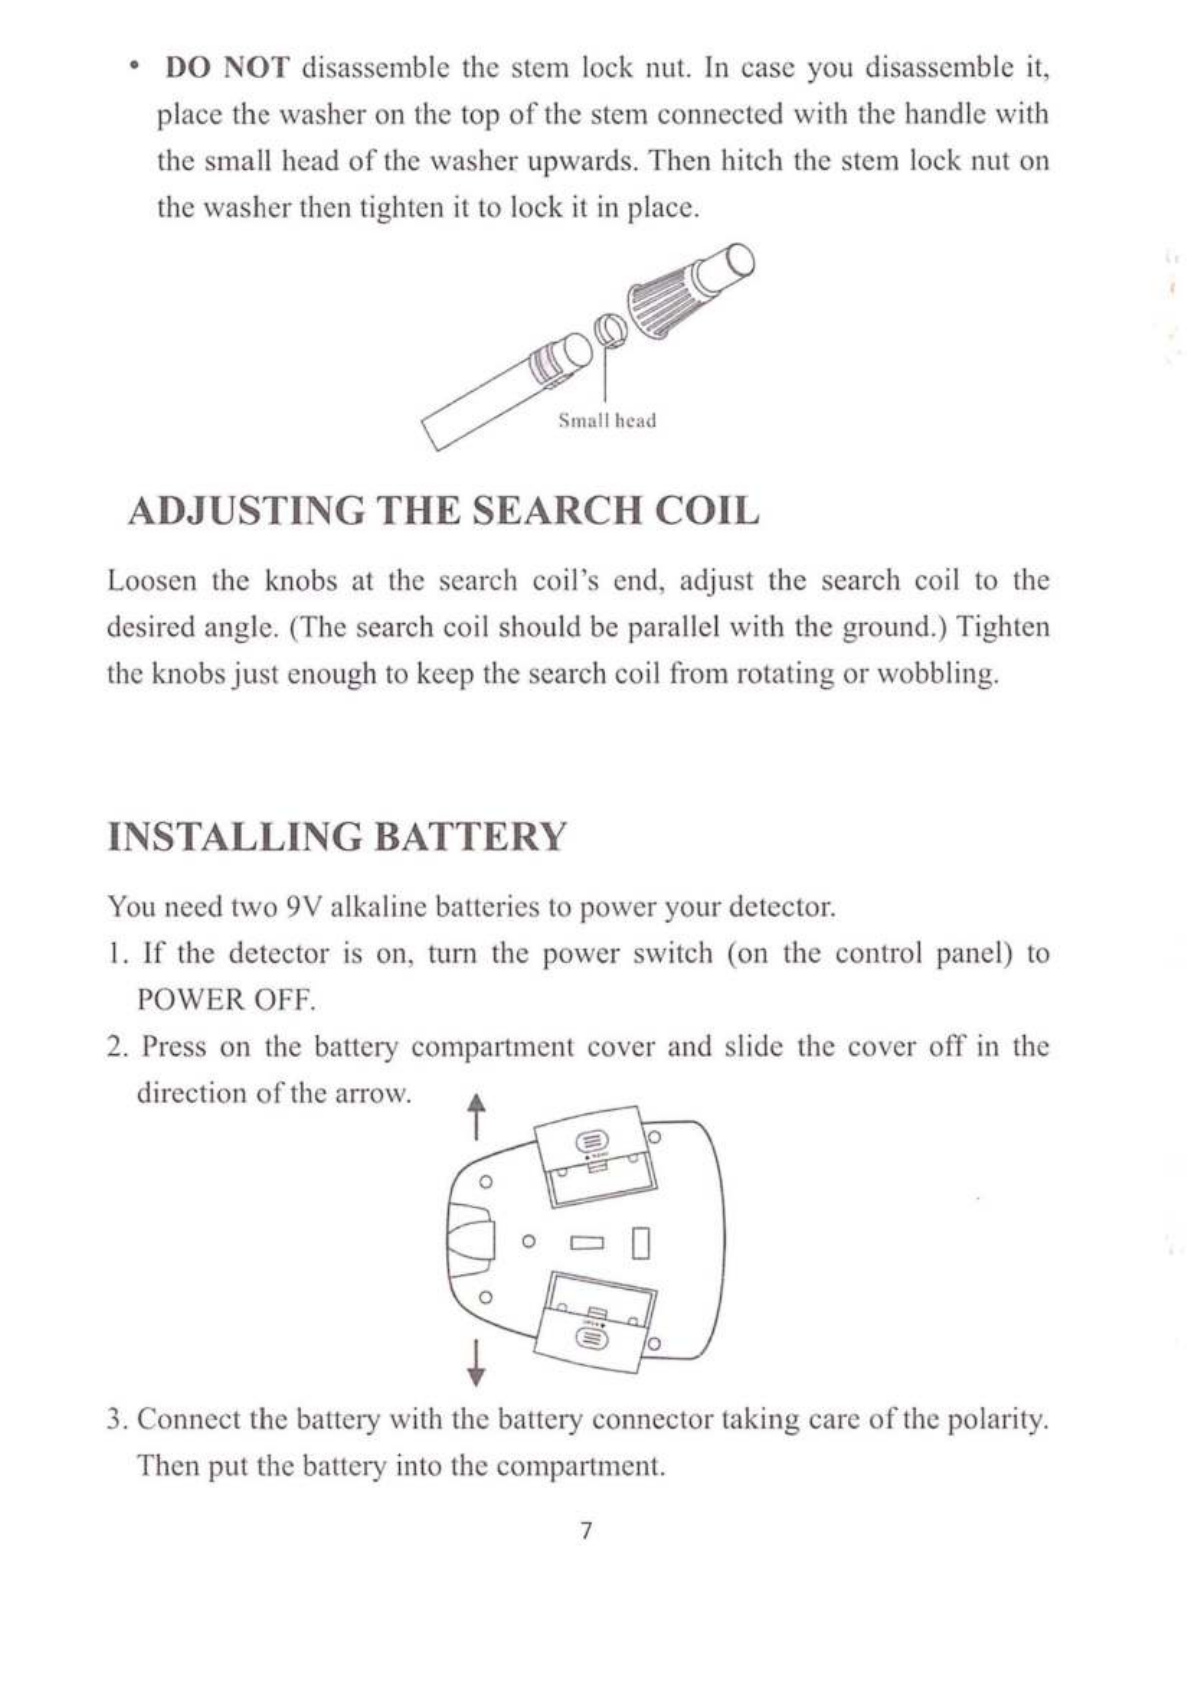
DO
NOT
disassemble
the
stem
lock
nut.
In
case
you
disassemble
it,
place
the
washer
on
the
top of
the
stem
connected
with
the
handle
with
the
small
head
of
the
washer
upwards.
Then
hitch
the
stem
lock
nut
on
the
washer
then
tighten
it
to
lock
it
in
place.
Small
head
ADJUSTING
THE
SEARCH
COIL
Loosen
the
knobs
at
the
search
coil’s
end,
adjust
the
search
coil
to
the
desired
angle.
(The
search
coil
should
be
parallel
with
the
ground.)
Tighten
the
knobs
just
enough
to
keep
the
search
coil
from
rotating
or
wobbling.
INSTALLING
BATTERY
You
need
two
9V
alkaline
batteries
to
power
your
detector.
l.
If
the
detector
is
on,
turn
the
power
switch
(on
the
control
panel)
to
POWER
OFF.
2.
Press
on
the
battery
compartment
cover
and
slide
the
cover
off
in
the
direction
of
the
arrow.
4
3.
Connect
the
battery
with
the
battery
connector
taking
care
of
the
polarity.
Then
put
the
battery
into
the
compartment.
7
4.
Replace
the
cover.
Cautions:
°
Use
only
fresh
batteries
of
the
required
size
and
recommended
type.
°
Always remove
old
or
weak
batteries;
batteries
can
leak
chemicals
that
can
destroy
electronic
parts.
°
If
you
do
not
plan
to
use
the
detector
for
a
long
time,
remove
the
batteries.
°
Dispose
of
old
batteries
promptly
and
properly.
You
can
extend
battery
life
by
using
earphones,
which
require
less
power
than
the
built-in
speakers.
USING
EARPHONES
You
can
connect
a
pair
of
headphones
(not
supplied)
to
the
detector
so
you
can
listen
privately.
Using
earphones
also
saves
battery
power
and
makes
it
easier
to
identify
subtle
changes
in
the
sounds
you
hear,
for
better
detection
results.
To
connect
earphones
to
the
detector,
insert
the
earphone’s
3.5mm
plug
into
the
EAR
jack
on
the
control
panel.
012345678910
RGET
INDICATOR
©
*
EAR
Note:
The
detector’s
internal
speaker
disconnects
when
you
connect
earphones.
°
DO
NOT
disassemble
the
stem
lock
nut.
In
case
you
disassemble
it,
place
the
washer
on
the
top of
the
stem
connected
with
the
handle
with
the
small
head
of
the
washer
upwards.
Then
hitch
the
stem
lock
nut
on
the
washer
then
tighten
it
to
lock
it
in
place.
Small
head
ADJUSTING
THE
SEARCH
COIL
Loosen
the
knobs
at
the
search
coil’s
end,
adjust
the
search
coil
to
the
desired
angle.
(The
search
coil
should
be
parallel
with
the
ground.)
Tighten
the
knobs
just
enough
to
keep
the
search
coil
from
rotating
or
wobbling.
INSTALLING
BATTERY
You
need
two
9V
alkaline
batteries
to
power
your
detector.
l.
If
the
detector
is
on,
turn
the
power
switch
(on
the
control
panel)
to
POWER
OFF.
2.
Press
on
the
battery
compartment
cover
and
slide
the
cover
off
in
the
direction
of
the
arrow.
4
3.
Connect
the
battery
with
the
battery
connector
taking
care
of
the
polarity.
Then
put
the
battery
into
the
compartment.
7
4.
Replace
the
cover.
Cautions:
°
Use
only
fresh
batteries
of
the
required
size
and
recommended
type.
°
Always remove
old
or
weak
batteries;
batteries
can
leak
chemicals
that
can
destroy
electronic
parts.
°
If
you
do
not
plan
to
use
the
detector
for
a
long
time,
remove
the
batteries.
°
Dispose
of
old
batteries
promptly
and
properly.
You
can
extend
battery
life
by
using
earphones,
which
require
less
power
than
the
built-in
speakers.
USING
EARPHONES
You
can
connect
a
pair
of
headphones
(not
supplied)
to
the
detector
so
you
can
listen
privately.
Using
earphones
also
saves
battery
power
and
makes
it
easier
to
identify
subtle
changes
in
the
sounds
you
hear,
for
better
detection
results.
To
connect
earphones
to
the
detector,
insert
the
earphone’s
3.5mm
plug
into
the
EAR
jack
on
the
control
panel.
012345678910
RGET
INDICATOR
©
*
EAR
Note:
The
detector’s
internal
speaker
disconnects
when
you
connect
earphones.
LISTENING
SAFELY
To
protect
your
hearing,
follow
these
guidelines
when
you
use
earphones.
°
Set
the
volume
to
the
lowest
setting
before
you
begin
listening.
°
After
you
begin
listening,
adjust
the
volume
to
a
comfortable
level.
°
Do
not
listen
at
extremely
high
volume
levels.
Extended
high
volume
listening
can
lead
to
permanent
hearing
loss.
°
Once
you
set
the
volume,
do
not
increase
it.
Over
time,
your
ears
adapt
to
the
volume
level,
so
a
volume
level
that
does
not
cause
discomfort
might
still
damage
your
hearing.
Traffic
Safety
DO
NOT
wear
headphones
while
operating
your
detector
near
high-traffic
areas.
Even
though
some
earphones
are
designed
to let
you
hear
some
outside
sounds
when
listening
at
normal
volume
levels,
they
still
can
present
a
traffic
hazard.
FUNCTIONS
AND
INDICATORS
1.
Parts
Of
The
Control
Box
View
Meter
012345678910
Disc
Low
Bat
9
arrow
to
lock
it
in
place
Lock
Nut
3.
Insert
the
latch
on
the
top
of
the
handle
into
the
assembly
hole
on
the
bottom
of
the
control
box.
Then
slightly
push
the
control
box
in
the
direction
of
IN
on
the
handle
to
fix
the
latch
in
place.
Control
Box
Fixing
Screw
——
Fixing
Screw
Assembly
Hole
4.
Tighten
the
fixing
screw.
5.
Insert
the
search
coil
cable
plug
into
the
five
pin
jack
on
the
front
control
box’s
housing.
6.
Lengthen
or
shorten
the
stem,
so
when
you
stand
upright
with
the
detector
in
your
hand,
the
search
coil
is
level
with
and
about
5~2
inches
/
1~Scm
above
the
ground.
After
that
tighten
the
lock
nut.
Caution:
°
The
search
coil
cable
plug
fits
into
the
connector
only
one
way.
DO
NOT
force
the
plug
or
you could
damage
it.
6

°
Dispose
of
any
junk
you
may
find,
only
in
approved
areas.
Do
not
leave
it
for
the
next
treasure
hunter
find.
PARTS
OF
THE
DETECTOR
Control
Box
Search
Coil
Adjustable
Stem
ArmRest
u.
with
Cable
PREPARATION
ASSEMBLING
THE
DETECTOR
Assembling
the
detector
is
easy
and
requires
no
special
tools.
Just
follow
these
steps.
1.
Unscrew
the
knobs
on
the
search
coil
and
remove
the
knobs
and
the
connector.
Insert
the
smaller
stem
and
align
the
holes
on
the
search
coil
bracket
and
the
stem.
Push
the
connector
through
the
holes,
then
replace
and
tighten
the
knobs.
2.
Loosen
the
stem’s
lock
nut
(connected
with
the
handle)
in
the
direction
of
the
arrow.
Then
insert
the
smaller
stem
into
the
big
stem
connected
with
the
handle.
Turn
the
stem’s
lock
nut
in
the
reverse
direction
of
the
5
a.
DISC
—
Rotate
the
control
clockwise
away
from
ALL
METAL
to
get
DISC
mode.
The
DISC
mode
comes
with
auto
ground
balance.
Rotate
the
control
slowly
and
clockwise
to
eliminate
different
trash
objects.
Rotate
the
control
counter
clockwise
to
the
end
to
get
ALL
METAL
mode.
ALL
METAL
also
comes
with
auto
ground
balance.
It’s
used
to
find
not
only
ferrous
metal,
but
also
non-ferrous
one
(see
more
details
below).
b.
SENS
—
Rotate
the
control
counter
clockwise
to
the
end
to
power
off
the
unit.
Rotate
the
control
clockwise
to
power
on
the unit.
Continue
rotating
it
clockwise
to
get
higher
sensitivity.
c.
VOLUME
-—
Rotate
the
control
clockwise
to
get
higher
level
or
to
get
lower
volume
level
by
rotating
it
counter
clockwise.
d.
LOW
BAT
-
Low
battery
indicator.
When
LOW
BAT
indicator
lights,
user
should
replace
the
batteries
at
once.
e.
EAR
—
3.5mm
headphone
jack
for
connecting
headphones.
f.
VIEW
METER
-
When
unit
finds
any
metal
target,
the
meter
pointer
swings
to
the
right.
TESTING
AND
USING
THE
DETECTOR
This
metal
detector
has
two
operation
modes:
ALL
METAL
&
DISC.
ALL
METAL
-
is
used
to
find
all
kinds
of
metal
targets.
DISC
-
Is
used
to
discriminate
the
metal
type.
Set
the
operation
mode
to
ALL
METAL,
DISC
to
counter
clockwise
end,
SENS
to
high
position.
Then
hold
the
search
coil
parallel
with
the
ground
about
5-2
inches
/
1-5cm
above
the
surface.
Sweep
the
search
coil
from
side
to
side
in
an
arc
line
of
2.75
inches
/
7cm
motion.
When
the
detector
detects
a
buried
target,
it
sounds
a
tone.
Make
a
visual
note
of
exact
spot
on
the
ground
where
the
detector
beeps.
Then
stop
the
search
coil
directly
over
this
point
on
the
ground.
Move
the
search
coil
10
straight
forward
away
from
you
and
straight
back
towards
you
a
couple
of
times.
Meantime
slowly
rotate
the
DISC
control
clockwise
away
from
ALL
METAL
until
the
unit
does
not
sound
or
sounds
short
tone.
You
can
identify
what
kind
of
metal
is
detected
according
to
the
setting
position
of
DISC.
A
reference
for
you
to
know
what
kind
of
metal
is
rejected
depending
on
the
DISC
setting.
Setting
of
DISC
Metal
Rejected
Near
11:00
Iron
Near
12:00
Nickel
coin
(5
¢
),
pull
tab
Near
13:00
Zinc
coin
(1
¢_
87
version)
Near
15:00
Copper
coin
(1
€
76
version)
When
the
DISC
control
is
set
to
the
clockwise
end
most
of
metal
is
rejected,
except
silver
(25¢,50¢
and
$1).
Search
Coil
Sweeping
Hints:
¢
Never
sweep
the
search
coil
as
if
it
were
a
pendulum.
Raising
the
search
coil
while
sweeping
or
at
the
end
of
a
sweep
will
cause
false
readings.
°
Sweep
slowly
hurrying
will
cause
you
to
miss
targets.
°
It’s
better
you
sweep
the
search
coil
from
side
to
side
in
an
arc
line
of
3
inches
motion
and
keep
the
search
coil
parallel
with
the
ground.
Factors
That
Affect
The
Detecting
It’s
difficult
to
have
an
accurate
detecting
result.
It
takes
practice
to
get
better
detection
results.
Sometimes
the
detecting
may
be
restricted
by
some
factors.
°
If
there
are
interference
from
other
instruments
or
electrical
cable,
TV
or
radio
in
your
searching
area,
lower
the
sensitivity,
or
to
change
the
current
searching
area.
11
FEATURES
With
your
metal
detector,
you
can
hunt
for
coins,
relics,
jewelry,
gold,
and
silver
just
about
anywhere.
This
metal
detector
is
versatile
and
easy
to
use.
Features
include:
Two
Operation
Modes:
All
Metal,
Disc
ALL
METAL
-
Lets
you
search
for
all
different
types
of
metal
with
auto
ground
balance
and
high
sensitivity.
It’s
the
best
operation
mode.
DISC
-
Discriminates
what
kind
of
metal
is
being
detected.
Volume
—
To
adjust
the
volume
level of
speaker
and
headphone.
Earphone
Jack
—
Lets
you
connect
headphones
(not
supplied)
to
the
detector.
View
Meter
and
Pointer
—
The
meter
pointer
swings
to
the
right
if
metal
is
found.
Waterproof
Search
Coil
—
Lets
you
search
for
metal
objects
under
shallow
water.
Note:
The
search
coil
is
waterproof,
but
the
control
housing
1s
not.
Adjustable
Stem
—
Lets
you
adjust
the
detector’s
length.
Operates
on
two
9V
alkaline
batteries
(not
supplied).
TREASURE
HUNTER’S
CODE
OF
ETHICS
A
few
basic
rules
you
should
follow
while
using
your
detector.
°
Always
get
permission
before
searching
any
site.
°
Respect
the
rights
and
property
of
others.
°
Observe
all
national,
state
and
local
laws
when
treasure
hunting.
°
Never
destroy
historical
or
archaeological
treasures.
If
you
are
not
sure
about
an
object
you
have
found,
contact
a
museum
or
historical
society
in
your
area.
°
Leave
the
land
vegetation
as
is,
and
fill
in
any
holes
you
dig.
°
Use
the
detector
only
in
safe
areas.
4

CONTENTS
Features
oooeoo..0oe0000000..0.9.0.090.9.900eo0e.eeoe0.0.0.0.0.0.0....00.
4
Preparation
Parts
of
the
detector
vv
sooo
o0000
0000000000022
00000000.
5
Assembling
the
detector
seeeeerrseeccccccccccccccceccces
5
Adjusting
the
search
coll
evvvoooo000000000
0000000000000
00.
7
Installing
the
batteries
e00000
00000000
EEE EEE
EEE
E00
E00
000000
7
Using
the
headphones
**eeeeeeeececscccccccccccccccccese
8
Functions
and
Indications
Parts
of
the
control
box
*e*eeeeeeeeeeeeeeeecccccecccecescecccccce
9
Displays
**eeeeeecessceccceccccsccccccccscccccccsccceccers
|()
Operation
Using
the
detector
esererececcccecccecccccccccccccccccccceces
|()
Search
coil
sweeping
hints
s*+eeeesesesecceccccccccccccccoccee
|]
Factors
that
affect
the
detecting
*seseesessereccccececcccccccece
J]
Care
and
maintenance
e00
000000
EEE
EEE
EEE
EEE EEE
EEE
EEE
EEE
EEE
00
12
°
When
searching
in
highly
mineralized
area,
the
unit
will
sound
even
if
there’s
no
metal.
In
this
case,
you
can
lower
the
sensitivity
and
increase
the
height
between
the
search
coil
and
the
ground
until
the
false
signal
disappears.
If
necessary,
reset
the
DISC.
°
When
searching
in
trash
area,
it’s
better
to
set
the
DISC
to
11:00
position,
so
that
the
unit
can
notch
most
of
invaluable
metals
such
as
nails
and
small
trashy
iron.
°
Move
away
any
metal
digging
tool
when
searching.
°
Sensitivity
level
is
generally
in
contradiction
with
that
of
the
Discrimination.
The
higher
the
sensitivity
level
is,
the
worse
discrimination
will
be.
But
you
can
lower
the
sensitivity
to
have
better
discrimination.
CARE
AND
MAINTENANCE
Your
metal detector
is
an
example
of
superior
design
and
craftsmanship.
The
following
suggestions
will
help
you
care
for
your
metal
detector
so
you
can
enjoy
it
for
years.
Handle
the
detector
gently
and
carefully.
Dropping
it
can
damage
circuit
boards
and
can
cause
the
detector
to
work
improperly.
Use
the
detector
only
in
normal
temperature
environments.
Temperature
extremes
can
shorten
the
life
of
electronic
devices,
causing
internal
damage
to
the
detector.
Keep
the
detector
away
from
dust
and
dirt,
which
can
cause
premature
wear
and
tear
of
parts.
Wipe
the
detector
with
a
damp
cloth
occasionally
to
keep
it
looking
new.
Do
not
use
harsh
chemicals,
cleaning
solvents,
or
strong
detergents
to
clean
the
detector.
12

MD-4030
Updated
Version
Metal
Detector
ALL
METAL
-
Lets
you
search
for
all
different types
of
metal
with
auto
ground
balance
and
high
sensitivity.
It’s
the
best
operation
mode.
DISC
—
Discriminates
what
kind
of
metal
is
being
detected.
Volume
—
To
adjust
the
volume
level
of
speaker
and
headphone.
Earphone
Jack
—
Lets
you
connect
headphones
(not
supplied)
to
the
detector.
View
Meter
and
Pointer
—
The
meter
pointer
swings
to
the
right
if
metal
is
found.
Waterproof
Search
Coil
—
Lets
you
search
for
metal
objects
under
shallow
water.
Note
:
The
search
coil
is
waterproof,
but
the
control
housing
is
not.
Adjustable
Stem
—
Lets
you
adjust
the
detector’s
length.
Operates
on
two
9V
alkaline
batteries
(not
supplied).


Model
:
MD-40305
UNDERGROUND
UNDERGROUND
METAL
DETECTOR
|
METAL
DETECTOR
Table of contents


