Bordeaux BEWC-66 User manual

96 Can + 33 Bottle
Dual Zone Wine Cooler
Built-in or Free Standing
Operation and Storage Manual
Model: BEWC-66


Contents
1 Features 2
2 Before First Use 2
3 Important Safety Measures and Instructions 3
4 Warnings and Cautions 4
5 Installation 7
6 Before Initial Operation 8
7 Device Overview 9
8 Operation 10
9 Temperature Setting 11
10 Helpful Hints/Energy Saving 11
11 Cleaning and Maintenance 12
12 How to Move the Appliance 13
13 How to Move the Shelves 13
14 Cabinet Dimensions 14
15 Electrical Circuit Diagram 14
16 Troubleshooting 15
17 Warranty Statement 17
18 Decommissioning 18
19 Technical Specifications 19
2
96 Can + 33 Bottle Dual Zone Wine Cooler
Thank you for choosing a Bordeaux Wine Cooler. If operated and taken care
of properly and in accordance with these instructions, this appliance will be
useful for many years.
1 Features
• Dual zone for up to 96 cans
and 33 bottles*
• Temperature range:
Right zone (wine) 5–18°C
Left zone (cans) 3–10°C
• Built-in or free-standing installation
• Blue LED interior light with switch
• Tempered glass door
*Based on standard shape 0.75 litre bottles.
**Extra Beechwood shelves available should you wish to store wine bottles
in both cabinets.
2Before First Use
• Before first use, remove any stickers or similar from the appliance except for
the rating label.
• Dispose of plastic bags as they pose a risk of suffocation to young children.
Please read this manual before operating the appliance and keep it in a safe
place for future reference. If this appliance is transferred to a new owner, the
manual should also be provided. Ignoring the following safety instructions may
endanger your health and life.
• Stainless steel door
frame and handle
• No frost interior with
fan circulating
• Energy efficient design
• 100% HFC free and CFC free
• Security lock system
• Beechwood shelves**

3
3 Important Safety Measures and Instructions
• Before operating the wine cooler, check that the voltage indicated on the
appliance’s technical plate corresponds to the voltage of the electricity
supplied to your home.
• Check the electrical connections that will be used to run the wine cooler.
Make sure all wires and connections to the appliance work properly and
that they are not time-worn. Check that the technical requirements match
that of the appliance. A check of existing and new connections should be
undertaken by an authorised professional. Modifications to the electrical
mains to enable the installation of the appliance must be performed by a
qualified professional.
• This appliance is intended for private domestic use only.
• This appliance is for indoor use only.
• This appliance is not intended to be operated for commercial purposes,
whilst camping or during transport.
• Operate the appliance in accordance with its intended use only.
• Do not allow anyone who is not familiar with this instruction manual to
operate the appliance.
• This appliance may be operated by children aged from 8 years and above
as well as by persons with reduced physical, sensory and mental capabilities
or lack of experience and knowledge if they are supervised or have been
instructed concerning the safe use of the appliance and comprehend the
hazards involved. Children must not play with the appliance. Cleaning
and user maintenance must not be carried out by children unless they are
supervised.

4
4 Warnings and Cautions
• Do not connect to the mains if the appliance itself or the power cord or the
plug are visibly damaged.
• Never try to repair the appliance yourself. If the appliance does not operate
properly, please contact the retailer. Use original spare parts only.
• If the power cord becomes damaged it must be replaced
by the manufacturer or a qualified electrician.
• This appliance is equipped with the environmentally friendly refrigerant
R600a. The refrigerant R600a is inflammable. The components of the
cooling circuit must not be damaged during transport or use.
• If any part of the cooling circuit is damaged, the appliance must not stand
near a fire, naked light or spark-generating devices. Immediately contact the
retailer if under warranty or customer support
• If gas is set free in your home:
1. Open all windows.
2. Do not unplug the appliance and do not use the control panel or
thermostat.
3. Do not touch the appliance until the gas has dissipated as sparks may be
generated that could ignite the gas.
• When disposing of or decommissioning the appliance, keep all components
away from fire or other sources of ignition.
• Do not install the appliance near volatile or combustible materials
(e.g. gas, fuel, alcohol, paints) or in rooms which may have poor air
circulation (e.g. garage).
EXPLOSION HAZARD
Do not store any explosive materials or sprays that contain flammable
propellants in the appliance.
• Do not connect the appliance to the electric supply unless all packaging and
transit protectors have been removed.

5
• Operate the appliance with 220–240V AC/50Hz only. All connections and
energy-leading components must be replaced by an authorised professional.
• Do not use an extention cord or a multi-socket when connecting the
appliance to the mains.
• A dedicated and properly grounded socket meeting the data of the plug is
required to minimise any kind of hazard. The appliance must be grounded
properly.
• Check that the power cord is not placed under the appliance or damaged
when moving the appliance.
• The technical data of your energy supplier must meet the data on the model
plate of the appliance.
• Your domestic circuit must be equipped with an automatic circuit breaker.
• Do not modify the appliance.
RISK OF ELECTRIC SHOCK
Turn off the power before you install the appliance and before you connect
it to the mains. Do not use a steam cleaner to clean or defrost the appliance.
The steam can make contact with the electrical parts and cause an electrical
short. Never use mechanical devices, knives or other sharp-edged items to
remove encrusted ice from inside the appliance.
• Disconnect the appliance from the mains before undertaking cleaning or
maintenance.
• Do not use electrical appliances inside the wine cooler.
• Do not place heat-radiating appliances on the wine cooler.
• Do not install the appliance in a place where it may come in contact with
water/rain, as the insulation of the electrical system will be damaged.
• Do not put a kettle or objects containing water e.g. a vase on top of the wine
cooler as spilled water can seriously damage the appliance.

6
• Children must never play with the appliance.
• If you decommission the wine cooler (even temporarily), ensure that children
cannot access the appliance interior.
• The condenser and the compressor, located at the rear of the appliance, can
reach high temperatures during ordinary operation. Carry out installation
according to this manual. Insufficient ventilation of the wine cooler will
impair its operation and will damage the appliance. Do not cover or block the
ventilation slats at any time.
• Do not touch the extremely cooled surfaces with wet or damp hands; skin
may stick to these surfaces.
• When you move the appliance, hold it at its base and lift it carefully. Keep
the appliance in an upright position.
• Do not tilt the appliance more than 45°.
• If the appliance is transported in a horizontal position, oil may flow from the
compressor into the refrigerant circuit.
• Leave the appliance in an upright position for 4–6 hours before you switch it
on to ensure that the oil has flowed back into the compressor.
• Never use the door for moving the appliance as you will damage the hinges.
• Do not operate the appliance unless all components are installed properly.
• Do not stand or lean on the base, the drawers, the doors etc of the
appliance.
• Do not put hot liquids or hot foodstuff into the appliance.
• The air vents of the appliance or its built-in structure (if the appliance is
suitable for being built-in) must be completely open, unblocked and free of
any kind of dirt.

7
5 Installation
• Unpack the appliance carefully. Dispose of the packaging.
• Packaging may include a rubber wedge that comes inserted into the gap in
the door. This is there to prevent the door from dropping during transit. Keep
this wedge with the user manual in case you move the wine cooler again in
the future.
• Included inside the cooler is a small white plastic tray. In cases where the
inside of the cooler is too dry and you wish to increase the humidity, fill the
tray with water and then position inside the cooler where it won’t be knocked
over. Refill as needed.
• The appliance and its accessories may have been protected from damage
during transport by the use of adhesive tape etc. After removal, tape residue
may be removed using lukewarm water, mild detergent, and a damp cloth
(see chapter Cleaning and Maintenance). Never remove any labels from the
back of the appliance.
• Install the appliance in a suitable position with an adequate distance from
sources of heat and cold.
• Check that the appliance and the power cord are not damaged.
• Install the appliance in a dry and well-ventilated place.
• Protect the appliance from direct sunlight.
• The doors must open completely and without hindrance.
• Install the appliance on a level, dry and solid floor.
• Connect the appliance to the mains properly.
• To allow air circulation, maintain a gap between the walls and the bottles.
• Do not overcrowd the wine cooler.
• Distribute wine bottles evenly throughout the wine cooler - avoid grouping
together.
• The wooden shelves may be moved or removed to accommodate non-
standard bottles.
8
• Do not obstruct fans.
• Do not move the wine cooler if it contains bottles.
• Do not pull out more than one loaded shelf at a time as this may cause the
wine cooler to tilt forward.
6 Before Initial Operation
• Leave the appliance in an upright position for 4–6 hours before you connect
it to the mains.
• Clean the appliance thoroughly. Be very careful, especially inside the
appliance (see chapter Cleaning and Maintenance).
• The appliance must be connected to the mains properly.
• Allow the appliance to stabilise the temperature for approximately 24 hours
before use.
• Do not overfill the appliance.
9
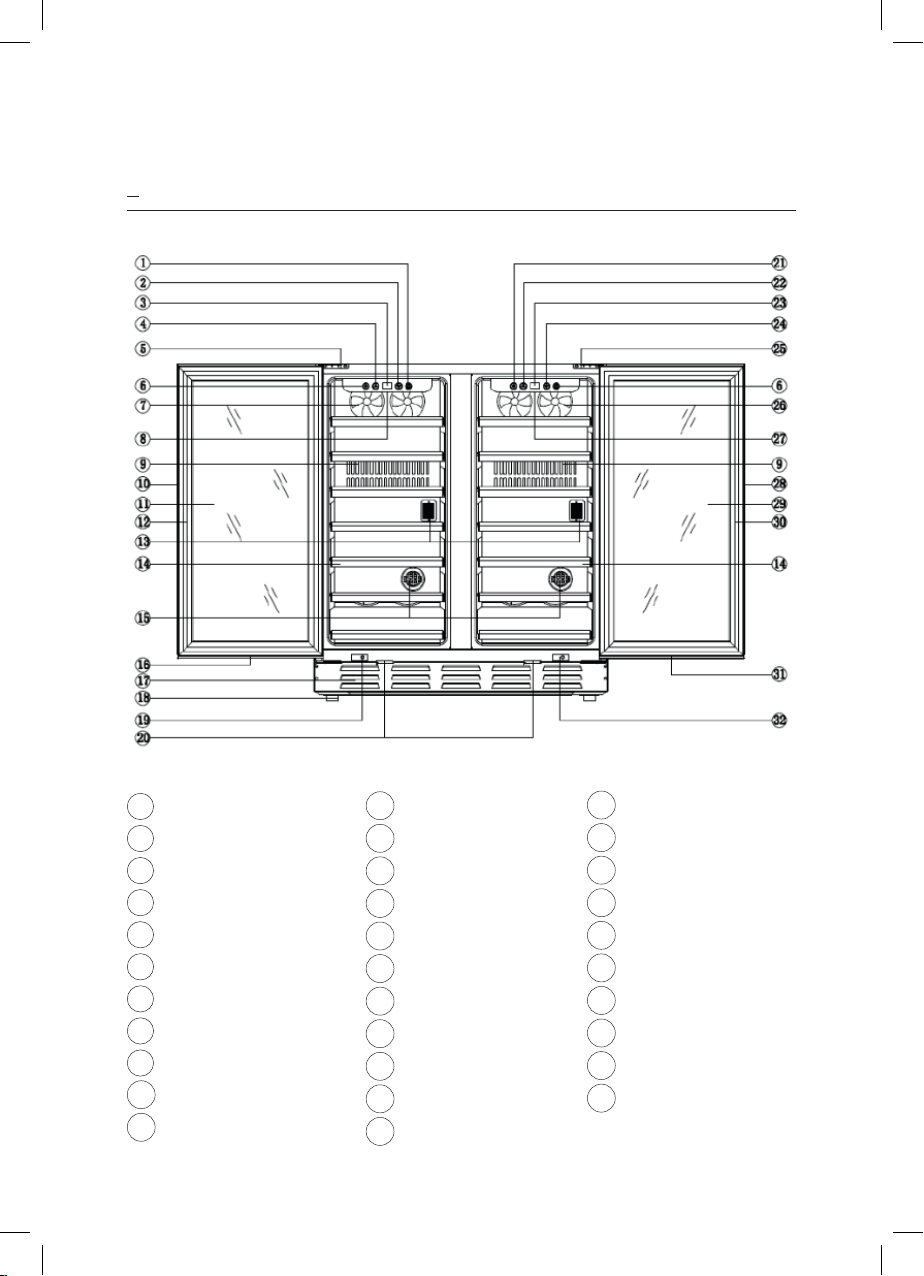
7 Device Overview
1Light Switch (°C/F°)
2Temperature Setting
3Temperature Display
4Temperature Setting
5Upper Hinge
6C°/F° Switch
7Fan
8Light
9Evaporator Window
10 Handle
11 Glass
12 Door Seal
13 NTC Point
14 Shelf
15 Carbon Filter
16 Lock
17 Exhaust Window
18 Foot
19 Light Switch
20 Lock Support
21 Light Switch
22 Temperature Setting
23 Temperature Display
24 Temperature Setting
25 Upper Hinge
26 Fan
27 Light
28 Handle
29 Glass
30 Door Seal
31 Lock
32 Light Switch

10
8 Operation
The appliance can only reach the relevant temperatures when:
1. The ambient temperature meets the climatic class.
2. The door is closed properly.
3. You do not open the door too often or for too long.
4. The door seals are in good condition.
5. The appliance is properly positioned.
6. You have not overfilled the appliance.
7. You do not store warm or hot food in the appliance.
Note: Operating the appliance at high ambient temperatures, whilst also
operating the appliance at the coldest setting, may cause the compressor to
function continuously in order to regulate the temperature inside the appliance.
The ambient room temperature should remain between 5°C and 30°C.
Temperatures outside this range may aect the performance of the wine
cooler as interior temperatures may fluctuate or may not be reached. As a
general rule, the desired internal fridge temperature should be no more than
5°C cooler than the ambient temperature of the room.
For example, if the ambient temperature of the room is 20°C then the lowest
temperature setting for the wine cooler should be 15°C. You can set it for
lower than this but the fridge will be working harder than it should, which will
aect it’s expected life span, and the set temperature may not be reached.
The lower the ambient room temperature the easier it is for the wine cooler to
operate - a 10°C room is preferable to a 30°C room.
• Avoid placing the wine cooler near microwaves or other heat emitting
appliances.
• As with a refrigerator, from time to time the wine cooler may make noises.
These include:
• Cracking/popping - expansion and contraction of the refrigerant gas.
• Gurgling - refrigerant flowing through the coils.
• Fan - circulating air within the wine cooler.
11
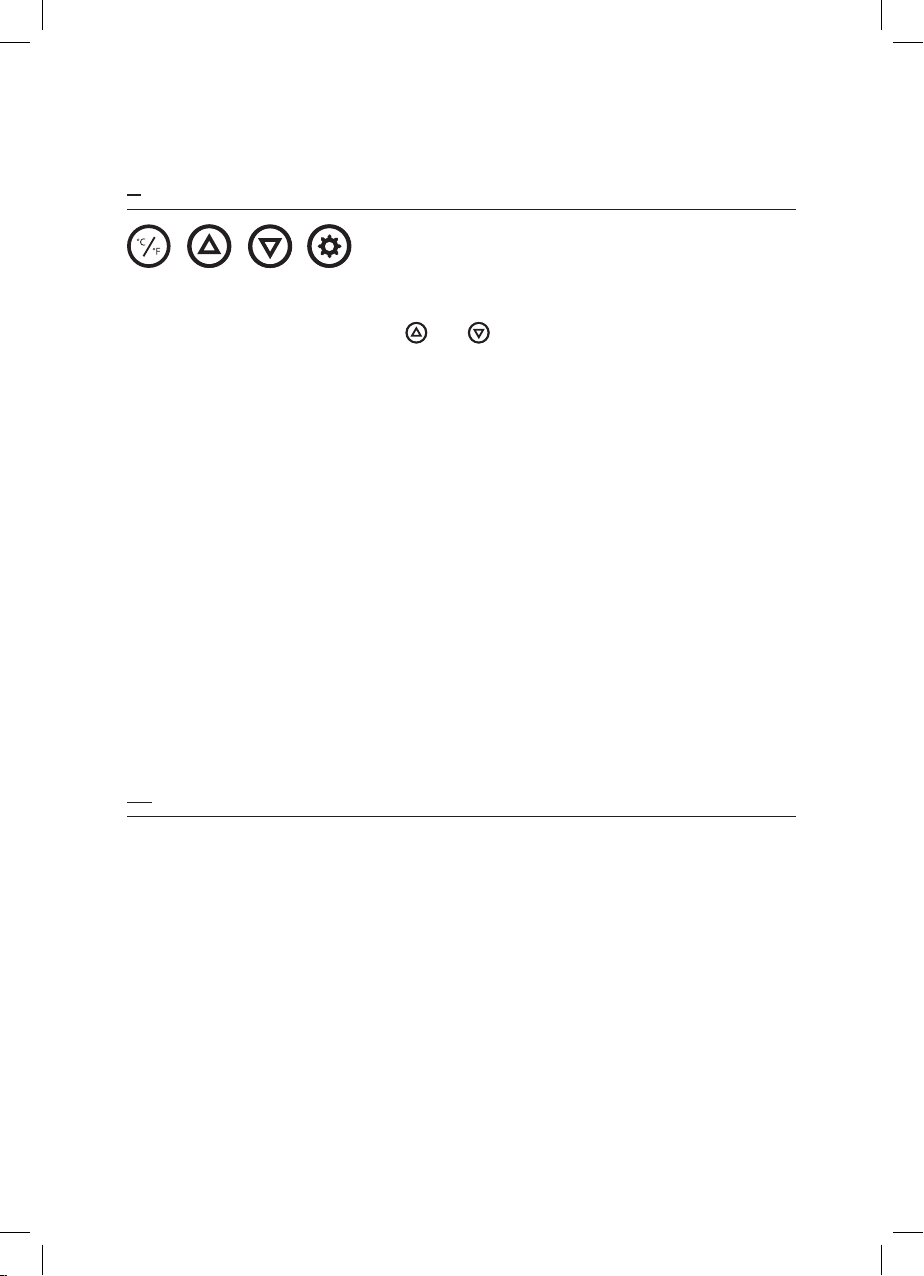
9 Temperature/Light Settings
• Press the POWER button for 3 seconds to turn the unit on or off
• Set the temperature using the and buttons. (This will increase/
decrease by 1° each time).
• The temperature range is between 3–10°C (38–50°F) for the left side and
between 10–18°C (50–66°F) for the right side.
• To switch the temprature display from Celsius degrees to be Fahrenheit
degrees or vice versa, press and hold LIGHT for 3 seconds.
• Flashing LED = Setting mode of the temperature.
• Constant LED = Cooling temperature.
• Switch on/off the internal light using the LIGHT button.
• To shut down the inner light and control panel display light, press and hold
both UP and DOWN buttons for 3 seconds. (the device will keep running
normally). Repress and hold both buttons for 3 seconds for the device to
restore itself to it’s normal status.
10 Helpful Hints/Energy Saving
• Try opening the door as little as possible, especially when the weather is warm
and humid. When you open the door, close it as soon as possible.
• Ensure the appliance is well-ventilated on all sides.
• Disconnect the appliance from the mains if not in operation.
• Always keep the door seals clean and in good condition.

12
11 Cleaning and Maintenance
WARNING
Disconnect the appliance from the mains before you clean or maintain it.
• Always keep the appliance clean to avoid unpleasant odours.
• Dust deposits on the condenser will increase energy consumption. Clean the
condenser twice a year with a vacuum cleaner or a soft brush.
• Remove rings and bracelets etc., before cleaning or maintaining the
appliance to avoid damaging the appliance surface.
Detergent
• Do not use harsh, abrasive detergents.
• Do not use solvents.
External Cleaning
• Use a moist cloth and a mild, non-acid detergent.
• Use clean water to rinse.
• Dry surfaces with a soft, non-abrasive cloth.
Internal Cleaning
• Clean interior walls, shelves and other removable parts with warm water
and a mild, non-acid detergent.
• Use clean water to rinse.
• Dry surfaces with a soft, non-abrasive cloth.
• Check the water drain and clean it if necessary.
Door Seal
• Clean with warm water and a mild, non-acid detergent.
13
12 How to Move the Appliance
• Remove all wine bottles and/or cans.
• Securely tape down all loose items inside the appliance, or remove them.
• Tape the door closed shut.
• Wind the four levelling feet up to the base of the cooler.
• When moving the appliance, hold it at its base and lift carefully. Keep the
appliance in an upright position. Use two people to lift the cooler.
• Do not tilt the wine cooler more than 45°. If the wine cooler is transported
in a horizontal position, oil may flow from the compressor into the cooling
circuit.
• Leave the wine cooler in an upright position for 4 to 6 hours before switching
it on to ensure that the oil has flowed back into the compressor.
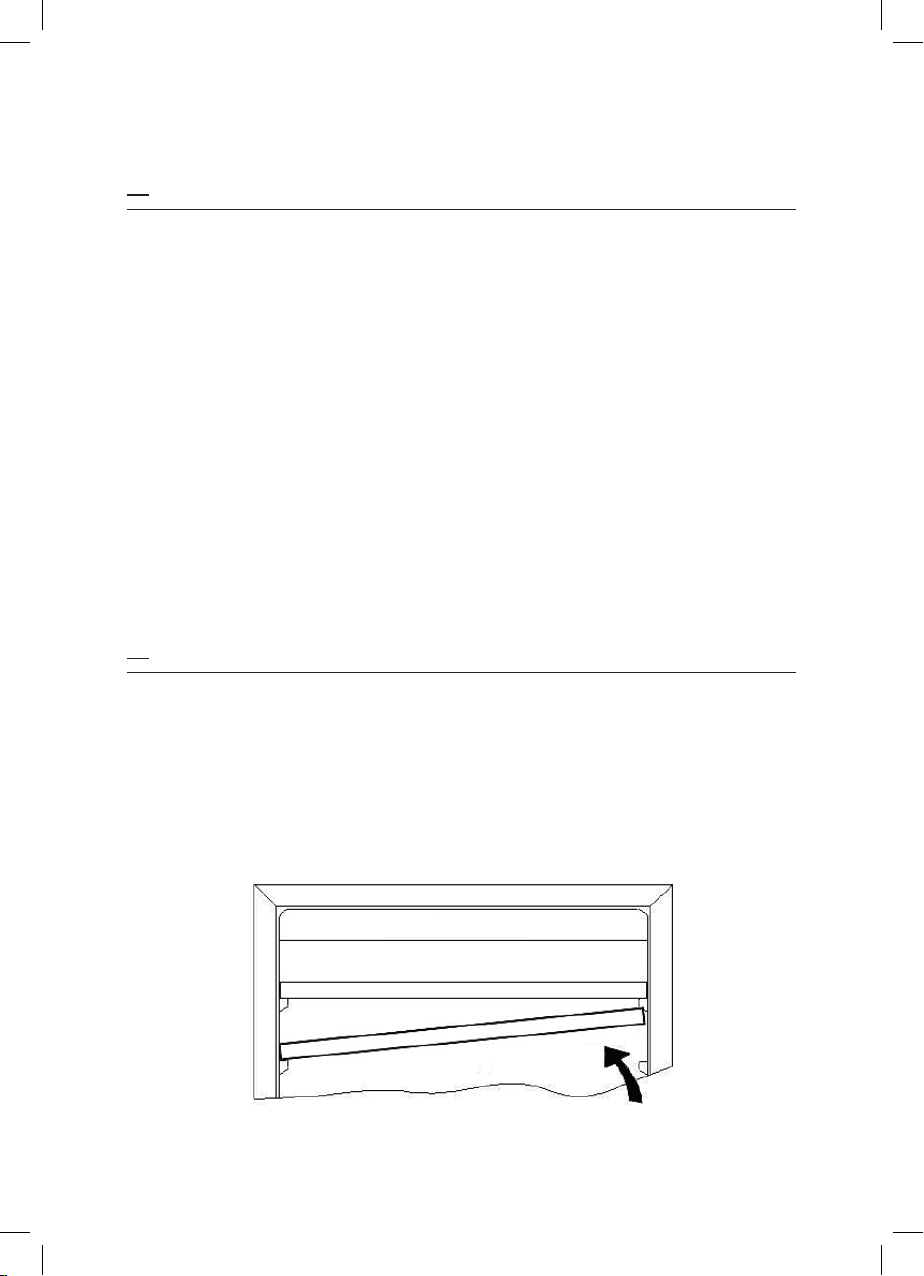
13 How to Move the Shelves
• To avoid damaging the door seal, open the door completely before removing
the shelves.
• For easy access to the contents, pull the shelves approximately one third
out. A notch on both sides of the tracks protects bottles from falling.
• To remove/insert a shelf, angle it as shown below.

14
14 Cabinet Dimensions
15 Electrical Circuit Diagram

15
16 Troubleshooting
PROBLEM POSSIBLE CAUSE SOLUTION
Wine cooler
doesn’t work.
The socket is faulty.
Check the corresponding
socket by connecting it with
another appliance.
The plug has come loose.
Check the plug of the
appliance is connected to
the socket and pushed all
the way in.
The socket is not supplied
with energy.
Check the switch is in the
‘ON’ position.
The fuse is switched o. Check the fuse. If fuse is
blown, replace it.
The voltage is too low. Compare the data on the
model plate.
Wine cabinet
internal walls have
frozen/iced up
(particularly near the
evaporator outlet).
Wine cooler not cool
enough.
The door was frequently
opened.
Minimise opening and
closing of door too often.
The door is not properly
closed. Close the door properly.
The door seal is damaged. Replace the door seal.
The appliance has been over
filled.
Do not overfill - remove
bottles until problem
resolves.
Wine cooler doesn’t
work or is not cool
enough.
Main control board is
defective. Contact the retailer
(Harvey Norman) if under
warranty. If no longer
under warranty, contact
the supplier’s service
department at apbservice
@asiapacbrands.com
Wine cooler has no
power. PCB is defective.
LED display shows
“LO” & “ER”
Control Panel is defective
or NTC sensor is defective.

16
PROBLEM POSSIBLE CAUSE SOLUTION
The plug is damaged
and wine cooler has
no power.
Plug is defective. Contact the retailer
(Harvey Norman) if under
warranty. If no longer
under warranty, contact
the supplier’s service
department at apbservice
@asiapacbrands.com
No lighting. Lighting PCB is defective.
Temperature cannot
be determined.
LED Display PCB is
defective.
Wine cooler is
making too much
noise. The appliance is not
installed on a level, dry
and solid floor.
Realign and adjust the
appliance until it is level and
ensure floor is solid and dry.
The compressor has
a strong vibration.
Wine cooler is
making more noise
than normal.
The appliance is in contact
with a wall or another item.
Make sure the appliance is
not in contact with the wall
or other item.
Some wine bottles
are cooler than
others.
The bottles are incorrectly
positioned. Realign the bottles.
Shelves can not be
pulled out smoothly.
Shelves are not inserted
correctly.
The door is not open
suciently.
Check and insert/align the
shelves correctly.
Wine cooler not
reaching set
temperature.
The desired internal fridge
temperature should be no
more than 5°C cooler than
the ambient temperature of
the room
Cool the ambient
temperature of the room,
or move the wine cooler to a
room with a cooler ambient
temperature. See section
8 - Operation, for a fuller
description and example.
16 Troubleshooting

17
17 Warranty Statement
Failure to adhere to the requirements set out in this manual may result in
personal injury or property damage, and may aect your ability to make a claim
under the manufacturer’s warranty.
The appliance must be used, installed, and operated in accordance with this
manual. You may not be able to claim on the manufacturer’s warranty in the
event that a product fault is due to failure to adhere to this manual.
This appliance is guaranteed from the date of purchase for one year against
manufacturing defects and abnormal deterioration when used in accordance
with the care and use instructions for normal domestic use. The warranty
excludes damage resulting from product misuse or neglect. In the unlikely
event of a fault occurring please contact the retailer for advice on how to
proceed.
Keep your receipt as proof of purchase for this product warranty. The benefits
given by this warranty are in addition to other rights and remedies you may
have under New Zealand Consumer law.
Our goods come with guarantees that cannot be excluded under the New
Zealand Consumer Law.
This warranty DOES NOT cover
• Service calls not related to any product defect. The cost of a service call will
be charged if the problem is found not to be a product fault. For example:
• Correcting the installation of the product.
• Instructing how to use the product.
• Replacing house fuses or correcting household wiring.
• Replacing blown light bulbs.
• Correcting fault(s) caused by the customer.
• Noise or vibration that is considered normal, e.g. fan sounds, regeneration
noises, or user warning beeps.
• Correcting damage caused by pests, e.g. rats, cockroaches.

18
• Correcting corrosion or discolouration due to chemical attack.
• Power outages or surges.
• Defects caused by factors other than:
Normal domestic use.
Use in accordance with the product’s user manual.
This product has been designed for use in a normal domestic environment. It
is not intended for commercial use of any kind. Doing so will void the product
warranty.
Manufacturer’s Declaration
The manufacturer declares:
• that this product meets all basic requirements regarding low-voltage
electrical equipment established in Directive 2006/95/EC dated 12
December 2006, and electro-magnetic compatibility established in
Directive 2004/108/EC dated 15 December 2004;
• it is not responsible for any failure to observe the instructions given in this
manual and current safety regulations for the correct use of the equipment;
and that it reserves the right to make any modifications to the equipment or
this manual without prior notice.
18 Decommissioning
If the appliance is not used for an extended period of time:
• Draw the plug out of the socket.
• Remove all items stored in the appliance.
• Dry the inside of the appliance with a cloth and leave the door open for a
few days.
While away on an average vacation/holiday (14–21 days):
• Do the same as described above, or
• Let the appliance operate.
Other manuals for BEWC-66
1
Table of contents
Other Bordeaux Kitchen Appliance manuals


Popular Kitchen Appliance manuals by other brands


Küppersbusch
Küppersbusch EEH 620.0 Instructions for use and installation instructions

Cannon
Cannon HENLEY Professional 600 10688 Use and Installation Instructions

Taurus
Taurus PHOENIX manual

Casselin
Casselin CTJ195 manual

Electrolux
Electrolux EHM1250 Instruction book

Heritage
Heritage 023210 Instructions for use and care


