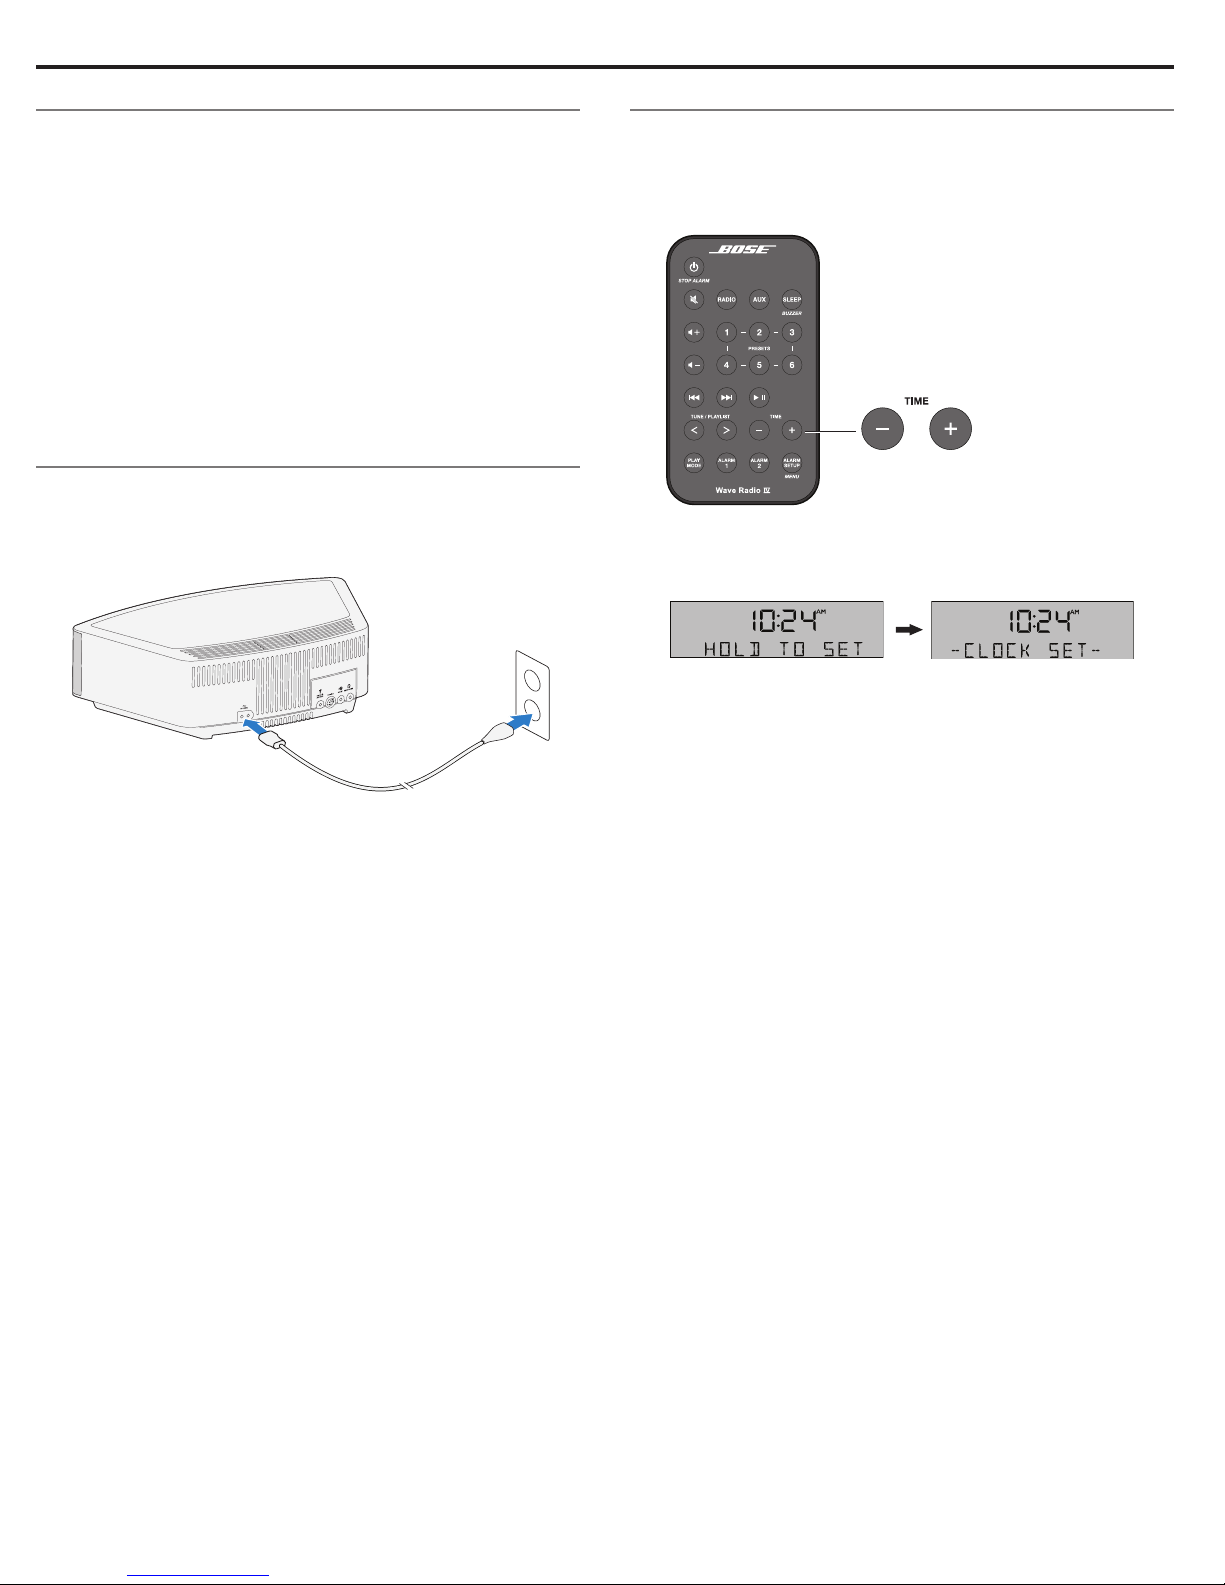
Bose Wave Music System IV User manual

®
Wave®Radio IV
Owner’s Guide • Guía del propietario • Notice d’utilisation

2 - English
Please read this owner’s guide carefully and save it for
future reference.
The lightning flash with arrowhead symbol within an
equilateral triangle alerts the user to the presence of
uninsulated dangerous voltage within the system enclo-
sure that may be of sufficient magnitude to constitute a
risk of electrical shock.
The exclamation point within an equilateral triangle, as
marked on the system, is intended to alert the user to the
presence of important operating and maintenance instruc-
tions in this owner’s guide.
WARNINGS:
• To reduce the risk of fire or electrical shock, do not expose the
product to rain or moisture.
• Keep new and used batteries away from children. Do not ingest
battery, chemical burn hazard. The remote control supplied with
this product contains a coin/button cell battery. If the coin/but-
ton cell battery is swallowed it can cause severe internal burns
in just 2 hours and can lead to death. If the battery compartment
does not close securely, stop using the product and keep it away
from children. If you think the battery may have been swallowed
or placed inside any part of the body seek immediate medical
attention. May explode or cause a fire or chemical burn if incor-
rectly replaced or mishandled. Do not recharge, disassemble,
heat above 212°F (100°C), or incinerate. Replace only with an
agency approved (ex. UL) CR2032 or DL2032 3-volt lithium
battery. Dispose of used batteries promptly.
• Do not place any naked flame sources, such as lighted candles,
on or near the apparatus.
• To prevent electric shock, match the wide blade of the line cord
plug to the wide slot of the AC (mains) receptacle. Insert fully.
• Do not expose this apparatus to dripping or splashing, and do
not place objects filled with liquids, such as vases, on or near the
apparatus. As with any electronic products, use care not to spill
liquids into any part of the system. Liquids can cause a failure
and/or a fire hazard.
WARNING: This product contains magnetic material.
Contact your physician if you have questions on whether
this might affect the operation of your implantable medical
device.
WARNING: Contains small parts which may be a choking
hazard. Not suitable for children under age 3.
CAUTIONS:
• Make no modifications to the system or accessories.
Unauthorized alterations may compromise safety, regulatory
compliance, and system performance.
• Long-term exposure to loud music may cause hearing damage.
It is best to avoid extreme volume when using headphones,
especially for extended periods.
• Use of controls or adjustments or performance of procedures
other than those specified herein may result in hazardous
radiation exposure from the internal laser component. The
compact disc player should not be adjusted or repaired by
anyone except properly qualified service personnel.
Notes:
• The product label is located on the bottom of the product.
• The product must be used indoors. It is neither designed nor
tested for use outdoors, in recreational vehicles, or on boats.
• Where the mains plug or appliance coupler is used as the
disconnect device, such disconnect device shall remain readily
operable.
Please dispose of used batteries properly, following
any local regulations. Do not incinerate.
Important Safety Instructions
1. Read these instructions.
2. Keep these instructions.
3. Heed all warnings.
4. Follow all instructions.
5. Do not use this apparatus near water.
6. Clean only with a dry cloth.
7. Do not block any ventilation openings. Install in accordance
with the manufacturer’s instructions.
8. Do not install near any heat sources, such as radiators, heat
registers, stoves or other apparatus (including amplifiers) that
produce heat.
9. Protect the power cord from being walked on or pinched,
particularly at plugs, convenience receptacles, and the point
where they exit from the apparatus.
10. Only use attachments/accessories specified by the
manufacturer.
11. Use only with the cart, stand, tripod, bracket, or table
specified by the manufacturer, or sold with the
apparatus. When a cart is used, use caution when
moving the cart/apparatus combination to avoid
injury from tip-over.
12. Unplug this apparatus during lightning storms or when unused
for long periods of time.
13. Refer all servicing to qualified service personnel. Servicing is
required when the apparatus has been damaged in any way:
such as power supply cord or plug is damaged; liquid has
been spilled or objects have fallen into the apparatus; the
apparatus has been exposed to rain or moisture, does not
operate normally, or has been dropped.
Important Safety Instructions

English - 3
Regulatory Information
NOTE: This equipment has been tested and found to comply
with the limits for a Class B digital device, pursuant to Part 15 of
the FCC rules. These limits are designed to provide reasonable
protection against harmful interference in a residential installation.
This equipment generates, uses, and can radiate radio frequency
energy and, if not installed and used in accordance with the
instructions, may cause harmful interference to radio communica-
tions. However, this is no guarantee that interference will not occur
in a particular installation. If this equipment does cause harmful
interference to radio or television reception, which can be deter-
mined by turning the equipment off and on, you are encouraged
to try to correct the interference by one or more of the following
measures:
• Reorient or relocate the receiving antenna.
• Increase the separation between the equipment and receiver.
• Connect the equipment to an outlet on a different circuit than the
one to which the receiver is connected.
• Consult the dealer or an experienced radio/TV technician
for help.
Changes or modifications not expressly approved by Bose
Corporation could void the user’s authority to operate this
equipment.
This device complies with part 15 of the FCC Rules. Operation is
subject to the condition that this device does not cause harmful
interference.
This device complies with part 15 of the FCC Rules. Operation
is subject to the following two conditions: (1) This device may
not cause harmful interference, and (2) this device must accept
any interference received, including interference that may cause
undesired operation.
This Class B digital apparatus complies with Canadian ICES-003.
CAN ICES-3(B)/NMB-3(B)
This device complies with Industry Canada licence-exempt RSS
standard(s). Operation is subject to the following two conditions:
(1) This device may not cause interference, and (2) this device must
accept any interference, including interference that may cause
undesired operation of the device.
This equipment should be installed and operated with a minimum
distance of 8 in. (20 cm) between this device and your body.
Product data loger
This system features a product data logger that is designed to help
Bose better understand product usage and performance over time.
The product data logger records certain technical data and usage
history, including but not limited to volume levels, on/off data, user
settings, source inputs, power output, and setup data. We may
use this data to provide you with better service and support on
your system and to improve product design in the future. Special
equipment is required to read the data stored by the product data
logger and such data can only be retrieved by Bose if your system
is returned to Bose for service or as returned merchandise. The
product data logger does not collect any personally identifiable
information about you and does not record title, genre or other
information about the media content you access while using
your system.
Please complete and retain for your records
Record the serial number of your new Wave®Radio IV in the
space below. The serial and model numbers can be found on the
bottom panel.
Serial number: _____________________________________________
Model number: ____________________________________________
Purchase date: _____________________________________________
We suggest you keep your receipt with this owner’s guide
Date of manufacture: The four bolded digits in the serial number
indicate the date of manufacture. The first digit is the year of manu-
facture; “5” is 2005 or 2015. Digits 2-4 are the month and date;
“001” is January 1 and “365” is December 31.
China Importer: Bose Electronics (Shanghai) Company Limited,
Part C, Plan 9, No. 353 North Riying Road, China (Shanghai) Pilot
Free Trade Zone
EU Importer: Bose GP, Castleblayney Road, Carrickmacross,
Ireland
Taiwan Importer: Bose Taiwan Branch, Room 905, 9F, Worldwide
House, 131 Min Sheng East Rd, Section 3, Taipei, Taiwan, 1
The distinctive design of the Wave radio is a registered trademark of Bose Corporation in the U.S. and other countries.
©2015 Bose Corporation. No part of this work may be reproduced, modified, distributed or otherwise used without prior written permission.

4 - English
Contents
Introduction
About your Wave®Radio IV .................................................................... 4
System Features.............................................................................. 4
e benefits of research......................................................................... 4
Unpacking................................................................................................. 4
Setting up the System
Placing the system.................................................................................. 5
Connecting to power............................................................................... 5
Setting the clock...................................................................................... 5
Using the System
Remote control buttons......................................................................... 6
Touch pad.................................................................................................. 7
Reading the display................................................................................. 7
Powering on or off the system .............................................................. 7
Controlling the volume .......................................................................... 7
Setting the sleep timer........................................................................... 7
Listening to Other Sources
Listening to FM or AM radio................................................................... 8
Tuning to an AM/FM station ......................................................... 8
Storing AM/FM radio station Presets .......................................... 8
Improving FM reception................................................................. 8
Setting and Using the Alarms
Alarm buttons and indicators ............................................................... 9
Using the Alarm buttons ............................................................... 9
Alarm status indicators.................................................................. 9
Setting the alarms................................................................................... 9
Using the alarms...................................................................................... 9
Turning an alarm on or off ............................................................. 9
Snoozing an alarm .......................................................................... 9
Connecting Other Equipment
System connections ............................................................................... 10
Using the AUX IN connector.................................................................. 10
Using a cable to connect an audio device................................... 10
Using headphones .................................................................................. 11
Using an external antenna .................................................................... 11
Personalizing the System
e setup menu ....................................................................................... 12
Changing a system setting.................................................................... 12
Care and Maintenance
Troubleshooting ...................................................................................... 13
Replacing the remote control battery ................................................. 14
Cleaning..................................................................................................... 14
Customer service..................................................................................... 14
Limited warranty ..................................................................................... 14
Technical information............................................................................. 14

English - 5
Introduction
About your Wave®Radio IV
Your Wave®Radio IV provides an elegant way to bring high quality
sound into any room.
System Features
• Display provides access to system settings and information.
• AUX connector enables playback from an audio device.
• Headphone connector for private listening.
• AM/FM tuner delivers precise radio reception.
• Remote control for point-and-click control from up to
20 feet away.
e benefits of research
Over fourteen years of research by Bose Corporation brings you
the benefits of award-winning proprietary acoustic waveguide
speaker technology. Using this technology, a tube efficiently
transfers energy from a small speaker to the outside air over a
wide range of low frequencies. And, long waveguides, folded into
intricate patterns, fit into products small enough to be placed
comfortably in your home. Your Wave®Radio IV features dual
tapered waveguide speaker technology, connecting two
speakers to two 26" tapered waveguides which combine to deliver
performance well beyond the size of the system.
Dual tapered
waveguides
Unpacking
Carefully unpack the carton and confirm that the following parts
are included.
Wave®radio IV
Remote control
(battery installed)
AC power cord(s)
®
May ship with multiple power cords. Use the power cord for
your region.
Save the carton and packing materials for transporting or storing
the system.
Introduction

6 - English
Setting up the System
Placing the system
• To enjoy maximum audio performance:
— Place the system across the room from where you listen.
— Place the system within two feet of a wall, and avoid placing
directly in a corner.
• Place the system on a flat, stable surface.
CAUTIONS:
• Do not place the system on a metal surface. It could interfere
with AM reception.
• Do not place the system on a heat-sensitive surface. Like all
electrical equipment, it generates some heat.
• Do not use the system in a damp location or any other place
where moisture can get inside.
Connecting to power
1. Insert the small end of the power cord into the
AC POWER connector.
2. Plug the power cord into an AC (mains) power outlet.
Setting the clock
After plugging in the system, set the clock using the remote.
1. Press and hold either Time – or Time + for about one second.
Note: Press-and-hold operations require holding the button down
for about one second.
Initially, HOLD TO SET appears on the display and then
quickly changes to – CLOCK SET – as the button is
depressed.
2. Release the selected Time button.
3. Press Time – to adjust the displayed time backward or press
Time + to adjust the displayed time forward until it matches
the current time. You can also press and hold for rapid
adjustment.
4. Wait five seconds for the system to exit clock setup mode.
Notes:
• To change the clock from 12-hour (AM/PM) time to 24-hour time,
see “Changing a system setting” on page 13.
• If the system loses power due to a power outage or if you
unplug the system, all system settings are permanently
retained. However, the clock time is only temporarily stored in
backup memory for up to 48 hours.

English - 7
Using the System
Remote control buttons
The system is easily operated using the remote control. Just
aim the remote at the display and press the buttons. The remote
control works within 20 feet of the display.
Radio
Toggles between radio on
and AM/FM selection
Playback controls
Alarm Setup - Menu
Alarm settings (page 10) and
setup menu (page 13)
Sleep Buzzer
Snooze alarms, set system shut off timer,
and select Buzzer alarm
Time - +
Set clock and alarm times
Aux
Listen to a source connected to the
AUX IN connector

8 - English
Using the System
Touch pad
The system has a touch-sensitive control pad on the top panel.
Momentarily placing your hand on the touch pad can power on or
off the system, snooze a sounding alarm, and reset it for the next
day (page 13).
®
Notes:
• Press-and-hold operations require holding the button down for
about one second.
• Pressing or automatically powers on the system to the
selected source.
Reading the display
Source indicators: CD, FM, AM, or AUX
Play mode Clock Alarm status
Source or system-related information
Powering on or off the system
• Press on the remote control
or
• Touch the touch pad.
®
The last source you were listening to is active.
Alternatively:
Press any source button to power on
the system to that source.
Notes:
• Selecting AUX does not power on a device connected to AUX IN
(such as a media player). Power on the device first.
• After 24 hours of no button presses, the system switches to
standby (off). If the 20-minute system standby timer (page 13)
is enabled, the system switches to standby if no audio is played
and no buttons are pressed for 20 minutes.
Controlling the volume
Press and hold or to adjust the volume level.
VOLUME - 0 (silent) to 99 (loud) appears on the display to
indicate the level.
Press to mute the system.
Press again, or press to unmute.
While muted, you can press to lower the volume before
unmuting the system.
Note: When the system is off, the volume can only be adjusted
between 10 and 75.
Setting the sleep timer
Press SLEEP to set the system to shut off after a selected
period of time.
• After pressing SLEEP, SLEEP - 30 MIN (or your last setting)
appears on the display and the sleep timer begins counting
down. If the system is off, press SLEEP to power on and
immediately set the sleep time. The last source selected will
start playing as the sleep timer counts down.
• While the SLEEP setting is displayed, press SLEEP again to
set the sleep timer to 10-90 minutes (in 10-minute increments)
or OFF.
Note: If more than 10 seconds elapses between button
presses, the system automatically exits the sleep timer
setup mode.
• To review the remaining sleep time, press SLEEP.
• To cancel the sleep timer, press and release SLEEP until
SLEEP - OFF appears on the display.

English - 9
Listening to Other Sources
Listening to FM or AM radio
Press RADIO to turn it on to the station last selected. Press
RADIO as necessary to select FM or AM radio.
When you select FM radio, Radio Data System (RDS) information
for the current station is displayed. This is controlled by the RADIO
TEXT setting in the setup menu. To disable RDS and view only the
station frequency, change the RADIO TEXT setting to OFF. See
“Changing a system setting” on page 13.
Tuning to an AM/FM station
When you press RADIO, Seek/Track, or Tune/Playlist to tune to
a radio station, the frequency appears in the center of the display
while you are tuning.
Station frequency
while tuning
• Press Seek/Track to find a
lower-frequency station with a strong signal.
• Press Seek/Track to find a
higher-frequency station with a strong signal.
• Press Tune/Playlist < to manually tune to a
lower frequency.
• Press Tune/Playlist > to manually tune to a
higher frequency.
• Press and hold Tune/Playlist < or
Tune/Playlist > to rapidly change
the frequency.
Note: If AM reception is weak, rotate the system clockwise or
counterclockwise to improve AM reception. If FM reception
is weak, make sure the power cord is straightened as much
as possible. To improve FM reception, you can install an
external FM antenna. See “Using an external antenna” on
page 12.
Storing AM/FM radio station Presets
You can store up to six FM and six AM radio stations
for quick recall using the PRESETS buttons. Storing
a preset replaces any station previously stored to
that preset number.
1. Tune to the station you want to save as a preset.
2. Press and hold one of the six PRESETS buttons until you hear
a double tone and the preset number and station frequency
appear on the display.
3. Press one of the PRESETS buttons to quickly tune to a
previously stored FM or AM station.
Improving FM reception
Unwind and straighten the power cord to ensure the best FM radio
reception. The power cord is used as an antenna.

10 - English
Setting and Using the Alarms
Alarm buttons and indicators
The system has two alarms, Alarm 1 and Alarm 2.
Each alarm can be set for:
• Time • Volume
• Wake-up source: buzzer or radio
Using the Alarm buttons
Using the Alarm buttons on the bottom of the remote you can
setup and operate each alarm:
Press to turn
Alarm 1 on or off.
Press to turn
Alarm 2 on or off.
1. Press to activate the Alarm Setup
mode and view Alarm 1 settings.
2. Press again to view Alarm 2 settings.
3. Press again to exit the Alarm Setup
mode.
Alarm status indicators
The upper right-hand corner of the display shows the alarm status
indicators if the alarm is set.
Example with Alarm 1 and 2 set:
Alarm 1 time
Alarm 1
Alarm 2
Alarm 2 time
AM
PM
AM
PM
Setting the alarms
You can choose the settings for each alarm by activating the Alarm
Setup mode and displaying the settings for each alarm.
To setup Alarm 1 or 2:
1. Press ALARM SETUP .
The alarm number and time start flashing (A) and after a
moment, the current Alarm 1 settings are displayed (B).
A
B
2. Using the Time buttons, set the alarm time.
3. Select your wake-up source:
• BUZZER is the factory alarm setting.
• Press to choose a radio station.
4. Press or to set the volume level of the selected
wake-up source.
5. Press to enter the Alarm 2 setup mode.
Repeat Steps 2-4 to set up Alarm 2.
6. Press again to exit the Alarm Setup mode.
The alarm you set is turned on and the alarm time displays:
Alarm number
and time
Using the alarms
Turning an alarm on or off
Press or to turn the selected alarm on or off.
When an alarm is turned on, the alarm number and time appear in
the upper right corner of the display.
Alarm number
and time
Snoozing an alarm
Tap the touch pad ®, or press on the remote.
SNOOZE is displayed for the duration of the selected snooze time
and then the alarm sounds again.
The snooze time is set at the factory to 10 minutes. To change the
snooze time, see “Changing a system setting” on page 13.
Stop and reset a sounding alarm
Press .
Reset a snoozed alarm for the next day
After snoozing the alarm, place your hand on the touch pad again
and hold it there for at least 2 seconds, or press Stop Alarm.

English - 11
Connecting Other Equipment
System connections
The rear panel of the system provides connections for external
equipment.
1
34
2
1 ANTENNAS
3.5 mm FM antenna (75 ohm) connector. See “Using an
external antenna” on page 12.
2 Bose link
An input that accepts the output of another Bose link
enabled product via a Bose link cable.
3 AUX IN
3.5 mm stereo input connector for external sources.
4 HEADPHONES
A 3.5 mm stereo headphone connector.
Using the AUX IN connector
When using a TV, DVD player, computer, video game or other audio
source, you can enhance your listening experience by playing the
audio device through the system.
Connecting an audio device to the system requires one of the
following cables:
3.5 mm audio cable
3.5 mm to stereo RCA cable
To obtain the correct cable, contact Bose®customer service or visit
a local electronics store. Refer to the quick start guide in
the carton.
Using a cable to connect an audio device
1. Using a cable, connect your audio device to the
AUX IN connector on the system’s connector panel.
2. Press on the remote control.
The last source you were listening to is active.
3. Press and release until appears on the display.
4. Start playing music on the audio device.
5. Press and hold or to adjust the volume.
Note: If the volume level of the system cannot be adjusted
high enough, increase the volume level of the connected
audio device.

12 - English
Using headphones
For private listening, plug the headphones into the headphone
connector on the rear panel of the system.
CAUTION: Long-term exposure to loud music may cause hearing
damage. It is best to avoid extreme volume when using
headphones, especially for extended periods.
Notes:
• Plugging in headphones automatically mutes the speakers.
Because headphone volume levels may vary from speaker
volume levels, be sure to lower the volume of the system before
connecting or disconnecting headphones.
• While using headphones, alarms will be heard through the
system speakers.
Controlling headphones volume:
Press and hold or to adjust the listening level of your
headphones.
Using an external antenna
The system’s power cord is used as an antenna for FM radio. If,
after adjusting the position of the power cord, you still experience
poor reception, you may need to install the provided external FM
dipole antenna.
1. Insert the 3.5 mm plug of the FM antenna into the
FM ANTENNA connector.
2. Extend the ends of the antenna as far from the unit and
other external equipment as possible to establish optimum
reception.
FM antenna
connector
Note: Many FM radio stations transmit a vertically polarized signal
as well as, or instead of, a horizontally polarized signal. If
the horizontal antenna orientation does not provide good
reception, try hanging the antenna in a vertical orientation.
Connecting Other Equipment

English - 13
Personalizing the System
e setup menu
The setup menu allows you to customize the operation of the system.
System Setting Menu Item Factory
Setting Choices Description
Snooze Duration SNOOZE- 10 MIN 10 MIN, 20 MIN,
30 MIN, 40 MIN,
50 MIN, 60 MIN
This setting determines the duration of time the system
remains silent when the snooze function is activated.
Radio Data System (RDS)
Information RADIO TEXT- ON ON, OFF Enables (ON) or disables (OFF) the system to display RDS
information.
Bass Level BASS- NORMAL NORMAL,
REDUCED Adjusts the bass level.
Clock Time Format TIME- 12 HOUR 12-HOUR,
24-HOUR Sets the clock display for 12-hour (AM/PM) or 24-hour time.
Display High Brightness
Level BRIGHT HI- 10 8-15 Sets the display brightness level when the unit detects high
ambient light conditions.
Display Low Brightness
Level BRIGHT LO- 4 1-8 Sets the display brightness level when the unit detects low
ambient light conditions.
Room Code ROOM- B _ _ _ – B _ _ _ –, C _ _ – _,
D _ _ – –, E _ – _ _,
F _ – _ –, G _ – – _,
H _ – – –, I – _ _ _,
J – _ _ –, K – _ – _,
L – _ – –, M – – _ _,
N – – _ –, O – – – _
Sets the room code for the system when it is connected
to a Bose link network. The dashes following the room
letter indicate how the microswitches should be set on a
Lifestyle®remote control.
Capacitive touch control TOUCH PAD- ON ON, OFF Enables (ON) or disables (OFF) the touch pad.
20-minute system standby
timer AUTO OFF- YES YES, NO Enables (YES) or disables (NO) the 20-minute system
standby timer. See “Powering on or off the system” on
page 8.
System Reset RESET ALL- NO NO, YES Restores the system to factory settings.
Changing a system setting
1. Press and hold Alarm Setup/Menu until -SETUP MENU- is displayed.
2. Press Tune/Playlist to skip to the menu item you want.
3. Press Time + or Time – to change the setting.
4. Press Alarm Setup/Menu to exit the setup menu or wait 10 seconds for the setup menu to exit automatically.

14 - English
Care and Maintenance
Troubleshooting
Problem What to do
System does not function • Connect the system to AC (mains) power.
• Unplug the power cord from the AC wall outlet for 10 seconds and then reconnect it; this resets
the system.
• Tap the touch pad on the top of the system to see if the system powers on (see page 8).
No sound • Increase the volume.
• Disconnect headphones from the system (connecting headphones mutes the speakers).
Poor sound quality • If the bass is too heavy or low, adjust the bass level of the system using the setup menu (see page 13).
• If listening to an external AUX source, use a stereo cable and that it is fully inserted.
Remote control is
inconsistent or does
not work
• Operate the remote control closer to the system.
• Check that the remote control battery is installed with positive (+) polarity facing up.
• Replace the remote control battery.
• Check for interference from fluorescent room lighting, sunlight, or dust or dirt on lens.
• Try the system in a different location.
AM reception is weak • Turn the system slightly one way and then the other to change the direction of the internal AM antenna.
• Move the unit farther from a TV, refrigerator, halogen lamps, dimmer switches, or other electronic
equipment that generates electrical noise.
• If neither suggestion works, you may be in an area of weak AM signal coverage.
FM reception is weak • Extend the power cord as much as possible. The power cord acts as an FM antenna. See page 9.
• See “Using an external antenna” on page 12.

English - 15
Replacing the remote control battery
1. Place the remote face down on a flat surface.
2. Using your finger, push the tab lock to the side as shown and
hold. Slide the battery compartment open.
3. Remove the old battery and install the new one with the plus
(+) symbol facing up.
4. Gently slide the battery compartment closed. It locks
automatically.
WARNING: Keep new and used batteries away from children.
Do not ingest battery, chemical burn hazard. The
remote control supplied with this product contains a
coin/button cell battery. If the coin/button cell bat-
tery is swallowed it can cause severe internal burns
in just two hours and can lead to death. If the battery
compartment does not close securely, stop using the
product and keep it away from children. If you think the
battery may have been swallowed or placed inside any
part of the body, seek immediate medical attention.
The coin/button cell battery may explode or cause a
fire or chemical burn if incorrectly replaced or mishan-
dled. Do not recharge, disassemble, heat above 212ºF
(100ºC), or incinerate. Replace only with an agency
approved (ex. UL) CR2032 or DL2032 3-volt lithium
battery. Dispose of used batteries promptly.
Cleaning
Clean the surface of the system with a soft, dry cloth.
• Do not use any sprays near the system. Do not use any solvents,
chemicals, or cleaning solutions containing alcohol, ammonia or
abrasives.
• Do not allow liquids to spill into any openings.
Customer service
For additional help, contact Bose Customer Service. Refer to the
quick start guide in the carton.
Limited warranty
Your system is covered by a limited warranty. Details of the limited
warranty are provided on the quick start guide in the carton.
Please refer to the quick start guide for instructions on how to reg-
ister. Failure to register will not affect your limited warranty rights.
The warranty information provided with this product does
not apply in Australia and New Zealand. See our website at
www.bose.com.au/warranty or www.bose.co.nz/warranty for details
of the Australia and New Zealand warranty.
Technical information
AC power rating
120V 60Hz 60W max.
Care and Maintenance

2 - Español
Lea atentamente esta guía del propietario y consérvela para
consultarla en el futuro.
El símbolo de relámpago con punta de flecha dentro de un
triángulo equilátero alerta al usuario acerca de la presencia
de voltaje peligroso no aislado dentro de la carcasa del
sistema, que puede ser de una magnitud suficiente para
constituir un riesgo de descarga eléctrica.
El signo de exclamación dentro de un triángulo equilátero,
tal como está marcado en el sistema, tiene como
propósito alertar al usuario sobre la presencia de
instrucciones operativas y de mantenimiento importantes
en la guía del usuario.
ADVERTENCIAS:
• Para reducir el riesgo de incendio o de descarga eléctrica,
no exponga el producto a la lluvia ni a la humedad.
• Mantenga las baterías nuevas y usadas lejos de los niños. No
ingiera la batería, ya que existe peligro de quemadura química.
El control remoto suministrado con este producto contiene una
batería de celda tipo moneda/botón. Si se traga la batería de
celda tipo botón puede ocasionar quemaduras internas graves
en solo 2 horas y puede producir la muerte. Si el compartimiento
de la batería no cierra bien, deje de usar el producto y
manténgalo alejado de los niños. Si cree que alguien se ha
tragado o insertado la batería en cualquier parte del cuerpo
busque atención médica de inmediato. Puede explotar o causar
un incendio o quemadura química si se reemplaza o manipula
incorrectamente. No recargue, desarme ni caliente por encima
de 100 ºC (212 ºF), ni incinere. Reemplace solo con una batería
de ión litio aprobada autorizada (por ejemplo, UL) de 3 voltios
CR2032 o DL2032. Deseche inmediatamente las baterías usadas.
• No coloque ninguna fuente de llama al descubierto, como velas
encendidas sobre el producto, o en la proximidad del dispositivo.
• Para impedir una descarga eléctrica, haga coincidir la paleta
ancha del cable de alimentación de línea a la ranura ancha del
receptáculo de CA (red eléctrica). Insértelo totalmente.
• No exponga el aparato a goteos o salpicaduras, no coloque
encima ni cerca del aparato objetos llenos de líquido como
jarrones. Al igual que con los productos electrónicos, tenga
cuidado de no derramar líquidos en ninguna pieza del sistema.
Los líquidos pueden producir una falla y/o un riesgo de incendio.
ADVERTENCIA: Este producto contiene material
magnético. Póngase en contacto con su médico
si tiene preguntas acerca de si esto podría afectar
el funcionamiento de un dispositivo médico implantable.
ADVERTENCIA: Contiene piezas pequeñas que pueden
representar un riesgo de asfixia. No es indicado para niños
de menos de tres años de edad.
PRECAUCIONES:
• No realice modificaciones al sistema ni a los accesorios. Las
alteraciones no autorizadas pueden comprometer la seguridad,
el cumplimiento regulatorio y el desempeño del sistema.
• La exposición a largo plazo a música fuerte puede causar daños
en la audición. Se recomienda evitar el uso de los auriculares a
un volumen extremo, especialmente durante largos períodos.
• El uso de controles o ajustes o desempeño de procedimientos
que no sean los especificados en este documento pueden
generar exposición peligrosa a radiación de los componentes
láser internos. El reproductor de discos compactos no debe
ser ajustado o reemplazado por ninguna persona que no sea
un miembro del personal de servicio técnico debidamente
calificado.
Notas:
• La etiqueta del producto se encuentra en la parte inferior
del producto.
• Este producto se debe utilizar en interiores. No está diseñado ni
probado para su uso al aire libre, en vehículos recreacionales o
en embarcaciones.
• Si se utiliza la clavija de conexión de red o el acoplador del
artefacto como el dispositivo de desconexión, dicho dispositivo
de desconexión deberá permanecer listo para funcionar.
Deseche las baterías usadas correctamente,
cumpliendo con las reglamentaciones locales. No incinere.
Instrucciones importantes de seguridad
1. Lea estas instrucciones.
2. Conserve estas instrucciones.
3. Tenga en cuenta las advertencias.
4. Siga todas las instrucciones.
5. No use este aparato cerca del agua.
6. Límpielo solamente con un paño seco.
7. No bloquee ninguna abertura de ventilación. Realice la
instalación conforme a las instrucciones del fabricante.
8. No lo coloque cerca de ninguna fuente de calor, como
radiadores, rejillas de calefacción, estufas u otros aparatos
(incluidos los amplificadores) que produzcan calor.
9. Proteja el cable de corriente de forma que nadie lo pise o lo
perfore, especialmente en enchufes, receptáculos de tomas
múltiples y en el punto donde sale del dispositivo.
10. Use solamente los accesorios especificados por el fabricante.
11. Use solamente con el carro, el pie, el trípode,
el soporte o la mesa especificado por el fabricante,
o vendido con el dispositivo. Cuando se usa un carro,
tenga precaución al mover el carro con el dispositivo
para evitar lesiones por tropiezos.
12. Desenchufe este aparato durante tormentas eléctricas o
cuando no lo utilice durante períodos de tiempo prolongados.
13. Derive todas las tareas de servicio al personal de servicio
calificado. Se requieren tareas de servicio cuando el aparato
se haya dañado de alguna manera, por ejemplo si se dañó
el enchufe o el cable de alimentación, si se derramó líquido
o si cayeron objetos dentro del aparato, el aparato estuvo
expuesto a la lluvia o la humedad, no funciona normalmente,
o se ha caído.
Instrucciones importantes de seguridad

Español - 3
Información regulatoria
NOTA: Este equipo ha sido sometido a prueba y se ha comprobado
que cumple con los límites de un dispositivo digital Clase B,
conforme a la Parte 15 de las reglas de la FCC. Estos límites
están diseñados para ofrecer una protección razonable contra la
interferencia perjudicial en una instalación domiciliaria. Este equipo
genera, usa y puede irradiar energía de radiofrecuencia y, si no se
instala y se usa conforme a las instrucciones, puede causar una
interferencia perjudicial a las comunicaciones de radio. Sin embargo,
esto no garantiza que no se producirá interferencia en una instalación
en particular. Si este equipo causa interferencia perjudicial para la
recepción de radio o televisión, que se puede determinar al apagar
y encender el equipo, se le aconseja intentar corregir la interferencia
mediante una o más de las siguientes medidas:
• Reoriente o reubique la antena receptora.
• Aumente la separación entre el equipo y el receptor.
• Conecte el equipo a una salida eléctrica en un circuito diferente
al que está conectado el receptor.
• Consulte con el distribuidor o con un técnico en radio o
televisión experimentado para obtener ayuda.
Los cambios o las modificaciones no aprobadas expresamente por
Bose Corporation podrían invalidar la autoridad del usuario para
operar el equipo.
Este dispositivo cumple con la parte 15 de las reglas de la
FCC. El funcionamiento está sujeto a la condición de que este
dispositivo no causa interferencia dañina.
Este dispositivo cumple con la parte 15 de las reglas de la FCC.
Su utilización está sujeta a las siguientes dos condiciones:
(1) Este dispositivo no debe provocar interferencias dañinas y
(2) Este dispositivo debe aceptar cualquier interferencia recibida,
incluidas interferencias que puedan provocar un funcionamiento
no deseado.
Este aparato digital Clase B cumple con las normas canadienses
ICES-003.
CAN ICES-3(B)/NMB-3(B)
Este dispositivo cumple con las normas RSS sin licencia de
la Industry Canada. Su uso está sujeto a las siguientes dos
condiciones: (1) Este dispositivo no debe provocar interferencias
dañinas y (2) Este dispositivo debe aceptar cualquier interferencia
recibida, incluidas interferencias que puedan provocar un
funcionamiento no deseado.
Este equipo debe instalarse y operarse a una distancia mínima de
20 cm (8 pulg.) entre el dispositivo y su cuerpo.
Registrador de datos del producto
Este sistema cuenta con un registrador de datos del producto
diseñado para ayudar a Bose a comprender mejor el uso y
el rendimiento del producto a lo largo del tiempo. El registrador de
datos del producto registra ciertos datos técnicos y el historial de
uso, que incluye, entre otros elementos, los niveles de volumen,
los datos de encendido/apagado, la configuración del usuario,
las entradas de fuente, la salida de potencia y los datos de
configuración. Podemos usar estos datos para ofrecerle un mejor
servicio y asistencia a su sistema y para mejorar el diseño del
producto en el futuro. Se requieren equipos especiales para leer
los datos almacenados por el registrador de datos del producto y
Bose solo puede recuperar esos datos si se devuelve el sistema
a Bose para que le realicen tareas de reparación o si se devuelve
la mercancía. El registrador de datos del producto no recopila
ninguna información personalmente identificable sobre su persona
y no registra título, género ni ninguna otra información sobre
el contenido de medios al que obtiene acceso al usar el sistema.
Complete y conserve para su registro
Registre el número de serie de su nueva radio Wave®IV en
el espacio a continuación. Los números de serie y de modelo se
pueden encontrar en la parte inferior del panel.
Número de serie: ___________________________________________
Número de modelo: ________________________________________
Fecha de compra: __________________________________________
Le sugerimos que guarde el recibo con esta guía del usuario
Fecha de fabricación : Los cuatro dígitos en negritas en el número
de serie indican la fecha de fabricación. El primer dígito es el año
de fabricación; “5” es 2005 ó 2015. Los dígitos 2-4 son el mes y la
fecha; “001” es 1 de enero y “365” es 31 de diciembre.
Importador en China: Bose Electronics (Shanghai) Company
Limited, Part C, Plan 9, No. 353 North Riying Road,
China (Shanghái) Pilot Free Trade Zone
Importador en UE: Bose GP, Castleblayney Road, Carrickmacross
County, Monaghan, Irlanda
Importador en Taiwán: Bose Taiwan Branch, Room 905, 9F,
Worldwide House, 131 Min Sheng East Rd, Section 3, Taipei,
Taiwán, 1
El diseño característico de la radio Wave es una marca comercial registrada de Bose Corporation en EE.UU. y en otros países.
©2015 Bose Corporation. No se puede reproducir, modificar, distribuir, o usar de otra manera ninguna parte de este trabajo sin previo consentimiento por escrito.

4 - Español
Contenido
Introducción
Acerca de la radio Wave®IV.................................................................... 5
Características del sistema ........................................................... 5
Los beneficios de la investigación........................................................ 5
Desembalar............................................................................................... 5
Instalación del sistema
Colocación del sistema........................................................................... 6
Conexión a la fuente de alimentación ................................................. 6
Ajuste del reloj ......................................................................................... 6
Uso del sistema
Botones del control remoto................................................................... 7
Panel táctil................................................................................................ 8
Lectura de la pantalla ............................................................................ 8
Encendido y apagado del sistema........................................................ 8
Control del volumen................................................................................ 8
Ajuste del apagado automático............................................................ 8
Reproducción de otras fuentes
Escuchar radio FM o AM ......................................................................... 9
Sintonización de una radio AM/FM ............................................. 9
Guardar ajustes predefinidos de radio AM/FM .......................... 9
Mejora en la recepción de FM........................................................ 9
Ajuste y uso de las alarmas
Botones e indicadores de alarma ......................................................... 10
Uso de los botones de la alarma................................................... 10
Indicadores de estado de alarma ................................................. 10
Ajuste de las alarmas.............................................................................. 10
Uso de las alamas.................................................................................... 10
Activación o desactivación de la alarma..................................... 10
Repetición de una alarma .............................................................. 10
Conexión de otros equipos
Conexiones del sistema.......................................................................... 11
Uso del conector AUX IN......................................................................... 11
Uso de un cable para conectar un dispositivo de audio........... 11
Uso de auriculares................................................................................... 12
Uso de una antena externa.................................................................... 12
Personalización del sistema
El menú de configuración ..................................................................... 13
Cambiar un ajuste del sistema ............................................................. 13
Cuidado y mantenimiento
Solución de problemas........................................................................... 14
Cambio de la batería del control remoto............................................. 15
Limpieza.................................................................................................... 15
Servicio de atención al cliente .............................................................. 15
Garantía limitada..................................................................................... 15
Información técnica ................................................................................ 15

Español - 5
Introducción
Acerca de la radio Wave®IV
La radio Wave®IV proporciona una forma elegante de llevar sonido
de alta calidad de manera inalámbrica a cualquier habitación.
Características del sistema
• La pantalla brinda acceso a la configuración e información
del sistema.
• El conector AUX permite la reproducción desde un dispositivo
de audio.
• Conector para auriculares para escucha privada.
• El sintonizador de AM/FM que ofrece una recepción de
radio precisa.
• Un control remoto para controlar desde 20 pies de distancia con
solo apuntar y hacer clic.
Los beneficios de la investigación
Más de catorce años de investigación de Bose Corporation le
brindan los beneficios de la premiada y exclusiva tecnología de
altavoces con guía de ondas acústicas. Al usar esta tecnología,
un tubo transfiere eficazmente la energía de un altavoz pequeño
al aire exterior a través de una amplia gama de frecuencias bajas.
Además, las guías de ondas largas, plegadas en complejos
patrones, se adaptan a productos lo suficientemente pequeños
como para colocarlos cómodamente en casa. La radio Wave®IV
cuenta con tecnología de altavoces con guías de ondas cónicas
dobles, que conectan dos altavoces a dos guías de ondas cónicas
de 26””, que se combinan para brindar un desempeño superior al
tamaño del sistema.
Guía de ondas
cónicas dobles
Desembalar
Desembale cuidadosamente la caja y confirme que estén incluidas
las siguientes partes.
Radio Wave®IV
Control remoto
(batería instalada)
Cable(s) de corriente
de CA
®
Puede entregarse con múltiples cables de corriente.
Use el cable de corriente correspondiente a su región.
Guarde la caja y el material de embalaje para transportar o guardar
el sistema.
Introducción

6 - Español
Instalación del sistema
Colocación del sistema
• Para disfrutar una potencia máxima de audio:
— Coloque el sistema al otro lado de la habitación lejos del
punto de escucha.
— Coloque el sistema a menos de 0,6 m (dos pies) de una
pared y evite colocarlo directamente en una esquina.
• Coloque el sistema sobre una superficie plana y estable.
PRECAUCIONES:
• No coloque el sistema sobre una superficie de metal. Podría
interferir con la recepción de AM.
• No coloque el sistema sobre una superficie sensible al calor.
Al igual que todos los equipos eléctricos, genera cierto calor.
• No use el sistema en una ubicación húmeda ni en ningún otro
lugar donde pueda humedecerse por dentro.
Conexión a la fuente de alimentación
1. Inserte el extremo pequeño del cable de corriente de CA en
el conector AC POWER.
2. Enchufe el cable de corriente en una salida de alimentación de
CA (red eléctrica).
Ajuste del reloj
Después de enchufar el sistema, ajuste el reloj usando
el control remoto.
1. Mantenga presionado Time – o Time + durante un segundo
aproximadamente.
Nota: Las operaciones que requieren mantener presionado un
botón requieren que el botón se mantenga presionado
durante un segundo.
Inicialmente, aparece en pantalla HOLD TO SET y luego
cambia rápidamente a – CLOCK SET – al oprimir el botón.
2. Suelte el botón Time seleccionado.
3. Presione Time – para ajustar la hora en pantalla hacia atrás,
o presione Time + para ajustar la hora en pantalla hacia
adelante hasta que coincida con la hora actual. También
puede mantener presionado para realizar un ajuste rápido.
4. Espere cinco segundos para que el sistema salga del modo de
ajuste del reloj.
Notas:
• Para cambiar el reloj del formato de 12 horas (AM/PM) al de
24 horas, vea “Cambiar un ajuste del sistema” en la página 13.
• Si el sistema pierde potencia, debido a un corte de energía, o si
desenchufa el sistema, se conservarán todos los ajustes del
sistema de forma definitiva. Sin embargo, la hora del reloj solo
se almacena temporalmente en una memoria de reserva durante
48 horas como máximo.
Other manuals for Wave Music System IV
2
Table of contents
Languages:
Other Bose Stereo Receiver manuals