Bosen BDT-4X00Y User manual

USER
M
A
N
U
A
L
4 . 3 i n c h c o l o r T F T D i s p l a y C a r M u l t i - M e d i a P l a y e
r
IN-DASH TOUCH SCREEN TFT MO
N
ITO
R
DVD/MPEG4/VCD/MP3/CD
P
L
A
Y
ER
WITH AM/FM 2 BAND
RA
DIO
MUT
D
V
D
/
U
S
B
/
S
D
/
R
D
S
/
T
V
/
B
.
T
/
I
P
O
D
/
G
P
S
EJECT
OPEN
SEL
MIC
MOD
A
F
TA
P
T
Y
IR
BND/
LOU
READY
USB
AMS
AV
IN
Car
Entertainment
S
y
s
t
e
m

Note
s
on installation
The unit is designed for 14.4V DC, negative ground operation
system only. Before installing the unit, make sure your vehicle is
connected to 14.4VDC negative grounded electrical system.
The negative battery terminal must be disconnected before
making connections, which can reduce damaging to the unit due
to short circuit.
Be sure to connect the speaker (-) leads to the speaker (-)
terminal. Never connect the left and right channel speaker
cables each other or to the vehicle body. Do not block vents or
radiator panels. Blocking the will cause heat to build up inside
and may result in fire.
After the completion of the installation and begin to operate the
unit (including replacing the battery), please press the reset
button on the front panel with pointed objects (such as ball pen)
to set the unit to initial status.

T
A
BL
E
O
F
CONTEN
T
S
Precautions 01~02
Wiring Diagram 03
Control Panel Layout 04
Using The Remote control 05
BASIC OPERATION 06
Multimedia Playing 07~11
Audio Setting 12
Radio Operations 13
Bluetooth Operation 14~16
TV & iPOD Operation 17
Navigation operation (option function) 18~20
System Setup 21
Dual Function 22
Multimedia Setup 23~26
Replace the Battery of IR Handset 27
Install the unit (DIN front mount) 28
The Trouble Shooting 29
Specification 30

P
recaution
s
.1.
The unit can play the following disc only
Type of Disc Label on the disc Recorded material Size of disc
DVD Video andAudio 12cm
VCD Video andAudio 12cm
CD
Audio 12cm
MPEG4/DIVX Video andAudio 12cm
MP3/
WMA/JPEG
Designed for
Windows
Media
T
M
Compressed
DigitalAudio 12cm
Note:
The unit is compatible with DVD,DVD+/-R, VCD 1.0/2.0/3.0, SVCD, CD, CD-R, CD-RW
and JPEG
DO NOT ATTEMPT TO MODIFY THE UNIT, MODIFYING THE UNIT MAY CAUSE
ANACCIDENT.
STOP THE VEHICLE BEFORE CARRYING OUT ANY OPERATION THAT COULD
INTERFERE WITHYOUR DRIVING
DO NOT TURN ON THE UNIT IF THE TEMPERATURE INSIDE THE VEHICLE IS
OUT OF –20CTO 60C
THIS PRODUCT IS DESIGNED FOR ONE SINGLE VIDEO OUTPUT, PLEASE USE
A SPLITTER IF YOU WOULD LIKE TO CONNECT FOR MULTIPLE VIDEO
OUTPUT
Handle the disc by its edge to
keep the disc clean, and do not
touch the surface
Do not use CDs with labels or stickers
attached, which may leave a sticky
residue while beginning to peel off
Do not use your CDs with paste
residue or ink attached
Clean the discs with an optional
cleaning cloth. Wipe each disc from
center out.

P
recaution
s
.2.
CAUTION WARNING: TO REDUCE THE RISK OF
FIRE OR ELECTRIC SHOCK, DO NOT
RISK OF ELECTRIC SHOCK
DO NOT OPEN EXPOSE THIS APPLIANCE TO RAIN OR
MOISTURE.
CAUTION: TO REDUCE THE RISK OF ELECTRIC SHOCK, DO NOT REMOVE COVER(OR
BACK).NO USER SERVICEABLE PARTS INSIDE, REFER SERVICING TO QUALIFIED
SERVICE PERSONNEL.
The lightening flash with arrowhead symbol, within an equilateral triangle, is intended
to alert the user to the presence of uninsulated dangerous voltage within the products
enclosure that may be of sufficient magnitude to constitute a risk of electric shock to
persons.
The exclamation point within an equilateral triangle in intended to alert user to the
presence of important operating and maintenance(serviging) instructions in the
literature accompanying the appliance.
CLASS 1 LASER PRODUCT
Laser product symbol: located on the rear panel of the unit, indicate this player is a class laser
product, only use weak laser andno hazardous radiation outside of the unit.
1.Read through this instruction manual before installation and use.
2.Do not touch the power plug with wet hand.
3.Switch off the main power when the unit is not in use.(Disconnect the power plug from the power
outlet when you do not intend to usethe unit for a prolonged period of time.) Before moving the unit,
remove the disc from the unit/tray first.
4.Do not open the cover or touch any of the components exposed out of the unit, only for qualified
technicians.
5.Do not expose the unit under direct sunlight or nearby objects that radiate heat to avoid damage the
unit.
6.Do not place the unit in moist and humid conditions, which effect the pick-up of the unit lead to
out of work.
7.Place the unit on a flat surface and ventilative condition, Please ensure the ventilation holes are
not covered to avoid overheating and malfunction.
8.Clear the panel and case with soft dry cloth only, do not apply any kind of thinner, alcohol or
sprays.
9.The apparatus shall not be exposed to dripping or splashing and that no objects filled with liquids,
such as vases, shall be placed on the apparatus.

.3.
W
irin
g
D
iagram
CAUTION:
DC
Power:14.4V
Speaker
Impedance:4
Ω
RECEIVING:
RANGE:
AM
530-1710KHz
FM
87.5-107.9MHz
Gray
Gray
RR
out(Red)
RL
out(White)
GPS
TV
Brown
Brown
Dual R-CH
Out(Red)
Dual L-CH
Out(White)
Black
Black
Aux R
in(Red)
Aux L
in(White)
Black
Gray
Aux Video
in(Yellow)
Video
Out(Yellow)
Orange
Camera(Yellow)
Antenna
(Blue)
(Red)
ACC
(Yellow)
Bat+
Fuse 15A
(Orange)
(Brown)
(Black)
Camera
control
TEL
Mute
GND
Front Left
speaker
Right Left
speaker
(White)
(White/Black)
(Green)
(Green/Black)
(Gray)
(Gray/Black)
(Purple)
(Purple/Black)
Front Right
speaker
Right rear
speaker
AUTO MULTI-MEDIAPLAYER
Only For 14.4V Nagative ground System

.4.
Control
P
anel
L
ayou
t
4
16
5
1
17
SEL
13
2
M
I
C
MUT
D V D
/
U S B
/
S D
/
R D S
/
T V
/
B
.
T
/
I
P O D
/
G P
S
EJECT
TA
A
F
P
T
Y
OPEN
6
MOD
14
8
7
15
IR
10
AMS
3
12
BND
/
LOU
READY
AV
IN
USB
9
11
18
Navi MAP
SD
20
19
1. Power Button
(
TFT ON/OFF
)
2. Volume+/-&(SEL)Button
3. IR Remote Control Sensor
4. 4.3 inch Wide screen TFT LCD
5. Eject Button
6. Open
11.
12.
13.
14.
15.
16.
A/V IN (Audio/Video Input)
BAND Button
Microphone(only for B.T)
Mode Button
DOWN ( )Button
Mute on/off Button
7. REL ( ) Button
8. RDS Button
17. UP ( ) Button
18. Disc Slot
(
AF/TA/PTY
)
9. USB/iPOD Slot 19.
20.
SD/MMC Memory Card Slot
Navi MAP Card Slot
10. AMS Button
(Automatic Search & Preset memory
Scan)
.5.
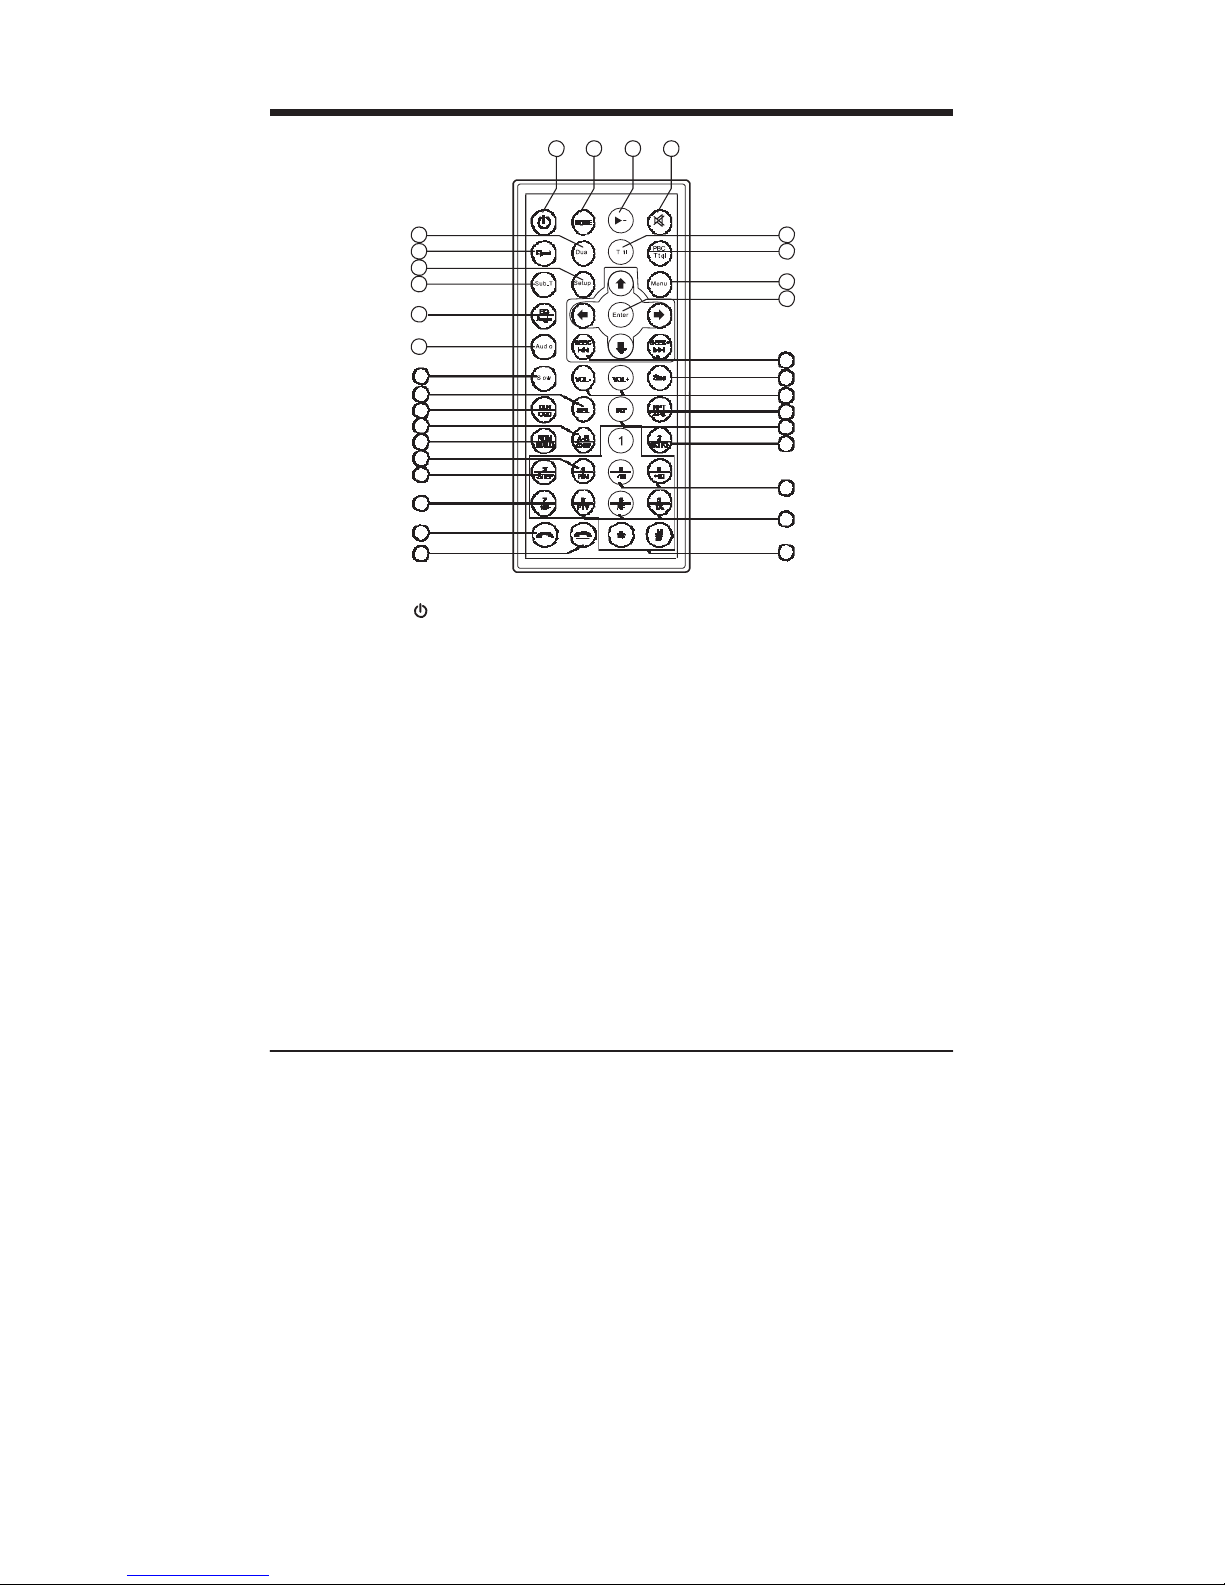
Using The Remote control
1 2 3
4
33
5
32
6
31
30
7
8
29
28
9
27 10
26 11
25 12
24 13
23 14
22
21
15
20
16
19
18
17
1. Power On/Off ( ),
Backgroud Light Switch
2. Mode Button
3. Play/Pause
4. MUTE
5. TITLE Button
6. PBC Button
7. MENU Button
8. ENTER Button
9. Seek UP/Seek Down Button
10. Stop Button
11. Vol
+
/
-
Button
12. Repeat Playback (RPT)
Auto-storage scan (APS)Button
13. INT Button
14. Playing Time Setting
15. 10+/10- Button
16. RDS Button(AF/TA/PTY)
17. Number Key
18. Hangup (Only for B.T)
19. Bluetooth Dialing (Only for B.T)
20. 10+ Button
21. Step playback Button
22. PAL/NTSC/AUTO Switch pattern
23. RDM/BD/LD Button
24. Paragraph Repeat (A-B)/
Zoom in/out Button
25. CLK ON/OFF,OSD Button
26. SEL Button
27. Slow Button
28. Audio Button
29. EQ/Angle Button
30. Subtitle Button (SUB-T)
31. Setup Button
32. Eject Button
32. Dual Button

.6.
BASIC OPERATION
Power ON/OFF
1.Press button to turn on the unit. When the
unit is on:
2.Short press button, turn off the monitor,
press button again to turn on the monitor.
3.Long press button to turn off the unit.
4.The unit switch on, it will go to Radio mode
automaticially
Press button to enter as below main menu
display screen, you can touch the icon of the
screen to enter different mode.
Clock Display
1、Click the icon to access the clock setup
interface.
--Touch icon Display Clock interface .
Clock Setup mode
You can adjust each item by pressing the
icon or in the touch screen.
--Click icon system save and exit mode.
Note:
After finishing setting, when you click the icon to
return the upper tier tools setup interface;click the icon
to exit the menu setup interface.

.7.
Multimed
i
a
P
layin
g
Insert the multimedia disc
To enjoy the Music、Video、Picture:
1.DVDVideo、DVD-R、DVD-R、MPEG4
2.VCD
3.Audio CD、CD-R、CD-RW
4.Only need to insert a disc with labeled side up into the disc slot, so the unit starts to play
automatically.After leave this mode, you can press MENU button.
5.Press “EJ “Button to Eject the Disc.
Viewing Angle
1. There are 3 angle , adjustment whichis15o,30o and 45o respecitively.
2. Press the button “OPEN” on the front Panel or on the remote control repeatedly to adjust the
angle view.
Upward sliding
Downward slide

.8.
Multimed
i
a
P
layin
g
Playing/Pausing
1.Insert the multimedia Disc、 USB、
SD/MMC Play the disc automatically.
2.Touch screen appears menu, press the
broadcast display files.
3.Touch the icon to pause the playing.
4.Touch the icon again to playing the
media
5.Touch the icon or shortly to skip the
next or previous chapter.
Folder Playing
MOVIE Playback Mode
1.Click the icon to exit the menu
setup interface.
2.Click the icon to play the move.
3.Touch screen icon to select a
file on the screen .
4.Click Remote control icon and
click the folder to playing
Audio Playback Mode
1.Click the icon to exit the menu
setup interface.
2.Click the icon to play theAudio.
3.Touch screen icon to select a
file on the screen .
4.Click Remote control icon and
click the folder to playing
JPEG Playback Mode
1.Click the icon to exit the menu setup interface.
2.Click the icon to play the JPEG image.
3.Touch screen icon to select a file on the screen .
4.Click Remote control icon and click the folder to playing

.9.
Multimed
i
a
P
layin
g
A-B Repeat (Paragraph repeat playback)
A-B repeat allows you to specify a paragraph of the current track to be repeated.
1. Press the "A-B" button to set the starting point of the section you wish to
repeat.“REPEATA-” will be visible on the screen.
2. Press the "A-B" button to set the end point of section you wish to repeat. “REPEAT
A-B” will be visible on the screen.
The unit will repeat the section of the current track you’ve just chosen from point “A”
to “B”.
3. To return to normal playback, press the "A-B" button again. “ A-B Cancel” will be
visible on the screen.
Playing In Random Sequence
Briefly press the “ ”button on the remote control or screen to switch the random
mode on/off. If the random mode is on the tracks (files) in the disc or USB/SD/MMC
memory card will be play in random sequence.
Change the L/RAudio
In the state of VCD Playing, Press the
AUDIO button repeatedly to select the sound
mode of the MONO L, MONO R, MIX MONO
and Stereo, no language function.
Audio
Sub
T
Angles
Menu Pause
4:3
PS
ZOOM
Change theAudio Language
In the state of DVD playing, press theAUDIO button repeatedly on the IR remote control
to select the desired language type.(depend on the media used)
Multimed
i
a
P
layin
g
.10.
Multi-subtitle Language Function
1.Multi-Audio Language Some DVD disc has multiple languages, allowing you to select the
subtitle language recorded on disc.
2.Press the "SUB-T"button to switch between the different languages recorded on the disc
during playback.
Multi-angle Function
You can view the same scene at different angles if the disc has been recorded with multiple
viewing angles.Press the "ANGLE"button during playback.
Angle 1
/
3
This example indicates that you are currently viewing the first of three available camera
angles. Press the "ANGLE"button to select a different angle.
Notes:
- Some time may be required for the angle to change.
- Depending on the disc, the viewing angle may switch in one of two ways.
1. Seamless:The angle switches smoothly.
2. Non-seamless: When the angle is switched, a picture is displayed first,after which the angle
switches.
- The number of available viewing angles varies from disc to disc.
- The function only works for discs having scenes recorded at different angles.
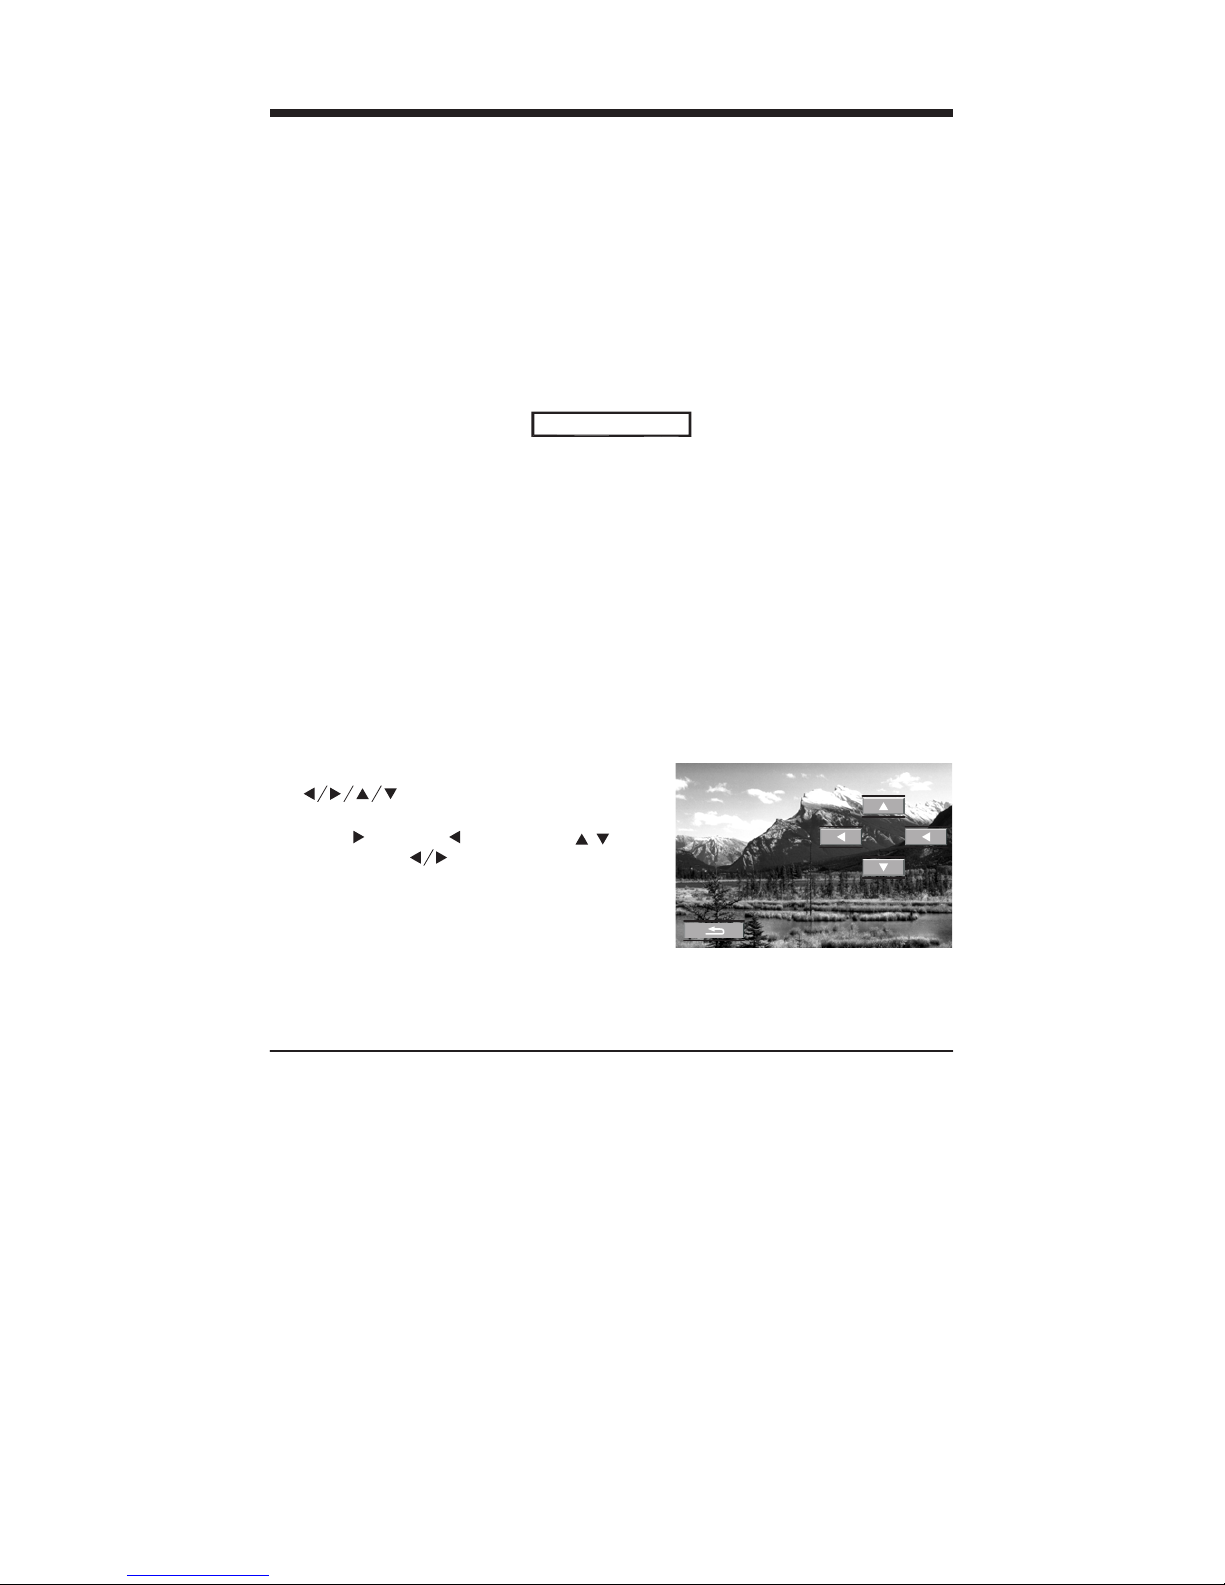
Rotate JPEG
During JPEG playback, press one of the
“ ”buttons to change the angle
of viewing picture that is displaying as
follows: 90 deg cw; 90 deg cw; up -
down; v: LEFT Right
During JPEG playback, press the PROG
button to change the mode of refresh
picture.
During JPEG playback, press the STOP
button to stop playing and return to the root
menu.

Multimed
i
a
P
layin
g
.11.
ZOOM Function
Press the ZOOM button repeatedly to enlarge or reduce the size of image according to the
disc as follows:
ZOOM 2 ZOOM 3 ZOOM 4 ZOOM 1 /
2
ZOOM
OFF
ZOOM
1
/
4
ZOOM
1
/
3
USB Operations
When you insert a USB device into the USB port, the DVD player will search and read the
MP3/WMA/MPEG4 file in the USB device automatically.
If you insert a disc into the disc slot while reading the USB stick, the unit will play the disc.
Press the MODE button on the head unit or MODE button on the remote control to
switch to USB playback mode.
Using the SD/MMC card:
SD/MMC card into the memory card slot,the DVD player will search and read the
MP3/WMA/MPEG4 files in the SD/MMC card automatically.
If you insert a disc into the disc slot while reading the SD/MMC card, the DVD player
will play the disc.
If you want to return the SD/MMC card playback mode, Press the MODE button on the
head unit or MODE button on the remote control to switch tothe SD/MMC card mode.

.12.
Audio Setting
Volume adjusting
1.Click Control Panel Layout "VOL+"and Using The Remote control"VOL+" Increasing
the volume.
2.Click Control Panel Layout "VOL-"and Using The Remote control"VOL-" Reduce the
volume.
Mute ON/OFF
When the unit is switched ON, briefly press the “MUTE”button to switch mute on mute or
OFF.
Sound Setting
Bass
This item is for Selecting Bass Setting.
Treble
This item is for Selecting Treble Setting.
Balance
This item is for Selecting Balance Setting.
Fader
This item is for Selecting Fader Setting.
TA Vol
This item is for Selecting TAvol Setting.
EQ Setting
1.Press the remote control to access the EQ
Setting on the monitor.
2.There are Setup Pages in all for the Menu.
Touch the icon to select an desired setup.
4.Press the button to Confirm it.
POP Rock Classic Flat EQ

.13.
R
ad
i
o Operation
s
To switch to radio mode
Touch the radio icon i n the main menu
display screen to select radio mode, the
LCD will displays as right side:
1.Touch LCD displays “FM1”icon.
Radio Mode
2 . C l i c k U s i n g T h e R e m o t e
control“BD”Button.
3.Click Control Panel Layout “BAND”
4.In radio mode, repeatedly press the
band button on the head unit or remote
control to select radio broadcasting
bands:
FM1 FM2 FM3
Sound Sett
i
ngs
MW2 MW1
Manual tuning mode:
1.Press“SEEK+”or“SEEK-”or /
icon
Display Sett
i
ngs
shortly to manual seek the radio station.
2.Long Press“SEEK+”or“SEEK-”or
icon /to automatically seek the radio
station.
3.Touch the frequency bar in the display
screento select preset memory station.
4.Click the “A/PS” key in IR handset
shortly to activate automatically memory
storing function.
5.Touch LCD displays “SEL” to Audio
Setup.
6.Touch LCD displays “EQ” to EQ setup.
EQ Sett
i
ng

.14.
Bluetoo
t
hOp
e
rati
o
n
Pairing and connection
1. Turn on the Bluetooth mode of the mobile
phone:
2. Select the item to search the Bluetooth
Device Find out the Bluetooth device. Select it
and enter it , then it will show a has bluetooth
and ask you to input a password, the password is
"0000"and then enter it.
3. F or some mob il e ph one s, they ca n
automatically connect with the BT device of the
car audio system after pairing is OK; for some
mobile phones, they need to select the paired BT
device and press the CONNECTION button.
When connection is OK, the LCD of the car
audio system will show LINK OK
When paring is failed, long press the PAIR button
on the remote control to enter pairing mode, then
the LCD will display PAIR START, then pair and
connect with mobile phone again.
Use the mobile phone to do connection or d
i
s
c
onn
ecti
on
1:In the connection status,find the paired and
connected bluetooth device, then press the
disconnection button to do disconnection.
2:In the disconnection status, find the paired
and disconnected bluetooth device, then press
the connection button to do connection.
3:In the connection status: the audio of mobile
phone transfers to the car audio system
whenever a dialling takes place or receiving a
call.
Dial Call
1. In connect icon status,press the " " button
to activate the bluetooth mode.
2. Touch the icon to bluetooth mode.

.15.
Bluetoo
t
hOp
e
rati
o
n
3.Input telephone number. simultaneity,the input number will be appear on the LCD. if a
number is wrongly input, press the " " button to delete the incorrect number.
4. Touch the " " button to execute dialing.
Accept/Reject/Wnd Call
Accept call
when a ring comes, press the " " button to
acceptcall
Reject call
when a ring comes,press the " " button to
reject the coming call.
Listen the Bluetooth Stereo Music (A2DP)
1.Set your mobile phone Bluetooth to stereo
music transmission
2.Play music through multimedia play
application of your mobile phone.
3
.
Enter the Bluetooth mode.
4
.
Then you can hear the music which the
Bluetooth transfer.
5.Press PLAY/PAUSE button to play or pause
the music.
6.Touch the icon or to skip the next or
previous chapter.
NOTE:
This function require your mobile phone supports the BluetoothA2DP protocol.

.16.
Bluetoo
t
hOp
e
rati
o
n
Phone book
1.There are phone call memories30.
2.In bluetooth statue, press "Phone
Book"”icon on the screen,if the display
shows the phone book menu
3.Press icon " "on the screen,go-to
"enter Name"display.
5.
Press" "icon, to select the save file
location.
6.Press "YES"to save the call register.
Press"NO"to canal the call register.
4.
Press" icon, enter pho"ne number.

.17.
T
V
&iPO
D
Op
e
rati
o
n
TV Operation (Option function)
1.Press MENU button to enter main menu
display screen.
2.Touch the icon to enter TV mode.
3.1. If touching the display screen, the TV OSD
will be displayed
4.Touch the icon “APS” to automatically search
and store the TV program station.
5.In TV mode, tapping any place on touch scree
can display TV keyboard interface as right.
6.Touch the icon exit setup.
To switch on a suited video color system and a suited TV accompanying sound system in TV
mode, short press the BAND button repeatedly.
PAL BG PAL I PAL B PAL BH PAL M NTSC M
SECAM DK SCEAM BG PAL DK
IPod Ready operation (option function)
1. Press MENU button to enter main-menu display scree.
2. Touch the icon to select the iPod mode . (Note: If don't connect the iPod, can't
enter this mode.)
3.Touch every icon , you can operate iPod function.
Table of contents


