Bosonic PCD-80 User manual

ENG-2
Safety Precautions
PCD-80
Instruction Manual
Portable CD Radio
·
Read all instructions carefully before using the unit and keep them for further reference.
·
Retain the manual. If you pass the unit onto a third party make sure to include this manual.
·
Check that the voltage marked on the rating label matches your mains voltage.
Damage
·
Please inspect the unit for damage after unpacking.
·
Do not continued to operate the unit if you are in any doubt about it working normally, or if it is damaged in
any way - switch off, withdraw the mains plug and consult your dealer.
Location of Unit
·
The unit must be placed on the flat stable surface and should not be subjected to vibrations.
·
Do not place the unit on sloped or unstable surfaces as the unit may fall off ir tip over.
·
The mains socket must be located near the unit and should be easily accessible.
Temperature
·
Avoid extreme degrees of temperature, either hot or cold. Place the unit well away from heat sources
such as radiators or gas/electric fires.
·
Avoid exposure to direct sunlight and other sources of heat.
Naked Flames
·
Never place any type of candle or naked flame on the top of or near the unit.
Moisture
·
To reduce the risk of fire, electric shock or product damage, do not expose this unit to rain, moisture,
dripping or splashing. No objects filled with liquids, such as vases, should be placed on the unit.
·
If you spill any liquid into the unit, it can cause serious damage. Switch it off at the mains immediately.
Withdraw the mains plug and consult your dealer.
Ventilation
·
To prevent the risk of electric shock or fire hazard due to overheating, ensure that curtains and other
materials do not obstruct the ventilation vents.
·
Do not install or place this unit in a bookcase, built-in cabinet or in another confined space. Ensure the
unit is well ventilated.
Safety
·
Always disconnect the unit from the mains supply before connecting/disconnecting other devices or
moving the unit.
·
Unplug the unit from the mains socket during a lightning storm.
Mains Cable
·
Make sure the unit or unit stand is not resting on top of the mains cable, as the weight of the unit may
damage the mains cable and create a safety hazard.
·
If the mains cable is damaged it must be replaced by the manufacturer, its service agent, or similarly
qualified persons in order to avoid a hazard.
Interference
·
Do not place the unit on or near appliances which may cause electromagnetic interference. If you do it, it
may adversely affect the operating performance of the unit, and cause a distorted picture or sound.
Batteries
·
Batteries used in the unit are easily swallowed by young children and this is dangerous.
·
Keep loose batteries away from young children and make sure that the battery holder tray is secure in the
unit. Seek medical advice if you believe a cell has been swallowed.
·
Please dispose of batteries correctly by following the guidance in this manual.
ENG-1
ENG-2 ENG-4
ENG-3
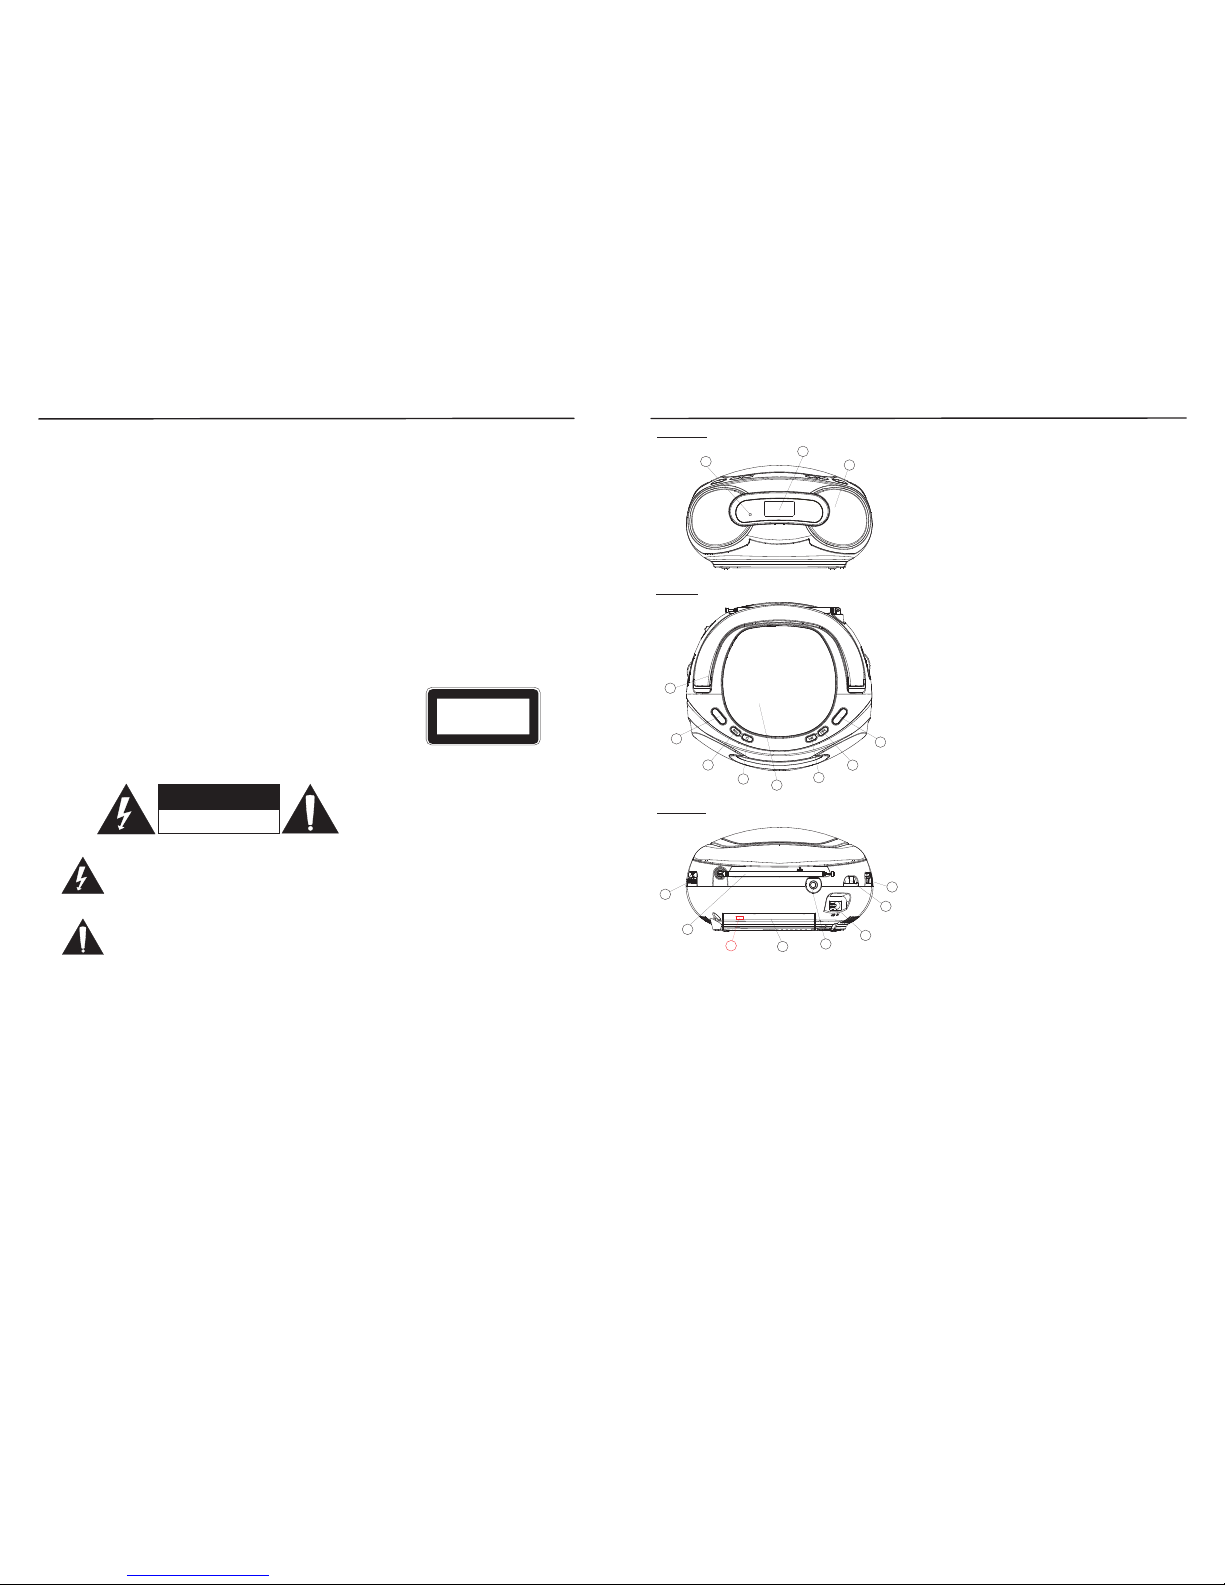
Safety Precautions Product Overview
Front view
2
1
3
1. Speakers
2. LCD Display
3. FM Stereo Indicator
4. Repeat
5. Next
CD: skips tracks forward.
6. Play/Pause
CD: start or pauses CD playback.
7. CD Door
8. Stop
CD: stops CD playback or delete a program.
9. Back
CD: skips tracks backward.
10. Program
11. Handle
12. Volume Control
13. Function Selector
- select CD, OFF, AM and FM ST..
14. AC IN Jack
- connect AC power cord to the mains socket.
15. Earphones Jack
16. Battery Compartment
17. Telescopic Antenna
18. Tuning Knob
- adjust the AM or FM radio station.
B. Voltage Selector (110V or 220V)
Earphones
·
Listening to loud sounds for prolonged periods of time may permanently damage your hearing.
·
Before putting on earphones, turn the volume down then put the earphones on and slowly increase the
volume until you reach a comfortable listening level.
Supervision
·
Children should supervised to ensure that they do not play with the unit and the remote control.
·
Never let anymore especially children push anything into the holes, slots or any other openings in the
case - this could result in a fatal electric shock.
Service
·
To reduce the risk of electric shock, do not remove screws, The unit does not contain any user-
serviceable parts. Please leave all maintenance work to qualified personnel.
Maintenance
·
Ensure to unplug the unit from the mains socket before cleaning.
·
Do not use any type of abrasive pad or abrasive cleaning solutions as these may damage the unit’s
surface.
·
Do not use liquids to clean the unit.
Class 1 Laser Product
·
This unit utilises a laser. Use of controls, adjustments or performance of
procedures other than those specified herein may result in hazardous
radiation exposure.
·
Before removing the unit, ensure the disc tray is empty.
·
Always remove the disc when the unit is not in use.
·
Failure to do so will risk severely damaging the disc and the unit.
·
Do not stack devices, heat from other devices may affect the performance of
the unit.
The lightning flash with arrowhead symbol, within an equilateral triangle, is intended to
alert the user to the presence of uninsulated “dangerous voltage” within the unit’s
enclosure that may be of sufficient magnitude to constitute a risk of electric shock.
The exclamation point within an equilateral triangle is intended to alert the user to the
presence of important operating and maintenance (servicing) instructions in the manual
accompanying the unit.
RISK OF ELECTRIC SHOCK
DO NOT OPEN
CAUTION
RISK OF ELECTRIC SHOCK
DO NOT OPEN
CAUTION
CLASS 1
LASER PRODUCT
Owner’s record
For your convenience, record the model number and serial number for future reference.
Model no.:___________________________________ Serial no.:____________________________________
Top view
4
5
6
7
10
8
9
11
Rear view
13
12
18
15
14
16
PH O N E S
17
B

ENG-5 ENG-6
Power Supply
Connect AC power
Caution:
Risk of product damage! Ensure that the power supply voltage corresponds to the voltage printed on the
rating label located on back or bottom of the unit.
Warning:
Risk of electric shock! When you disconnect the AC power, always pull the plug from the wall outlet.
Note: Install the unit near the wall outlet and where the AC power plug can be easily reached.
1. Connect the power cord to the AC IN jack on the unit and to the wall outlet.
2. To save energy: After use, set the switch to OFF.
Install batteries (not included)
Note: You can use both batteries and AC power as power supply of this unit.
Batteries are not supplied with the accessories.
1. Open the battery compartment.
2. Insert 8 x UM-2 batteries with correct polarity (+/-) as indicated.
3. Close the battery compartment.
Handling the batteries
·
Install the batteries correctly by following the polarity (+ and -) indications in the battery compartment.
·
Never use batteries that show signs of electrolyte leaks or cracking.
·
Never dispose of used batteries in an open fire.
·
Keep batteries out of reach of children.
·
Never recharge disposable batteries.
·
Never short circuit battery terminals.
·
Always remove used batteries from the appliance case.
·
Do not try to open the batteries.
·
Do not mix up different kind of batteries or new and already used batteries together.
·
Only use batteries of the recommended or equivalent type.
·
Remove batteries from the unit before disposing of it at the end of its service life.
·
Do not dispose of the end of the used batteries as domestic waste. Dispose of them in accordance with
local regulations.
Note:
When replacing the batteries, make sure you dispose of the old batteries in accordance with applicable
regulations. They should be disposed of in a location specifically designated for that purpose so they can
be recycled safely and without posing any risk for the environment. Do not burn or bury them.
General Operation
1. To switch on and select your operation source, adjust the Function Selector to CD or RADIO.
2. Adjust the sound with the Volume Control.
3. To switch off the unit, adjust the Function Selector to OFF.
Note: To avoid unnecessary energy consumption, always adjust the Function Selector to OFF after using
the unit.
Radio Reception
1. Adjust the Function Selector to AM or FM ST..
2. Turn the Tuning Knob to tune to a station.
Note: The FM stereo indicator comes on if the band selector is set on FM stereo and you have tuned the
radio to an FM stereo station.
Helpful hints:
·
To improve FM reception, you can extend, incline or turn the telescopic antenna for best reception.
·
To improve AM reception, turn the unit to face a different direction.
Using earphones
Turn down the volume before connecting the earphones. Slowly raise the volume with the earphones on
until you reach your desired volume. When earphones are connected, the speaker is automatically
disabled.
Note: Avoid listening to sound at excessive levels which could be harmful to your ears. At full power, the
prolonged listening can damage the ears of the user.

ENG-7 ENG-8
CD Operation
You can play commercially available audio CDs including CD-R and CD-RW.
Note:
·Even if this portable radio-CD player is able to read CD-R and CD-RW discs, in addition to conventional
compact discs, it is not possible to offer a 100% guarantee that all CD-R/RW discs can be read; playback
depends on the quality and condition of the blank discs that you use, among other things. A playback
failure does not necessarily indicate that the unit is malfunctioning.
·You cannot play CDs encoded with copyright protection technologies.
Play a CD
1. Adjust the Function Selector to CD.
2. To open the CD door, raise it by the corner marked OPEN/CLOSE.
3. Insert a CD with the printed side facing up.
·The total number of tracks in the disc will display.
·If no disc or CD door is not closed, display shows “- -”.
4. To start playback, press the Play/Pause button.
5. To pause/resume play, press the Play/Pause button.
6. To stop play, press the Stop button.
7. To skip a track, press the Back or Next buttons.
8. To search within a track, press and hold the Back or Next buttons.
Release the button to resume normal play.
Play options
Adjust volume level
1. During play, turn Volume Control to increase/decrease the volume level.
Select play modes
1. Press the Repeat button repeatedly to select a play mode:
·repeat: repeat the single track.
·repeat all: repeat the whole disc.
2. To return to normal play, press the Repeat button repeatedly until play mode icons are no longer
displayed.
Program play sequence
You may store up to 20 tracks in desired sequence. Be sure to press the Stop button before use to ensure
no prior program has been set.
1. In stop mode, press the Program button to activate programming.
· “PROGRAM” and “00” indicator will flash on the display.
2. Press the Back or Next buttons to select your desired track number.
3. Press the Program button to store the desired track number.
4. Repeat steps 2-3 to select additional tracks into program memory.
· When the memory is full, “PROGRAM” and “- -” will flash on the display.
5. To play your program, press the Play/Pause button in stop mode.
· The “PROGRAM” indicator will flash.
6. To review the program, press the Program button to
display your stored tracks in stop mode.
7. To erase a program, press the Stop button in stop mode or by
opening the CD door.
· The “PROGRAM” indicator will disappear.
Total t rack
PRO GRA M
PRO GRA M
REP EAT RE PEAT ALL
REPE AT 1 à REPE AT ALL à NOR MA L PL AYB ACK
Maintenance
Clean the cabinet
Use a soft slightly moistened with a mild detergent solution. Do not use a solution containing alcohol,
spirits, ammonia or abrasives.
Clean discs
When a disc becomes dirty, clean it with a cleaning cloth. Wipe the disc from the centre out.
Do not use solvents such as benzene, thinner, commercially available cleaners, or antistatic spray
intended for analogue records.
Clean the disc lens
After prolonged use, dirt or dust may accumulate at the disc lens. To ensure good play quality, clean the
disc lens with camera lens brush or any commercially available cleaners. Follow the instructions supplied
with cleaner.
ENG-9 ENG-10
Troubleshooting
Environmental information
All unnecessary packaging materials has been omitted. The packaging can be easily separated into three
materials: cardboard, polystyrene and plastic.
Your set consists of materials which can be recycled if disassembled by a specialized company. Please
observe the local regulations regarding the disposal of packaging, dead batteries and old equipment.
If a fault occurs, first check the points listed below before taking the set for repair.
If you are unable to remedy a problem by following hints, consult your dealer or service center.
Note: Do not open the unit as there is a risk of electric shock. Under no circumstances should you try to
repair the set yourself; as this will invalidate the guarantee.
No power
·Ensure that the power cord is connect securely.
·Ensure that there is power at the AC Mains.
·Ensure that the batteries are inserted correctly.
No sound or poor sound
·Adjust the volume.
No response from the unit
·Disconnect and reconnect the AC power cord, then turn on the unit again.
·Electrostatic discharge, re-connect the AC power cord after a few seconds.
No disc detected
·Insert a disc.
·Check if the disc is inserted upside down.
·Wait until the moisture condensation at the lens has cleared.
·Replace or clean the disc.
·Use a finalized CD or correct format disc.
The CD skips tracks
·Ensure that the CD is not damaged or dirty.
·Ensure that program mode is deactivated.
Poor radio reception
·Increase the distance between the unit and your TV or any home appliance.
·Fully extend the telescopic antenna.
Specifications
(The technical characteristics are liable to change without notice)
Power Supply
Power Consumption
Dimensions
Weight
Frequency Range
Output Power (RMS)
Speakers
Earphones Jack
Mains: AC 110/220V ~ 60/50Hz
Battery: DC 12V(8 x UM-2 batteries, not included)
: 14W
: 233(L) x 209(W) x 129(H) mm
: 1.33 kg
: AM 530-1710KHz
: FM 88-108MHz
: 2 x 1.2W
: 8 Ohms
: 3.5mm
Recycle
This symbol bears the selective sorting symbol for waste electrical and electronic
equipment (WEEE). This means that this product must be handled pursuant to
European Directive 2002/96/EC in order to be recycled or dismantled to minimize its
impact on the environment. It should be disposed at the end of its life separately from
your household waste. There are separate collection systems for recycling in the EU.
For more information, please contact the local authority or your retailer where you
purchased the product.
Electronic products not included in the selective sorting process are potentially
dangerous for the environment and human health due to the presence of hazardous
substances.
This mark is applied to show the equipment conforms to European safety and
electromagnetic compatibility standards.
Notes for battery disposal
The batteries used with this product contain chemicals that are harmful to the environment. To
prevent our environment, dispose of used batteries according to your local laws or regulations.
Do not dispose of batteries with normal household waste.
For more information, please contact the local authority or your retailer where you purchased the
product.
Table of contents


