Boss Audio Systems POLCAM User manual

0821
BOSS Audio Systems
3451 Lunar Court • Oxnard, CA 93030
POLCAM
COMPATIABLE WITH POLARIS®
RZR RIDE COMMAND™

1
Introduction
Congratulations on your purchase, and welcome to BOSS Audio Systems!
This camera is designed to be mounted on the front or rear of your Polaris RZR
vehicle. The camera is compatible with Polaris RZR models equipped with Ride
Command unit. With the supplied connection cables, you can easily plug and
play on any other head unit with a video input.
Delivery content
• 1x Front/Rear camera with female JST Ride Command compatible connector
• 1x Universal Power/Video cable with male JST connector
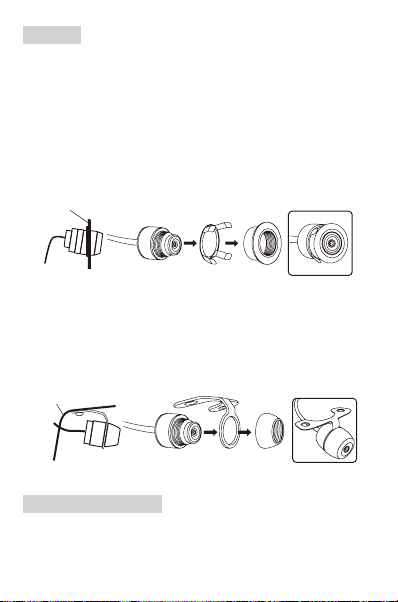
• Camera mounting kit
• User manual
Before use
Read and understand all instructions before you use your product. If you do
not follow the instructions in this manual, we are not responsible for injury or
damage resulting from improper handling, or vehicle damage due to improper
installation. This will also void the warranty.
Important safety precautions
• Use of the camera must not replace other safe driving habits. Precise control
and looking around before backing up is necessary.
• Always remember that the area displayed by the camera system is limited,
and certain obstacles may not be detected or not reliably detected.
• Servicing must only be carried out by a technician. Contact our technical
support for any service question.
Installation precautions
• WARNING: Always consult a professional installer.
• Improper wiring and mounting of the product can cause damage, injury or
accident. Have installation performed by a professional only. Contact our
technical support for any installation questions.
• Observe the safety and operating instructions of the devices which are
connected to the product.
• Only use the accessories provided with the product.

2
Wiring
Important notes on wiring
• This product must be used with 12 DC power supply. Never connect this
product to any other power supply.
• Disconnect the negative terminal of the vehicle battery prior to installation.
• Make sure wires are not squeezed or damaged by sharp edges. Use rubber
bushings for protection if needed.
12 3
Universal video cable Camera cable
Blue and white
wire loops
DC 12V
Camera
1. Connect the camera to the moniter on your vehicle. See 1.
Connect the yellow RCA plug of the supplied video cable to the video input
on your monitor.
See the user manual of your monitor for power connection to the monitor.
2. Connect the camera to power supply. See 2.
For the front camera:
Connect the red splitting wire of the video cable to the accessory power of
your vehicle. When connected to theaccessory power, the camera will auto
power on and display live view upon starting the vehicle engine.
For the rear camera:
Connect the red splitting wire of the video cable to the positive wire of the
reverse light. When connected to the reverse light, the camera will auto power
on and display live view upon putting the vehicle in the reverse gear.
3. Connect the video and camera cables together. See 3.
Now you complete all the camera wiring.
Image setting
• When used as a front camera, cut off the blue wire loop to avoid reverse
image. When used as a rear camera, keep the blue wire loop uncut for rear
view image.
• To display guide lines in the camera view, keep the white wire loop uncut.
Otherwise, cut it off.
• To activate the image setting change (cut-off of the wire loop), unplug the
camera cable and plug it again.

3
Mounting
Important notes on mounting
• When making modications to the vehicle due to the installation, make sure
trafc safety and stability of the vehicle is not impaired.
• When drilling or cutting any holes on your vehicle, make sure the fuel tank,
fuel lines, hydraulic lines and electrical wiring are not damaged.
Option 1: Flush mount
1. Select a suitable location on the front or rear of your vehicle (e.g. front or rear
bumper). Then cut an appropriate hole which ts the camera securely.
2. Flush mount the camera as illustrated below. No screws are required.
Vehicle body
Option 2: Hanging mount
1. Select a suitable location on the front or rear of your vehicle (e.g. front or rear
bumper). Then cut an appropriate hole for the camera cable, and drill two
screw holes for the mounting bracket.
2. Use the supplied two screws to x the bracket then attach the camera to the
bracket as illustrated below.
Vehicle body
Care of the environment
Do not throw away the product with the normal household waste at the end of
its life, but hand it in at an ofcial collection point for recycling. By doing this, you
help to preserve the environment.

4
Troubleshooting
Refer to the checklist below to solve the problems when using the product. If
problems persist, contact our technical support. Do not attempt to disassemble
or modify the product.
Problem Solution
No image Check that the power cable is correctly or securely
connected (see section “Wiring”).
Check that the video cable has a good connection to the
video input on the monitor.
Check that the reverse gear is engaged for the rear
camera.
Check to ensure correct image settings on your monitor.
Image blurring Check for water drops or dust on the camera lens. Clean it
with a damp, ber-free cloth.
Image shaking Check the camera is securely mounted.
Image slanted Check the camera is horizontally mounted.
Specications
Power supply...........................................12V DC (allowable 9 – 15 V DC)
Viewing angle ..........................................170°
TV system................................................PAL/NTSC
Video output ............................................1.0 vp-p, 75 Ω
Signal-to-noise ratio.................................≥48 dB
Operating conditions................................ -22 to +158°F (-30 to +70°C),
max. 95% RH
White balance..........................................Auto
Illumination ..............................................min. 0.5 lux
Automatic gain control (AGC)..................Auto
Effective pixels.........................................656 x 492
Product information is subject to change without notice.
0821

0821
BOSS Audio Systems
3451 Lunar Court • Oxnard, CA 93030
POLCAM
COMPATIABLE WITH POLARIS®
RZR RIDE COMMAND™
Table of contents
Other Boss Audio Systems Digital Camera manuals