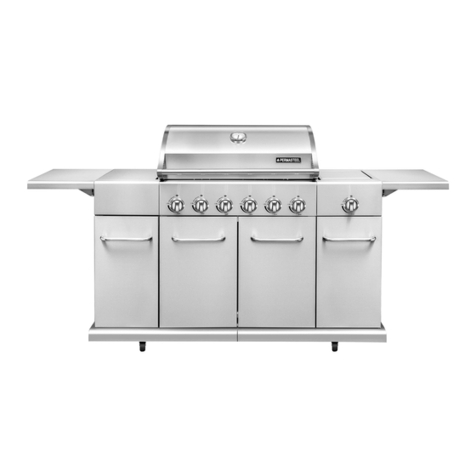
BOSS Grill IQBQ6BCHTB User manual

OWNER’S MANUAL
PREMIUM 6 BURNER BBQ WITH SIDE BURNER
IQBQ6BCHTB

2
Thank you for purchasing a BOSS GRILL BBQ
Forged from iron, steel and solid, British values, our BBQ’s deliver a finger-licking
feast. We design high-quality grills, so you can serve up a sizzling experience for
your family and friends.
Tongs at the ready? Then step up to the plate, Boss.
CONTENTS
Important Safety Information
3
General Information for Successful Assembly
3
Exploded Diagram
4
Parts List
5
Tools Required
6
Assembly Instructions
7
Gas Supply Information
14
Regulator and Hose
14
Gas Cylinder
14
Connecting the gas bottle to the appliance
15
Checking for leaks
15
Lighting Instructions
16
Main Burner
16
Side Burner
16
Safely using your BBQ
17
Flare-up Control
17
Fat Fires
17
Cleaning and Care
18
Outside Surface
18
Interior of the BBQ
18
Cooking Grid
18
Cleaning the Burners
18
Storage of the Appliance
18
Technical Information
19
Manufacturer Support
19

3
IMPORTANT SAFETY INFORMATION
Please read this user manual before using this BBQ and keep it safe for future reference .
⚫Read the following instructions carefully and
be sure your BBQ is properly installed,
assembled and cared for. Retain the
instructions for future reference.
⚫Failure to follow these instructions may
result in serious bodily injury and/or
property damage.
⚫WARNING - Risk of Suffocation! BBQ’s must
be used outdoors and must not use in
enclosed areas such as sheds or marquees!
⚫Read the instruction manual before using the
appliance.
⚫WARNING: Accessible parts may be very hot.
Keep young children away.
⚫Wear heat proof gloves whilst operating the
appliance.
⚫This appliance must be kept away from
flammable materials during use.
⚫Do not move the appliance during use.
⚫Turn off the gas supply at the gas cylinder
after use.
⚫Do not modify this appliance.
⚫If you have any questions concerning
assembly or operation, consult the retailer or
Bottled Gas Company.
⚫Always place the appliance and cylinder on
flat level ground.
⚫Never light the appliance with the hood in
the closed position.
⚫Your BBQ can be used with gas cylinders
between 11 kg and 15 kg. The maximum size
is 310mm (Diameter) x 600mm(Height) .
Your BBQ will perform better if propane or
LPG mixtures are used. Butane can be used
but because of the power of this appliance
the cylinder may tend to freeze and supply
gas at reduced pressures affecting the
performance of your BBQ.
⚫The BBQ is supplied with a 27mm clip on
37mbar regulator. Alternative regulators may
be used as long as they are the correct rating
for the BBQ and type of gas used.
⚫When positioning the BBQ the following
clearances must be obeyed:
Sides and rear of appliance: 1 METRE
FROM ANY OBSTRUCTION.
Above the appliance: NO OVERHEAD
OBSTRUCTION ARE PERMITTED.
⚫Please turn off the gas cylinder if gas leak is
suspected.
⚫Parts sealed by the manufacturer must not
be altered by the user. No modifications
should be made to any part of this BBQ and
repairs and maintenance should only be
carried out by a registered Gas Safe service
engineer.
GENERAL INFORMATION FOR
SUCCESSFUL ASSEMBLY
Please read the assembly instructions carefully and follow the safety precautions. Allow sufficient time for
assembly. Before starting assembly, clear an area measuring approximately two to three square metres.
Remove the item from the packaging and lay out all of the parts and any necessary tools so that they are
within easy reach.
Only tighten all of the screw connections firmly when you have finished assembly or are instructed to
within the manual. Otherwise this can result in unwanted tension and instability.

4
EXPLODED DIAGRAM

5
PARTS LIST
CARTON 1 OF 2
Part
No
Description
Diagram
Qty
Part
No
Description
Diagram
Qty
01
Warming Rack
1
24
Side Burner
Panel
1
03
Flame Tamer
4
25
Ignition Wire
1
04
Body
Assembly
1
26
Side Burner
Shelf
1
05
Side Shelf
1
27
Side Burner
1
06
Side Shelf
Panel
1
28
Side Burner
Rack
1
07
Door Bracket
1
29
Side Burner
Valve, Pipe
and Regulator
1
08
Cart Bracket
2
Screwdriver
1
13
Castor
2
BBQ Cover
1
14
Door Axle
2
FITTINGS BAG
17
Magnet
1
A
M6 x 10mm
Bolt
44
18
Wheel Axle
2
B
Clip
2
19
Wheel
2
C
M3 x 10mm
Bolt
2
22
Control Dial
1
D
M3 Nut
2
23
Dial Base
1
E
M4 x 10mm
Bolt
12
f
Hook
3

6
CARTON 2 OF 2
Part
No
description
diagram
qty
PLEASE NOTE:
BEFORE STARTING ASSEMBLY, CHECK THE CONTENTS OF
THE BOXES TO ENSURE THAT ALL PARTS ARE PRESENT
AND UNDAMAGED.
02
Cooking Tray
1
09
Back Right Leg
1
10
Front Right
Leg
1
11
Back Panel
1
12
Trolley Side
Panel
2
15
Door
2
16
Bottom Tray
1
20
Front Left Leg
1
21
Back Left Leg
1
30
Cooking Grid
2
Tools required
Cross Head Screwdriver
Adjustable Spanner

7
Assembly INSTRUCTIONS
STEP 1.
Attach the Front Left Leg (20) and Back Left Leg (21) to the Cart Bracket (08) and
Trolley Side Panel (12) using 8 Bolts (A). Repeat for the Right side using the Back
Right Leg (09) and Front Right Leg (10).
Right Leg (09) and Front Right Leg (10)
FITTINGS REQUIRED
DESCRIPTION
QTY
A
M6 x 10mm
BOLT
16
Do not fully tighten the bolts at
this point.
STEP 2.
FITTINGS REQUIRED
DESCRIPTION
QTY
A
M6 x 10mm
BOLT
4
Do not fully tighten the bolts at
this point.
Attach the Bottom Tray (16) to the two sides built in Step 1
using two bolts (A) at each end.

8
STEP 3.
FITTINGS REQUIRED
DESCRIPTION
QTY
A
M6 x 10mm
BOLT
8
C
M3 x 10mm
Bolt
2
D
M3 Nut
2
Attach the Door Bracket (07) to both Front Legs using two Bolts (A) at each side.
Then attach the Back Panel (11) to the Back Legs using two Bolts (A) at each side.
Attach the Magnet (17) using 2
Bolts (C) and 2 Nuts (D).
At this point all the bolts fitted in
Steps 1 -3 should be fully
tightened.
STEP 4.
Screw the two castors (13) into the base of the Right Legs.
Attach the Wheels (19) to the Left Legs by sliding the Wheel Axle (18) through the
Wheel and Left Leg, before locking in position with Clip (B)
FITTINGS REQUIRED
DESCRIPTION
QTY
B
Clip
2

9
STEP 5.
STEP 6.
Attach the Doors (15) to the frame by Sliding the Door Axle (14) through it,
before locating the Axle into the locating hole in the door bracket. Once the
top is located, push the door into position and slide the bottom of the Door
Axle into the corresponding hole in the Bottom Tray.
Place the Body Assembly (04) into position on the
assembled frame.

10
STEP 7.
STEP 8.
FITTINGS REQUIRED
DESCRIPTION
QTY
A
M6 x 10mm
BOLT
4
Fix the Body Assembly (04) into position on the
frame using 4 Bolts (A). Once all four bolts are in
position, they can be fully tightened.
Screw the Side Burner Valve, Pipe and Regulator
Assembly (29) onto the side of the control panel,
tightening with an Adjustable Spanner.
FITTINGS REQUIRED
DESCRIPTION
QTY
E
M4 x 10mm
BOLT
6
Attach the Side Shelf Panel (06) to the Side Shelf
(05) using three Bolts (E).
Repeat to attach the Side Burner Panel (24) to the
Side Burner Shelf (26)
Do not fully tighten the bolts at this point.

11
STEP 9.
STEP 10.
FITTINGS REQUIRED
DESCRIPTION
QTY
A
M6 x 10mm
BOLT
12
Attach the Shelves assembled in step 8
to the BBQ using six Bolts (A) for each
Shelf.
Once the Shelves are attached, all the
bolts fitted in steps 8 and 9 can be fully
tightened.
FITTINGS REQUIRED
DESCRIPTION
QTY
E
M4 x 10mm
BOLT
2
Attach the Side Burner Valve
(29) to the back of the Side
Burner Shelf using two Bolts
(E) through the Dial Base (23).
This can be fully tightened.
Then attach the Control Dial
(22) by pushing it into position
over the stem of the valve.

12
STEP 12.
FITTINGS REQUIRED
DESCRIPTION
QTY
E
M4 x 10mm
BOLT
2
FITTINGS REQUIRED
DESCRIPTION
QTY
E
M4 x 10mm
BOLT
2
Slide the Side Burner (27)
into position and secure
with two Bolts (E). This can
be fully tightened.
Note: The connection between the Side Burner and the Side Burner Valve is
designed to be loose. This allows air to be drawn into the gas supply,
increasing the efficiency of the burner.
STEP 11.
Attach the Ignition Wire (25)
to the Side Burner using two
Bolts (E). This can be fully
tightened.
Attach the opposite end of the
Ignition Wire to the terminal
on the Side Burner Valve.

13
STEP 13.
Place the Flame Tamers (03), Cooking Grids (30), Cooking Tray (02), Side Burner Rack (28) and
Warming Rack (01) in position on the appliance. Screw the three Hooks (F) into the side of the
Side Burner Shelf.
FITTINGS REQUIRED
DESCRIPTION
QTY
F
Hook
3

14
CONNECTING THE GAS CYLINDER
GAS SUPPLY information
This appliance is only suitable for use with low pressure Butane, Propane, or LPG mixtures, fitted with the
appropriate low-pressure regulator via a flexible hose. The hose should be secured to the regulator and the
appliance with hose clips. This BBQ is set to operate with a 28 mbar regulator when used with Butane gas,
a 37 mbar regulator when used with Propane gas, and 30 or 50 mbar for LPG mixtures. Please consult your
local bottled gas dealer for information regarding a suitable regulator for the gas cylinder, and BBQ.
REGULATOR AND HOSE
•This BBQ is provided with a 27mm clip on 37 mbar regulator, suitable for Calor Patio gas, Flogas Leisure
gas, BP Gaslight and similar.
•Replacement regulators are available from your equipment retailer or an authorised bottled gas
stockest. Use only regulators and hoses approved for bottled gas at the above pressures. The life
expectancy of the regulator is estimated as 10 years. It is recommended that the regulator should be
changed within 10 years of the date of manufacture.
•The use of the wrong regulator or hose is dangerous, always check that you have the correct items
before operating the BBQ.
•The hose used must conform to the relevant standards for the country of use. The length of the hose
must be a maximum of 1.5 metres. Worn or damaged hoses must be replaced.
•Ensure that the hose is not obstructed, kinked or in contact with any part of the BBQ other than at its
connection.
GAS CYLINDER
•The gas cylinder should not be dropped or handled roughly. If the appliance is not in use, the cylinder
must be disconnected. Replace the protective cap on the cylinder after disconnecting the cylinder from
the appliance.
•Cylinders must be stored outdoors in an upright position and out of the reach of children. The cylinder
must never be stored where temperatures can reach over 50oC. Do not store the cylinder near flames,
pilot lights or other sources of ignition. DO NOT SMOKE NEAR THE CYLINDER(S).
•This BBQ is designed for use outdoors only, away from any flammable materials. It is important that
there are no overhead obstructions and that there is a minimum distance of 1m from the side and rear
of the appliance. It is important that the ventilation openings of the appliance are not obstructed. The
BBQ must be used on a level, stable surface.
•The appliance should be protected from direct draughts and should be positioned or protected against
direct penetration by any trickling water (e.g. rain).
Parts sealed by the manufacturer must not be altered by the user. No modifications should be made to
any part of this BBQ and repairs and maintenance should only be carried out by a registered Gas Safe
service engineer.

15
CONNECTING THE GAS BOTTLE TO THE APPLIANCE
•Before connecting the gas supply, ensure that there is no debris caught in the head of the gas cylinder,
regulator, burner or burner parts. Spiders and insects can nest within and clog the burner/ venturi tube
at the orifice. A clogged burner can lead to a fire beneath the appliance.
•Clean the burner holes with a heavy-duty pipe cleaner.
•Fit the hose to the appliance, ensuring that the screw fitting has been fully tightened using a spanner. If
the hose is replaced, it must be secured to the appliance and regulator using hose clips.
•Disconnect the regulator from the cylinder (according to the directions indicated on regulator) when the
BBQ is not in use.
•The BBQ must be used in a well-ventilated area. Do not use indoors or in a garage.
•ONLY USE THIS BBQ OUTDOORS.
CHECKING FOR LEAKS
BEFORE USE CHECK FOR LEAKS
Never check for leaks with a naked flame, always use a soapy water solution
•Make 50 –75ml of leak detecting solution by mixing ¼ washing up liquid with 3/4 water.
•Ensure the control dials on the BBQ are set to the OFF position.
•Connect the regulator to the cylinder, ensuring that all the connections are secure before turning ON the
gas.
•Brush the soapy solution onto the hose and all joints. If bubbles appear you have a leak, which must be
rectified before use.
•Turn OFF the gas at the cylinder after testing.
•If a leak was detected, retest the BBQ for leaks after taking the appropriate action to resolve the leak.
•If leakage is detected and cannot be rectified, do not attempt to repair the leakage but consult a suitably
qualified technician.

16
LIGHTING INSTRUCTIONS
If any burner fails to ignite after a number of attempts, turn the control dial to the off position (clockwise)
and also turn the cylinder valve off. Wait for five minutes before attempting to light the BBQ again.
MAIN BURNERS
1. Open the lid and make sure that all burners are in the OFF position.
2. Connect the regulator to the gas bottle. Turn the gas supply to “ON” position on the regulator. Use
soapy water to check if there is any gas leakage between the gas bottle and the regulator.
3. Push down the control dial and turn it anti-clockwise to the position, this will light the burner.
4. If the burner fails to ignite, turn the control dial to the off position (clockwise) and also turn the cylinder
valve off. Wait 5 minutes and repeat step 3.
5. Adjust the heat by turning the control dial between the High/Low markings on the control panel.
6. To turn OFF the BBQ, turn the control dial clockwise to the “OFF” position and then turn the cylinder
valve or regulator switch to the “OFF” position, before disconnecting the gas bottle.
Before cooking for the first time, operate the BBQ for around 15 minutes with the lid closed and the gas
turned to HIGH. This will ‘heat clean’ the internal parts and dissipate odour from the painted finish.
SIDE BURNER
1. Push down the control dial and turn it anti-clockwise to the position to light the burner
2. If the burner is not lit within 5 seconds, turn the dial to the OFF position, and repeat step 1.
3. To turn OFF the BBQ, turn the control dial clockwise to the “OFF” position and then turn the cylinder valve or
regulator switch to the “OFF” position, before disconnecting the gas bottle
Note: The loose connection between side burner and valve is designed to allow air into the gas mix to ensure the
fuel is burned efficiently, and is not a fault with the unit.

17
SAFELY USING YOUR BBQ
FLARE-UP CONTROL
Flare-ups can occur during barbequing, and is caused by fat and juices falling onto a hot surface. Avoid
excessive flare-ups to prevent food from being burnt. The flame tamers are designed to help limit the
amount of flare ups, but these must be kept in good condition and free of grease to be effective.
To control flare ups, excess fat must be trimmed from meat and poultry before cooking, try to avoid very
cheap meat products as these tend to have a high fat and water content. Only use cooking sauces and
marinades sparingly.
If a flare up occurs, move food away from the flare up if it is safe to do so. Baking soda or salt can be used
to extinguish it. Always protect your hands when handling anything near the cooking surface of the BBQ
and take care to protect yourself from the flames.
FAT FIRES
Empty and clean the BBQ of food debris following each use. If the BBQ is to be used for a large gathering, it
may be necessary to turn off and cool the BBQ every two hours to remove food debris and grease from the
drip tray and drip pan. The maximum cooking time between cleans is dependent on both the amount of
food been cooked and their fat content. When cooking large quantities of food with a high fat content, the
BBQ will require more regular cleaning. Failure to keep the fat under control may result in a fat fire, which
is dangerous if it spreads to the gas hose. Fat fires may cause injury and seriously damage the BBQ. This
would not be covered under the warranty.
In the event of a fat fire:
•If safe to do so, turn all the controls to the ‘off’ position.
•Turn off the gas supply on the regulator.
•Keep everyone a safe distance away from the BBQ and wait until the fire has burnt out.
•Do not close the BBQ lid.
•never douse a BBQ with water. if an extinguisher is used, it should be a powder type.
•do not attempt to remove the fat until the BBQ has cooled.
•If the fire does not seem to be abating or appears to be worsening, contact the Fire Brigade for
assistance.

18
CLEANING AND CARE
All cleaning and maintenance should be carried out when the BBQ is cool and the fuel supply is turned OFF with the
gas cylinder disconnected.
OUTSIDE SURFACE
•Use mild detergent or baking soda and hot water solution. Non-abrasive scouring powder can be used
on stubborn stains, then rinse with water.
•If the inside surface of the lid has the appearance of pealing paint, baked on grease build-up has turned
to carbon and is flaking off. Clean thoroughly with strong, hot soapy water solution. Rinse with water
and allow to completely dry.
NEVER USE OVEN CLEANER.
INTERIOR OF BBQ
Burning off” the BBQ after every use (for approx. 15 minutes) will keep excessive food residue to a minimum.
Remove residue using a brush, scraper and/or cleaning pad, then wash with soapy water solution. Rinse
with water and allow to dry.
COOKING GRID
Use a mild soapy water solution and rinse with water. Non-abrasive scouring powder can be used on
stubborn stain.
CLEANING THE BURNERS
•Turn the gas OFF at the control dial and disconnect the gas cylinder.
•Remove the cooking grid and cooking tray.
•Clean the burner with a soft brush or blow clean with compressed air and wipe with a cloth.
•Clean any clogged parts with a pipe cleaner or stiff wire (such as an opened paper clip).
•Inspect the burner for any damage (cracks or holes). If damage is found, replace the burner.
•When re-installing the burner, check to ensure that the gas valve orifices are correctly positioned and
secured inside the burner inlet (venturi).
STORAGE OF THE APPLIANCE
The appliance must only be stored indoors when it has been disconnected and the cylinder has been
removed. When the appliance is not in use for a period of time it should be carefully packed for storage and
stored in a dry, dust free environment.

19
TECHNICAL INFORMATION
IQBQ6BCHTB
Buy It Direct Limited
The Black Church, St Mary’s Place, Dublin 7
Unit J6, Lowfields Way, Elland, West Yorkshire, HX5 9DA
Total Heat Input
(All Gas Categories)
18.2 kW (1325g/h)
Gas Category
I3+(28-30/37)
Types of Gas
LPG
Gas Pressure
37 mbar
Injector Size
Main Burner:
0.75 mm
Side Burner:
0.85 mm
Identification Code
0359CL1116
ART NO:
G9506AE-SB
FOR USE OUTDOORS AND IN WELL VENTILATED AREAS.
WARNING: ACCESSIBLE PARTS MAY BE VERY HOT, KEEP YOUNG CHILDREN AWAY.
READ THE INSTRUCTIONS BEFORE USING THE APPLIANCE.
Ignition:
Main Burner:
Single shot piezo ignition unit which lights a transient pilot
Side Burner:
Single shot piezo ignition unit
MANUFACTURER SUPPORT
0330 390 3062
Office hours: 9AM - 5PM Monday to Friday
Boss grill
Unit J6, Lowfields Business Park
Lowfields Way, Elland
West Yorkshire, HX5 9DA
Table of contents
Popular Grill manuals by other brands

Landmann
Landmann PROFESSIONAL Ardor Assembly, care and use instructions
Masterbuilt
Masterbuilt 20042011 Care & use manual

Dimplex
Dimplex CBQ-ELE-EU owner's manual

Outwell
Outwell CORTE 650796 instruction manual

KitchenAid
KitchenAid KSOX 9020 Instructions for use

Universal Innovations
Universal Innovations Sahara 686A user manual

