3 Embers GAS8490AS User manual

Natural Gas Conversion
Instructions for Model
GAS8490AS
Natural Gas Conversion Kit Sold Separately
Equipo de Conversión a Gas Natural
Instrucciones para el Modelo
GAS8490AS
Equipo de Conversión a Gas Natural Vendidó por Separado
Use 3 Embers Natural Gas Conversion Kit
Utilice 3 Embers Equipo de Conversión de Gas Natural
PROFESSIONAL INSTALLATION MANUAL
MANUAL DE INSTALACIÓN PROFESIONAL
NOTICE TO
PROFESSIONAL INSTALLER:
LEAVE THESE INSTRUCTIONS WITH THE
GRILL OWNER FOR FUTURE REFERENCE.
AVISO PARA EL INSTALADOR:
ENTREGUE ESTAS INSTRUCCIONES AL
PROPIETARIO DE LA PARRILLA PARA
REFERENCIA FUTURA.
HAZARDOUS EXPLOSION MAY RESULT IF THESE
WARNINGS AND INSTRUCTIONS ARE IGNORED. READ
AND FOLLOW ALL WARNINGS AND INSTRUCTIONS IN
THIS MANUAL TO AVOID PERSONAL INJURY, INCLUDING
DEATH OR PROPERTY DAMAGE.
WARNING ADVERTENCIA
SE PUEDE PRODUCIR UNA EXPLOSIÓN PELIGROSA
SI SE HACE CASO OMISO A ESTAS ADVERTENCIAS E
INSTRUCCIONES. LEA Y SIGA TODAS LAS ADVERTENCIAS
E INSTRUCCIONES EN ESTE MANUAL PARA EVITAR
LESIONES PERSONALES, INCLUSO LA MUERTE, O LOS DAÑO
MATERIALES.
SAVE THIS MANUAL FOR FUTURE REFERENCE
GUARDE ESTE MANUAL PARA REFERENCIA FUTURA
ASSEMBLY AND OPERATING INSTRUCTIONS
INSTRUCCIONES DE ARMADO Y OPERACIÓN

1
WE WANT YOU TO USE YOUR CONVERSION KIT FOR YOUR GRILL AS SAFELY AS POSSIBLE.
THE PURPOSE OF THIS SAFETY ALERT SYMBOL IS TO ATTRACT THE ATTENTION TO
POSSIBLE HAZARDS AS THE GRILL IS CONVERTED AND USED AS A NATURAL GAS GRILL.
WHEN YOU SEE THE SAFETY ALERT SYMBOL
PAY CLOSE ATTENTION TO THE INFORMATION WHICH FOLLOWS!
READ ALL SAFETY WARNINGS AND INSTRUCTIONS CAREFULLY
BEFORE CONVERTING AND OPERATING YOUR GRILL.
DANGER
IMPORTANT SAFETY WARNINGS
1. Do not store or use gasoline or other ammable liquids or vapors in the vicinity of this or any other appliance.
2. An LP cylinder not connected for use shall not be stored in the vicinity of this or any other appliance.
WARNING
Installer Company or Service Name: _______________________________________________
Technician Name:____________________________________Installation Date:_____________
Failure to follow the instructions as written, or installation by other than
a trained professional, will void all manufacturer warranties.
WARNING
This conversion kit shall be installed by a professional service technician in accordance with the
manufacturer’s instructions as specified by the codes and requirements of the authority having jurisdiction.
The information in these instructions must be followed to minimize the risk of fire or explosion or to prevent
property damage, personal injury or death. The qualified service agency performing this conversion assumes
responsibility for the proper conversion of the appliance of this kit.
Model Number: ____________________________________
Serial Number:_____________________________________Date Purchased: ____________
IMPORTANT: FILL OUT PRODUCT RECORD INFORMATION BELOW.
IF YOU SMELL GAS:
1. SHUT OFF GAS TO THE APPLIANCE.
2. EXTINGUISH ANY OPEN FLAME.
3. OPEN LID.
4. IF ODOR CONTINUES, KEEP AWAY FROM APPLIANCE AND IMMEDIATELY CALL YOUR GAS SUPPLIER OR
YOUR FIRE DEPARTMENT.

2
General Warnings . . . . . . . . . . . . . . . . . . . . . . . . . . . . . . . . . . . . . . . . . . . . . . . . . . . . . . . . 3
Assembly Instructions . . . . . . . . . . . . . . . . . . . . . . . . . . . . . . . . . . . . . . . . . . . . . . . . . . . 4-7
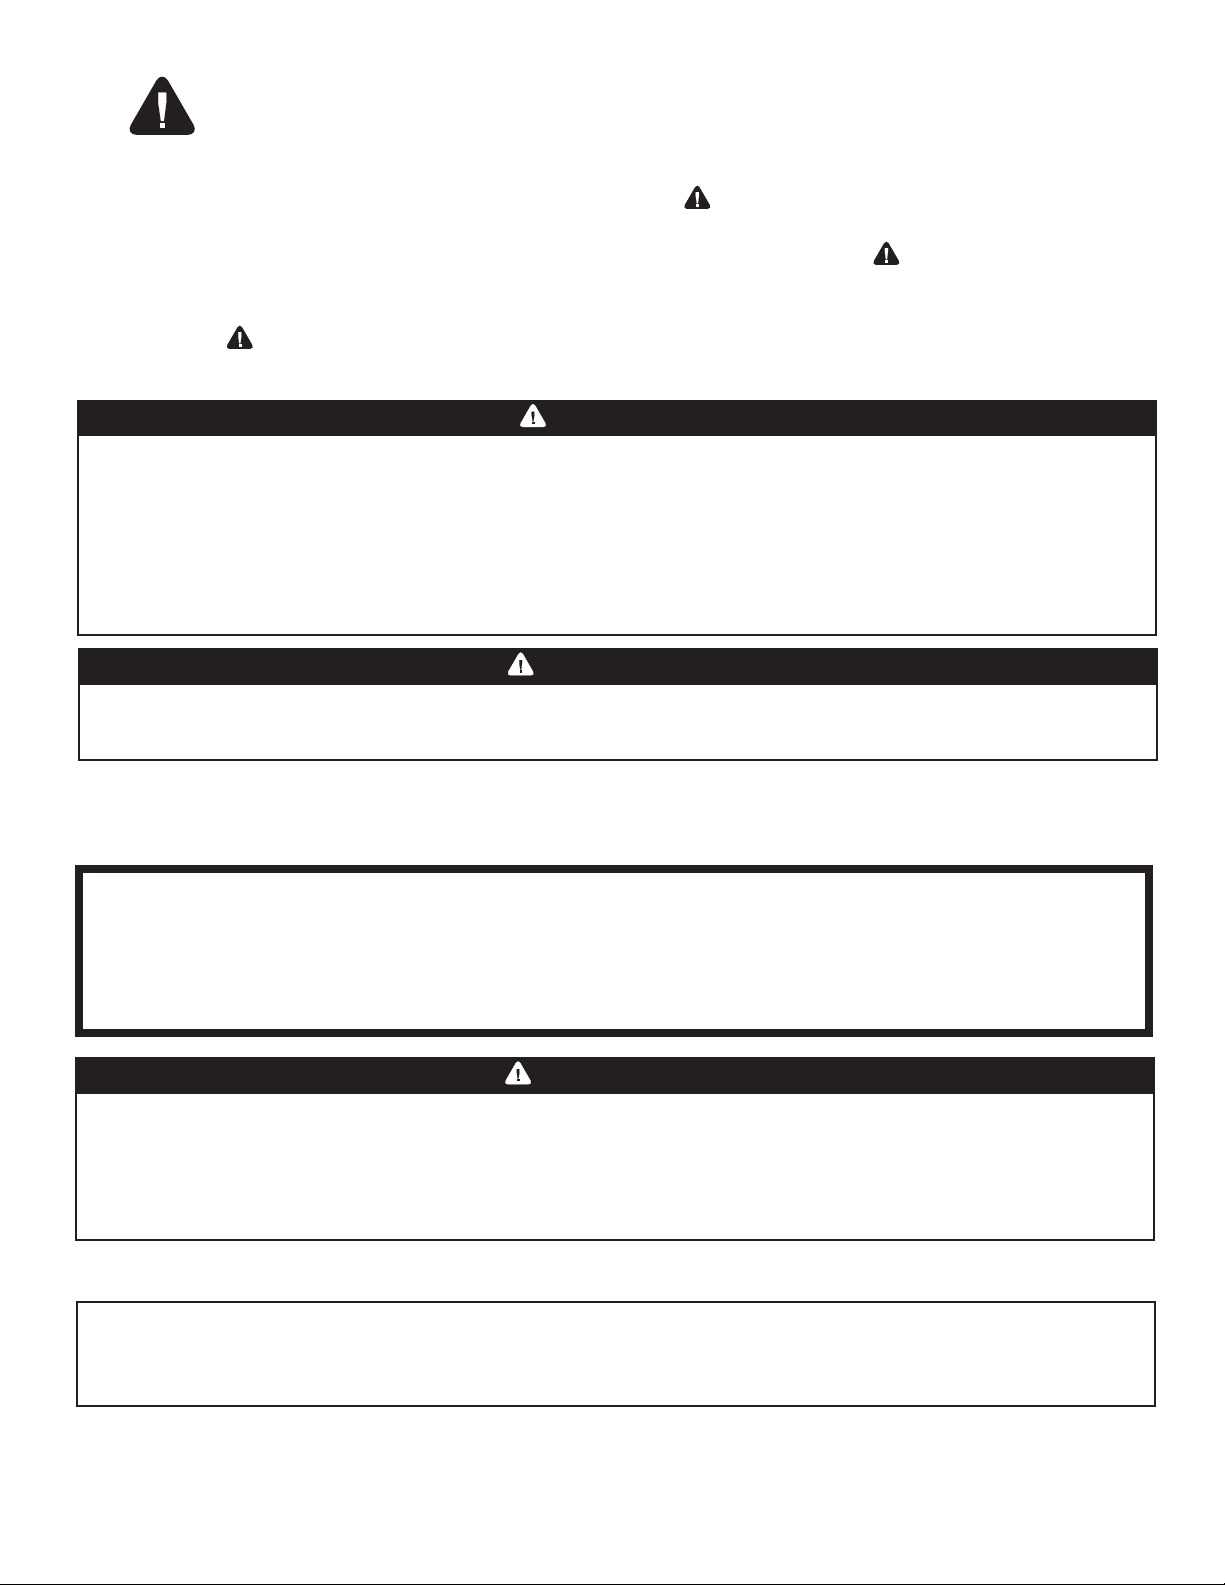
Connecting to Natural Gas Source . . . . . . . . . . . . . . . . . . . . . . . . . . . . . . . . . . . . . . . . . . . 8
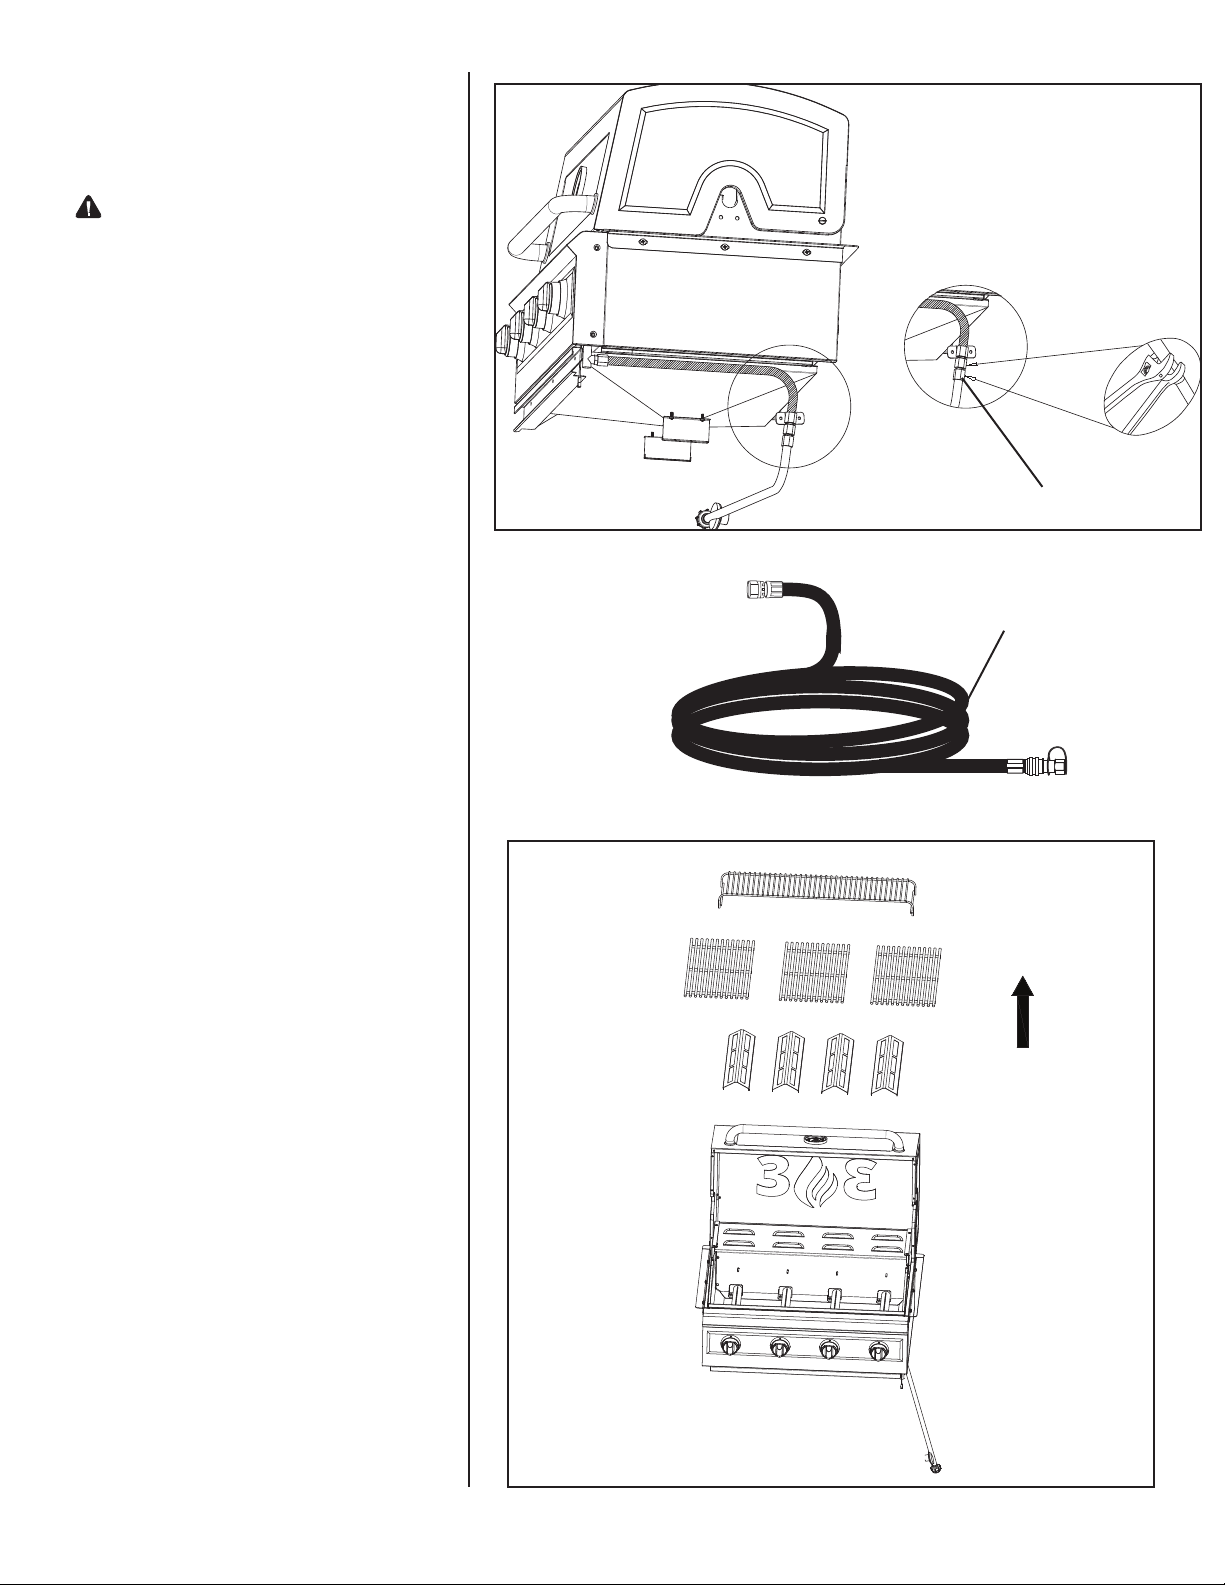
Leak Testing. . . . . . . . . . . . . . . . . . . . . . . . . . . . . . . . . . . . . . . . . . . . . . . . . . . . . . . . . . 8-10
Pre-start Check List . . . . . . . . . . . . . . . . . . . . . . . . . . . . . . . . . . . . . . . . . . . . . . . . . . . . . . 11
Lighting Instructions . . . . . . . . . . . . . . . . . . . . . . . . . . . . . . . . . . . . . . . . . . . . . . . . . . . . . . 11
Warranty Information . . . . . . . . . . . . . . . . . . . . . . . . . . . . . . . . . . . . . . . . . . . . . .Back Cover
TABLE OF CONTENTS
DANGER: Indicates an imminently hazardous situation which, if not avoided, will result
in death or serious injury.
WARNING: Be alert to the possibility of serious bodily injury if the instructions are not
followed. Be sure to read and carefully follow all of the messages.
CAUTION: Indicates a potentially hazardous situation which, if not avoided, may result
in minor or moderate injury.
INSTALLATION INFORMATION:
The installation of this appliance must be in accordance with:
All applicable local codes, or in the absence of local codes, either:
• National Fuel Gas Code ANSI Z223.1 NFPA 54
• Natural Gas and Propane Installation Code: CAN/CGA B149.1
• Natural Gas Installation Code: CAN/CGA B149.1 (Canada)
This kit converts your grill for natural gas use at 7 inch water column supply pressure. To check your pressure
contact your local natural gas company. If the supply pressure is different than 7 inch, contact a
professional
service technician
for assistance. Not for use with LP gas.
WARNING
• FOR OUTDOOR USE ONLY. DO NOT operate indoors or in an enclosed area such as a garage, shed
or breezeway.
• Use your grill OUTDOORS in a well ventilated space away from dwellings or other buildings to
prevent dangers associated with gas accumulation and toxic vapors. We recommend your grill be
situated at least 10 feet (3.1 m) from buildings.
• Maintain a minimum clearance of 36 inches (91 cm) between all sides of grill and walls or other
combustible material. DO NOT use grill under overhead unprotected combustible construction.
• DO NOT use or install this grill in or on a recreational vehicle and/or boat.
CALIFORNIA PROPOSITION 65 WARNING
This product contains chemicals, including lead in the brass of certain component parts, that are known
to the State of California to cause cancer, and birth defects or other reproductive harm. Wash hands
after handling. When used, this product emits fuel combustion chemicals that are known to the State of
California to cause cancer, and birth defects or other reproductive harm. Follow all instructions in this
manual and use only in well ventilated, outdoor area.

3
WARNING
GENERAL WARNINGS
• Never use liquid propane gas in a unit designed for natural gas.
• Never use charcoal or wood briquette in a gas grill. Flavoring chips must be contained in a metal
smoking box to contain ash and prevent res.
• Leak test all connections before rst use, even if grill was purchased fully assembled.
• Never check for leaks using a match or open ame.
CAUTION: Strong odors, colds, sinus congestion, etc. may prevent the detection of natural gas.
Use caution and common sense when testing for leaks.
• Always keep your gas grill free and clear of gasoline, lighter uid, paint thinner, or other ammable
vapors and liquids or combustible materials.
• Always check the grill prior to each use as indicated in the “Pre-Start Check List” section of this
manual.
• DO NOT obstruct the ow of combustion or ventilation air.
• Keep children and pets away from hot grill. DO NOT allow children to use or play near this grill.
• DO NOT leave the grill unattended while in use.
• DO NOT allow the gas hose to come in contact with hot surfaces.
• DO NOT allow grease from drain hole to fall on hose.
• Keep any electrical supply cords away from water or heated surfaces.
• Keep a re extinguisher on hand acceptable for use with gas products. Refer to your local authority
to determine proper size and type.
• For household use only. DO NOT use this grill for anything other than its intended purpose.
• DO NOT use while under the inuence of drugs or alcohol.
• Grill is hot when in use. To avoid burns:
• DO NOT attempt to move the grill.
• Wear protective gloves or oven mitts.
• DO NOT touch any hot grill surfaces.
USE CAUTION AND COMMON SENSE WHEN OPERATING YOUR GAS GRILL.
FAILURE TO ADHERE TO THE SAFETY WARNINGS AND GUIDELINES IN THIS MANUAL
COULD RESULT IN SEVERE BODILY INJURY OR PROPERTY DAMAGE.
SAVE THIS MANUAL FOR FUTURE REFERENCE.
Connection should be made by a professional service technician. Supply the technician with a copy of these
instructions. Incorrect connection can result in a gas leak with possibility of re.
DANGER

4
PARTS CONTENTS
ASSEMBLY INSTRUCTIONS
YOU MUST BE A
PROFESSIONAL SERVICE TECHNICIAN
TO CONVERT THIS GRILL.
READ ALL SAFETY WARNINGS & ASSEMBLY INSTRUCTIONS CAREFULLY
BEFORE ASSEMBLING OR OPERATING THE CONVERTED GRILL.
The following tools are required to assemble the Conversion Kit:
• Phillips and Flathead Screwdrivers • Adjustable Wrench • 3/4 Wrench
Inspect contents of the box to ensure all parts are included and undamaged.

CAUTION: Some parts may contain
sharp edges. Wear
protective gloves if
necessary.
Note: Make sure all control knobs are
in the off position, LP tank valve
is closed and tank is
disconnected from regulator
and removed from grill.
Step 1
Using an adjustable wrench to hold
the gas connection secure, use a 3/4”
wrench to loosen the hose connection
nut. Replace existing LP hose/regulator
assembly with natural gas 10’ hose
assembly. Tighten the connection
carefully using two wrenches.
Step 2
Open hood and remove warming rack,
cooking grills and heat tents. Set aside for
later use.
5
CONVERSION
INSTRUCTIONS
GAS8490AS
Gas Manifold Nut
10’ Natural Gas Hose

Step 3
Remove the stud and cotter pin from
each burner. Carefully lift each burner up
and away from valve opening.
Step 4
Use the gas orifice tool to remove the
LP brass orifice from each main burner
valve, through the hole on the firebox
front panel.
Note: All orifices of the grill are double
orifices (LP gas and natural gas). You
only remove the LP gas orifice tip.
6
LP Gas Orifice
Gas Orifice Tool
Side View
Firebox Front Panel

7
Step 5
Make sure all control knobs are OFF,
then remove all control knobs.
Step 6
Tighten screw on each control valve
as shown in Figure 1. Replace control
knobs when finished.
Note: This screw regulates the low
flame setting for natural gas.
After replacing knobs you will
notice the knobs will stop at the
“MED” setting on the dial. This
is the correct low setting for
natural gas. Do not try to turn
the knob to “LO” setting.
Step 7
Carefully replace each burner, making
sure burner openings slide over valve
nozzles and burner holes are facing up.
Reattach burner studs and cotter pin.
Step 8
Replace warming rack, cooking grills and
heat tents.
Note: Follow directions in the leak
testing section of this manual
before using this grill.
FIGURE 1

8
CONNECTING YOUR GRILL TO THE NATURAL GAS SOURCE
1. Coat pipe nipple with gas resistant teon tape or pipe dope. Tighten quick-disconnect coupling onto
pipe nipple that leads to natural gas supply (Figure A).
2. After grill is completely assembled, make sure natural gas supply valve is “OFF” and then connect
natural gas hose to socket. Push sleeve back on socket (Figure B) and insert plug until sleeve snaps
forward, locking plug into socket. Be sure to leak test these connections prior to use.
Pipe nipple
Quick-disconnect
coupling Plug
Push sleeve back to attach
Sleeve
Socket
Natural gas supply
Natural gas supply Hose
Hose
Insert cover when hose is disconnected
DISCONNECTING YOUR GRILL FROM THE NATURAL GAS SOURCE
1. Turn natural gas supply valve “OFF”
2. To disconnect, push sleeve back and pull plug out of sleeve.
(Figure A)
(Figure B)
Supply valve
Supply valve
Pipe Fitting Flare Fitting
When attaching the quick disconnect to your natural gas supply line, use a pipe tting,
DO NOT use a are tting.
3/8” pipe
threads

9
AVOID HARD METAL PIPING
• DO NOT use hard metal piping of any kind to connect this converted natural gas grill. Use only
natural gas hose specied by the manufacturer. Using hard metal piping or convoluted metal
tubing is an unsafe practice. Movement of the grill can cause breakage of metal pipe.
WARNING
LEAK TESTING:
To prevent re or explosion hazard:
• DO NOT smoke or permit ignition sources in the area while conducting a leak test.
• Perform test OUTDOORS only in a well ventilated area.
• Never perform a leak test with a match or open ame.
• Never perform a leak test while the grill is in use or while grill is still hot.
DANGER
WHEN TO PERFORM A LEAK TEST:
• After assembling or converting your natural gas grill and before lighting for the rst time, even if
purchased fully assembled.
• Any time the gas components are replaced.
• Any time your grill has been moved.
• At least once per year or if your grill has not been used for more than 60 days.
WARNING
• Never use your grill without leak testing all gas connections and hoses. See the section on
“Leak Testing” in this manual for proper procedures.
• Visually inspect the hose assembly prior to each use for evidence of damage, excess wear or
deterioration. If found, replace the assembly before using your grill. Only the manufacturer’s
supplied replacement should be used.
• During assembly or conversion to natural gas, keep the supply hoses free of kinks and/or
damage.
WARNING

10
CHECKING FOR LEAKS:
1. Create a mixture of 50% water and 50% liquid dishwashing soap.
2. Open the lid.
3. Ensure all control knobs are set to the “OFF” position.
4. Ensure gas hose is tightly connected to gas source.
5. Turn on the fuel supply at the source.
6. Apply the soap water mixture to the following:
Hose connection to gas manifold.
Brass connections and quick
disconnect assembly.
The full length of gas supply hose.
Quick disconnect coupler.
7. Check each place listed (A–D) for growing bubbles
which indicates a leak.
8. Turn off gas supply at source.
9. Turn on control knobs to release gas pressure in hose.
10. Turn control knobs to “OFF” position.
11. Tighten any leaking connections.
12. Repeat soapy water test until no leaks are detected.
13. Turn off gas supply at source until you are ready to use your grill.
14. Wash off soapy residue with cold water and towel dry.
15. Wait 5 minutes to allow all gas to evacuate the area before lighting grill.
CAUTION: DO NOT use the grill if leaks cannot be stopped.
Note: The leak test must be performed in an area that has adequate lighting in order
to see if bubbles are developing.
D
C
B
A
Watch For Bubbles
D
A
C
B

LIGHTING INSTRUCTIONS:
Follow the instructions in your grill owners manual or on the control panel of the grill.
1. OPEN THE GRILL LID before attempting to light a burner so that fumes do not accumulate inside
the grill. An explosion could occur if grill lid is down.
2. Check that all burner control knobs are turned to the “OFF” position.
3. DO NOT stand with head, body, or arms over the grill when lighting.
TURNING OFF THE GRILL:
1. Turn off the gas at the source.
2. Turn all burner control knobs to the “OFF” position.
CAUTION:
• The natural gas source should always be in the off,
or closed position when the grill is not in use.
• Refer to your grill owner’s manual for grill operating instructions.
•Apply conversion kit sticker to an area near the rating label to show
the grill has been converted for use with natural gas.
WARNING
WARNING
Read, understand and follow all warnings and instructions contained in this manual. DO NOT skip
any of the warnings and instructions contained in the preceding sections of this manual.
Note: Observe ame height of main burner when lit:
Flame should be a Blue/Yellow color between
1”–2” when burner is on “HIGH”.
WARNING
Property damage, bodily harm, severe burns, and death could result from failure to follow these
safety steps. These steps should be performed after the grill has been assembled and prior to
each use. DO NOT operate this grill until you have read and understand ALL of the warnings and
instructions in this manual.
PRE-START CHECK LIST:
• Ensure that the grill is properly assembled.
• Inspect the gas supply hose for burns, chaffing, kinks, and proper routing before each use. If it is
evident there is excessive abrasion or wear, or the hose is cut, it must be replaced prior to the grill
being used.
• Leak check all gas connections and hose. See section on “Leak Testing”.
• Ensure that all electrical supply cords are properly grounded. Keep any electrical supply cord and the
fuel supply hose away from any heated surfaces. Hose should be at least 3 inches from hot surfaces.
• Position your grill on level ground in a well ventilated location, a safe distance from combustible
materials, buildings and overhangs.
• Properly place the empty grease tray under the grease drain hole in the bottom of the grill to catch
grease during use.
•DO NOT obstruct the ow of combustion and ventilation air.
11

12
QUEREMOS QUE USTED UTILICE EL EQUIPO DE CONVERSIÓN PARA SU PARRILLA
DE LA MANERA MÁS SEGURA POSIBLE. LA FINALIDAD DE ESTE SÍMBOLO DE ALERTA
DE SEGURIDAD ES ATRAER SU ATENCIÓN A LOS POSIBLES RIESGOS QUE IMPLICA LA
CONVERSIÓN DE ESTA PARRILLA PARA UTILIZARLA CON GAS NATURAL. CUANDO VEA
ESTE SÍMBOLO DE ALERTA DE SEGURIDAD ,
¡LEA DETENIDAMENTE LA INFORMACIÓN QUE SIGUE!
LEA MUY BIEN TODAS LAS ADVERTENCIAS E INSTRUCCIONES DE SEGURIDAD
ANTES DE CONVERTIR Y OPERAR SU PARRILLA.
PELIGRO
ADVERTENCIAS IMPORTANTES
DE SEGURIDAD
1. No almacene o utilice gasolina u otros líquidos o vapores inamables cerca de este u otros aparatos.
2. Un cilindro de gas LP no conectado para el uso no podrá ser almacenado cerca de este u otros aparatos.
ADVERTENCIA
Nombre de la compañía instaladora o de servicio:_____________________________________
Nombre del técnico:___________________________________ Fecha de instalación: ________
Si las instrucciones escritas dadas aquí se ignoran o una persona que no sea un profesional
capacitado instala el aparato, toda garantía del fabricante quedará anulada.
ADVERTENCIA
Este equipo de conversión deberá ser instalado por un técnico profesional de servicio de acuerdo con las
instrucciones del fabricante como lo especifican los códigos y requerimientos de la autoridad con jurisdicción
en el área. La información contenida en estas instrucciones debe ser seguida al pie de la letra para minimizar
el riesgo de incendios o explosiones o para evitar daños personales, a la propiedad o incluso la muerte. La
agencia calificada de servicio que realice esta conversión se hace responsable de convertir debidamente esta
parrilla.
Número de modelo: __________________________________
Número de serie: ____________________________________ Número de serie:___________
IMPORTANTE: Llene la información de registro del producto a continuación.
SI HUELE A GAS:
1. CIERRE EL SUMINISTRO DE GAS AL APARATO.
2. EXTINGA TODA LLAMA ABIERTA.
3. ABRA LA CUBIERTA.
4. SI EL OLOR PERSISTE, ALÉJESE DEL APARATO Y LLAME DE INMEDIATO A SU PRPOVEEDOR DE GAS O A
LA ESTACIÓN DE BOMBEROS.

13
ÍNDICE DE MATERIAS
Advertencias Generales. . . . . . . . . . . . . . . . . . . . . . . . . . . . . . . . . . . . . . . . . . . . . . . . . . . . . . 14
Instrucciones de Ensamblado . . . . . . . . . . . . . . . . . . . . . . . . . . . . . . . . . . . . . . . . . . . . . . 15-18
Cómo Conectar a una Fuente de Gas Natural . . . . . . . . . . . . . . . . . . . . . . . . . . . . . . . . . . . . 19
Prueba de Detección de Fugas . . . . . . . . . . . . . . . . . . . . . . . . . . . . . . . . . . . . . . . . . . . . . 19-21
Lista de Revisión Antes del Primer Uso. . . . . . . . . . . . . . . . . . . . . . . . . . . . . . . . . . . . . . . . . . 22
Instrucciones de Encendido . . . . . . . . . . . . . . . . . . . . . . . . . . . . . . . . . . . . . . . . . . . . . . . . . . . 22
Información de la Garantía. . . . . . . . . . . . . . . . . . . . . . . . . . . . . . . . . . . . . . . . . Cubierta trasera
PELIGRO: Indica una situación peligrosa inminente que, de no ser evitada, resultará en la
muerte o en una lesión grave.
ADVERTENCIA: Manténgase alerta ante la posibilidad de una lesión corporal grave si no sigue las
instrucciones. Asegúrese de leer y seguir cuidadosamente todos los mensajes.
PRECAUCIÓN: Indica una posible situación peligrosa que, de no ser evitada, podría ocasionar una
lesión menor o moderada.
• PARA USO EXTERNO ÚNICAMENTE. NO utilice esta parrilla en interiores o lugares cerrados como
cocheras, cobertizos o pasadizos techados abiertos.
• Use su parrilla AFUERA en un lugar bien ventilado lejos de viviendas u otros edicios para evitar
peligros relacionados con la acumulación de gas y vapores tóxicos. Recomendamos que su parrilla
esté situada por lo menos a 10 pies (3.1 m) de cualquier edicio. Quien la ponga a una distancia
más cercana obstaculizará su debida ventilación y posiblemente incrementará el riesgo de un
incendio y/o de daños a la propiedad que podrían también causar lesiones personales.
• Conserve una distancia mínima de 36 pulgadas (91 cm) entre todos los lados de la parrilla, del
barandal de la cubierta, de un muro u otro material combustible. NO utilice la parrilla debajo de
construcciones no protegidas que puedan incendiarse.
• NO utilice o instale esta parrilla en o sobre un vehículo recreativo y/o lancha.
ADVERTENCIA
INFORMACIÓN SOBRE LA INSTALACIÓN:
La instalación de este electrodoméstico debe cumplir con todos los códigos locales pertinentes o en caso
de no haberlos, con el:
• Códigonacional para gas combustible ANSI Z223.1 NFPA 54
• Códigopara la instalación de gas natural y propano: CAN/CGA B149.1
• Códigopara la instalación de gas natural: CAN/CGA B149.1 (Canadá)
Este equipo convierte su parrilla a una que funciona con gas natural suministrado a una presión de 7
pulgadas de columna de agua. Para averiguar su presión, llame a la compañía de gas de su localidad.
Si la presión del suministro no es de 7 pulgadas, llame a un técnico profesional de servicio para que le
ayude.
No debe usarse con gas LP.
CALIFORNIA PROPOSICIÓN 65 ADVERTENCIA
Este producto contiene químicos, incluyendo el plomo en el estaño en ciertas partes de sus componentes,
conocido en el estado de California porque producen cáncer y defectos de nacimiento u otros daños repro-
ductivos. Lávese las manos después de manejarlo California porque producen cáncer y defectos de nacimiento
u otros daños reproductivos. Siga todas las instrucciones en este manual y úselo solamente en un área bien
ventilada en exteriores.

14
ADVERTENCIA
ADVERTENCIAS GENERALES
• Nunca utilize gas propano líquido en una unidad hecha para gas natural.
• Nunca utilice briquetas de carbón vegetal o de leña en una parrilla de gas. Los trocitos para impartir
sabor deben permanecer en una caja metálica para el ahumado para guardar la ceniza y prevenir
incendios.
• Realice la prueba de detección de fugas en todas las conexiones antes del uso inicial, incluso si la
parrilla fue comprada totalmente ensamblada y después de rellenar el tanque cada vez.
• Nunca use un fósforo (cerillo) o llama abierta para detectar fugase.
PRECAUCIÓN: Olores intensos, catarros, congestión de los senos nasales, etc. pueden dicultar
o imposibilitar la detección de propano. Tenga precaución y use su sentido
común al realizar la prueba de detección de fugas.
• Siempre mantenga su parrilla de gas sin gasolina, líquido para encendedores, diluyente de pintura
(thinner) u otros vapores o líquidos inamables o materiales combustibles.
• Siempre revise su parrilla antes de cada uso como lo indica la sección “Lista de revisión antes del
primer uso” de este manual.
• NO obstruya el ujo del aire de combustión o ventilación.
• Mantenga a niños y mascotas lejos de la parrilla caliente. NO permita que los niños utilicen la parrilla
para jugar o jueguen cerca de ella.
• NO deje la parrilla desatendida cuando la esté utilizando.
• NO permita que la manguera de gas toque supercies calientes.
• NO permita que la grasa del oricio de drenaje caiga sobre la manguera o el ensamblado del regulador
de la válvula.
• Mantenga todos los cables de suministro eléctrico alejados del agua o de supercies calentadas.
• Para uso casero solamente. NO utilice esta parrilla para otra cosa que no sea la nalidad para la cual fue
hecha.
• NO la use si está bajo la inuencia de drogas o alcohol.
• La parrilla está muy caliente durante el uso. Para evitar quemaduras:
• NO intente mover la parrilla.
• Fije las ruedas para que su aparato no se mueva accidentalmente.
• Póngase guantes protectores o guantes gruesos para el horno.
• NO toque ninguna supercie caliente de la parrilla.
• NO se ponga ropa suelta o permita que su cabello toque la parrilla.
TENGA PRECAUCIÓN Y USE SU SENTIDO COMÚN AL OPERAR SU PARRILLA DE GAS.
LA PERSONA QUE NO SIGA LAS ADVERTENCIAS Y DIRECTRICES DE SEGURIDAD
CONTENIDAS EN ESTE MANUAL PODRÍA SUFRIR UNA LESIÓN GRAVE O
TENER UN GRAN DAÑO A LA PROPIEDAD.
GUARDE ESTE MANUAL PARA CONSULTARLO EN EL FUTURO.
Sólo un técnico profesional de servicio debe realizar la conexión. Déle al técnico una copia de estas
instrucciones. Una conexión incorrecta puede ocasionar una fuga de gas y un posible incendio.
PELIGRO

15
Inspeccione el contenido de la caja para asegurarse de que todas las piezas han sido
incluidas y están intactas.
PIEZAS INCLUIDAS:
INSTRUCCIONES DE ENSAMBLADO
USTED DEBE SER UN TÉCNICO PROFESIONAL DE SERVICIO PARA CONVERTIR ESTA PARRILLA.
LEA DETENIDAMENTE TODAS LAS ADVERTENCIAS DE SEGURIDAD E INSTRUCCIONES DE
ENSAMBLADO ANTES DE ARMAR U OPERAR LA PARRILLA CONVERTIDA
Las siguientes herramientas son indispensables para ensamblar el equipo de conversión:
• Destornillador con cabeza Phillips • Llave de tuercas ajustable • 3/4 Llave de tuercas

PRECAUCIÓN: Algunas piezas
pueden tener bordes losos. Póngase
guantes protectores en caso
necesario.
Nota: Cerciórese de que todas las
perillas de control estén en
posición cerrada (“OFF”),
que la válvula del tanque
de gas LP esté cerrada y
que el tanque haya sido
desconectado del regulador
y sacado de la parrilla.
Paso 1
Utilizando una llave de tuercas
ajustable para detener bien la
conexión del múltiple del gas, use
una llave de tuercas de 3/4” para
aojar la tuerca de conexión de la
manguera. Reemplace el ensamblado
manguera / regulador para gas LP
existente con el ensamblado de la
manguera de 10’ para gas natural.
Apriete cuidadosamente ambas
conexiones con las dos llaves de
tuercas.
Paso 2
Abra la campana y quite la rejilla
de calentamiento, las parrillas para
cocinar y los escudos térmicos. Ponga
todo a un lado para usarlo más tarde.
16
INSTRUCCIONES
DE CONVERSIÓN
GAS8490AS
Manguera de Gas
Natural de 10’

17
Paso 3
Retire los dos tornillos de cada quemador
que se encuentra en la parte posterior de
la parrilla. Retire los quemadores de la
parte posterior de la parrilla.
Paso 4
Use la herramienta del oricio del gas
para quitar el oricio de latón para el
gas LP de las válvulas del quemador
principal, introduciéndola a través
del agujero en el panel frontal de la
cámara de fuego.
Nota: Todos los oricios de la parrilla
son oricios tipo doble (gas del
LP y gas natural). Quite
solamente la extremidad del
oricio del gas del LP.
Oricio del Gas LP Herramienta del
Oricio del Gas
Panel Frontal de
la Cámara de
Fuego
Vista Lateral

18
Paso 5
Asegúrese de que todas las perillas de
control están APAGADOS, y quite todos
los botones de control y dejar a un lado
para su uso posterior.
Paso 6
Apretar el tornillo en cada válvula de
control como se muestra en la Figura 1.
Vuelva a colocar las perillas de control
cuando haya terminado.
Nota: Este tornillo regula el ajuste de
llama baja para el gas natural.
Después de reemplazar las
perillas, notará que las perillas
se detendrán en el ajuste
“MED” del dial. Este es el ajuste
correcto para el gas natural.
No intente girar la perilla a la
posición “LO”.
Paso 7
Vuelva a conectar con cuidado Reemplace
cada quemador, de tal modo que los
oricios del quemador se deslice sobre
la boquilla de la válvula todos los oricios
del quemador están hacia arriba. Vuelva a
colocar los postes en los quemadores y una
chaveta.
Paso 8
Vuelva a colocar en sus lugares la rejilla de
calentamiento, las parrillas para cocinar y
los escudos térmicos.
Nota: Antes de utilizar esta parrilla,
siga las instrucciones en
la sección de prueba de
detección de fugas de este
manual.

19
CÓMO CONECTAR SU PARRILLA AL SUMINISTRO DE GAS NATURAL
1. Aplíquele lubricante o una cinta de Teon resistente al gas al tubo corto enroscado. Apriete el
acoplamiento de desconexión rápida al tubo corto enroscado que va al suministro de gas natural
(Figura A).
2. Una vez que la parrilla haya sido ensamblada totalmente, asegúrese de que la válvula de suministro
del gas natural esté cerrada (“APAGADO”) y luego conecte la manguera del gas natural al receptáculo.
Empuje el manguito de regreso al receptáculo (Figura B) e inserte el tapón hasta que el manguito haga
un chasquido y se mueva hacia delante, jando al tapón en el receptáculo. No se olvide realizar la
prueba de detección de fugas en estas conexiones antes del uso.
Tubo Corto
Enroscado
Acoplamiento de
Desconexión Rápida
Tapón
Empuje el manguito hacia atrás para unir.
Manguito
Receptáculo
Suministro de gas
Natural Manguera
Inserte la cubierta cuando haya desconectado la manguera.
CÓMO DESCONECTAR SU PARRILLA DEL SUMINISTRO DE GAS NATURAL
1. Cierre la válvula de gas natural (gírela a la posición “APAGADO”)
2. Para cerrarla, empuje el manguito de regreso y saque el tapón del manguito.
(Figura A)
(Figura B)
Válvula de
Suministro
Suministro de gas
Natural
Válvula de
Suministro
Manguera
Accesorio para Tuberías Accesorio Abocinado
Al anexar la desconexión rápida a la línea del suministro de gas natural, use un accesorio para
tuberías. NO use un accesorio abocinado.
Other manuals for GAS8490AS
1
Table of contents
Languages:
Other 3 Embers Grill manuals
Popular Grill manuals by other brands

Garland
Garland HE SERIES Installation and operation manual

Magma
Magma A10-1218-2 owner's manual

Scarlett
Scarlett Silver Line SC-EG350M05 instruction manual

Proluxe
Proluxe Progrill CS1500 Operation manual

Weber
Weber MASTER-TOUCH 14501001 Assembly guide

Outback
Outback Omega 200 Assembly and operating instructions

GRILL GURU
GRILL GURU ORIGINAL COMPACT GGO223 owner's manual

George Foreman
George Foreman GR144 Grand Champ Use & care manual

Rotel
Rotel U121CH2 Instructions for use

Traeger
Traeger Ironwood Series Assembly guide

Electrolux
Electrolux thermaline S90 Installation and operating instructions

Broil King
Broil King Premium P3X manual