Bosslan BOSSVD40 User manual
BOSSVD40/BOSSVD90/BOSSVD160 User Guide
This document contains preliminary information and subject to change without notice.
USER GUIDE
BOSSVD40/ BOSSVD90 / BOSSVD160
9/16 channel MPEG-4 Triplex DVR
V. 1.4
BOSSVD40/BOSSVD90/BOSSVD160 User Guide
2
SAFETY PRECAUTIONS
EXPLANATION OF SYMBOLS
CAUTION
THIS PRODUCT HAS MULTIPLE-RATED VOLTAGES (110V AND 220V).
SEE INSTALLATION INSTRUCTIONS BEFORE CONNECTING TO THE POWER SUPPLY.
THIS PRODUCT USESALITHIUM BATTERY.
RISK OF EXPLOSION IF THE BATTERY ON THE MAIN BOARD IS REPLACED BY AN INCORRECT
TYPE. DISPOSE OF USED BATTERIESACCORDING TO INSTRUCTIONS.
THIS EQUIPMENT AND ALL COMMUNICATION WIRINGSARE INTENDED FOR INDOOR USE.
TO REDUCE THE RISK OF FIRE ELECTRIC SHOCK, DO NOT EXPOSE THE UNIT TO RAIN OR
MOISTURE.
This symbol is intended to alert the user to the presence o
f
important operation and maintenance (servicing) instructions in
the literature accompanying the appliance.
This symbol is intended to alert the user to the presence o
f
unprotected “dangerous voltage” within the product’s enclosure
that may be strong enough to cause a risk of electric shock

BOSSVD90/BOSSVD160 User Guide
3
WARNING
THE PRODUCT SHOULD BE INSTALLED BY A TRAINED PROFESSIONAL. THE DVR SHOULD BE
POWERED OFF WHEN CONNECTING CAMERA, AUDIO, OR SENSOR CABLES.
THE MANUFACTURER IS NOT RESPONSIBLE FOR ANY DAMAGES CAUSED BY IMPROPER USE
OF THE PRODUCT OR FAILURE TO FOLLOW INSTRUCTIONS FOR THE PRODUCT.
THE MANUFACTURER IS NOT RESPONSIBLE FOR ANY PROBLEMS CAUSED BY OR RESULTING
FROM THE USER PHYSICALLY OPENING THE DVR FOR EXAMINATION OR ATTEMPTING TO FIX
THE UNIT. THE MANUFACTURER MAY NOT BE HELD LIABLE FOR ANY ISSUES WITH THE UNIT IF
THE WARRANTY SEAL IS REMOVED.

BOSSVD40/BOSSVD90/BOSSVD160 User Guide
4
THE LIST OF CONFIGURATION
DVR SET
CLIENT SOFTWARE CD
REMOTE CONTROLLER
BATTERY
MANUAL
(SERVER & REMOTE CLIENT S/W)
RUBBER RINGS &
SCREWS (4x4x4EA)
IDE HDD CABLE(2EA)
HDD BRACKETS(4EA)
RACK MOUNT (Option)
POWER CABLE 110V & 220V

BOSSVD90/BOSSVD160 User Guide
5
Rack Mount Instructions
The following or similar rack-mount instructions are included with the installation instructions:
A) Elevated Operating Ambient - If installed in a closed or multi-unit rack assembly, the operating ambient
temperature of the rack environment may be greater than room ambient. Therefore, consideration should
be given to installing the equipment in an environment compatible with the maximum ambient
temperature (Tma) specified by the manufacturer.
B) Reduced Air Flow - Installation of the equipment in a rack should be such that the amount of air flow
required for safe operation of the equipment is not compromised.
C) Mechanical Loading - Mounting of the equipment in the rack should be such that a hazardous
condition is not achieved due to uneven mechanical loading.
D) Circuit Overloading - Consideration should be given to the connection of the equipment to the supply
circuit and the effect that overloading of the circuits might have on overcurrent protection and supply
wiring. Appropriate consideration of equipment nameplate ratings should be used when addressing this
concern.
E) Reliable Earthing - Reliable earthing of rack-mounted equipment should be maintained. Particular
attention should be given to supply connections other than direct connections to the branch circuit (e.g.
use of power strips).

BOSSVD40/BOSSVD90/BOSSVD160 User Guide
6
THE OPERATION OF REMOTE CONTROLLER
POWER Power On/Off
DISPLAY Display of Full, Quad or 9 split view
F/REW Jump 60 seconds backward
PLAY Play/Pause
F/ADV Jump 60 seconds forward
FREEZE/CAP Freeze/Capture
FF Fast Forward
ALARM Disable alarm operation
SETUP Setup menu screen
ARCHIVE Display of archive list
AUDIO Disable, Mute or Highlighted
channel only
LOCK Key lock of all of the functions
SEQ Sequence of Full or Quad view
RECORD Manual recording
SEARCH Search menu screen
DIRECTION
SELECT
Direction or number 1 to 4
Enter
ID DVR ID
(ID Button + DVR ID number)
ESC Esc
PTZ PTZ menu screen
NUMBER Channel 1 to 9
+10 Channel 10 and channel 11 to16
10CH->press +10 and number 0
11CH->press +10 and number 1
12CH->press +10 and number 2
13CH->press +10 and number 3
14CH->press +10 and number 4
15CH->press +10 and number 5
16CH->press +10 and number 6

BOSSVD90/BOSSVD160 User Guide
7
VIDEO SIGNAL SELECT / SETTING
Video mode Video output
SETTING NTSC PAL BNC VGA
O X O X
X O O X
O X X O
X O X O
NOTICE
Do not change the setting when the power is on.
When the position of the switch is changed, the DVR should be rebooted to apply the
new setting.

BOSSVD40/BOSSVD90/BOSSVD160 User Guide
8
HDD INSTALLATION
HDD installation order
1. Primary Master HDD
2. Primary Slave HDD
3. Secondary Master HDD
4. Secondary Slave HDD
NOTICE
The brands and models of all HDD should be the same. If the brands and models of each HDD
are different with others, the DVR could not reco
g
nize HDD.

BOSSVD90/BOSSVD160 User Guide
9
Compatible HDD models
BRAND CAPACITY RPM BUFFER INTERFACE
80GB 7200RPM 2M E-IDE
160GB 7200RPM 8M E-IDE
HITACHI
250GB 7200RPM 8M E-IDE
80GB 7200RPM 2M E-IDE
160GB 7200RPM 8M E-IDE
MAXTER
250GB 7200RPM 8M E-IDE
80GB 7200RPM 2M E-IDESAMSUNG
160GB 7200RPM 2M E-IDE
80GB 7200RPM 2M E-IDE
160GB 7200RPM 8M E-IDE
WESTERN DIGITAL
250GB 7200RPM 8M E-IDE
40GB 7200RPM 2M E-IDE
80GB 7200RPM 2M E-IDE
160GB 7200RPM 2M E-IDE
SEAGATE
250GB 7200RPM 2M E-IDE
BOSSVD40/BOSSVD90/BOSSVD160 User Guide
10
SPECIFICATIONS
ITEM BOSSVD40/BOSSVD90/BOSSVD160
Channel,
Input Level 9/16CH, Composite 1.0Vp-p, 75 Ohm
Signal Format NTSC/PAL
Input
Video Loss Check Yes
Main Monitor
Output 1 CH BNC, 1 CH S-VIDEO, 1CH VGA
Output Level Composite 1.0Vp-p +_0.2, 75 Ohm
Signal Format NTSC/PAL & VGA
Video
Output
Etc Output 9/16CH Loop-back , 1CH SPOT
Input & Output 4 CH Line input & 1 CH Line output
Audio Audio Codec G.711
Sensor Input 9/16 (NC/NO Selectable)
Alarm Output 8
Alarm
Alarm Output By Alarm, Motion, Video Loss
Compression MPEG-4
Multi-operation TRIPLEX (Playback/Record/Network)
MAX. 120fps @ 352x240
MAX. 60fps @ 704x240
NTSC
MAX. 30fps @ 704x480
MAX. 100fps @ 352x288
MAX. 50fps @ 704x288
Frame
Rate
PAL
MAX. 25fps @ 704x576
Recording quality grade 5 grades
Recording Mode Continuous / Schedule / Motion/ Sensor/ Manual
Motion Detection Motion detection setup by Grid
Recording
Pre & Post Recording Yes
Display
Frame Rate ( /Sec) NTSC: 30fps/channel, 60 field PAL: 25fps/channel, 50 field
Playback Multi-Decoding 1, 4, 9, & 16

BOSSVD90/BOSSVD160 User Guide
11
Playback
Speed
Fast Forward /
Reverse ×2, 4, & 8
Search Mode Event, Archive, Log
Interface Type EIDE/ATA133
Max Capacity
of 1 HDD 250GB
Internal
HDD Max HDD
Number 4
File system NaFS: Own developed & Designed for never broken
by any power failure
USB 2.0
memory stick
& CDRW
Still Image & AVI
Storage
Backup
Network Moving picture & Still Image
Menu Display GUI
User I/F Input Method Front Keypad, Remote controller
Console & External Modem 1 RS-232C (9pin D-SUB connector)
Serial port Camera control 1 RS-485/422 (4 Terminal Block)
Dynamic IP support Yes
Network Network Interface 10/100 base-T Ethernet (RJ-45)
Functions Live, Search, Backup, PTZF Camera Control
Network
Client S/W Central Monitoring System Yes
DLS (Day Light Saving) Yes
Multi-Language Yes
Additional
Functions S/W Upgrade USB memory stick
Power Power Source 100~127V/200~240V, 50-60Hz

BOSSVD40/BOSSVD90/BOSSVD160 User Guide
12
TABLE OF CONTENTS
1. Features..................................................................................................................................14
2. Name, Function and Connection ............................................................................................15
2-1. Front Panel...................................................................................................................15
2-2. Rear Panel....................................................................................................................17
3. Setting Up the DVR.................................................................................................................19
3-1. Setup – Main Screen....................................................................................................19
3-2. Setup – Live Mode........................................................................................................21
3-3. Setup – Recording Mode..............................................................................................22
3-3-1. Motion Zones .....................................................................................................23
3-3-2. Recording Schedule...........................................................................................24
3-4. Setup – Device Mode...................................................................................................25
3-4-1. ALARM-OUT......................................................................................................26
3-4-2. PTZ Setup..........................................................................................................27
3-5. Setup – System Mode..................................................................................................28
3-6. Setup – Security Mode.................................................................................................31
3-7. Setup – Network Mode.................................................................................................32
3-7-1. Ports...................................................................................................................33
3-7-2. Network types ....................................................................................................34
3-8. Setup - Storage Mode...................................................................................................36
3-9. Saving Setup................................................................................................................36
4. Live & Search..........................................................................................................................37
4-1. Live Window.................................................................................................................37
4-2. SEARCH Window.........................................................................................................38
4-3. Play mode.....................................................................................................................39
4-4. LOG Search..................................................................................................................41
4-4. PTZF operation.............................................................................................................42
5. Archiving Video into USB Memory Device..............................................................................43
5-1. Capturing images or video............................................................................................43
5-2. Transferring still images or video into USB...................................................................44
5-3. Playing AVI video..........................................................................................................46
6. Upgrading Firmware ...............................................................................................................47
7. NETWORK..............................................................................................................................48
7-1. Overview.......................................................................................................................48
7-2. Minimum PC requirements...........................................................................................49

BOSSVD90/BOSSVD160 User Guide
13
7-3. Installing the program...................................................................................................49
7-4. Live viewer....................................................................................................................50
7-4-1. Main user interface.............................................................................................50
7-4-2. Main control panel..............................................................................................50
7-5. Search and Playback Viewer........................................................................................53
7-5-1. Main user interface.............................................................................................53
7-5-2. Main control panel..............................................................................................53
7-5-3. Back up..............................................................................................................55
7-6. System configuration....................................................................................................56
7-6-1. General ..............................................................................................................56
7-6-2. Site.....................................................................................................................57
7-6-3. Event..................................................................................................................57
7-6-4. Record................................................................................................................58
7-6-5. Disk....................................................................................................................59
7-6-6. About..................................................................................................................60

BOSSVD40/BOSSVD90/BOSSVD160 User Guide
14
1. Features
●9/16 channels real-time live display and 16channels simultaneous playback.
●MPEG-4 - Unbeatable recording picture quality and compression ratio has been tuned for years. It
best fits for minimizing recording space and networking speed.
●TRIPLEX - Simultaneous Recording, Playback, and Networking
●NaFS (File System developed) - Designed & developed for preventing loss and broke of recording
data by any power failure.
●Multiplexing operation
●Reliability - Real Time Operating System and simplified hardware as well as watchdog timer ensure
the reliability.
●Individual channel recording and playback with different frame rate.
●High-quality live and playback resolution.
●Multi-site management - Supported by CMS application.
●Network features - Remote Live, Playback, PTZF Control, and Backup.
●Network via LAN, DHCP, ADSL (Dynamic and Static IP address).
●4 channels audio recording.
●User-friendly setup menu with graphic user interface.
●Easy to schedule a complicated weekly recording plan.
●The OSD icons on screen provide various helpful and well-explained information.
●Motion detection – Grid 30x24 motion zone per camera is provided.
●USB ports for JPEG, MPEG data backup and software upgrade using USB flash memory stick.
●Still image capture and review as JPEG format.
●Internal Pan/Tilt/Zoom/Focus controller.
●Easy operating with the buttons on the front and the remote controller.
●User verification by password certification.
●Video loss detection.
●Backup - Still-images or AVI data into USB flash memory stick, USB CDRW, and Network.
●Variety of Hard Drive Sizes - up to internally 1TB (250GB HDD X 4) for long-term recording.
●Multi-Languages -User can easily select language from Setup menu.
●Various Video Output - VGA(800x600 24 Bit Color), S-VHS, SPOT

BOSSVD90/BOSSVD160 User Guide
15
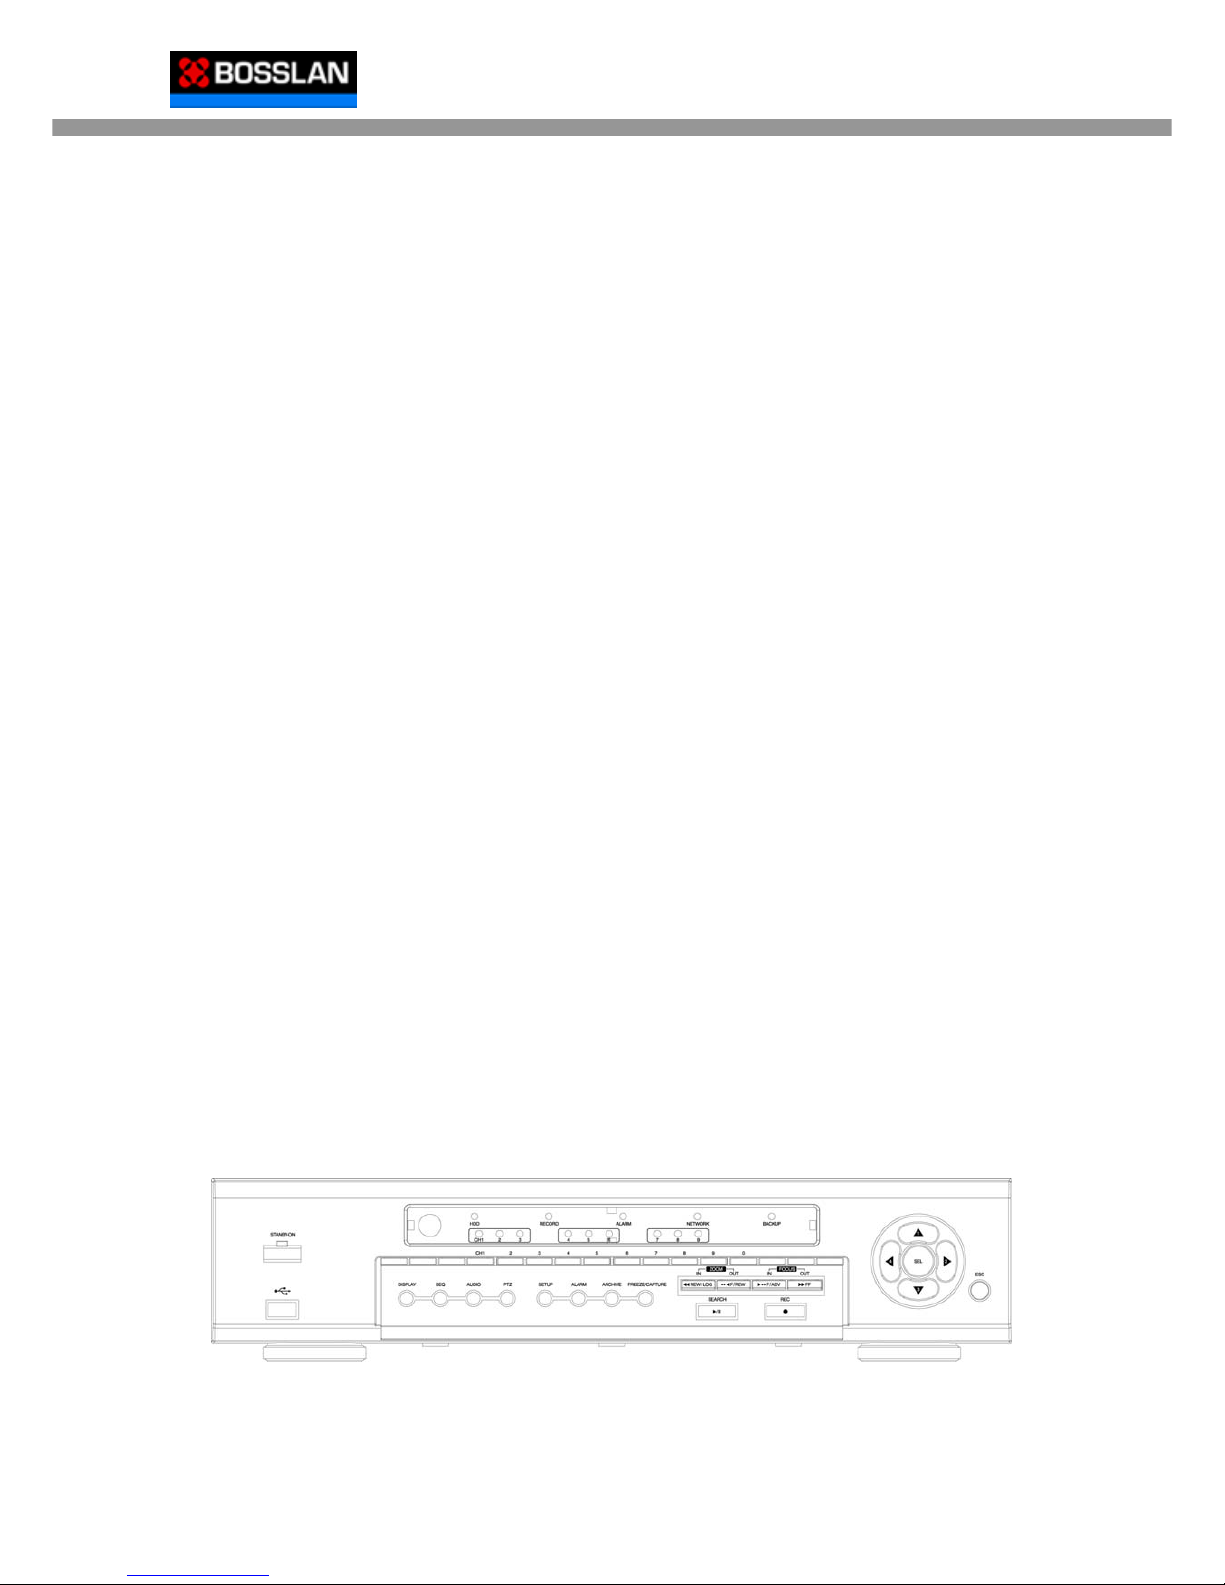
2. Name, Function and Connection
2-1. Front Panel
The following information will help you operate the front panel controls.
Figure 2.1.1. Front panel
Table2.1.1. Indication lamps
Name Description
HDD LED light is on when the system is accessing hard disk.
REC LED light is on when the system is recording video data.
ALARM LED light is on when alarm sensor(s) is/are triggered or motion is detected.
NETWORK LED light is on when client is connected to the system through the network.
BACKUP LED light is on when USB storage device is stored images or video.
Table 2.1.2. Front panel buttons
Name Description
POWER Power ON/ OFF. If a password has set for power off in the SECURITY setup
menu, the system will ask you the password when you press the POWER
button.
DISPLAY Press to select full, quad, 9 or 16 split screen in live display mode.
SEQ Press to start auto sequencing of the screen in full or quad display mode.
AUDIO Press to select audio mode. SINGLE, MIX, MUTE
MUTE- All of 4 channels. SINGLE- Highlighted channel only.
MIX- All of 4 channels.
PTZ Press to control PTZ operation
SETUP Press to launch SETUP menu.
ALARM Press to enable/disable alarm operation.
ARCHIVE Press to see the ARCHIVE LIST in live display mode.
FREEZE/
CAPTURE
Press to freeze and capture video in jpeg format in live or playback mode.
REW/ Press to rewind the footage at 1x, 2x, 4x, and 8x speed in playback mode or

BOSSVD40/BOSSVD90/BOSSVD160 User Guide
16
LOG to see the LOG LIST in live display mode.
F/REW Jump/Step backward. In playback mode, the playback position moves 60
seconds backward.
F/ADV Jump/Step forward. In playback mode, the playback position moves 60
seconds forward.
FF Press to fast forward the footage at 1x, 2x, 4x, and 8x speed in playback
mode.
SEARCH
PLAY/PAUSE
Press to go to SEARCH menu in live display mode or to play and pause the
footage in playback mode.
REC Press to start or stop manual recording.
Press to move up the menu items in setup mode. It is also used as the
number 1 when entering password.
Press to move right in the menu or to change the values in setup mode. It is
also used as the number 2 when entering password.
Press to move down the menu items in setup mode. It is also used as the
number 3 when entering password.
Press to move left in the menu or to change the values in setup mode. It is
also used as the number 4 when entering password.
Press to select desired menu item or to store the setup value in the setup
menu.
ESC Press for temporal storage of the changed value or to return to the previous
menu screen.
USB Port There is a USB Port located on the left side of the front panel. This USB port
is used to archive footage into a USB storage device.

BOSSVD90/BOSSVD160 User Guide
17
2-2. Rear Panel
Figure 2.2.1. Rear Panel
Table 2.2.1. Rear panel connections
Connection Purpose
VIDEO IN 9/16 connectors for video input.
Connect camera output to Video-in (NTSC/PAL)
VIDEO OUT 9/16 connectors for video output.(loop back)
SPOT Composite video output for spot monitoring.
VIDEO Composite video output in NTSC or PAL format
S-VHS S-VHS output
VGA Connector for VGA monitor
AUDIO IN 4 connectors for audio input.
AUDIO OUT 1 connector for audio output.
RS-232 For engineering use only.
LAN RJ45 connector for LAN connection.
RS-485/422 For camera control use.
SENSOR IN Connector for sensor device connection.
ALARM OUT 8 connectors for alarm device connection.
Provides simple On/Off switching by using relay. 0.5A/125V, 1A/30V
POWER Connect AC115/230V power cable.

BOSSVD40/BOSSVD90/BOSSVD160 User Guide
18
SWITCHES
TEST For future use
422/485 Select 422 or 485
VGA Set to ON when VGA monitor is used.
PAL Set to ON when video is PAL
CAUTION: Once the position of the switch is changed, BOSSVD40/BOSSVD90/BOSSVD160
should be rebooted to apply the new setting value.

BOSSVD90/BOSSVD160 User Guide
19
3. Setting Up the DVR
The following sections detail the initial setup of the DVR
3-1. Setup – Main Screen
When you press the SETUP button, the DVR will ask for a password. The default password is
1111, which can be entered by pressing the up button 4 times and then pressing the SEL button.
We recommend you protect the system by assigning a new password immediately. The
procedure for assigning a password is found in section 3.6. After a password has been assigned,
enter the password by using the direction keys (representing 1, 2, 3, & 4), and then
press the SEL button for the password validation. Once the password is entered, you will see
the screen as shown in Figure 3.1.1. Navigate through the menu items and press the SEL
button to enter the sub-category menu.
Figure 3.1.1. Setup menu screen

BOSSVD40/BOSSVD90/BOSSVD160 User Guide
20
LIVE OSD
SEQUENCE
SEQ-DWEL TIME
OSD CONTRAST
CHANNEL DISPLAY, BRIGHTNESS, CONTRAST, HUE, SATURATION
RECORD RESOLUTION
CHANNEL FRAMERATE,QUALITY,RECORDING,MOTIONZONE,
MOTION SENSIVITY, SENSOR TYPE, PRE RECORD,
POST EVENT RECORD, AUDIO, SCHEDULE
DEVICE ALARM-OUT
PTZ
SPOT CHANNEL
SPOT EVENT DWELL TIME
KEY TONE
REMOTE CONTROL ID
SYSTEM DVR ID
DESCRIPTION
LOAD FA CTORY DEFAULT
LOAD DEFAULT
DATE FORMAT
SET DATE & TIME
LANGUAGE
DAYLIGHTSAVING
SECURITY ADMIN PASSWORD
USER PASSWORD
NETWORK PASSWORD
NETWORK PORT
CLIENTACCESS
BANDWIDTHSAVING
NETWORK TYPE
DDNS
STORAGE OVERWRITE
FORMAT
DISKINFO
Table 3.1.1. Setup menu configuration
This manual suits for next models
2
Table of contents
Other Bosslan DVR manuals

Popular DVR manuals by other brands


Panasonic
Panasonic DMR-ES30VGN Service manual

GeoVision
GeoVision GV-NVR quick start guide

CFI EXTEL
CFI EXTEL eWatch 900 Installation and user guide

VideoSystemer
VideoSystemer Digital Video Recorder Operating instruction

Generic
Generic CVSA-DV68 user manual

Prestigio
Prestigio Novatek NT96650 quick start guide