Click” ”Enter the "time" setting interface, set.
Step 1: Click the left mouse button on the preview interface to pop up
the shortcut menu, select "Record Query" to enter the record playback
interface.
Step 2: Select Time, Channel, More, Left-click to search the file, and the
video will start playing to select the video file.
5.5 IP Channel Configuration
5.6 Recording Settings
Step 1: Choose “Main Menu> System> Channel Configuration”.
Step 2: Select the signal access type of each channel as required.
Step 3: Click “Apply”. Modify the restart after the entry into force to
complete the configuration operation.
Step 1: The device automatically enters the Boot Wizard page after it is
powered on. Click Next. The Login System page is displayed. Enter the
user name and password to enter the startup wizard general settings
page.
Step 2: After configuring the basic settings such as language, video
mode, video format, and device time in the normal settings, set the
current interface parameters and click Next to set other parameters of
the interface.
Before setting the network parameters, make sure the DVR has been
properly connected to the network. If there is no routing device in the
network, please assign the IP address of the same network segment.If
there is a routing device in the network, you need to set the
corresponding gateway & subnet mask.
Procedure: Choose Main Menu> System> Network.
Note: If you do not need to set the device, you can click "Cancel" to exit
the boot wizard interface. You can also turn off the boot wizard in
"Main Menu → System → General Settings".
After successful login, enter the preview interface, click on the channel
name on the left for real-time monitoring.
Note: The Web-side can also perform the operations such as system,
network, storage, playback, download, upgrade, maintenance, and
factory reset on the Web. For details, see the introduction of the CD.
Shut down through the main menu (recommended)
① Go to Main Menu> Shut Down and click Shut Down.
② Power off the case through the rear panel power switch
Note: To change the hard drive, open the chassis and cut off the
external power supply
Before accessing and configuring the IP channel, make sure that the IP
device is connected to the network. You can add or delete remote IP
devices in this interface and view related information.
Step 1: Choose "Main Menu> Channel> Add Device" to enter the IP
channel configuration interface.
Step 2: Add IPC, there are two ways to automatically add and manually
added. Automatically add, click "one click to add" button. Manually add
a device, click Add, the remote device interface automatically searches
for LAN devices in the "Onvif" or "Private" protocol (if our company IPC
recommends selecting "Private"), select the IP device to be added,
"Button to complete.
Step 3: After the success is added, "Status" is displayed as” ”,
Indicating the success of the addition; otherwise check the network or
add is correct.
Step 4: Click” ”, You can re-edit device channel information, click”
”, You can modify the encoding parameters related information.
Note: single channel select signal access mode to follow certain rules,
the interface will be automatically reflected in the optional options.
The actual access signal should be checked with the signal mode. If a
channel selected "HD" mode, you can access the TVI / CVBS / AHD / CVI
signal; when switching signals cause abnormal display, you can
reconnect the video cable; if a channel is selected "IP" mode, is the IP
channel , Can access IP equipment.
Preview interface, the channel displays "HD VIDEO" when there is no
video signal on the HD (TVI / CVBS / AHD / CVI) channel. When there is
no video signal on the IP channel, the channel displays "NO VIDEO".
Description: DVR native acquiescence to open all channels 24 hours of
ordinary video.
Steps:
Step 1: Choose Main Menu> Recording Settings.
Step 2: Select the channel, check the record type (including normal record,
motion detect record) and set the record time for this record type.
There are two ways to set the time period.
5.3 Network Settings
5.7 Instant playback
5.8 Video playback
5.9 Shut down
5.4 Channel Configuration
6.1 Login
6.2 Preview
6.WEB Operation
Sketch in the timeline diagram, hold down the left mouse button, drag
the mouse to draw the time period. There are six time periods
available for setting each day, and the device will start the correspond-
ing type of recording within the set time range.
9 10 11 12
13 14 15 16
Click” ”Enter the "time" setting interface, set.
5.5 IP Channel Configuration
5.6 Recording Settings
Description: DVR native acquiescence to open all channels 24 hours of
ordinary video.
5.3 Network Settings
5.7 Instant playback
5.8 Video playback
5.9 Shut down
5.4 Channel Configuration
6.1 Login
6.2 Preview
9 10 11 12
13 14 15 16
Step 1: When the mouse clicks anywhere in the current channel screen,
the control bar will automatically pop up below the channel.
Step2:click” ”Into the instant playback interface, can play the first
5 minutes of the current channel video.
DVR LAN login (in the same router under the computer, also known as
intranet)
Step 1: Make sure the DVR is on the same network segment as the login
computer. If there is no network segment in the computer, add the IP
of the same network segment as DVR, such as "192.168.1.99".
Step 2: Open IE browser, select Tools → Internet Options → Security →
Custom Level → ActiveX controls and plug-ins, all options are enabled.
Step 3: Enter the DVR URL: http://192.168.1.88/ (if the DVR port 80 to
the other, need to add the port after the change) into the OCX
download interface.
Step 4: Download and install the OCX plug-in.
Step 5: Refresh the IE interface, enter the login interface, select
"English" in the Language drop-down box. Enter Username and
Password and click Login.
Step 1: Download & install “UXD Live LStream”app from Google Play
for Android Phones or from App Store for iOS Phones
Step 2: Adding Devices to the App
METHOD 1:“QR Login” (Note: This is the easy way to add a single
device to your app. No account registration needed for this method. )
Run UXD Live LStream>Click“ ”on top left to view sidebar > Select
"QR Login" to go to the login screen directly:
Device ID: Get it from the DVR Menu: Rightclick > Configuration >
Network > P2P>Scan the QR or type the ID number. Give Account name
(admin), Password(12345) and Click “Login”.
It is recomended always to change default password for better security.
METHOD 2 :“Account login” (Note : Need to register an account for
this method. Use this method if you want to monitor multiple devices)
Run UXD Live LStream> Click “ ”on top left to view sidebar > Click
"Please login first" icon on top > Click on “please login first ”> Give
your User name and Password if you have it already and click “Login”.
Otherwise click “Register”and make a new account and then login.
After Logged into your account you have to add the device to your
account. Click “Device” from sidebar >“Add Device” from the
bottom > Select “QR Add”(Scan the QR from the DVR Menu: Rightclick
> Configuration > Network > P2P> Scan the QR to get the Device ID)
and type Device account (admin) & Password (12345)> Click
“Submit”. Then give any Device Name for your reference and click
Grouping to select or add a group and click “Send”. Now the device is
added Successfully to your account.
Step 3: To get Live Preview
From the Sliding bar( ) select “Preview”>Click“+”from the window
> Select your device and channel from the list by clicking “”
Step 4: To get Playback History
From the Sliding bar( ) select “Playback”>Click“+”from the
window > Select your device and channel from the list by clicking
“”. Older recordings can be played back by switching date from
calendar
Click” ”Enter the "time" setting interface, set.
Step 1: Click the left mouse button on the preview interface to pop up
the shortcut menu, select "Record Query" to enter the record playback
interface.
Step 2: Select Time, Channel, More, Left-click to search the file, and the
video will start playing to select the video file.
5.5 IP Channel Configuration
5.6 Recording Settings
Step 1: Choose “Main Menu> System> Channel Configuration”.
Step 2: Select the signal access type of each channel as required.
Step 3: Click “Apply”. Modify the restart after the entry into force to
complete the configuration operation.
Step 1: The device automatically enters the Boot Wizard page after it is
powered on. Click Next. The Login System page is displayed. Enter the
user name and password to enter the startup wizard general settings
page.
Step 2: After configuring the basic settings such as language, video
mode, video format, and device time in the normal settings, set the
current interface parameters and click Next to set other parameters of
the interface.
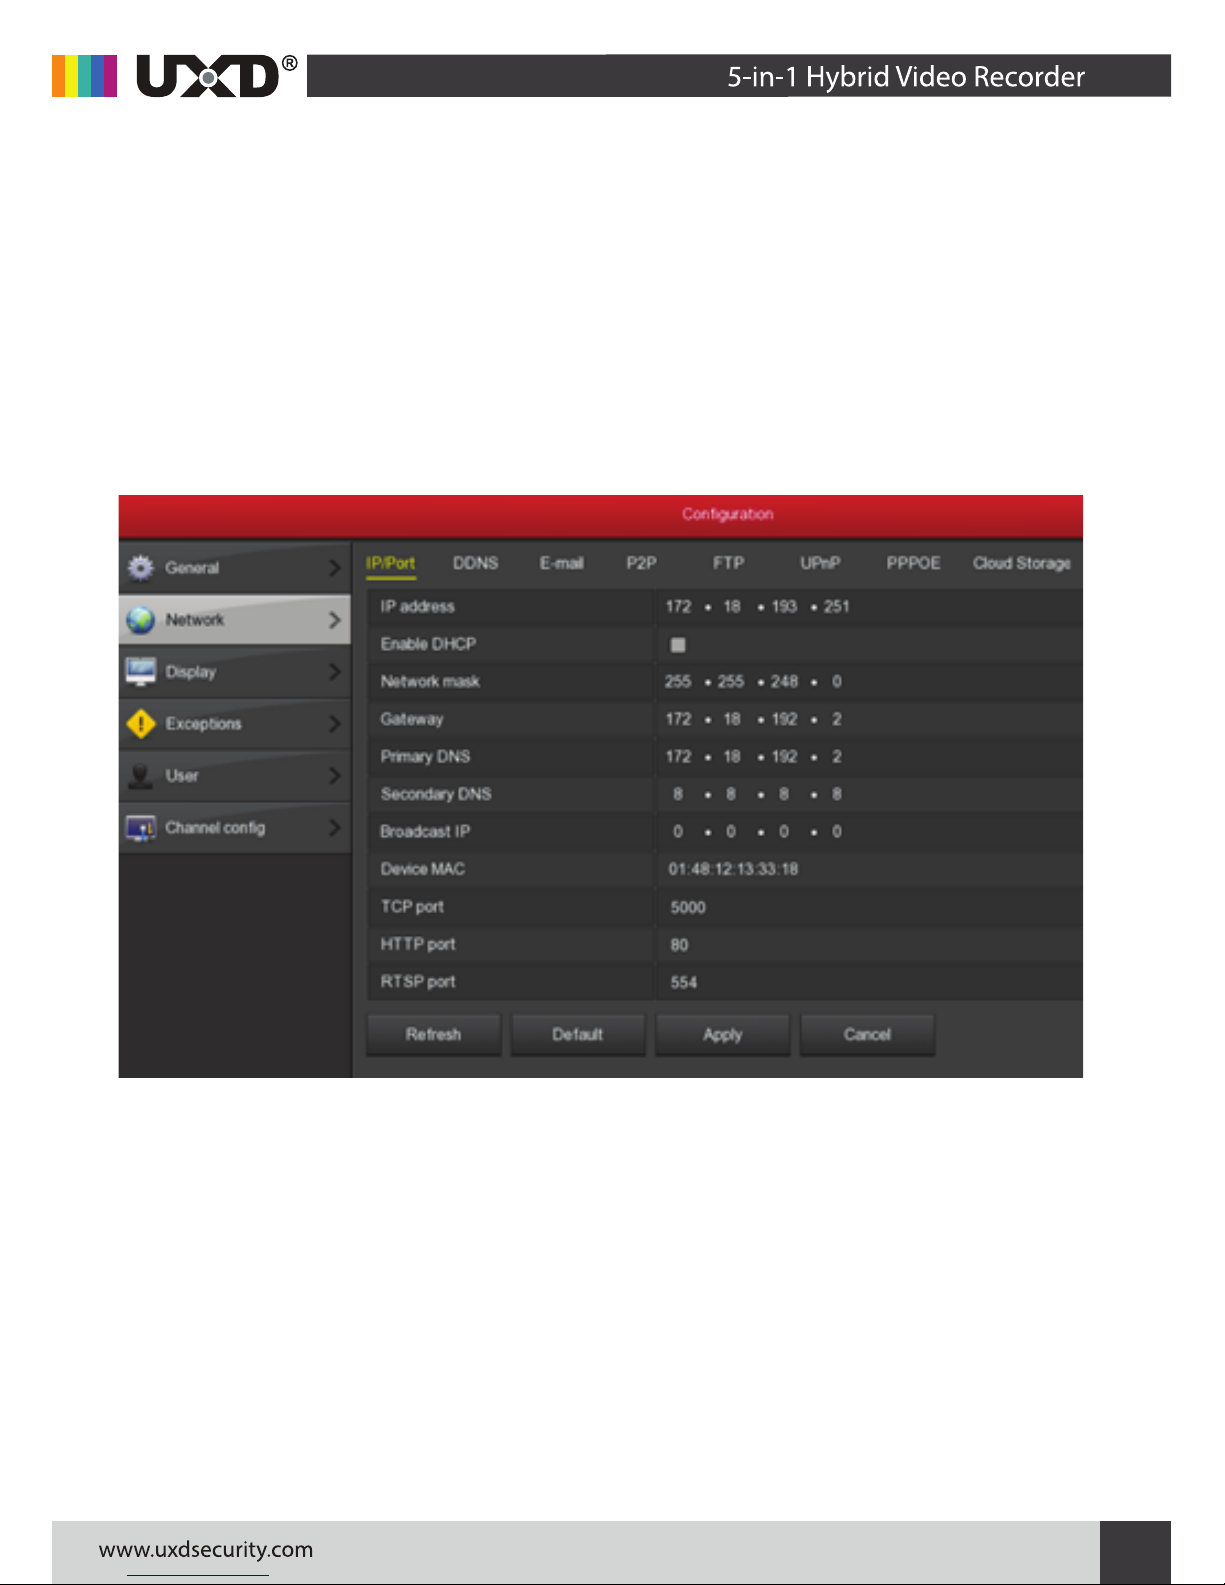
Before setting the network parameters, make sure the DVR has been
properly connected to the network. If there is no routing device in the
network, please assign the IP address of the same network segment.If
there is a routing device in the network, you need to set the
corresponding gateway & subnet mask.
Procedure: Choose Main Menu> System> Network.
Note: If you do not need to set the device, you can click "Cancel" to exit
the boot wizard interface. You can also turn off the boot wizard in
"Main Menu → System → General Settings".
After successful login, enter the preview interface, click on the channel
name on the left for real-time monitoring.
Note: The Web-side can also perform the operations such as system,
network, storage, playback, download, upgrade, maintenance, and
factory reset on the Web. For details, see the introduction of the CD.
Shut down through the main menu (recommended)
① Go to Main Menu> Shut Down and click Shut Down.
② Power off the case through the rear panel power switch
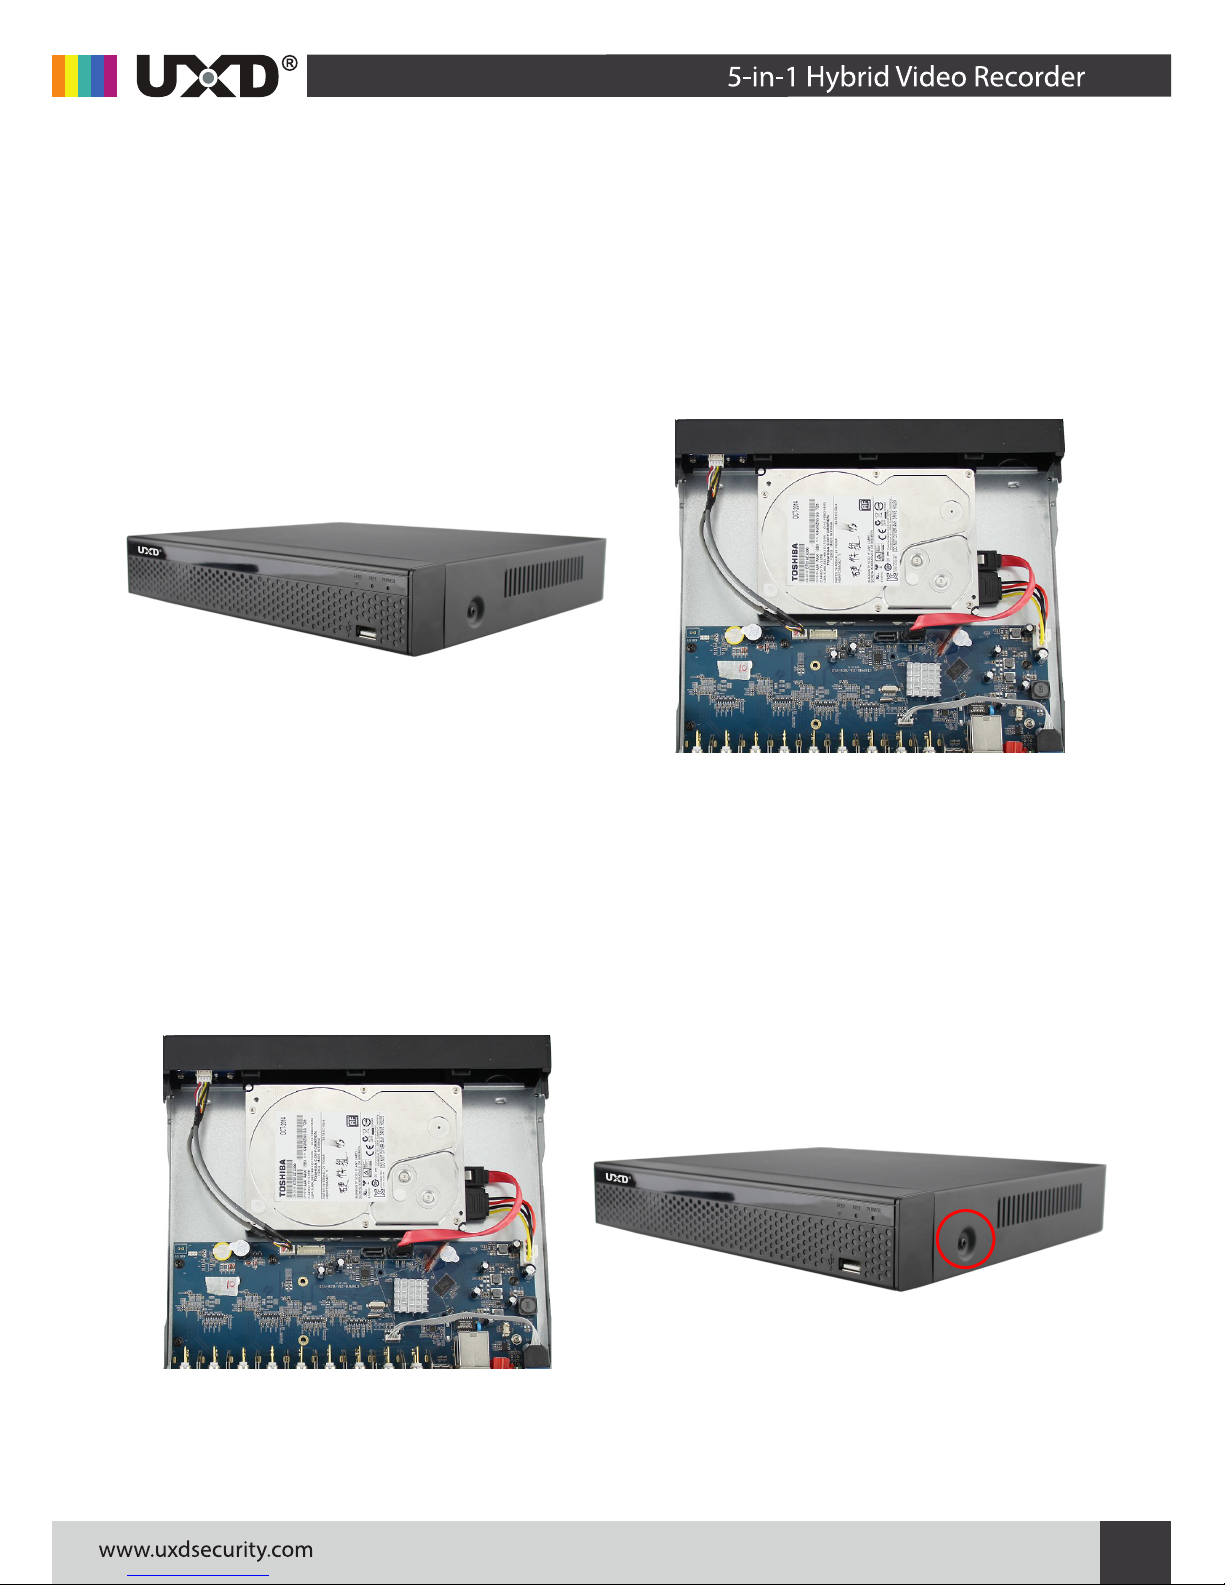
Note: To change the hard drive, open the chassis and cut off the
external power supply
Before accessing and configuring the IP channel, make sure that the IP
device is connected to the network. You can add or delete remote IP
devices in this interface and view related information.
Step 1: Choose "Main Menu> Channel> Add Device" to enter the IP
channel configuration interface.
Step 2: Add IPC, there are two ways to automatically add and manually
added. Automatically add, click "one click to add" button. Manually add
a device, click Add, the remote device interface automatically searches
for LAN devices in the "Onvif" or "Private" protocol (if our company IPC
recommends selecting "Private"), select the IP device to be added,
"Button to complete.
Step 3: After the success is added, "Status" is displayed as” ”,
Indicating the success of the addition; otherwise check the network or
add is correct.
Step 4: Click” ”, You can re-edit device channel information, click”
”, You can modify the encoding parameters related information.
Note: single channel select signal access mode to follow certain rules,
the interface will be automatically reflected in the optional options.
The actual access signal should be checked with the signal mode. If a
channel selected "HD" mode, you can access the TVI / CVBS / AHD / CVI
signal; when switching signals cause abnormal display, you can
reconnect the video cable; if a channel is selected "IP" mode, is the IP
channel , Can access IP equipment.
Preview interface, the channel displays "HD VIDEO" when there is no
video signal on the HD (TVI / CVBS / AHD / CVI) channel. When there is
no video signal on the IP channel, the channel displays "NO VIDEO".
Description: DVR native acquiescence to open all channels 24 hours of
ordinary video.
Steps:
Step 1: Choose Main Menu> Recording Settings.
Step 2: Select the channel, check the record type (including normal record,
motion detect record) and set the record time for this record type.
There are two ways to set the time period.
5.3 Network Settings
5.7 Instant playback
5.8 Video playback
5.9 Shut down
5.4 Channel Configuration
6.1 Login
6.2 Preview
6.WEB Operation
Sketch in the timeline diagram, hold down the left mouse button, drag
the mouse to draw the time period. There are six time periods
available for setting each day, and the device will start the correspond-
ing type of recording within the set time range.
9 10 11 12
13 14 15 16
Click” ”Enter the "time" setting interface, set.
5.5 IP Channel Configuration
5.6 Recording Settings
Description: DVR native acquiescence to open all channels 24 hours of
ordinary video.
5.3 Network Settings
5.7 Instant playback
5.8 Video playback
5.9 Shut down
5.4 Channel Configuration
6.1 Login
6.2 Preview
9 10 11 12
13 14 15 16
Click” ”Enter the "time" setting interface, set.
5.5 IP Channel Configuration
5.6 Recording Settings
Description: DVR native acquiescence to open all channels 24 hours of
ordinary video.
5.3 Network Settings
5.7 Instant playback
5.8 Video playback
5.9 Shut down
5.4 Channel Configuration
6.1 Login
6.2 Preview
9 10 11 12
13 14 15 16
Step 1: When the mouse clicks anywhere in the current channel screen,
the control bar will automatically pop up below the channel.
Step2:click” ”Into the instant playback interface, can play the first
5 minutes of the current channel video.
DVR LAN login (in the same router under the computer, also known as
intranet)
Step 1: Make sure the DVR is on the same network segment as the login
computer. If there is no network segment in the computer, add the IP
of the same network segment as DVR, such as "192.168.1.99".
Step 2: Open IE browser, select Tools → Internet Options → Security →
Custom Level → ActiveX controls and plug-ins, all options are enabled.
Step 3: Enter the DVR URL: http://192.168.1.88/ (if the DVR port 80 to
the other, need to add the port after the change) into the OCX
download interface.
Step 4: Download and install the OCX plug-in.
Step 5: Refresh the IE interface, enter the login interface, select
"English" in the Language drop-down box. Enter Username and
Password and click Login.
Step 1: Download & install “UXD Live LStream”app from Google Play
for Android Phones or from App Store for iOS Phones
Step 2: Adding Devices to the App
METHOD 1:“QR Login” (Note: This is the easy way to add a single
device to your app. No account registration needed for this method. )
Run UXD Live LStream>Click“ ”on top left to view sidebar > Select
"QR Login" to go to the login screen directly:
Device ID: Get it from the DVR Menu: Rightclick > Configuration >
Network > P2P>Scan the QR or type the ID number. Give Account name
(admin), Password(12345) and Click “Login”.
It is recomended always to change default password for better security.
METHOD 2 :“Account login” (Note : Need to register an account for
this method. Use this method if you want to monitor multiple devices)
Run UXD Live LStream> Click “ ”on top left to view sidebar > Click
"Please login first" icon on top > Click on “please login first ”> Give
your User name and Password if you have it already and click “Login”.
Otherwise click “Register”and make a new account and then login.
After Logged into your account you have to add the device to your
account. Click “Device” from sidebar >“Add Device” from the
bottom > Select “QR Add”(Scan the QR from the DVR Menu: Rightclick
> Configuration > Network > P2P> Scan the QR to get the Device ID)
and type Device account (admin) & Password (12345)> Click
“Submit”. Then give any Device Name for your reference and click
Grouping to select or add a group and click “Send”. Now the device is
added Successfully to your account.
Step 3: To get Live Preview
From the Sliding bar( ) select “Preview”>Click“+”from the window
> Select your device and channel from the list by clicking “”
Step 4: To get Playback History
From the Sliding bar( ) select “Playback”>Click“+”from the
window > Select your device and channel from the list by clicking
“”. Older recordings can be played back by switching date from
calendar