Boxfish 360 User manual

All rights reserved. Information and specifications may change at any time without notice.
Version 1.8.0, 2018-01-18
1
Boxfish 360 Spherical Underwater
Camera
Owner's Manual
Please read these instructions carefully before using this product, and save this manual
for future use.
If you have any questions, email [email protected] or visit
https://www.boxfish-research.com/contact/
Please note that the actual controls and components, menu items, etc. of your camera
and software may look somewhat different from those shown in the illustrations in this
Owner’s Manual.

All rights reserved. Information and specifications may change at any time without notice.
Version 1.8.0, 2018-01-18
2
Table of Contents
About the Boxfish 360 Spherical Underwater Camera ............................................ 3
Cautions for use .......................................................................................................... 3
Warranty and Limitations of Liability ........................................................................ 4
Package List ................................................................................................................ 4
Features ....................................................................................................................... 5
Specifications .............................................................................................................. 6
Identification of parts .................................................................................................. 7
Recording Extender (optional) ................................................................................... 8
Pre-Dive checklist ....................................................................................................... 9
Post-Dive checklist ..................................................................................................... 9
Installing the optional Recording Extender .............................................................. 9
Quick start guide ....................................................................................................... 11
Opening and closing the housing ............................................................................ 11
Preparation of the housing ....................................................................................... 11
Charging ..................................................................................................................... 12
Turning on .................................................................................................................. 13
Starting/Stopping the recording .............................................................................. 14
Maximum recording duration chart ........................................................................... 15
Downloading videos and photos ............................................................................. 15
Creating 360 spherical video .................................................................................... 17
Erasing memory cards .............................................................................................. 18
Preparing new memory cards .................................................................................. 18
Downloading log data (depth, temperature, …) ...................................................... 19
Log data description ................................................................................................. 21
Adjusting camera settings ....................................................................................... 22
Adjusting the aperture .............................................................................................. 23
Adjusting the white balance ..................................................................................... 23
Adjusting the exposure compensation value (EV) ................................................. 24
Adjusting the ISO value ............................................................................................ 24
Adjusting the shutter angle ...................................................................................... 24
Shutter Angle to Shutter Speed conversion chart .................................................... 25
Mounting on a tripod ................................................................................................. 25
Attaching video lights ............................................................................................... 25
Care and Maintenance .............................................................................................. 25
Recommended Camera Settings ............................................................................. 26
Troubleshooting ........................................................................................................ 27
For Customers in the U.S.A. ..................................................................................... 29
Declaration of Conformity ......................................................................................... 29
Caution ..................................................................................................................... 29
Recycling Lithium Batteries ...................................................................................... 29
For supplied accessories .......................................................................................... 30
For Customers in Canada ......................................................................................... 30
Recycling Lithium Batteries ...................................................................................... 30
For supplied accessories .......................................................................................... 30
For Customers in Europe ......................................................................................... 31

All rights reserved. Information and specifications may change at any time without notice.
Version 1.8.0, 2018-01-18
3
Notice ....................................................................................................................... 31
Trademarks ................................................................................................................ 32
Interference ................................................................................................................ 32
Contact ....................................................................................................................... 33
About the Boxfish 360 Spherical Underwater Camera
The Boxfish 360 is designed to maximise your time in the water and speed up your 360
production workflow. A single cover provides quick access to all memory cards and
long-lasting batteries. With automatically created project files, only three seams, and
precisely synced cameras, the stitching process is extremely fast and efficient. The
Boxfish 360 gets you back into the water quicker to shoot more immersive high-quality
video.
An integrated electronics package controls start/stop and continuously records changes
to depth, temperature, and camera orientation. This eliminates the need to manually
note this information during the dive, or look it up in the dive computer later. It is not only
great for scientific analysis, it also looks spectacular if integrated into a HUD-style video
overlay.
The Boxfish 360 has an external start/stop button. The rig is pre-calibrated to be used
underwater or on the surface without having to adjust focal distances. You can shoot
with our without domes on the surface, but for optimal image clarity we recommend
removing them if possible.
Cautions for use
• Before cleaning the housing, remove the battery or the DC coupler, or disconnect
the power plug from the outlet.
• Do not use solvents such as benzine, thinner, alcohol, kitchen detergents, etc., to
clean the camera or housing, since it may deteriorate the external case or the
coating may peel off.
• Do not leave the camera with the lens facing the sun, as rays of light from the
sun may cause it to malfunction.
• During access (image writing, reading and deleting, formatting etc.), do not turn
this unit off, remove the battery, card or disconnect the AC adaptor and do not
subject the housing to vibration, impact or static electricity.
• The data on the cards may be damaged or lost due to electromagnetic waves,
static electricity or breakdown of the camera or the card. We recommend storing
important data on a computer etc.
• Do not format the card on in the camera. Use the supplied App for Microsoft
Windows or Apple OS X to ensure proper operation.
• The battery is not charged when the camera is shipped. Charge the battery
before use.

All rights reserved. Information and specifications may change at any time without notice.
Version 1.8.0, 2018-01-18
4
• The battery is a rechargeable lithium ion battery. If the temperature is too high or
too low, the operating time of the battery will become shorter.
• The battery becomes warm after using and during and after charging. The
camera also becomes warm during use. This is not a malfunction.
• Do not leave any metal items (such as clips or hex keys) near the contact areas
of the power plug or near the batteries.
• Store the battery in a cool and dry place with a relatively stable temperature:
o Recommended temperature: 15 oC to 25 oC (59 oF to 77 oF)
o Recommended humidity: 40%RH to 60%RH
• Do not store the battery for a long time while fully charged. When storing the
battery for a long period of time, we recommend charging it once a year. Remove
the battery from the camera and store it again after it has completely discharged.
• A water-tight test in a bathtub or similar is highly recommended when using the
system for the first time and after the changing of port and O-ring(s). Submerge
the camera fully for several minutes, and watch for any bubbles.
• Do not use lubricants from other brands with the silicone rubber O-ring on this
housing, only use the lubricant provided by Boxfish Research.
• Discontinue use immediately should you notice any leakage.
• Store the housing in a robust, shock-proof container during transportation; avoid
transporting while turned on.
• When travelling by air, do not close the housing, as this may lead to a pressure
difference between the atmosphere and inside the housing.
• Care must be taken when opening the housing, as pressure may build up inside
the housing which increases the opening force.
• Do not open the product in a wet or sandy environment. Protect the interior from
moisture and debris in order to prevent malfunction or leakage.
• Do not store the product in an environment of high humidity.
• Do not leave the housing and the camera in direct sunlight for prolonged periods.
• Keep out of reach of children, failure to do so could result in injury.
• Defective products should be shipped to our factory or distributors for service.
Unauthorised disassembling and/or modifications could result in malfunction or
leakage.
Warranty and Limitations of Liability
For warranty, limitations of liability and terms of sale see our standard terms at
http://www.boxfish-research.com/terms.
Package List
• 1x Nanuk 933 hard case with
o 1x Boxfish 360 camera
§ Memory Cards and batteries installed
o 1x Neoprene cover
o 1x Replacement dome 4.5"

All rights reserved. Information and specifications may change at any time without notice.
Version 1.8.0, 2018-01-18
5
o 1x Printed manual
o 1x Laminated quickstart guide
o 1x Plastic case with label "Card reader"
§ 1x USB Card reader
§ 1x USB Cable
§ 1x Microfibre cloth
o 1x Plastic case with label "Spares"
§ 1x O-ring lube
§ 1x Clear bag with
§ 2x O-ring 165
§ 3x O-ring 156
§ 1x Clear bag with
§ 2x 3/8"-16 to 1/4"-20 Reducer bushing
§ 2x M6 X 12.5 Button socket screw
§ 2x M6 Flat washer
§ 4x M4 X 8 Button socket screw
o 1x Plastic case with label "Power pack"
§ 1x AC->DC Power supply CE
§ 1x AC Power cable
§ 1x Z-Cam E1 camera manual
§ 2x Boxfish Research sticker
• If ordered with optional Recording extender:
o 1x Boxfish 360 Recording Extender, installed in Boxfish 360 camera.
o 1x AC/DC Battery charger CE
o 1x AC Power cord
o 1x Printed manual
Features
• Coverage: Full-spherical 360.
• Recording modes: Video, Photo time-lapse.
• Spherical video resolution: 5040x2520 at 24, 25 and 29.97 fps.
• Spherical photo resolution: 12.1 MP.
• Record RAW photos: yes (DNG).
• Gel filter holders included: yes.
• Underwater stop/start: yes.
• Genlocked cameras: yes, millisecond accuracy.
• Audio buzzer: yes, for acoustic confirmation and sync backup.
• Aperture control: yes, manual from f/2.8 to f/11.
• Frame rate control: yes, 24, 25 and 29.97.

All rights reserved. Information and specifications may change at any time without notice.
Version 1.8.0, 2018-01-18
6
• ISO control: yes, auto and manual from ISO100 to ISO102400.
• Shutter angle control: yes, auto and manual from 45º to 360º.
• White balance control: yes, auto and manual from 2300K to 7500K.
• Exposure compensation control: yes, -3EV to +3EV.
• Colour space control: yes, sRGB and Z-LOG.
• Record depth: yes.
• Record temperature: yes.
• Record orientation: yes.
• Can be used on surface: yes, with and without domes.
• File management App included: yes, for Windows and OS X.
• Stitching templates included: yes.
• In-camera stitching: no.
Specifications
• Housing body: Aluminium alloy.
• Surface treatment: Hard anodised.
• Dome Material: Acrylic.
• Depth rating: 300m / 1000ft.
• Buoyancy: Slightly negative.
• Dimensions: 300 x 165mm / 11.8 x 6.5 inch.
• Weight with cameras and batteries: 6.0 kg / 13.2 lbs.
• Battery life: up to 90 min (180 minutes with extender).
• Maximum recording duration: 280 minutes with 128GB card.
• Video format: MOV H.264.
• Photo format: JPG + DNG.
• Recording bitrate: 60Mbit per camera.
• Dynamic range: 10 stops.
• Aperture: F1.8 to F16, manual iris. Easily adjustable from f/2.8 to f/11 via
aperture-ring.
• Recording media: Micro SD 64 GB.
• Sensors: Panasonic MN34230 Micro Four Thirds.
• Lenses: 185° circular fisheye.
• Mounting options: 3x 1/4” and 2x 3/8” threads.
• Supported memory cards: UHS-I microSDXC cards with 32GB, 64GB, or 128GB
capacity and a minimum sustained write speed of 10MB/s.
• Recommended memory cards:
o SanDisk 64GB Extreme UHS-I microSDXC.
o Transcend 64GB UHS-1 microSDXC.

All rights reserved. Information and specifications may change at any time without notice.
Version 1.8.0, 2018-01-18
7
Identification of parts
1. Latches
2. Depth sensor
3. Top lid
4. Start/stop button
5. Micro USB port
6. Aperture adjustment levers
7. Power button levers
8. DC power/charge socket
9. Grabber for memory cards
10. Hex keys
11. Main O-ring
All rights reserved. Information and specifications may change at any time without notice.
Version 1.8.0, 2018-01-18
8
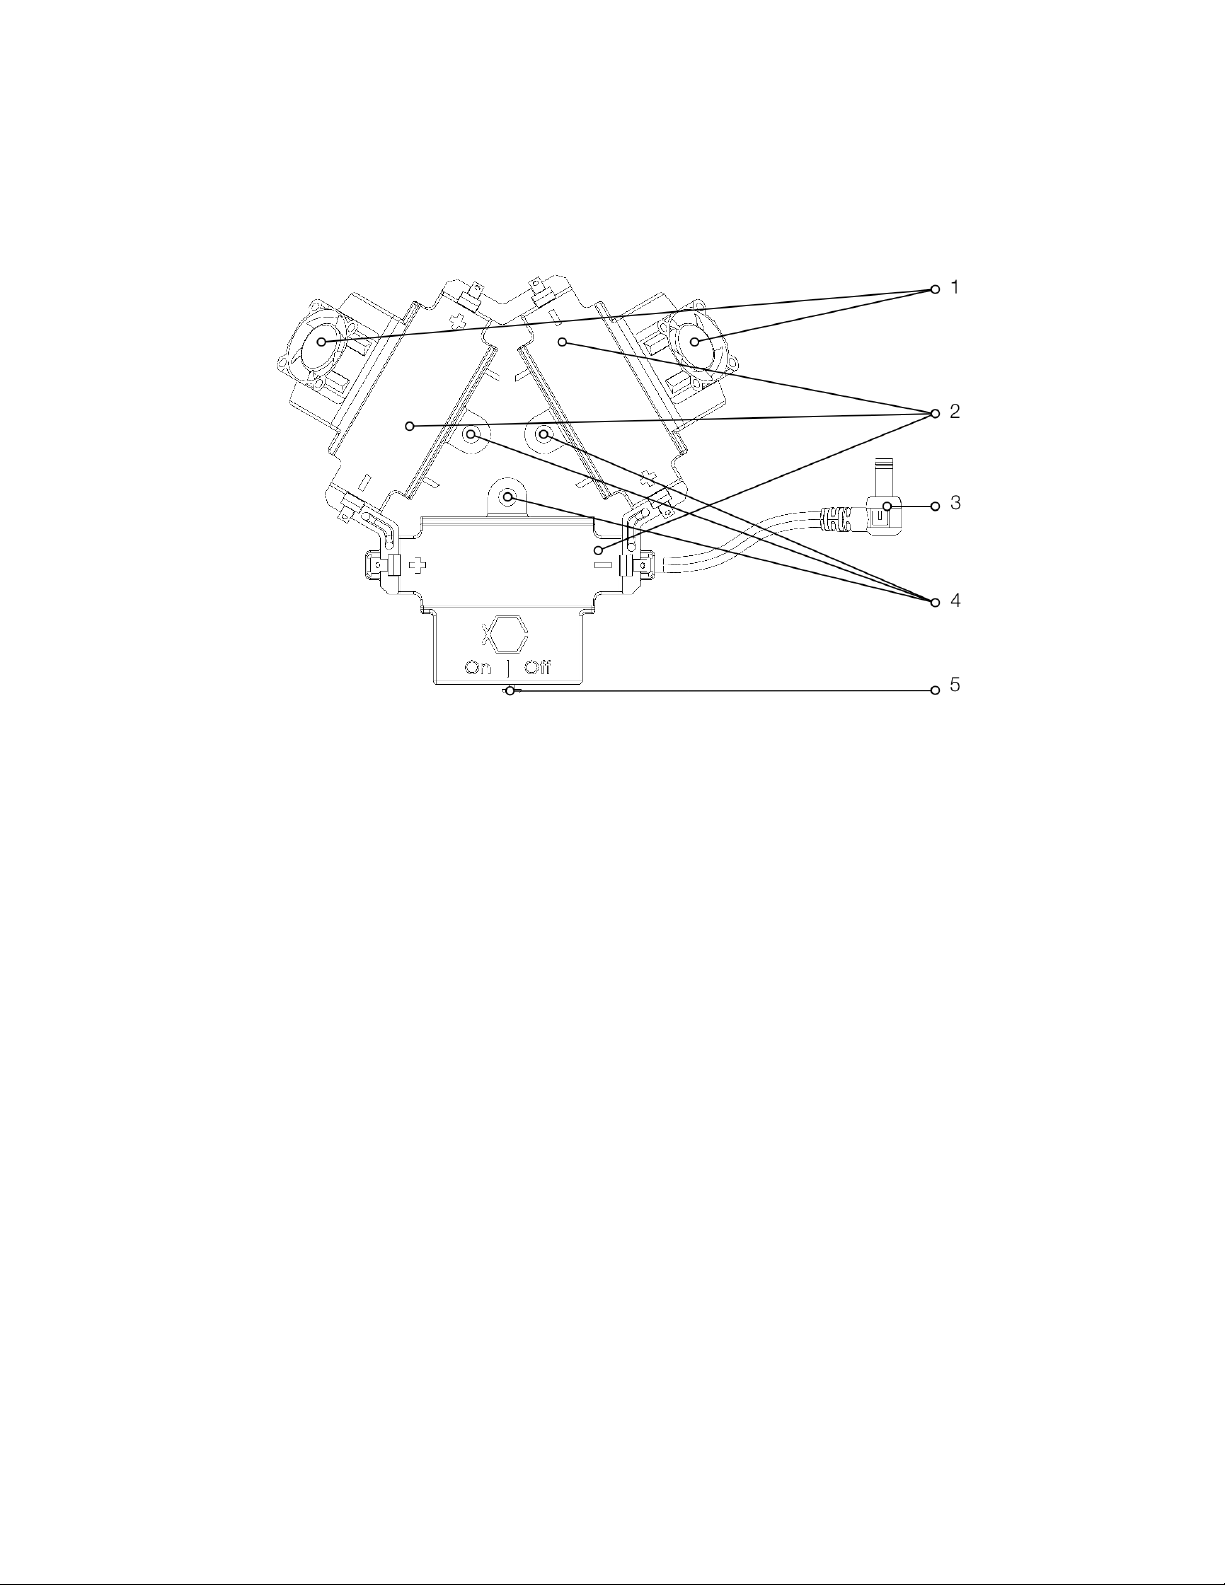
Recording Extender (optional)
1. Fans
2. Battery compartments
3. Power lead to Boxfish 360
camera
4. Mount points
5. On/Off switch

All rights reserved. Information and specifications may change at any time without notice.
Version 1.8.0, 2018-01-18
9
Pre-Dive checklist
• Inspect each dome for scratches and dirt, inside and outside.
• Erase Memory cards with the Boxfish App. Please do not format memory
cards in the camera, or the synchronised autostart will not work.
• Open the top lid.
• Press each camera's power button for two seconds to power on.
• Confirm each camera battery is fully charged.
• Confirm each camera is set to the same aperture, ISO speed, shutter angle,
white balance, and exposure compensation.
• Press the start/stop button and confirm all cameras are starting up.
• Press the start/stop button again to stop the recording.
• Confirm the O-ring is in place, undamaged, and free of debris.
• Close the top lid.
• Ensure all three latches have locked securely.
• Place the camera inside the neoprene bag to protect the domes while getting
into the water.
• Enter the water.
• Remove the neoprene bag.
• Clear bubbles from domes to ensure unobstructed video recording.
Post-Dive checklist
• Place the housing inside the neoprene bag to protect the domes while getting
out of the water.
• Remove the camera from water.
• Rinse the camera with fresh water after use; wipe the camera with a towel
before opening.
• Open the top lid.
• Press each camera's power button for two seconds to turn it off.
• Connect the AC power adapter to charge the camera batteries.
• Remove the memory cards and insert them into the triple card reader.
• Place a towel over the housing while charging to prevent dirt and dust
entering the housing.
• Use the Boxfish App to copy the video files onto your computer and create the
stitching project.
• Make a backup of the video files before erasing the memory cards.
Installing the optional Recording Extender
1. Remove the batteries from the Boxfish 360 Recording Extender.
2. Remove the top lid from the Boxfish 360 Spherical Camera.
3. Place the Boxfish 360 Recording Extender inside the top lid, making sure not
to pinch any cables.
4. Position the three included screws into the mounting holes.

All rights reserved. Information and specifications may change at any time without notice.
Version 1.8.0, 2018-01-18
10
5. Securely fasten the screws using the 4mm hex key include with the Boxfish
360 Spherical Camera.
6. Reinstall the batteries in the Boxfish 360 Recording Extender.

All rights reserved. Information and specifications may change at any time without notice.
Version 1.8.0, 2018-01-18
11
Quick start guide
1. Open the housing by removing the top lid.
2. Turn on each camera with it's power button.
1. To record video: nothing else needs to be done.
2. To record timelapse: tap each camera’s power button again to switch
them into photo mode.
3. Close the housing, ensure the O-ring is free from dirt and not pinched.
4. Recording:
1. To record video, briefly but firmly press the outside button to start or
stop the recording.
2. To record timelapse photos, briefly but firmly press the outside button
twice to start the recording. Hold the button for 5 seconds to stop the
records. You can adjust the timelapse interval with the Boxfish App.
5. The view from the three lenses overlap a short distance outside the housing in
all directions.
6. The cameras capture circular fisheye 4K-UHD video or JPG+DNG RAW still
images.
7. After recording, open the housing and turn off the cameras.
8. Retrieve files from the three Micro SD cards using the supplied reader and
App for Windows and Mac.
9. The App automatically organises the files by take and creates project files for
Kolor Autopano Video Pro.
10. Open the project file in Kolor Autopano Video Pro and render the desired part
of the timeline.
11. Erase the Micro SD cards using the supplied App. This guarantees that the
required camera configuration files are written to the cards.
12. Connect the supplied AC adapter to charge the cameras inside the housing.
Opening and closing the housing
1. Always place the housing on a flat surface or in your lap and open it with the
top facing up.
2. When closing, make sure the O-ring is free of dirt and there is nothing caught
between the top lid and the main housing.
3. The housing can be opened and closed by operating the three housing locks;
when opening, depress the safety catch, then flip the latch up.
4. To close, position the lid safely on the housing, making sure not to pinch the
O-ring. Then place the latches over the catch, then press the latch down until
flat with the housing, and then make sure they are locked in place securely.
Preparation of the housing
All rights reserved. Information and specifications may change at any time without notice.
Version 1.8.0, 2018-01-18
12
1. After verifying that the main O-ring is in good condition, lightly coat it with the
lubricant provided.
2. Make sure the O-ring groove located in the top part of the housing is free from
any foreign material; the groove can be cleaned with the aid of a microfiber
cloth.
3. Place the main O-ring into the groove by gently pushing it, first at the corners,
then the whole perimeter.
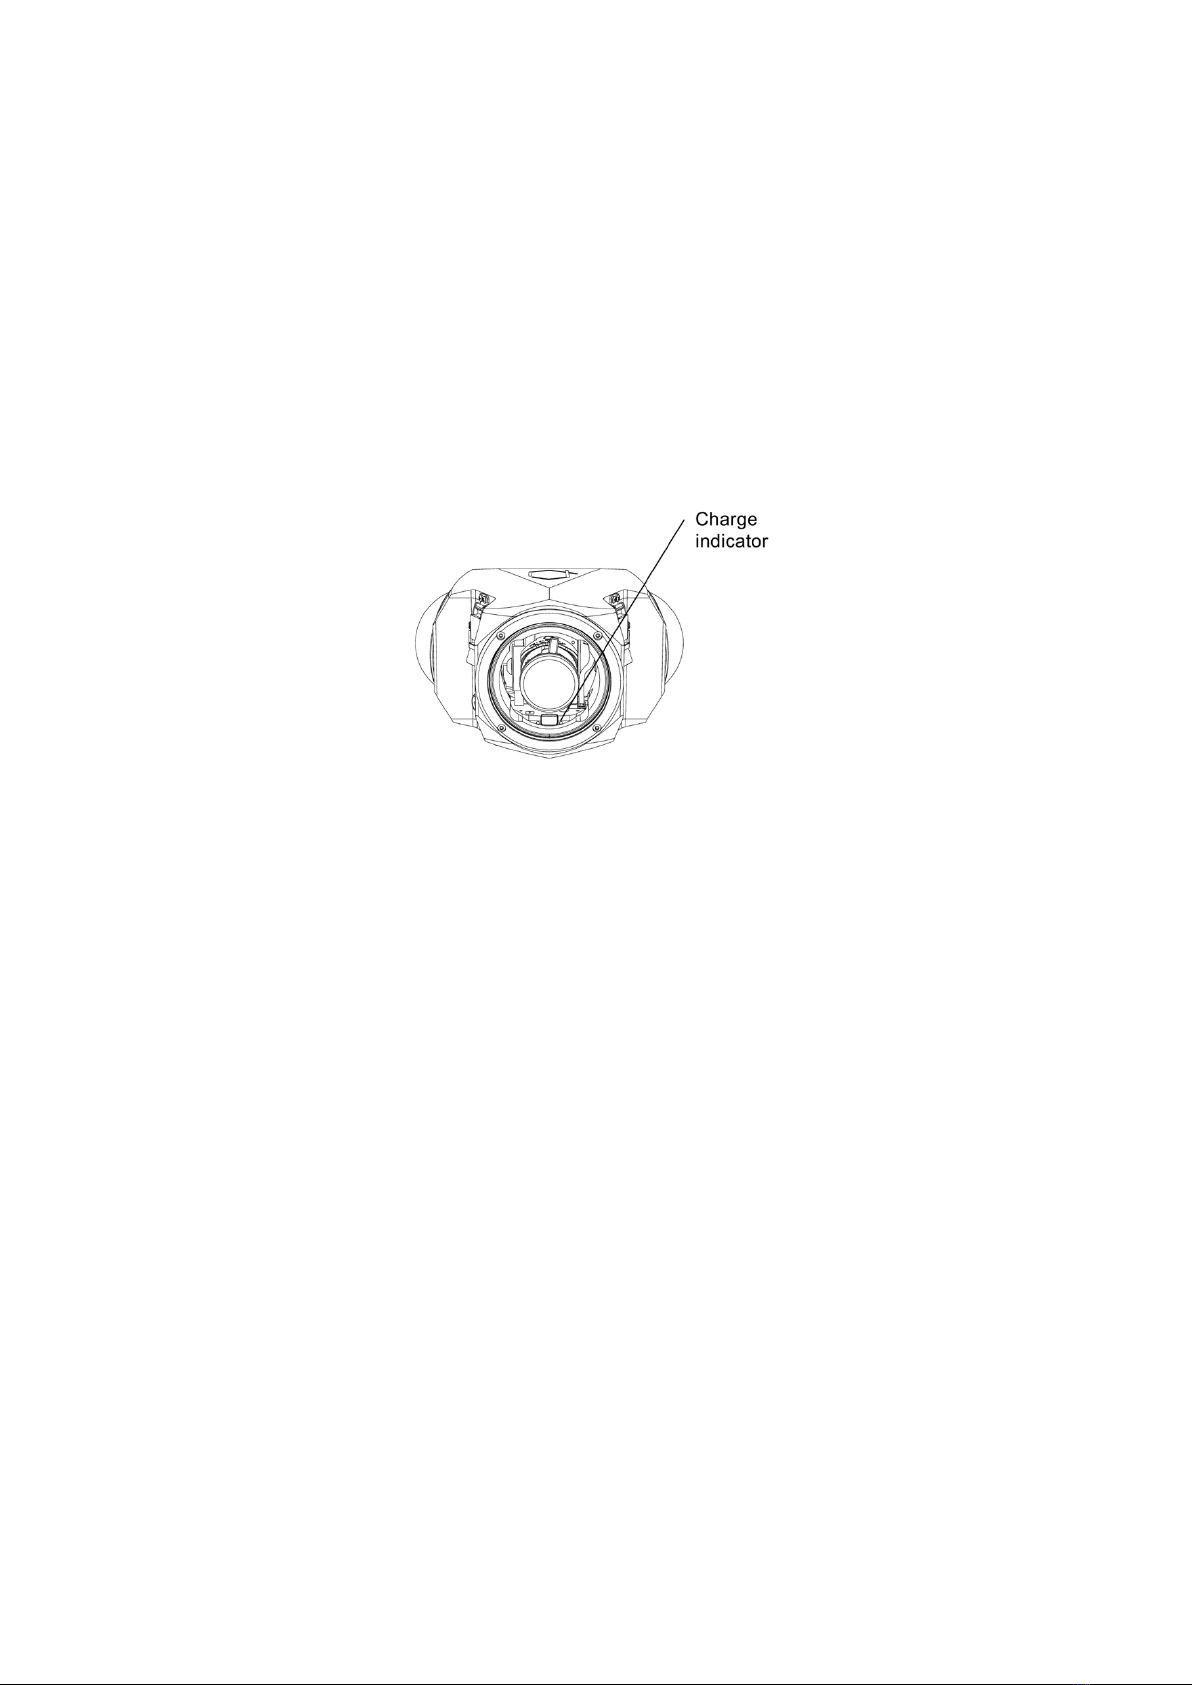
Charging
1. You can use the camera while power is supplied from a wall outlet (wall
socket) by using the AC Adaptor (supplied).
2. Insert the battery packs into the cameras.
3. Connect the camera charge port to a wall outlet (wall socket) using the AC
Adaptor (supplied).
4. The red charge indicators on each camera and the camera mounting plate is
turned on during charging.
5. The red charge indicators will turn off once the charging has completed
without any problem. (Disconnect the charger from the electrical socket and
detach the battery after charging is completed.)
6. Charging time: 120 minutes
The indicated charging time is for when the battery has been discharged
completely. The charging time may vary depending on how the battery has
been used. The charging time for the battery in hot/cold environments or a
battery that has not been used for a long time may be longer than normal.

All rights reserved. Information and specifications may change at any time without notice.
Version 1.8.0, 2018-01-18
13
Turning on
The camera can only be turned on and off outside the water, with opened lid.
1. Remove the top lid.
2. Locate the power buttons for each camera and press them for three seconds.
3. The cameras will power up.
4. Check the display of each camera to ensure:
1. Each camera is in video mode
2. Each camera has sufficient battery charge.
3. Each camera has sufficient recording time left.
4. Each camera shoots at the same frame rate .
5. Each camera is set ot the desired exposure compensation
6. No errors are shown (red), like a faulty or missing card.
5. Verify the cameras are all set to the desired aperture (See “Adjusting the
aperture”
6. The Boxfish 360 is now ready for recording.
With optional recording extender:
7. Turn the Boxfish 360 Recording Extender on. The fans will start spinning.
8. Connect the power lead to the DC plug inside the camera housing.
9. Carefully place the lid on top of the housing. Feed the extra cable length in the
space between camera lens and camera body of camera #2.
10. Ensure the lid sits securely and no cable or O-ring is pinched.
11. Fasten the latches.
If you would like to record timelapse photos, briefly press the power button of each
camera again to switch them into photo mode.
You can set the timelapse recording interval and duration with the Boxfish App.

All rights reserved. Information and specifications may change at any time without notice.
Version 1.8.0, 2018-01-18
14
Starting/Stopping the recording
Video recording
1. Turn all cameras on (see “Turning On”).
2. Locate the large start/stop button on the outside of the housing.
3. Press the start/stop button firmly once and release it.
4. You will hear a beep while the button is pressed.
5. After three seconds the cameras will start recording and a short beep is
emitted.
6. The short be can sometimes be useful to verify camera synchronization in
post.
7. If this is followed by a very long beep, the cameras were not turned on.
8. Verify that all cameras are recording by looking for the red blinking recording
LED visible through each dome.
9. You can stop the recording by pressing the start/stop button again.
Timelapse recording
1. Turn all cameras on (see “Turning On”).
2. Tap each camera’s power button once to switch them into photo mode.
3. Locate the large start/stop button on the outside of the housing.
4. Press the start/stop button firmly twice and release it.
5. You will hear a beep while the button is pressed, and three beeps after the
double press.
6. The cameras take a photo every five seconds. You can change the recording
interval with the Boxfish App (Tab “Settings”, Slider “Photo Interval”).
7. Verify that all cameras are recording by looking for the red blinking recording
LED visible through each dome.
8. You can stop the recording by pressing the start/stop button again.

All rights reserved. Information and specifications may change at any time without notice.
Version 1.8.0, 2018-01-18
15
Maximum recording duration chart
Card Size
Recording Duration
32GB
70 minutes (1:10 hrs)
64GB
140 minutes (2:20 hrs)
128GB
280 minutes (4:40 hrs)
Downloading videos and photos
Boxfish Research provides a free App for Windows and Mac to download and
organise the recorded files. Navigate to http://www.boxfish-research.com/downloads/
to download the latest version.
Attach memory cards to computer:
1. Remove the top lid.
2. Open the top compartment of each camera.
3. Remove the three memory cards, using the supplied grabber if necessary.
4. Insert the memory cards into the supplied card reader.
5. Connect the card reader to your computer.

All rights reserved. Information and specifications may change at any time without notice.
Version 1.8.0, 2018-01-18
16
Copy Files:
1. Start the Boxfish App for Windows or Mac.
2. The App should automatically assign the correct drives to each card. Choose
the drives manually if this does not happen.
3. Choose the target directory. If the folder doesn't exist it will be created.
4. Choose the desired stitching template for Autopano.
5. You can specify a project name that will be added to every copied file name.
This can make it easier to organise your files later.
6. Press "Copy Files"
7. The App will copy the files in parallel and provide a progress bar for each
card.
8. The App will create an Autopano Video project file (.kava) with the chosen
stitching template along side each set of clips, and an Autopano Giga project
file (.pano) along side each photo.
Sample files:

All rights reserved. Information and specifications may change at any time without notice.
Version 1.8.0, 2018-01-18
17
Creating 360 spherical video
1. The App automatically creates an Autopano Video Pro project file with the
chosen stitching template along side each set of clips on copy.
2. Double-click the project file (E.g. EYED00001_autopano.kava) to open it in
Autopano.
3. Select the desired part of the time line (red line).
4. Open the Render menu.
5. Verify the target resolution, filename, frame rate, and bitrate.
6. Click Render.
Please note that the templates that come with the Boxfish 360 App are
designed to help you quickly create stitched videos for review only. For a
professional production you will most likely have to adjust several perameters,
including horizon, FOV & K-values, and set mask points.

All rights reserved. Information and specifications may change at any time without notice.
Version 1.8.0, 2018-01-18
18
Erasing memory cards
1. Remove the top lid.
2. Open the top compartment of each camera.
3. Remove the three memory cards, using the supplied grabber if necessary.
4. Insert the memory cards into the supplied card reader.
5. Connect the card reader to your computer.
6. Start the Boxfish App for Windows or Mac.
7. Click "Erase Cards".
8. The Boxfish App will erase the cards and write camera id and configuration
files.
9. The configuration file (MISC/cfg) on each card is required or the synchronised
autostart will not work.
Preparing new memory cards
1. Connect the card reader to your computer.
2. Insert the first memory card into the supplied card reader.
3. Format the card as exFAT and name it 360_01.
4. If the card is not formatted using exFAT file system, the video files are split at
5 minute intervals to work around the maximum file size.
5. Insert the second memory card into the supplied card reader.
6. Format the card as exFAT and name it 360_02.
7. Insert the third memory card into the supplied card reader.
8. Format the card as exFAT and name it 360_03.
9. Start the Boxfish App for Windows or Mac.
10. Click "Erase Cards"
11. The Boxfish App will erase the cards and write the camera configuration file.
12. The configuration file is required or the synchronised autostart will not work.

All rights reserved. Information and specifications may change at any time without notice.
Version 1.8.0, 2018-01-18
19
Downloading log data (depth, temperature, …)
The Boxfish 360 logs time, depth, temperature, heading, and orientation during video
and photo recording. This information can be used to create information overlays or
HUD style video elements, or for scientific analysis.
The data is stored in the internal memory of the Boxfish 360 camera controller.
Download it with the Boxfish App by connecting the Boxfish 360 camera to your
computer using a Micro-USB cable. The Micro-USB port is located inside the
housing opposite the power plug.
Prepare the Boxfish 360:
1. Remove the top lid and locate the Micro-USB port.
2. Connect the camera to your computer using your Micro-USB cable.
3. Double-tap the record button like you would when recording timelapse photos
Copy Data:
1. Start the Boxfish App for Windows or Mac.
2. Click on the “Copy Data” heading

All rights reserved. Information and specifications may change at any time without notice.
Version 1.8.0, 2018-01-18
20
3. Select the appropriate port for the camera device. The port name depends on
your operating system. For most users there should be only one option to
choose from, this being the Boxfish 360 camera.
4. If the list is empty, make sure the Boxifsh 360 is connected and turned on,
and then press “Refresh Devices”
5. Choose the target directory. If the folder doesn't exist it will be created.
6. You can specify a project name that will be added to every copied file name.
This can make it easier to organise your files later.
7. Press "Copy Data"
8. The App will copy the log data, creating a new file per recording.
9. It takes about 30 seconds to copy 500 datasets.
10. You can open the CSV files in Excel, Numbers, Calc, or a text editor.
Sample data files:
Erase Memory:
After downloading the data you may press “Erase memory” to free up log space for
future data. The memory can hold up to 32 thousand log entries, which is roughly 12
hours of recording at one entry per second.
Other manuals for 360
3
Table of contents
Other Boxfish Digital Camera manuals


