Boyo AVN700A User manual

Instruction
Manual
AVN700A
!D
0
((?},
't-+i
{MUTE'},
L
MC
__
~_·
__
'
_~_----_----_.
-
IrfiITJ'
tf7!;~_))
tJD
GPS
NAVIGATION
•
Bluetooth
•
71NCH
WIDE
TFT
LCD
MONITOR
o
Bluetooth·
iiiiiItI
Take
the
time
to
read
through
this
instruction
manual.
Familiarity
with
installation
and
operation
procedures
will
help
you
obtain
the
best
performance
from
the
unit.

CONTENTS
Introduction ........................4
Safety Precautions...................5
Warning ............................6
BOX Contents.......................7
Part Names and Functions ............8
Main Unit - Front ........................8
Main Unit - Left Side .....................9
Main Unit - Rear ........................9
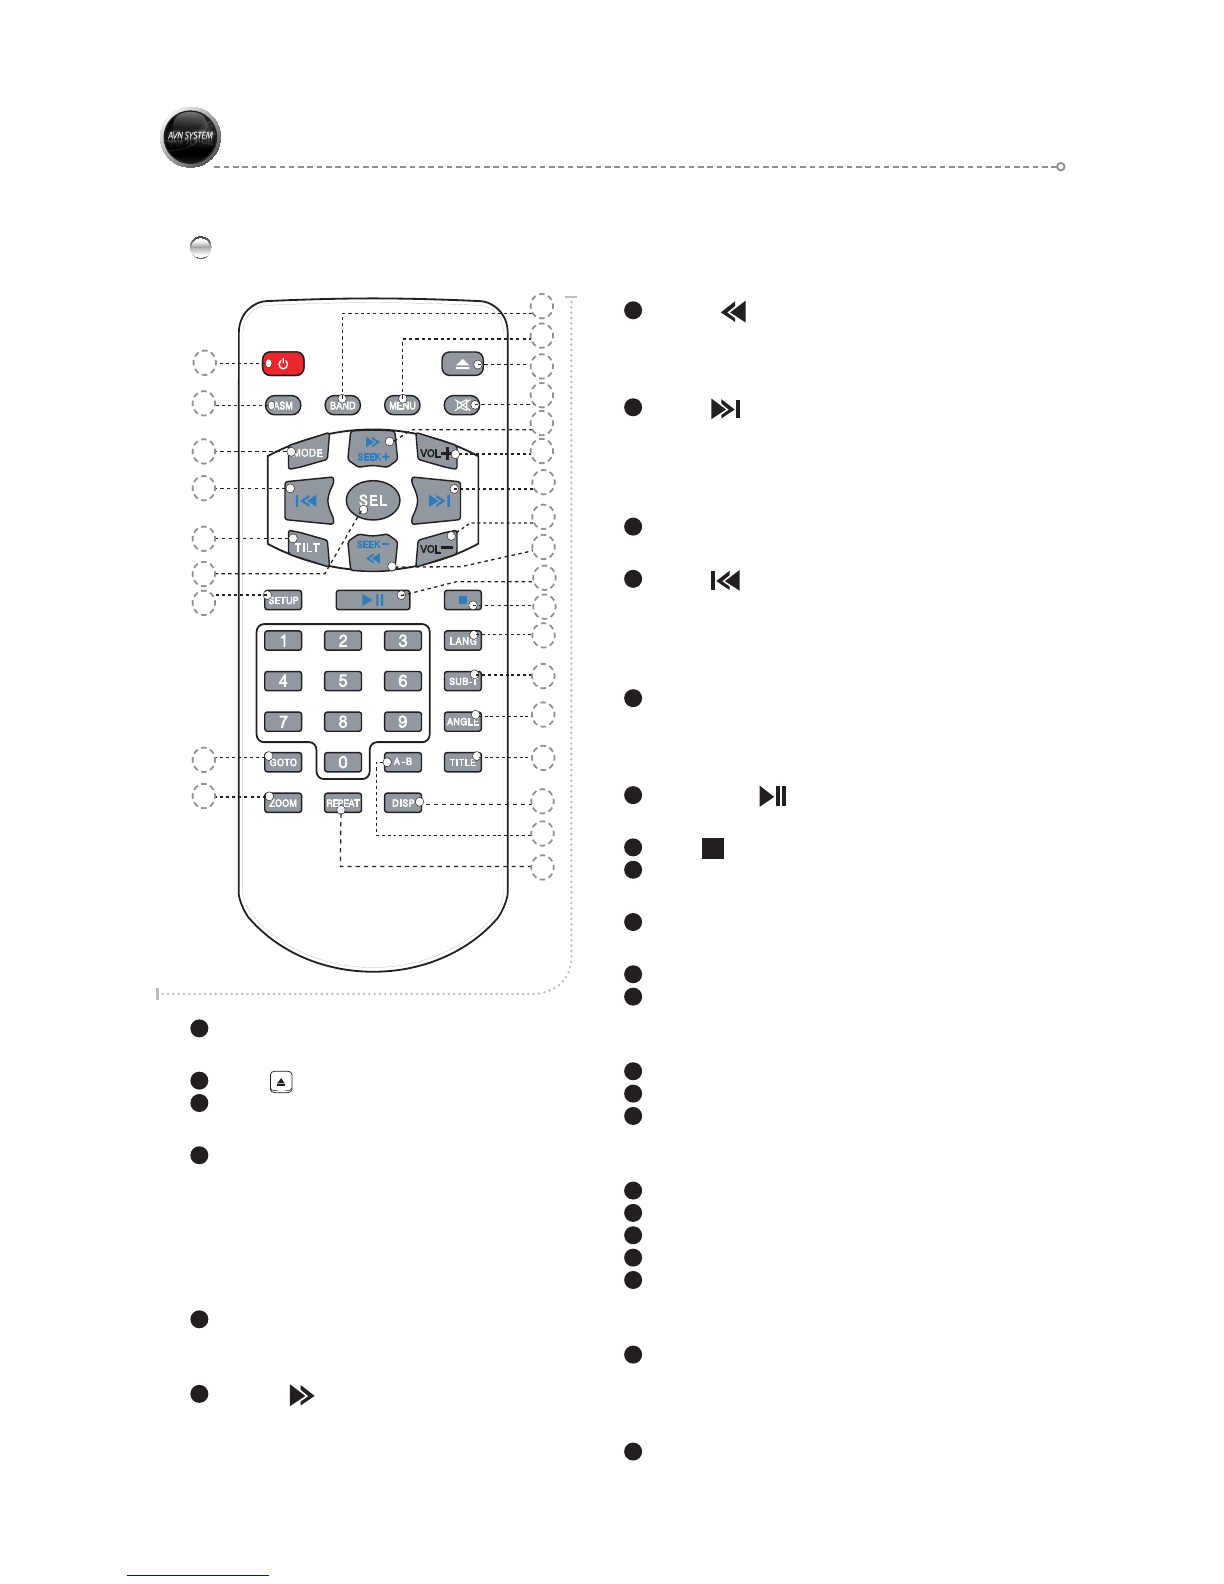
Remote Control ........................10
Basic Operation ....................11
Mode Selection ........................11
Volume Adjustment .....................12
Mute.................................12
Navigation P P Function .................13
DualZone.............................13
TILT Function .........................13
EJECT Function .......................13
NAVIGATION.......................14
Preface MERGE .......................14
End-User License Agreement .............15
Safety Information and Precautions ........16
Introduction to Your NavMate Software .....17
NavMate Software Operation .............18
Quick Start ..........................18
Using Your NavMate Software ............20
Function Buttons .....................20
Navigation Menus ....................21
List Mode, Spell Mode, and Most Recently Used
21
Map Screen .........................23
Destination Selection (Go To…) ...........24
Address/Intersection ..................25
Point of Interest (POI) .................27
Home Address .......................29
Office Address . . . . . . . . . . . . . . . . . . . . . . .30
Favorites ...........................30
Address Book........................31
Trail Book ...........................32
Trip Book ...........................32
Latitude Longitude ....................32
Previous Destination ..................32
By using Map ........................33
Route Calculation and Guidance ..........35
Route Calculation.....................35
Please Proceed ......................35
Route Guidance ......................35
True View (Intersection Zoom)...........36
Map Display...........................36
Current Location Screen ...............37
Arrival Screen .........................38
Off-Route and Route Interruptions .........38
Edit Favorites Menu ....................38
Edit Address Book......................39
Edit Home Address .....................39
Edit Office Address .....................40
Edit Trail Book .........................41
Add Trail ...........................41
Name Trail ..........................42
Delete Trail..........................43
Edit Trip Book .........................44
Add................................44
Edit ................................45
Edit My POI ...........................46
Add Category ........................46
Setup Display........................47
Edit Category ........................48
Add................................48
Alert ...............................49
Modify..............................50
Set-up Menu ..........................50
Navigation Preferences ................51
Display Options ......................52
U F Settings .........................53
Day/Night Settings ....................53
Point of Interest ......................53
Set Distance Units ....................54
Set Time............................54
Language Settings ....................55
Location Reset .......................55
System .............................55
GPS diagnostic ......................56
System Information ...................
56
Trip Computer .........................57
Planned Route.........................58
Detour ...............................58
Cancel Route..........................59
Follow Trail ...........................60
Appendix A : NavUtil Manual .............63

Introduction .........................63
Select Device and Language function.......64
Select Device ........................64
Language ...........................64
POI Uploader..........................65
Select Category feature ................66
Map/Voice Uploader ....................68
Steps to follow to download the Map Data 68
Select Database Area .................69
Select Language .....................69
Select the Destination .................70
The Process of Copying................70
Remove the Memory Device . . . . . . . . . . . .72
Backup ..............................73
Restore ..............................74
RADIO ............................75
RADIO Main Screen ....................75
RADIO Simple Operation ................76
RADIO Frequencies by Region............77
PRESET Memory by Country .............77
RADIO Detailed Functions ...............78
SATELLITE RADIO ..................79
SAT’ RADIO Main Screen................79
DIRECT SEEK Main Screen ..............80
CHANNEL SEEK.......................81
INFO ................................82
SAT’ RADIO Simple Operation ............82
DVD..............................83
DVD Main Screen . . . . . . . . . . . . . . . . . . . . . .83
FUNCTION Icons ......................84
DVD Simple Operation ..................85
DVD SETUP ..........................86
iPod ..............................87
iPod Main Screen ......................87
iPod Simple Operation ..................88
AV ...............................89
AV Main Screen .......................89
USB/SD CARD .....................90
MUSIC Mode Main Screen ...............90
PHOTO Mode Main Screen ..............91
MOV E Mode Main Screen ...............92
USB Simple Operation ..................93
SD CARD Simple Operation ..............94
BLUETOOTH(Handsfree).............95
BLUETOOTH Main Screen ...............95
BLUETOOTH Simple Operation ...........96
PAIRING .............................96
BLUETOOTH Detailed Functions ..........97
Mobile Phone MP3 Player Function ........98
REAR VIEW CAMERA ...............99
REAR VIEW CAMERA Main Screen .......99
SETUP ...........................100
SETUP Main Screen ...................100
EQUALIZER .........................101
DISPLAY ............................102
SPEAKER ...........................103
BLUETOOTH / NAVIGATION............104
NFO/DUALZONE ....................105
TIME SETUP ........................106
Installation & Connection ...........107
Installation Procedure ..................107
WARN NG ...........................107
CAUTION ...........................107
How to install .........................108
How to install .........................109
How to disassemble ...................110
System Connection ................111
OUTPUT connection ...................111
Glossary .........................113
Glossary ............................113
Troubleshooting Prior to Service Inquiry
..114
General .............................114
Disc source ..........................116
MP3/WMA source .....................116
Troubleshooting Guide .............117
Specifications.....................118
DVD & Monitor .......................118
AUDIO OUT .........................119
General .............................120
FCC
(Federal Communications Commission). . .
122
CONTENTS

4
Thank you for choosing and purchasing this unit.
This instruction manual aims to provide you with installation and operating instructions for the unit.
Features
“Multi-tasking” refers to the simultaneous use of numerous programs or applications on one system.
HIGH RESOULUTION & BRIGHT ACTIVE WIDE TFT LCD with Touch Screen
5 Step Automatic Motorized Viewing Angle
Last Angle Memory
Blue Back Light Control Buttons
Full-Func ion Infrared Remote Control
Max Output Power 50W x 4ch
A/V INPUT , REARVIEW INPUT, A/V OUPUT
Auto Dimmer Control
Picture Adjustable ( Brightness, Contrast, Color, Hue, Sharpness)
NTSC/PAL Auto Selection
DVD/DVD-RW/DVD-R/VCD/CD-R/CD-RW/MP3/JPEG
DVD Last Position Memory
Electronic Anti-Shock
Built-in FM/AM Tuner
Auto Scan Memory(ASM) Store/Preset Scan
Satellite Ready
1. Get in http://www.audiovox.com
2. Click "Find a Product" -> "Audiovox"-> "Sirius XM Satellite Radio" -> "XM Direct"
3. Find "CNP2000UC"
Bulit-in Bluetooth for Bluetooth Enabled Device (Celluar Phone)
iPod Control(Audio only)
TEL. Mute Function
Steering Wheel Remote Key supported ( In order to use steering wheel remote control
users have to purchase and connect with module : SWI-PS.)
(www.pac-audio.com, http://www.pac-audio.com)
The PIP function support
Introduction
NOTE
This instruction manual is only for reference.
Modifying rights are reserved.
Modifications are subject to change without notice.

5
To prevent injury or fire, take the following precautions:
To prevent a short circuit, never put or lnsert any metallic objects (such as coins or metal tools)
inside the unit.
Do not touch the liquid crystal fluid if the LCD is damaged or broken due to shock.
The liquid crystal fluid may be dangerous to your health or even fatal.
If the liquid crystal fluid from the LCD contacts your body or clothing, wash it off with soap immediately.
Do not watch Video or operate the unit while driving.
It may cause a car accident because of the distraction.
To enjoy Video Pictures, find a safe place to park, and engage the parking brake.
This unit is a Class 1 laser product. To prevent direct exposure to laser system, do not open the unit.
The laser beam may hurt your eyes.
Note that TFT LCD is very fragile and could be easily damaged. Do not press or scratch the surface.
Do not attempt to service this product by yourself.
(Don’t repair this unit by yourself to avoid serious damage)
In case of smoking or malfunction from the monitor, power off this unit immediately and contact
dealer for service.
It is the responsibility of the purchaser and installer to comply with all applicable laws and regulations
governing the installation and use of this unit.
Manufacturer disclaims all liability for any property damage or personal injury that may result from
improper or unintended installation or use of this unit.
To prevent damage to the unit, take the following precautions.
Make sure to ground the unit to a negative 12V power supply.
Do not install the unit in a spot exposed to direct sunlight or excessive heat or humidity.
Also avoid places with too much dust or Moisture.
To prevent deterioration, do not touch the terminals of the unit or faceplate with your fingers.
Do not subject the faceplate to excessive shock, as it is a piece of precision Components.
Don’t watch Video pictures while the car’s engine is off. (It may drain the battery)
When replacing a fuse, only use a new fuse with prescribed rating. Using a fuse with the wrong
rating may cause your unit to malfunction.
Use only the screws provided. If you use the wrong screws, you could damage the unit.
You cannot view video pictures while the vehicle is moving.
To enjoy TV/video pictures, find a safe place to park and engage the parking brake.
Loading and Replacing the remote battery
Open the battery holder on the back of the remote
control and insert the battery.
Lithium Battery - CR2025 / 3V
Safety Precautions

6
Do not place the remote control in Direct Sunlight.
Cleaning the panel and monitor
Warning
Cleaning the disc slot
As dust can accumulate in the disc slot, clean it occasionally.
Your discs can get scratches if you put them in a dusty disc slot.
Lens Fogging
Right after you turn on the car heater in cold weather, dew or condensation may form on the lens
in the disc player of the unit causing lens fogging, discs may be impossible to play. In such a
situation, remove the disc and wait for the condensation to evaporate.
If the unit still does not operate normally after a while, consult your dealer.
When the control panel and monitor panels are dirty, wipe and clean them using a soft cloth
(such as a commercially available silicon coated cloth).
When contaminated excessively, clean them using a cloth dipped in a neutral detergent first ,
then remove the detergent using a dry cloth.
Do not use a hard cloth or a volatile chemical (such as an alcohol).
Physical or water damage to unit including broken LCD panel will void warranty.

7
After purchasing this product, open packaging and see if any of the components listed below are damaged or missing.
If there is an abnormality, please inquire to the dealer you purchased from.
As these images are to facilitate the understanding of the consumer, they may differ from the actual conditions.
BOX Contents
Unit 1 EA Remote Control Lithium Battery 1EA
(CR2025 3V)
Half Sleeve 1 EA
(For Mounting Bracket)
AUDIO Cable (8P) 1EAPower & Speaker Cable (16P) 1 EA A/V Cable (7P) 1EA
USB Cable 1EA
Trim Plate 1EA GPS Antena 1EA
Screw(For Rear Mounting Bracket) /
Center Screw
MIC 1EA
Key 2 EA (For Removing a unit)
Registration CardWarranty Card
SD Card 1EA
User’s Manual 1EA
Steering Remote Control Cable iPod Cable 1EA

8
Main Unit - Front
Part Names and Functions
2 3 6 7 8 9
4 5
1
1 LCD Screen Displays the screen.
The product is equipped with a touch screen to facilitate user operation.
2 USB Port Use with the USB cable to connect with other external devices
(external hard drive, memory stick, etc.).
3 MIC Sound input device when using Bluetooth.
4 RESET
Press the RESET button to reset.
5 VOLUME Button Decrease Volume : - Increase Volume : +
6 MUTE Button
Short key : Audio MUTE ON/OFF
Long key :
Navigation Mode : Other Modes Turn the Mute function On/Off.
Other Modes except Navigation Mode : Turn the screen On/Off.
7 TILT Button Adjust the angle of the LCD panel.
Can set angle to [15°►30°►45°►60°►75°].
8 EJECT Button EJECT / NSERT a CD
9 POWER Button Short Key : Main Menu
Long Key: Use to turn the power of the main unit(ON/OFF)

9
Main Unit - Left Side
Main Unit - Rear
1
8
9
24 5 6 7
Part Names and Functions
1 Fan 6 AV IN PUT Connection
2 Steering Connection 7 Preout Connection
3 Fuse (20A) 8 External Cable Ass'y
4 VCC Connection & Speaker 9 SAT.RADIO Cable Ass'y
5 Center Hole
1 SD CARD Slot The SD Card Slot is visible when the TILT button is pressed.
2 CD Slot The CD Slot is visible when the EJECT button is pressed.
3

10
Part Names and Functions
Remote Control
1
14
3
10
5
9
11
20
25 4
21
26
27
24
23
22
13
12
7
19
8
16
6
15
2
18
17
1Power button
You can turn on or off the power by pressing the button.
2Eject ( ) button
To Release Disc.
3Mode button
Main Menu ON/OFF.
4DISP button
Selects the one of the following time display mode in
AUDIO CD. SINGLE ELAPSED, TOTAL ELAPSED,
TOTAL REMAIN, OFF
Selects the one of the following time display mode in
DVD. TITLE REMAIN, CHAPTER ELAPSED,
CHAPTER REMAIN, DISPLAY OFF.
5TILT button
Selects one of the following view angle by pressing the button.
15˚►30˚►45˚►60˚►75˚
degrees.
6SEEK+ ( ) button
*Short key: Increases the radio frequency.
*Long key: Fast the play speed in DVD mode.
7SEEK
-( ) button
*Short key: Decreases the radio frequency.
*Long key: Slows the play speed by two times in DVD
mode.
8NEXT ( ) button
MP3 NEXT and PREV must be hold 2 button 2-3
second.
Has a same function like “SEEK+” button in SAT Radio
mode
9SEL button
Selects the current item.
10
PREV ( ) button
MP3 NEXT and PREV must be hold 2 button 2-3
second.
Has a same function like “SEEK-” button in SAT.Radio
mode
11
SETUP button
Turns the SETTING MENU ON/OFF in all modes.
Pressing the Long key in DVD mode selects the DVD
Setup menu.
12
Play/Pause ( ) button
Pauses and replays a disc.
13
Stop ( ) button
Stops a disc.
14
ASM button
Auto frequency scan in radio mode.
15
MUTE button
You can turn on or off the sound by pressing the button.
16
Volume +
Adjust the volume up.
17
BAND button
Selects radio mode each time press the button.
Mode will change as follows :
FM1►FM2►AM
18
MENU button
Returns to the root menu.
19
Volume -
Adjust the volume down.
20
GOTO button
Selects a chapter that you want to go. Press the “SEL”
button after you input a chapter number.
21
A-B button
Selects a repeat interval or OFF.
22
LANG button
Selects a LANGUAGE.
23
SUB-T button
Selects a SUB-TITLE or OFF.
24
ANGLE button
Selects a view angle in DVD mode.
25
ZOOM button
Enlarges a screen each time you press it in DVD mode
as follows :
X1►X2►X3►X4►ZOOM OFF
26
REPEAT button
Repeats a TITLE or CHAPTER.
Menu will changes as follows:
REPEAT CHAPTER
►REPEAT TITLE ►REPEAT OFF.
27
TITLE button
Returns to the DVD root menu.

11
Basic Operation
The initialization screen appears when turning
on power, followed momentarily by the
"CAUTION screen".
03
02
Mode Selection
Touch the desired mode to select.
Convert to the most recently used mode when the power is
turned on.
01
Press the <MENU> button to change the mode.
04
After reviewing the warning information on the
CAUTION screen.

12
Basic Operation
Volume Adjustment
Use the [ , ] buttons to adjust the volume to
the desired level.
: Increase Volume.
: Decrease Volume.
01
Press the [ ▲,▼ ] buttons on the screen to adjust the
volume to the desired level.
▲ : Increase Volume.
▼ : Decrease Volume.
02
Mute
Press the product’s [ ] button.
The sound is muted.
The icon on the LCD screen changes from [ ►].
Press and hold the Mute key to turn the screen on/off.
01
Press the [ ] button on the screen.
The sound is muted.
The icon on the LCD screen changes from [ ►].
02

13
Basic Operation
TILT Function
Press the product’s [ ] button.
Cycle gh the sequence of [15°►30°►45°►60°►75°]
to set the desired angle.
01
EJECT Function
Press the product’s [ ] button.
The CD or DVD can be extracted or inserted.
01
NAVIGATION PIP Function
The pip function supported in the DVD, AV, and rear
camera mode audio output only in all other modes
touch the pip screen to cycle screen size through 1/4
-> 1/2 -> full.
(MAP + 1/4 SIZE P P MODE)
01
DUALZONE
1MBZBOEDPOUSPMB%7%5*5-&EVSJOHPVUQVUUISPVHI
7*%&0065
01

14
Preface MERGE
NAVIGATION
NavMate navigation software provides turn-by-turn route guidance while traveling
to your destination. Before operating, take a few minutes to review the safety and
operating instructions in this manual so you can quickly and safely become familiar
with your NavMate software’s many features.
This User Manual explains the NavMate software’s functions, and provides details on:
● Using the control buttons
● Entering destinations
● Understanding the different screens available on your NavMate software
● Adjusting user preferences
Note: All users should read this manual prior to operating your NavMate software.
Copyright© 2006
All rights reserved.
NavMate Software User Manual Ver. 3.2.57 STD (480x272)
This document and the software described in it are furnished under license and may
be used or copied only in accordance with such license. Except as permitted by such
license, the contents of this document may not be disclosed to third parties, copied,
or duplicated in any form, in whole or in part, without the prior written permission of
Horizon Navigation, Inc.
The NavMate software, including its operation and use, is covered by one or more of
the following patents:
US Patents No. 5,262,775; 5,283,575; 5,291,412; 5,291,413; 5,291,414; 5,297,028;
5,303,159; 5,311,434; 5,339,246; 5,343,400; 5,345,382; 5,359,529; 5,374,933;
5,377,113; 5,390,123; 5,394,333; 5,402,120; 5,414,630; 5,430,655; 5,440,484;
5,477,220; 5,508,931; 5,515,283; 5,515,284; 5,550,538; 5,608,635; 5,712,788;
5,731,978; 5,862,509; 5,898,390; 5,902,350; 5,904,728; 5,910,177; 5,912,635;
5,922,042; 5,928,307; 5,938,720; 5,987,381; 6,058,390; 6,144,919; 6,147,626;
6,253,154; 6,259,987; 6,282,496; 6,298,305; 6,360,165; 6,456,931; 6,456,935;
6,470,268; 6,542,814; 6,552,656; 6,600,994; 6,622,086; 6,735,516; D364,840;
D397,046; D457,823; EP0987665A3. The sale and/or licensing of the NavMate
software and associated materials does not include any licenses (implied or otherwise)
to patents or technology, unless specifically stated in writing.
NavMate®is a trademark of Horizon Navigation, Inc. The NavMate software and
associated materials are protected by copyright in the US and internationally.

15
NAVIGATION
End-User License Agreement
This End-User License Agreement (EULA) is a legal agreement between you (either
an individual or a single entity) and HORIZON NAVIGATION, INC. for the operating
software and updates thereof that run the digital map database and associated hardware
(collectively the “Software”). By installing or using the Software, you agree to be bound by
the terms of this Agreement. If you do not agree to the terms of this Agreement, return the
Software, along with al other accompanying items in the form they were purchased, within
thirty (30) days after such purchase to the authorized dealer from where the Software was
purchased, for a full refund of any fees paid. Use of the Software without acceptance of
this Agreement is unauthorized and not permitted.
License Grant. HORIZON NAVIGATION, INC. grants you a non-exclusive license to use your1. purchased copy of the Software for your own internal purposes of accessing the digital map database
and running the associated hardware and not for service bureau time-sharing, or other similar
purposes.
Limitations On Use. You are not permitted to copy, modify, decompile, disassemble, or reverse2. engineer any portion of the Software without the expressed written permission from HORIZON
NAVIGATION, INC.
U.S. Government End Users. The Software is provided with Restricted Rights. Use,duplication, or3. disclosure by the Government is subject to restrictions as set forth in subparagraph(c) (1) (II) of the Rights
in Technical Data and Computer Software clause at DFARS 252 227-7013 or subparagraphs (c) (1) and (2)
of the Commercial Computer Software-Restricted Rights at 48 CFR 52.227-19, as applicable. HORIZON
NAVIGATION, INC., 4701 Patrick Henry Dr. Suite 1301 Santa Clara, CA 95054 USA.
Indemnity. You agree to indemnify, defend and hold free and harmless HORIZON NAVIGATION,4. INC., including its licensors, assignees, subsidiaries, affiliated companies, and the respective officers,
directors, employees, shareholders, agents, authorized dealers or sales agents, and representatives
of each of them from and against any liability, loss, injury, demand, cost, expense, or claim of any kind
of character, including but not limited to attorney’s fees, arising out of (a) any use or possession of the
Software, or (b) any breach of any warranties or representations made by you in this Agreement or of
your obliga ions under his Agreement.
Disclaimer of Warranty. HORIZON NAVIGATION, INC. does not make any warranties or5. representations, either express or implied, with respect to the software, without limiting theforegoing,
HORIZON NAVIGATION, INC. expressly disclaims any implied warranties of quality, performance,
merchantability, fitness for a particular purpose or non-infringement. Some states do not allow the
exclusion of implied warranties, so some portion of the above exclusion may not apply to you.
Limitation of Liability. HORIZON NAVIGATION, INC. shall not be held responsible for any actual,6. anticipated or speculative loss of profit or direct, indirect, incidental, special, or consequential damages,
including, without limitation, loss of revenue, data, or use incurred by you or any third party arising
out of your use or possession of the software, whether in an action in contract or tort or based on a
warranty, even if HORIZON NAVIGATION, INC. has been advised of he possibility of such damages.
Warnings.7. A. Copies of the digital map database reflect conditions as they existed at various points in time before
your receipt of such copies. Accordingly, copies of the digital database map may contain inaccurate or
incomplete data or information due to inaccurate or incomplete source materials, the passage of time,
road construction, changing conditions, and otherwise.
B. Nei her he Software nor the digital map database include, analyze, process, consider or reflect
any of the following categories of information, i.e., neighborhood quality or safety; population density;
availability or proximity of law enforcement, emergency, rescue, medical or other assistance;
construction work, zones, or hazards; road and lane closures; various legal restrictions (such as
vehicular type, weight, load, height and speed restrictions); road slope or grade; bridge height, width,
weight or o her limits; road, traffic or traffic facili ies safety or conditions; weather condi ions; pavement
characteris ics or conditions; special events; traffic congestion; or travel ime.
Transfer. This Agreement, including all rights, obligations and representations may be transferred to8. another individual or single entity, provided the same transfer includes the simultaneous transfer of the
associated hardware in which the Software is installed, and further provided that such other individual
or single entity accepts all the terms of this Agreement. In the event such individual or single entity to
which the Software is transferred does not accept the terms of this agreement, then the License herein
automatically terminates. Further use of the Software is unauthorized and not permitted.
Governing Law. This Agreement shall be governed by he laws of he State of California, with out giving9. effect to its conflict of laws provisions.

16
Safety Information and Precautions
NAVIGATION
The Please Drive Safely screen is displayed each time the NavMate software is turned
ON as a reminder to make use of the system’s navigational aids in a safe manner.
Before using the NavMate software, read this entire manual. Make sure that you are
familiar with the system’s features and know how to operate the system. Proper use of
the NavMate software includes the following guidelines:
The NavMate software is not a substitute for your personal judgment. The route
suggestions should never supersede any local traffic regulation or your personal
judgment and /or knowledge of safe driving practices. Prior to completing any
maneuvers suggested by your NavMate software (for example, a U-turn or a left turn),
verify that you can legally and safely complete the maneuver. Do not follow route
suggestions if they direct you to perform an unsafe or illegal maneuver, would place
you in an unsafe situation, or would route you into an area that you consider unsafe.
Glance at the screen only when necessary and safe to do so. Let the computer voice
guide you. If prolonged viewing is necessary, pull off the road to a safe location.
Do not use the NavMate software to locate emergency services (such as police, fire
stations, hospitals, and clinics). The database may not include all emergency service
providers. Use your own best judgment and ask for directions in these situations.
If the vehicle is in motion, only a passenger should program the NavMate software.
The driver should not program the system unless the vehicle is parked in a safe
location.
The NavMate software’s map database provides information on suggested routes
without regard to factors that may affect your driving experience or the time required
to arrive at your destination. For example, the system does not reflect road detours,
closures or construction, some road characteristics (e.g., road surface, slope or grade,
weight or height restrictions, etc.), temporary traffic congestion, weather conditions,
and similar factors.
WARNING!
Please read and follow the following safety precautions.
Failure to follow the instructions below may increase your risk of
collision and personal injury.

17
Introduction to Your NavMate Software
NAVIGATION
NavMate software provides turn-by-turn visual and voice assistance to direct you to
your selected destination. The software quickly calculates step-by-step directions to
any destination available on the included navigation map.
The NavMate software uses Global Positioning System (GPS) satellites, and a digital
roadway map database to calculate and display travel directions. The system’s GPS
antenna receives signals from a constellation of 24 satellites orbiting the earth and
uses the strongest of signals, to determine your position to within meters.
Vehicle Position
The NavMate software’s computer considers vehicle speed and heading changes,
together with longitude and latitude information, to accurately determine vehicle
heading and position on a digital map.
Signals from GPS satellites are used to determine the vehicle location. Three (good)
or four (best) satellites must be received to accurately determine location. The GPS
reception status is indicated by the GPS symbol on the map.
Map and Information Database
The map database used by your NavMate software was created using high-resolution
aerial and land based data collection.
Car navigation maps are frequently updated. While the database was judged to be as
accurate as possible at the time of its release, a map database can never be 100%
accurate. Road information that is maintained in the map databases, such as turn
restrictions or road names may change over time.

18
NavMate Software Operation
NAVIGATION
Before operating your NavMate software, please carefully read and follow the instructions
provided in the “Safety Information and Precautions” section of this manual.
Start up/Main Menu
After the NavMate software starts, you
will see the reminder warning to use your
NavMate software safely and lawfully.
01
Warning Screen
Main Map Screen
Select Destination
You have many ways to select a destination.
For this example, let’s find a nearby Airport.
Select by touching screen:
●icon (F3) to activate main menu.
Start Route Guidance●Point of Interest●State/Province NOTE:● The software remembers the last State/Province,
so this step is not necessary every time.
By Category●Airport●Sort by Distance●Select one of these and the system will calculate a route to that destination●using the criteria set in the Setup menu.
02
Quick Start
Follow these four easy steps and you are on your way.

19
NAVIGATION
Map/Guide along Route
Proceed to the highlighted route and drive
while the NavMate software provides
audible and visual guidance to your
destination.
03
Arrive at Destination
That’s it! You’ve arrived at the selected
destination.
Refer to the rest of this manual to become
more familiar with the many options
available on your NavMate software.
04

20
Using Your NavMate Software
NAVIGATION
The best way to learn about this product is to explore it, while observing the safety
precautions discussed earlier.
Function Buttons
Exit from Navigation
Zoom in the map to show a smaller area
Zoom out the map to show a larger area
Return to Map mode
Center map on current vehicle location
Display menu, jump to main menu.
Display map in 3D view.
Display map in 2D view.
After panning map, select current panned position.
Select currently highlighted item.
Display spell mode.
Page up in displayed list.
Page down in displayed list.
Go back one step.
Repeat voice instruction.
Function Buttons
The buttons on the bottom of the display are called function buttons. These buttons
change labels and function depending on the screen displayed.
The list below provides a brief description of the function buttons.
Table of contents
Other Boyo GPS manuals