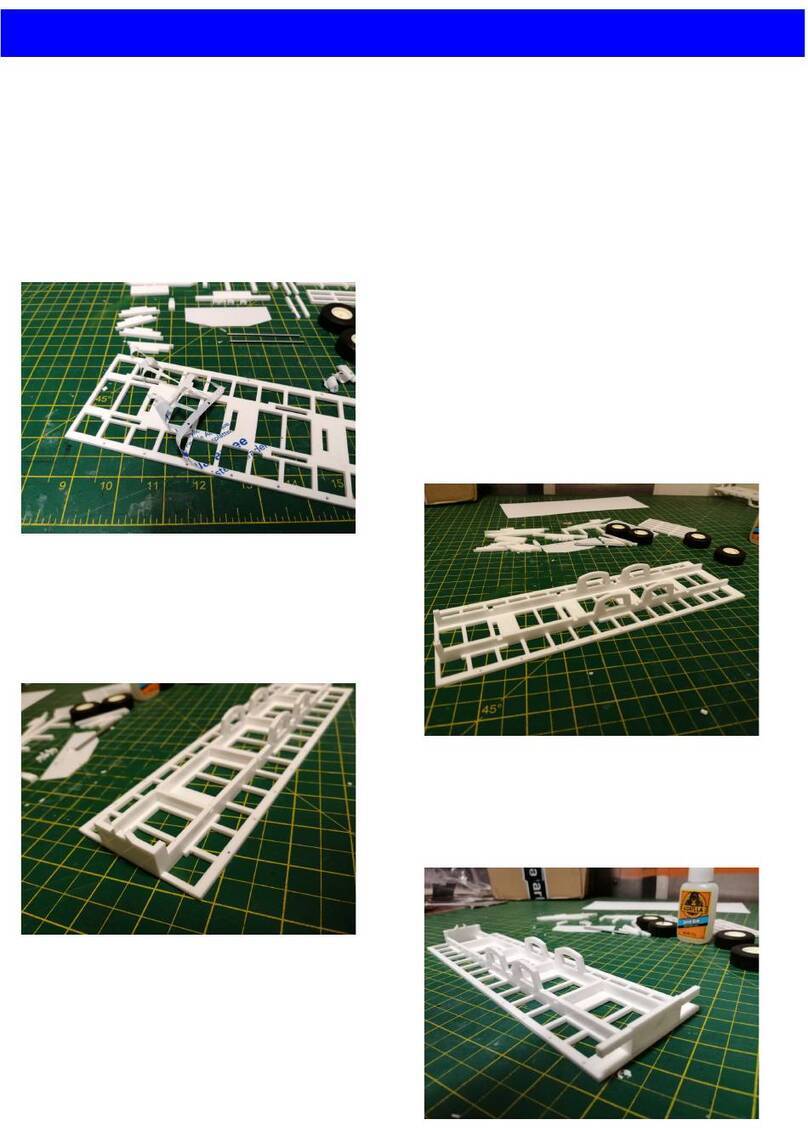
Braemere Models Littleborough Lancs Houghton Parkhouse Platinum Four Deck Livestock... User manual

Braemere Models Littleborough
Lancs
CLEAN ALL RESIN PARTS IN WARM SOAPY WATER
The silicone release agent used in the casng process will
react with paint, it must be thoroughly cleaned o before
painng.
1:32 Houghton Parkhouse Planum
Four Deck Livestock Trailer Model Kit
This is a rough guide to using the kit. Care should be taken at each stage to make sure the model is going together
correctly and any alteraons that are not in the instrucons should be carried out.
Glue: Recommended glue is a good quality super glue for acrylic and resin parts (white and cream plasc) and a
plasc solvent such as Plasc Weld or Revell Contacta Plasc Glue for ABS parts (black plasc).
Paint: The instrucons will suggest the best point to paint components. A good quality automove primer or plasc
primer followed by automove acrylic is recommended. Brands such as Hycote or Halfords are likely to be problem
free and provide a good nish to your model while being readily available.
Step 1: To start with I recommend cleaning
up the resin parts of the kit. This begins by
removing the ash and vents le over from
the casng process. To do this you can use a
strong sharp Stanley knife or a razor saw is a
safer opon. Sand the surface where the
vents where to a smooth nish.
Next wash the resin parts in a soluon of
warm water a washing up liquid or Ajax
scouring powder. Scrub them well to remove
the remnants of the silicone release agent
used in the casng process. This will prevent
any le over silicone reacng with the paint
you apply.

Braemere Models Littleborough
Lancs
Step 2: Remove the backing from any plasc parts. This is kept on to protect the material during laser cung but
needs removal. The black ABS parts have a paper backing on both sides, the white acrylic parts have a blue or white
plasc backing, To remove simply turn up an edge, you may nd a knife blade useful for this, and pull the material
away. Take care not to break or bend the plasc while you do this. Parcularly fragile parts like the vents.

Braemere Models Littleborough
Lancs
Step 3: To help with painng I recommending building all the external parts such as tool lockers and chassis sepa-
rately to the body. Most trailers are painted in two colours so doing this reduces the amount of painng required.
The crash barrier can be constructed rst using parts (15), the U shaped piece 85mmx15mm and 3x (16) *Don’t
worry about a,b,c derivaves of part (16) they're all the same size.
The crash barrier can be constructed rst using
parts (15), the U shaped piece 85mmx15mm and 3x
(16) *Don’t worry about a,b,c derivaves of part
(16) they're all the same size.
Glue the U shaped part to the front of Part 15. Ori-
entate the part by mounng the open end of the U
over the top of the engraved number 15.
Glue the three 16’s to the back of 15, the slots
should align providing a good t.

Braemere Models Littleborough
Lancs
Step 4: Collect the chassis parts 13a, 13b, 14a, 14b, 5x 18 (do not worry about leers a,b,c,d,e they're all the same
part and will t anywhere).
Glue 13a back to back with 14a. Glue
so that the engraved numbers both
face in and are hidden in the nal de-
sign. Repeat by gluing 13b to 14b.
Glue all 5 18’s into the slots in one
chassis rail.
Line up the other side of the 18’s with
the slots in the second chassis rail and
glue in place
Super glue the hatches to either side of the slurry tank on the
raised squares. Then super glue the slurry tank to the back of
the chassis. It will slot into the gap, the sloped end should
point to the rear of the chassis

Braemere Models Littleborough
Lancs
Step 5: Collect the mudguard parts. These are the 3mm White Acrylic Pieces. Take care when ng them together
as they will only t one way (le hand parts and right hand parts). Test t dry before applying glue.
Each long piece is marked L or R. The small squares t
into the slots. For the L side parts the engraved side of
the small squares should be on the right when viewed
from the front and vice versa for the R side.
Remove any plasc backing lm and lightly sand the
parts before construcon. 200-400 grit sand paper will
be adequate.
To construct super glue the top and boom to the two
middle squares simultaneously. You will not be able to t
squares one by one.
Then add the edge squares to make up the full construc-
on.

Braemere Models Littleborough
Lancs
Step 6: The last couple of chassis parts that require assembly. Tool locker and run up gates
Super glue the small resin side guard
to the side of the tool locker. If
mounng the tool locker on the le of
the trailer mount the side bar to the
right of the locker when viewed from
the front.
Super glue the Square tubing to the
ends of the run up gates. The tops of
the gates are where the larger spac-
ings are so make sure the tube is glued
at the higher end of each gate.
With the addion of the jack legs and bumper casngs this concludes the chassis parts of the kit, these can
now be set aside unl painng.

Braemere Models Littleborough
Lancs
Step 7: You can now move on to building up the body work. Take care as some thin parts are fragile. Check and dry
t parts as you go along to avoid mistakes.
For all black ABS parts I recommend
ang back both sides with some
300/400 grit sand paper. This will remove
the slightly raised edges caused by the
laser helping the glue adhere beer and
will also aid paint adhesion later
Start by gluing the large 0.5mm outer
pieces to their matching 1.5mm parts 11
and 12. Make sure the engraved detail is
on the outside. The two parts should line
up on their furthest edges (the edges of
the tabs).
Sand back all of the vent parts. There are
four vent types. Two short sets and two
longer sets. For each set there is a middle
and top parts. Middle parts have equal
extra material either side. Top parts have
a very narrow strip of material on one
side and a normal amount the other.
Glue the vents inplace where
they t. The top vents run along
the top with the narrow part at
the top and the wide part glued
to the body. In the event that a
vent has a gap make sure one
edge is glued rmly and the
other le loose. This provides a
stronger bond than lightly
gluing both edges. Repeat for
all vents on both trailer sides.
Glue generously as these vents
will become inaccessible if they
fall out later.

Braemere Models Littleborough
Lancs
Step 8: Next build up the rear of the trailer as shown in the steps below,
Sand down part 5 the rear of the trailer
You now need the single line vent piece, the white acrylic strip with 2x
2mm holes in and one of the two magnets. Glue the vent over the nar-
row gap in the top of 5 taking care not to clash with any of the tabs*.
glue the magnet centrally to the top of the large opening in 5 (UNLIKE
PHOTOGRPAHED I RECOMMEND GLUING THE MAGNET TO THE OTHER
SIDE TO GUARENTEE A CONECTION WITH THE MAGNET IN THE DOOR).
Glue the edge of the white acrylic centrally just above the magnet. The
holes should run in line with the edges of the opening.
*QUICK TIP
You may nd it easier to remove some material from
the single vent to stop it clashing with the tabs while
sll ng centrally in the opening.

Braemere Models Littleborough
Lancs
Step 9: The next step is to build up the body work into a box shape using parts 2, 3, 4, 5 and 8.
Glue the central support parts in place
lined up with the slots. They will only
t one way so they can’t be ed up-
side down. The order from the rear is 5
(rear door with parts glued on in last
step), 4 (has engraved door detail
poinng to rear), 3 and 2 (both blank).
Glue 8 the oor into place lined up
with each slot. This can be ed either
way depending on which side you
want the tool box. Tool box on the le
then the two small slots should be on
the le and the three small slots on
the right.
Glue the other side piece in place lin-
ing up with all the slots. Glue rmly
checking that the trailer remains
square.

Braemere Models Littleborough
Lancs
Step 10: The front of the body and the inner roof can now be ed.
To build up the front of the trailer glue the short oor piece 9 to the step framed secon. Then glue the front 1
to the front of the trailer slong into 9 and the two large side pieces. At this point you need to make sure all
the vents are securely xed in place as you will not be able to access them from this point forward.
The inner roof piece 10 can now be ed into place. Gently ease it into place so that it ts into all the slots and
behind all the top vents. Glue into place. Once in place trim or sand any vent pieces level with the top of the
roof so there are no protrusions.
The large blank outer roof piece can now be ed . The piece should t ush on both long slides and ush with
the front of the trailer. It should over hang the back of the trailer.

Braemere Models Littleborough
Lancs
Step 11: The rear door details can now be applied to the trailer using the rest of the white acrylic parts.
Start with the two long narrow 3mm
parts with slanted ends, glue these to
the edges of the back with the at part
at the top and the slant running into
the trailer.
Super Glue the other narrow 3mm part
to the top between the two parts just
ed where the roof over hangs.
Super Glue the narrow 2mm piece to
the back just above the door opening
in line with the engraved line.
Super Glue the two complex shaped
2mm parts to the boom. The hole
should be at the boom and the slant
will line up with the 3mm parts.
The two small 6mm squares with 2mm
holes are glued to the boom of the
oor above the exisng holes. You may
need to sand some material away to
get a good t.

Braemere Models Littleborough
Lancs
Step 12: The last few addions before painng are the kingpin and bulkhead
Super glue the large 2mm kingpin plate
to the oor of the step frame secon.
Glue centrally along the length of the
trailer. Glue in a posion that best
suits mounng to your chosen truck.
The 2mm plasc rod can be glued now
or glued in the most suitable hole later
aer painng.
Super glue the large resin bulk head to
the front of the trailer (1). Sand the
back down smooth to provide the best
t. You may wish to sand down the
sharp corners of the top of the trailer
to meet the chamfered edge of the
bulkhead like on the real vehicle.

Braemere Models Littleborough
Lancs
Step 13: The parts are now all ready to paint. The best recommendaon for painng is to make sure everything is
aed back to provide a good keyway for the paint to adhere, 400 grit or greater is best for this. Use a good quality
automove primer, a specic plasc primer is likely to adhere beer than standard primer, though either can work.
Follow this up with a good quality modelling or automove paint, checking it is suitable for use with the primer you
have used. Apply any decals and then nish with a clear coat/varnish .
Painng should be done the way you see t as each colour scheme will dier. However as a p to help paint the
interior at the rear I would spray paint it with an aluminium colour, let it set, then mask the inside of the vents and
the door way. Then apply your exterior paint.
Glue

Braemere Models Littleborough
Lancs
Step 14: Allow plenty of me for the paint to set before nal assembly. I’d recommend applying any decals and a
clear coat over them before commencing nal assembly. While the kit doesn’t include decals they are easy to make
at home, a quick search on YouTube for ‘how to make water slide decals model cars’ will give plenty of videos
showing the process.
Final assembly involves gluing the chassis to the body, it should t in the slots running down the centre of the orr,
some sanding may be required to remove excess paint and allow tment. The crash bar also slots into place. The
mudguards should be rmly glued with the small indents lining up with the holes in the chassis for the axle. The
tool box glues in front of the mudguards and the two jack legs glue to the front of the chassis as pictured. The
wheel require painng and should then slot straight onto the 2mm steel bar axles, they can be glued for extra
strength in staying xed to the axle.
Ensure in line

Braemere Models Littleborough
Lancs
Step 15: Assembly connues with the rear door. First the gates are ed in place, slot one of the 2mm plasc rods
into the boom hole just under the door, then thread a gate onto it, before slong the rod into the hole just
above the door. Glue the rod in place and repeat with the other side. Next glue the door in place by oering it up
to the hinge and slong two bits of 1mm rod into either hole, the holes may require some cleaning out of paint
debris. Once set trim the rods ush with the hinge.

Braemere Models Littleborough
Lancs
Step 16: With that your model is complete bar any nal details you may wish to add such as mudguards, picking
out details such as the front lights and any addional extras. This instrucon manual is of course just a guide and
there are many ways to construct the model. The model is designed so that modicaons such as internal oors or
even working liing decks can be added without too much complicaon. Now sit back and enjoy the model you
have created!
Other Braemere Models Toy manuals
Popular Toy manuals by other brands
Hot Wheels
Hot Wheels DINE & DASH instructions

KNEX
KNEX MARIOKART TOAD 38719 quick start guide

Sky Master
Sky Master ARF PRO F-100F Assembly and operation manual
ThinkGizmos
ThinkGizmos TG632 Ingenious Machines Assembly guide

V-tech
V-tech 3-in-1 Musical Band user manual

Hot Wheels
Hot Wheels Triple Track Twister instructions
V-tech
V-tech V.Smile: Thomas & Friends Engines Working... user manual

Speed Link
Speed Link RACING SPHERES COMPETITION SET user guide
Fly Sky
Fly Sky FS-CT6 (A/B) user manual
Stevens Aero Model
Stevens Aero Model Build It! RingRat 250 Assembly instructions
protech
protech T0392 Formula FLyer instruction manual
Techone
Techone Paiget II user manual

