Brailletec Eurotype User manual

Blista-Brailletec gGmbH
Tom-Mutters-Str. 11
D - 35041 Marburg - Germany
Tel. +4 -(0)6421-8020 Fax +4 -(0)6421-80214
e-mail: [email protected]
Internet: www.brailletec.de
E U R O T Y P E
mechanical braille writer
Operating manual
Mai 2017
050517
Note taking • Writing • Printing in Braille. If it’s Braille...ask BRAILLETEC
VW-7 030
Manual Eurotype
Braille & Inc

2 / 10

Contents
Page
1. Prefa e 4
2. General Information 4
Included in delivery 4
Technical data 5
Orientation drawing 6
3. Ma hine Des ription 7
Carrying handle 7
Keyboard 7
Margin stops 7
Orientation scale 7
Embossing head 7
Platen knobs 8
Reading platform 8
Pressure roller 8
Paper chanal 8
Warning bell 8
4. Working with the Eurotype 8
Inserting the paper 8
Removing the paper
Paper movement lock at the end of the sheet
Key lock at the end of the line
Writing on Dymo band
Setting margins
Margin release
Embossing head release / return 10
Important notice 10
3 / 10

Prefa e
Congratulations on your choice!
We are certain you will enjoy your new Eurotype very much. The Eurotype is a
modern, quiet mechanical braille writer. It is easy to carry due to its housing-in-
tegrated handle. The paper channel system provided on the machine allows you
to write on both single sheet paper DIN A4 and DIN A3 and fanfold paper. For
special features and instructions for use, please refer to the following sections.
1. General information
In luded in delivery
The following parts are included in delivery.
1 Eurotype braille writer
2 Dymo clips
1 Anti dust plastic cover
1 Manual in ink
1 Manual in braille
The following accessories are available on request
Carrying case
Carrying bag
Machine pad
Braille paper DIN A4 and DIN A3
Fan fold paper
Plasticfilm
Plastic labelling tape
4 / 10

Te hni al data
Embossing format
Vertical dot spacing 2,5 mm
Horizontal dot spacing 2,5 mm
Cell spacing 6,0 mm
Line spacing 10 mm
Paper width max. 300 mm
Paper length unlimited
Cells per line max. 44
Paper thickness max. 180 g/m²
Weights
Machine 4,6 kg
Case 2,3 kg
Bag 0,7 kg
Keyboard
6 Braille keys
1 Space bar (can be recessed for transport)
1 Line movement key
1 Margin release key
1 Back space key
1 Warring bell key
Fun tions
Left and right margin stops adjustable
Key lock at the end of sheet / line (can be released)
Additional Features
Device for writing on Dymo band
Warning bell disengageable
Machine-integrated reading platform
Machine-integrated carrying handle
5 / 10
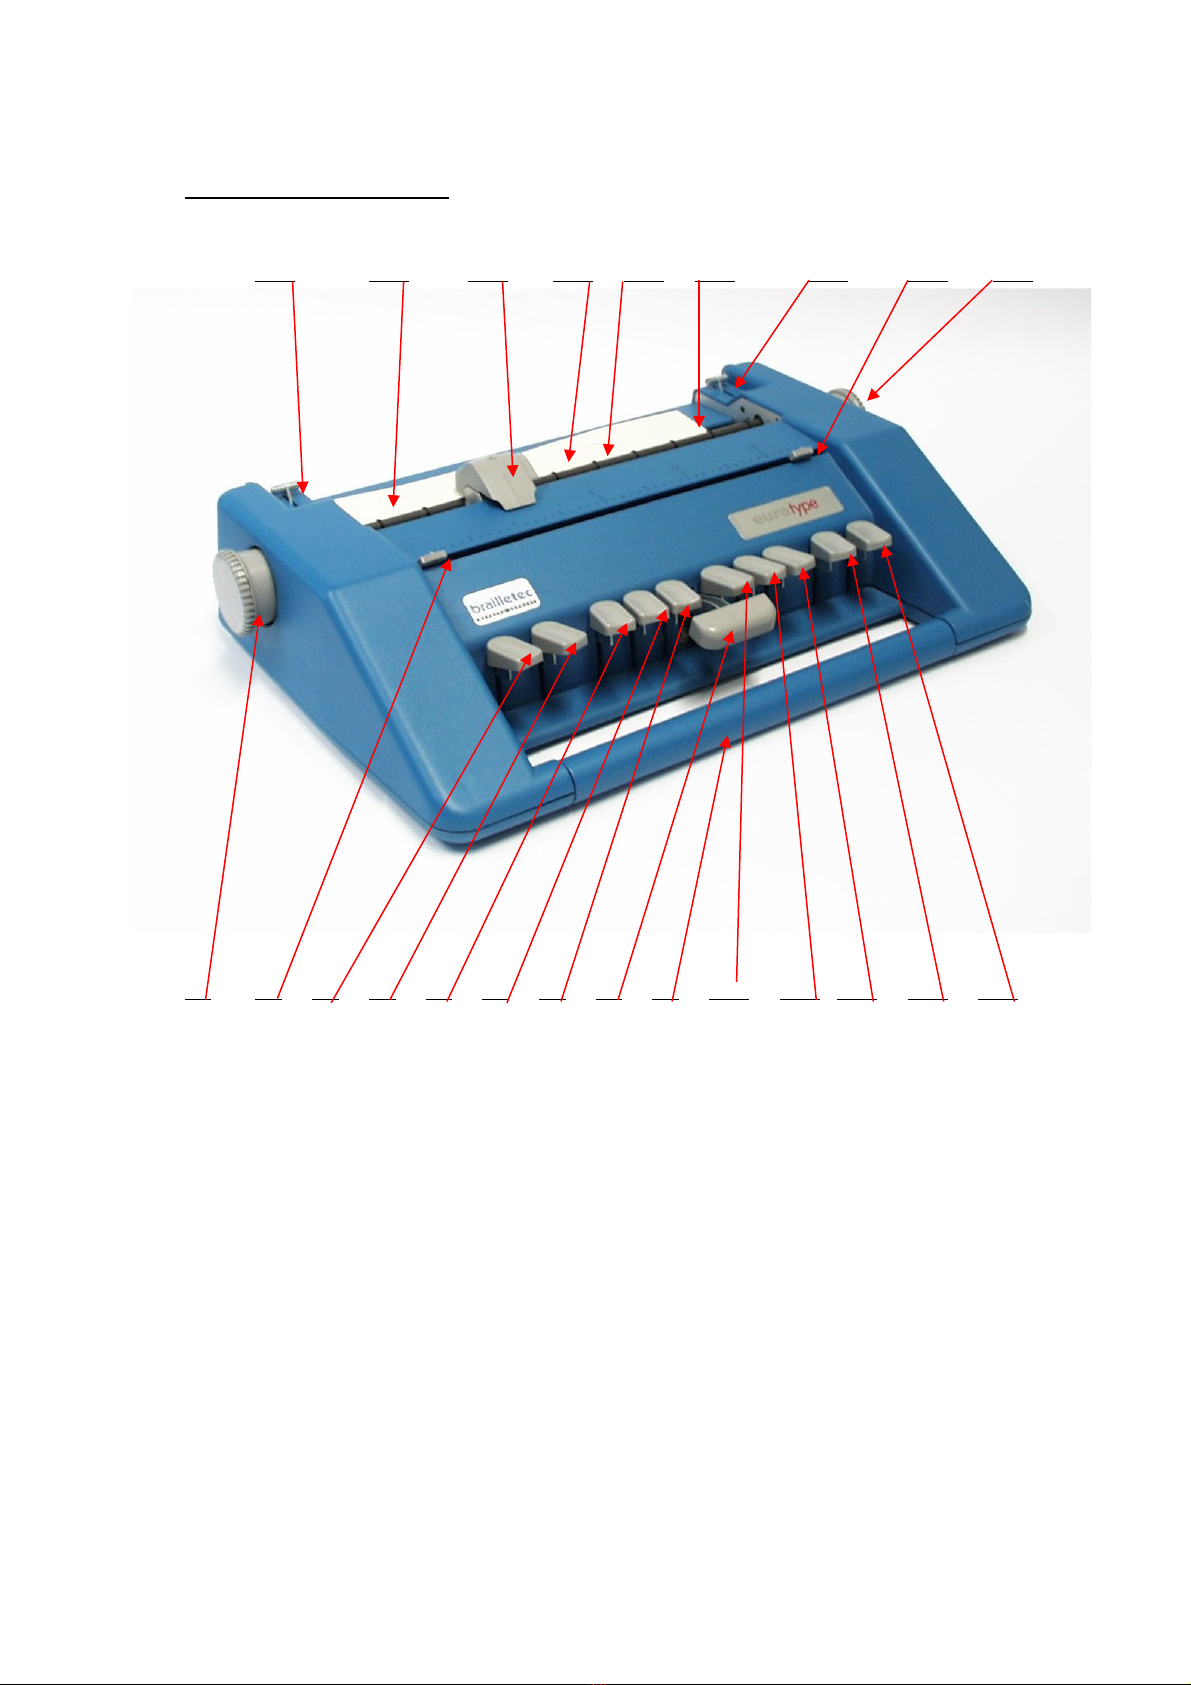
Orientation drawing
23 22 21 20 19 18 17 16 15
1 2 3 4 5 6 7 8 9 10 11 12 13 14
1 Left platen knob 13 Back spacer
2 Left margin stop 14 Warning bell on / off
3 Margin release key 15 Right platen knob
4 Line movement key 16 Right margin stop
5 Key for dot 3 17 Right paper release lever
6 Key for dot 2 18 Right Dymo band clip
7 Key for dot 1 1 Reading platform
8 Space bar 20 Embossing head release
Carrying handle 21 Embossing head
10 Key for dot 4 22 Left Dymo band clip
11 Key for dot 5 23 Left paper release lever
12 Key for dot 6
6 / 10

2. Ma hine des ription
Place your Eurotype in front of you in operating position and explore its different
components. Pull the space bar (8) towards you first (the middle wide key ) other-
wise the keyboard will remain locked. The various operating elements will be de-
scribed in the following from the front to the rear.
Carrying handle
The carrying handle ( ) is rigidly mounted on the housing in front of the key-
board. The Elotype can be transported in a convenient manner.
Keyboard
The Eurotype has 11 keys. The middle one (8), is used for writing blanks (re-
cessed for transportation). On the left and right side of this key are located three
keys for writing 6-dot braille (5), (6), (7) and (10), (11), (12). The line movement
key (4) is located at the left of the key for braille dot 3, followed by the margin re -
lease key (3), which allows both to temporarily write outside the area between
the margin stops or unlock the line movement key at the end of the sheet. The
back spacer key (13) is found at the right of the key for braille dot 6 followed by
the key (14) to turn the warning bell on / off.
Margin stops
The margin stops (2), (16) are located in a slot behind the keyboard. While de-
pressed, they can easily be moved and adjusted to any desired position.
Orientaton s ale
It is located directly behind the margin stops. Each dot indicates one position in
the line. Each fifth position is marked with two dots above one another and each
tenth position is shown by three dots above one another. The letters above indic-
ates the value of the tenner positions (a stands for position 10, b for position 20,
etc.).
Embossing head
The embossing head (21) is located behind the orientation scale. The narrow end
of the embossing head is located over the paper and indicates the position in
which will be embossed the next character. There are two markings at the left
and the right side of this tip used as an orientation aid to show the position of em-
bossed dots 2 and 5. The wide end points to the orientation scale. The raised
part in the middle shows the exact position. The embossing head release push-
button (20) is located on the right in the embossing head.
7 / 10

Platen knobs
There are two platen knobs (1) and (15) located at the left and right ends of the
machine each, approx. at the height of the embossing head (21). These are used
to move the paper one or more lines back or forwards.
Reading platform
The horizontal area of the reading platform (1 ) starts behind the embossing
head. It offers large space enough for reading fife lines of braille. You will find two
holes (18) on the left and two other ones (22) on the right side located in the
reading platform. These are used to fix the Dymo clips.
Pressure Roller
There are two levers (17) and (23) on the left and right ends, beside the reading
platform, which are used to lift or lower the pressure roller. To release the paper,
pull one of the levers to the front towards the keyboard. Pulling one of the levers
will automatically move the other one in the same direction.
Paper hannel
The chute for inserting the paper is found at the bottom of the machine rear.
Warning bell
The warning bell sound 6 cells before reaching the right margin stop set. The bell
may be turned off by depressing the key (14) located at the extreme right end.
This key will remain depressed. To activate the bell again, simply disengage this
key by pulling it up.
3. Working with the Eurotype
Inserting the paper
There are two possibilities for inserting the paper:
1. from the bottom through the paper channel on the rear end of the housing
2. from the top between the embossing head and the carriage
Lift the pressure roller by means of the paper release levers (17) or (23). Insert
the paper left adjusted with two hands at the same time in the paper channel
from machine rear until it appears under the embossing head or insert it in the
machine from top between the narrow end of the embossing head and the car-
riage. Now pull the paper until it reaches the rear end of the reading platform and
align it with the edge and the left side part. Push the paper release levers away
from you to fasten the paper. Turn back the paper using the platen knob until the
top edge of the sheet reaches the narrow end of the embossing head.
8 / 10

Removing the paper
The paper may at any time be removed from the machine. To this end, lift the pa-
per release levers (17) or (23) and pull the paper by two hands over the reading
platform to remove it from the machine.
Line movement lo k at the end of the sheet
The line movement key (4) will be locked one or two lines before reaching the
end of the sheet, depending on how accurately the paper has been inserted. To
unlock the paper feed, keep the margin release key (3) depressed or the margin
stop (2) or (16) pressed towards the orientation scale and press the line move-
ment key. Repeating the above described procedure will eject the paper sheet.
Key lo k at the end of the line
When reaching the right margin stop (16) the keyboard will be locked after the
last cell has been written. This will prevent from overwriting the last character
written.
Writing on Dymo band
The use of Dymo band is very simple. First move the embossing head (21) to po-
sition 20, then the left margin stop (2) to position 8 and the right (16) to position
38. Insert the enclosed clips in the holes (18) and (22) located in the reading plat-
form and secure towards the keyboard. Now you can clip the Dymo band using
the two clips. Move the embossing head to the left margin stop and start with
writing.
Setting margins
The position of the margin is shown by the marking on the margin stop pointing
to the orientation scale. To change the margin, depress the appropriate margin
stop slightly and move it to the desired position until it is felt to „catch“ in place.
Make sure that the embossing head (21) is not located between the old and new
position of the margin, since the margin stop cannot be moved beyond the posi-
tion of the embossing head. Therefore move the embossing head out of this
area.
Margin release
The margin set may be crossed in the two directions by pressing the margin re-
lease key (3) or by pressing the margin stops (2) and (16) towards the orientation
scale.
9 / 10

Embossing head release / return
The embossing head (21) may easily be moved back or forewards several posi-
tions. Take the embossing head between the thumb and the index and press the
push-button (20) for the embossing head release into the right side of the em-
bossing head. This will allow you now to move the embossing head easily over
the paper to the desired position.
Important:
Remember again that the Eurotype will only work properly, after the paper has
been inserted, if:
1. the paper is left adjusted
2. the pressure roller is lowered
3. the space bar, that has been pushed in for transportation is pulled out
Noti e
During transport, please move the embossing head all the way to the right bey-
ond the margin until it won't go any further.
10 / 10
Table of contents


