Brama Brama ID Touch User manual

User Guide
Brama ID Touch
Document Version: 1.0

Brama ID Touch User Guide
© Interlink-U, 2021 Page 2 of 26
1. Introduction – About the Brama Devices
Brama Devices are the first dedicated lone worker device to support Indoor Location and Risk
Messaging (automatic or manually delivered notifications directed to a user’s device). The
Brama Device is specifically designed as an personal device which is easy to use and discreet
to carry. Containing mobile-phone (4G/LTE) technology, the device enables a 24/7 link to a
dedicated, state of the art Alarm Receiving Centre (ARC) (or Monitoring Center) in the event a
lone worker requires assistance.
1.1 About this Guide
At the push of a button, a trained ARC/Monitoring Center Operator is listening a potentially
abusive or violent situation on your behalf and recording for future use if necessary (as
potentially admissible evidence in court proceedings etc). The event handler will then escalate
the situation in line with what is an appropriate response - including alerting the Emergency
Services through the appropriate channels.
This user guide provides all the information you need to set up, operate and take care of your
Brama Device.
This document details:
Brama ID Touch Layout and key functions
Initial Set Up, Care & Maintenance
How to Use ID Touch
Technical Specifications
Warranty

Brama ID Touch User Guide
© Interlink-U, 2021 Page 3 of 26
2. Brama Device Layout and Key Functions
2.1 Brama Device Layout
Figure 1: Brama ID Touch Main Functions
2.2 Key Functions
2.2.1 Device Check
This function allows you to check status of the Battery, Signal, GNSS (Global Navigation Satellite
System), Wifi, and Bluetooth on your Brama Device and can be done at any time throughout your
working day.
2.2.2 Status Check
This function allows you to leave a brief voice message before you begin each visit, or each time you
move location by detailing where you are and for how long.
2.2.3 Red Alert
This function allows lone workers to discreetly raise an Alarm to a dedicated Alarm Receiving
Centre/Monitoring Center whenever they feel vulnerable or threatened. This will be an audio call (via
VoIP on LTE) activated by the device, to an ARC.
Speaker
Touch Screen
Menu & Alerts
Physical ‘Red Alert’
button
Rip Pin Socket
Rip Pin Socket
Status Bar

Brama ID Touch User Guide
© Interlink-U, 2021 Page 4 of 26
2.2.4 Incapacitation Alarm
This function can automatically initiate an alarm if your Brama Device detects you have become
incapacitated.
The Incapacitation Alarm is not active by default. An Brama Device user determines when, (and for
how long) incapacitation detection is enabled. Once the specified time elapses, incapacitation
detection is inactive once more.
2.2.5 Risk Messaging
The Risk Messaging functionality on Brama Device allows a lone worker to be notified of
useful or pertinent information based on their location.
The function can be enabled automatically by pre-defined message settings which are linked
to the breaching of a Geofence. For customers, this is driven by a pre-defined schedule in
the software management platform to reflect a worker’s calendar or delivered directly by a
lone worker’s manager –again through the software management platform.
2.2.6 GNSS (Global Navigation Satellite System)
This function can assist the ARC in the event of a Red Alert and is used in conjunction with your
Status Check Voice message to assist in determining your Location.
2.2.7 Rip Pin
This function allows a lanyard to be connected to the device. In the event that the lanyard is
removed, a Red Alert is automatically raised.

Brama ID Touch User Guide
© Interlink-U, 2021 Page 5 of 26
3. Initial Set Up and Care and Maintenance
3.1 Initial Set Up
3.1.1 What’s included
The box containing your Brama Device includes the following items:
•Brama ID Touch device
•Charger and cable (including adapter for your region)
3.1.2 Initial Charge of your Brama Device
Your Brama Device must be fully charged before you attempt to use it; this conditions the battery fully.
We recommend leaving the device on charge for a minimum of 2-3 hours the first time you charge it,
and that it is only charged using the supplied charger.
3.2 Care and Maintenance
Brama Devices are purposely designed so that you do not need to perform any routine maintenance.
However, you should note the following points about cleaning and general care.
3.2.1 Cleaning
Use a damp cloth (not wet) to remove any dirt from your Brama Device. Be very careful not to allow
water into the unit.
Ensure the cloth is clean from grit or dirt when cleaning the camera lens as this could scratch the device
lens.
Do not use any alcohol or chemical cleaning agents of any type.
3.2.2 Moisture Resistance
Brama Device is water resistant and can survive short lengths of submersion in shallow depths of
water, less than 1m.
3.2.3 Impact Damage
Brama Devices are made from a tough ABS plastic case. It is designed to resist a certain amount of
damage typical with general use, but the device will not withstand heavy impacts.

Brama ID Touch User Guide
© Interlink-U, 2021 Page 6 of 26
The touch screen is manufactured from toughened glass but should not be exposed to high force
pressure and heavy impacts.

Brama ID Touch User Guide
© Interlink-U, 2021 Page 7 of 26
4. How to Use your Brama Device
4.1 Functionality
4.1.1 Charging & Powering your Device
You should ensure that your Brama Device is fully charged before use.
We recommend leaving the device on charge for a minimum of 3 hours per day or at the end of each
shift using the supplied charger. Aside from the Incapacitation Alarm, the Alert functions of your Brama
Device can still be used while the device is on charge.
Brama Devices are
charged via a USB-Type C
connection.
When your Brama Device is connected to the charger, the Battery Symbol on the display will reflect
this. As the battery charges, the battery symbol shows more cells.
When you place your device onto charge, or remove it, the screen will “wake up” to indicate the
change. If you put the device on charge while it is powered off, it will display a charging screen, which
disappears once the device is removed from charge.
Figure 2: Charging your Brama Device

Brama ID Touch User Guide
© Interlink-U, 2021 Page 8 of 26
Powering your Brama Device on and off
Checking if Brama Device is already turned on:
First check if your Brama Device is on; this is
done by completing a single, quick button press
to the physical power button (do not push and
hold this button).
If the device is turned on, this action will serve
to wake the device and the screen will
illuminate.
If you push the same button a second time, the
display will return to its previous state and the
device will remain on.
Figure 8: Checking whether Brama Device is on or off
If you perform the above, and the device does not wake, assume the device is turned off.

Brama ID Touch User Guide
© Interlink-U, 2021 Page 9 of 26
Powering on the Brama Device:
Figure 9: Power your Brama Device On
When your Brama Device is on, it registers with the cellular network and is ready to communicate to
the Alarm Receiving Centre/Monitoring Center.
Power Off Brama Devices:
Press and hold the button shown to
power the device on.
You will feel a single vibration.
The LCD on the your device will show
the startup splash-screen as the
device begins to boot up.
Once completed, the home screen
will be displayed. Typically, this
sequence should take no longer than
60 seconds.
Press and hold the button as shown
(for 2 seconds) to power off the
device.
You will feel two vibrations.

Brama ID Touch User Guide
© Interlink-U, 2021 Page 10 of 26
Figure 10:Power off your Brama Device
Please note that the Brama Device has a built-in safe shutdown process whereby if the battery level
reaches “critical”levels (~1%) the Brama Device will safely power down.
4.1.2 Alerts and Alarms
You can use the Device Check function on Brama Device to get visual feedback on several things
including:
•Battery life
•Geolocation
•Mobile Signal strength
You can get a snapshot of your device
functionality by viewing the status bar on
Brama Device.
The screen on your device will go
blank, and the device will be off.

Brama ID Touch User Guide
© Interlink-U, 2021 Page 11 of 26
To view details regarding device status,
the ‘Device Status’ icon can be selected
and pressed.
This will take you through to the ‘Device
Status’ screen where you can access the
latest device information.
Figure 3: Brama Device - Device Status
Check In
A Check In is a short voice message to our ARC which is then saved and listened to in the event of a
Red Alert. Relevant information informing an escalation process should be left here –including the
outlining of any risks faced.
On the Brama Device’s home screen, push the
‘Check In’ icon highlighted to enter the correct
menu.
Then swipe the icon on the menu-bar from left
to right to start the process of leaving the alert.
You will feel three single vibrations on the device
and a timer will become visible.
This is the point at which a user’s message
should commence. The timer will count down
Brama ID Touch User Guide
© Interlink-U, 2021 Page 12 of 26
from 20 to 0, at which point the message
recording had finished.
The device will then vibrate twice to confirm
completion of the ‘Check In’.
Figure 4: Brama Device Check In
**When you begin a Check In, the device attempts to dial to allow your voice message to be left. If the
voice call cannot be connected, it will retry several times. If your call fails to connect after this process,
then your Brama Device will let you know by giving one long vibration.
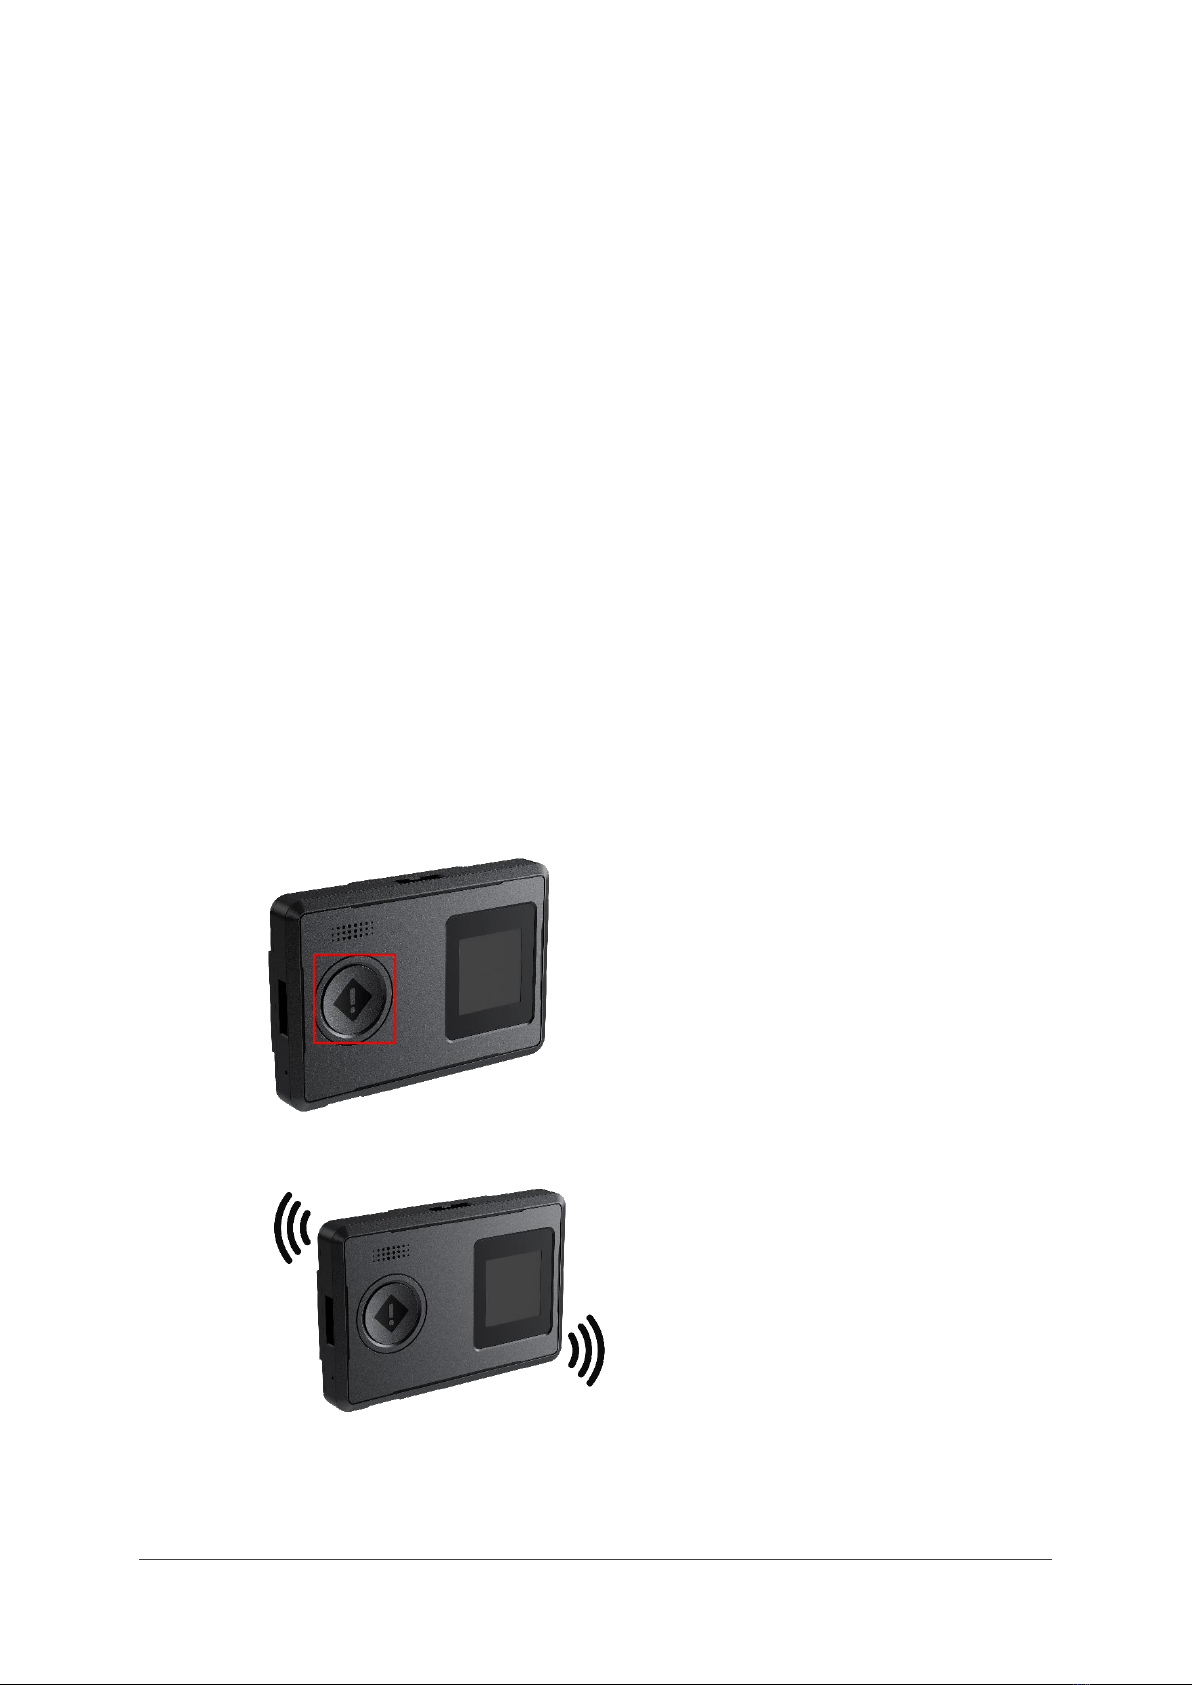
Red Alert
On the Brama Device, a Red Alert is an alarm call through to the Alarm Receiving Centre, available to
a device user on a 24/7 basis.
A ‘Red Alert’ can be raised several ways:
Via the ‘Red Alert’ button:
By pressing and holding the ‘Red Alert’ on
the device. This can be done discreetly
and without breaking eye-contact.
Once a call is live, you will feel three short
vibrations.
You will then feel a ‘heartbeat’ vibration
every ten seconds, to reassure you that
the ARC Operator is listening on your
behalf.
This applies regardless of how a ‘Red
Alert’ has been activated.

Brama ID Touch User Guide
© Interlink-U, 2021 Page 13 of 26
When in an area of no cellular coverage
you will feel a single, long vibration rather
than three short vibrations. This long
vibration indicates that your ‘Red Alert’
call has not successfully connected. This
applies regardless of how a ‘Red Alert’ has
been activated.
Figure 5: Brama Device Red Alert via button press
Via the touch-screen interface:
First wake the device-screen with a single
press to the power button.
Then select the ‘Red Alert’ icon on the
device homepage to enter the correct
menu.
Then swipe the icon from left to right. The
screen will go blank as soon as a Red Alert
is started.
The red bar, phone icon and call timer on
the screen indicate that the ‘Red Alert’ is
now live.

Brama ID Touch User Guide
© Interlink-U, 2021 Page 14 of 26
Figure 6: Brama Device Red Alert via device interface
Incapacitation Alarm
Brama Devices detect a fall or substantial impact followed by non-movement. Typically, a significant
shock occurs followed by motionless for a period of 30 seconds (standard configuration), the unit will
enter a pre-alarm phase and start to vibrate in order to make the user aware the device is going to
alarm if left unchecked. If the device is not moved for a further 30 seconds, then it will automatically
raise an Incapacitation Alarm and contact our ARC.
When an Incapacitation Alarm is started, your Brama Device gives three short bursts of vibration to
confirm the state; and then opens a voice call to the ARC and enables the microphone, so that an ARC
Operator can listen to and record the situation.
During an active Incapacitation Alarm, your device will periodically vibrate like a heartbeat; this is to
provide reassurance that the call is active and open, and that someone is listening to and recording
events.
If an Incapacitation call is closed accidentally then your device allows an ARC Operators to dial back
into your device discreetly, you will feel 5 short buzzes. This gives reassurance that the incapacitation
situation is again being monitored.
Activating Incapacitation Alarm
The Incapacitation Alarm is not active by default on the Brama Device. A user is required to manually
activate a timer at the beginning of a period for however long they will be working where a risk of
incapacitation is present (can be activated for a minimum of 15 minutes, and up to a maximum of 8
hours). This is done as follows:
Select the Incapacitation Alarm icon
from page 1 of the device's interface.

Brama ID Touch User Guide
© Interlink-U, 2021 Page 15 of 26
Here you select the Incapacitation
Timer icon (as highlighted).
On the screen that follows you use
the slider (as highlighted) to select
the length of time during which a risk
of Incapacitation is present.
You must then select stopwatch
timer icon to activate the timer.
Once the timer is active you will see
the icon highlighted in the sidebar.
To cancel or adjust the remaining
time, you most once again visit the
Timer screen (as detailed above).

Brama ID Touch User Guide
© Interlink-U, 2021 Page 16 of 26
Figure 7: Brama Device Incapacitation Alarm activation
Incapacitation detection is always disabled when the unit is on charge or switched off.
When there is a minute left on your
timer the device will enter an Alert-
Expiry phase during which it notifies
you (as highlighted, and by vibrating 4
times) of imminent timer expiry.
When the Timer expires (or is
ended/cancelled) the device will give
2 long vibrations, and the Timer icon
will disappear.
The Incapacitation Alarm is cancelled
by sliding the Incapacitation slider
(as shown) back to the left.
You can also manually activate an
Incapacitation Alarm by sliding the
Incapacitation slider (as shown) to
the right.
If your device recognizes
Incapacitation while the Timer is
active, it will raise an Alert into our
ARC, when an operator will begin
attempting to establish the degree of
assistance you require.

Brama ID Touch User Guide
© Interlink-U, 2021 Page 17 of 26
*Check with your Employer or your Account Manager as to whether you have this feature available to
you.
Rip Pin
The Rip Pin functionality provides an additional mechanism of raising a Red Alert.
The Rip Pin is connected to a lanyard which is then worn around the user’s neck. In the event a device
is snatched from the neck, this will detach the lanyard from the device and pull the Rip Pin from the
socket.
When the Rip Pin is detached from the socket, then the device will automatically raise a Red Alert.
Closing your Red Alert or Incapacitation Alarm
Once you feel that your situation no longer needs monitoring, you can close an alert down.
If your Red Alert activation was raised by the Rip Alarm, you must first re-insert the lanyard plug.
The Red Alert & Incapacitation Alarm call can only be closed by you. After you feel a set of 2 vibrations
or 3 vibrations, press and hold the Red Alert button for 1.5 seconds, you will feel 2 longer vibrations.
The Red Alert is now closed.
4.1.3 Location
The Brama Device comes equipped with multiple means by which a device user can be located should
the require assistance. The Brama Device sends a periodic device status message to the software
management platform, typically on 15-minute intervals. When an Alert is activated, the interval
between device status updates reduces, typically to 30 seconds. This allows the ARC operators to
confirm a device user’s location with relative accuracy should they need assistance. These functions
are described below.
GNSS (Global Navigation Satellite System)
GNSS requires a clear line of site to the sky, not obstructed by buildings or other obstacles. The GNSS
location operation will not work whilst the unit is indoors.
The GNSS technology within the Brama Device means
•GPS (United States)
•GLONASS (Russia)
•Galileo (European Union)

Brama ID Touch User Guide
© Interlink-U, 2021 Page 18 of 26
•Beidou (China)
As standard the Brama Device will come with the combination of GPS and GLONASSactivated, however
as the device supports the above, alternative combination cans be configured with agreement from
your Account Manager.
Wifi/Cell Towers
Brama Devices report all local Wireless Access Point & Cell Tower information (without connecting to
the networks themselves) to the ARC. This information can then be uses in the event of an Alert being
raised in order to locate the user should GNSS or other services not provide a location due to a lack of
coverage.
4.2 Brama Device Key Indicators
4.2.1 Icons
The following table summarizes the icons on your Brama Device screen.
Function
Symbol
Meaning
Battery Symbol
(Charging)
Device is on charge and the
battery level is between 0%
- 20%
Device is on charge and the
battery level is between
20% - 40%
Device is on charge and the
battery level is between
40% - 60%
Device is on charge and the
battery level is between
60% - 80%
Device is on charge and the
battery level is 100%
Device has been placed on
charge using incompatible
cable/charger
Battery Symbol
(Off Charge)
Battery condition good
(>75%)

Brama ID Touch User Guide
© Interlink-U, 2021 Page 19 of 26
Function
Symbol
Meaning
Battery condition normal
(<75%)
Battery condition low
(<35%)
Battery condition poor (<1
hour)
Battery condition critical
(<15 mins)
Cellular Signal
Signal quality strong
Signal quality good
Signal quality medium
Signal quality low
Signal quality –none or
critical
Sidebar Icons
A Check In is in progress
A Red Alert is in progress
GNSS Signal
Searching for a valid GNSS
location fix - low
Searching for a valid GNSS
location fix - medium
Searching for a valid GNSS
location fix - high
Table 1: Device Interface Icons
4.2.2 Vibration Patterns
The following table summarizes the standard vibration indications given by your Brama Device.
Brama Device Action
Vibration Pattern
Device is turned on
1 short vibration
Device is turned off
2 short vibrations
Check In is activated
3 long vibrations

Brama ID Touch User Guide
© Interlink-U, 2021 Page 20 of 26
Check In message recording begins
1 short vibration
Check In call is in progress
1 short vibration every 10secs
Check In call is ended
2 long vibrations
Incapacitation Timer Pre-Alert is activated
4 short vibrations
Incapacitation Timer ends
1 long vibration
Incapacitation Alarm is activated
3 short vibrations
Incapacitation Alarm call is connected
3 short vibrations every 10secs
Incapacitation Alarm call is ended (or cancelled)
2 long vibrations
Incoming call is made to the device
4 short vibrations
Incoming call to device is answered
1 short vibration every 10secs
Red Alert is activated
3 short vibrations
Red Alert call is connected
2 short vibrations
Red Alert call is in progress
2 short vibrations every 10secs
Red Alert is ended (or cancelled)
2 Long vibrations
Table 2: Vibration indication Table
Table of contents


