Breeze Dryer Multi Folding Frame Clothesline (3 in 1) User manual

The Multi Folding Frame Clothesline (3 in 1)
IMPORTANT –READ THESE INSTRUCTIONS BEFORE INSTALLING & USING YOUR CLOTHESLINE
Note the following for future reference
Product Name
Date of purchase:
Place of purchase:
Introduction
Mini Line
Slim Line
Long Line

1
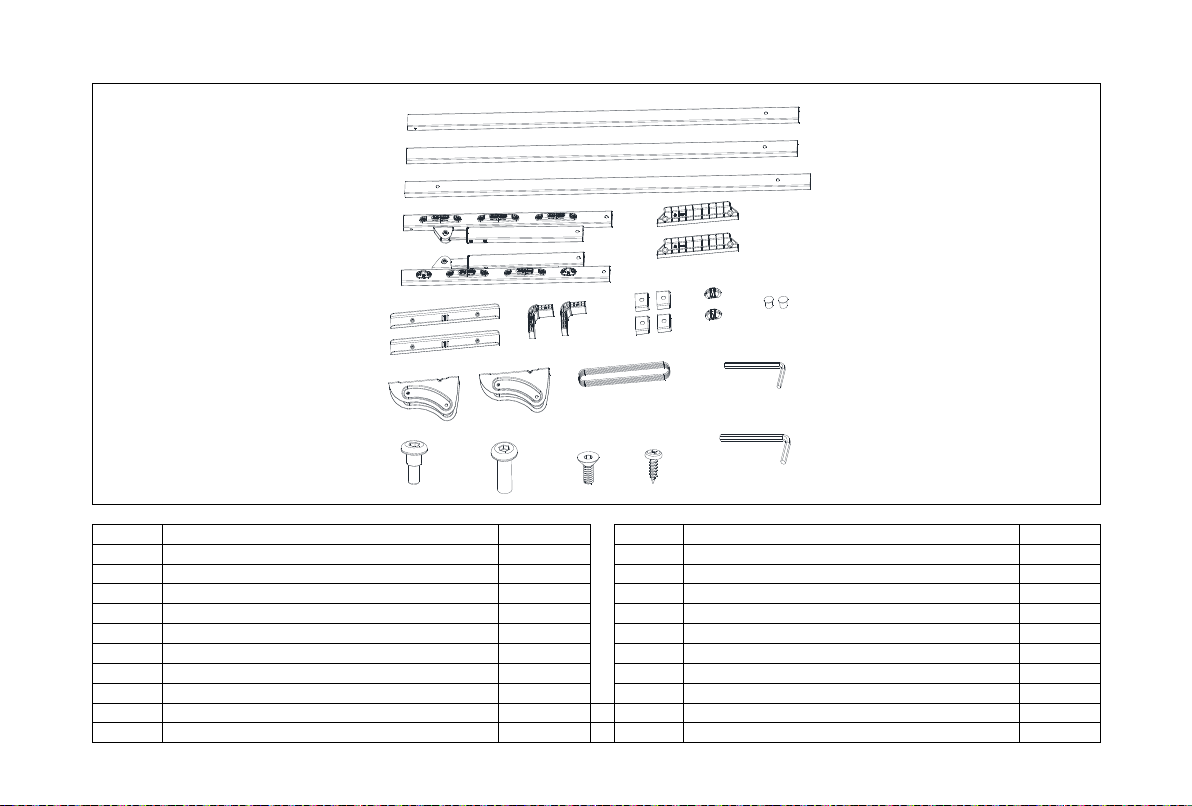
1. Carton Contents
1
2
3
4
5
7
8910
12 13
14 15 16 17
18
19
6
11
Item
Description
Qty
Item
Description
Qty
1
Front Bar Left Hand
1
11
Hole Cover for Mini Line
2
2
Front Bar Right Hand
1
12
Wall Bracket
2
3
Front Bar Handle
1
13
Line
1
4
Arm Left Hand
1
14
Chicago Bolt - Male
4
5
Arm Right Hand
1
15
Chicago Bolt - Female
4
6
Front Bar Handle
2
16
M6 x 16mm Countersunk Socket Screw
4
7
Front Bar Joiner
2
17
ST4.2x13 Screw
4
8
Corner
2
18
4mm Hex Key
1
9
End Cap
4
19
5mm Hex Key
2
10
Tensioner Cover
2
Note: Mounting Hardware Not Included

2
2. Choose the Installation Location
Before installing the Multi Folding Frame Clothesline, measure the height and width of your mounting location.
Be sure to allow clearance around the clothesline. We recommend a minimum of 4” (100mm) one either side of the clothesline and
16” (400mm) above. Ensure that the top of the Wall Brackets will be at least 51” (1.3m) above the ground so that there is space for
the Arms to fold down when not in use.
The width of the clothesline can be adjusted shorter than the three (3) factory options provided. See item 8 for further instructions.
Position and attach the Wall Brackets so that the top of the bracket is 2” (50mm) below the user’s height.
2
″
(50mm) Users head height
2”(50mm)
Users head height

3
3. Mounting the Wall Brackets
Due to the wide range of installation applications, we recommend visiting your local hardware store for assistance in selecting the
correct mounting hardware (ie. slip collar anchors for brick or block and lag screws/washers for wood framing). A level and straight
edge are recommended to ensure that Brackets are aligned both vertically and horizontally.
Note: It is critical that appropriate mounting hardware is used to ensure the Folding Frame Clothesline can support a full load of
wet laundry.
7″(170mm)
86 5/8″ (2200mm (Slim Line))
130 3/9″ (3320mm (Long Line))
7″(170mm)
7″(170mm)
45 5/8″ (1160mm (Mini Line))
Installation Note: If modifying the width beyond the three options above, see Section
8 prior to mounting wall brackets.
7”(170mm)
7”(170mm)
7”(170mm)
Ͷͷͷͺ
ൗ” (1160mm) Mini Line
ͺ ͷͺ
ൗ”(2200mm) Slim Line
ͳ͵Ͳ ͵Ͷ
ൗ”(3320mm) Long Line

4
4. Installing the Arms
1. Fit the End Caps over the Arms and Struts.
2. Align the holes in the Arms with the upper holes in the Bracket.
3.Push through the
Chicago Bolts
and secure with the 5mm Hex Keys provided.
4. Repeat the process for the Strut in the lower hole of the Bracket.
Note: Do not over-tighten the fasteners as the Arms and Struts must be free to pivot.
Left Hand Side
Right Hand Side

5
5. Assemble the Front Bar
Front Bar for Slim Line
Front Bar for Mini Line
ShshortShortMini
Front Bar for Long Line

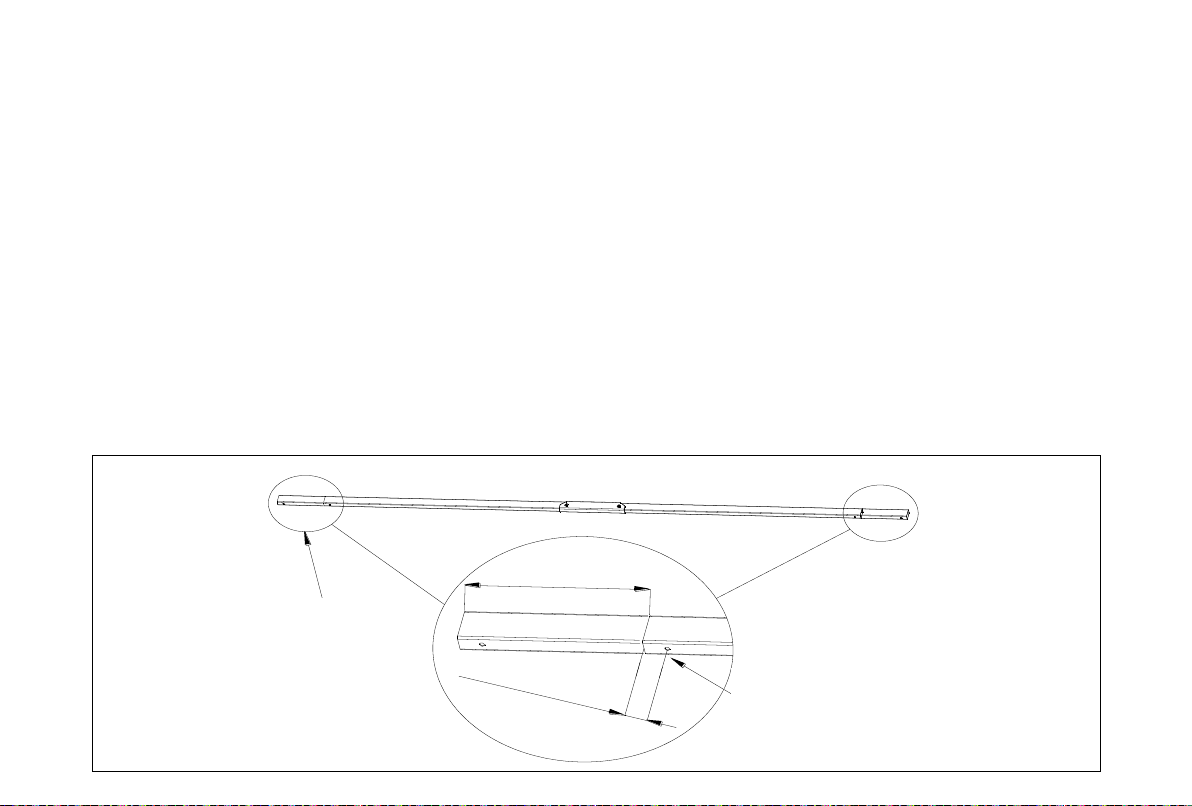
6
6. Assembly Steps:
1. Note the location of the holes prior to assembly of the Front Bar. They must be facing down.
2. Use a rubber mallet/hammer to tap the Front Bar Joiner into one of the Front Bars. Continue tapping until the center slot in the
Front Bar Joiner aligns with the end of the Front Bar and check that the hole in the Front Bar lines up with the screw thread in the
Front Bar Joiner. (Step 1) If you’ve tapped it too far use a flat-bladed screwdriver to carefully lever the Front Bar Joiner out of
the Front Bar. Take care to not damage the painted finish.
3. Assemble the Front Bar Handle to the Front Bar and Front Bar Joiner with one screw (M6 x 16mm Countersunk Socket Screw). This
will keep the Front Bar Joiner in position while you insert the other Front Bar section. (Step 2)
4. Use the rubber mallet/hammer to gently tap the second Front Bar section into position. Stop when it is flush with the first Bar.
(Step 3)
5. Insert the second screw and tighten. (Step 4)
Step 1
Step 2
Step 3
Step 4

7
7. Assemble the Front Bar to Arms
1. Insert Corner Brackets into the Front Bar and secure with ST4.2x13 Screws. (Step 1)
2. Install the Front Bar with Corner Brackets into the Arms and secure them with ST4.2x13 Screws. (Step 2)
Step 1
Step 2
Note: Install hole covers in spreader bar holes on Mini.
8
8. Adjusting the width of your Folding Frame Clothesline
1. The width of the Multi Folding Frame Clothesline can be reduced to your specific installation needs or to align with existing
framing.
2. Determine the new Wall Bracket spacing for your installation location.
3. Choose the best model configuration that is longer than you need. Determine the length that you need to reduce your
assembled Front Bar by. This length will need to be split in two and taken from both ends of the assembled Front Bar. Be advised
that the Corner Brackets need to be included in the overall length of spacing (1 ½” (40mm) overall).
Amount to cut from each end of the Front Spreader Bar =
Mini Line - Factory width spacing (45 5/8” (1160mm) – Desired Spacing –1 ½” (40mm)/2)
Slim Line - Factory width spacing (86 5/8” (2200mm) – Desired Spacing –1 ½” (40mm)/2)
Long Line - Factory width spacing (130 3/4” (3320mm) – Desired Spacing –1 ½” (40mm)/2)
4. Be careful when cutting with a hacksaw to ensure that you do not slip and damage the finish. In addition, make sure to keep the
cut edge square. You may need to clean up the edges with a file after cutting. The Corner Brackets must be able to slide in easily.
5. Measure 25/32” (20mm) from each end of the Front Bar. Drill a centered replacement hole 3/16” (4.5mm) in the bottom of both
ends of the Front Bar to secure the Corner Brackets.
25/32
″
(20mm)
Cut equal lengths
from each end
Drill replacement holes
Φ3/16″ (4.5mm)
Cut equal lengths
from each end
Drill replacement holes
3/16”(4.5mm)
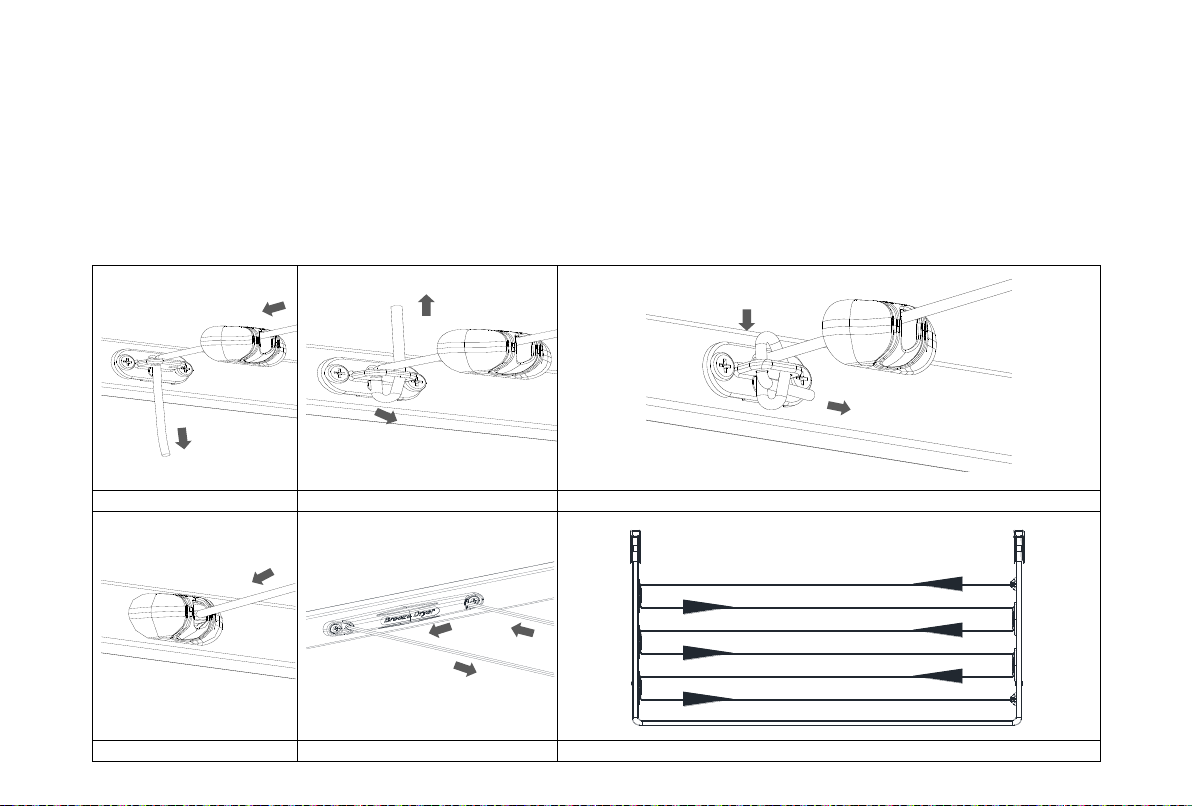
9
9. Thread the line
1. Thread the line through the Tensioner Cover.
2. Pull the line down through the top of the Line Tensioner. (Step 1)
3. Loop the line back up through the right hand hole leaving a loop below. (Step 2)
4. Loop the line up over, threading the line down the left hand hole pulling tight, feed the end of the line through the loop
underneath of the Tensioner. (Step 3)
5. Pull tight and trim the excess length. Clip the Tensioner Cover into position. (Step 4)
6. Feed the line through each line sleeve backwards and forwards between the Arms keeping the lines tight. (Step 5)
7. When you reach the end Tensioner, repeat steps 1 to 4 to secure the line.
Note: Do Not Over Tension The Lines.
Step 1
Step 2
Step 3
Step 4
Step 5
Line Direction
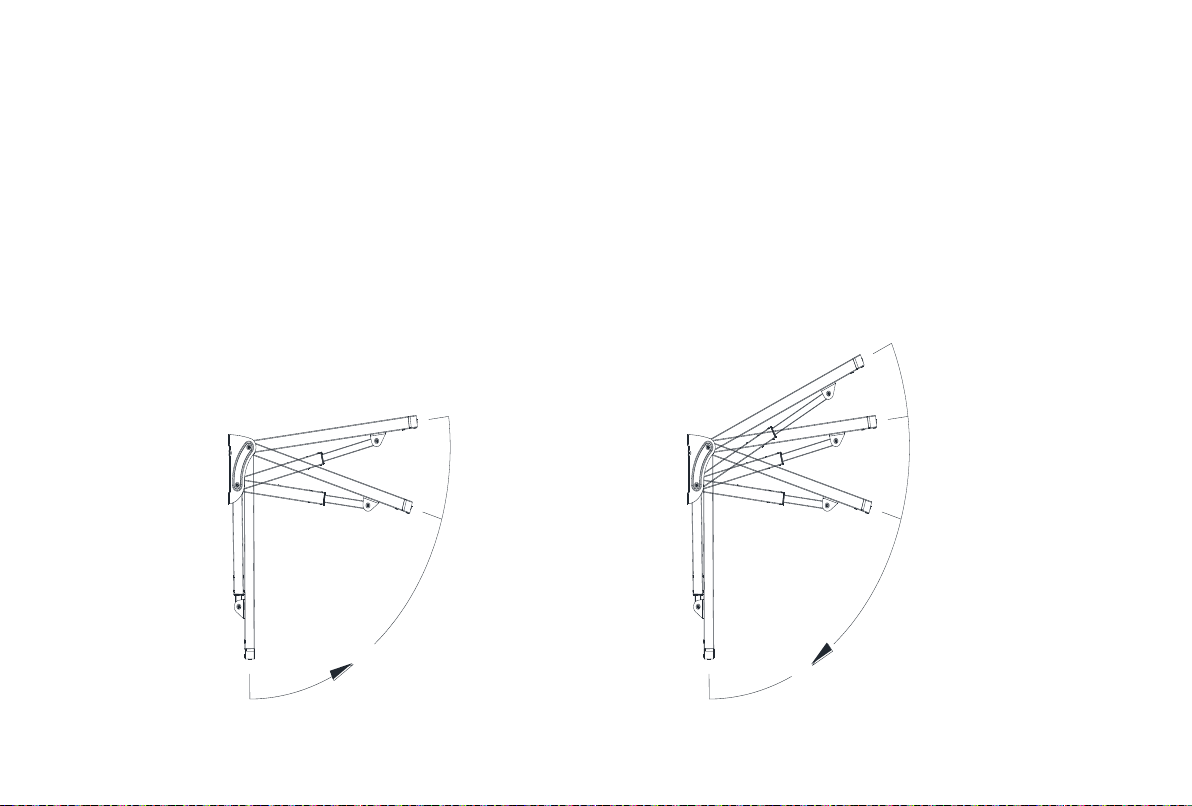
10
10. Operation of your clothesline:
1. To raise your clothesline, grip the Front Bar Handle and lift from the closed position slowly (Fig.1–A). The struts will click
when they reach the low height (Fig.1-B). Gently let go of the Handle in up position.
2. To lock the struts at the maximum height, grip the Front Bar Handle and lift until the struts click for the second time (Fig.1-C).
Release the handle in up position.
3. To lower your clothesline to its folded closed position, grip the Front Bar Handle on the Front Bar and raise it above the
maximum height position until the struts click (Fig.2-D). Gently lower the Front Bar until the clothesline is in its folded closed
position (Fig.2-A).
4. If the Struts do not engage fully on both sides, repeat the process.
Note: Do not force the Struts to overextend or damage will occur.
Fig. 1 Fig. 2
A
B
C
B
C
D
A
Raising your Clothesline
r Clothesline
Lowering your Clothesline
11
Closed position
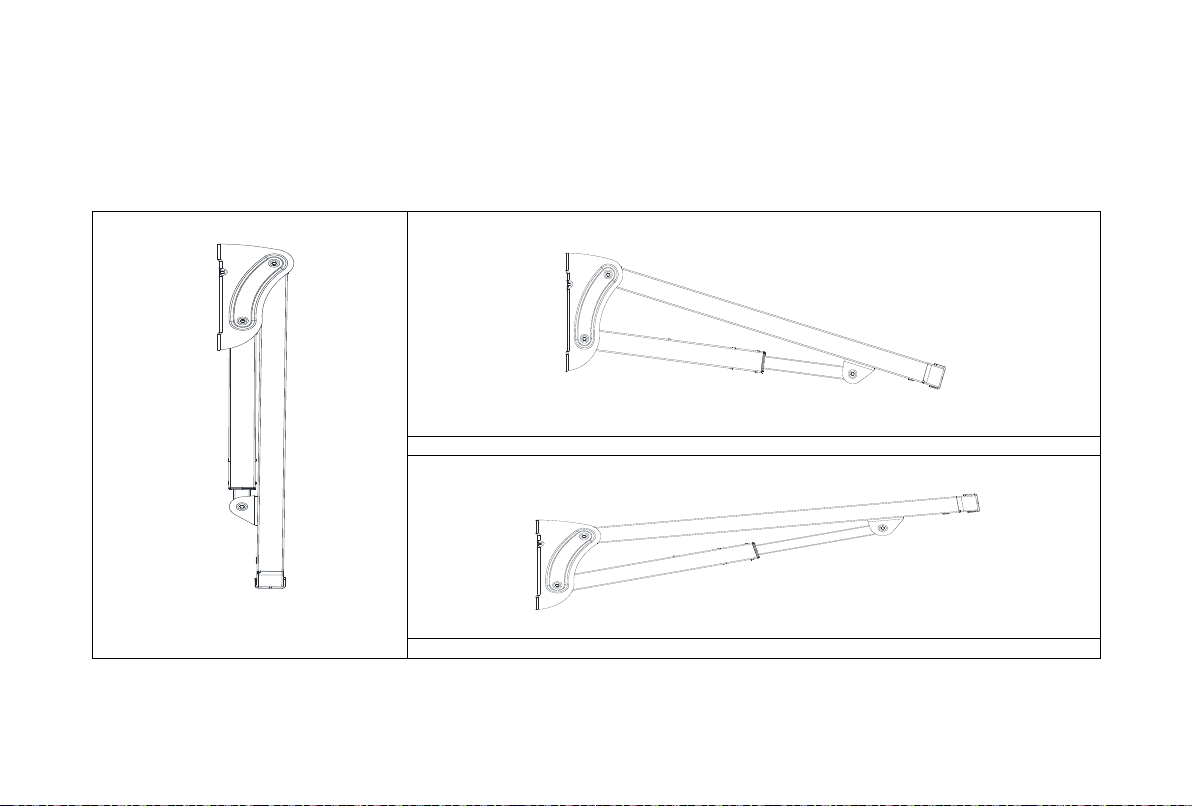
11. Multi Position Struts:
The strut locking mechanism allows the Folding Frame clothesline to be positioned in one of three ways.
1. Locked open at maximum height: great for drying large sheets and towels.
2. Locked open at low height: perfect for hanging out small items.
3. Closed: when the clothesline is not in use, it can be folded flat against the wall.
Low Height
Maximum Height

12
Warranty Information
Breeze Dryer
®
warrants to the purchaser of the product (the customer) that this Multi Folding Frame Clothesline will be free from defects
in workmanship and materials for 10 years, and the polycore line for 1 year, from the date of the purchase of the product. Breeze Dryer
®
is not responsible for normal wear and tear, for products used commercially or for failures caused by accidents, abuse, alteration,
modification, misuse, or improper care. If a defect in materials or workmanship becomes evident during the warranty period, Breeze
Dryer
®
will, at its option, either:
-Provide replacement parts, OR
-Replace the product
In the event of such a defect, the product will need to be returned to the manufacturer of the product by the customer, together with a
valid proof of purchase, for replacement parts or a replacement unit. Any handling, shipping costs, or other expenses incurred in
claiming under this warranty are not covered by this warranty and will be borne by the customer.
There are no other express warranties beyond the terms of this limited warranty. In no event shall any implied warranties, including
merchantability and fitness for a particular purpose, extend beyond the duration of the express warranty contained herein. In no event
shall Breeze Dryer
®
be liable for incidental or consequential damages.
Some states do not allow limitations on how long an implied warranty lasts or the exclusion of limitation of incidental or consequential
damages, so the above limitation or exclusions may not apply to you. This warranty gives you specific rights and you may have other
rights which vary from state to state.
For instructions on requesting repair or replacement of your Breeze Dryer
®
product, please see the Warranty Claims Tab on the Breeze
Dryer
®
website, www.breezedryer.com.
Delivery Address: Mailing Address:
Breeze Dryer Breeze Dryer
4657 York Rd., Unit 1560 PO Box 1560
Buckingham, PA 18912-1560 Buckingham, PA 18912
As the product is intended for home DIY use only, commercial usage of this product for professional or industrial purposes will VOID this
warranty.
Again please note that the Line is only covered for 1 year from date of purchase.

13
Tips for your Original Online Experience
Only use your clothesline to hang and dry laundry.
Remember the clothesline is not a children’s toy.
The clothesline must be closed up in extreme weather like high wind, etc.
The safety load shall not exceed 22 pounds (10 kg) for Mini Line, 44 pounds (20 kg) for Slim Line or 66 pounds (30 kg) for Long.
Care & Maintenance
Be sure to inspect your Folding Clothesline for any signs of wear and tear. Do not use your Folding Clothesline if it is damaged. Spare
parts are available for repairs.
The clothesline should be periodically wiped down with a damp cloth and mild detergent. We recommend a yearly application of car
polish on the powder coated galvanized steel to maintain the appearance of the finish on the Folding Clothesline.
It may be necessary to occasionally remove excess slack from the lines. Retighten the lines as previously described. Again do not over
tension the lines.
BQ01189a

Table of contents
Other Breeze Dryer Dryer manuals


