Breeze Dryer Rotary Hoist Clothesline User manual
Rotary Hoist Clothesline
IMPORTANT –READ THESE INSTRUCTIONS BEFORE INSTALLING & USING YOUR CLOTHESLINE
Note the following for future reference
Product Name:
Date of Purchase:
Place of Purchase:

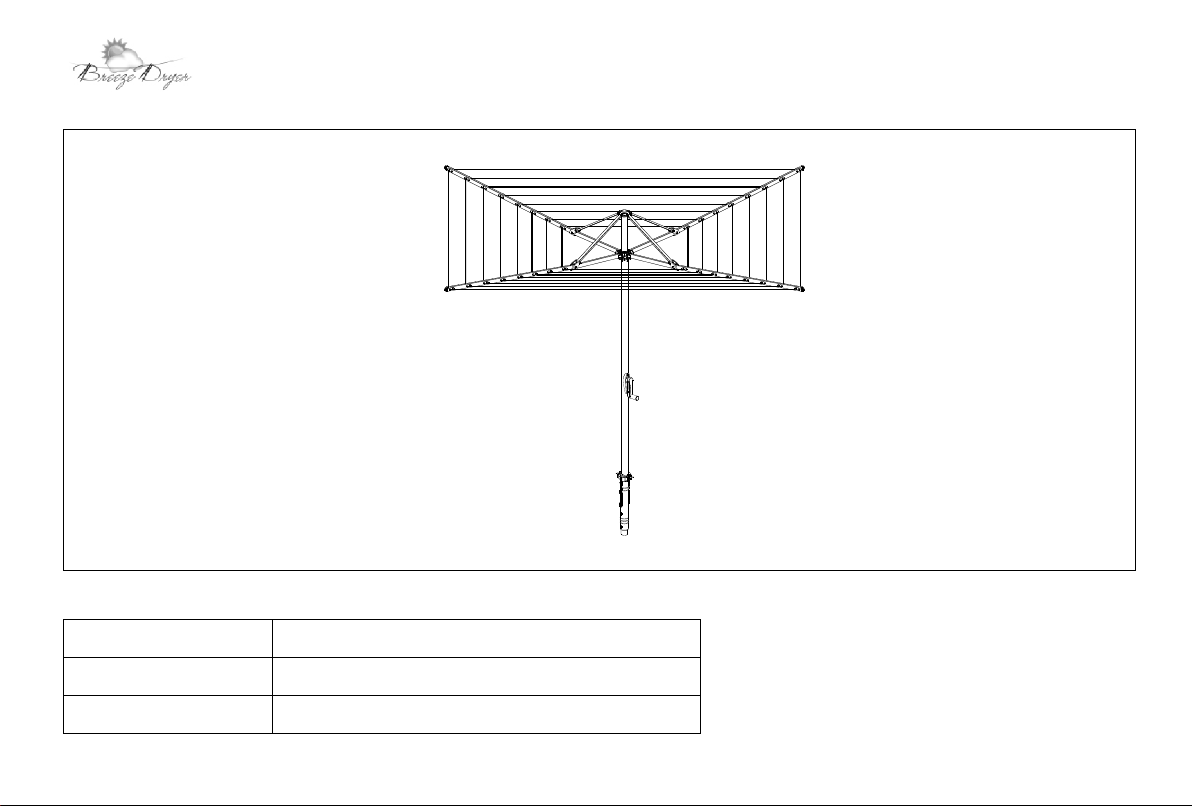
1
1. Carton Contents
7
6
54
3
2
1
8
Item
Description
Qty
Item
Description
Qty
1
Head Assembly
1
5
Ground Socket Cap
1
2
Main Standard
1
6
Ground Socket Spacer
3
3
Handle Spigot
1
7
Ground Socket
1
4
Handle
1
8
Ground Socket Locking Collar
1
2
2.Choose Location and Install Ground Socket
DO NOT USE OR MOVE THE CLOTHESLINE UNTIL THE CONCRETE HAS SET –ALLOW 24 HOURS .
10” (250mm)
hole
26” (650mm)
deep hole
18” (450mm)
concrete
8” (200mm) gravel
Check vertical level
Engage into
ground socket.
Rotate to lock.
Locking collar
Main standard
Top of Ground
Socket approximately
¼”-1/2” (6-12mm)
above ground level.
Close tabs to
prevent entry of
concrete.
1. Choose a clear space at least 15 feet (4.6m) in diameter.
2. Dig a hole 10” (250mm) wide by 26” (650mm) deep.
3. Place 8” (200mm) of coarse gravel into the hole for drainage.
4. Insert the Main Standard into the Ground Socket. Engage the
Locking Collar and lock into position. Make sure the tabs are
closed to prevent concrete from entering the locking recess in
the Ground Socket.
5. Place Ground Socket and Main Standard into hole. Push base
of Ground Socket into the gravel. Check for level vertically. The
top of the Ground Socket must sit approximately ¼”-1/2” (6-
12mm) above ground level.
6. Support the Main Standard and concrete into position.
Concrete should be damp enough to hold together when
squeezed in the hand. Settle concrete by pushing a thin stick
in and out of the mix several times. Keep concrete out of the
locking recess in the Ground Socket. Check for level vertically.
Gently remove Main Standard from Ground Socket and protect
from rain.
7. Allow the concrete to set for 24-48 hours before use.
8. The 3 Ground Socket Spacers are provided to increase the
starting height of the clothesline in 2” (51mm) increments up
to 6” (153mm) total. Suggested operating height is user head
height + 1” (25mm).
The starting height of rotary hoist can range from 5’5”
(1.65m) to 5’11” (1.8m) depending on the number of
installed plastic spacers.
Note: Height spacers can be removed from the ground socket
with a piece of a folded hanger.

3
3.Main Standard/Head Assembly
1
. Assemble the Handle Spigot (3) to the Handle Crank (4) on the
Main Standard (2).
3. Slide the Head Assembly into the Main Standard Assembly until you
hear a click. We suggest you lay the head assembly on the ground and
gently slide the main standard into the head assembly. Be sure not to
catch the lines.
Note: Once the Head Assembly is engaged into the Main Standard it
cannot be removed by the consumer.
2. After Assembly.
2
3
4
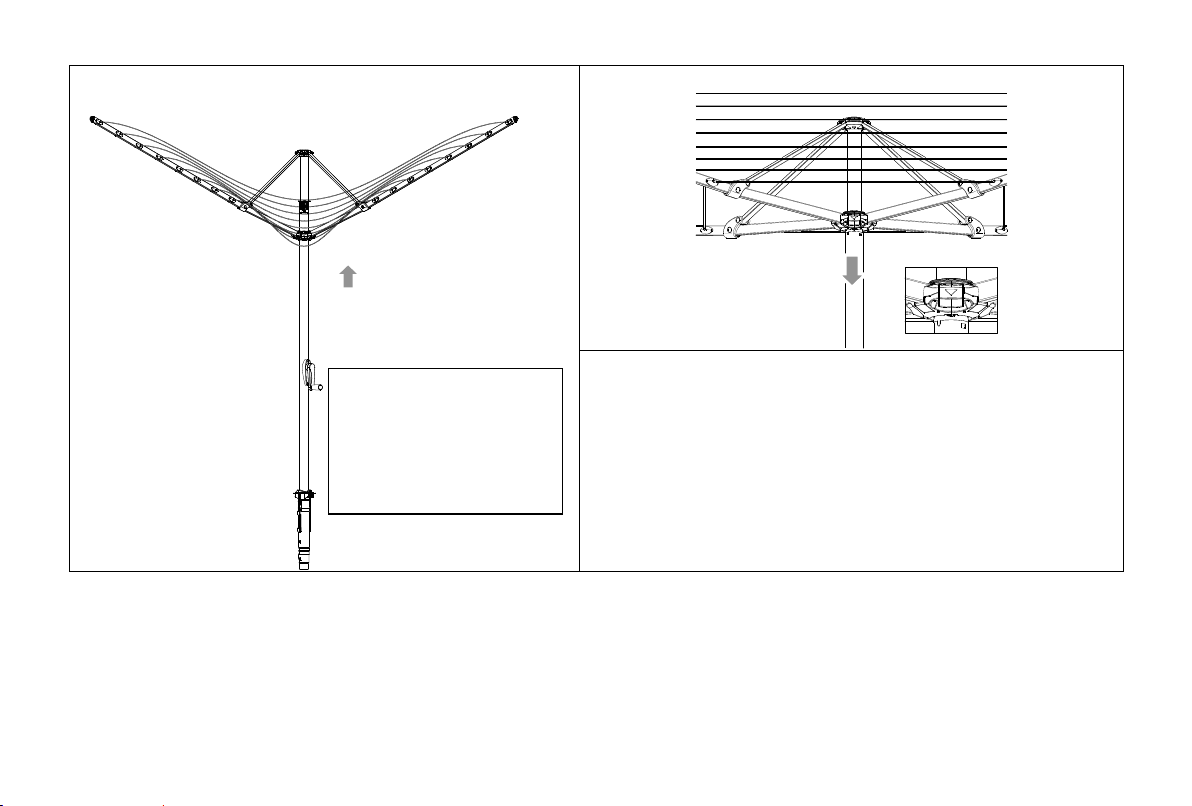
4
4. Opening & Closing The Rotary Hoist
1. Manually push the Head Assembly up to the locked position to
open the head assembly. Note: Similar to rain umbrella.
2. Press the button of locking latch to close the Head Assembly.
1. To adjust the height of your Rotary Hoist once the Head Assembly is opened and in the locked position, crank the handle clockwise to raise the
opened Head Assembly and counter clockwise to lower the Head Assembly. Note: The height adjusting winding mechanism has an automatic design
to disengage the handle at the maximum and minimum heights. A slight clicking noise will be heard when the Head Assembly has reached its upper
or lower limits.
2. If you experience trouble getting your rotary hoist to open and latch. Please ensure that the lines are not knotted or wrapped around the ends of
the arms. In addition, that the lines are located in the correct segment of the head.
3. For additional assistance, check out our online videos and/or call customer assistance.
NOTE:
Do not collapse head
assembly with laundry on
the line.
5
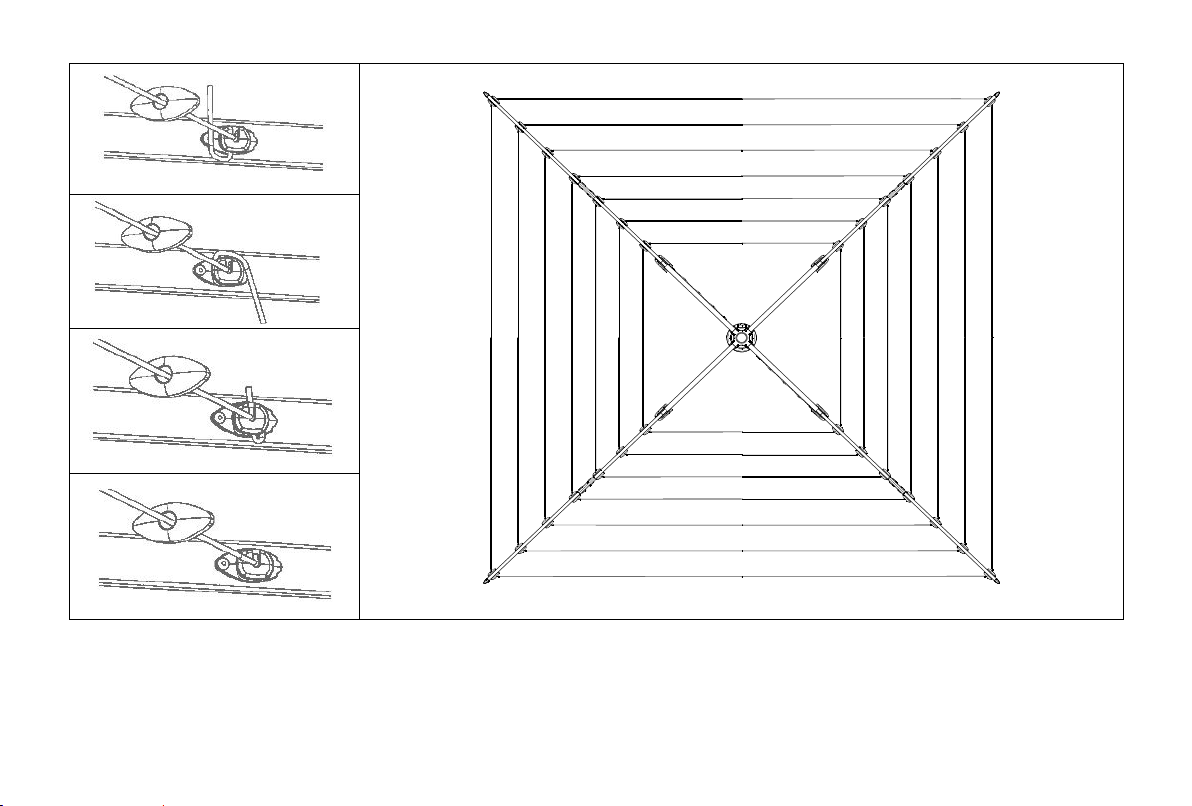
5. Line Replacement
1. The lines are pre-wired in the factory and typically do not require tensioning.
2. If over time the lines do require tensioning, the rotary hoist must be in the open position.
3. Although the arms all look the same, only one arm is a tensioning arm. Each of the 8 lines will start and end on this arm.
4. This arm is typically to the left of the latch.
Note: Do Not Over Tension The Lines. The Head Assembly should open and close easily without having to force it. Light slack in the lines will
typically disappear as you hang the laundry on the line.

6
Warranty Information
Breeze Dryer®warrants to the purchaser of the product (the customer) that this Rotary Hoist Clothesline will be free from defects in workmanship and
materials for 10 years, and the polycore line for 1 year, from the date of the purchase of the product. Breeze Dryer®is not responsible for normal wear and
tear, for products used commercially or for failures caused by accidents, abuse, alteration, modification, misuse, or improper care. If a defect in materials or
workmanship becomes evident during the warranty period, Breeze Dryer®will, at its option, either:
-Provide replacement parts, OR
-Replace the product
In the event of such a defect, the product will need to be returned to the manufacturer of the product by the customer, together with a valid proof of
purchase, for replacement parts or a replacement unit. Any handling, shipping costs, or other expenses incurred in claiming under this warranty are not
covered by this warranty and will be borne by the customer.
There are no other express warranties beyond the terms of this limited warranty. In no event shall any implied warranties, including merchantability and
fitness for a particular purpose, extend beyond the duration of the express warranty contained herein. In no event shall Breeze Dryer®be liable for
incidental or consequential damages.
Some states do not allow limitations on how long an implied warranty lasts or the exclusion of limitation of incidental or consequential damages, so the
above limitation or exclusions may not apply to you. This warranty gives you specific rights and you may have other rights which vary from state to state.
For instructions on requesting repair or replacement of your Breeze Dryer®product, please see the Warranty Claims Tab on the Breeze Dryer®website,
www.breezedryer.com.
Delivery Address: Mailing Address:
Breeze Dryer Breeze Dryer
4657 York Rd., Unit 1560 PO Box 1560
Buckingham, PA 18912-1560 Buckingham, PA 18912
As the product is intended for home DIY use only, commercial usage of this product for professional or industrial purposes will VOID this warranty.
Again please note that the Line is only covered for 1 year from date of purchase.

Tips for your Original Online Experience
Only use your clothesline to hang and dry laundry.
Remember the clothesline is not a children’s toy.
The clothesline must be closed up in extreme weather like high wind, etc.
The safety load shall not exceed 145 pounds (66 kg).
One of the greatest benefits of a Rotary Hoist is that it spins naturally in the breeze, allowing the sun to shine on all your clothes and speed up the drying
time.
Raise your Rotary Hoist for maximum drying efficiency and to increase clearance for longer items.
The wind brake assists in the hanging and take down of clothes on windy days by restricting the rotation of the Rotary Hoist. It can be engaged by winding
the head assembly of the hoist fully down onto the wind brake.
We suggest placing smaller items (lights & whites) on the inner shorter lines working your way outwards for larger items. Keep in mind that you can stand in
one position and spin the head assembly around to hang the laundry.
When hanging heavy bulkier items, you can hang them over more than one line.
When you do not expect to fill the Rotary Hoist with laundry, start by hanging things on the outer lines. This will allow your Rotary Hoist to spin more freely.
Care & Maintenance
Be sure to inspect your Rotary Hoist for any signs of wear and tear. Do not use your Rotary Hoist if it is damaged. Spare parts are available for repairs.
The hoist should be periodically wiped down with a damp cloth and mild detergent. We recommend a yearly application of car polish on the powder coated
galvanized steel to maintain the appearance of the finish on the Rotary Hoist.
Remember your Breeze Dryer Rotary Hoist can be easily folded and removed from the yard for winter storage or family functions. Making it unobtrusive in
your yard.
Note: We recommend that your Rotary Hoist be removed from the ground socket at least every six months to prevent sediment build up over time.
BQ01182a
Table of contents
Other Breeze Dryer Dryer manuals
 User manual")
Popular Dryer manuals by other brands


Siemens
Siemens WT47W460GR Installation and operating instructions

GE
GE DCVH680EJ Dimensions and installation information

LG
LG DLEX3250W quick guide

Candy
Candy CDV 265 EX User instructions

Bosch
Bosch WTE84106GB Installation Instructions, Instructions for Use, Programme... user manual

Inglis
Inglis Dryer User instructions