BREEZEAIR ICON SERIES Setup guide

N A T U R A L L Y C O O L E RN A T U R A L L Y C O O L E R
O W N E R S I N S T R U C T I O N M A N U A L
S E R I E SS E R I E S
I C NI C N

®1
INDEX
2Introduction
3Wall Control Functions
7Drain Valve
9Maintenance
11 Troubleshooting
2
3
7
9
11
1
EFFECTIVE COOLING
To provide efficient cooling or ventilation
the building must have sufficient natural
exhaust openings to outdoors in the form
of doors, windows or other vents. To
assist air circulation, open windows or
doors that are furthest from the outlet
vent in each room/area.
In every room/area that has an outlet
vent, provide an exhaust opening about
2 or 2.5 times the size of the outlet vent in
the room/area.
Where the design of the building prevents
adequate natural exhaust, mechanical
extraction (exhaust fan/s) may be
required.
Total minimum openings for the whole
building are demonstrated by the
following table:
Congratulations on choosing Breezair air
cooling.
Your air cooler is built from the highest
quality materials and engineered to
provide many years of economical,
trouble free cooling. It is compliant with
European safety standards.
Breezair air coolers are equally effective
in industrial, commercial and residential
buildings.
Please take a few minutes to read these
instructions so you have a full
understanding of how to operate your air
cooler. Your installer should demonstrate
the features and procedures set out in
these instructions. The installer should
also provide you with a Model and Serial
number, which can be filled out on the
last page.
If the supply cord is damaged, it must be
replaced by a special cord available from
the manufacturer or its service agents
Keep these instructions in a safe
place for future reference.
This appliance is not intended for use by
persons (including children) with reduced
physical, sensory or mental capabilities,
or lack of experience and knowledge,
unless they have been given supervision
or instruction concerning use of the
appliance by a person responsible for
their safety.
Children should be supervised to ensure
that they do not play with the appliance.
Cooler Model Total natural
exhaust area
EXH130 2
2.0m
2
2.5m
2
3.0m
2
4.0m
EXH170
EXH190
EXH210
Please note that an average size door is
12
.5m
®2
INTRODUCTION
2

®3
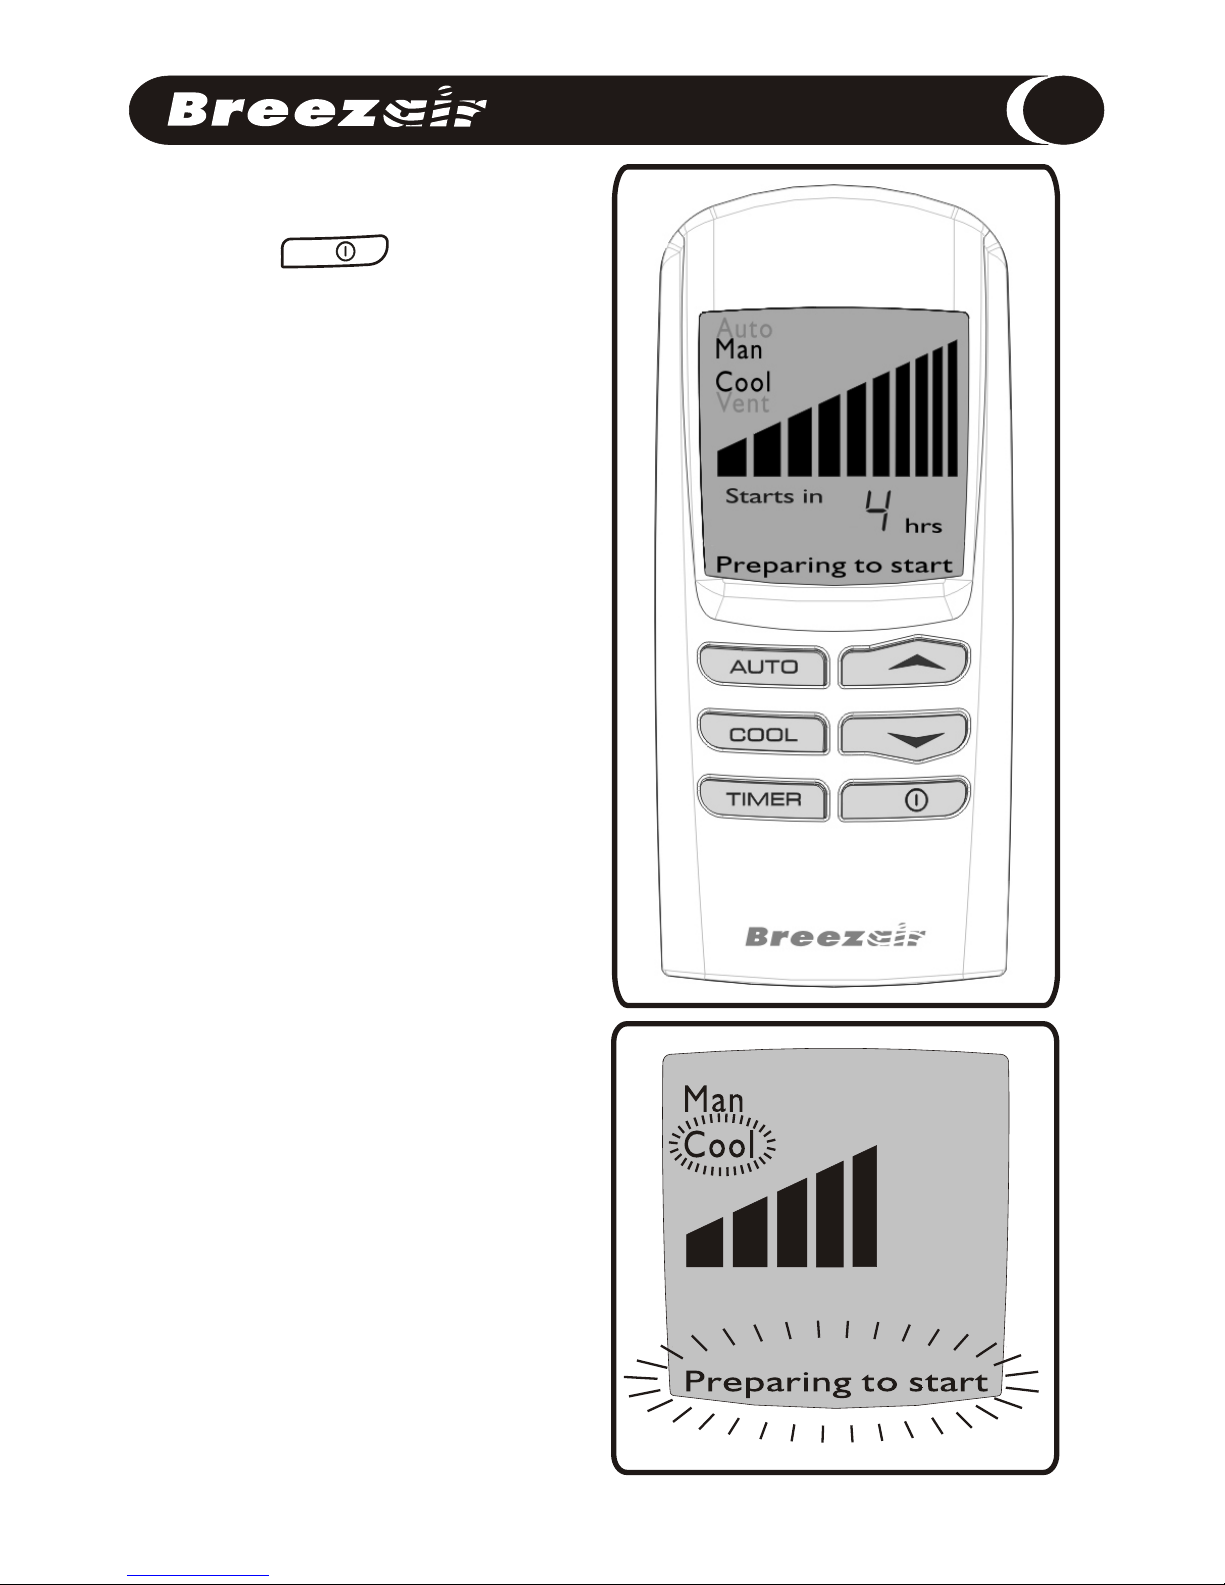
STARTING YOUR COOLER
The button turns the air cooler
on and off.
There are two modes of operation to
choose from, Automatic mode or Manual
mode. When the air cooler is turned on, it
will start in the mode of operation it was in
when last turned off.
If your air cooler has been off for more
than (about) 10 minutes, then when you
start it, “Preparing to Start” may flash on
the display as shown. This shows that the
water pump will operate to saturate the
cooling pads for a few minutes, before
the fan is turned on. This ensures that
when the fan starts, only cool air enters
the building.
WALL CONTROL FUNCTION
ILL1122-B
3

®4
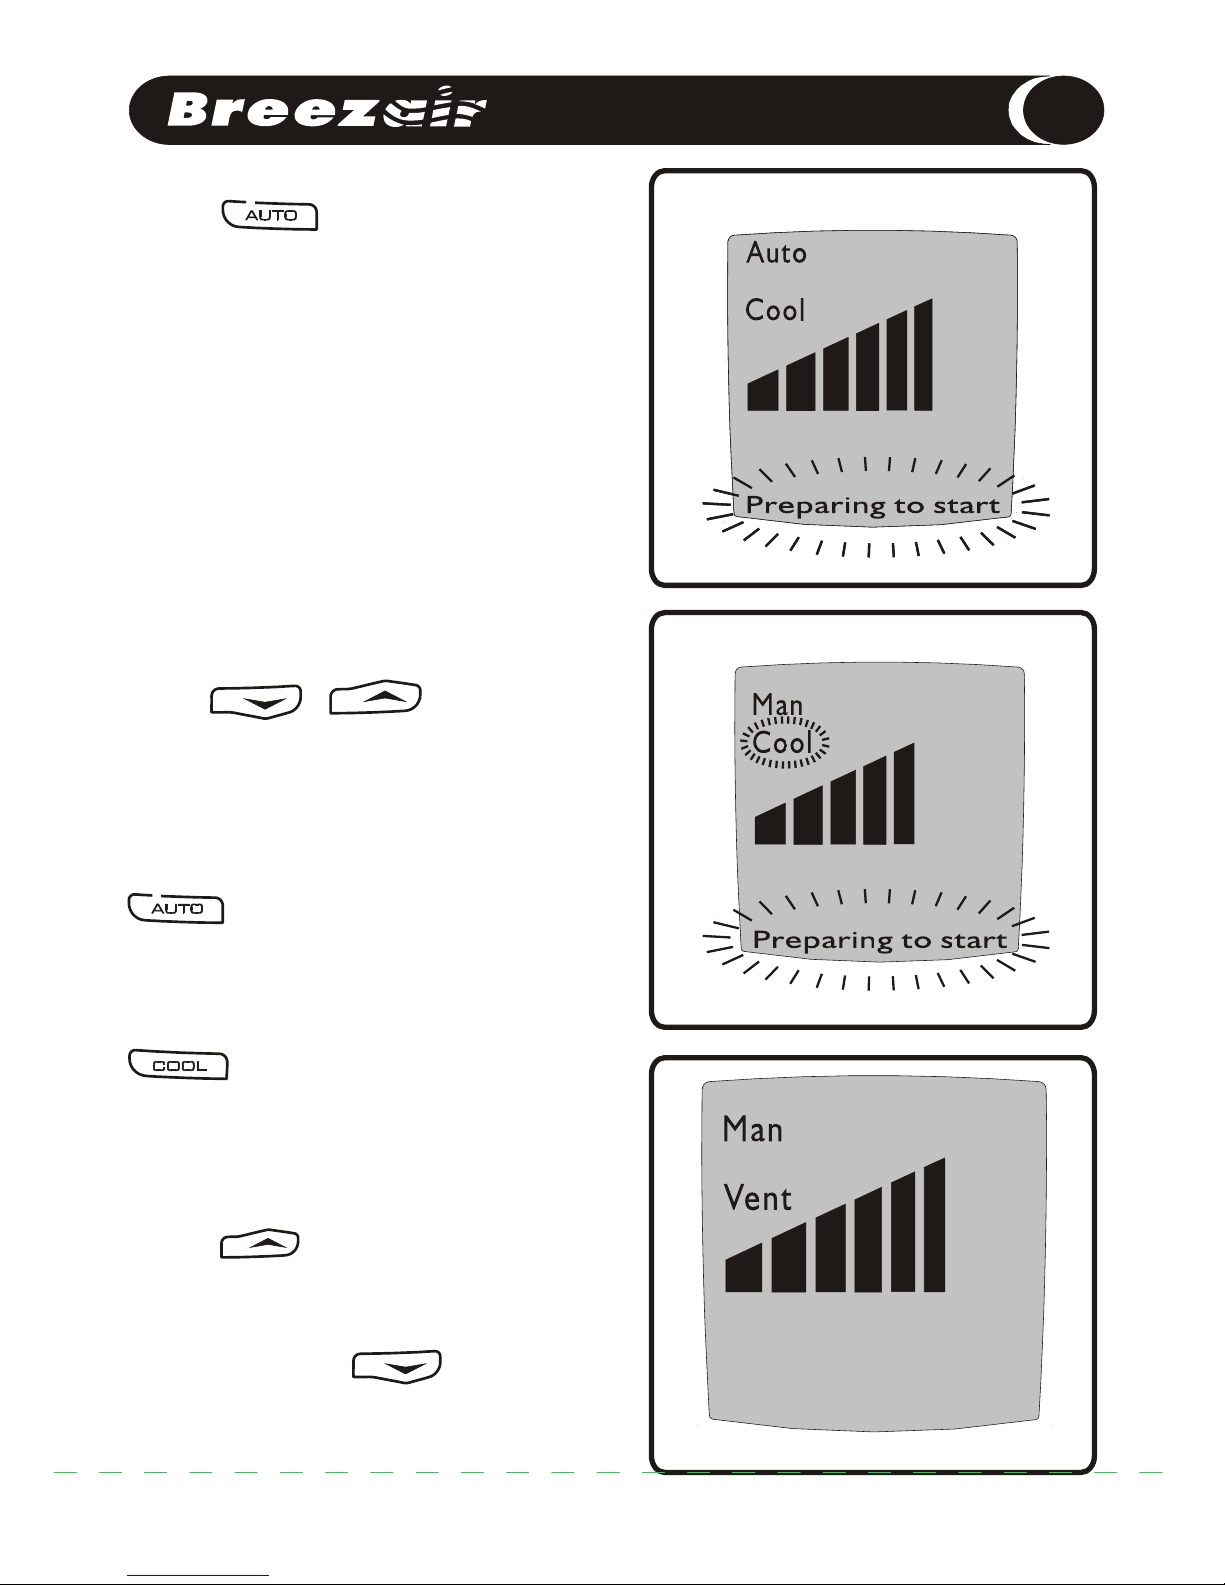
WALL CONTROL FUNCTION
AUTOMATIC MODE
The button is used to select
Automatic mode or Manual mode.
When “Auto” is displayed the cooler is
under Automatic control and will operate
according to the temperature sensed at
the wall control.
When the air cooler is turned on, it will
read the temperature and set the cooler
operation accordingly. If the temperature
increases at the wall control, then the fan
speed will increase. As the temperature
decreases the fan speed will decrease
until the cooler turns off.
Press or to overide
the automatic cooling level setting and
adjust your room temperature.
MANUAL MODE
To switch to Manual mode, press
until “Man” appears in the
display. In Manual mode the cooling level
can be manually adjusted.
In Manual mode, press to
choose between circulating cool air or
uncooled air. When “Cool” is displayed,
fresh cool air will circulate into the
building. When “Vent” is displayed as
shown, fresh uncooled air will circulate
through the building.
Press to increase the fan speed
and circulate more air. Press to
decrease the fan speed and circulate less
air. Press once to change the speed by
one increment. Hold the button down to
change the speed more quickly.
ILL1122-B
ILL1123-B
ILL1124-B
4

TIMED AUTOMATIC START
You can set the air cooler so that it will turn on
after a set number of hours.
1.To set the delayed start time, press
with the cooler turned OFF. “Starting in” will
be displayed as shown with the last mode of
operation (Manual or Automatic).
2.If you want the air cooler to turn on in
Automatic mode with the previous settings,
then press until “Auto” is displayed.
Alternatively, if you want the air cooler to turn
on in Manual mode, press until
“Man” is displayed, then press and
then or to set the required
fan speed.
3.To set the time until the start, press
4.Then press or to adjust
the time. The cooler can start up to 24 hours
in advance.
5.Press again to initiate the timed
automatic start. The timed start will not
repeat.
TIMED AUTOMATIC STOP
You can also set the air cooler so that it will
turn off after a set number of hours.
1.To set a delayed stop time, press
with the cooler running. ”Stopping
in” will display.
2.Press or to adjust the
number of hours before the air cooler will
stop. The maximum delay setting is 24 hours.
3. Press again to begin the timed
stop.
.
.
®5
WALL CONTROL FUNCTION
4.
5.
3.
3.
2. 2.
2.
1.
1.
OR
ILL1117-B
ILL1118-B
ILL1119-B
5
®6
WALL CONTROL FUNCTION
USING THE COOLER
Now that you have read these
instructions, press the button to
turn your air cooler on. If the air cooler
has not operated for a while , “Preparing
to Start” will flash on the display (see
page 3). The pre cool cycle will begin and
will take only a few minutes to complete.
After this time, the fan will start
automatically, and you can enjoy the
comfort of cool fresh air!
AIR TOO COLD
With the cooler running in Automatic
mode, you may find that you are too cold
or that the air cooler is blowing too much
air. Press to reduce the amount
of cooling.
If you are too cold with the cooler running
in Manual mode, then press to
reduce the fan speed. You can also
circulate fresh uncooled air by pressing
until “Vent” displays.
.
AIR NOT COLD ENOUGH
You may find that with the air cooler
running in Automatic mode, you are not
cool enough. Simply press to
increase cooling.
If you are not cool enough with the air
cooler running in Manual mode, then
press to increase the fan speed.
Ensure that cooled air is circulating by
pressing until “Cool” displays.
You can experiment with the
settings on your wall control. This
is the best way to decide what
suits your needs.
6

®7
DRAIN VALVE
AUTOMATIC DRAIN VALVE
.
This air cooler is supplied with an automatic
drain that performs two primary functions:
1. It opens and closes automatically to
control salt concentrations in the tank.
2. It opens to drain all water and keep your
tank dry during prolonged “off” cycles to
protect your health.
Your cooler will automatically change some
of the water during operation when the water
salinity becomes too high. This ensures the
water is always fresh and helps maintain your
cooler in good condition to ensure optimum
cooling performance. This is called “salinity
sensor” method. Alternatively and if
necessary, the air cooler can be set to change
some water after a set time of cooling
operation. The frequency of the automatic
drain function may have been adjusted by
your installer. This is called “timed drain”
method. You can select either method of
water replacement with the following steps.
1.When the cooler is off, press and hold
2.While still pressing , press
3. A number will display which corresponds
to the selected salinity control method as
shown in the table in the next column. Press
or to change the dis-
played number to the desired salinity control
method.
4.Press to set your selection.
DISPLAY NUMBER CONTROL METHOD
00
01
STANDARD SALINITY SENSOR
TIMED DRAIN
When the air cooler is not operated for
72 hours, the drain valve will open
automatically to empty all water from the
cooler. If necessary, you can adjust this
delay time with the following steps.
1.When the cooler is off, press and hold
2.While still pressing , press
.
3.A number will display indicating the
current water drain delay time according
to the table.
Press or to select
your desired delay time.
4.Press to set your selection.
At any time when the wall control is OFF,
you can manually drain the cooler by
pressing and holding and
for 1 second. The display will
show “dr” to confirm the operation has
activated.
4 Hours
1 Day
2 Days
4 Days
DISPLAY NUMBER
00
01
02
04
03 STANDARD 3 Days
DRAIN DELAY TIME
7
®8
MAINTENANCE
MAINTENANCE
Manual draining of water from your air
cooler at the end of the summer season is
not required, it will occur automatically.
However, it is advisable to check the
pump, drain valve, solenoid and fan
motor every 2 years.
WARNING! Maintenance must be
carried out by an authorised
service agent. Power to the cooler
must be disconnected before pad
frames are removed or you may
risk personal injury.
WARNING! If the supply cord is
damaged, it must be replaced by
a special cord available from the
manufacturer or it’s service
agent.
HEALTH REGULATIONS
Note that some regulating authorities
require servicing to be conducted at
specific intervals.
END OF SEASON SERVICE
• Turn off the power supply to the air
cooler.
• Turn off the water supply to the air
cooler.
• Remove the pad frames as shown .
• Turn off the power switch inside the
cooler.
• Check and clean the lid water channels
• Thoroughly clean the tank and pump
filter.
• Re-fit the pad frames.
8

®9
MAINTENANCE
PRE-SEASON SERVICE
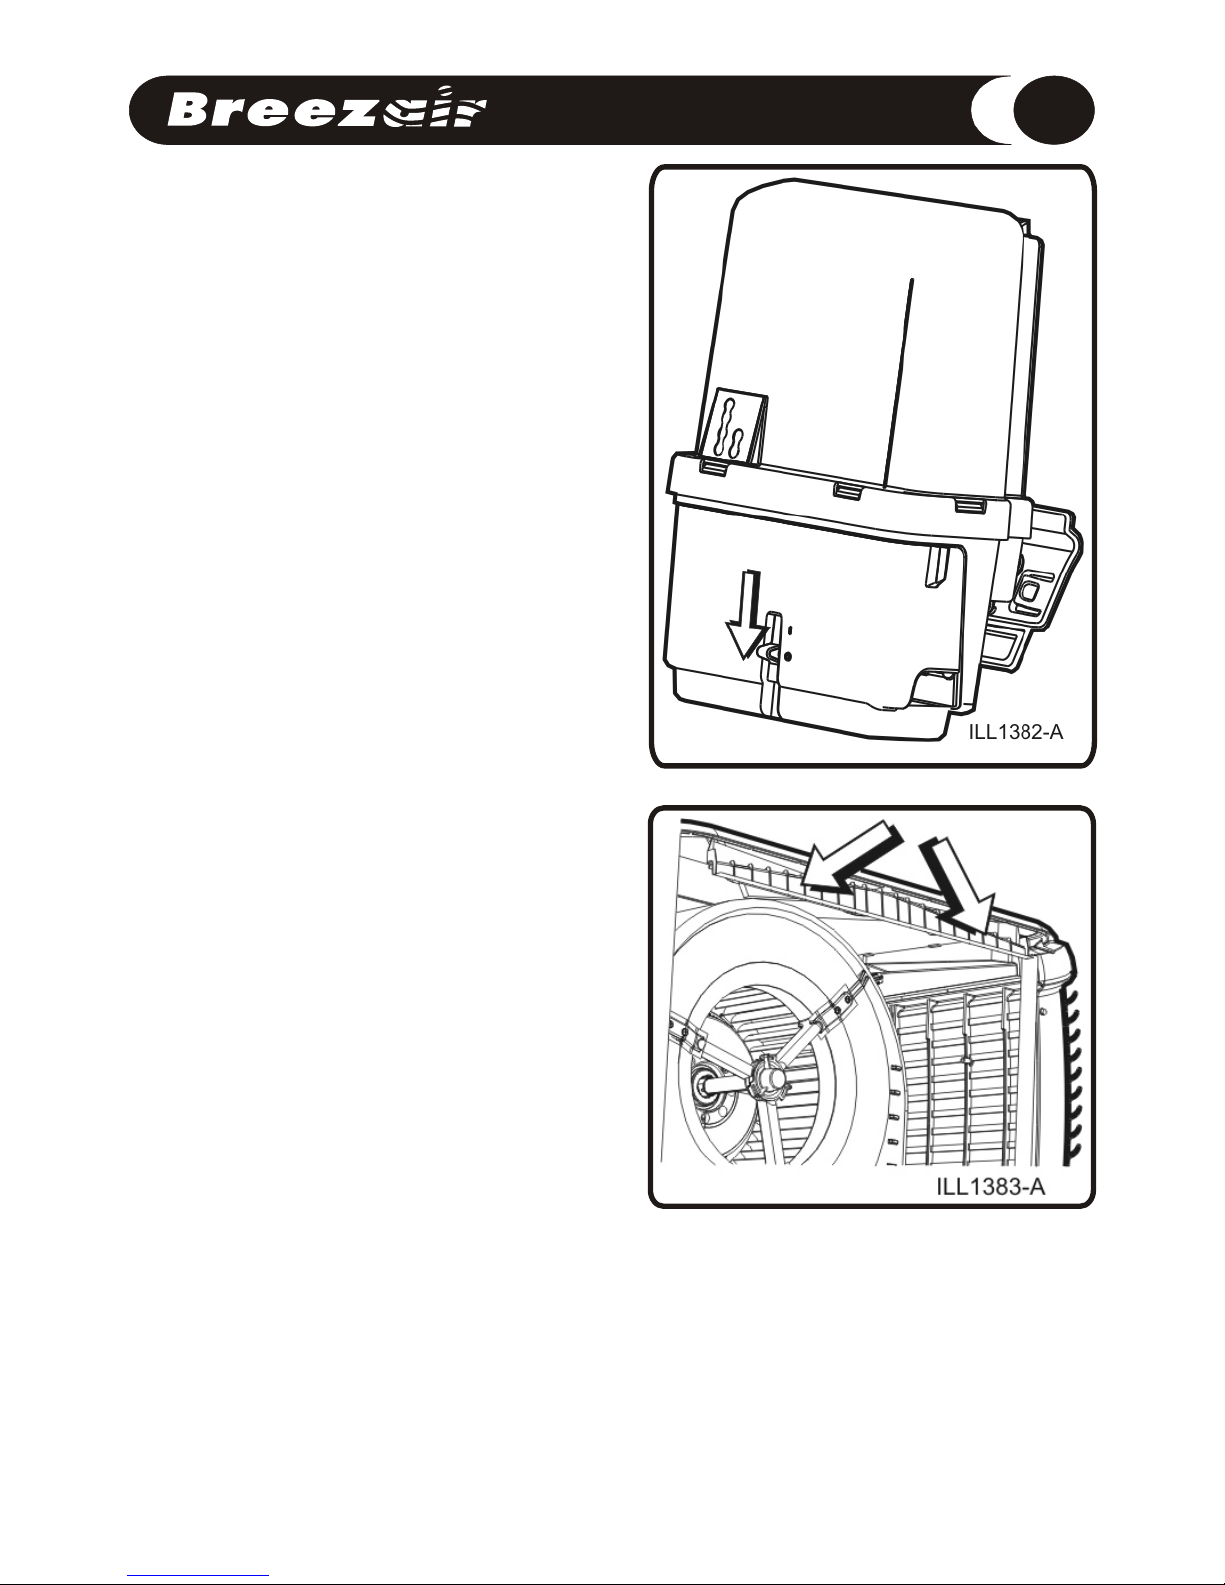
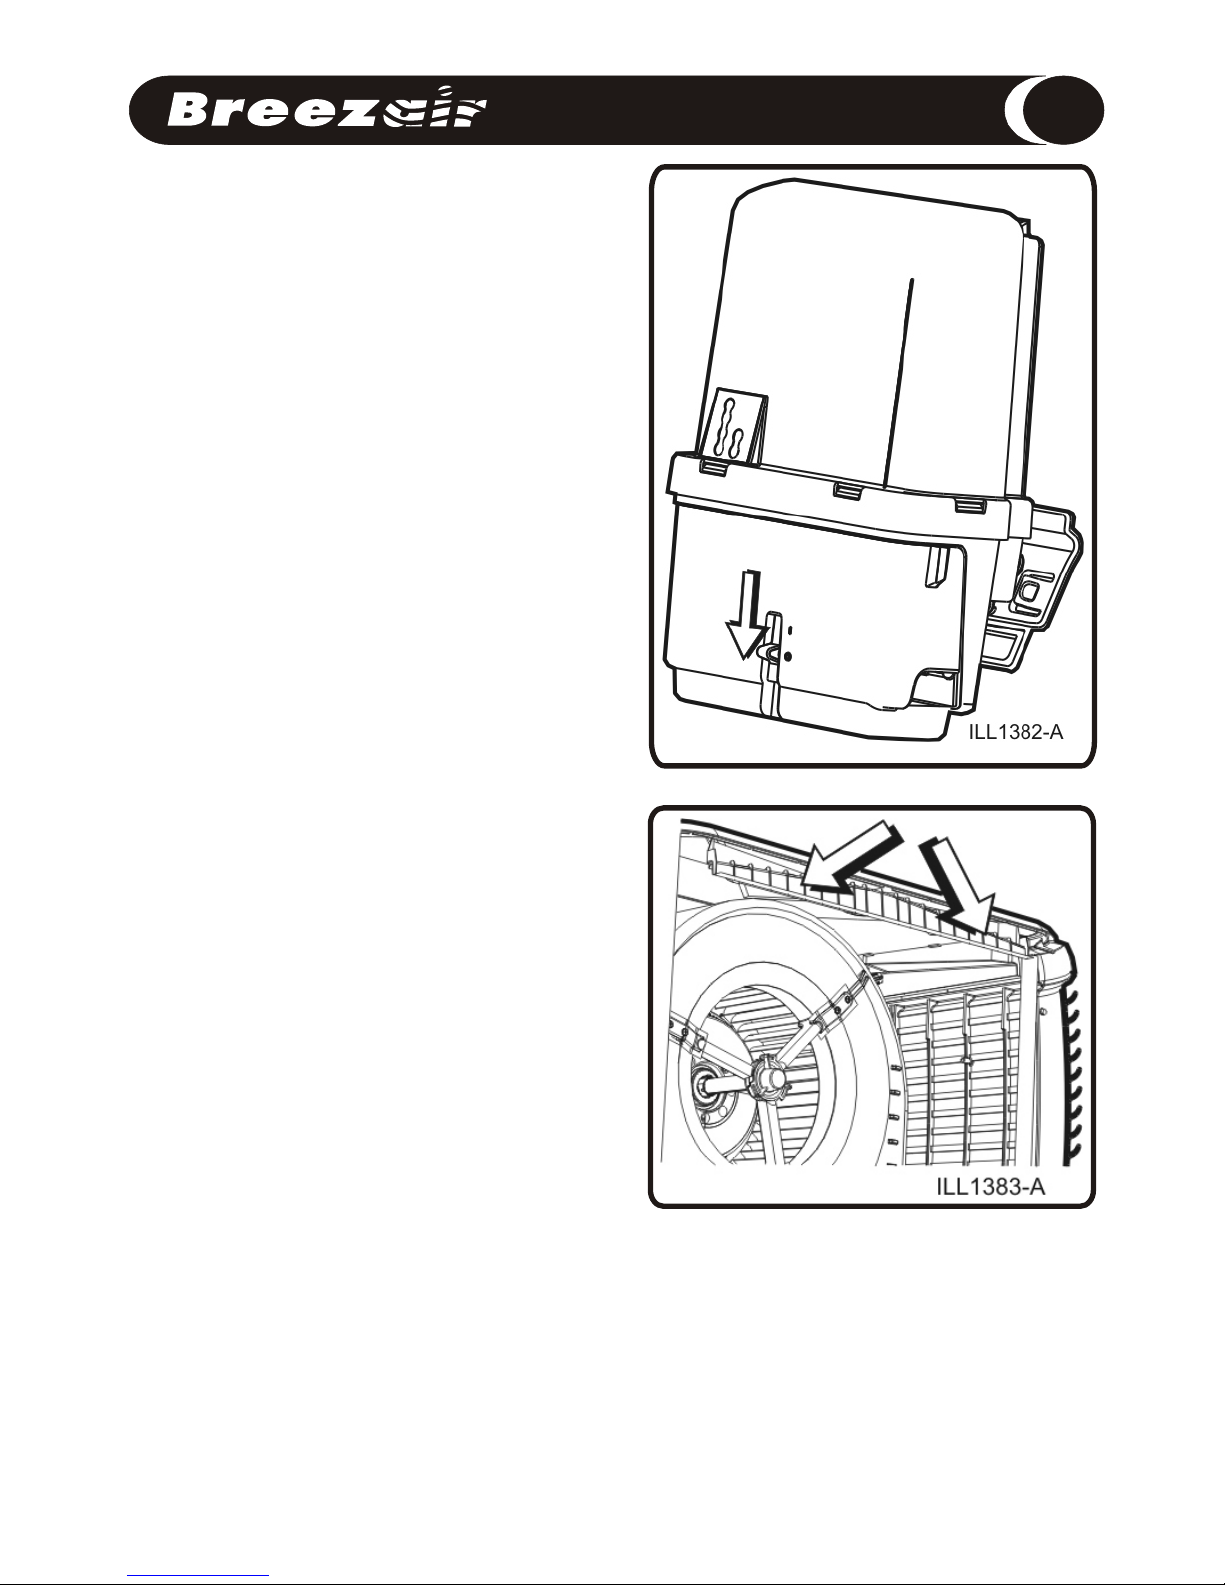
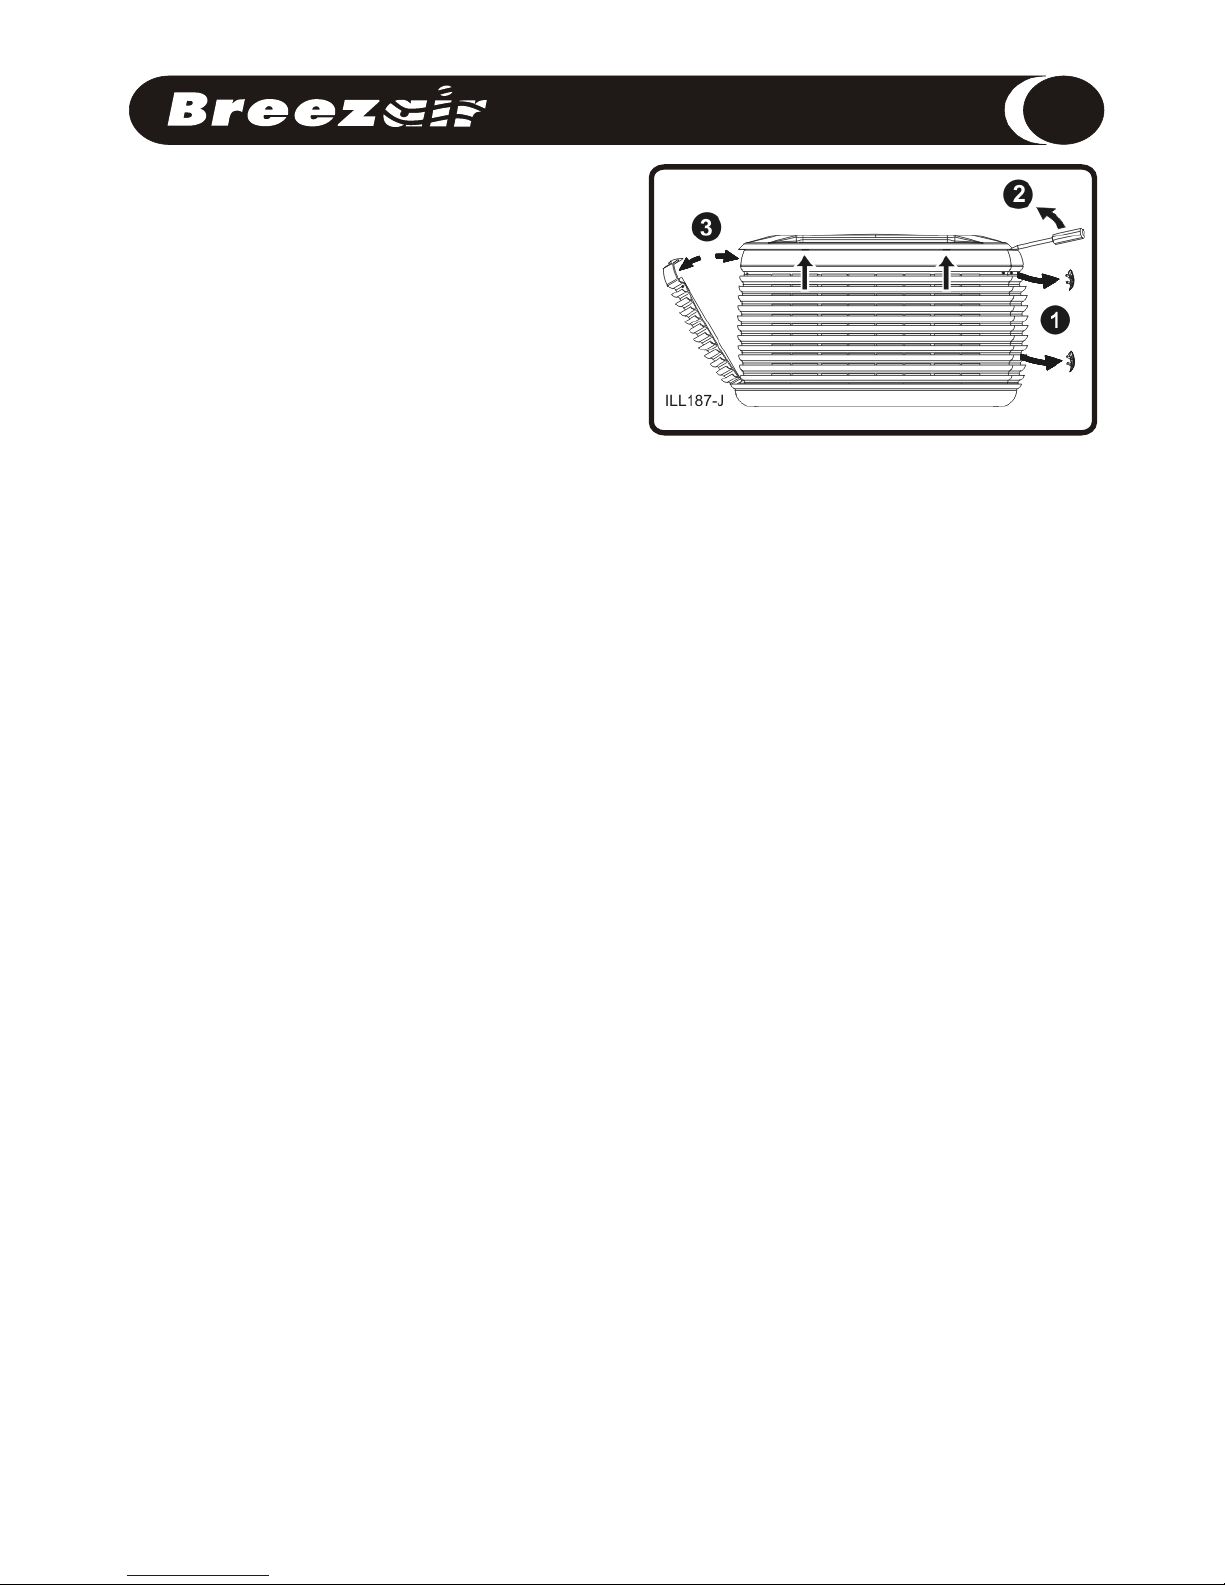
REMOVAL OF PAD FRAMES
•Turn off the main power supply to the air
cooler
•Remove the pad frames as shown.
•Ensure the power switch in the cooler is
off.
•Gently wash the pads to remove any
dust build up during the winter
period. If the pads are in poor
condition, replace them.
IMPORTANT! Do not damage the
pads with high pressure water
spray.
•Turn on the power switch inside the
cooler.
•Turn on the water and then the main
power.
•Re-fit the pad frames and run the cooler.
WARNING! Do not run the air
cooler with the pad frames
removed.
To remove a pad frame, insert a flat screw
driver tip into the slot as shown and lever
until disengagement occurs.
Take hold of the pad frame and pull it
towards you until the internal side clips
disengage.
Pivot the pad frame outwards and lift up.
Take care not to damage the pad. Repeat
these steps for the remaining pad frames.
9
®10
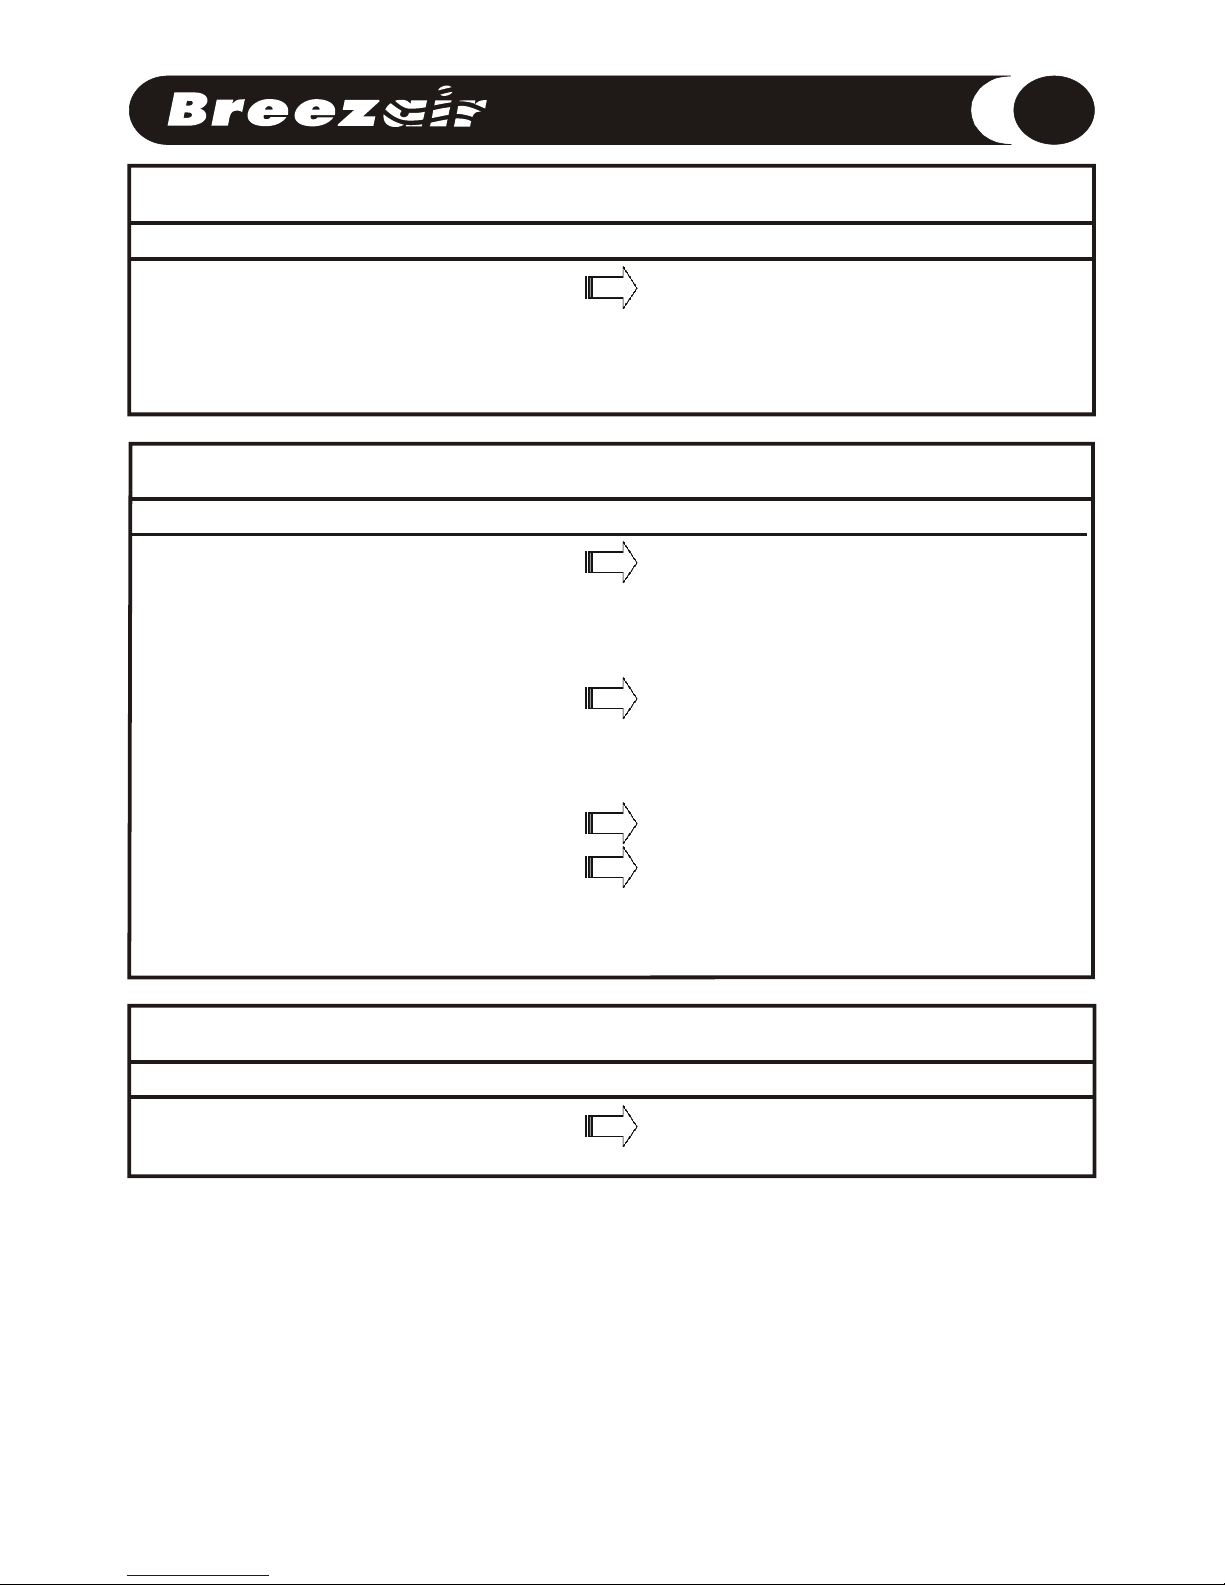
TROUBLESHOOTING GUIDE
PROBLEM – Inadequate Cooling
CAUSE ACTION
1. Pump not working correctly Check plug, wiring and circuit breaker.
Impellor may be jammed or obstructed.
Check salinity sensor correctly installed Rectify
fault or replace pump.
2. Dry pads. Check water flow to pads.
Inspect fitment of distributor cap.
Check for blocked or kinked hose. If blocked,
dismantle, clean and flush or unkink the hose.
3. Leaking ducts Find leaks and seal.
4. Weatherseal failing to open. Break off transport clips.Check for
weatherseal/transition screw interference.
Check minimum fan speed setting
PROBLEM – Unpleasant Odour
CAUSE ACTION
1. Odour from new pads. Allow time to condition by running the air
cooler
PROBLEM – Wall Control Flashes “Service”
CAUSE ACTION
1. An operational fault has been
detected Ensure the water supply has been turned on.
Check the cooler drain pipe is not blocked.
Turn off the Wall Control and record the
number displayed on the screen. Quote this
If your wall control display flashes “Service” or should you consider that your air cooler
requires service, you should contact your local Dealer.
When you contact your Dealer regarding service or warranty please quote the cooler
model number and serial number as shown below.
Model No. _________________ Serial No. _____________________
10

®1
INDICE
2
3
7
8
10
Introducción
Funciones del Panel de Control
Válvula de Drenaje
Mantenimiento
Solución de Fallos
2
3
7
8
10
11
ENFRIAMEINTO EFICAZ
Para proveer un enfriamiento o ventilación
eficiente, el edificio debe tener suficientes
aberturas de salida al exterior, ya sea en
forma de puertas, ventanas u otros
respiraderos. Para ayudar la circulación de
aire, abra las ventanas o puertas que estén
más alejadas de la boca de salida de aire
frío en cada habitación. En cada habitación
que tenga una boca de salida de aire frío,
debe proveerse una abertura al exterior que
sea 2 a 2.5 veces más grande que la medida
de la boca de salida de aire frío instalada en
la habitación. Cuando el diseño del edificio
no ofrece una abertura de salida al exterior,
se debe considerar la provisión de un
mecanismo mecánico de extracción tal
como un extractor de aire.
Las aberturas mínimas para todo el edificio
se indican en la siguiente tabla:
Felicitaciones por elegir un climatizador
de aire Breezair.
Su climatizador está construido con
materiales de la más alta calidad y está
diseñado para proveer años de
climatización de aire de manera
económica y sin problemas.
Tómese unos minutos para leer estas
instrucciones para entender cómo
funciona su climatizador de aire. El
instalador debe mostrarle las
características y procedimientos que se
explican en estas instrucciones. El
instalador debe también entregarle el
Modelo y Número de Serie, los cuales
pueden anotarse en la última página.
Si el cable de alimentación esta dañado,
debe ser reemplazado con un cable
especial disponible del fabricante o de
sus agentes de servicio
Guarde estas instrucciones en un
lugar seguro como futura
referencia.
Este aparato no debe ser usado por
personas (incluyendo niños) con
capacidad física, sensorial o mental
reducida, o por personas sin experiencia
y conocimiento, a menos que sean
supervisadas o hayan recibido
instrucciones respecto al uso del aparato
por una persona que se haga
responsable de su seguridad. Los niños
deben ser supervisados para asegurar
que no jueguen con el aparato.
Note que la medida promedio de una
2
puerta es 1.5m .
®2
INTRODUCCION
EXH130 2
2.0m
2
2.5m
2
3.0m
2
4.0m
EXH170
EXH190
EXH210
Modelo de
Climatizador
Abertura de
Extracción al Exterior
12
®3
PUESTA EN MARCHA DEL
CLIMATIZADOR
El botón de (Encendido)
enciende y apaga el climatizador.
Se puede elegir entre dos modalidades
de funcionamiento, modalidad
AUTOMATICA o modalidad MANUAL.
Cuando se enciende el climatizador, éste
arrancará en la modalidad de
funcionamiento que estaba cuando se
apagó.
Si su climatizador estuvo sin funcionar
por un tiempo, al encenderlo algunas
veces puede aparecer en el display las
palabras “Pre-Cool Cycle” (Ciclo de Pre-
Enfriamiento), como se ilustra.
Esto indica que la bomba de agua
funcionará para saturar los filtros de
enfriamiento durante unos minutos antes
de que se encienda el ventilador. Esto es
para asegurar que, una vez que arranca
el ventilador, solamente entre aire frío al
edificio.
FUNCIONES DEL PANEL DE CONTROL
ILL1122-B
13
®4
MODALIDAD AUTOMATICA
El botón se usa para seleccionar
la modalidad Automática o la modalidad
Manual. Cuando aparece la palabra
“Auto” el climatizador está bajo control
automático y funcionará según la
temperatura que detecte el panel de
control.
Cuando se enciende, el climatizador de
aire lee la temperatura y fija el
funcionamiento del climatizador de
acuerdo a la misma. Si la temperatura
aumenta en el panel de control, la
velocidad del ventilador aumenta.
Cuando la temperatura disminuye la
velocidad del ventilador disminuye hasta
que se apague el climatizador.
Apriete o para dejar sin
efecto el nivel de enfriamiento fijado y
poder ajustar la temperatura de la
habitación.
MODALIDAD MANUAL
Para pasar a Modalidad Manual, apriete
Hasta que aparezca la palabra
“Man” en el display. En la modalidad
Manual, el nivel de enfriamiento se
puede ajustar manualmente.
En la modalidad Manual, apriete
(Enfriar) para elegir entre
circular aire frío o aire sin enfriar. Cuando
aparece “Cool” en el display, en el
edificio circulará aire frío. Cuando
aparece “Vent”, como se ilustra, en el
edificio circulará aire puro sin enfriar.
Apriete para aumentar la
velocidad del ventilador y para que
circule más aire. Apriete t para disminuir
la velocidad del ventilador y que circule
menos aire. Apriete u n a v e z
para cambiar la velocidad en
incrementos de a uno. Mantenga el
botón apretado para cambiar la
velocidad más rápidamente.
.
FUNCIONES DEL PANEL DE CONTROL
DISPLAY EN MODALIDAD AUTOMATICA
DISPLAY EN MODALIDAD MANUAL
ILL1123-B
ILL1122-B
ILL1124-BILL1124-B
14

ARRANQUE AUTOMATICO A UNA
HORA DETERMINADA
Usted puede programar el climatizador de
aire para que arranque después de un número
de horas determinadas.
1. Para programar la hora de arranque,
apriete el botón con el climatizador
apagado en OFF, Aparecerá “Starting in” en el
display, como se ilustra, junto con la última
modalidad de funcionamiento (Manual o
Automático).
2. Si desea encender el climatizador de aire
en modalidad Automática con los programas
anteriores, apriete hasta que aparezca
“Auto” en el display. Alternativamente, si
desea que el climatizador arranque en
modalidad Manual, apriete hasta que
aparezca “Man” en el display, luego apriete
y luego o para fijar la
velocidad deseada del ventilador.
3. Para fijar el tiempo a transcurrir hasta la
hora de arranque, apriete .
4. Luego apriete o para
ajustar el tiempo. El climatizador puede
programarse para arrancar hasta 24 horas
por adelantado.
5. Apriete nuevamente para iniciar
el arranque automático a una hora
determinada. El arranque automático no se
repetirá.
PARADA AUTOMATICA A UNA HORA
DETERMINADA
Usted puede programar el climatizador para
que se apague después de un cierto número
de horas.
1. Para fijar una hora determinada de
detención, apriete con el climatizador
en marcha. Aparecerá “Stopping in” en el
display.
2. Apriete o para ajustar el
número de horas de funcionamiento antes de
que el climatizador se apague. La demora
máxima que se puede fijar para detenerse es
de 24 horas.
3. Apriete nuevamente para fijar la
parada programada.
®5
4.
5.
3.
3.
2. 2.
2.
1.
1.
OR
FUNCIONES DEL PANEL DE CONTROL
ILL1118-B
ILL1117-B
ILL1119-B
15

®6
FUNCIONES DEL PANEL DE CONTROL
USO DEL CLIMATIZADOR
Ahora que ha leído estas instrucciones,
apriete el botón
(Encendido) para poner en marcha su
climatizador de aire Breezair. Si el
climatizador no ha funcionado por un
tiempo, en el display aparecerá “Pre
Cool Cycle” (Ciclo de Pre-Enfriamiento)
en forma intermitente. El “Pre Cool
Cycle” comenzará y se completará en
unos pocos minutos. Después de este
tiempo, el ventilador comenzará a andar
automáticamente y usted podrá disfrutar
del confort del aire fresco y puro.
fffffff
AIRE NO SUFICIENTEMENTE FRIO
Usted puede notar que no se siente
suficientemente fresco con el
climatizador funcionando en modalidad
Automática. Simplemente apriete
para aumentar el enfriamiento.
Si no se siente suficientemente fresco con
el climatizador funcionando en la
modalidad Manual, apriete para
aumentar la velocidad del ventilador.
Asegúrese de que esté circulando aire
frío apretando hasta que “Cool”
aparezca en el display.
Usted puede experimentar con los
controles del Panel de Control. Esta
es la mejor manera de familiarizarse
y sacar el mejor provecho de su
AIRE DEMASIADO FRIO
Con el climatizador en marcha en
modalidad Automática, usted puede
notar que hace demasiado frío y que el
climatizador de aire está impulsando
mucha cantidad de aire. Apriete
para disminuir la temperatura
seleccionada automáticamente y para
reducir la cantidad de enfriamiento.
Si está muy frío y el climatizador está en
la modalidad Manual, apriete
para reducir la velocidad del
ventilador. Usted puede también hacer
circular aire puro sin enfriar apretando
Hasta que en el display aparezca
“Vent”.
.
16

4 Horas
1 Día
2 Días
4 Días
Número en el display
00
01
02
04
03 STANDARD 3 Días
Drenaje después de:
®7
VALVULA DE DRENAJE
Número en el display Método de Control
de Salinidad
00
01
STANDARD Sensor de Salinidad
Tiempo de Drenaje
VALVULA DE DRENAJE
AUTOMATICO
Si se instaló la válvula de drenaje en lugar del
sistema alternativo de drenaje, su
climatizador automáticamente reemplazará
el agua durante su funcionamiento cuando
la salinidad del agua aumente mucho. Esto
asegura que el agua sea siempre pura, y
ayuda a mantener el climatizador en buenas
condiciones, lo que a su vez asegura una
óptima eficiencia de enfriamiento.
Alternativamente y si es necesario, el
climatizador se puede programar para que
reemplace parte del agua después de un
tiempo determinado de funcionar enfriando.
La frecuencia del drenaje automático puede
ya haber sido fijada por el instalador.
Usted puede ajustar el método de reemplazo
de agua siguiendo los siguientes pasos.
1.Cuando el climatizador está apagado,
apriete y mantenga apretado .
2.Mientras todavía está apretando ,
apriete .
3.En el display aparecerá un número el cual
corresponde al método de control de
salinidad seleccionado como lo muestra la
tabla siguiente.
Apriete o para cambiar el
número que aparece en el display
correspondiente al método de control de
salinidad deseado.
4.Apriete para fijar su selección.
VALVULA DE DRENAJE
AUTOMATICA
Cuando el climatizador no ha
funcionado durante 72 horas, la válvula
de drenaje se abrirá automáticamente
para vaciar toda el agua del
climatizador. Si fuera necesario, usted
puede variar este periodo de tiempo
siguiendo los siguientes pasos.
1. Cuando el climatizador está
apagado, apriete y mantenga apretado
.
2. Mientras tiene apretado ,
apriete .
3. En el display aparecerá un número
indicando el periodo de tiempo después
del cual se producirá el drenado, según
se indica en la siguiente tabla.
Apriete o para seleccionar
la cantidad de tiempo deseada.
4. Apretar para fijar la
selección.
En cualquier momento mientras el panel
de control está en OFF (apagado), usted
puede drenar el climatizador
simplemente apretando y manteniendo
apretado y durante 1
segundo. En el display aparecerá “dr”
para confirmar que se ha activado la
función.
17
®8
MANTENIMIENTO
Si su climatizador tiene instalada una
válvula de drenaje automática, al finalizar
la temporada de verano no es necesario
drenar el agua. Sin embargo, se aconseja
chequear la bomba, la válvula de drenaje,
el solenoide y el motor del ventilador cada
dos años. Si se instaló el sistema de
alternativa, el mantenimiento debe
llevarse a cabo antes y después de la
temporada de verano como se describe a
continuación.
ADVERTENCIA: Se recomienda que el
mantenimiento sea llevado a cabo por un
agente de servicio autorizado. El subirse al
tejado es peligroso y puede resultar en
lesiones personales o en daño a la
propiedad. Se debe desconectar la
alimentación eléctrica antes de quitar los
paneles de filtro, de lo contrario correrá el
riesgo de lesionarse.
REGULACIONES SANITARIAS
Nótese que algunas autoridades
reguladoras exigen que los climatizadores
evaporativos reciban un servicio de
mantenimiento a intervalos de tiempo
específicos.
SERVICIO DE MANTENIMIENTO DE
FIN DE TEMPORADA
• Desconecte la alimentación de
electricidad al climatizador.
• Desconecte la alimentación de agua al
climatizador.
• Quite los paneles de los filtros como
se ilustra.
• Desconecte el interruptor de
alimentación de dentro del climatizador.
• Chequee y limpie las canaletas de
agua de la tapa.
• Limpie completamente el tanque y el
filtro de la bomba. No vuelva a colocar el
sistema de drenaje. (Si se instaló una
válvula de drenaje esto no es necesario ya
que el drenaje se hace automáticamente.)
• Vuelva a colocar los paneles de los
filtros.
MANTENIMIENTO
18
®9
MANTENIMIENTO
SERVICIO DE MANTENIMIENTO DE
PRE-TEMPORADA
• Desconecte la alimentación de
electricidad al climatizador.
• Quite los paneles de los filtros según se
ilustra.
• Asegúrese que el interruptor de
electricidad del climatizador esté apagado.
• Suavemente lave los filtros para quitar el
polvo acumulado durante la temporada de
invierno. Si los filtros están en malas
condiciones, reemplácelos.
IMPORTANTE: No dañe los filtros con un
chorro de agua a alta presión.
• Vuelva a colocar el sistema de drenaje si
fue quitado durante el mantenimiento de
final de la temporada anterior, y asegúrese
de que la junta tórica (empaquetadura) esté
colocada. (Si el climatizador tiene instalada
una válvula de drenaje, esto no es necesario
ya que la misma se cierra automáticamente
cuando se enciende el climatizador.)
• Encienda el interruptor de electricidad de
dentro del climatizador.
• Conecte el agua y luego la electricidad.
• Vuelva a colocar los paneles de los filtros
y ponga en marcha el climatizador.
ADVERTENCIA: No haga funcionar el
climatizador sin los paneles de los filtros.
DESMONTAJE DE LOS PANELES DE
LOS FILTROS
Para quitar el panel del filtro, inserte la punta
de un destornillador plano en la ranura
como se ilustra y haga palanca hasta que se
desenganche.
Sostenga el panel y tire hacia usted hasta que
los clips internos se desenganchen.
Haga pivotar el panel hacia afuera y
levántelo. Tenga cuidado de no dañar el
filtro. Repita estos mismos pasos con los
otros paneles. 19
Table of contents
Languages:


