Brentwood Select AF-2410S Quick guide
© 2021 Brentwood Appliances, Inc.
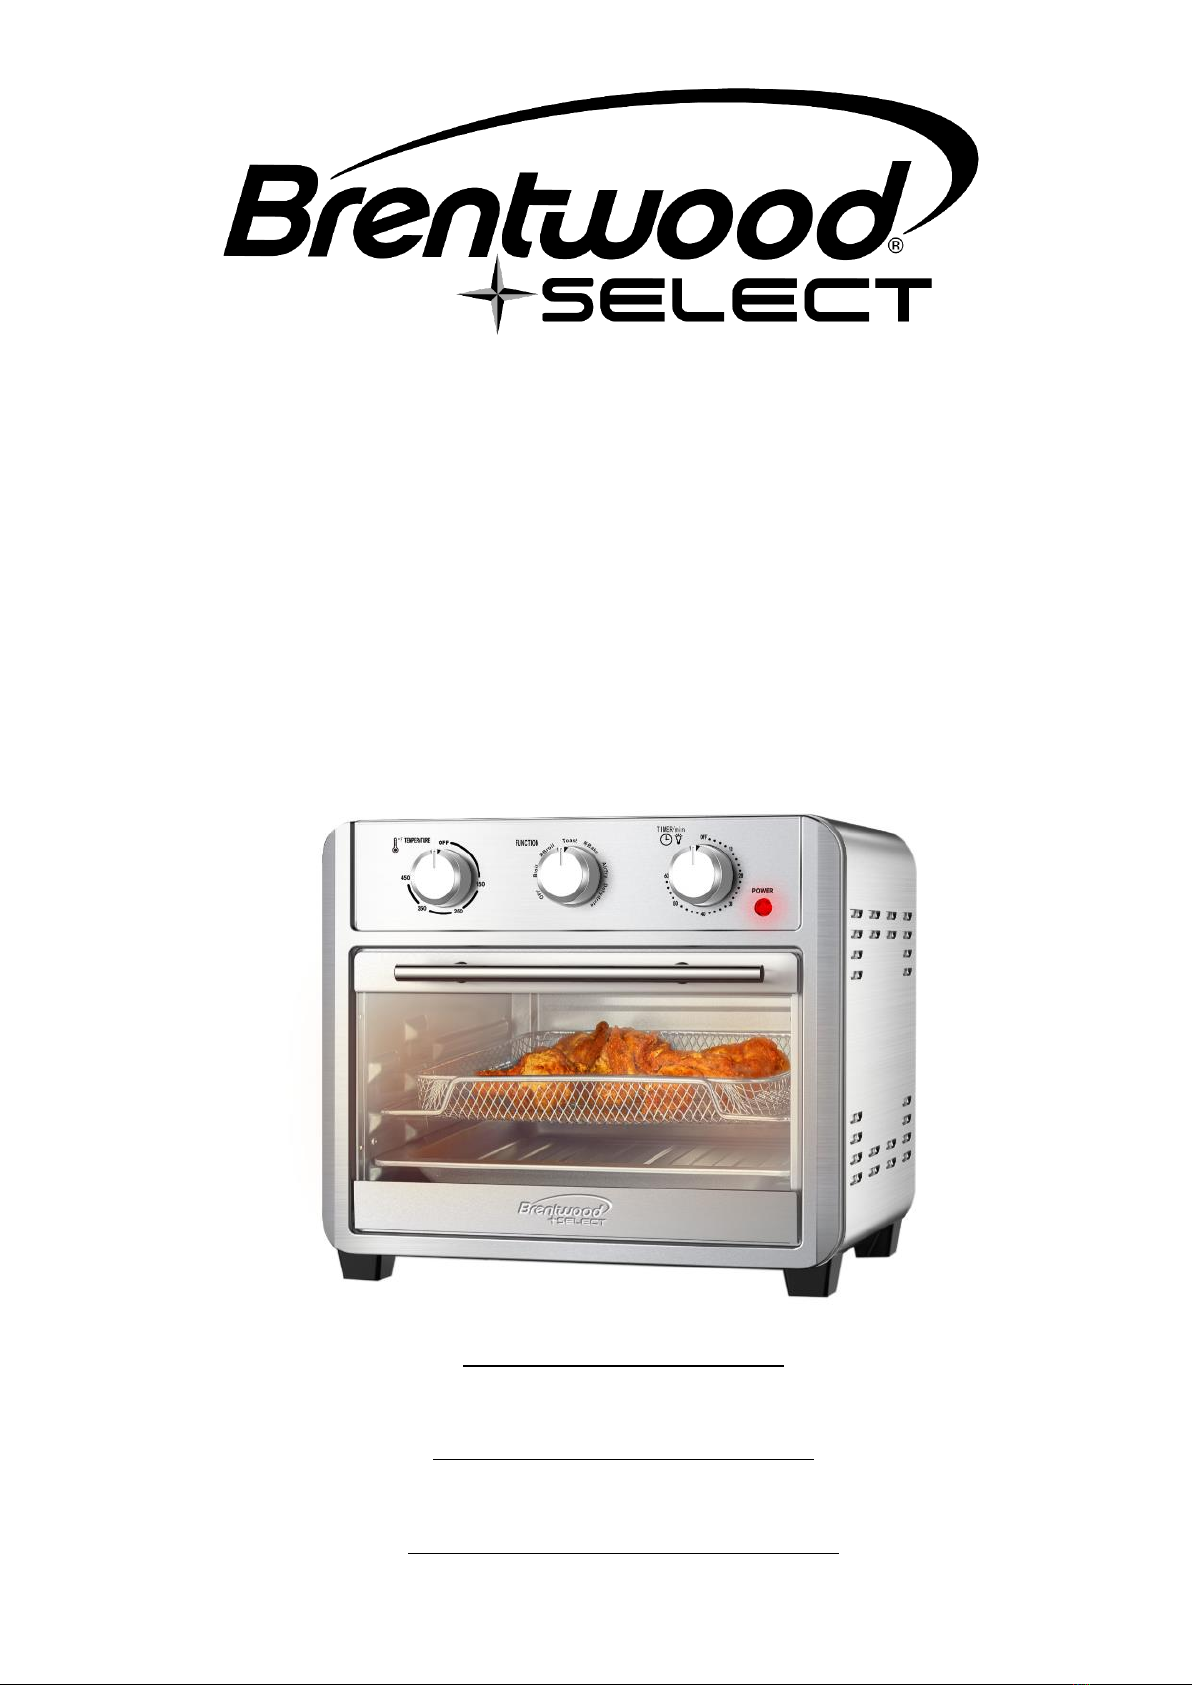
6 IN 1 AIR FRYER OVEN
6 EN 1 HORNO DE FREIDORA DE AIRE
6 EN 1 FOUR FRITEUSE À AIR
INSTRUCTION MANUAL
ITEM NO: AF-2410S
Operating and Safety Instructions
FOR INDOOR HOUSEHOLD USE ONLY
Instrucciones de Operación y Seguridad
SOLO PARA USO DOMESTICO
Consignes de Sécurité et de Fonctionnement
POUR USAGE DOMESTIQUE INTÉRIEUR SEULEMENT

IMPORTANT SAFEGUARDS
When using this or any other electrical appliance, always follow these basic safety precautions,
especially when children are present.
READ ALL INSTRUCTIONS BEFORE USE
This product is an electric heating appliance. For your safety and convenience, please read this Manual
carefully and follow the steps. Please keep it for future reference.
I. Before Use
Please observe the following safety precautions before using this product:
1. Please read this user manual carefully before using the product.
2. Do not immerse the power cord, plug and oven in water in case of electric shock.
3. Before using this oven, be sure to untie all the power cords wrapped around the back to avoid the
accident.
4. When the electric oven is working or after use, the external surface temperature is high, and touch
is not allowed to prevent burns.
5. Use this product with extra care when children are around. Children are not allowed to use this
product on their own or keep it out of reach of children.
6. When the timer is on, do not swing the plug or socket to avoid strong currents and injuries by
sparks.
7. Never hang the power cord on the edge of a cabinet/table or on a hot surface.
8. If the power cord or plug is damaged, or the oven fails, stop using it and seek a professional to repair
or replace it.
9. If the power cord is damaged, it shall be replaced by the manufacturer or a professional to avoid
danger.
10. Do not damage, bend, stretch, or twist the power cord; do not place heavy objects on the power
cord or clamp the power cord.
11. When the electric oven is not in use, the plug shall be pulled out of the socket to avoid electric shock
or electric leakage fire due to insulation aging.
12. The matching accessories shall be used correctly to avoid fire or injuries caused in operation.
13. The electric oven shall be placed in a dry environment and shall not be used outdoors.
14. During the use of the electric oven, it is necessary to keep a distance of at least 4 inches.
15. Keep the electric oven in a stable place and keep it away from flammable materials.
16. Only consumable food can be baked in the oven. Do not put large pieces of food or metal objects in

the electric oven in case of fire or danger.
17. To bake greasy oily foods (such as meat), put the bake tray on the bottom layer to prevent the oil
from falling onto the bottom heating tube to cause a flame.
18. Do not place the following items in the oven for grilling, such as paper, cards, plastic, cloth, and
flammable items.
19. When moving or repairing the electric oven, unplug the power cord and wait for the electric oven to
cool before proceeding.
20. When the electric oven is working, do not open the oven door to move the bake tray or other
accessories to avoid burns caused by high temperature or high-temperature liquid.
21. Avoid sharp edges when using electric ovens.
22. Do not place anything on the electric oven. Do not cover or obstruct the heat dissipation position of
the electric oven.
23. No items are allowed on the glass door.
24. Bake trays or other items are not allowed to be put directly on the heating elements of the electric
oven.
25. Please watch out for starchy foods (such as bread) to avoid fire.
26. Once the set cooking time is done, it will beep notifying you it is complete and safe to open the oven
door.
27. This product is for home use only. Do not use this oven for any other purpose not specified.
28. All maintenance must be carried out by professional personnel.
29. This appliance cannot be operated with an external timer or a separate remote control.
30. This device cannot be used by children, mental patients, people with physical challenges and those
who are slow to respond unless guided by a person who is able to use it.
SAVE THESE INSTRUCTIONS
FOR FUTURE REFERENCE

II. Labels and Function Description
Broil
Upper baking: Two upper heating tubes on both sides
Broil
Upper baking + convection: Two upper heating tubes on both
sides+ convection
Toast
Upper and bottom baking: Two upper heating tubes on both sides
+ bottom heating tubes at the same time
Bake
Upper and bottom baking + convection: Two upper heating tubes
on both sides + bottom heating tubes + convection
Airfry
Airfryer: All upper heating tubes + convection
Dehydrate
Upper baking + convection: Two upper heating tubes in the
middle + convection
III. Names of Main Parts
Bake Tray
Air fry Basket
Bake Rack
Crumb Tray
Tray Handle
Indicator
Temperature
Knob
Timer
Door Handle
Function
Knob
Oven Door

III. User Guide
Note before using electric oven for the first time:
1. Read the User Manual carefully.
2. Remove all accessories and parts from the oven or package.
3. Use warm water to clean accessories. Wipe the inside of the oven with a soft, soapy cloth
and wait until it is completely dry.
4. There shall be enough space around the oven and make sure the surface of the oven is more
than 4 inches from the other objects. No objects shall be put on the top of the oven.
5. Before using the electric oven for the first time, set the temperature knob to the maximum
(450°F scale mark), preheat it for 10-15 minutes to remove the machine oil from the electric
oven. It is normal if smoke appears when used.
1. Accessories
Bake tray: used to bake the food.
Bake rack: used to bake the food.
Tray handle: used to take out the bake tray and bake rack.
Air Fry basket: used for small-sized food.
Crumb tray: used to hold the oil.
2. General Steps
➀Put the bake tray or bake rack on the appropriate layer of the chamber, depending on the size
of the food.
➁Put the food on the bake tray or bake rack.
➂Use the Temperature knob to select the desired temperature.
➃Turn the Function knob clockwise to select the appropriate function, depending on how to cook
the food.
➄Turn the Timer clockwise to set the baking time according to the size of the food and baking
color preferred.
➅When finished, turn the Function knob to "OFF", and the Timer to "OFF".
➆Remove food with oven gloves or tray handle.

Tips: Do not use flammable materials such as plastic or paper; do not use glass or ceramic plates or lids; do
not let the grease drip directly to the bottom of the oven. When baking foods with much fat, place the bake
tray on the grill and place the crumb tray on the bottom rack; set the desired temperature according to the
recipe or personal preference.
3. Broil
The ‘Broil’ function places food close to the oven's heating element so that it
can quickly cook, brown, char or caramelize.
➀Put the bake tray or bake rack on the middle or top layer of the chamber.
➁Put food that needs to be defrosted on the bake tray or bake rack.
➂Use the Temperature knob to set the desired temperature.
➃Set the function to Broil. After the power is turned on, the two upper side heating tubes
will heat up at the same time.
➄The indicator light will be on when the power is on. Use the Timer to set the baking time
in a clockwise direction.
➅When you hear signal sound, the pre-set time is off and take the food out with special
accessories.
4. Convection Broil
The ‘Convection Broil’ function shortens broiling times for thicker cuts of meat,
fish, and poultry.
➀Put the bake tray or bake rack on the middle or top layer of the chamber.
➁Put the prepared food on the bake tray or bake rack.
➂Use the Temperature knob to select the desired temperature.
➃Turn the Function knob clockwise to Broil, and the two upper side heating tubes and
the air fan will work at the same time, after the power is on.
➄The indicator light will be on when the power is on. Use the Timer to set the baking time
in a clockwise direction.
➅When you hear signal sound, the pre-set time is off. Make sure the food is cooked
enough and take it out with special accessories.

5. Toast
The ‘Toast’ function applies an equal amount of heat from the top and the
bottom perfect for evenly cooking foods like toast, sandwiches, and more.
➀Put the bake tray or bake rack on the middle or bottom layer of chamber.
➁Put the prepared food on the bake tray or bake rack.
➂Use the Temperature knob to select the desired temperature.
➃Turn the Function knob clockwise to Toast, and the two upper side heating tubes and bottom
heating tubes will work at the same time, after the power is on.
➄The indicator light will be on when the power is on. Use the Timer to set the baking time in a
clockwise direction.
➅When you hear signal sound, the pre-set time is off. Make sure the food is cooked enough and
take it out with special accessories.
6. Convection Bake
The ‘Convection Bake’ function circulates air, which results in a steady, dry
temperature. Foods will cook faster and the surface of foods will be dry. Best
for browning, roasting, and quick baking.
➀Put the bake tray or bake rack on the middle or bottom layer of chamber.
➁Put the prepared food on the bake tray or bake rack.
➂Use the Temperature knob to select the desired temperature.
➃Turn the Function knob clockwise to Bake. After the power is on, the two upper side heating
tubes, bottom heating tubes and the air fan will work at the same time.
➄The indicator light will be on when the power is on. Use the Timer to set the baking time in a
clockwise direction.
➅When you hear signal sound, the pre-set time is up. Make sure the food is cooked enough and
take it out with special accessories.

7. Air Fry
The ‘Air Fry’ function rapidly circulates very hot air around the food to produce
a crunchy, crispy exterior. Faster than convection bake and ideal for foods that
would traditionally be deep fried.
➀Put the bake tray or bake rack on the top layer of the chamber.
➁Put the food on the bake tray or bake rack (also for the food that requires the rotisserie or bake
cage).
➂Use the Temperature knob to set the desired temperature.
➃Turn the function knob clockwise to Air Fry. When the power is on, all the upper heating tubes
and air fan will work at the same time.
➄After the power is on, turn the Timer clockwise to set the baking time, and the power indicator
will be on.
➅When you hear signal sound, the pre-set time is up. Make sure the food is cooked enough and
take it out with special accessories.
8. Dehydrate
The ‘Dehydrate’ function is used for drying various fruits, vegetables, and meats.
➀Put the bake tray or bake rack on the middle or top rack.
➁Put food on the bake tray or bake rack.
➂Use the Temperature knob to set the desired temperature.
➃Turn the Function knob clockwise to Dehydrate. When the power is on, the two upper middle
heating tubes and air fan will work at the same time.
➄The indicator light will be on when the power is on. Use the Timer to set the baking time in a
clockwise direction.
➅When you hear signal sound, the pre-set time is off. Make sure the food is cooked enough and
take it out with special accessories.
Note: The baking time is adjusted depending on the temperature and size of the food. Frozen and
chunky foods generally take longer to bake.

IV. Cooking Guide
1. Cooking time varies according to the temperature, quantity, and weight of the food. Please refer
to the recipe table.
2. For continuous cooking, since the starting temperature inside is high, cooking time can be shorter
than the time when used for the first time. Please make adjustment according to the actual food.
3. When the heating temperature in the oven is too high, the built-in thermostat will automatically
shut off and the heating tube will stop working. Once cooled, the oven will be operatable again.
Always use a food thermometer to check internal food temperature. The following cooking times
are estimates and food may require additional cooking time.
Types of Food
Temperature inside Oven
Cooking Time
Steak
450℉
10-20 minutes
Ribs
450℉
20-30 minutes
Prawn
355℉
10-12 minutes
Sausages
355℉
12-15 minutes
Beef cake
450℉
15-17 minutes
Egg tart
450℉
18-20 minutes
Doughnut
450℉
7-10 minutes
Chips
450℉
25-30 minutes
Toasts
450℉
5-8 minutes
Chicken wings
450℉
15-18 minutes
V. Clean and Maintenance
1. Unplug the power cord before cleaning the oven and allow the oven to cool down completely.
2. The inner and outer surfaces of the electric oven and accessories can be cleaned with a soft cotton
cloth or sponge with a neutral detergent and cleaned with water.
3. Do not use hard brushes or articles for cleaning to avoid damaging the inner surface of the electric
oven and the protective layer of accessories.
4. Do not use toxic and corrosive cleaning agents such as gasoline, thinners, or polish.
5. The cleaned parts must be wiped dry before plugging in.
6. Please do not clean the heating tube, the heating tube cleans itself.
7. Do not immerse the electric oven in a liquid such as water.

ONE YEAR LIMITED WARRANTY
Write down the following information about your appliance to better help you obtain assistance or service if you ever
need it.
CUSTOMER RECORD
Date of
Purchase___________________________________Store/Dealer_________________________________________
Model/Item No: _______________________________
THIS WARRANTY APPLIES TO PRODUCTS PURCHASED AND USED IN THE CONTINENTAL U.S. AND CANADA ONLY. This is
the only express warranty for this product and is in lieu of any other warranty or condition. This product is warranted to
be free from defects in material and workmanship for a period of one (1) year from the date of original purchase. During
this period, your exclusive remedy is repair or replacement of this product, at our option; however, you are responsible
for all costs associated with returning the product to us and our returning a product or component under this warranty
to you. If the product or component is no longer available, we will replace with a similar one of equal or greater value.
This warranty does not cover glass, filters, wear from normal use, use not in conformity with the printed directions, or
damage to the product resulting from accident, alteration, abuse, or misuse.
THIS WARRANTY EXTENDS ONLY TO THE ORIGINAL CONSUMER PURCHASER. KEEP THE ORIGINAL SALES RECEIPT, AS
PROOF OF PURCHASE IS REQUIRED TO MAKE A WARRANTY CLAIM.
This warranty is void if the product is used for other than single-family household use or subjected to any voltage and
waveform other than what is specified on the rating label (E.G., 120V~60Hz). We exclude all claims for special, incidental,
and consequential damages caused by breach of express or implied warranty. All liability is limited to the amount of the
purchase price. Every implied warranty, including any statutory warranty or condition of merchantability or fitness for a
particular purpose, is disclaimed except to the extent prohibited by law, in which case such warranty or condition is
limited to the duration of this written warranty. This warranty gives you specific legal rights. You may have other legal
rights that vary depending on where you live. Some states do not allow limitations on implied warranties or special,
incidental, or consequential damages, so the foregoing limitations may not apply to you. To make a warranty claim do
not return this appliance to the store.
TO OBTAIN WARRANTY SERVICE AND/OR TROUBLESHOOTING INFORMATION:
Call Customer Service at 1-888-903-0060 in the U.S.
Monday through Friday: 9:00am –5:00pm PST.
U.S. Customers Please Email: warranty@brentwoodus.com
Canadian Customers Please Email: canada.warranty@brentwoodus.com
Go online at www.brentwoodus.com

PRECAUCIONES IMPORTANTES
Al usar este o cualquier otro electrodoméstico, siga las precauciones básicas de seguridad,
especialmente cuando niños están presentes.
LEA TODAS LAS INSTRUCTIONES ANTES DE USAR
Este producto es un aparato de calefacción eléctrico. Para su seguridad y conveniencia, por favor lea
este manual cuidadosamente y siga los pasos. Por favor, guárdelo para futuras referencias.
I. Antes del uso
Por favor, observe las siguientes precauciones de seguridad antes de usar este producto:
1. Lea atentamente este manual de instrucciones antes de utilizar el producto.
2. No sumerja el cable de alimentación, el enchufe y el horno en agua en caso de descarga eléctrica.
3. Antes de usar este horno, asegúrese de desatar todos los cables de alimentación envueltos en la
parte posterior para evitar el accidente.
4. Cuando el horno eléctrico está funcionando o después de su uso, la temperatura de la superficie
externa es alta, y no se permite tocarla para evitar quemaduras.
5. Utilice este producto con especial cuidado cuando haya niños alrededor. No se permite que los
niños utilicen este producto por su cuenta o lo mantengan fuera del alcance de los niños.
6. Cuando el temporizador esté encendido, no balancee el enchufe o la toma para evitar corrientes
fuertes y lesiones por chispas.
7. Nunca cuelgue el cable de alimentación en el borde de un armario/mesa o en una superficie
caliente.
8. Si el cable de alimentación o el enchufe están dañados, o si el horno falla, deje de utilizarlo y busque
un profesional para repararlo o reemplazarlo.
9. Si el cable de alimentación está dañado, deberá ser reemplazado por el fabricante o un profesional
para evitar el peligro.
10. No dañe, doble, estire o retuerza el cable de alimentación; no coloque objetos pesados sobre el
cable de alimentación ni lo sujete con abrazaderas.
11. Cuando no se utilice el horno eléctrico, se deberá sacar el enchufe de la toma de corriente para
evitar una descarga eléctrica o un incendio por fuga eléctrica debido al envejecimiento del aislamiento.
12. Los accesorios correspondientes deben usarse correctamente para evitar el fuego o las lesiones
causadas durante el funcionamiento.
13. El horno eléctrico se colocará en un ambiente seco y no se utilizará al aire libre.

14. Durante el uso del horno eléctrico, es necesario mantener una distancia de al menos 4 pulgadas.
15. Mantener el horno eléctrico en un lugar estable y mantenerlo alejado de materiales inflamables.
16. En el horno sólo se pueden cocer alimentos consumibles. No ponga grandes trozos de comida y
objetos metálicos en el horno eléctrico en caso de incendio o peligro.
17. Para hornear alimentos grasos y aceitosos (como la carne), coloque una bandeja de horno en la capa
inferior para evitar que el aceite caiga sobre el tubo calefactor inferior y provoque una llama.
18. No coloque los siguientes elementos en el horno para asar, como papel, tarjetas, plástico, tela y
artículos inflamables.
19. Cuando mueva o repare el horno eléctrico, desenchufe el cable de alimentación y espere a que el
horno eléctrico se enfríe antes de proceder.
20. Cuando el horno eléctrico esté funcionando, no abra la puerta del horno para mover la bandeja de
hornear u otros accesorios para evitar quemaduras causadas por alta temperatura o líquido de alta
temperatura.
21. Evite los bordes afilados cuando utilice los hornos eléctricos.
22. No coloque nada sobre el horno eléctrico. 23. No cubra ni obstruya la posición de disipación de calor
del horno eléctrico.
23. No se permiten objetos en la puerta de vidrio.
24. No se permite poner bandejas de horno u otros artículos directamente sobre los elementos
calefactores del horno eléctrico.
25. Por favor, tenga cuidado con los alimentos con almidón (como el pan) para evitar el fuego.
26. Una vez que el tiempo de cocción establecido se ha hecho, sonará un pitido para notificarle que está
completo y es seguro abrir la puerta del horno.
27. Este producto es sólo para uso doméstico. No utilice este horno para ningún otro propósito no
especificado.
28. Todo el mantenimiento debe ser realizado por personal profesional.
29. Este aparato no puede ser operado con un temporizador externo o un control remoto separado.
30. Este aparato no puede ser utilizado por niños, pacientes mentales, personas con problemas físicos y
aquellos que son lentos para responder, a menos que sean guiados por una persona que sea capaz de
utilizarlo.
GUARDE ESTAS INSTRUCCIONES
COMO REFERENCIA

II. Etiquetas y Descripción de la Función
Asar a la Parrilla
La parte superior de la cocción: Dos tubos de calefacción superiores a
ambos lados
Asar a la Parrilla
Horneado superior + convección: Dos tubos de calefacción superiores a
ambos lados + convección
Tostar
Horneado superior e inferior: Dos tubos de calefacción superiores en
ambos lados + tubos de calefacción inferiores al mismo tiempo
Hornear
Horneado superior e inferior + convección: Dos tubos de calefacción
superiores a ambos lados + tubos de calefacción inferiores + convección
Air Fry
Air Fryer: Todos los tubos de calefacción superiores + convección
Deshidratar
Horneado superior + convección: Dos tubos de calefacción superiores en
el medio + convección
III. Nombres de las Partes Principales
Bandeja de Horno
Cesta de Aeroplano
Bandeja de Hornear
Bandeja de Migas
Asa de la Bandeja
Indicado
r
Perilla de
Temperatura
Temporizador
Manija
Perilla de
Función
Puerta del Horno

III. Guía del Usuario
Nota antes de usar el horno eléctrico por primera vez:
1. Lea el manual de usuario con atención.
2. Retire todos los accesorios y piezas del horno o del paquete.
3. Use agua tibia para limpiar los accesorios. Limpie el interior del horno con un paño suave y
jabonoso y espere hasta que esté completamente seco.
4. Habrá suficiente espacio alrededor del horno y asegúrate de que la superficie del horno esté a
más de 4 pulgadas de los otros objetos. No se pondrá ningún objeto en la parte superior del
horno.
5. Antes de usar el horno eléctrico por primera vez, coloca la perilla de temperatura al máximo
(marca de escala de 450°F), precaliéntala durante 10-15 minutos para sacar el aceite de la
máquina del horno eléctrico. Es normal si aparece humo cuando se usa.
1. Accesorios
Bandeja de Horno: se utiliza para hornear la comida.
Bandeja de Hornear: se utiliza para hornear la comida.
Asa de la Bandeja: se utiliza para sacar la bandeja del horno y la rejilla del horno.
Cesta de Aeroplanos: se utiliza para alimentos de pequeño tamaño.
Bandeja de Migas: se utiliza para guardar el aceite.
2. Pasos Generales
➀Ponga la bandeja o la rejilla del horno en la capa apropiada de la cámara, dependiendo del
tamaño de la comida.
➁Poner la comida en la bandeja o rejilla del horno.
➂Utilice la perilla de temperatura para seleccionar la temperatura deseada.
➃Gire la perrilla de función en el sentido de las agujas del reloj para seleccionar la función
apropiada, dependiendo de cómo se cocinen los alimentos.
➄Girar el Temporizador en el sentido de las agujas del reloj para ajustar el tiempo de horneado
según el tamaño del alimento y el color de horneado preferido.
➅Cuando termine, gire el mando de función a "OFF" y el temporizador a "OFF".
➆Retire los alimentos con guantes de cocina o el asa de la bandeja.

Consejos: No utilice materiales inflamables como plástico o papel; no utilice platos o tapas de vidrio
o cerámica; no deje que la grasa gote directamente al fondo del horno. Cuando se horneen
alimentos con mucha grasa, coloque la bandeja de hornear en la parrilla y coloque la bandeja de
migas (no incluida) en la rejilla inferior; establezca la temperatura deseada según la receta o
preferencia personal.
3. Asar a la Parrilla
La función "Asar" coloca la comida cerca del elemento calefactor del horno
para que se cocine rápidamente, se dore, se carbonice o se caramelice.
➀Ponga la bandeja de hornear o la rejilla de hornear en la capa media o superior de la
cámara.
➁Poner la comida que necesita ser descongelada en la bandeja o rejilla del horno.
➂Utilice la perilla de temperatura para fijar la temperatura deseada.
➃Ponga la función en Asar. Después de que se encienda, los dos tubos de calefacción de la
parte superior se calentarán al mismo tiempo.
➄La luz indicadora se encenderá cuando se encienda la alimentación. Utilice el temporizador
para ajustar el tiempo de horneado en el sentido de las agujas del reloj.
➅Cuando oiga el sonido de la señal, el tiempo preestablecido está apagado y saque la
comida con los accesorios especiales.
4. Asar a la Parrilla
La función "Asado por convección" acorta los tiempos de asado para los cortes
más gruesos de carne, pescado y aves.
➀Ponga la bandeja o la rejilla del horno en la capa media o superior de la cámara.
➁Ponga la comida preparada en la bandeja o rejilla del horno.
➂Utilice la perilla de temperatura para seleccionar la temperatura deseada.
➃Gire la perilla de Función en el sentido de las agujas del reloj para asar, y los dos tubos de
calefacción de la parte superior y el ventilador de aire funcionarán al mismo tiempo,
después de que se encienda la cámara.
➄La luz indicadora se encenderá cuando se encienda la alimentación. Utilice el temporizador
para ajustar el tiempo de horneado en el sentido de las agujas del reloj.
➅Cuando oiga una señal sonora, el tiempo preestablecido estará desactivado. Asegúrese de
que los alimentos estén suficientemente cocidos y sáquelos con accesorios especiales.

5. Tostada
La función "Tostada" aplica una cantidad igual de calor desde la parte superior
e inferior, perfecta para cocinar uniformemente alimentos como tostadas,
sándwiches y más.
➀Ponga la bandeja de hornear o la rejilla de hornear en la capa media o inferior de la
cámara.
➁Poner la comida preparada en la bandeja de horno o en la rejilla de hornear.
➂Utilice la perilla de temperatura para seleccionar la temperatura deseada.
➃Gire la perilla de Función en el sentido de las agujas del reloj para tostar, y los dos tubos de
calefacción de la parte superior y los tubos de calefacción de la parte inferior funcionarán
al mismo tiempo, después de que se encienda la cámara.
➄La luz indicadora se encenderá cuando se encienda la alimentación. Utilice el temporizador
para ajustar el tiempo de horneado en el sentido de las agujas del reloj.
➅Cuando oiga el sonido de la señal, el tiempo preestablecido estará apagado. Asegúrese de
que los alimentos estén suficientemente cocidos y sáquelos con accesorios especiales.
6. Horno de Convección
Esta La función "Horno de Convección" hace circular el aire, lo que resulta en
una temperatura constante y seca. Los alimentos se cocinarán más rápido y la
superficie de los alimentos estará seca. Es mejor para dorar, asar y hornear
rápidamente.
➀Ponga la bandeja de hornear o la rejilla de hornear en la capa media o inferior de la
cámara.
➁Poner la comida preparada en la bandeja de horno o en la rejilla de hornear.
➂Utilice la perilla de temperatura para seleccionar la temperatura deseada.
➃Gire la perilla de Función en el sentido de las agujas del reloj para tostar, y los dos tubos de
calefacción de la parte superior y los tubos de calefacción de la parte inferior funcionarán
al mismo tiempo, después de que se encienda la cámara.
➄La luz indicadora se encenderá cuando se encienda la alimentación. Utilice el temporizador
para ajustar el tiempo de horneado en el sentido de las agujas del reloj.
➅Cuando oiga el sonido de la señal, el tiempo preestablecido estará apagado. Asegúrese de
que los alimentos estén suficientemente cocidos y sáquelos con accesorios especiales.

7. Air Fry
La función "Alevín de aire" hace circular rápidamente aire muy caliente
alrededor de la comida para producir un exterior crujiente y crujiente. Más
rápido que el horneado por convección e ideal para alimentos que
tradicionalmente se freirían.
➀Ponga la bandeja de hornear o la rejilla de hornear en la capa superior de la cámara.
➁Poner la comida en la bandeja de hornear o en la rejilla de hornear (también para la
comida que requiere el asador o la jaula de hornear).
➂Utilice la perilla de temperatura para fijar la temperatura deseada.
➃Gire el mando de función en el sentido de las agujas del reloj hasta Air Fry. Cuando la
energía está encendida, todos los tubos de calefacción superiores y el ventilador de aire
funcionarán al mismo tiempo.
➄Después de que la energía esté encendida, gira el temporizador en el sentido de las agujas
del reloj para ajustar el tiempo de horneado, y el indicador de energía estará encendido.
➅Cuando escuches el sonido de la señal, el tiempo preestablecido se habrá acabado.
Asegúrese de que los alimentos estén suficientemente cocidos y sáquelos con accesorios
especiales.
8. Deshidratar
La función "Deshidratar" se utiliza para secar varias frutas, verduras y carnes.
➀Ponga la bandeja de hornear o la rejilla de hornear en la rejilla central o superior.
➁Poner la comida en la bandeja de horno o en la rejilla de hornear.
➂Utilice la perilla de temperatura para ajustar la temperatura deseada.
➃Girar la perilla de Función en el sentido de las agujas del reloj para deshidratar. Cuando la
energía está encendida, los dos tubos de calefacción del medio superior y el ventilador de
aire funcionarán al mismo tiempo.
➄La luz indicadora se encenderá cuando la alimentación esté encendida. Utilice el
temporizador para ajustar el tiempo de horneado en el sentido de las agujas del reloj.
➅Cuando oiga una señal sonora, el tiempo preestablecido estará desactivado. Asegúrese de
que los alimentos estén suficientemente cocidos y sáquelos con accesorios especiales.
Nota: El tiempo de horneado se ajusta en función de la temperatura y el tamaño de los
alimentos. Los alimentos congelados y con trozos suelen tardar más tiempo en hornearse.

IV. Guía de Cocina
1. El tiempo de cocción varía según la temperatura, la cantidad y el peso de los alimentos. Por favor,
consulte la tabla de recetas.
2. Para una cocción continua, dado que la temperatura inicial en el interior es alta, el tiempo de
cocción puede ser más corto que el tiempo cuando se utiliza por primera vez. Por favor, haga el
ajuste de acuerdo con el alimento real.
3. Cuando la temperatura de calentamiento en el horno es demasiado alta, el termostato
incorporado se apagará automáticamente y el tubo de calentamiento dejará de funcionar. Una
vez enfriado, el horno será operable de nuevo.
Siempre usa un termómetro para alimentos para comprobar la temperatura interna de los alimentos.
Los siguientes tiempos de cocción son estimados y los alimentos pueden requerir un tiempo de
cocción adicional.
Tipos de alimentos
La temperatura dentro del Horno
Tiempo de Cocción
Bistec
450℉
10-20 minutos
Costillas
450℉
20-30 minutos
Gambas
355℉
10-12 minutos
Salchichas
355℉
12-15 minutos
Pastel de carne
450℉
15-17 minutos
Tarta de huevo
450℉
18-20 minutos
Doughnut
450℉
7-10 minutos
Chips
450℉
25-30 minutos
Brindis
450℉
5-8 minutos
Alas de pollo
450℉
15-18 minutos
V. Limpieza y Mantenimiento
1. Desenchufa el cable de alimentación antes de limpiar el horno y deja que el horno se enfríe
completamente.
2. Las superficies internas y externas del horno eléctrico y los accesorios pueden limpiarse con un
paño de algodón suave o una esponja con un detergente neutro y limpiarse con agua.
3. No utilice cepillos duros o artículos de limpieza para evitar dañar la superficie interna del horno
eléctrico y la capa protectora de los accesorios.
4. No utilice agentes de limpieza tóxicos y corrosivos como gasolina, diluyentes o pulidores.
5. Las piezas limpias deben secarse antes de enchufarlas.
6. Por favor, no limpie el tubo calentador, el tubo calentador se limpia solo.
7. No sumerja el horno eléctrico en un líquido como el agua.

IMPORTANTES MESURES DE SÉCURITÉ
Lorsque vous utilisez cet appareil ou tout autre appareil électrique, suivez
toujours ces précautions de base, surtout en présence d’enfants.
LISEZ TOUTES LES INSTRUCTIONS AVANT USAGE
Ce produit est un appareil de chauffage électrique. Pour votre sécurité et votre confort, veuillez lire
attentivement ce manuel et suivre les étapes. Veuillez le conserver pour référence future.
I. Avant l'utilisation
Veuillez observer les mesures de sécurité suivantes avant d'utiliser ce produit:
1. Veuillez lire attentivement ce manuel d'utilisation avant d'utiliser le produit.
2. Ne pas immerger le cordon d'alimentation, la prise et le four dans l'eau en cas de choc électrique.
3. Avant d'utiliser ce four, assurez-vous de détacher tous les cordons d'alimentation enroulés autour du
dos pour éviter l'accident.
4. Lorsque le four électrique fonctionne ou après utilisation, la température de la surface extérieure
est élevée et le toucher n'est pas autorisé pour éviter les brûlures.
5. Utilisez ce produit avec une attention particulière lorsque des enfants sont présents. Les enfants ne
sont pas autorisés à utiliser ce produit seuls ou à le garder hors de leur portée.
6. Lorsque la minuterie est activée, ne faites pas pivoter la fiche ou la prise pour éviter les courants
forts et les blessures dues aux étincelles.
7. Ne suspendez jamais le cordon d'alimentation sur le bord d'une armoire/table ou sur une surface
chaude.
8. Si le cordon d'alimentation ou la prise sont endommagés ou si le four est défaillant, cessez de
l'utiliser et faites appel à un professionnel pour le réparer ou le remplacer.
9. Si le cordon d'alimentation est endommagé, il doit être remplacé par le fabricant ou un
professionnel pour éviter tout danger.
10. Ne pas endommager, plier, étirer ou tordre le cordon d'alimentation ; ne pas placer d'objets lourds
sur le cordon d'alimentation ni le serrer.
11. Lorsque le four électrique n'est pas utilisé, la fiche doit être retirée de la prise de courant afin
d'éviter tout risque de choc électrique ou d'incendie dû à une fuite électrique en raison du vieillissement
de l'isolation.
12. Les accessoires correspondants doivent être utilisés correctement pour éviter les incendies ou les
blessures causées par le fonctionnement.
13. Le four électrique doit être placé dans un environnement sec et ne doit pas être utilisé à l'extérieur.
14. Pendant l'utilisation du four électrique, il est nécessaire de garder une distance d'au moins 10

pouces.
15. Maintenez le four électrique dans un endroit stable et éloignez-le des matériaux inflammables.
16. Seuls les aliments consommables peuvent être cuits dans le four. Ne mettez pas de gros morceaux
d'aliments ou d'objets métalliques dans le four électrique en cas d'incendie ou de danger.
17. Pour cuire des aliments gras et huileux (comme la viande), placez une plaque de cuisson sur la
couche inférieure pour éviter que l'huile ne tombe sur le tube chauffant inférieur et ne provoque une
flamme.
18. Ne mettez pas les articles suivants dans le four pour la cuisson au gril, tels que le papier, les cartes,
le plastique, le tissu et les articles inflammables.
19. Lorsque vous déplacez ou réparez le four électrique, débranchez le cordon d'alimentation et
attendez que le four électrique refroidisse avant de continuer.
20. Lorsque le four électrique fonctionne, n'ouvrez pas la porte du four pour déplacer la plaque de
cuisson ou d'autres accessoires afin d'éviter les brûlures causées par une température élevée ou un
liquide à haute température.
21. Évitez les arêtes vives lorsque vous utilisez le four électrique.
22. Ne posez rien sur le four électrique. Ne pas couvrir ou obstruer la position de dissipation de la
chaleur du four électrique.
23. Aucun objet n'est autorisé sur la porte vitrée.
24. Il est interdit de poser des plaques à pâtisserie ou d'autres objets directement sur les éléments
chauffants du four électrique.
25. Veuillez faire attention aux féculents (comme le pain) pour éviter les incendies.
26. Une fois le temps de cuisson réglé, un signal sonore vous indique que la cuisson est terminée et que
vous pouvez ouvrir la porte du four en toute sécurité.
27. Ce produit est destiné à un usage domestique uniquement. N'utilisez pas ce four pour tout autre
usage non spécifié.
28. Tout entretien doit être effectué par du personnel professionnel.
29. Cet appareil ne peut pas être utilisé avec une minuterie externe ou une télécommande séparée.
30. Cet appareil ne peut pas être utilisé par des enfants, des malades mentaux, des personnes ayant des
difficultés physiques et des personnes qui sont lentes à réagir, à moins d'être guidées par une personne
capable de l'utiliser.CES INSTRUCTIONS
CONSERVEZ CES INSTRUCTIONS À
TITRE DE RÉFÉRENCE
Table of contents
Languages:


