Brickcom OSD-040 36x Series User manual

36x Speed Dome
Network Camera
OSD-040 36x Series
User’s Manual

Product name:
Network Camera ( OSD-040 36x series )
Release Date:
2011/01
Manual Revision:
V1.0
Web site:
www.brickcom.com
Email:
info@brickcom.com
© 2010 Brickcom Corporation. All Rights Reserved

Table of Contents
Before You Use This Product ....................................................................................... 1!
Regulatory Information ................................................................................................. 2!
Chapter 1 - Package Contents ...................................................................................... 3!
Chapter 2 - 36x Outdoor Speed Dome Network Camera Overview........................... 4!
Chapter 3 - Device Appearance Description ............................................................... 6!
Chapter 4 - LED Behavior.............................................................................................. 7!
Chapter 5 - Installation .................................................................................................. 8!
5.1!Hardware Installation....................................................................................... 8!
5.2!Camera Connection ....................................................................................... 11!
5.3!System Requirements ................................................................................... 12!
5.4!Software Installation...................................................................................... 13!
5.4.1!EasyConfig.............................................................................................. 21!
Chapter 6 - Accessing the Network Camera ............................................................. 29!
6.1!Check Network Settings................................................................................ 29!
6.2!Add Password to Prevent Unauthorized Access........................................ 29!
6.3!Authentication................................................................................................ 30!
6.4!Installing the Plug-In...................................................................................... 31!
Chapter 7 - Live View................................................................................................... 32!
Chapter 8 - Configuration............................................................................................ 35!
8.1!Camera/Video/Audio...................................................................................... 35!
8.1.1!Camera ................................................................................................... 35!
8.1.2!Video....................................................................................................... 37!
8.1.3!Audio....................................................................................................... 40!
8.1.4!Multicast.................................................................................................. 41!
8.2!Camera Control .............................................................................................. 42!
8.2.1!Preset Point ............................................................................................ 42!
8.2.2!Privacy Mask........................................................................................... 43!
8.2.3!Patrol Setting .......................................................................................... 44!
8.3!Network........................................................................................................... 45!
8.3.1!IP Settings............................................................................................... 45!
8.3.2!UPnP....................................................................................................... 46!
8.3.3!DDNS (dynamic domain name service).................................................. 47!
8.3.4!EasyLinkTM .............................................................................................. 48!
8.3.5!HTTP/HTTPS.......................................................................................... 49!
8.4!Event ............................................................................................................... 51!
8.4.1!Event Settings......................................................................................... 51!

8.4.2!Motion Detection ..................................................................................... 55!
8.4.3!Digital Input (DI) ...................................................................................... 56!
8.5!Notifications ................................................................................................... 57!
8.5.1!FTP Settings ........................................................................................... 57!
8.5.2!E-mail Settings........................................................................................ 58!
8.5.3!Samba Settings....................................................................................... 59!
8.5.4!HTTP Settings......................................................................................... 60!
8.5.5!Digital Output (DO) ................................................................................. 61!
8.5.6!Video Clip................................................................................................ 61!
8.6!System ............................................................................................................ 62!
8.6.1!System Log ............................................................................................. 62!
8.6.2!Date and Time ........................................................................................ 64!
8.6.3!Device Information .................................................................................. 65!
8.7!Maintenance ................................................................................................... 67!
8.7.1!User Management .................................................................................. 67!
8.7.2!Language ................................................................................................ 68!
8.7.3!IP Filter.................................................................................................... 68!
8.7.4!Firmware Upgrade .................................................................................. 69!
8.7.5!Configuration........................................................................................... 69!
8.7.6!Reset to Default ...................................................................................... 70!
8.7.7!Reboot .................................................................................................... 70!

1
Before You Use This Product
In many countries, there are laws prohibiting or restricting the use of surveillance
devices. This Network Camera is a high-performance, web-ready camera which can be
part of a flexible surveillance system. It is the user’s responsibility to ensure that the
operation of this camera is legal before installing this unit for its intended use.
Upon opening the product’s package, verify that all the accessories listed on the
“Package Contents” are included. Before installing the Network Camera, read the
warnings in the “Quick Installation Guide” to avoid misuse. When installing the Network
Camera, carefully read and follow the instructions in the “Installation” chapters to avoid
damages due to faulty assembly or installation.

2
Regulatory Information
Federal Communication Commission Interference Statement
This equipment has been tested and found to comply with the limits for a Class B digital
device, pursuant to Part 15 of the FCC Rules. These limits are designed to provide
reasonable protection against harmful interference in a residential installation. This
equipment generates uses and can radiate radio frequency energy and, if not installed
and used in accordance with the instructions, may cause harmful interference to radio
communications. However, there is no guarantee that interference will not occur in a
particular installation. If this equipment does cause harmful interference to radio or
television reception, which can be determined by turning the equipment off and on, the
user is encouraged to try to correct the interference by one of the following measures:
- Reorient or relocate the receiving antenna.
- Increase the separation between the equipment and receiver.
- Connect the equipment into an outlet on a circuit different from that to which the
receiver is connected.
- Consult the dealer or an experienced radio/TV technician for help.
FCC Caution: Any changes or modifications not expressly approved by the party
responsible for compliance could void the user's authority to operate this equipment.
This device complies with Part 15 of the FCC Rules. Operation is subject to the following
two conditions: (1) This device may not cause harmful interference, and (2) this device
must accept any interference received, including interference that may cause undesired
operation.
IMPORTANT NOTE:
FCC Radiation Exposure Statement:
This equipment complies with FCC radiation exposure limits set forth for an
uncontrolled environment. This equipment should be installed and operated with
minimum distance 20cm between the radiator & your body.
This transmitter must not be co-located or operating in conjunction with any other
antenna or transmitter.
The availability of some specific channels and/or operational frequency bands are
country dependent and are firmware programmed at the factory to match the
intended destination. The firmware setting is not accessible by the end user.
3
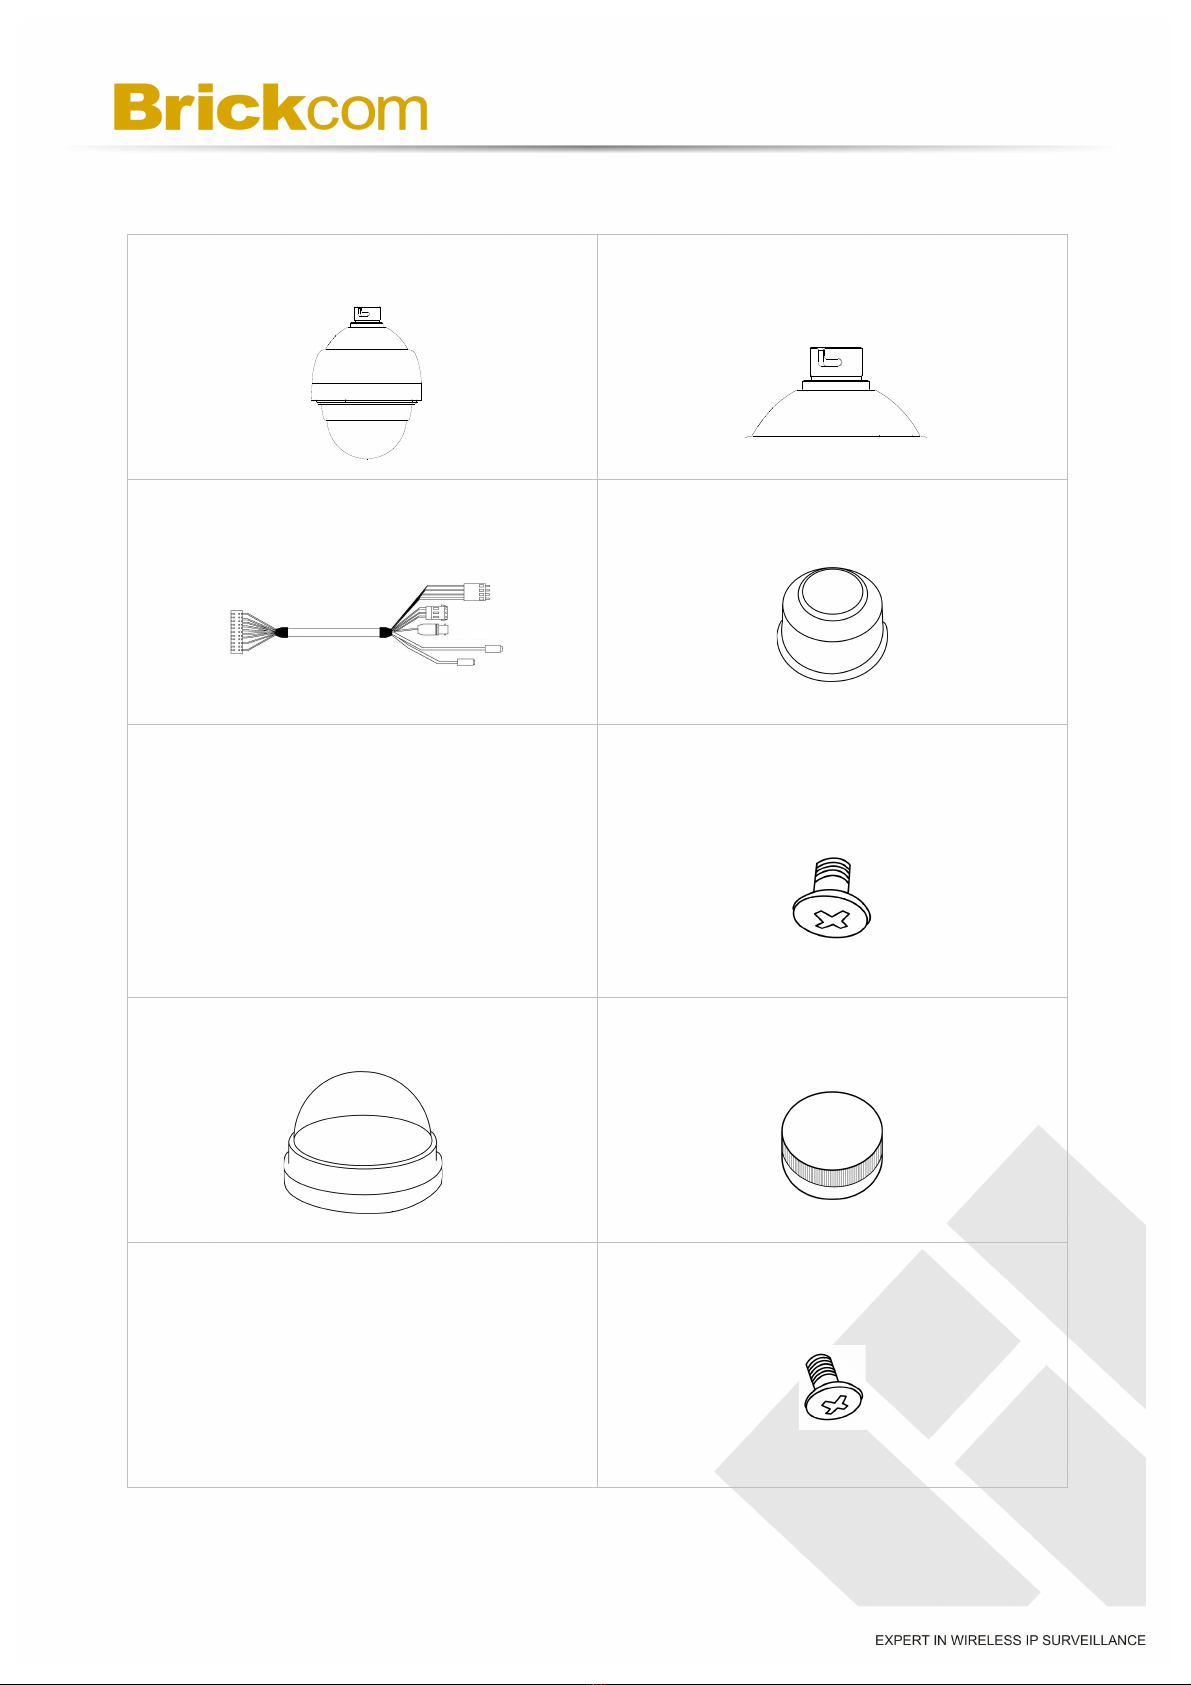
Chapter 1 - Package Contents
a. Network Camera (OSD-040 36x)
b. Mount Kit
c. I/O Cable
d. Waterproof Rubber
e. Warranty Card /
Easy Installation Guide
f. M5 Screw
g. Dome Cover
h. Lubricant
i. Product CD
j. Screw for Dome Cover

4
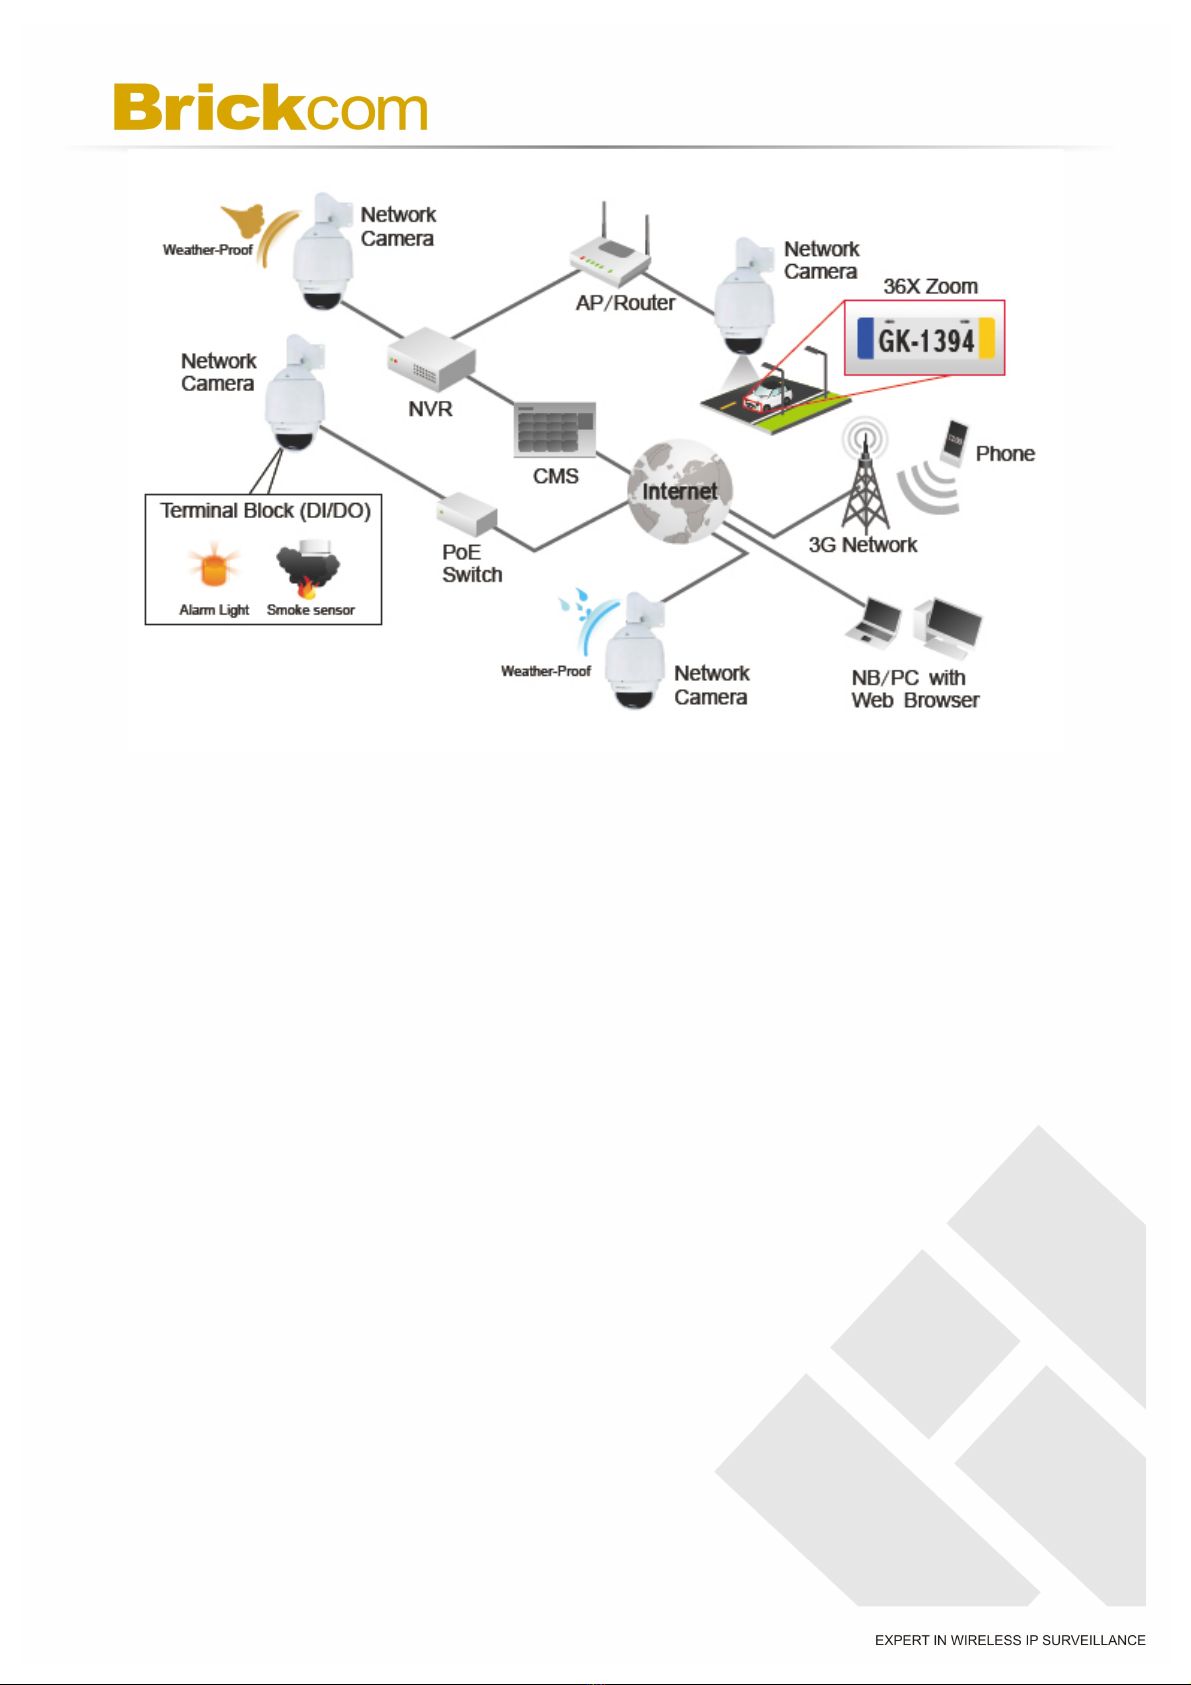
Chapter 2 - 36x Outdoor Speed Dome
Network Camera Overview
The Brickcom OSD-040 36x series is a high-end, Speed Dome network camera
designed to provide high-quality video surveillance for outdoor environments. By offering
H.264/M-JPEG/MPEG-4 triple codec compression, it is able to provide a flexible system
which does not require high bandwidth or storage capabilities.
The advanced features of the OSD-040 36x series work together to create crystal-clear
video surveillance. By adopting a powerful 36x optical zoom lens with auto focus, it can
easily provide clear close-up shots of objects. The Sony Super HAD II CCD sensor
with Effio DSP(Digital Signal Processor) and removable IR-cut filter significantly improve
the light sensitively of the OSD-040 36x series, providing excellent surveillance in both
day and night settings. When its Wide Dynamic Range (WDR) sensor, the camera
can handle extreme variations of brightness within the same sense. The WDR sensor
averages out the very bright and very dark areas to create a more even evenly exposed
video scene which is close to what the human eye would see.
Along with high-level sensors, the OSD-040 36x series is equipped with a fast and
precise pan/tilt mechanical design. The 360ocontinuous pan and -10o~190otilt
combine with a rotation speed of 0.5o ~400oper second to provide complete coverage of
every angle. With such powerful pan, tilt and zoom capabilities and a weather-proof
casing (IP66), this camera is perfect for environments where precision and reliability are
key; such as railway stations, airports, warehouses, and production facilities.
5

6
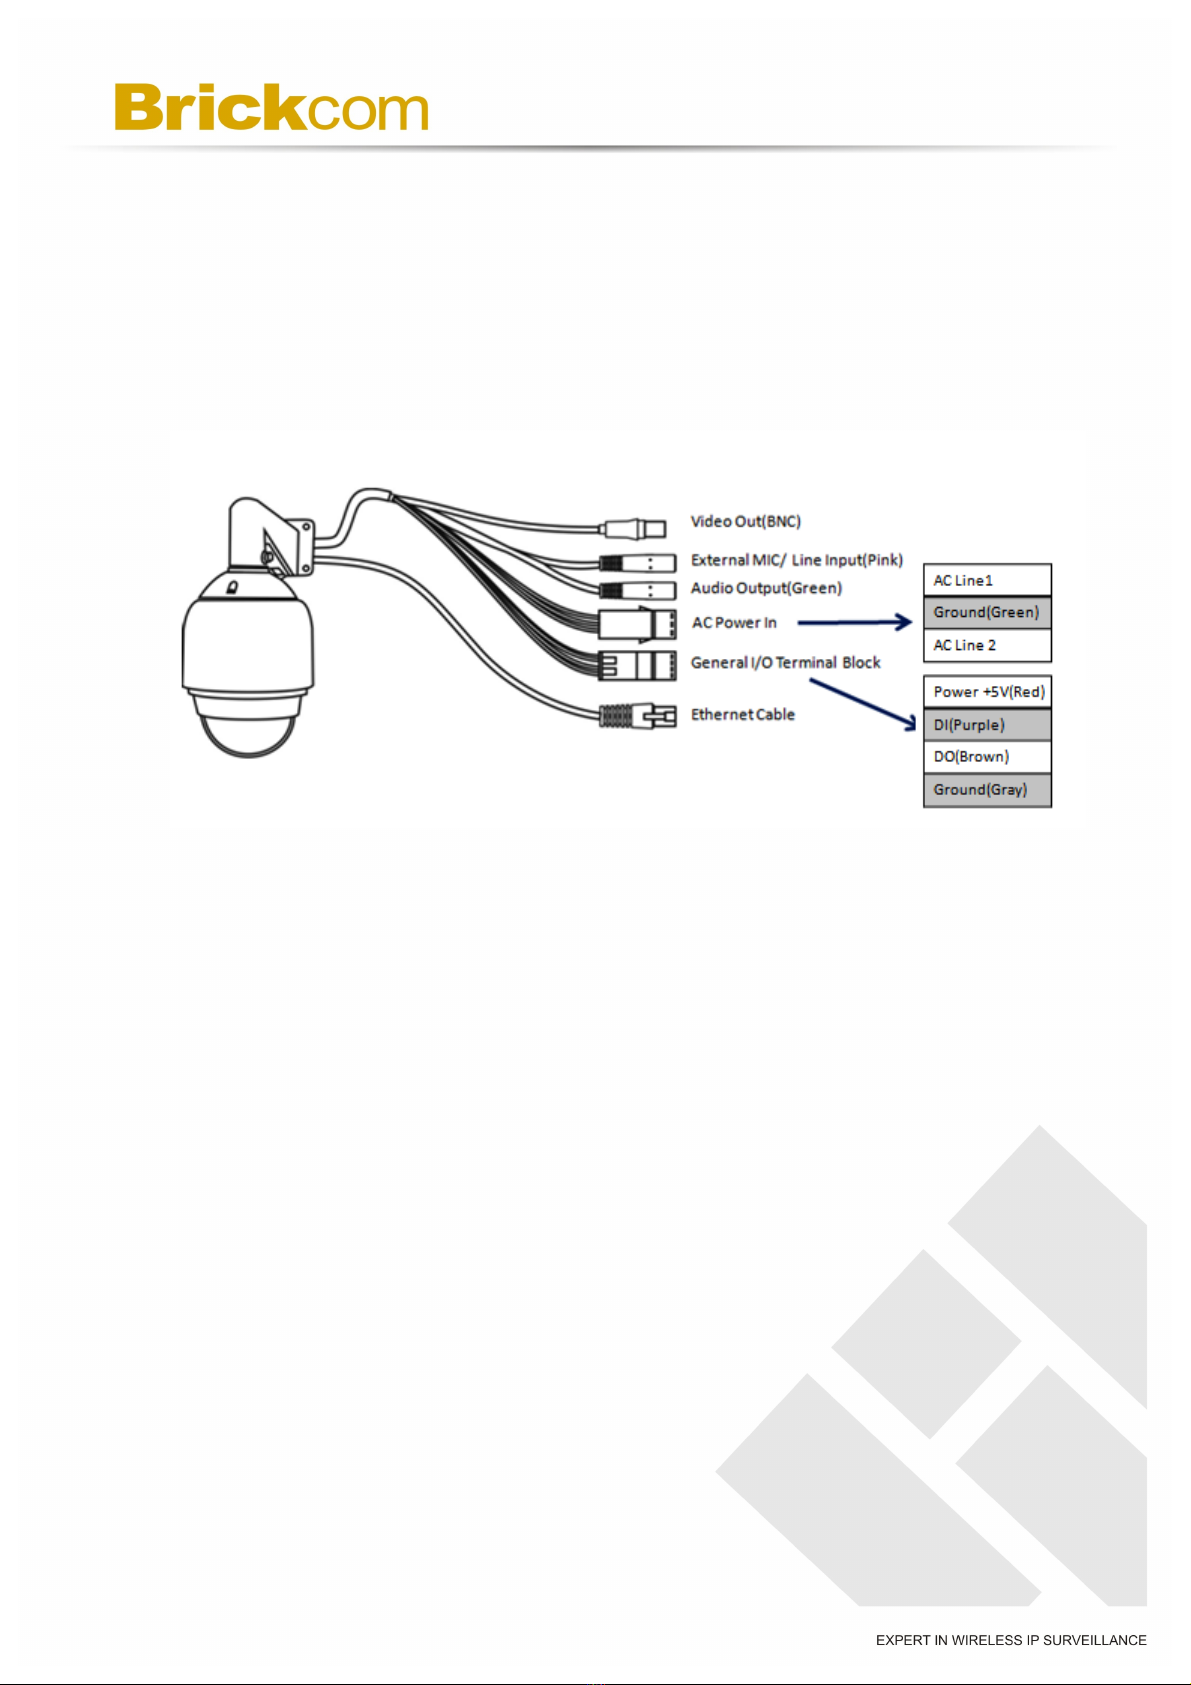
Chapter 3 - Device Appearance
Description
< Bottom View >
< I/O Cable >
< Dimension >
Ethernet RJ45
10/100 Socket
Safety Wire Hook
I/O Cable Connector
Reset Button
Power LED
Link LED
Audio Out(Pink)
AC Power Input
Extension I/O
Terminal Block
Video Out
Microphone/Line In
(Green)
Mount Holder

7
Chapter 4 - LED Behavior
Function
LED Behavior
Description
Power LED
Continuous illumination
Power on
Power LED
Unit
Power off
Link LED
Continuous illumination
Link
Link LED
Blinking
Connecting

8
Chapter 5 - Installation
5.1 Hardware Installation
A. Before Installation
The SD-040 36x is supplied with a dome cover to protect the camera
unit. Before installation, follow these instructions to attach the dome
cover and remove the mount holder.
1) Unpack the dome package and take out the Dome body.
2) Rotate the mount holder and take it off the Dome body.
3) Remove the protective cover and PE sheet.

9
4) Apply lubricant to the Dome cover’s water-proof rubber to make the
installation process smoother.
NOTE - The tiny protrusion on the dome cover must align with
one of the four holes on the dome body.
5) Attach the Dome cover to the Dome body by gently pressing down
on the sides of the Dome cover with both hands.
NOTE - DO NOT press the cover from the top as this may
cause damage to the Dome body.
6) Screw the Dome cover and body together.

10
B. Install Camera with Mount Kit
1) Make a cable entry hole on the wall/ ceiling to insert the cable(s).
2) Mount the Speed Dome camera according to the “Speed Dome
Mounting Accessories Installation Guide”.
3) Attach the waterproof rubber to the selected mount kit.
4) Route the Ethernet and I/O cables through the top holder and join
the selected mount kit with supplied screws and washers. Then
adjust the Waterproof Rubber over the joint.
5) Connect the Ethernet and I/O cables and hook the safety wired to
the camera.
6) Attach the camera to the top cover with the supplied screw and
washers.
Wall Mounting: Pendant Mount (mounting example)
NOTE - Refer to the mounting instruction in the “Speed Dome
Mounting Accessories Installation Guide” for more details.
11
5.2 Camera Connection
1) Connect the camera to a switch using an Ethernet cable.
2) Connect supplied I/O cable to the camera.
3) To attach external devices, such as sensors and alarms, connect them to
the extension I/O terminal block.

12
5.3 System Requirements
Operating System:
Microsoft Windows XP Home Edition SP2
Microsoft Windows XP Professional SP2
Computer:
IBM PC/AT Compatible
CPU:
Pentium 3GHz or faster
Memory:
1024 MB or more
Monitor:
1024 x 768 pixels or more, 24-bit True color or better
Network Interface:
10/100Mbps Network interface card must be installed
Web Browser:
Microsoft Internet Explorer 6.0 SP2 or higher
Adobe Reader:
Adobe Reader 8.0 or higher
Audio:
The audio function will not work if a sound card is not installed in the PC.
Audio may be interrupted depending on network traffic.

13
5.4 Software Installation
In this manual, "User" refers to whoever has access to the Network Camera, and
"Administrator" refers to the person who can configure the camera and grant user
access to the camera.
After checking the hardware connection, run the Installation Wizard program
included on the product’s CDROM to automatically search the intranet for the
camera. There may be many cameras on the local network. Differentiate the
cameras using the serial number which is printed on the labels on the carton and the
bottom of the camera.
A. Insert the Installation CD into the CD-ROM driver. Run Auto-Run Tool
directly from the CD-ROM to start the installation. When installing the
Brickcom software kit for the first time, select a desired language for the
interface. The available languages are listed in the scroll box. Click
<Install> and follow the steps to install the EasyConfig wizard on the
desired computer.

14
B. In the Install Shield Wizard dialog box, click <Next> to continue.
C. Read the End-User License Agreement and check the option “I accept the
terms of the license agreement”. Click <Next> to continue.

15
D. Select either “Complete” setup or “Custom” setup to install the system.
a. If COMPLETE SETUP is selected:
i. All program features will be installed into the default directory.
Check the option “Complete” and then click <Next>.
ii. Click <Change> to change the appointed folder where installation
and program files will be stored. Click <Next> to continue.
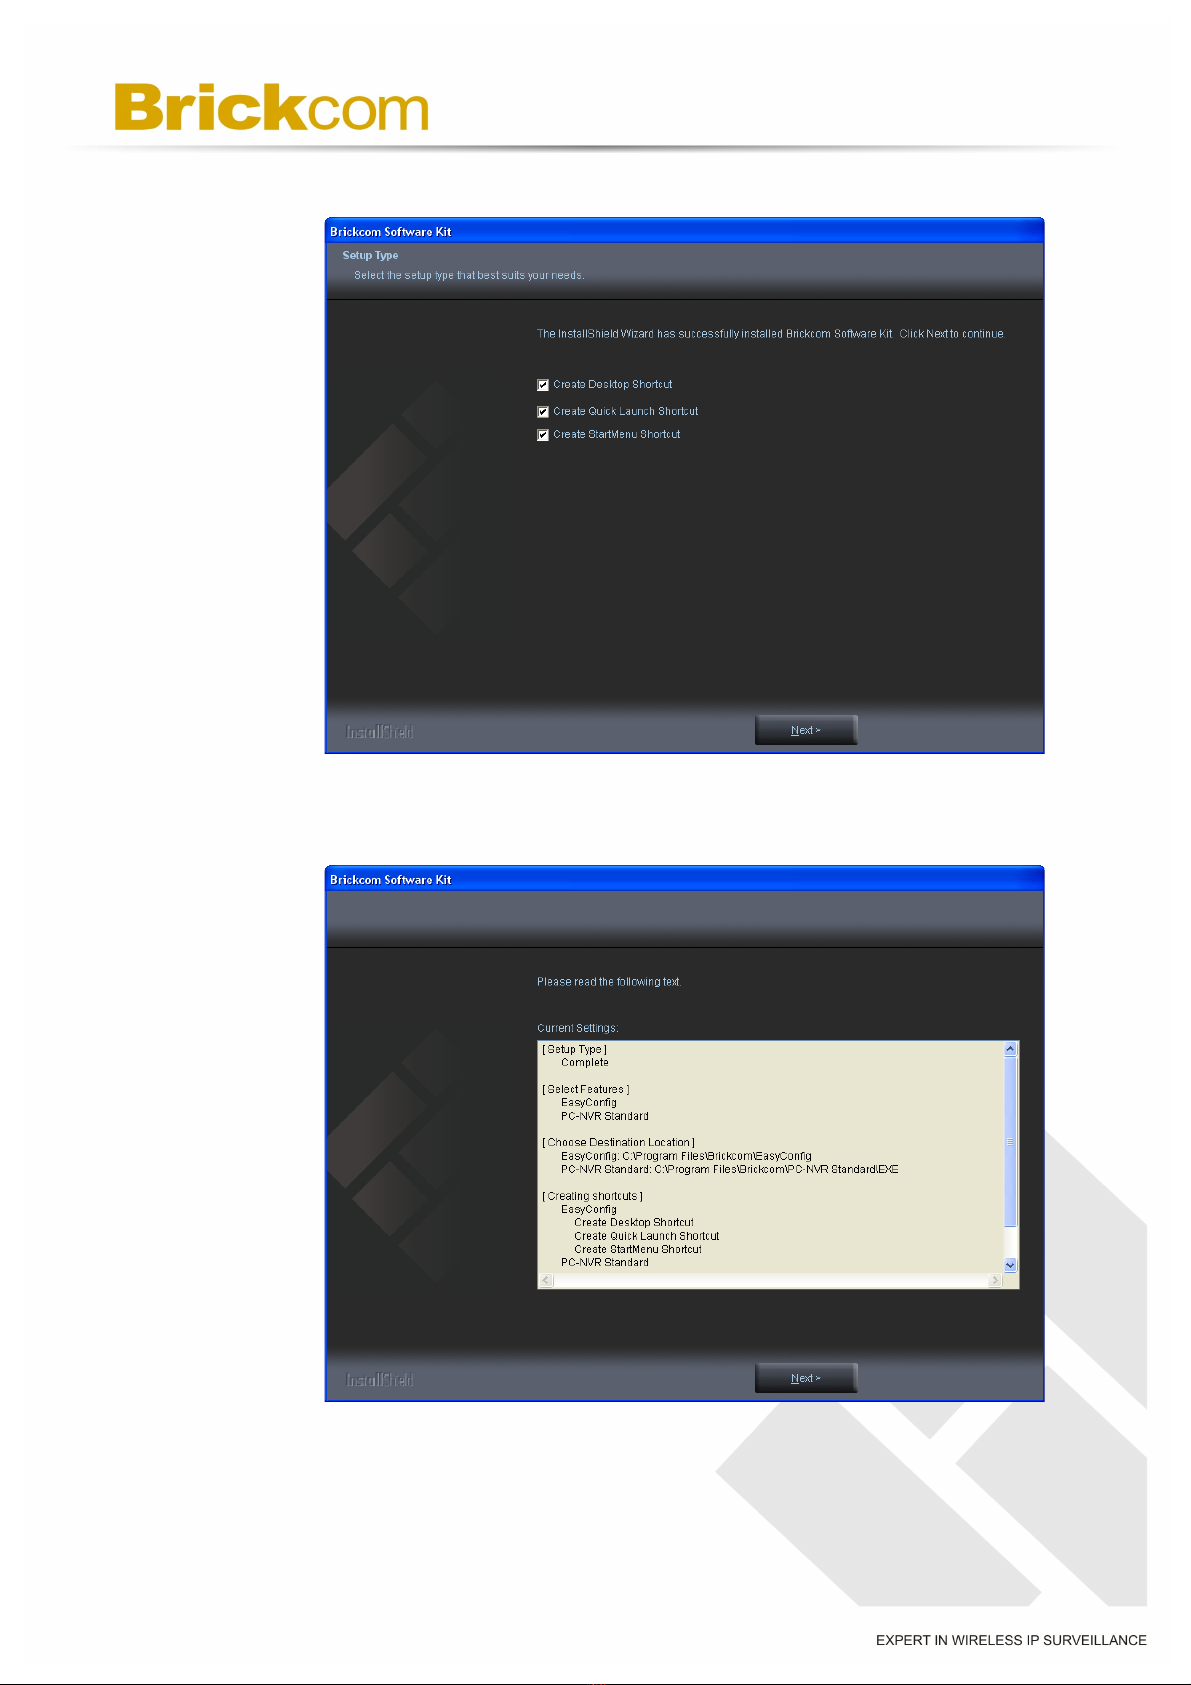
16
iii. Select to create shortcuts. Click <Next> to continue.
iv. The installation information will be displayed. Click <Next> to
continue.
Other manuals for OSD-040 36x Series
2
Table of contents
Other Brickcom IP Camera manuals


