Prestel HD-PTZ512HM User manual

Prestel HD-PTZ512HM
HD Video Conferencing Camera
User Manual
V1.0
(English)

Preface
Thanks for using this HD Video Conferencing Camera.
This manual introduces the function, installation and operation of the HD camera. Prior to
installation and usage, please read the manual thoroughly.
Precautions
This product can only be used in the specified conditions in order to avoid any damage to the
camera:
Don’t subject the camera to rain or moisture.
Don’t remove the cover. Otherwise, you may get an electric shock. In case of abnormal
operation, contact the authorized engineer.
Never operating under unspecified temperature , humidity and power supply.
Please use the soft dry cloth to clean the camera. If the camera is very dirty, clean it with
diluted neuter detergent; do not use any type of solvents, which may damages the surface.
Note
This is class A production. Electromagnetic radiation at the specific frequency may affect the
image quality of TV in home environment

Note
Electric Safety
Installation and operation must accord with electric safety standard.
Caution to transport
Avoid stress, vibration and soakage in transport, storage and installation.
Polarity of power supply
The power supply of the product is +12V, the max electrical current is 2A .Polarity of the power
supply plug drawing as follows.
Careful of installation
Do not grasp the camera head when carrying the camera. Don’t turn camera head by hand. Doing
so may result in mechanical damage.
Don’t apply in corrosive liquid, gas or solid environment to avoid damaging the cover which is
made up of plastic material.
To make sure no obstacle in rotation range.
Never power on before installation is not completed.
Don’t dismantle the camera
We are not responsible for any unauthorized modification or dismantling.
CAUTION!
The specific frequency of electromagnetic field may affect the image of the camera!
SuppliedAccessories
When you unpack, check that all the supplied accessories are included:
Camera ......................................................... 1PCS
AC power adaptor.......................................... 1PCS
Power cord..................................................... 1PCS
RS232 cable................................................... 1PCS
Remote controller .......................................... 1PCS
User manual ................................................. 1PCS

Quick Start
Step1. Please check connections are correct before starting
Step2.Connect the power on the rear panel of camera, the camera power indicator on the front panel
Step3. The camera starts to initialize after power-on, Pan-Tilt rotate to the maximum position of upper
right, then both horizontal and vertical to the middle position, the motor stops running, initialization
complete. (Note: If the position preset 0 has been stored, the position preset 0 will be called up after
initialization)

Features
Completely New Look
Designed with worm gear drive, completely new look, mini size, two colors for choosing from.
1080P Full HD
Apply Panasonic's 1/2.7 inch, 2.07 million effective pixels high quality HD CMOS sensor, can
reach maximum 1920 x 1080 high resolution and achieve quality image.
High frame rate
1080P output frame rate up to 60fps.
72.5 Wide-angle Lens + 32x Digital Zoom
Use 72.5°wide-angle high quality lens, support 12x optical zoom, and 32x digital zoom
(optional).
AACAudio Encoding
Support AAC audio encoding, better sound quality and smaller bandwidth.
Low-light
High SNR of CMOS sensor combined with 2D and 3D noise reduction algorithm, effectively
reduce the noise, even under low illumination conditions, picture can still keep clean and clear.
HD Interface
Support HDMI output, effective transmission distance up to 150 meters (under 1080p30).
Remote Control
Using RS232 interface, all the parameters of the camera can be remote controlled by the
high-speed communications.
network Interface
Support network multi-channel audio and video stream output

Product Specification
Model
Prestel HD-PTZ512HM
Name
HD Video Conferencing Camera
Camera
Sensor
1/2.7 inch, CMOS, Effective Pixel: 2.07M
Scanning Mode
Progressive
Lens
12x, f3.5mm ~ 42.3mm, F1.8 ~ F2.8
Digital Zoom
16x (optional)
Minimal Illumination
0.05 Lux @ (F1.8, AGC ON)
Shutter
1/30s ~ 1/10000s
White Balance
Auto, Indoor, Outdoor, One Push, Manual
Backlight Compensation
Support
Digital Noise Reduction
2D&3D Digital Noise Reduction
Video S/N
≥55dB
Horizontal Angle of View
72.5°~ 6.9°
Vertical Angle of View
44.8°~ 3.9°
Horizontal Rotation Range
±170°
Vertical Rotation Range
-30°~ +90°
Pan Speed Range
1.7°~ 100°/s
Tilt Speed Range
0.7°~ 28°/s
H & V flip
Support
Image Freeze
Support
PoE
Support(optional)
Face Detection
Support (optional)
Local Storage
Support
Number of Preset
255
Preset Accuracy
0.1°
IPC Features
Video coding standard
H.265/H.264/MJEPG
Video Stream
First Stream, Second Stream

First Stream resolution
1920x1080,1280x720,1024x576,960x540,640x480,640x360
Second Stream resolution
1280x720,1024x576,720x576,720x408,640x360,480x270,320x240,3
20x180
Video Bit Rate
128Kbps ~ 8192Kbps
Bit Rate Type
Variable rate, Fixed rate
Frame Rate
50Hz: 1fps ~ 50fps, 60Hz: 1fps ~ 60fps, 720p120: 120fp(supported
by S Model only), 640x480p240: 240fps(Supported by S Model
only, optional)
Audio encode standard
AAC
Audio Bit Rate
96Kbps, 128Kbps, 256Kbps
Support protocols
TCP/IP, HTTP, RTSP, RTMP, Onvif, DHCP, Multicast, etc.
Input/Output Interface
HD Output
1xHDMI: Version 1.3
Network interface
1xRJ45: 10/100/1000M Adaptive Ethernet ports
Audio interface
1-ch 3.5mm audio interface, Line In
Communication interface
1xRS-232: 8pin Min DIN, Max Distance: 30m, Protocol: VISCA/
Pelco-D/Pelco-P
Power jack
JEITA type (DC IN 12V)
Generic Specification
Input Voltage
DC 12V / PoE (802.3af) (optional)
Current Consumption
1.0A (Max)
Operating Temperature
-10°C ~ 40°C (14°F ~ 104°F)
Storage Temperature
-40°C ~ 60°C (-40°F ~ 140°F)
Power Consumption
12W (Max)
MTBF
>30000h
Size
169mm x 142mm x 164mm
Net Weight
1.35Kg (3.0lb)

IR Remote Controller Explanation
1.Standby Button
Press this button to enter standby mode.
Press it again to enter normal mode. (Note:
Power consumption in standby mode is
approximately half of the normal mode)
2. Position Buttons
To set preset or call preset
3. *Button
Used with other buttons
4. Set/Preset Buttons
Set preset: Store a preset position
[SET PRESET] + Numeric button (0-9):
Setting a corresponding numeric key preset
position
5. Pan-Tilt control Buttons
Pressing the Pan-Tilt back to the middle
position
6. Back buttons
Press the OSD menu return to the superior.
7. Zoom Buttons
Slow Zoom: Zoom In [+] or Zoom Out [-]
slowly
Fast Zoom: Zoom In [+] or Zoom Out [-]
fast
8. Pan-Tilt L/R set
Press with 1 buttons and 2 buttons setting the direction of the Pan-Tilt
L/R Set +1[STD]: set the Pan-Tilt turn the same direction as the L/R Set
L/R Set +2[REV]: set the Pan-Tilt turn the opposite direction as the L/R Set
9. Focus Buttons
Used for focus adjustment.
Press [AUTO] adjust the focuses on the center of the object automatically. To adjust the focus manually.

Press [MANUAL] adjust the focus on the center
of the object manual
MANUAL button, and adjust it with [Far] (Focus
on far object) and [NEAR] (Focus on near object)
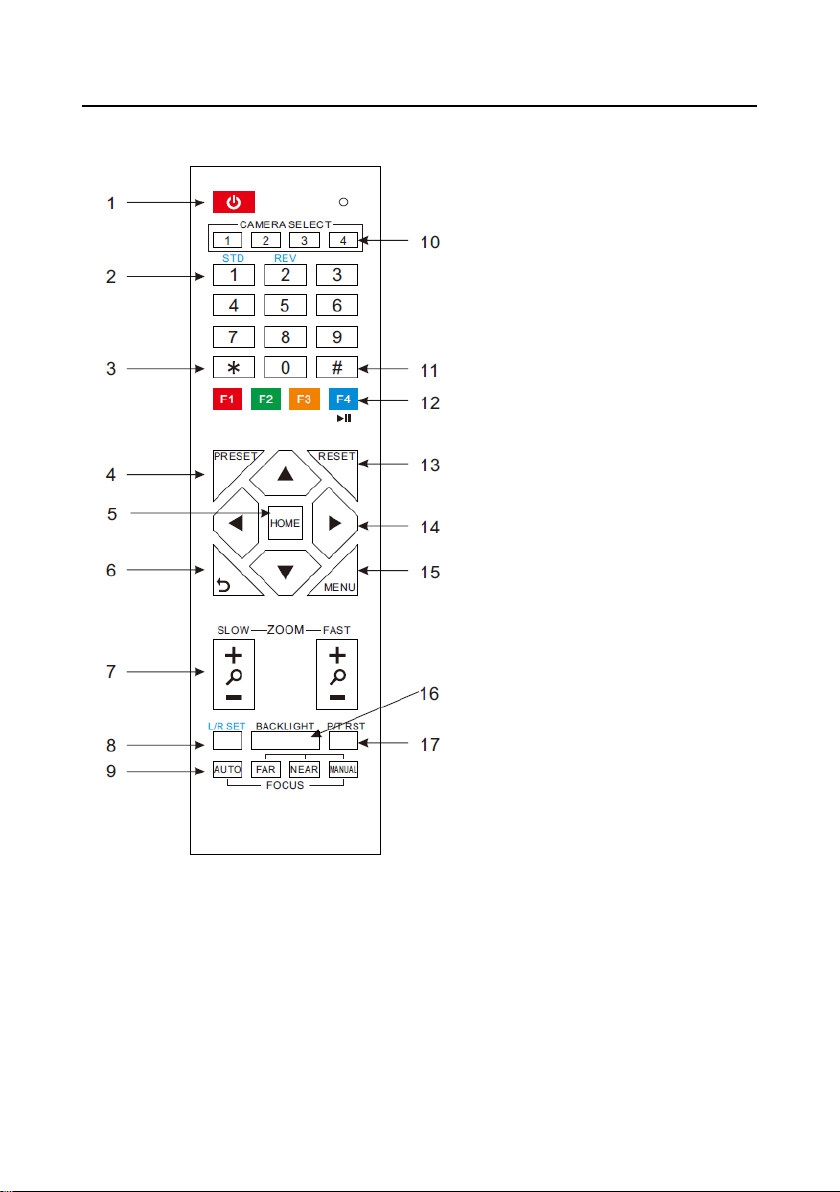
10. Camera Select Buttons
Press the button corresponding to the camera you
want to operate with the remote controller.
11. # Button
Used with other buttons
12. Set Camera IR Address Buttons
[*]+[#]+[F1]: Address1
[*]+[#]+[F2]: Address2
[*]+[#]+[F3]: Address3
[*]+[#]+[F4]: Address4
13. Clear Preset Buttons
Clear preset: Erase a preset position
[CLEAR PRESET] + Numeric button (0-9)
Or: [*]+[#]+[CLEAR PRESET]: Erase all the
preset individually
14. Pan/Tilt Control Buttons
Press arrow buttons to perform panning and tilting.
Press [HOME] button to face the camera back to
front
15. MENU
MENU: enter or exit OSD MENU
16. BLC (Backlight Compensation) Button
BLC ON/OFF: Press this button to enable the
backlight compensation. Press it again to disable
the backlight compensation.(NOTE: Effective
only in auto exposure mode)
Note: If a light behind the subject, the subject will
become dark. In this case, press the backlight ON /
OFF button. To cancel this function, press the
backlight ON / OFF button.
17. Pan/Tilt reset
Preset Pan/Tilt self-test.
18. Image freezing function
Manually freeze: Open the freezing function after
press the remote control [F4], display "Freeze" on
the left upper corner character, after 5 seconds
display disappear automatically. If you want to
cancel the freeze, press [F4] key and then can
return to normal, display "Unfreeze" on the left
upper corner, after 5 seconds display disappear
automatically.
Recalling the Preset image Freeze:By the OSD
Menu Setting "Recalling the Preset image Freeze"
function. After the function is opened, the screen
will stay in before Recalling the Preset when
Recalling the Preset, the screen can be switched to
the preset position screen until the camera points
to the preset position.
19. Shortcut Set
[*]+[#]+[1]: OSD menu default English
[*]+[#]+[3]: OSD menu default Chinese
[*]+[#]+[4]: Default IP address
[*]+[#]+[5]: Save OSD
[*]+[#]+[6]: Quickly recover the default
[*]+[#]+[8]: Look the camera version
[*]+[#]+[9]: Quickly set up inversion

RS-232 Interface
Camera Windows DB-9
1.DTR 1.CD
2.DSR 2.RXD
3.TXD 3.TXD
4.GND 4.DTR
5.RXD 5.GND
6.GND 6.DSR
7.IR OUT 7.RTS
8.NC 8.CTS
9.RI
Camera Mini DIN
1.DTR 1.DTR
2.DSR 2.DSR
3.TXD 3.TXD
4.GND 4.GND
5.RXD 5.RXD
6.GND 6.GND
7.IR OUT 7.NC
8.NC 8.NC
No.
Function
1
DTR
2
DSR
3
TXD
4
GND
5
RXD
6
GND
7
IR OUT
8
NC

VISCANetwork Configuration

Serial Communication Control
In default working mode, the camera is able to connect to a VISCA controller with RS232C
serial interface.
➢RS232 Communication Control:
The camera can be controlled via RS232 ,the parameters of RS232C are as follows:
Baud rate: 2400/4800/9600 bit/s.
Start bit: 1 bit.
Data bit: 8 bits.
Stop bit: 1bit.
Parity bit: none.
➢RS485 Communication Control:
The camera can be controlled via RS485, Half-duplex mode:
Baud rate: 2400/4800/9600 bit/s.
Start bit: 1 bit.
Data bit: 8 bits.
Stop bit: 1bit.
Parity bit: none.
Pan-Tilt will rotate to the maximum position of top right after the camera started, then it return to
the center, the process of initialization is finished. (Note: If the position preset 0 has been stored, the
position preset 0 will be called up after initialization) Then the users can control the camera with
commands in the command list.
PTZ over TCP/UDP Realize
A TCP server has achieved in camera, port number 5678. When the client has established a TCP
connection with the server, the client send PTZ control command to the server, the server parsed and
executed the PTZ command.
A UDP server has achieved in camera, port number 1259. Client to the server sends the PTZ
control command, the server parsed and executed the PTZ command.

Command List
Ignore
Note:
The camera serial standard VISCA/Pelco-D/Pelco-P, if the need for the secondary development,
According to standard protocol to control the camera. If you need VISCA/Pelco - D/Pelco - P protocol
command list in detail, please contact the manufacturer.

Menu Setting
1.MENU
Press [MENU] button to display the main
menu on the normal screen, using arrow button to
move the cursor to the item to be set. Press the
[HOME] button to enter the corresponding
sub-menu.
2. EXPOSURE
Move the cursor to the Exposure item in the
main menu and press [home] button, EXPOSURE
menu appears, as shown in the following figure.
Mode: Exposure mode. Optional items: Auto,
Manual, SAE, AAE, Bright
ExpCompMode: Exposure compensation
mode, Optional items: On, Off (Effective only
inAutomode)
ExpComp: Exposure compensation value,
Optional items:-7 ~ 7(Effective only in
ExpCompMode item to On)
Gain Limit: Maximum gain limit. Optional
items: 0 ~ 15 (Effective only in Auto, AAE ,Bright
mode)
Backlight: Set the backlight compensation,
Optional items: On, Off (Effective only in Auto
mode)
Meter: Optional items: Average, Center,
Bottom, Top
DRC: DRC strength, Optional items: 0 ~ 8.
EXPOSURE
Mode Auto
ExpCompMode Off
Backlight Off
Gain Limit 3
Anti-Flicker 50Hz
Meter Average
DRC 2
Select Item
Change Value
[Menu] Back
MENU
Exposure
Color
Image
P/T/Z
Noise Reduction
Setup
Communication Setup
Restore Default
[Home] Enter
[Menu] Exit

Bright: Intensity control, Optional items:
00~17. (Effective only in Bright mode)
Anti-Flicker Flicker: Anti-flicker. Optional
items: Off, 50Hz, 60Hz (Effective only in Auto,
Bright mode)
Iris: Aperture value. Optional items: F1.8,
F2.0,F2.4,F2.8,F3.4,F4.0,F4.8,F5.6,F6.8,F8.0,F9.6
,F11.0,Close(Effective only in Manual, AAE
mode)
Shutt: Shutter value. Optional items:
1/30,1/60,1/90,1/100,1/125,1/180,1/250,1/350,1/5
00,1/725,1/1000,1/1500,1/2000,1/3000,1/4000,1/6
000,1/10000 (Effective only in Manual, SAE
mode)
3. COLOR
Move the cursor to the Color item in the main
menu and press [home] button, COLOR menu
appears, as shown in the following figure.
WB-Mode: White balance mode. Optional
items: Auto, 3000K/Indoor, 4000K,5000K/
Outdoor, 6500K-1,6500K-2,6500K-3,One Push,
Manual
RG: Red gain. Optional items: 0~255
(Effective only in Manual mode)
BG: Blue gain. Optional items: 0~255
(Effective only in Manual mode)
RG Tuning: Red gain fine-tuning, Optional
items: -10 ~ +10(Effective only in AWBsens is
Low)
BG Tuning: Blue gain fine-tuning, Optional
items: -10 ~ +10(Effective only in AWBsens is
Low)
Sat.: Saturation. Optional items: 60% ~
200%.
Hue: Chroma adjustment, Optional items:0 ~
14
AWBsens: The white balance sensitivity,
Optional items: Normal, High, Low.
4. IMAGE
Move the cursor to the Image item in the
main menu and press [home] button, IMAGE
menu appears, as shown in the following figure.
COLOR
WB Mode Auto
RG Tuning +2
BG Tuning 0
Saturation 100%
Hue 7
AWB sens Low
Select Item
Change Value
[Menu] Back

Luminance: Brightness adjustment. Optional
items: 0 ~ 14
Contrast: Contrast adjustment. Optional items:
0 ~ 14
Sharpness: Sharpness adjustment. Optional
items: Auto, 0 ~ 15
Flip-H: Image flipped horizontally. Optional
items: On, Off.
Flip-V: Image Flip Vertical. Optional items:
On, Off.
B&W-Mode: Image color. Optional items:
On, Off.
Gamma: Optional items: Default, 0.45, 0.5,
0.56, 0.63.
Style: Optional items: Norm, Clarity, Bright,
Soft, 5S.
5.P/T/Z
SpeedByZoom: The depth of field scale
switch, Optional items: On, Off
AF-Zone: Interested in focusing area,
Optional items: Top, Center, Bottom
AF-Sense: Automatic focusing sensitivity
options, Optional items: Low, Normal, High
L/R Set: Optional items: STD, REV
Image Freeze: Optional items: On, Off
Display Info: Optional items: On, Off
Digital Zoom: Optional items: Off, 2x, 4x, 8x,
16x
6. NOISE REDUCTION
Move the cursor to the Noise Reduction item
in the main menu and press [home] button, NOISE
REDUCTION menu appears, as shown in the
P/T/Z
SpeedByZoom On
AF-Zone Center
AF-Sense High
L/R Set STD
Display Info On
Image Freeze Off
Digital Zoom Off
Select Item
Change Value
[Menu] Back
IMAGE
Luminance 7
Contrast 7
Sharpness 2
Flip-H Off
Flip-V Off
B&W-Mode Off
Gamma Default
Style Clarity
Select Item
Change Value
[Menu] Back

following figure.
NR2D-Level: 2D noise reduction. Optional
items: Off, Auto, 1 ~ 5
NR3D-Level: 3D noise reduction. Optional
items: Off, 1 ~ 8
D-HotPixel: Dynamic bad points, Optional
items: Off, 1 ~ 5
7.SETUP
Move the cursor to the Setup item in the main
menu and press [home] button, SETUP menu
appears, as shown in the following figure.
Language: menu language, Optional items:
EN, Chinese, Russian
DVI Mode, Optional items: DVI, HDMI
Lens:Lens type. Optional items:Type1, Type2
8.COMMUNICATION SETUP
Move the cursor to the Setup item in the main
menu and press [home] button,
COMMUNICATION SETUP menu appears, as
shown in the following figure.
SETUP
Language EN
DVI Mode DVI
Lens Type1
Select Item
Change Value
[Menu] Back
NOISE REDUCTION
NR2D-Level 3
NR3D-Level 3
D-HotPixel Off
Select Item
Change Value
[Menu] Back

Protocol: Control protocol type. Optional
items: AUTO, VISCA, PELCO-D, PELCO-P
V_Address: Protocol address, To be decided
according to the agreement, AUTO, VISCA
protocol Optional items: 1 ~ 7
P_D_Address: PELCO-D protocol Optional
items: 0 ~ 254
P_P_Address: PELCO-P protocol Optional
items: 0 ~ 31
V_AddrFix: If I can change through the serial
port of infrared switch, Optional items: On, Off
(When set to On, useless in 88 30 01 FF
Command)
Net Mode: Set the serial port control
networking, Optional items: Serial, Paral
Baudrate: Serial port baud rate. Optional
items: 2400, 4800, 9600
9.RESTORE DEFAULT
Move the cursor to the Restore Default item
in the main menu and press [home] button,
RESTORE DEFAULT menu appears, as shown in
the following figure.
Restore: Confirm restore factory settings.
Optional items: Yes, No
Note: Press [HOME] button to confirm, All
parameter restore default, Include IR Remote
address and VISICAAddress
Save: Save Options. Optional items: Yes, No
RESTORE DEFAULT
Restore? No
Change Value
[Home] OK
[Menu] Back
COMMUNICATION SETUP
Protocol VISCA
V_Address 1
V_AddrFix Off
Net Mode Serial
Baudrate 9600
Select Item
Change Value
[Menu] Back

Network Function
1Operating Environment
Operating System: Windows 2000/2003/XP/
vista/7/8
Network Protocol: TCP/IP
Client PC: P4/128MRAM/40GHD/ support
scaled graphics card, support DirectX8.0 or more
advanced version.
2Equipment Installation
1) Connect internet camera to your internet or to
your PC directly via internet cable.
2) Turn on DC12V power.
3) The orange light of internet port lit on, green
light flashing, and the physical connection
finished.
3Internet Connection
Connection ways between internet camera
and computer, as picture 1.1 and picture 1.2
shown:
Picture 1.1 connect by internet cable
Picture 1.2 Connect by router /interchanger
4IP camera visited/ controlled by LAN
4.1 Setup IP address
IP camera default IP address"192.168.100.
88", Unknow camera IP, view as below:
Method 1: press * and # and 4 on remote
controller one by one, the camera IP address will
be shown on screen.
Method 2: connect camera to PC with
ethernet cable, use "upgrade_En.exe" to search for
IP address
Change IP address,2 methods as below:
Method 1: On web control page, find
"Network"--->Change IP---->Click "Apply"---->
Restart camera

Method 2: Open "upgrade_En.exe", change
IP and click "Set". After modified, IP Camera be
restart.
NOTE!
IP camera default IP address"192.168.100.
88",user "admin", password "admin".
4.2 Visit/Access IP Camera
Input http://192.168.100.88 to IE ( better
with IE web browser, others will cause little
latency),a login window pop up, input login name:
admin, password: admin, shown as below:
After login, shown as below:
NOTE!
If user first time use this camera by internet
(only for new user),must install a player software
(VLC). Please go to VLC
websidehttp://www.videolan.org/vlc,download
and Install VLC (player software).After
installation, login again, will show as above:
5IP Camera accessed/controlled by WAN
(internet)
5.1 Setup IPC accessed/controlled by dynamic
DNS
2 dynamic DNS available:
Dyndns.org,
3322.org
Router Port Mapping:
Take Tenda router for example, enter Router
Home Page (interface page),select "Advanced"-
"Virtual Server" ,add a new port number in "Ext
Port", add a new port number in "Int port", put
camera IP address to "Internal IP", then select
"Save", shown as below:
Table of contents
Other Prestel IP Camera manuals