Bridge BP-100HS-A Instruction Manual

Directions for installation and maintenance

2
Contents
1. Introduction ………………….…………………………….……..………….
p3
2. Caution…………………………………………………….………………….…..
p3
3. Delivery control …………………………………………........................
p4
4. Technical description …………………………….……………………..
p4
Technical characteristics
Outside
Inside
Explored view
Wire control operation
General diagram of the refrigerating circuit
Safety and control systems
5. Installation ……………………….………………………………….......
p14
Rules of installation
Hydraulic connections
Electric connections
6. Water flow and refrigerating circuit pressure........................
p17
7. Environment problem ………………………………………............
p18
8. Maintenance and inspection ……………….…………………..…
p19
9. Electric diagram ……………………………………………….……..…
p21

3
1- Introduction
We thank you for having chosen our Heat pump.
This installation and maintenance notice contains the necessary
information to its installation (delivery control, the installation, the
connections) and to its repair. It is a complementary document to
the user’s manual which describes its instructions for use.
We invite you to read it first.
2-
Caution
This document is an integral part of the product and it must stays in
the technical room.
This Heat pump is exclusively for heating swimming pools.
Any other use not in conformity and random will be considered as
dangerous and unsuitable.
This appliance is not intended for use by persons (including children)
with reduced physical, sensory or mental capabilities, or lack of
experience and knowledge, unless they have been given supervision
or instruction concerning use of the appliance by a person
responsible for their safety.
The assembly, the electric connection and the start-up must be
carried out by specialized and professional person.
The appliance shall be installed in accordance with national wiring
regulations.
It is essential to maintain the temperature in the swimming pool
lower than the recommended value by the swimming pool’s
manufacturer.
Please make sure that minimum water flow speed is 8m³/h.
In a concern to a constant improvement, our products can be
modified without notice; the present pictures in this note or the
characteristics which are described are not contractual.

4
3- Delivery’s control
At the delivery time, check the condition of packing; in case of
damages, have reservation about them to the carrier, before 48
hours and by registered letter with acknowledged receipt.
Before any manipulation, check the complete state of the machine.
4
-
Technical description
Characteristics:
MODEL
BP-100HS-A
Power supply
230V~, 50Hz
Heating consumption power *
(kW)
1.85
Heating restored power *(kW)
11
Heating nominal intensity *(A)
8.8
Heating consumption power **
(kW)
1.75
Heating restored power **(kW)
8.2
Heating nominal intensity **(A)
8
Air flow (m3/H)
2600
Noise level (d(B)A)
<54
Refrigerant gas
R32
Rate of average filling of gas (g)
750
CO2 equivalent [T]
0.51
Net weight of the unit (kg)
54
Overall sizes L x W x H (cm)
90 x 31 x 62
possible variations of value according to climatic conditions
*: A26W26 **A15W26

5
Outside:
Inside:
(Front sheet cover and panel removed)
1
Fan protection grid
2
Front panel
3
Top cover
4
Control panel
5
Refrigerant pressure manometer
6
Fast connection for water outlet
7
Fast connection for water intlet
8
Wire connection for power supply
9
Evaporator
10
Fan
11
Compressor
12
High and low pressure interruptor
13
Titanium heat exchanger
14
Temperature sensor of swimming pool water
15
Four way valve
16
Ambient temperature sensor
17
Defrost sensor
18
Water flow switch

6

7
Wire control operation
The function of the LCD display and control:
Set the operation parameter:
◎Long Press “ ” button to enter operation parameter setting interface.
◎Press " " to check parameter(parameter from 0-28, see Operation Parameter Table).
◎Under parameter, press " " to start setting(the parameter displayed blinks), press " " or "
" to set data for parameter from 0-28, press " " again to exit the current parameter
settings.
◎In operation parameter setting interface, press “ ” or “ ” button exit to man interface, No
operation is maintained in the parameter interface.
NO
Meaning
Range
Change
Factory setting
0
Automatic restart
0/1
YES
1
1
Daily cycle mark
0/1
YES
1
2
Water temperature difference to restart
2~10°C
YES
2
3
Water temperature difference to restart Y
0~3°C
YES
0
4
Turnround of defrosting Under heat mode
30~90 min
YES
40 min
5
Defrosting start temperature
-30~0°C
YES
-7°C
6
Defrost exit temperature
2~30°C
YES
20°C
7
Time of exit defrost Under heat mode
1~12 min
YES
8 min
8
Compressor protection Exhaust temperature
95~120°C
NO
95°C
9
Max set water temperature
40~65
YES
40°C
10
Water pump mode
0/1
YES
1
11
Constant temperature water pump stop time
3~20 min
YES
15
13
Mode (cool/coo & heat/ heat)
0/1/2
YES
1
14
EEV action cycle
20~90s
NO
40
15
Heating Target Superheat
-5~10°C
NO
0°C
16
Acceptable exhaust temperature when EEV
adjustment
80~110℃
NO
95℃
17
Defrosting EEV aperture setting
20~450
NO
400

8
18
Min. EEV aperture setting
50~200
NO
100
19
EEV manual step number
20~450
NO
350
20
EEV manual/automatic
0/1
NO
1
21
Water inlet temperature
-9~99°C
Measured value
23
Heating coil temperature
-9 ~ 99°C
Measured value
24
Compressor Exhaust temperature
-9 ~ 125°C
Measured value
25
Ambient temperature
-9 ~ 99°C
Measured value
26
Return gas temperature
-9 ~ 99°C
Measured value
27
Actual open steps of EE valve
100~500
Measured value
28
Cooling coil temperature
-9 ~ 99°C
Measured value

9
Real-time clock setting
Press“" button to set clock,
“" symbol will flash during this setting,
Press " " button, it will enter hour setting,
press “ ” or “ ” buttons to change the value.
Press " " button once more, it will enter minute setting.
Also press “ ” or “ ” buttons to change the value.
After setting, press “ ” button to back to default screen.
Timer setting
Press“" button to set clock, if the clock without setting,
Press “"button again to first group timer setting,
Press and hold " " to shift the timer On/OFF,
While the timer is ON, " " symbol will flash,
Once the timer ON, press " " to set the hour for Timer switch ON,
Press “ ” or “ ” buttons to change the value.
Press " " button once more to set the minute for Timer switch ON.
Press " " button again, it will enter Timer switch OFF setting.
Same as the Timer switch ON.
During timer setting, press “"button,it will enter next group timer setting.
There are 3 group of timer Settings.
Long press " " to cancel the group setting when the group "" symbol flashes.
Key lock:
Long press “ ” button 5 seconds, To set keylock.
Long press “ ” button 5 seconds again to release keylock.

10
General diagram of the refrigerating circuit
The heat pump is reversible allowing the swimming-pool’s heating or
cooling:
Swimming-pool water’s heating mode:
The cold and liquid refrigerant fluid absorbs the heat contained in the air through the evaporator
(gilled radiator), in which it is vaporizing; it is then put up in pressure and in temperature by the
compressor which sends it in the condenser (exchanger) where it loses its heat (in giving it to the
water of swimming pool) and comes back in liquid state; it loses its pressure and still cools in the
expansion capillaries before turning back to the evaporator for a new cycle.
Hot water
Cold water
Hot air
Cold air
Compressor
Single
way
valve
Condenser
(exchanger)
4 way valve
Pressure and gas
intake
Evaporator
(gilled
radiator)
Expansion
capillary

11
Swimming-pool water’s cooling mode:
The 4way valve reverses thecirculation of the refrigerant fluid; the fluid vaporizes in the exchanger
(evaporator) in getting the heat of the water, goes through in the compressor which reheats it and
through in the gilled radiator (which becomes condenser) where it comes back to liquid state.
Cold water
Heat water
Cold air
Hot air
Compressor
Evaporator
(exchanger)
4 way
valve
Evaporator
(gilled
radiator)
Pressure and gas
intake
Single
way
valve
Expansion
capillary

12
Safety and control systems
Heat pumps are equipped with the following standard protection
systems:
1. Water flow switch
Thanks to this flow switch, the heat pump will not work when the filter pump is not working (and
the water is not circulating). This system prevents the heat pump from heating only the water flow
in the heat pump itself. The protection also stops the heat pump if water circulation is cut off or
stopped.
2. Refrigerant gas high and low pressure protection
The high pressure protection makes sure the heat pump is not damaged in case of over
pressurisation of the gas. The low pressure protection emits a signal when refrigerant is escaping
from the conduits and the unit cannot be kept running.
3. Overheating protection on the compressor
This protection protects the compressor from overheating.
4. Automatic defrost control
When the air is very humid and cold, ice can form on the evaporator. In that event, a thin layer of
ice appears that will grow increasingly bigger as long as the heat pump is running. When the
temperature of the evaporator has become too low, automatic defrost control will be activated,
which will reverse the heat pump cycle so that hot refrigerant gas is sent through the evaporator
during a brief period of time to defrost it.

13
5. Anti-frost protection during winter
This protection can only be activated if the heat pump is in STAND-BY mode.
5.1 First anti-frost protection
If the filter pump is controlled by the heat pump (regardless of the value for parameter 9) and
when the water temperature lies between 2 and 4 °C and the air temperature is lower than
0 °C, the filter pump will be automatically turned on to prevent the water from freezing in the
piping. This protection is deactivated when the temperature rises again.
5.2 Second anti-frost protection
If the water temperature drops even more, that is, below 2 °C (during long frost periods), the heat
pump will also start running to heat the water until its temperature approximates 5 °C. When this
temperature is reached, the heat pump will stop, but anti-frost protection will remain active until
conditions change.
6. 3-fase protection
If the phases are connected in the wrong order due to electrical mis-wiring, this protection
will interrupt
the power supply to prevent mechanical deformation. There will be an EE 4 error code on
the display.
14
5- Installation
Rules of installation:
Electric and hydraulic connections must be carried out according to standards in
effect (NF C 15 100, CE I 364).
The machine must be installed outside.
The machine must be posed on its anti-vibratory studs, set and lying flat and on a
massive base (concrete slab); this base must have a sufficient height to prevent
any entry of water by the bottom of the machine. Height must be adjusted to fit
the connector collecting the condensates.
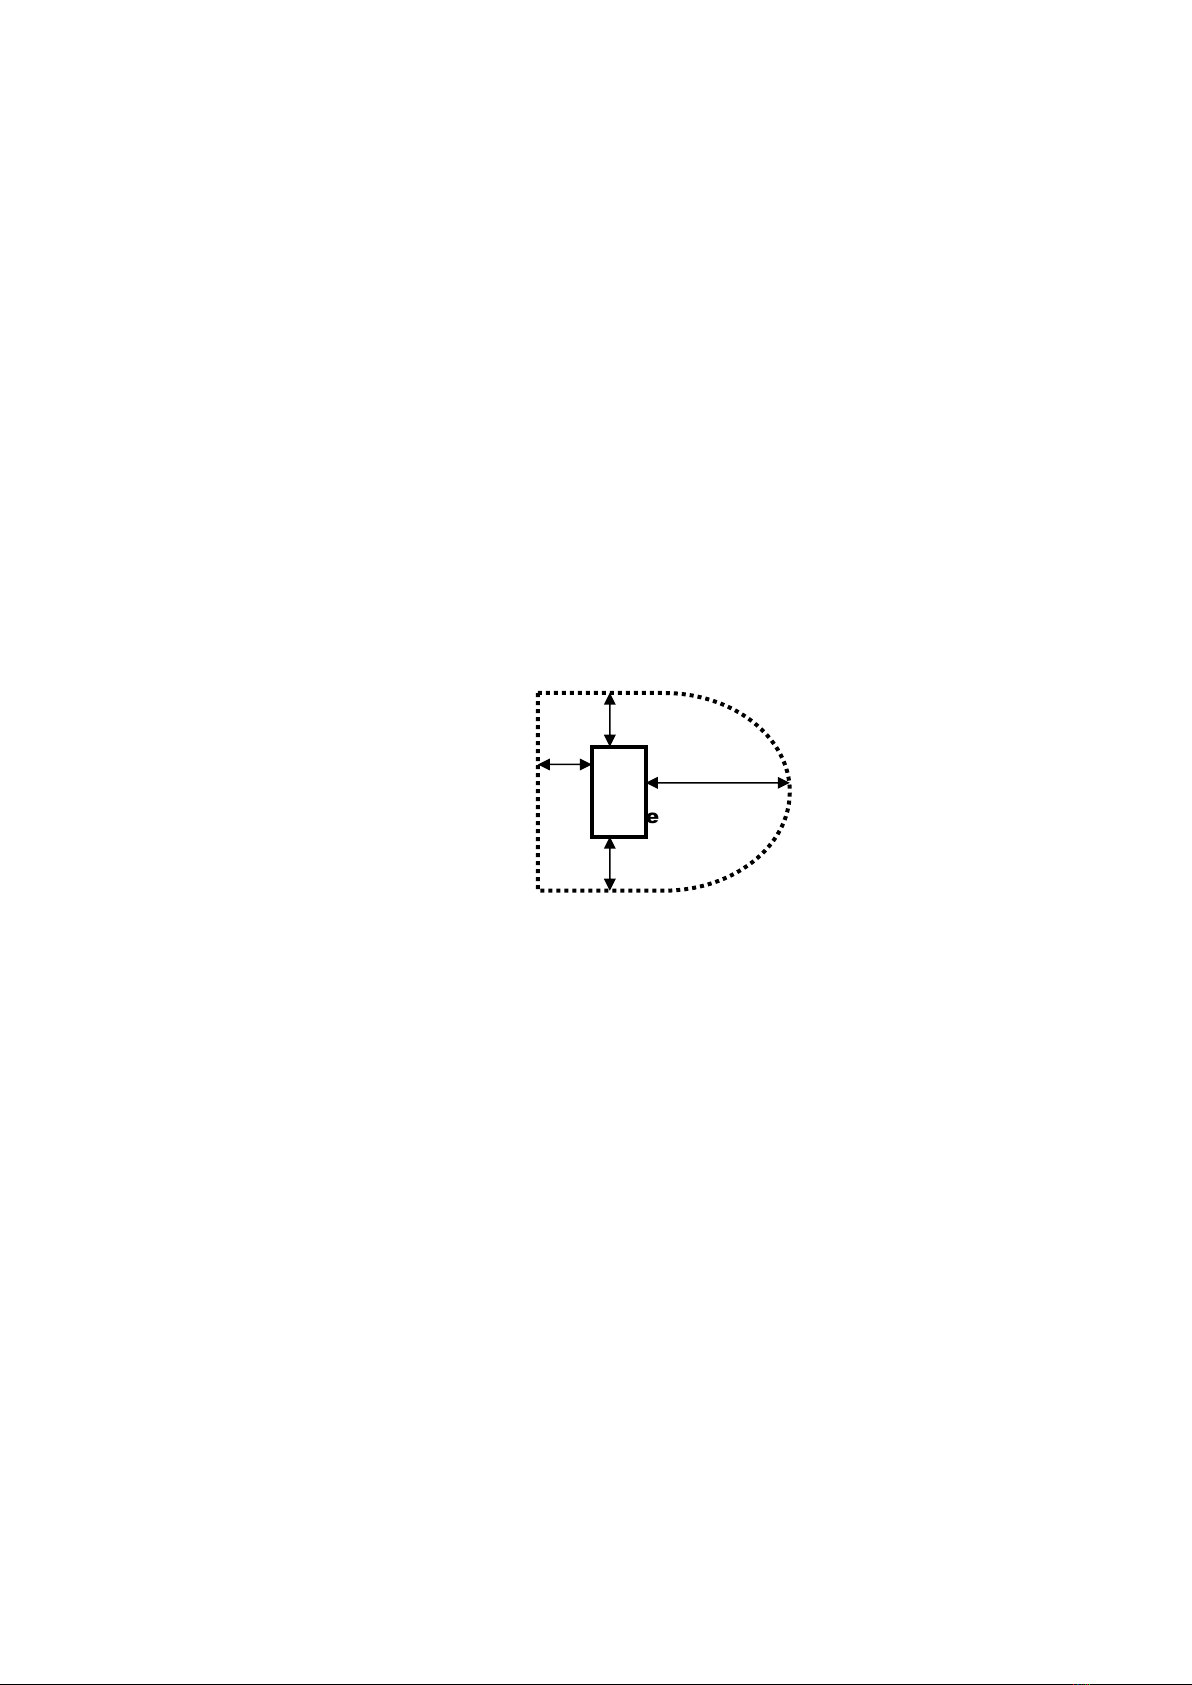
The obstacles such as wall and vegetation must be separated from the machine as
indicated on the diagram below.
Exhausting Blowing
side side
Do not to install the Heat pump in a confined place (the fan would recycle its air
and the Heat pump would be down performance).
The fan should not blow towards the windows or crossing point.
Safety distance between the swimming pool and the foot bath: the fitter must
imperatively refer to the standard C15-100 section 702; the machine should not be
installed in volume 1 surrounding the swimming pool but at least in volume 2 so at
a distance of 3 m minimum of the swimming pool and foot bath.
Other precautions of installation:
- Do not to install the machine near a way with circulation of car in order to avoid
mud projections.
- Avoid directing blowing against dominant winds.
- If the machine is intended to be used in winter, put it in a place protected from the
falls of snow.
- The machine must be able to be supervised in order that children do not play
around
2,5 m mini
0,5 m mini
0,3 m mini
0,5 m mini

Swimming-Pool
Technical room
Chemical treatment
Blowing
By-pass
Heat Pump
Drain of the
condensates: insert
the plastic elbow in
the hole of
evacuation of the
bottom and connect
the pipe if need.
Hydraulic connections: To
respect imperatively
Connection is carried out with a by-pass located on
the circuit of filtration, upstream appliances of the
chemical treatment of water.
Connect intake/outlet water PVC pipes DN50 to the
openings of the machine in following the inlet /
outlet indications (grease the worms before
screwing)
Filte
r
15

16
Electric connections:
CAUTION: before connecting the machine, make sure that the feeder is
disconnected to the electrical network.
The electric installation must be carried out by an experienced electrician and the
supply must come from a severing equipment and differential protection; the
whole must be carried out according to standards' in force in the country where
the material is installed.
Characteristics of the electric supply:
- 230 V +/- 10%, single-phase current, or 380 V +/- 10%, three-phase current,60 Hz
- Mode of neutral TT and TN.S; the circuit of heat pump must be connected to an
earth circuit.
Characteristic minimum of the protection:
- Protection must be of 16 A, by circuit breaker or fuse; it must protect the Heat
pump exclusively; the circuit breaker must be specified with curve D, the fuse
must be specified Am.
- Differential protection : 30 mA (the length of cable between the connector block
of the heat pump and the protection of should not exceed 12 m).
Control :
The heat pump is fitted out with a water flow detector which function is to apply
the signal to the electronic card when the water flow is sufficient.
We recommend when it is possible to control the heat pump to the filtration
pump (by contacting relay non supplied to insert in the feeding circuit of the heat
pump).
The remmonded water flow speed is 8m³/h.
Removed control panel:
An extension cord allows the removal of the panel in inserting it in a standard
electric box into the technical local; the option is supplied with a cover allowing to
seal the aperture let by the removal of the control panel.
16

16
6- Water Flow and refrigerating circuit pressure
After putting into service, do the settings of pressure of the refrigerant
circuit for having an optimal operating of the heat pump, as following:
Stage 1:
Before starting the Heat Pump, ambient
temperature around 20°C, refrigerant meter
shows pressure from 14 to 16kg/cm².
Stage 2:
Close completely the by-pass valve and open
large inlet and outlet valves of the Heat
Pump; in these conditions the totality of the
water flow goes by the Heat Pump.
Put into service the Heat Pump in heating mode, wait for the indicated
pressure being stabilized; the correct setting of the pressure is from 21 to
35 kg/cm²;
In most of cases (pump of filtration given a flow until 9m³/h) you do not have
to open the by-pass valve.
If the stabilized pressure is under 21kg/cm², the progressive opening of the
by-pass valve will allow rising this pressure.
The adjustment of the by-pass valve done, you have in principle no reason
to modify it during the season. See the paragraph “Environment problem”
too.
18
17

16
7 –Environment problem
Under certain external conditions the heat exchanges between the refrigerant and
the water on one hand and between the fluid and the air on the other hand are
insufficient; the consequence is that the refrigerating circuit runs up in pressure
and the compressor consumes more electricity.
The temperature sensors compressor outlet and the magnetic circuit breaker on
the compressor power supply protect the compressor from these extreme
conditions; the error messages
E 3
occur.
The condition causing this situation is as follows:
In heating mode:
- insufficient water flow:
close the by-pass valve for increasing the refrigerant exchange →water
In cooling mode:
- too heavy water flow: open the by-pass valve for decreasing the water flow and
so the exchange water →refrigerant
- insufficient air flow: be sure that the real net of condenser are not blocked.
Note: these error codes are likely to occur if temperature of swimming pool water
is high and the ambient air is hot.
18

16
8. Maintenance and inspection
8.1 Maintenance
•Check the water inlet and drainage often. The water and air inflow into the system
should be sufficient so that its performance and reliability does not get compromised.
You should clean the pool filter regularly to avoid damage to the unit caused by clogging
of the filter.
•The area around the unit should be spacious and well ventilated. Clean the sides of the
heat pump regularly to maintain good heat exchange and to save energy.
•Check if all processes in the unit are operational and pay special attention to the
operation pressure of the refrigerant system.
•Check the power supply and cable connections regularly. Should the unit begin to
function abnormally or should you notice a smell from an electrical component, arrange
for timely repair or replacement.
•Winterizing : make sure to purge all the water from the heat pump and other systems
in order to prevent frost damage.
•You should also purge the water if the unit will not work for an extended period of time.
You should check
all parts of the unit thoroughly and completely fill the system with
water before turning it on again
afterwards.
8.2 Troubleshooting guide
Improper installation may result in an electrical discharge that could lead todeath of –or
serious injury to -pool users, installers or others due to electrical shock and may also cause
damage to property.
DO NOT attempt to modify the internal configuration of the heat pump.
1. Keep your hands and hair clear of the fan blades to avoid injury.
2. If you are not familiar with your pool filtering system and heat pump:
a. Do not attempt to adjust or service without consulting your dealer or your professional
pool or air conditioning contractor.
b. Read the entire installation and user manual before attempting to use, service or adjust
the unit.
c. Start the heat pump at least 24 hours after its installation in order to prevent
damage to the compressor.
Note: Switch off the power prior to maintenance or repairs.
19

16
8.3 Overview of possible error codes displayed on the screen
Go back to chapter 4 “Protection systems” for more detailed information.
The heat pump screen displays one of the following codes:
Display
Problem
Cause
Solution
P1
“HEATING COIL
PIPE” sensor out of
order
Sensor open or short-circuited
Check or replace the sensor
P2
“Compressor exhust”
sensor out of order
Sensor open or short-circuited
Check or replace the sensor
P3
“WATER IN” sensor
out of order
Sensor open or short-circuited
Check or replace the sensor
P5
“Return Gas”sensor
out of order
Sensor open or short-circuited
Check or replace the sensor
P7
“AIR” sensor out of
order
Sensor open or short-circuited
Check or replace the sensor
P9
Low pressure
protection
Not enough refrigerant gas
Have the heat pump checked
by a refrigeration technician
Leak in the cooling conduits
Have the heat pump checked
by a refrigeration technician
Pb
“COOLING COIL
PIPE” sensor out of
order
Sensor open or short-circuited
Check or replace the sensor
PC
First anti-frost
protection active
Low temperatures for water
and air
No action required
PC
Second anti-frost
protection active
Low temperatures for water
and air
No action required
PL
Insufficient water flow
Insufficient water flow
Check the water flow
Waterflow switch out of order
Replace the Water flow switch
E3
compressor exhaust
temperature is too
high
Water temperature and
environmental temperature is
too high
Set to the safety of water
temperature.
Refrigerant leakage
Check and repair.
Insufficient water flow
Check the water flow
E4
High pressure
protection
Insufficient water flow
Check the water flow
Pressureswitch out of order
Replace the pressure switch
Have
E8
Too much refrigerant gas
present
the heat pump checked by a
refrigeration technician
20
Table of contents
Other Bridge Heat Pump manuals

Popular Heat Pump manuals by other brands


 specification")

STIEBEL ELTRON
STIEBEL ELTRON WPL 47 Operation and installation manual

WarmPool
WarmPool OPTIMUS E7 quick start

Bosch
Bosch BOVA Series installation instructions

Trane
Trane ComfortLink II 4TWZ0060A1000C Service facts

LG
LG MULTI F MAX Engineering manual

Bryant
Bryant Heat Pump Guide to operating and maintaining yo