Henden 2712991 Operating instructions
Inverter Heat Pump
INSTALLATION &
OWNER’S MANUAL
IMPORTANT
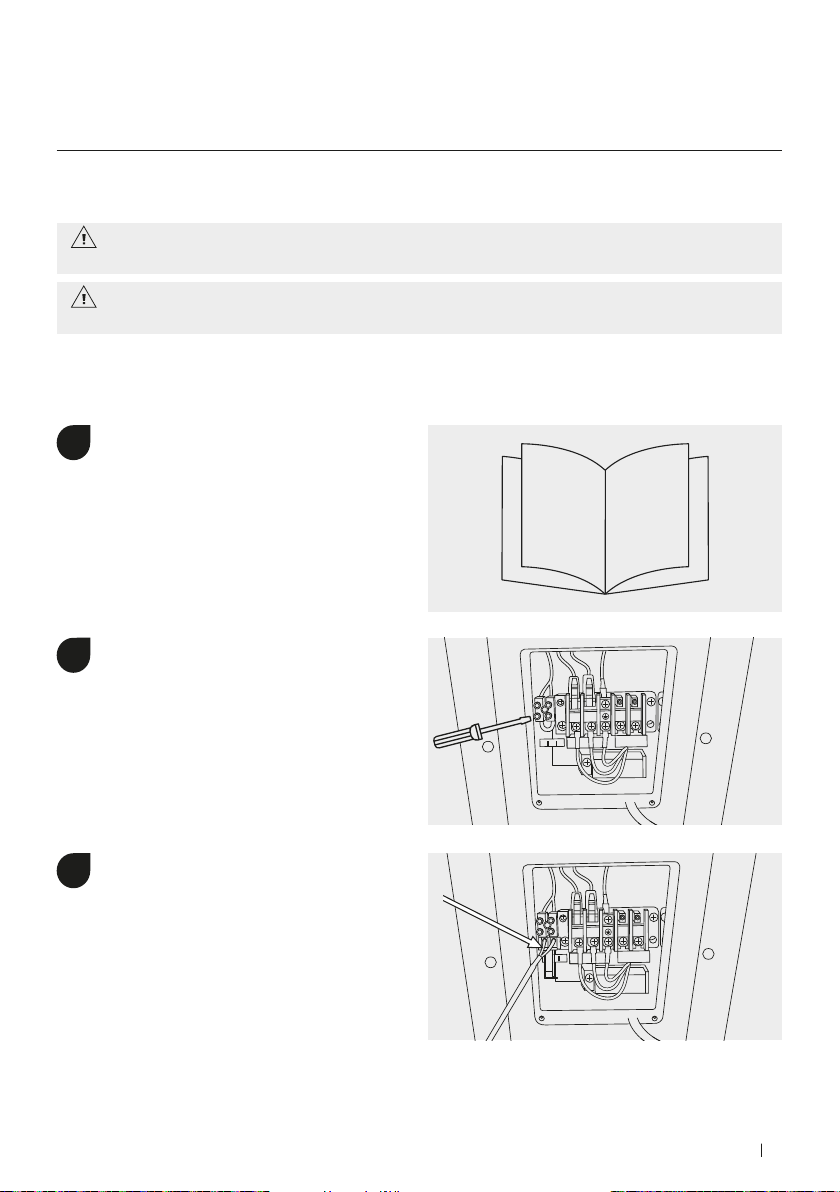
Please read carefully
CAUTIONS AND WARNINGS:
Installation and maintenance must be handled
by a professional pool builder/service agent.
Repairs should be carried out in a well
ventilated area.
Failure to follow these instructions and comply
with all applicable codes may cause serious
bodily injury and/or property damage.
This Inverter Heat Pump contains R32
refrigerant gas which is a flammable substance
under certain conditions.
Turn off the power during thunderstorms and
severe weather.
The Inverter Heat Pump must be positioned on a
concrete base. It is recommended that the frame
is secured using M10 bolts.
Do not lift the Inverter Heat Pump using the
water unions.

2HENDEN – INSTALLATION & OWNERS MANUAL

3HENDEN – INSTALLATION & OWNERS MANUAL
Contents
Inverter Heat Pump
Introduction 4
Helpful hints 4
In the box 5
Electrical set up 6
Installation 7
First time start up 10
Typical installation 13
Alternative installation options 14
Operation 21
App functionality 28
Specifications 31
Dimensions 32
Maintenance 33
Winterising 34
Troubleshooting 35
Error codes 36
Frequency conversion board fault 38
Exploded diagram (9kw/14kw/17kw/20kw) 40
Spare parts (9kw/14kw/17kw/20kw) 41
Exploded diagram (24kw/28kw) 42
Spare parts (24kw/28kw) 43
Warranty 44
Notes 45

4HENDEN – INSTALLATION & OWNERS MANUAL
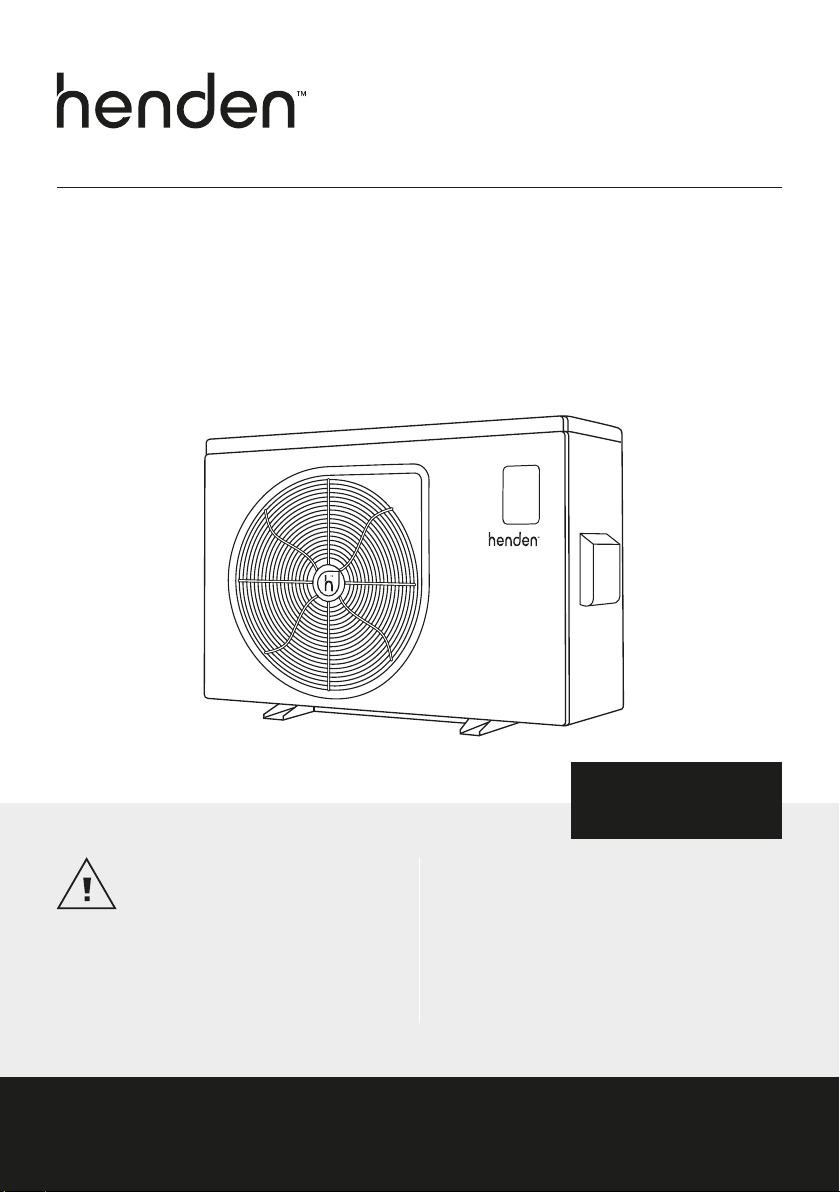
INTRODUCTION
Thank you for purchasing a Henden
Inverter Heat Pump.
Harness the power of this high performing
heat pump. Built with inverter technology
for energy efficiency and designed
for super quiet operation, this sleek
and compact heat pump is perfect for
Australian residential pools.
HELPFUL HINTS
> The surroundings of the Henden Inverter
Heat Pump should be kept clear to avoid
restricting ventilation.
> Install the Henden Inverter Heat Pump in
a well ventilated, outside area.
> Regularly check the condensate hose for
blockages and clean as necessary.
> Ensure the Wi-Fi strength at the site of
installation is strong (more than -50dB is
recommended).
> Install the Henden Inverter Heat Pump in
line with the ventillation diagrams in this
manual.
> For a complete heating solution, pair
with a Henden 550 Micron Solar Pool
Cover. This addition helps reduce energy
consumption, heat loss and water
evaporation.

Henden Inverter Heat Pump
X4 rubber feet
X2 union tails
1.5 metre drain hose
Quick Start Guide
Inverter Heat Pump
QUICK START
GUIDE
Scan to view the complete installation manual:
CAUTIONS AND WARNINGS:
Keep the Henden Inverter Heat Pump
away from any potential fire source.
The Henden Inverter Heat Pump must be
placed in a well-ventilated area; it must not
be placed in an indoor or enclosed area.
Installation must be handled by a professional
pool builder/service agent.
Repair and disposal must be carried
out by manufacturer approved
service personnel.
Thank you for purchasing a Hen den Inverter Heat Pump.
Built with inverter technology for energy efficiency and designed for
super quiet operation. Harness the power of this high performing
heat pump and enjoy more time in the pool.
HELPFUL HINTS
• Prepare the outdoor installation area by
removing tree branches, debris or
anything that could restrict ventilation.
• Regularly check the condensate drain for any
blockages or debris build up. This will
ensure optimal drainage.
• Make sure there is water flowing through the
Henden Inverter Heat Pump when operating.
• To maximise efficiency, install the Henden
Inverter Heat Pump in line with the ventilation
diagrams depicted.
• If you intend to connect the Henden
Inverter Heat Pump to the Handy
Heat Pump app, ensure you have strong
Wi-Fi in the installation location. More than
-50Db is considered suitable for use.
IMPORTANT
Please read carefully
5HENDEN – INSTALLATION & OWNERS MANUAL
Inverter Heat Pump
IN THE BOX

6HENDEN – INSTALLATION & OWNERS MANUAL
ELECTRICAL SET UP
Always use a qualified electrician to perform any electrical work. A licensed
electrician must read the information before connecting.
The Henden Inverter Heat Pump must be earthed and equipotential bonded.
Ensure the power cable and circuit breaker are of suitable size for the heater
being installed. See specification sheet on page 27 for max input power.
Check that there is adequate voltage and current available at the heater
connection to run the unit. Voltage range should be 220–230 volts for single
phase. Voltage ranges outside these parameters will damage the Henden
Inverter Heat Pump.
Ensure power is disconnected during installation or service.
Always comply with the national and local electrical codes and standards.
Ensure electrical cable size is adequate for heater requirements at the
installation location.
1
2
3
7HENDEN – INSTALLATION & OWNERS MANUAL
Inverter Heat Pump
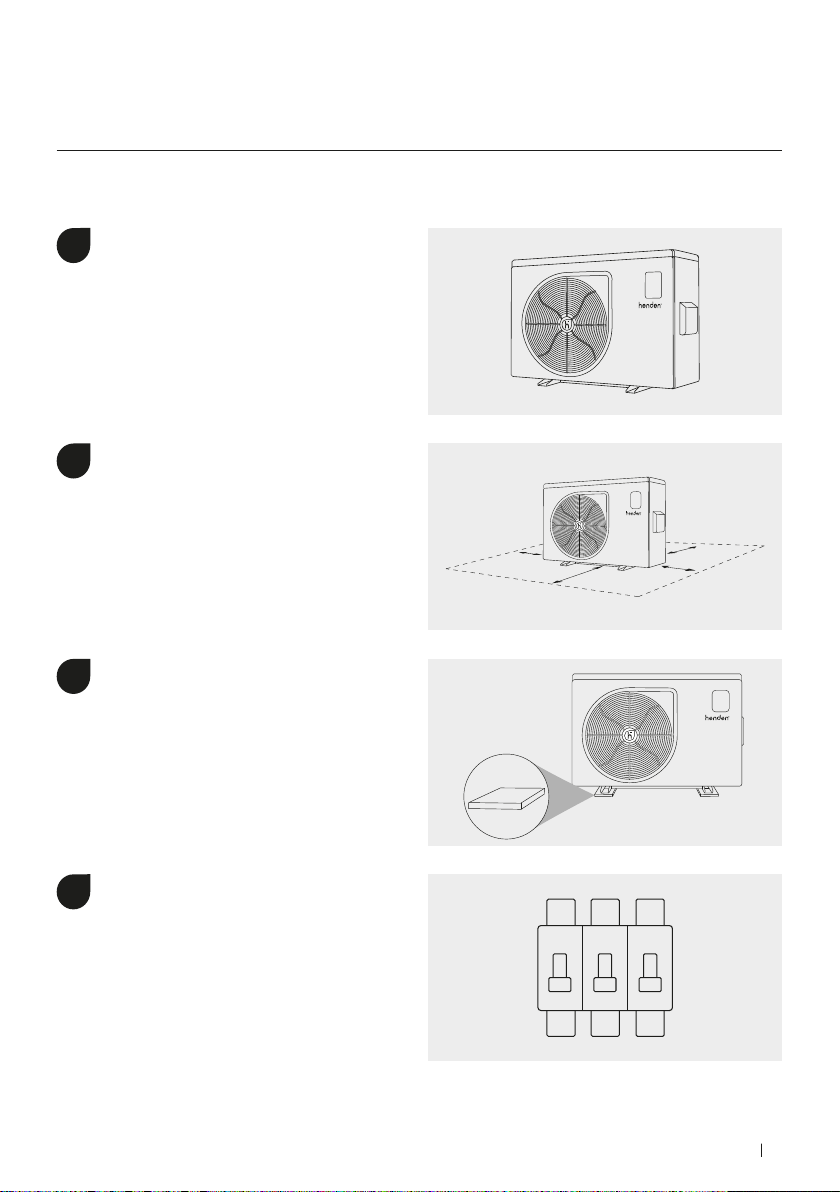
To begin, position the Henden Inverter
Heat Pump on solid level ground
outside. Do not place the unit in an
enclosed area.
Positioning the Henden Inverter Heat Pump
Check that there are no objects
blocking the air inlet and that the
minimum clearance guidelines
displayed are followed.
Place the 4 rubber feet supplied
under the Henden Inverter Heat Pump.
Ensure the Henden Inverter Heat
Pump is equipped with a circuit
breaker and electrical isolation switch.
700mm 700mm
700mm 300mm
INSTALLATION
1
2
3
4
8HENDEN – INSTALLATION & OWNERS MANUAL
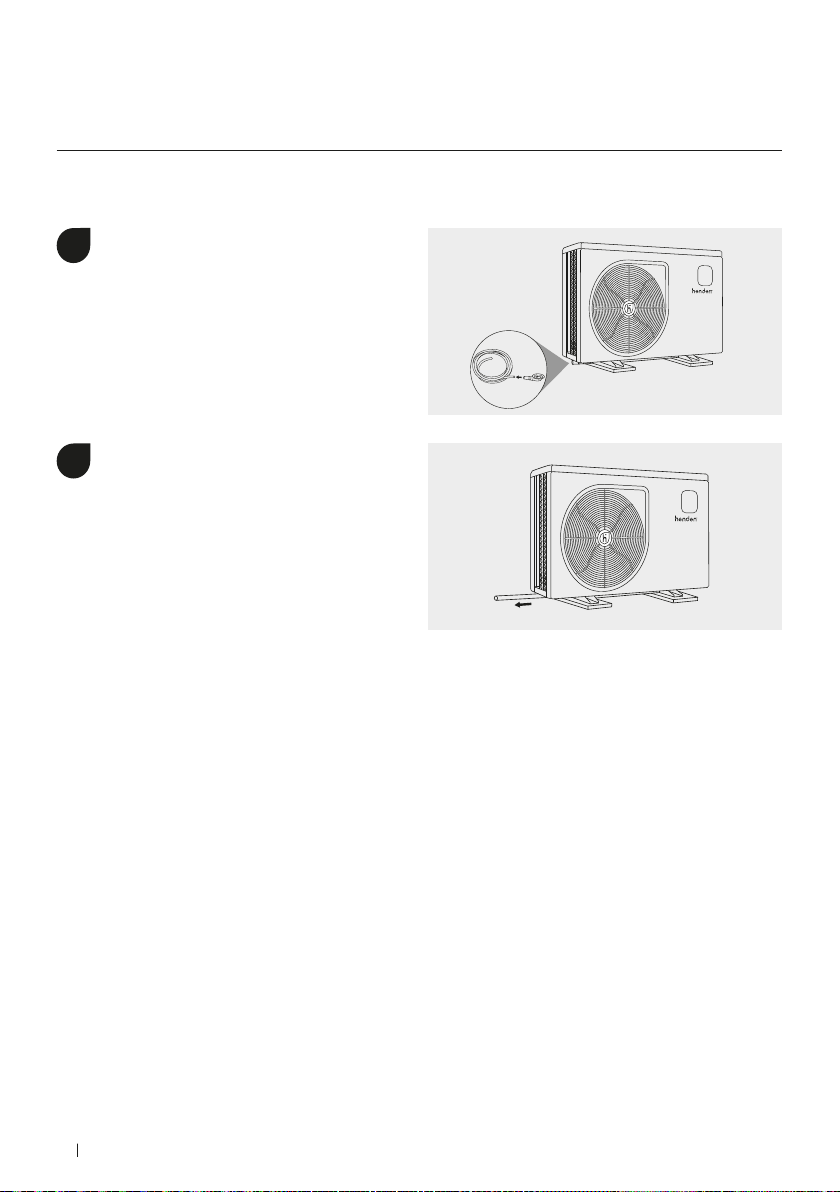
Connecting the condensation drain
Locate the barb under the heater
and push the supplied drain hose
on securely.
Run the drain hose downhill to
a suitable location. For example, a
garden or nearby stormwater drain.
Note: the hose can drain up to
10 litres of condensation per hour.
1
2
INSTALLATION

9HENDEN – INSTALLATION & OWNERS MANUAL
Inverter Heat Pump
INSTALLATION
Using the 40mm tail supplied,
connect the inlet of the Henden
Inverter Heat Pump downstream,
after the pool pump and filter.
Create a flow bypass between the
inlet and outlet pipework to ensure
optimal efficiency. See an example
of this using 3 valves adjacent.
Using the 40mm tail supplied,
connect the outlet upstream before
any chlorinators, acid injection
or other chemical dosing systems.
Setting up the flow bypass
Connecting the pipework
1
2
1
Flow
Bypass

10 HENDEN – INSTALLATION & OWNERS MANUAL
FIRST TIME START UP
%
ON
ON
With the bypass valve fully open,
turn the pool pump on.
Check there are no water leaks
and verify adequate flow to and
from the pool.
Turn on the electrical power
supply to the Henden Inverter
Heat Pump. If hardwired, turn
on the isolation switch.
Press the power symbol on the
control panel. The Henden Inverter
Heat Pump will turn on within
a few seconds.
1
2
3
4
Powering the Henden Inverter Heat Pump

11HENDEN – INSTALLATION & OWNERS MANUAL
Inverter Heat Pump
Flow
Bypass
FIRST TIME START UP
To adjust the bypass and calibrate the
flow rate, open all isolating valves.
Fully close the flow bypass and switch
the Henden Inverter Heat Pump
to the maximum temperature.
Wait 3–4 minutes until the
Henden Inverter Heat Pump is
at 100% capacity.
Slowly open the flow bypass valve to
increase the temperature differential
between the inlet and outlet. Closing
the bypass valve will decrease the
temperature differential. Adjust until
optimum differential of 2–3 °C is
achieved.
Handy Tip! Wait two minutes between
each adjustment.
5
6
7
8
3
-
4
MINUTES
Flow
Bypass

12 HENDEN – INSTALLATION & OWNERS MANUAL
FIRST TIME START UP
The initial start up is complete. Allow
the Henden Inverter Heat Pump to run
24 hours per day until the desired pool
temperature is reached. This can take
several days.
24
HOURS
12
%
%
ºC
%
ºC
Outlet
Inlet
The flow bypass set up is successful
when the temperature difference
between the inlet and outlet is 2–3 °C.
At this point, lock the position of the
bypass if possible.
9
After the compressor has been
running for a few minutes, the air
leaving the Henden Inverter Heat
Pump should be 5–10°C cooler than
the ambient air temperature.
11
To test the flow switch, ensure
the Henden Inverter Heat Pump is
operating, then turn the pool pump
off. If the flow switch is working,
the Henden Inverter Heat Pump
should turn off automatically
and the control panel should
display E3 indicating no flow.
10
13HENDEN – INSTALLATION & OWNERS MANUAL
Inverter Heat Pump
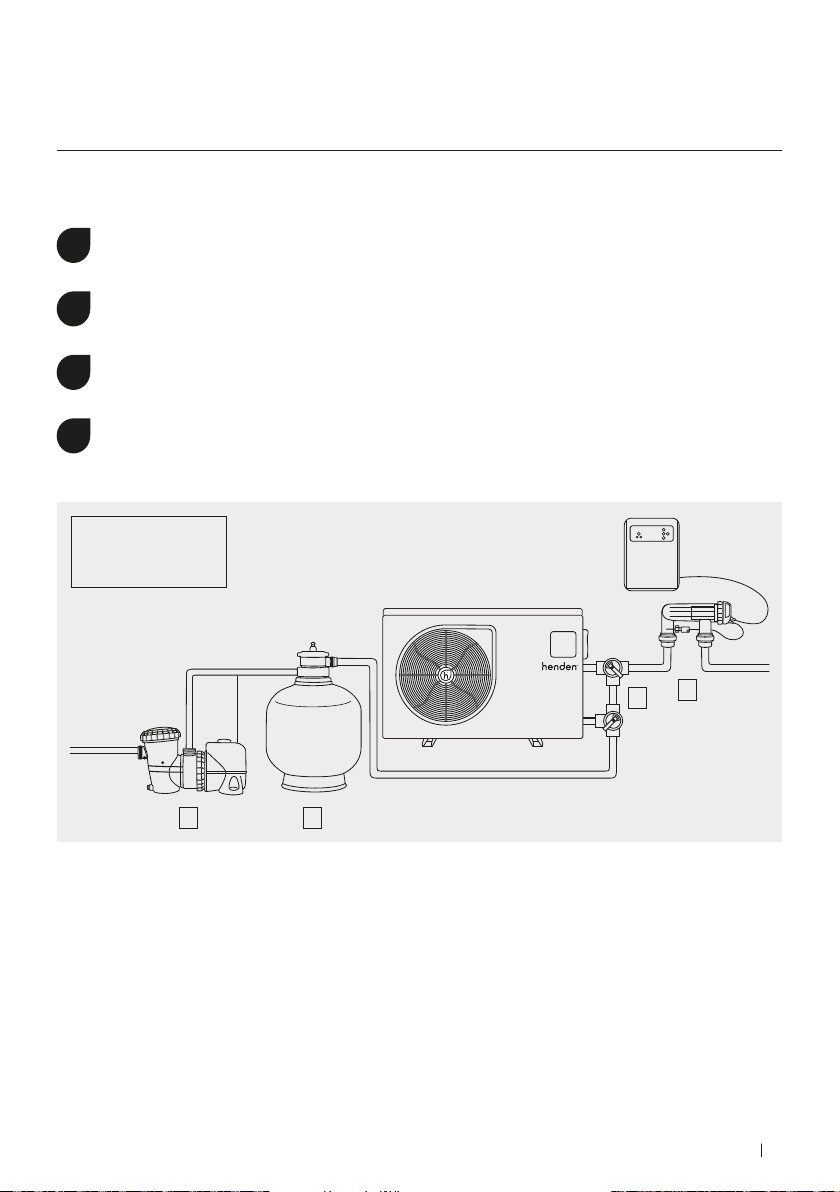
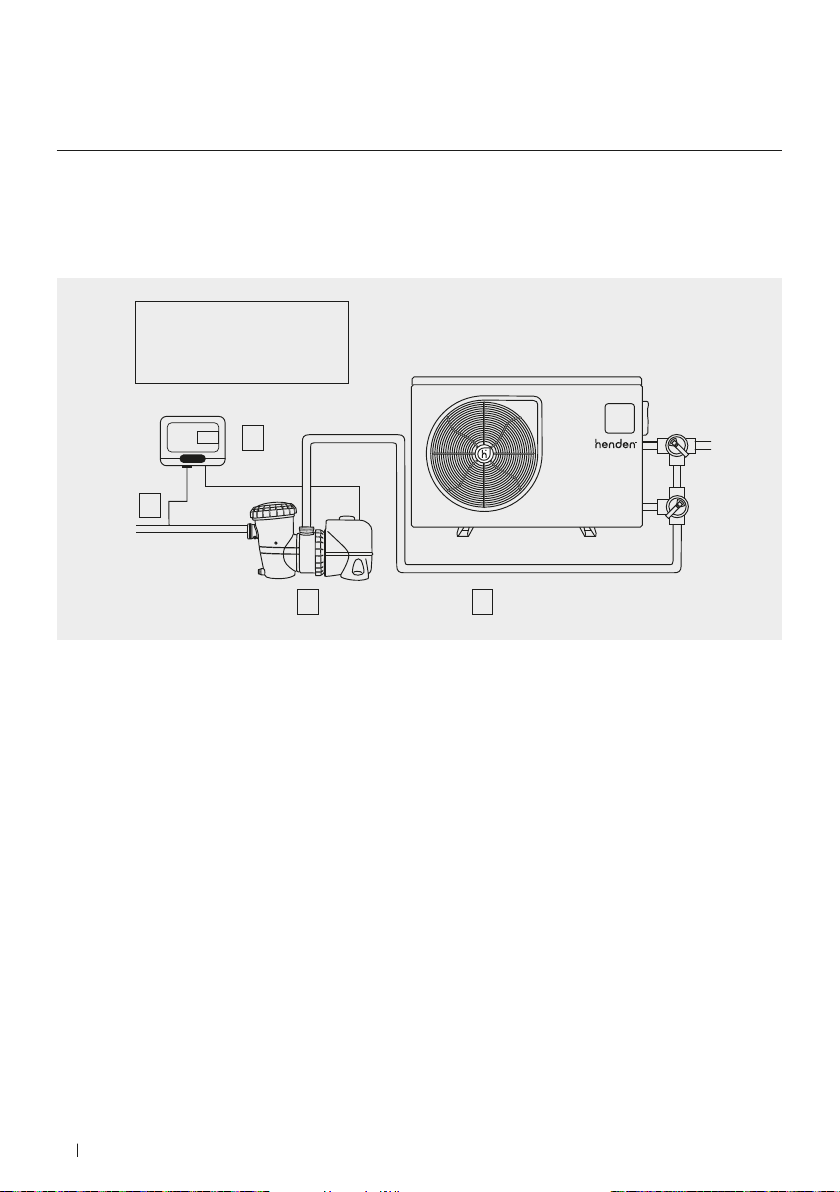
TYPICAL INSTALLATION
Flow switch activated heating
The Henden Inverter Heat pump can be left in an “ON” state and will
activate/ deactivate the heating process using the inbuilt flow sensor.
While the circulation pump is running, the Henden Inverter Heat Pump will
continue to monitor the flow and temperature.
When the Henden Inverter Heat Pump detects a loss of flow the Heater will power
off and an E3 – ‘Low Flow’ error message will be displayed.
Once the flow is restored the alarm will clear, and the heating
process will resume.
1
2
3
4
A - Pool Pump
B - Filter
C - Chlorinator Cell
D - Bypass Manifold
A B
DC

14 HENDEN – INSTALLATION & OWNERS MANUAL
ALTERNATIVE INSTALLATION OPTIONS
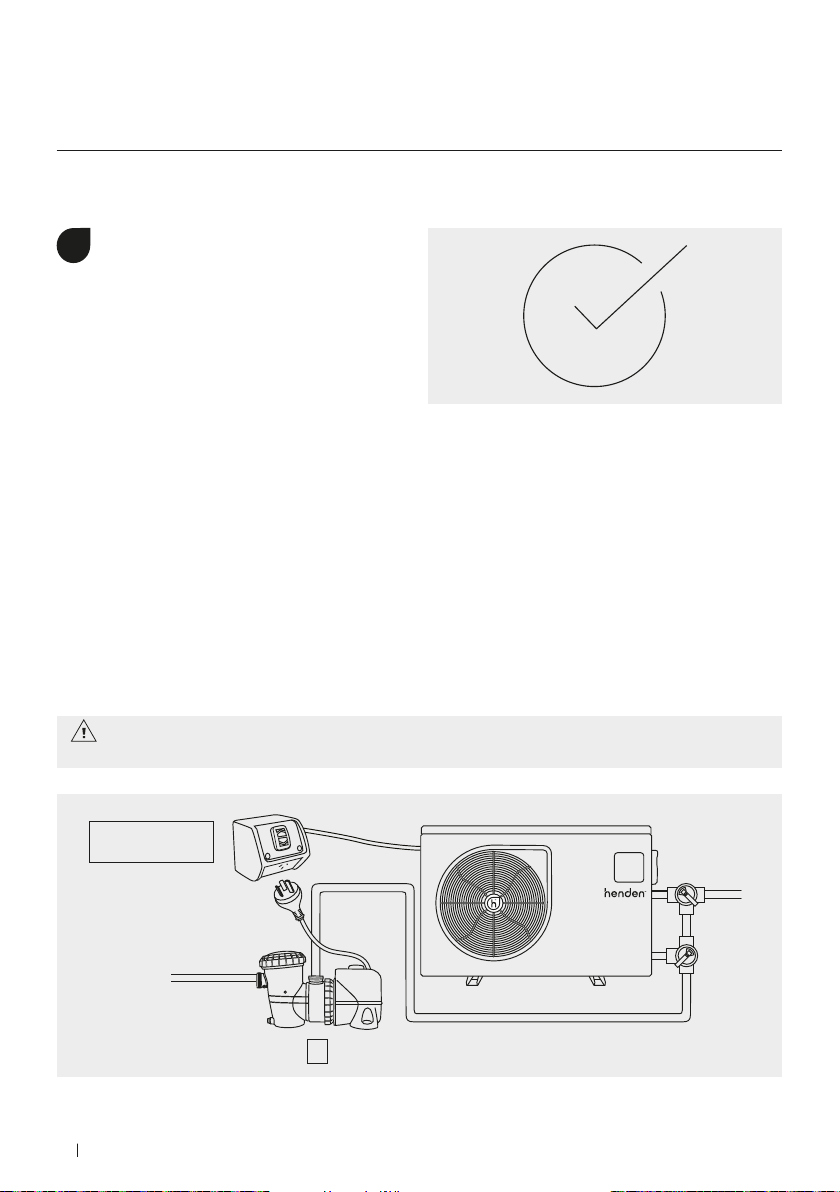
Locate the electrical terminal cover
on the right side of the Henden
Inverter Heat Pump and remove the
two screws attaching the cover using
a phillips head screwdriver.
1
Once removed, you will see the High
Voltage protective cover. Using a
Phillips head screwdriver remove
the two screws.
2
Accessing the electrical terminals
(For External Automation Control, Independant Circulation
Pump & Chlorinator Override Controller Installations)
You will now have access to the
electrical terminals required for
a. External automation control
b. Individual circulation pump
c. Flow activated with chlorinator
override controller
3
L
5
|
PR
|
6
NP1P2
O
W
E
PMP
U
15HENDEN – INSTALLATION & OWNERS MANUAL
Inverter Heat Pump
ALTERNATIVE INSTALLATION OPTIONS
This Henden Inverter Heat Pump contains electrical equipment. Always use a
licensed professional and never remove panels without disconnecting the power.
Please check with the automation system provider that the connection
is a dry contact switch and the best way to install with their equipment.
The Henden Inverter Heat Pump can be paired with an external automation controllers.
To connect the controller, follow the steps below.
3Insert the control wire from the
automation unit into terminals 5 and
6 then re-tighten the terminal screws.
Locate the loop wire in terminals 5
and 6 then loosen the terminal screws
and remove the loop wire.
2
L
5
|
PR
|
6
NP1P2
O
W
E
PMP
U
External Automation Control
Access the electrical terminals
using the steps from page 14.
1
L
PR
RLMO
|
6
NP1P2
O
W
E
PMP
U
16 HENDEN – INSTALLATION & OWNERS MANUAL
The external automation controller
will now override the power control
the Henden Inverter Heat Pump.
Handy Tip: If the Henden Inverter
Heat Pump display reads “OFF”
check the heat pump setting in
the external controller.
Handy Tip: If the external controller uses a temperature sensor, set the Henden
Inverter Heat pump to its maximum temperature to allow full override from
external Controller.
4
Independant circulation pump
Handy Tip: This set up is only when there is dedicated heating pipework which can operate
independent of the filtration system.
Handy Tip: For this set up, it is recommended to install a single power point for the circulation
pump to plug into for any future service work to the pump which may be required.
WARNING: the maximum load for the relay is 10A.
This Henden Inverter Heat Pump contains electrical equipment. Always use a
licensed professional and never remove panels without disconnecting the power.
A
A - Pool Pump
ALTERNATIVE INSTALLATION OPTIONS

17HENDEN – INSTALLATION & OWNERS MANUAL
Inverter Heat Pump
ALTERNATIVE INSTALLATION OPTIONS
Locate the termination points labelled
P1 and P2 from the on-board relay.
2
L
5
|
PR
|
6
NP1P2
O
W
E
PMP
U
Access the electrical terminals using
the steps from page 14.
1
The P1 and P2 termination points
are a ‘no-voltage’ relay. To supply
mains power to the circulation pump,
a bridging wire is required from the
Active terminal to the P1 terminal.
3
Use the P1 and P2 termination points
to hardwire a 10amp power outlet.
4
L
E
N
P1P2
HEAT PUMP
L N E
POOL PUMP
L
5
|
PR
|
6
NP1P2
W
E
PMP
U
18 HENDEN – INSTALLATION & OWNERS MANUAL
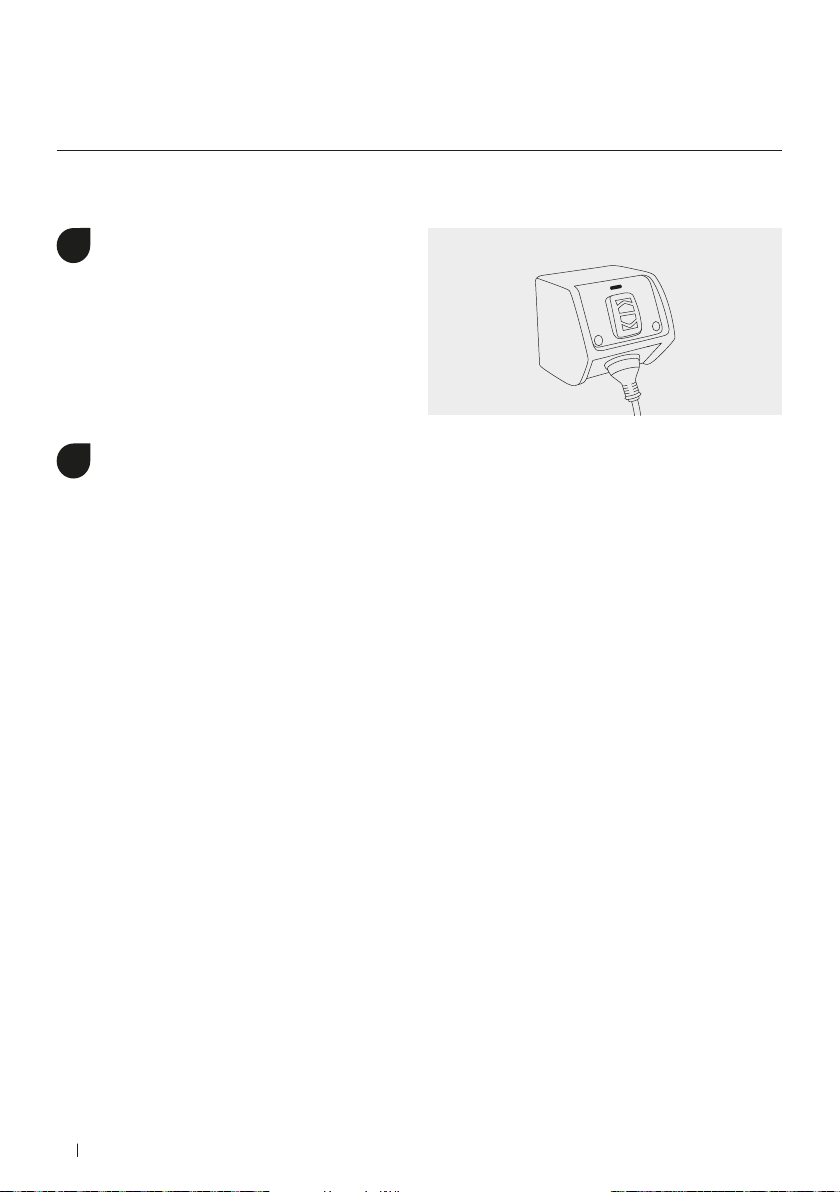
The circulation pump can then
be plugged into the power outlet
connected to the Henden Inverter
Heat Pump.
5
ON
The Henden Inverter Heat pump will now use the inbuilt timers and temperature
sensor to control the power to the outlet.
a. If the pool reaches the set temperature, the Henden Inverter Heat Pump will
switch off relay to stop the circulation pump.
b. While the timer is still active, the circulation pump will run for 2 minutes every
hour to test the water temperature. If the temperature is 1 degree below the set
point, the Henden Inverter Heat Pump will continue to run the circulation pump
and start the heating process again.
6
Handy Tip: For optimal efficiency Henden recommends adjusting parameter #6 to 100.
This will force the Henden Inverter Heat Pump to operate at 100% and reduce the time
the circulation pump is required to run. To modify the parameters, refer to page 28.
ALTERNATIVE INSTALLATION OPTIONS

19HENDEN – INSTALLATION & OWNERS MANUAL
Inverter Heat Pump
Flow activated with Chlorinator override controller
An onboard pump output relay can activate the main filtration pump by using it in
combination with a “Chlorinator override controller”. This allows the Henden Inverter
Heat Pump to run past the chlorinator timers and prevent over-chlorination when further
heating is required.
Handy Tip: This set-up is best when only single pipework is available from pool and
doesn’t have individual heating pipework.
ALTERNATIVE INSTALLATION OPTIONS
Access the electrical terminals using
the steps from page 14.
1
Locate the termination points labelled
P1 and P2 from the on-board relay &
connect the two–core cable from the
Chlorinator override controller.
2
The Chlorinator override controller
will then provide power to the
circulation pump when it receives a
signal from either the Chlorinator or
the Henden Inverter Heat Pump.
3
L
5
|
PRP
|
6
NP1P2
O
W
E
20 HENDEN – INSTALLATION & OWNERS MANUAL
Solar retro
The Henden Inverter Heat Pump can be used to replace existing solar heating systems.
In some installations, this can be achieved using the existing solar pipework and pump.
A
C
B
D
A - Pool Pump
B - Solar Controller
C - Temp Sensor
D - Existing Solar Pipework
ALTERNATIVE INSTALLATION OPTIONS
This manual suits for next models
3
Table of contents
Other Henden Heat Pump manuals


Popular Heat Pump manuals by other brands

Jula
Jula 416-081 operating instructions

Nibe
Nibe F1155 Series Service manual

Lennox
Lennox ZHA Series Unit information

evoheat
evoheat EVO FLEX 10 Installation & operation manual

Friedrich
Friedrich Twintemp YQ07 operating guide

Riello
Riello NexSirius Series Instructions for the installer and the technical service centre


