BRIGHT BT-H31 User manual

Wireless (Bluetooth) Stereo Headphones
BT-H31
1
Please kindly read the manual first before using the produ t
V1.01

Notice : The changes or modifications not expressly approved by the party responsible for compliance could void the
user’s authority to operate the equipment.
MPORTANT NOTE: To comply with the FCC RF exposure compliance requirements, no change to the antenna or
the device is permitted. Any change to the antenna or the device could result in the device exceeding the RF exposure
requirements and void user’s authority to operate the device.
FCC NFORMAT ON
The Federal Communication Commission Radio Frequency nterference Statement includes the following
paragraph:
The equipment has been tested and found to comply with the limits for a Class B Digital Device, pursuant to part
15 of the FCC Rules. These limits are designed to provide reasonable protection against harmful interference in a
residential installation. This equipment generates, uses and can radiate radio frequency energy and, if not installed and
used in accordance with the instruction, may cause harmful interference to radio communication. However, there is no
grantee that interference will not occur in a particular installation. f this equipment dose cause harmful interference to
radio or television reception, which can be determined by turning the equipment off and on , the user is encouraged to
try to correct the interference by one or more of the following measures:
--Reorient or relocate the receiving antenna.
-- ncrease the separation between the equipment and receiver.
--Connect the equipment into an outlet on a circuit different from that to which the receiver is connected.
--Consult the dealer or an experienced radio/TV technician for help.
The user should not modify or change this equipment without written approval from Bright Headphone Electronics
Company. Modification could void authority to use this equipment.
2

CONTENTS INCLUDE:
•Bluetooth Stereo Headphones with built-in microphone
BLUETOOTH COMPATIBILITY:
•Helix H31 supports hand-free profile (HFP), headset profile (HSP), advance audio distribution profile (A2DP), and
audio/video remote control profile (AVRCP). Helix H31 is compatible with most MP3 players, personal computers or
cellular phones that support the same profile.
•To stream music from any audio devices to Helix H31, the audio device must support
A2DP profile. Please refer to the owner's manual of the audio device or consult to the
manufacturer of the audio device for further assistance.
USING THE HEADPHONES:
1. Power on: press and hold the power button on the downside of the right earcup for about 2
seconds, and release the button when the blue LED logo light is on.
2. Power off: press and hold the power button on the downside of the right earcup until the
blue LED logo light is off.
Important:
•Placing the headphones over the correct ears is important since they are designed to fit the
shape of the head.
•The earcups twist in only one direction—forcing them to twist in the wrong direction will
damage the headphones.
INSTALLING THE BATTERIES:
1. To install batteries, please twist-to-open the battery
compartment cover on the left earcup using a coin as
illustrated in the picture on the right.
2. Place the battery according to the polarity indication shown
inside the battery compartment.
Note:
•Please remove the battery if storing the headphones for an
extended period of time.
PAIRING WITH MOBILE PHONE:
1. Please ensure the headphone is off before entering the pairing mode.
The blue LED logo on both earcups shall be off.
2. To activate pairing, press and hold the power button at the bottom of
the right earcup for 5 seconds until the blue LED logo light is flashing
quickly.
3. Enable Bluetooth service on the cellphone and perform a device
discovery from the cellphone (search or scan). Please refer to the
cellphone instruction manual or consult to the cellphone manufacturer
for additional information.
4. Select the device “BT-H31” and then enter the pairing key “0000” if
prompt for input. The cellphone will finish the pairing automatically.
5. When the pairing is complete, the blue LED logo on both earcups will
stop flashing quickly.
Note: Above procedure is necessary only when using Helix H31 with the
cellphone for the first time. To use Helix H31 with another cellphone, please repeat the procedure above. To use Helix H31 with
previously paired cellphone, please go to the Bluetooth menu on the cellphone and select the appropriate function to reconnect to
Helix H31.
PAIRING WITH PC:
1. Please ensure the headphone is off before entering the pairing mode. The blue LED logo on both earcups shall be off.
3

2. To activate pairing, press and hold the power button at the bottom of the right earcup for 5 seconds until the blue LED
logo light is flashing quickly.
3. Please make sure the computer is equipped with Bluetooth technology (Please check with your computer's manufacturer
for the related information).
4. Perform a search or scan for new device on the computer. Select the device “Helix H31” and enter the pairing key
“0000”.
5. When the pairing is complete, the blue LED logo on both earcups will stop flashing quickly.
6. To connect the headphone again as hand-free device on the next system boot up, short click the power button once and
observe the LED blink activity to ensure the connection is successfully established.
7. To connect the headphone again as A2DP device for music playback on the next system boot up, short click the
play/pause button once and observe the LED blink activity to ensure the connection is successfully established.
MUSIC REMOTE CONTROLLING:
1. Launch the music player application on the mobile phone or the computer to play
music. Make sure the headphone is power on and connected.
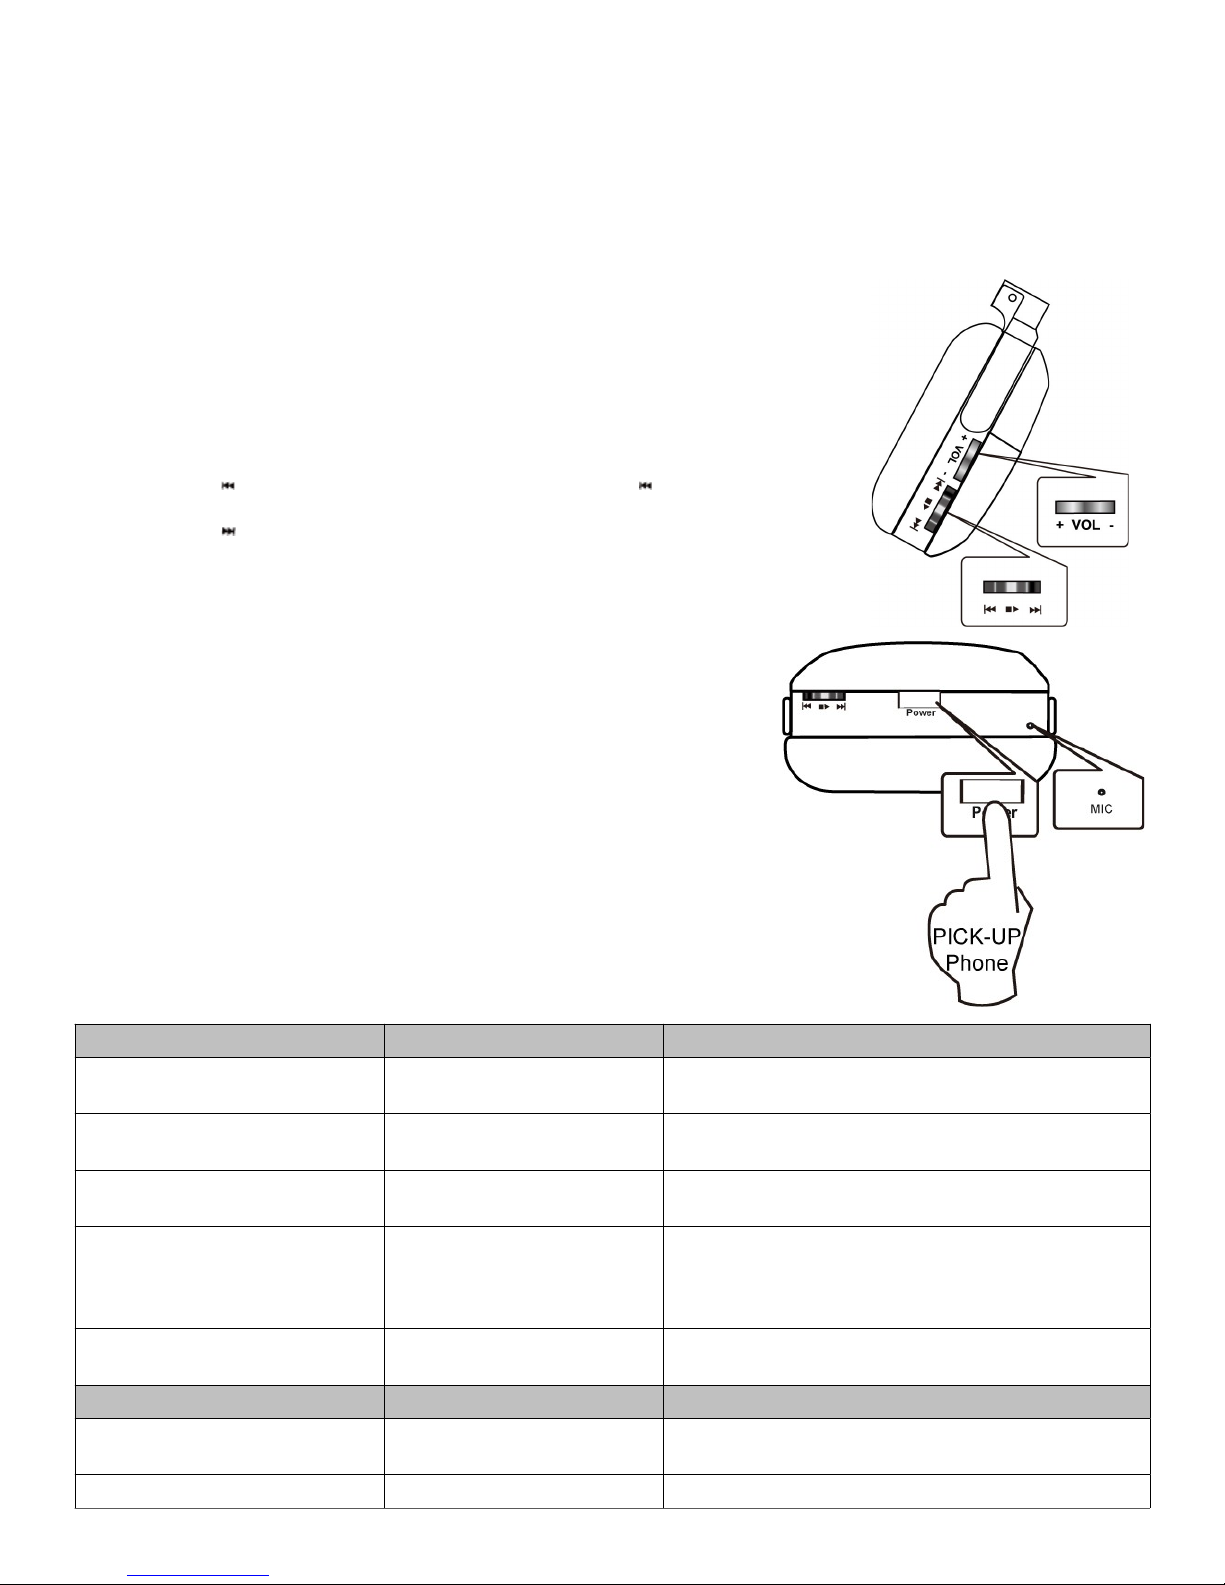
2. To adjust the volume, short click the volume control button on the right earcup:
•“-” to decrease the volume
•“+” to increase the volume
3. Press down the control dial on the right earcup to play or pause the music.
4. Press the button once to replay the current music or press twice to go back to the
last song.
5. Press the button to skip to the next song.
Note: Some phones do not support stereo music streaming (A2DP) or headphone remote
control (AVRCP). Please refer to your phone's manual.
ANSWERING A CALL:
1. Please ensure the pairing process is completed.
2. When a call comes in, the headphone will switch to voice communication
mode automatically.
3. Short click the power button on the downside of the right earcup to pick up
the phone.
4. Short click the power button again to hang up the phone call.
5. To reject the call, short click the power button twice rapidly.
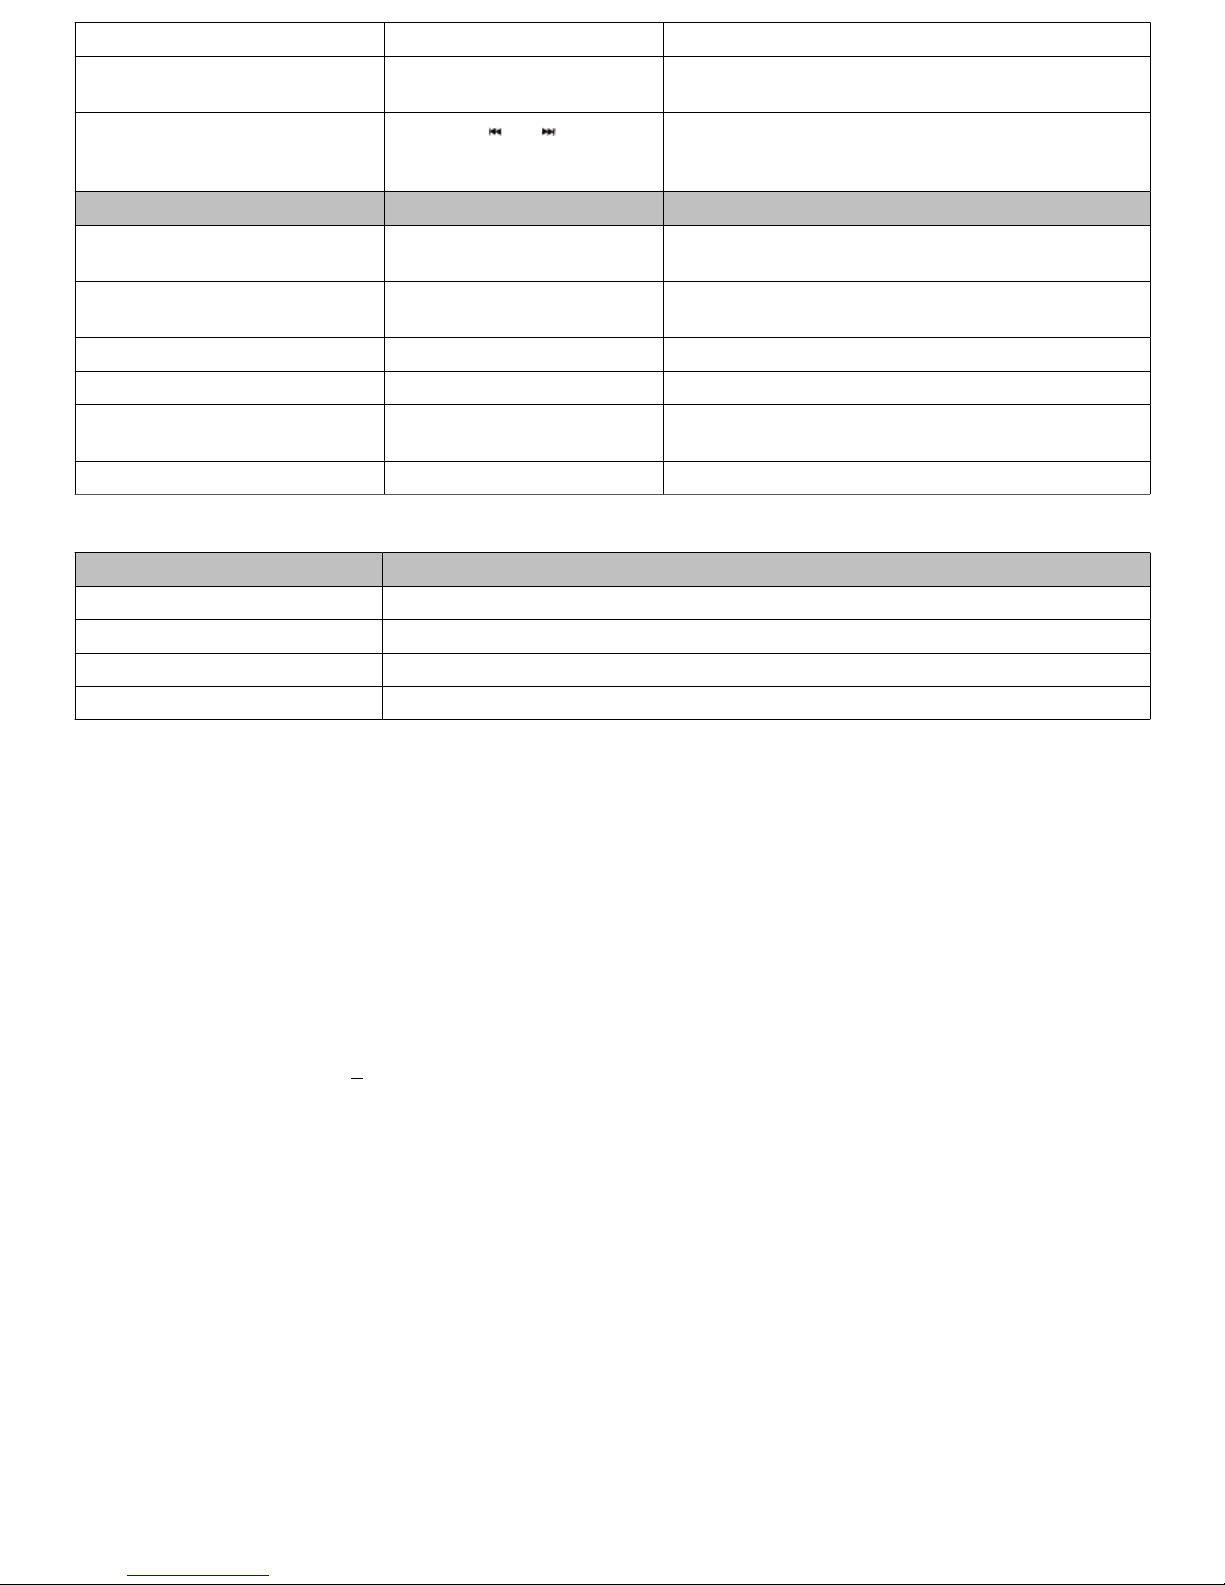
HEADPHONE FUNCTION:
General Function nstruction Remark
Power on Press and hold the power button
for approximately 2 seconds.
The blue light shall be on and you may hear the “Do- Re-
Me” sound to notify you that the power is on.
Power off Press and hold the power button
for approximately 2 seconds.
The blue light shall be off and you may hear the “Do-
Re- Me” sound to notify you that the power is off.
Pairing Press the power button for at
least 5 seconds.
The blue light will flash quickly indicating the start of
the pairing mode for 3 minutes.
Auto Power Off The headphone will turn off
automatically when it is not
connected to any other devices
after 10 minutes.
The headphone will also turn off automatically after 1
minute after fail to reconnect to last paired device when
the connection is interrupted due to out of range
Low battery Replace the battery according to
the battery installation guide
A beep sound will occur every 20 seconds
Music Playback Function nstruction Remark
Volume up Press down the volume button +
repeatedly.
You may hear the beep sound to notify you that you have
reached the maximum volume level.
Volume down Press down the volume button - You may hear the beep sound to notify you that you have
4

repeatedly reached the minimum volume level.
Pause / Play Press down the track control
dial once
Backward / Forward Press down and for
skipping to the previous and
next song.
Voice Communication Function nstruction Remark
Volume up Press down the volume button +
repeatedly.
You may hear the beep sound to notify you that you have
reached the maximum volume level.
Volume down Press down the volume button -
repeatedly
You may hear the beep sound to notify you that you have
reached the minimum volume level.
Answer or end a call Press the power button once You may hear the toot sound as a notification
Reject a call Press the power button twice
Voice dial Press the power button once Please refer to you cellphone guide for further
instruction. Not all cellphones support this function.
Redial last number Press the power button twice Not all cellphones support this function
LED INDICATION:
Headphone status LED activity
Power on / dle (not connected) Always on
Pairing mode Fast flashing
Connected Flash twice every 4 seconds
Music playing / Active call 2 seconds on and 2 seconds off alternatively
TECHNICAL SPECIFICATION:
Design
Bluetooth
Profile
Driver
Frequency Response
Microphone
Range
Battery life
Power
Dimension
Weight
Fold-flat, on-ear
2.1 + EDR
A2DP, HFP, HSP, AVRCP
40mm mylar cone
10Hz ~ 20kHz
Omnidirectional
Up to 10m (When using compatible Bluetooth class 1 transmitter, the range is up to 100m)
Talk time about 20 hours,
Play time about 30 hours,
Standby time about 300 hours
Alkaline Batteries (1.5V AAA x 2)
187 x 150 x 40 mm
190+ 5g
5
mportant:
1. Do not drop/throw the product.
2. Charge the battery to full before use the
product for the first time
3. Do not place the product in extreme heat,
humid, cold, and any other hazardous
conditions.
4. You may find additional product information
on the official website.

Bright Headphone Ele troni s Co.
8F, #109, Li De Street, Chung Ho District
New Taipei City, Taiwan, R.O.C. 235
Official Website:
www.bright-rf. om
© Copyright 2011 by Bright Headphone Electronics Company
The information contained herein is subject to change without notice.
Bright shall not be liable for technical or editorial errors or omissions contained herein.
Made in Taiwan
6
Table of contents
Other BRIGHT Headphones manuals