Brinno TLC 200 f1.2 User manual

www.brinno.com
HD Video Camera
TimeLapse
TLC 200 f1.2
User Manual

Brinno TimeLapse Camera TLC200 f1.2
Length of battery usage
ASAP
5 Seconds
10 Seconds
20 Seconds
30 Seconds
1 Minute
5 Minutes
10 Minutes
1 Hour
4 Hours
24 Hours
450000
300000
260000
210000
180000
120000
34560
17280
2880
720
120
2.5 Days
3.6 Days
17 Days
30 Days
48 Days
62 Days
83 Days
120 Days
Time Interval Capture Frames Battery Life
Follow Brinno Now

1
www.brinno.com
Thank you for purchasing a Brinno TimeLapse Camera!
The Brinno TimeLapse Camera (TLC200 f1.2) uses unique Time Lapse and Power
Saving technologies to capture images for days, weeks, or even months. The
Brinno TimeLapse Camera TLC200 f1.2 captures photos and stores them as videos
making them easy to view. Turn it on, set the time interval, frame your subject, let
it run and you have a time lapse video! No fancy equipment, no intervalometer,
no complicated gear setups, no time-controlling, no video-making headaches.
If you have any questions or problems setting up your Brinno TimeLapse Camera
please contact the sales sta where you purchased our product or email us at
Brinno Incorporated directly customerservice@brinno.com
Please Visit our website www.brinno.com
TLC200 f1.2 Output le format
- [Video Mode] Format AVI. Resolution 1280x 720, 640x 480
Note: The maximum size of each single AVI file ranges between 8,192 to
20,480 frames, depending on the time interval setting.
- Still Image Mode] Format JPEG. Resolution 1280x 720, 640x 480
Time Lapse Camera TLC200 f1.2 Features
Large Aperture Wide Angle View
Better low light recording
and sharper images.
140˚Field of View.
A wider area to be recorded
creating panoramic images
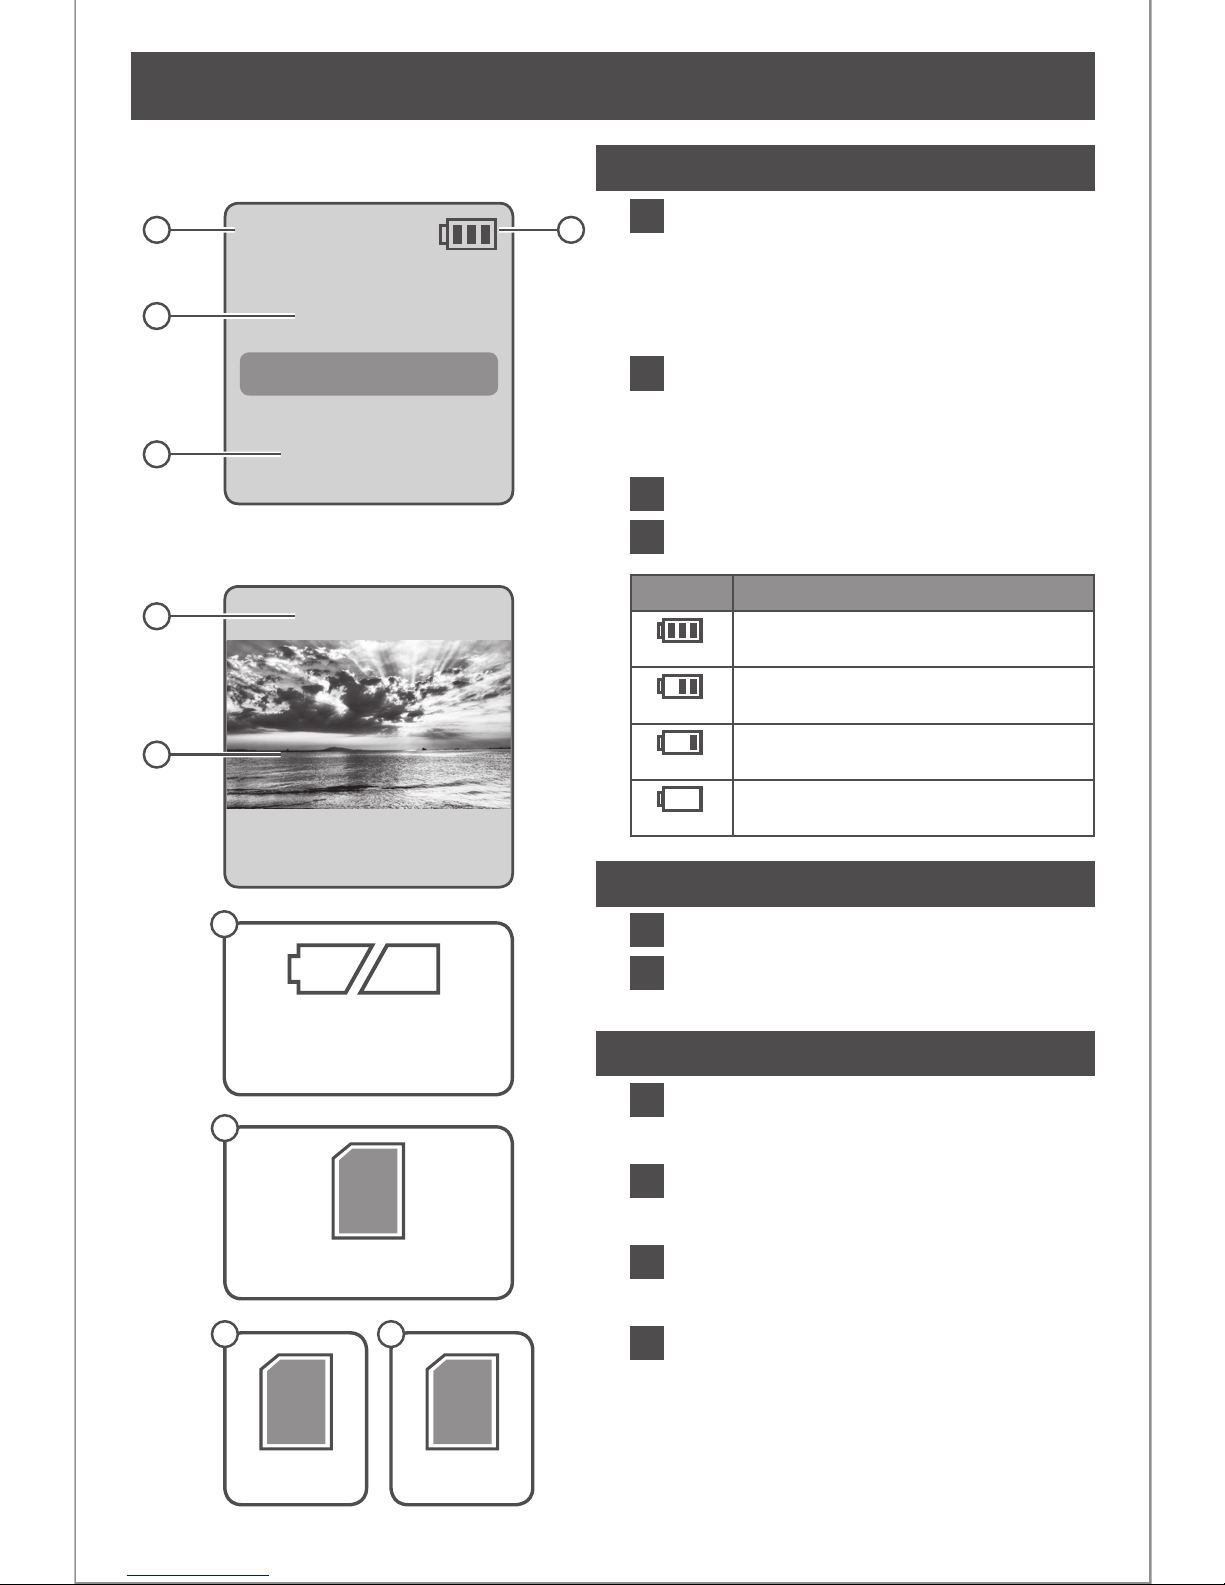
Power Saving
Unique Power Control,
means 4 AA batteries can
capture 300,000 frames.
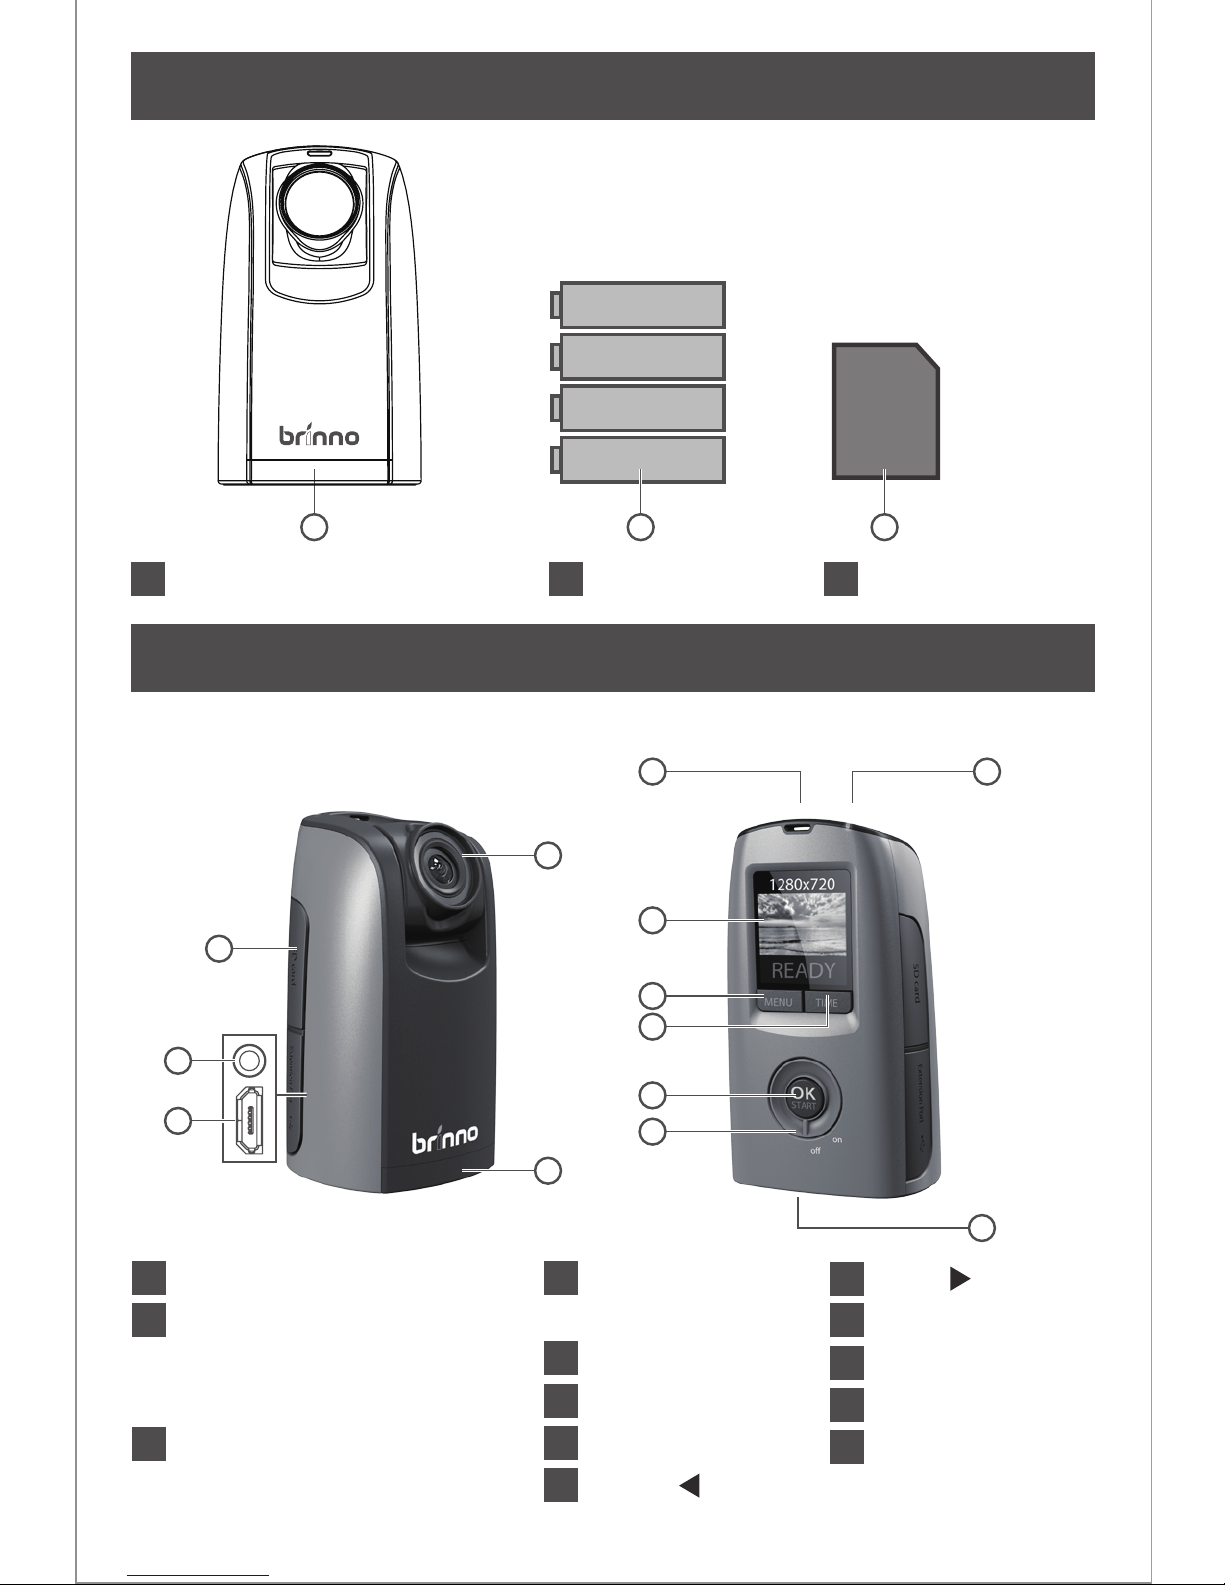
LCD Viewnder
The 1.44" LCD screen,
allows you to easily frame
your subject.
aperture
Rotatable Lens
Provides greater flexibility
in targeting your subject!
Time Lapse Video
TLC200 f1.2 provides you
a 1280x720 resolution
video, yes, it’s HD video.

2Brinno TimeLapse Camera
SD
AA
AA
AA
AA
Front Back
Package Contents
Parts of the Camera
1
1
6
11
2
2
7
12
8
13
9
10
3
3
4
5
TimeLapseCam (TLC200 f1.2)
SD Card Cover
Strap Eyelet
Power Switch
4 AA Batteries
Connector for Extension
Accessories
(For ATS100, ATM100)
LCD Screen
LED Indicator
MENU ( ) Button
Tripod Screw Hole
TIME ( ) Button
OK/ START Button
SD card*
* SD Card may or may not be included, please check the contents list on the package .
Connector for Micro USB cable
(For extension power supplier, DC 5V)
Metal Ring
(for ATM100, ATL045 )
Battery Door
1
1
7
8
10
11
4
5
12
6
9
2 3
13
TLC200 f1.2
2
3

3
www.brinno.com
Set Up screen At Set Up screen
At Preview screen
Status icon
BATTERY
EMPTY
FULL
ERROR
NO CARD
Preview screen
Display Icons
1
2
3
4
5
6
7
8
9
10
Capture mode
Normal: Time Lapse mode
Shutter: Shutter Line mode
Motion: Motion Activated mode
Time interval
Select the pre-set time interval or
customize yourself.
System date and time
Battery level
Video/ Image resolution
Preview image capture window
Battery Empty
Please replace battery imediately.
SD Card Full
Please download les to clear SD card space.
SD Card Error
Please replace SD card.
No Card
Please Insert SD card.
OK/ START Button
Normal
ASAP
2011/08/31
22:58:32
OK
1280x720
READY
1
2
5
3
6
4
Icon
(green)
(green)
(yellow)
(red)
Description
Battery fully charged.
Battery partially discharged.
Low battery.
Replace as soon as possible.
Out of battery.
Replace battery immediately.
7
8
9
10
SD
SD SD

4Brinno TimeLapse Camera
1
2
1
2
3
Open battery door.
Insert 4 AA batteries.
Close battery door.
Be sure the battery cover is locked into place.
Initial Step-1 Install Batteries and SD Card
About Power Saving
1 2 3
TLC200 f1.2
At Set Up Screen
After 10 seconds without activity on the set up screen, the camera will go to
Preview screen automatically. You can press the MENU or TIME button to go
back to the set up screen.
Set up screen Preview screen Turn o LCD
1280x720
READY
Normal
ASAP
2011/08/31
22:58:32
OK
At Preview Screen
After 20 seconds without activity on the set up or preview screen, the LCD
screen will turn o automatically to save power. You can press the OK button
to wake up camera.
10 sec. 20 sec.

5
www.brinno.com
Rotate the Power switch to ON position.
Process screen
It may display other information on screen, please refer to page 3.
Set Up screen
Now, you can set Date and Time and Time Interval before you use your
TimeLapse Camera!
1
2
3
1
2
3
Open SD card cover.
Insert SD card until it clicks into place.
Close SD card cover.
Initial Step-2
Initial Step-3
Install SD Card
Turning the Camera on
1 2 3
1 2 3
READING..
SD
Normal
ASAP
2011/08/31
22:58:32
OK
on

6Brinno TimeLapse Camera
TIME
10 Min
OK
Press MENU ( ) and TIME ( ) to select a pre-set time interval or customize
it by yourself. When complete, press the OK Button to conrm and return
to the Set up screen. (ASAP option: everysecond can capture 2 photos)
Press TIME button to enter time interval set up.
Now you are back to the Set up screen
Now, you are ready to go to Preview screen and start recording your
Time Lapse Videos.
2
1
3
TIME
OK : Next
22 : 58 : 32
TIME
2 Sec
CUSTOM
OK
OK
1 3
2
Initial Step-5 Set Time Interval
Press MENU button.
Press TIME ( ) to select Set Date & Time (MENU 5/10), and press OK.
At the highlight eld, press MENU ( ) to decrease value, press TIME
( ) to increase value, press OK to conrm and go to the next eld. When
nished press OK to exit set up.
32
1
2
3
Initial Step-4 Set Date and Time
MENU Date & Time
Set Date
& Time
OK OK : Next
2011/ 08 /31
22 : 58 : 32
1
Normal
2 Sec
2011/08/31
22:58:32
OK
TLC200 f1.2

7
www.brinno.com
Recording!
Turn o LCD
OK
Press TIME ( ) to select Set Date & Time (MENU 5/10), and press OK.
Adjust lens angle to frame subject.
Turn on TLC200 f1.2, set time interval and press OK to Preview Screen.
At Preview screen, press OK button to start recording, during recording
period the LCD panel will turn o to save power.
2
1
3
13
2
Start Recording
LED Indicator
Set up screen Preview screen
1280x720
READY
Normal
ASAP
2011/08/31
22:58:32
OK
Green LED light: indicates Image capture in process
When the Green LED ashes, the Time Lapse Camera
(TLC200 f1.2) is capturing photos.
Red LED light: Low battery level, Low recording
space on your SD card
Stop Recording
Preview screen
While recording, hold the OK button until the LCD lights on and shows
the Preview Screen, it will display text "Done!". This indicates the
recording session is over .
Remove the SD card from the camera, and plug it into your computer or
notebook to enjoy your amazing Time Lapse Videos!
1
2
1 2
SD
1280x720
Done!

8Brinno TimeLapse Camera
Advanced Menu Setting
Select AVI Frame Rate.
What frame rate should I use?
Generally, use 10 FPS is suitable for Time Lapse video.
1 FPS: The video plays 1 frame per second, so the video will look not
smooth, and the video length will be longer.
30 FPS: The video plays 30 frames per second, so the video will look
smooth, and the video length will be shorter.
You can change the videos FPS (frames per second) playback with this setting.
1
2
1 2
AVI Playback Frame Rate
MENU Frame Rate
AVI Frame
Rate 10 FPS
10 FPS ( Frames Per Second )
means:
10 frames are played in 1
second.
OK OK
Select Image Quality
Set the image quality for your camera.
1
2
1 2 3
Image Quality
Image
Quality
Image
Quality
Image
Quality
Best Better Good
OK OK OK
There are three options you can select: Best, Better, Good

9
www.brinno.com
ON
OFF
OK
Select Time Stamp.
Select ON or OFF.
You can choose if you want to show the time stamp at bottom of your video.
1
2
1 2
Time Stamp
MENU Time Stamp
Time
Stamp
OK
Select Low Light Recording.
ON: Allows your camera to record video in a low light environment.
OFF: Your camera will go to sleep in a low light environment.
You can choose to enable your camera to keep recording video in a low light
environment (< 5 Lux).
1
2
1 2
Low Light Recording
MENU Low Light
Low Light
Recording
ON
OFF
OK OK

10 Brinno TimeLapse Camera
Select Set Date & Time.
Set the correct date and time for your camera.
1
2
1 2
Set Date and Time
MENU
Set Date
& Time
OK
Date & Time
OK : Next
2011/ 08 /31
22 : 58 : 32
At the highlight eld, press MENU ( - ) to decrease the value, press TIME
( ) to increase the value, press OK to conrm and go to the next eld.
When nished, press OK to exit set up.
Select Output Resolution.
There are two options you can select: 1280x720, 640x480.
You can change video resolution with this setting.
1
2
1 2
Output Resolution
MENU Resolution Resolution
Output
Resolution 1280x720 640x480
OK OK OK

11
www.brinno.com
ON
OFF
OK
Select LED Display.
ON: When the camera is capturing a frame, the LED indicator will ash
once.
OFF: During capture period the LED indicator will not ash .
You can choose if the LED indicator will ash while capturing each frame, or
not ash at all.
1
2
1 2
LED Display
MENU LED Display
LED
Display
OK
None
50 Hz
60Hz
OK
Select Band Filter.
None: For outdoor environment.
50 Hz: USA
60 Hz: Europe
Select the correct uorescent lighting frequency to match your indoor
lighting frequency.
1
2
1 2
Band Filter
MENU Band Filter
Band
Filter
OK

12 Brinno TimeLapse Camera
X.XX.X
OK
Select Firmware Version.
Display the current rmware version of camera.
1
2
1 2
Firmware Version
MENU Firmware
Firmware
Version
OK
Display the rmware version for 30 seconds, or press the OK button to
exit.
NO
YES
OK
Select Reset.
Select YES and press the OK button to reset your camera.
Default Settings:
You can reset your camera back to the default setting.
1 2
Reset
MENU Reset
RESET
OK
Function Setting
Time Interval 2 Seconds
1280x720Output Resolution
10 FPSAVI Frame Rate
ONLow Light Recording
ONTime Stamp
ONLED Display
NoneBand Filter
BetterImage Quality

Accessories
Time Lapse Camera

14 Brinno TimeLapse Camera
Accessories Wide-Angle Lens (ATL045)
MAGNET MOUNT CONVERSION LENS
-0.45 WIDE-ANGLE-
Enlarge your vision with Wide-Angle Lens!
Capture the changes of magnicent scenery, and discover the city in a dierent
way. You will capture an entirely new scene when you add the wide angle lens!
Easy way to secure your Time
Lapse Camera and accessories.
Accessories Camera Pouch (ATP100)

15
www.brinno.com
Accessories Shutter Line (ATS100)
SHUTTER LINE for Time Lapse Camera
EASY to CREAT
STOP MOTION VIDEO!
In the past, in order to create stop motion
video, you will need Hi-end equipment
and lots of time to edit thousands photos.
But now, the Brinno TLC200 f1.2 and
shutter line will help you save time and
make it easy to make a stop motion
video!

16 Brinno TimeLapse Camera
Accessories Weather Resistant Housing
(ATH100)
Whether it is Natures Beauty, Plant Growth or a Construction Project
The Weather Resistant Housing (ATH100) allows the Time Lapse Camera (TLC200 f1.2) to
function safely outdoors in any weather. Your Time Lapse Camera(TLC200 f1.2) will be
protected against severe weather, so you can keep recording images in any season or location.
Waterproof: IP54
For Outdoor Use
Accessories Motion Sensor (ATM100)
Perfect for HOME & PROPERTY SECURITY!
Adding the Motion Sensor (ATM100) to Time Lapse camera (TLC200 f1.2), will allow the
camera to detect any movement and wake up and take pictures automatically. It can
take thousands of photos and convert them into a video, making them easy to review.
Motion Detected
the Movement Detecting Activated & Record
Waterproof: IP54
Detect Angle: 90ْ
Detect Distance: 4 meters

Specications
Package Contents
* SD Card may or may not be included, please check the contents list on the package.
TimeLapse Camera (TLC200 f1.2)
AA Battery
..1
.............................................. 4
TLC200 f1.2
1.44" TFT LCD
120°
Optional, (In use with Weather Resistant Housing (ATH100))
Auto generate Time Lapse video
Optional, (In use with Shutter Line (ATS100))
Optional, (In use with Motion Sensor (ATM100))
F1.2
Aspherical Lens
140°
18 mm (35mm equivalent)
30 cm (Minimum)
Format: AVI
Resolution: 1280x 720, 640x 480
Format: JPEG (only for using Shutter Line)
Resolution: 1280x 720, 640x 480
SD Card (Supported up to 32 GB)
0.5 ~ 1 second
From 1 second to 24 hours
Battery: 4 AA Batteries
DC IN: 5V (Micro USB connector)
3.6 Days, at 1 second time interval, captures 310,000 frames
120 Days, at 24 hours time interval, captures 120 frames
64x 46x 106 mm
120 g (without batteries)
Green/ Black
4GB SD card*
User Manual
........................................... 1
.......................................... 1
Camera
Model
LCD Screen
Rotate Lens
Waterproof
Capture Mode
Time Lapse
Stop Motion
Motion Activated
Optics Lens
Aperture
Lens type
Field of View
Focal Length
Focus Distance
Recording
Time Lapse Video
Still Image
Memory Storage
Time Interval
ASAP
Custom
Power
Power source
Battery Life
Dimension
Size (DxWxH)
Weight
Color

7F, No. 75, Zhou Zi St., Taipei City 11493, Taiwan
Phone: +886-2-8751-0306 Fax: +886-2-8751-0549
Email: [email protected]
www.brinno.com
301-0014-20
EN A1
Other manuals for TLC 200 f1.2
1
Table of contents
Other Brinno Camcorder manuals

Brinno
Brinno TLC 2000 User manual

Brinno
Brinno TLC200 Pro User manual

Brinno
Brinno TLC200 Pro User manual

Brinno
Brinno TLC 200 User manual

Brinno
Brinno TLC300 User manual

Brinno
Brinno TLC130 User manual

Brinno
Brinno TLC120 User manual

Brinno
Brinno TLC200 Pro User manual

Brinno
Brinno TimeLapse TLC200 User manual

Brinno
Brinno TimeLapse TLC 100 User manual