BRIO BEARDSCAPE V2 User manual

v2
For the Beard and Beyond
BEARDSCAPE


Contents
Safety Information 2
Components of your Beardscape 6
Getting Started 8
Charging 8
Best Practices for Li-ion Batteries 9
Using the Beardscape 10
Trimming Tips 10
LCD Screen Function 12
Caring for your Brio Beardscape 14
Warranty / Support 16
Troubleshooting 17
1

Safety Information
IMPORTANT SAFEGUARDS: READ ALL
INSTRUCTIONS BEFORE USING
The Brio Beardscape has been carefully designed to provide the
best possible trimming experience. When using electrical products
– especially those with blades – basic safety precautions should
always be followed.
2

Reduce the Risk of Electric Shock and Injuries
• Always unplug this product aer charging is complete.
• Do not use while bathing / showering.
• Do not place the product where it can fall into water.
• Do not place, drop, or otherwise submerge product in
water or other liquid.
• If charger falls into water, unplug immediately and
discontinue use.
• Never use charger if the cord or plug are damaged.
• Use this product only for its intended use as described
in the manual.
• Do not use accessories, chargers, or attachments that
are made by other manufacturers.
• Discontinue use if product is damaged in any way.
• Do not allow any portion of this product to be used as a toy.
Safety Information | 3

• Do not pull or carry by cord, use cord as a handle, or pull
cord around sharp edges or corners.
• Keep cord away from heated surfaces.
• Do not unplug by pulling on the cord. To unplug, grasp the
plug, not the cord.
• Only connect this product to a properly grounded outlet
that is GFCI protected.
• Do not plug into an outlet with a voltage other than 120-220V.
• Never force the plug into the outlet; do not attempt use if it
does not easily fit into the outlet.
4

Safety Information | 5
Other Considerations
• This product has the ability to rapidly cut hair and is
capable of producing very bad haircuts. Please make sure it is
used with care.
• This product is not intended for use by persons with
reduced physical, sensory, or mental capabilities or lack of
experience or knowledge of this product.
• Children should not be allowed to use the Beardscape.
• Do not use attachments other than those sold by the
manufacturer.
• Never place any portion of this product in the dishwasher.
• Never use the charger if the cord or plug are damaged.
• If the product is dropped, Inspect and test for proper
operation before use.
• Do not use if blade appears to be cracked or damaged
in any way.

Components of your Brio Beardscape
1.99MM
1.8mm
1.6mm
1.3mm
RPM
5500
MIN
216
6
A
B
F
G
C
D
E
IJ
H

Components | 7
A
B
F
G
C
D
E
I
J
H
Reversible Trimming Guards
Blade Assembly
Lever Lock Button
Micro Adjust Lever
On/Off Button/Travel Lock
Speed Control
Display
USB Plug/ Charging Base and Cord
Cleaning Brush
Blade Oil

Getting Started
Charging your Beardscape
8
• Plug the USB style charger into the transformer and plug into
the wall.
• The charging plug can either be connected directly to the bottom
of the Beardscape or plugged into the charging cradle.
• If you are using the charging cradle, plug it in and set the
Beardscape in, bottom first.
• Make sure the charging bubble icons appear.
• Most Beardscape trimmers come partially to fully charged.
• A complete charge may take up to 3 hours.
• The Beardscape will beep and automatically stop charging when
the battery is full.
• If the battery is low, the Beardscape can still be used while plugged
directly into the wall.

Getting Started | 9
The display will show differing amounts of battery time remaining
based on the speed setting of the trimmer. The table below
shows how long a fully charged battery will last based on the
speed settings.
5000 RPM – 240 min • 5500 RPM – 225 min • 6000 RPM – 210 min
6500 RPM – 195 min • 7000 RPM – 180 min
• Don’t let your Beardscape get too hot or too cold.
• Make sure you fully charge the Beardscape before using.
• It is best to cycle the battery - let the battery
run down before re-charging - it is not necessary
to re-charge aer each use.
• It is best to charge the battery when the capacity
is less than 20% or when the battery meter has
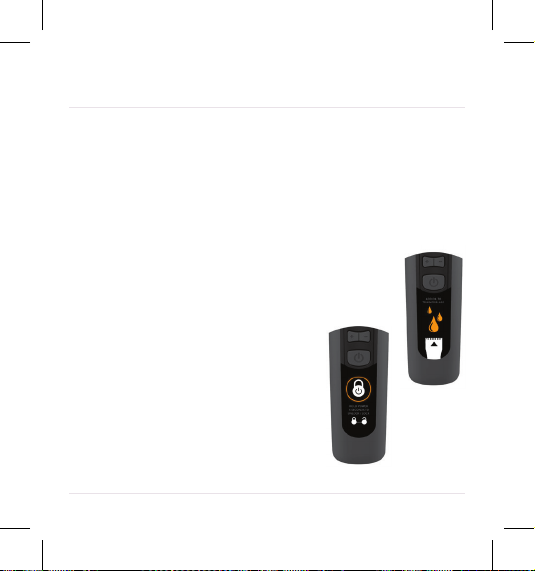
only one red square illuminated, as shown.
RPM Compared to Expected Life
Best Practice for Optimal Battery Life

10
Using the Brio Beardscape
Trimming Tips
• Before starting, make sure your have selected the proper guard or
blade height. If you are not sure, start with a longer cut height and
move to shorter heights as desired.
• To use the micro-adjust lever, make sure to press down the center
lock button before sliding the lever up or down. The lever controls
the cutting height from 1.0, 1.3, 1.6 and 1.9mm. The lengths are
displayed on the screen just below the Brio logo.
• To clip the guards on, grab the guard in one hand and slide the
blade of the trimmer into the top of the guard where the teeth wrap
over. Push the blade until it can’t go any farther and then snap the
trimmer down into the guard. The length guard should lock on to
the trimmer and be secure. Test the connection before use.
• For more details on how to attach the guards and remove / replace
the blade, view our videos at www.brio4life.com.

Using the Brio Beardscape | 11
• A precise cut may take multiple passes, so move the clipper slowly
and take your time.
• In certain areas (like your neck) it may help to use your free hand to
pull your skin tight to get the best trim.
• The Beardscape cuts best when the gold part of the rake is pressed
flat against your skin.
12
To function properly, your Beardscape requires oil.
To oil the trimmer, sweep away any hairs with your included brush,
put one or two drops of oil on the tips of the cutting surface (where
the white blade meets the gold rake) and run the trimmer for a
minute to work in the oil. Wipe away any excess oil with a dry cloth.
Every 60 minutes of operating time the Beardscape
will signal that it is time to oil the blade by flashing
the oil screen. When you see the oil prompt,
please clean and oil your trimmer.
Screen Functions
Travel Lock
Press and hold the power button for
5 seconds to turn on the travel lock.
Press and hold for another 5 seconds to
turn off the lock.

Screen Functions | 13
RPM - Speed Control
Available Time
The Beardscape operates at an RPM range of 5,000-7,000
revolutions per minute. Use the (- +) button to change the
speed settings. The high torque motor is designed to maintain
the speed setting even when cutting thick or course hair.
The time display shows the amount of cutting time remaining in the
charge. As the speed (RPM) is lowered, cutting time increases.

14
Charging Prompts
Caring for your Brio Beardscape
When only 20 minutes of time remain on the trimmer, the charging
icon will flash and the Beardscape will make a beep tone, alerting
you to fully charge the Beardscape aer your use.
Do not rinse your Beardscape! If you were paying attention in 6th
grade science, you will remember that oil and water don’t mix. Your
blade likes oil, not water and the body of the trimmer needs to be
kept dry at all times. If you feel there is too much hair or debris on
the trimmer, use the included brush to clean it off. NEVER run the
blade under the water.
To remove your Beardscape blade assembly, make sure the micro-
adjust lever is all the way down to the 1.9mm setting. Use two
thumbs on the front of the blade and gently press the blade back.
It should pop off easily. To put the blade back on, make sure the
micro adjust lever is in the lowest position (1.9mm), find the small

Caring for your Brio Beardscape | 15
black tab on the blade assembly and tuck that into the mouth of the
trimmer. Snap the blade into place. Do not line up the black plastic
feet with the metal prongs on the inside of the trimmer – this will
cause it to jam. Simply tuck the blade assembly into the mouth of
the trimmer and snap the blade into place.
Use the micro-adjust lever to check the alignment and make sure
the blade is properly in place. This takes a little practice, but don’t
worry, it gets easier.
If you need a new blade or assistance with removing your blade

16
Recycling your Beardscape
Warranty & Support
If your Beardscape is no longer working, contact Brio at
If you need to dispose of the device, please recycle properly as it
does contain a battery. The device can be recycled as you would
other batteries. For a drop-off location near you check out
www.e-stewards.org for a nearby battery recycling location.
The Brio Beardscape is guaranteed to function properly from two
years from the date of purchase. Defects due to faulty materials
and workmanship will be repaired or replaced at Brio’s expense
with a qualified receipt.
To contact Brio customer service please call 248-268-6530 or
email [email protected].
For more information on the warranty service process please visit
www.brio4life.com/pages/warranty-support.

Recycling and Warranty Information | 17
Limitation of Remedies
Troubleshooting
In no event shall Brio or any of its affiliated companies be liable for
any special, incidental, or consequential damages based upon
breach of warranty, breach of contract, negligence, tort, or any
other legal theory. Such damages include, without limitation, loss
of savings or revenue, loss of profit, loss of use; the claims of third
parties including, without limitation, and cost of any substitute
equipment or services. Some states do not allow the exclusion or
limitation of incidental or consequential damages.
If you are unable to resolve a problem of any kind based on the
information within these instructions. Please contact Brio Customer
Service at 248-268-6530 to speak to a representative.

Table of contents


