BROHN BRGC6001SS User manual

Please read this manual carefully before using, and keep it for future reference.
User Manual
BRGC6001SS - 60 cm 4 burner gas stainless steel cooktop
BRGC9001SS - 90 cm 5 burner gas stainless steel cooktop
BRGC6001BLK - 60 cm 4 burner gas glass cooktop
BRGC9001BLK - 90 cm 5 burner gas glass cooktop
BRGC3001BLK - 30 cm single burner gas glass hob
BRGC6040DSS - 60 cm 4 burner gas stainless steel hob
BRGC7001SS - 70 cm 5 burner gas stainless steel hob

P a g e |2
web: brohn.com.au
CONTENTS
1. PACKAGE.................................................................................................................................................................4
IMPORTANT - CHECK FOR ANY DAMAGE OR MARKS..................................................................................... 4
HANDLING................................................................................................................................................................... 4
BEFORE USING YOUR NEW GAS HOB................................................................................................................... 4
2. SAFETY WARNINGS................................................................................................................................................ 5
IMPORTANT INFORMATION..................................................................................................................................... 5
GENERAL INFORMATION......................................................................................................................................... 5
CHILD SAFETY..............................................................................................................................................................5
GENERAL SAFETY........................................................................................................................................................6
DURING USE.................................................................................................................................................................6
CLEANING................................................................................................................................................................... 6
INSTALLATION..............................................................................................................................................................6
3. SPECIFICATIONS.....................................................................................................................................................7
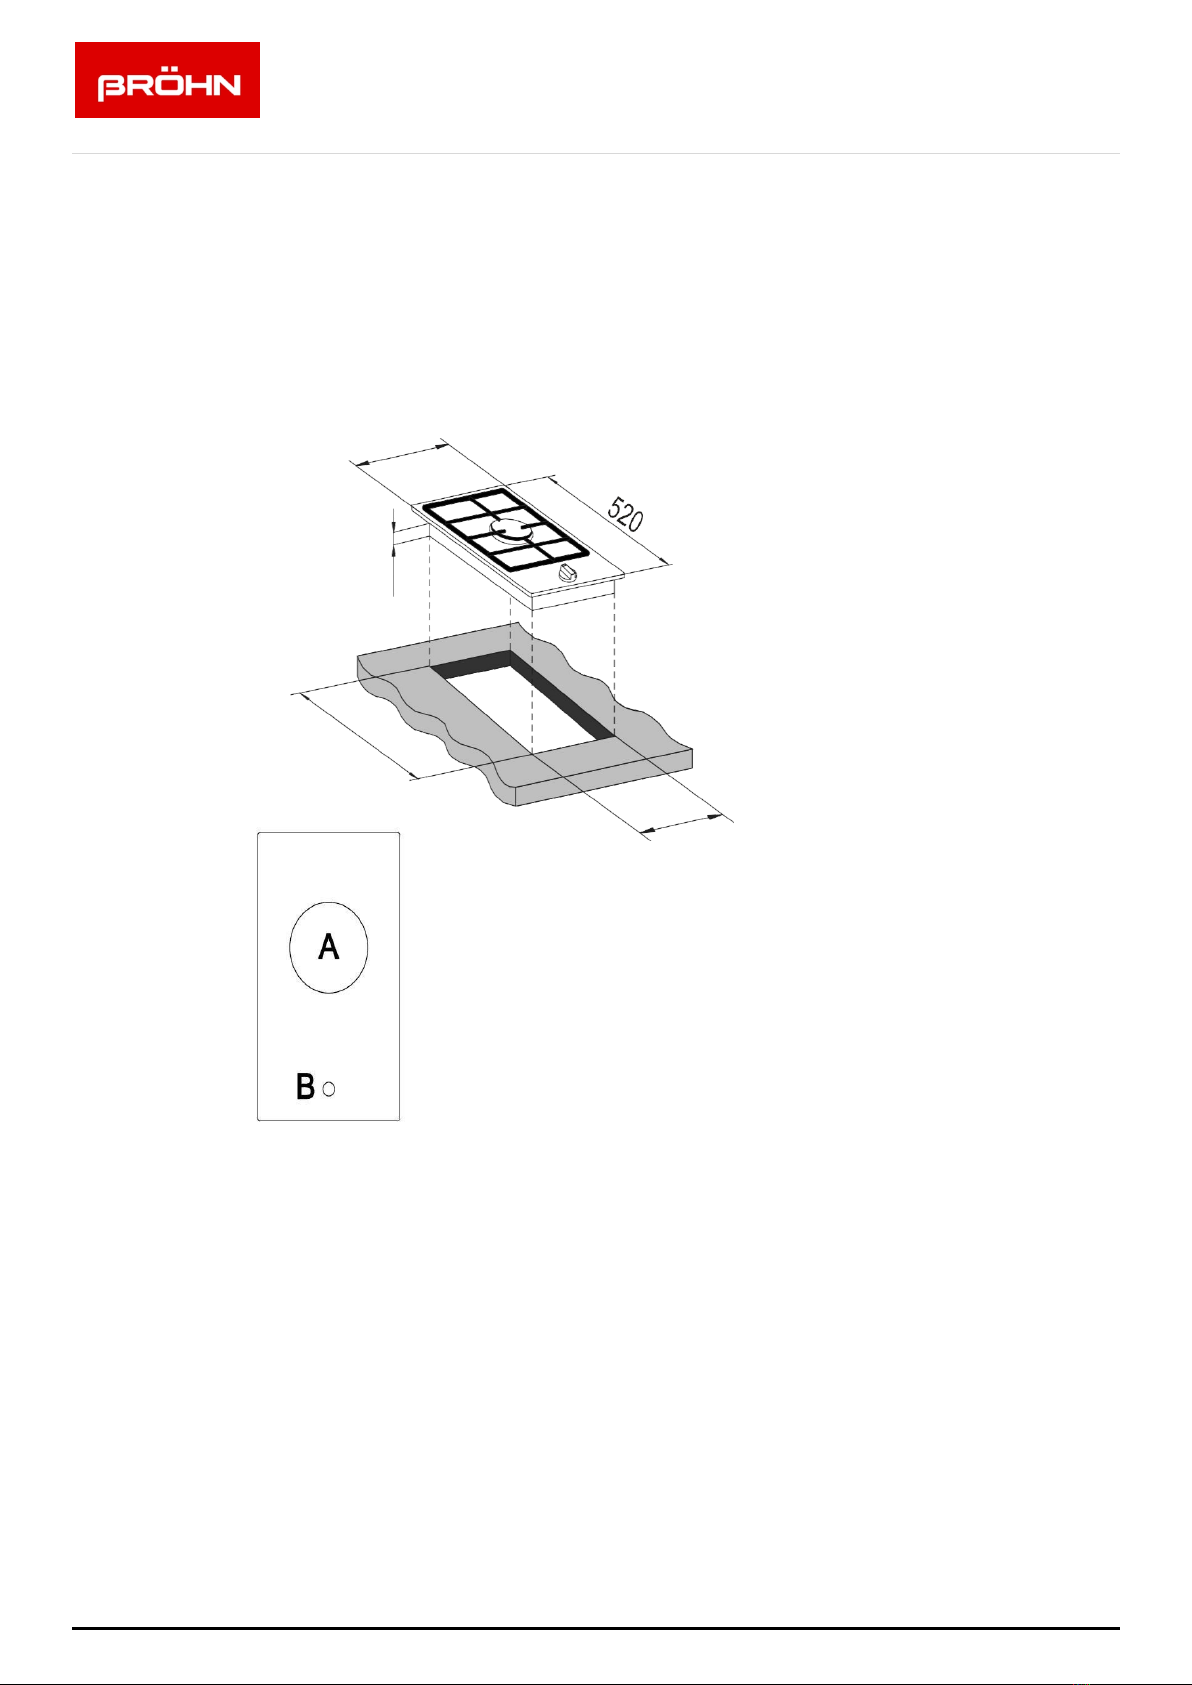
3.1 BRGC3001BLK................................................................................................................................................. 7
3.2 BRGC6040DSS.................................................................................................................................................8
3.3 BRGC7001SS....................................................................................................................................................9
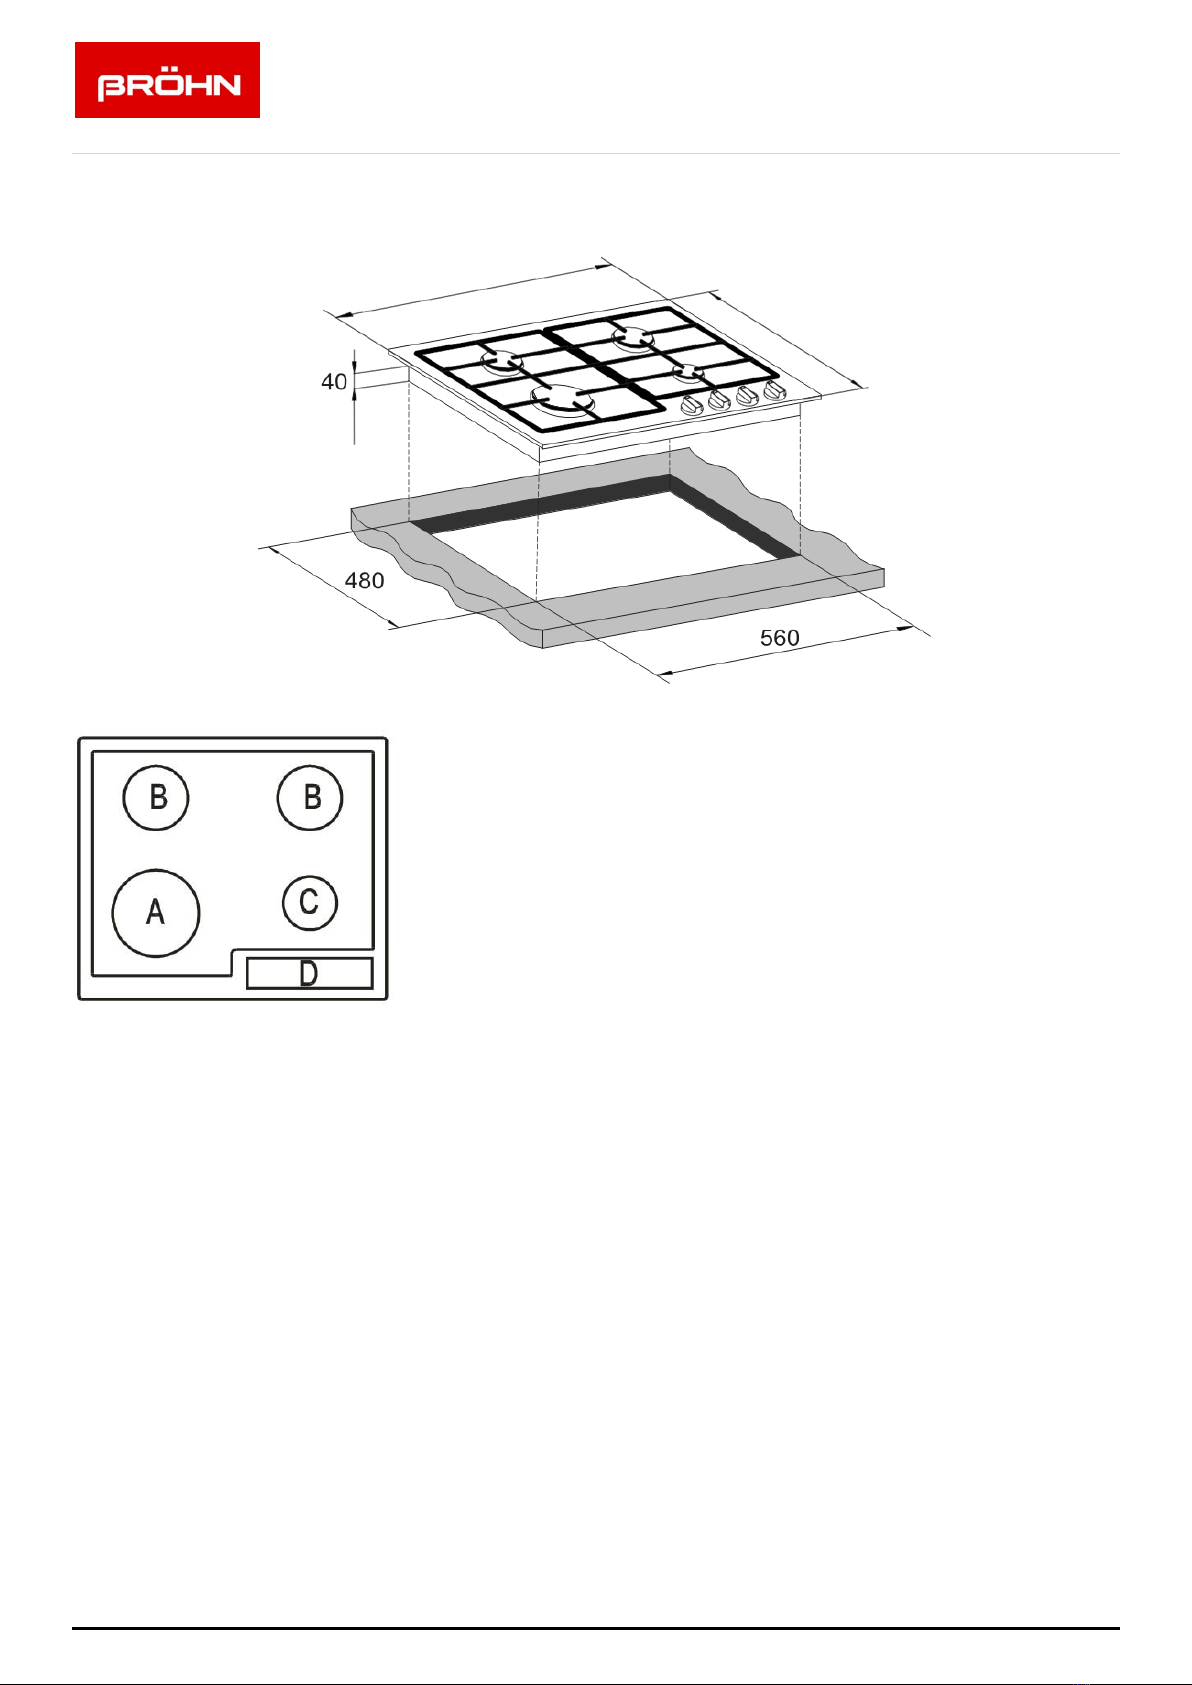
3.4 BRGC6001SS / BRGC6001BLK...................................................................................................................10
3.5 BRGC9001BLK...............................................................................................................................................11
3.6 BRGC9001SS................................................................................................................................................. 12
ELECTRICAL DETAILS................................................................................................................................................13
GAS DETAILS..............................................................................................................................................................13
4. USING THE GAS HOB...........................................................................................................................................14
BEFORE FIRST USE..................................................................................................................................................... 14
SWITCHING THE HOB ON....................................................................................................................................... 14
AUTOMATIC IGNITION WITH FLAME FAILURE SAFETY DEVICE.......................................................................14
ENERGY SAVING TIPS.............................................................................................................................................. 15
5. CLEANING............................................................................................................................................................. 16
CLEANING THE HOB TOP....................................................................................................................................... 16
AFTER EACH USE.......................................................................................................................................................16
CLEANING THE HOB BURNERS.............................................................................................................................. 16
MAINTAINING THE CAST IRON PAN STANDS.....................................................................................................17
6. INSTALLATION AND GAS CONNECTION........................................................................................................ 18
POSITIONING.............................................................................................................................................................18

P a g e |3
web: brohn.com.au
ALL MODELS..............................................................................................................................................................19
IMPORTANT INFORMATION................................................................................................................................... 20
VENTILATION REQUIREMENTS................................................................................................................................20
DUAL GAS REGULATOR VALVE INTRODUCTION..............................................................................................21
INSTALLATION METHOD:.........................................................................................................................................21
GAS SAFETY (INSTALLATION AND USE) REGULATIONS................................................................................... 22
INSTALLATION PROCESS.........................................................................................................................................22
GAS ADJUSTMENT (CONVERSION TO LPG)...................................................................................................... 23
MINIMUM FLOW ADJUSTMENT FOR HOB GAS TAPS....................................................................................... 24
GAS TAP MAINTENANCE........................................................................................................................................25
ELECTRICAL CONNECTION................................................................................................................................... 25
REPLACING THE MAINS SUPPLY CABLE..............................................................................................................26
INSTALLATION SUMMARY WARNINGS................................................................................................................ 26
7. DISPOSAL............................................................................................................................................................... 27
8. CUSTOMER CARE................................................................................................................................................. 28

P a g e |4
web: brohn.com.au
1. PACKAGE
IMPORTANT - CHECK FOR ANY DAMAGE OR MARKS
Please thoroughly inspect your goods at the delivery time, if you notice any damage to
your goods:
Please notify the delivery team at the time of delivery and do NOT accept
damaged product.
Please notify us immediately as the problem can be solved and damaged product
can be returned to the courier office.
When package is opened, and damage/marks are found on the appliance, it must be
reported within 24 hours. Do not install or connect the item and keep the package as it
was originally, if you wish to claim for damage/marks under the manufacturer’s warranty.
This does not affect your statutory rights.
Evidence of damage will be required.
HANDLING
Do not use cable to carry or move the appliance.
Carry out the movements and transportation in the original packaging.
Pay maximum attention to the appliance while loading/unloading and handling.
Ensure that the packaging is securely closed during handling and transportation.
Protect from external factors (such as humidity, water, etc.) that may damage the
packaging.
Take caution while handling and transporting appliance to prevent risk of poor
operation due to possibility of bumps, crashes, drops, etc.
BEFORE USING YOUR NEW GAS HOB
Read this guide, taking special note of the ‘Safety Warnings’ section.
Remove any protective film that may still be on your gas hob.

P a g e |5
web: brohn.com.au
2. SAFETY WARNINGS
IMPORTANT INFORMATION
Your safety is of the utmost importance to us. Please make sure that you
read this instruction booklet before attempting to install or use the
appliance. If you are unsure of any of the information contained in this
booklet, please contact customer support or retailer where you purchased
the product.
GENERAL INFORMATION
This appliance is designed for domestic household use.
The adjacent furniture and all materials used in the installation must be able to
withstand a minimum temperature of 85°C above the ambient temperature of the
room it is located in, whilst cooktop in use.
Certain types of vinyl or laminate kitchen furniture are particularly prone to heat
damage or discoloration at temperatures below the guidelines given above.
Any damage caused by the appliance being installed in contravention of this
temperature limit, will be the liability of the owner.
You should not use this appliance to store items on or as a work surface.
No modifications to the appliance are permitted.
You should not store or place flammable liquids/materials on top of or near the
appliance. Items made from aluminium, plastic or plastic film should also be kept
away from the appliance as they may fuse to the surface.
Repairs may only be carried out by authorised service agents and licensed
professionals.
CHILD SAFETY
It is strongly recommended that the appliance is not to be used by children or
persons with reduced physical, sensory or mental capabilities, or lack of experience
and knowledge, unless they have been given supervision.
It is recommended for children not to play with the appliance.

P a g e |6
web: brohn.com.au
GENERAL SAFETY
The appliance should only be installed and connected by a licensed qualified
professional.
Care should be taken to ensure that the units and work surfaces that you build the
appliance into, meet with the relevant standards.
DURING USE
Care should be taken when utilising the appliance, otherwise there is a risk of burns
being caused.
You should not allow the electrical connection cables to come into contact with
the hob surface when it is hot or any hot cookware.
If fat and oil overheat, it can ignite extremely quickly. For this reason, when cooking
with fat and oil, the appliance should not be left unattended.
Make sure that all of the cooking zones are switched off after use.
CLEANING
Cleaning of the hob should be carried out on a regular basis.
IMPORTANT: Before attempting to clean the appliance, it should be
disconnected from the mains and cool down.
Great care should be taken whilst using this appliance and when following the
cleaning procedure.
You should not use a steam jet or any other high pressure cleaning equipment to
clean the appliance.
INSTALLATION
This appliance must be correctly installed by a qualified individual
and connected to the gas supply by a licensed professional strictly in
accordance with the manufacturer’s instructions, local standards and
regulations.
Manufacturer or a retailer of the appliance declines any
responsibility for injury or damage, to person or property, as a result
of improper use or installation of this appliance.

P a g e |7
web: brohn.com.au
3. SPECIFICATIONS
3.1 BRGC3001BLK
Product specifications:
A = 1 x 14.4 MJ/h triple crown (wok) burner (NG)
B = Control panel
o Front control operation
o Automatic ignition
o Metal pan stands
o Flame failure safety device on each burner
31
0
49
0
26
8

P a g e |8
web: brohn.com.au
3.2 BRGC6040DSS
Product specifications:
A = 1 x 10.8 MJ/h rapid burner (NG)
B = 2 x 6.5 MJ/h semi-rapid burners (NG)
C = 1 x 3.6 MJ/h auxiliary burner (NG)
D = Control panel
o Side control operation
o Automatic ignition
o Metal pan stands
o Flame failure safety device on each burner
480
560

P a g e |9
web: brohn.com.au
3.3 BRGC7001SS
Product specifications:
A = 1 x 14.4 MJ/h triple crown (wok) burner (NG)
B = 1 x 10.8 MJ/h rapid burner (NG)
C = 2 x 6.5 MJ/h semi-rapid burners (NG)
D = 1 x 3.6 MJ/h auxiliary burner (NG)
E = Control panel
o Front control operation
o Automatic ignition
o Heavy duty metal pan stands
o Flame failure safety device on each burner
700
480
560

P a g e |10
web: brohn.com.au
3.4 BRGC6001SS / BRGC6001BLK
Product specifications:
A = 1 x 14.4 MJ/h triple crown (wok) burner (NG)
B = 2 x 6.5 MJ/h semi-rapid burners (NG)
C = 1 x 3.6 MJ/h auxiliary burner (NG)
D = Control panel
o Front control operation
o Automatic ignition
o Heavy duty metal pan stands
o Flame failure safety device on each burner

P a g e |11
web: brohn.com.au
3.5 BRGC9001BLK
Product specifications:
A = 1 x 14.4 MJ/h triple crown (wok) burner
(NG)
B = 1 x 10.8 MJ/h rapid burner (NG)
C = 2 x 6.5 MJ/h semi-rapid burners (NG)
D = 1 x 3.6 MJ/h auxiliary burner (NG)
E = Control panel
o Front control operation
o Automatic ignition
o Heavy duty metal pan stands
o Flame failure safety device on each burner
A
B
D
C
C
E

P a g e |12
web: brohn.com.au
3.6 BRGC9001SS
Product specifications:
A = 1 x 14.4 MJ/h triple crown (wok) burner (NG)
B = 1 x 10.8 MJ/h rapid burner (NG)
C = 2 x 6.5 MJ/h semi-rapid burners (NG)
D = 1 x 3.6 MJ/h auxiliary burner (NG)
E = Control panel
o Front control operation
o Automatic ignition
o Heavy duty metal pan stands
o Flame failure safety device on each burner

P a g e |13
web: brohn.com.au
ELECTRICAL DETAILS
Rated Voltage: 220 - 240 Vac 50 / 60 Hz
Supply Connection: 3A
Max Rated Inputs: 0.0008 kW
Mains Supply Lead: 3 core x 0.75mm² (Type RR-F <HAR> marked)
GAS DETAILS
Connection: Rp ½ (ISO R7)
Type: Natural Gas (1.0 KPa) LPG (2.75KPa)

P a g e |14
web: brohn.com.au
4. USING THE GAS HOB
BEFORE FIRST USE
IMPORTANT: Any film or stickers that are present on the cooktop surface should
be removed before use.
The cooktop surface should be cleaned regularly (see “Care and Maintenance” section).
SWITCHING THE HOB ON
The following symbols will appear on the control panel, next to each control knob:
Gas off
Large flame: maximum setting
Small flame: minimum setting
oThe minimum setting is at the end of the anti-clockwise rotation of the control knob.
oAll operation positions must be selected between the maximum and minimum
position.
oNever select a knob position between the maximum and off position.
oThe symbol on the control panel, next to the control knob will indicate which gas
burner it operates.
AUTOMATIC IGNITION WITH FLAME FAILURE SAFETY DEVICE
The appliance is fitted with a flame failure safety device on each burner, which is
designed to stop the flow of gas to the burner head in the event of the flame going
out.
To ignite a burner:
Press in the control knob of the burner that you wish to light and turn it anti-clockwise to
the maximum position.
If you keep the control knob depressed, the automatic ignition for the burner will
operate.

P a g e |15
web: brohn.com.au
You should hold down the control knob for 20 seconds after the flame on the burner
has lit.
After this 20 second interval, turn the control knob to your required setting between
the maximum and minimum setting symbols.
To switch the burner off, turn the control knob fully clockwise to the gas off position.
In case of power failure, the burners can be lit by carefully using a match.
ENERGY SAVING TIPS
BURNERS
PANS
Minimum diameter
Maximum diameter
Wok
220 mm
260 mm
Rapid
180 mm
220 mm
Semi-rapid
120 mm
200 mm
Auxiliary
80 mm
160
The diameter of the bottom of the pan should be compatible with the burner.
Use flat bottomed pans only.
The burner flame must never extend beyond the diameter of the pan.

P a g e |16
web: brohn.com.au
5. CLEANING
Cleaning operations must only be carried out when the hob is cool.
The appliance should be disconnected from your mains supply before
commencing any cleaning process.
CLEANING THE HOB TOP
Any residues that remain on the hob top surface from cleaning agents will
damage it. You should remove any residues with warm soapy water.
Abrasive cleaners or sharp objects will damage the hob surface; you should clean it
using warm soapy water.
Although it is easier to clean some deposits whilst the hob surface is still warm. Make
sure that the hob surface, pan supports and hob burners have all cooled sufficiently
before you attempt to touch them.
AFTER EACH USE
Remove the pan stands and wipe the appliance over with a soft, damp cloth that
has been put into warm soapy water. The cloth should be wrung out after being
taken out of the soapy water.
Dry the appliance by rubbing the surface with a soft, clean cloth.
We would recommend that an appropriate stainless-steel cleaner and polish is
regularly used on the stainless-steel surfaces of this appliance.
CLEANING THE HOB BURNERS
The hob burners should be cleaned once a week or more frequently if they get soiled.
IMPORTANT: Make sure that the hob surface, pan stands and hob burners have cooled
before you attempt to touch them.
Remove the hob burners by pulling them upwards and away from the hob top.
Soak them for about ten minutes in hot water and a small amount of detergent.
After cleaning and washing them, wipe and dry them carefully.
Before placing the burners back on the hob top, make sure that the gas jet is not
blocked.
IMPORTANT: Make sure that you reassemble the burners in the original way.

P a g e |17
web: brohn.com.au
MAINTAINING THE CAST IRON PAN STANDS
IMPORTANT: Make sure that the hob surface and pan stands have cooled before you
attempt to touch them.
Wipe the pan stands over with a soft, damp cloth washed in warm soapy water.
Using a paper towel, thoroughly dry the pan stands.
To maintain the appearance of the cast iron pan stands, we would recommend
that you rub a small amount of olive oil into the pan stands after you have finished
cleaning them.

P a g e |18
web: brohn.com.au
6. INSTALLATION AND GAS CONNECTION
LEGAL
The installation must be carried out by a licensed installer and professional gas
fitter in accordance with the local standards and regulations.
POSITIONING
The adjacent furniture must be able to withstand a minimum temperature rise
of 85°C above the ambient temperature of the room it is located in.
This appliance is designed to be located in a kitchen.
This appliance is classified as Class 3 and therefore is to be built into a kitchen unit
(depending on size) or 600mm worktop, providing the following minimum distances are
allowed:
The edges of the hob must be a minimum distance of 55 mm from a side or rear
wall.
700 mm between the highest point of the hob surface (including the burners) and
the underside of any horizontal surface directly above it.

P a g e |19
web: brohn.com.au
400 mm between the hob surface, providing that the underside of the horizontal
surface is in line with the outer edge of the hob. If the underside of the horizontal
surface is lower than 400 mm, then it must be at least 50 mm away from the outer
edges of the hob.
50 mm clearance around the appliance and between the hob surface and any
combustible materials.
ALL MODELS
IMPORTANT: You must have a gap of
at least 25 mm between the
underneath of the appliance and any
surface that is below it.
Carefully turn the hob upside down
and place it on a cushioned mat.
Apply the sealing strip (A) provided
around the edge of the appliance.
The protective covering must be
removed from all sides.
Do not leave gaps in the sealing agent or overlap it creating uneven thickness.
NOTE: It will be difficult to remove the hob from the benchtop in case when needed, if a
silicon sealant used to seal the appliance to the benchtop.
(A) Sealing strip
(B) Clamp
(C) Screw

P a g e |20
web: brohn.com.au
Place the clamp (B) over the holes that match the size of the screws. There are one
set of screw holes in each corner of the hob. Slightly tighten a screw (C) through the
clamp (B) so that the clamp is attached to the hob, but so that you can still adjust
the position of it.
Carefully turn the hob back over and then gently lower it into the aperture hole that
you have cut out.
On the underneath of the hob, adjust the clamps into a position that is suitable for
your worktop. Then fully tighten the screws (C) to secure the hob into position.
IMPORTANT INFORMATION
This hob is supplied to run on natural gas and cannot be used on any other type of
gas without modification.
Conversion for use on LPG and other gases must only be undertaken by a licensed
professional.
The hob must be installed by a qualified installer.
Failure to install the appliance correctly could invalidate warranty and lead to
prosecution under the local law and regulations.
VENTILATION REQUIREMENTS
The room containing the hob should have an adequate air ventilation.
The room must have opening windows or equivalent, some rooms may also require
a permanent vent.
If the room has a volume of less than 5m³, it will require an air vent of 100cm² in
effective area.
If the room has a volume between 5 and 10m³, it will require an air vent of 50cm²
unless it has a door which opens directly to the outside.
If it is installed in a room with a volume that exceeds 11m³, then no air vent is
required.
Consideration must be taken if there are any other fuel burning appliances in the
same room.
Ensure that the room containing the hob is well ventilated. Keep natural ventilation
holes or install a mechanical ventilation device such as a rangehood.
Prolonged intensive use of the appliance may call for additional ventilation, either
by the opening of a window, or by increasing the level of the mechanical
ventilation device (where present).
This manual suits for next models
6
Table of contents