Brotech Fatpipe Pro User manual

- 1 - - 1 -
Copyright © 2016 Brotech Electronics.
- 1 -1
Blues
Owners Manual

- 2 - - 2 -
Copyright © 2016 Brotech Electronics.
- 2 -2
Thank you and congratulations on your choice of the Brotech
Electronics , Blues distortion box. To
ensure proper operation and years of trouble-free service, please take the time to
read through this Owner’s Manual before starting out.
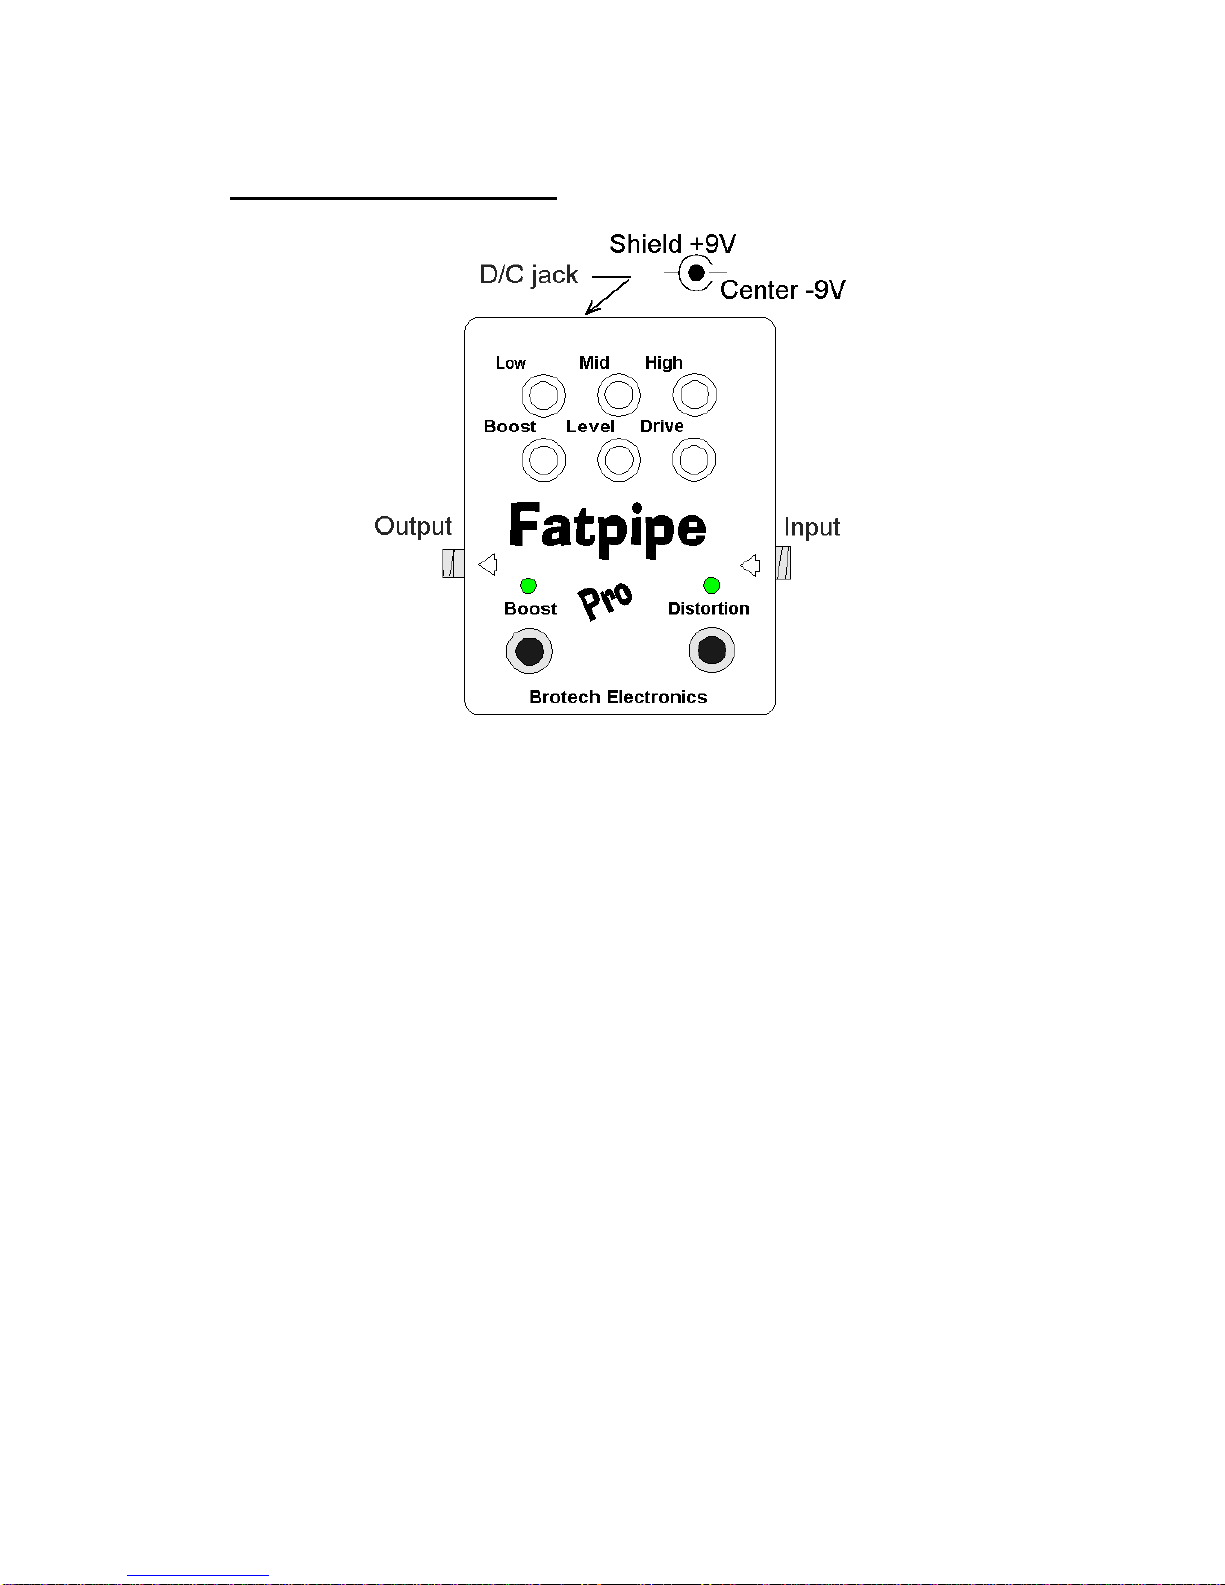
FEATURES
The , Blues is a Distortion and Sustain guitar
effects box. It includes a three band equalizer, gain and level controls for the
distortion, a separate boost feature, boost and distortion foot switches with active
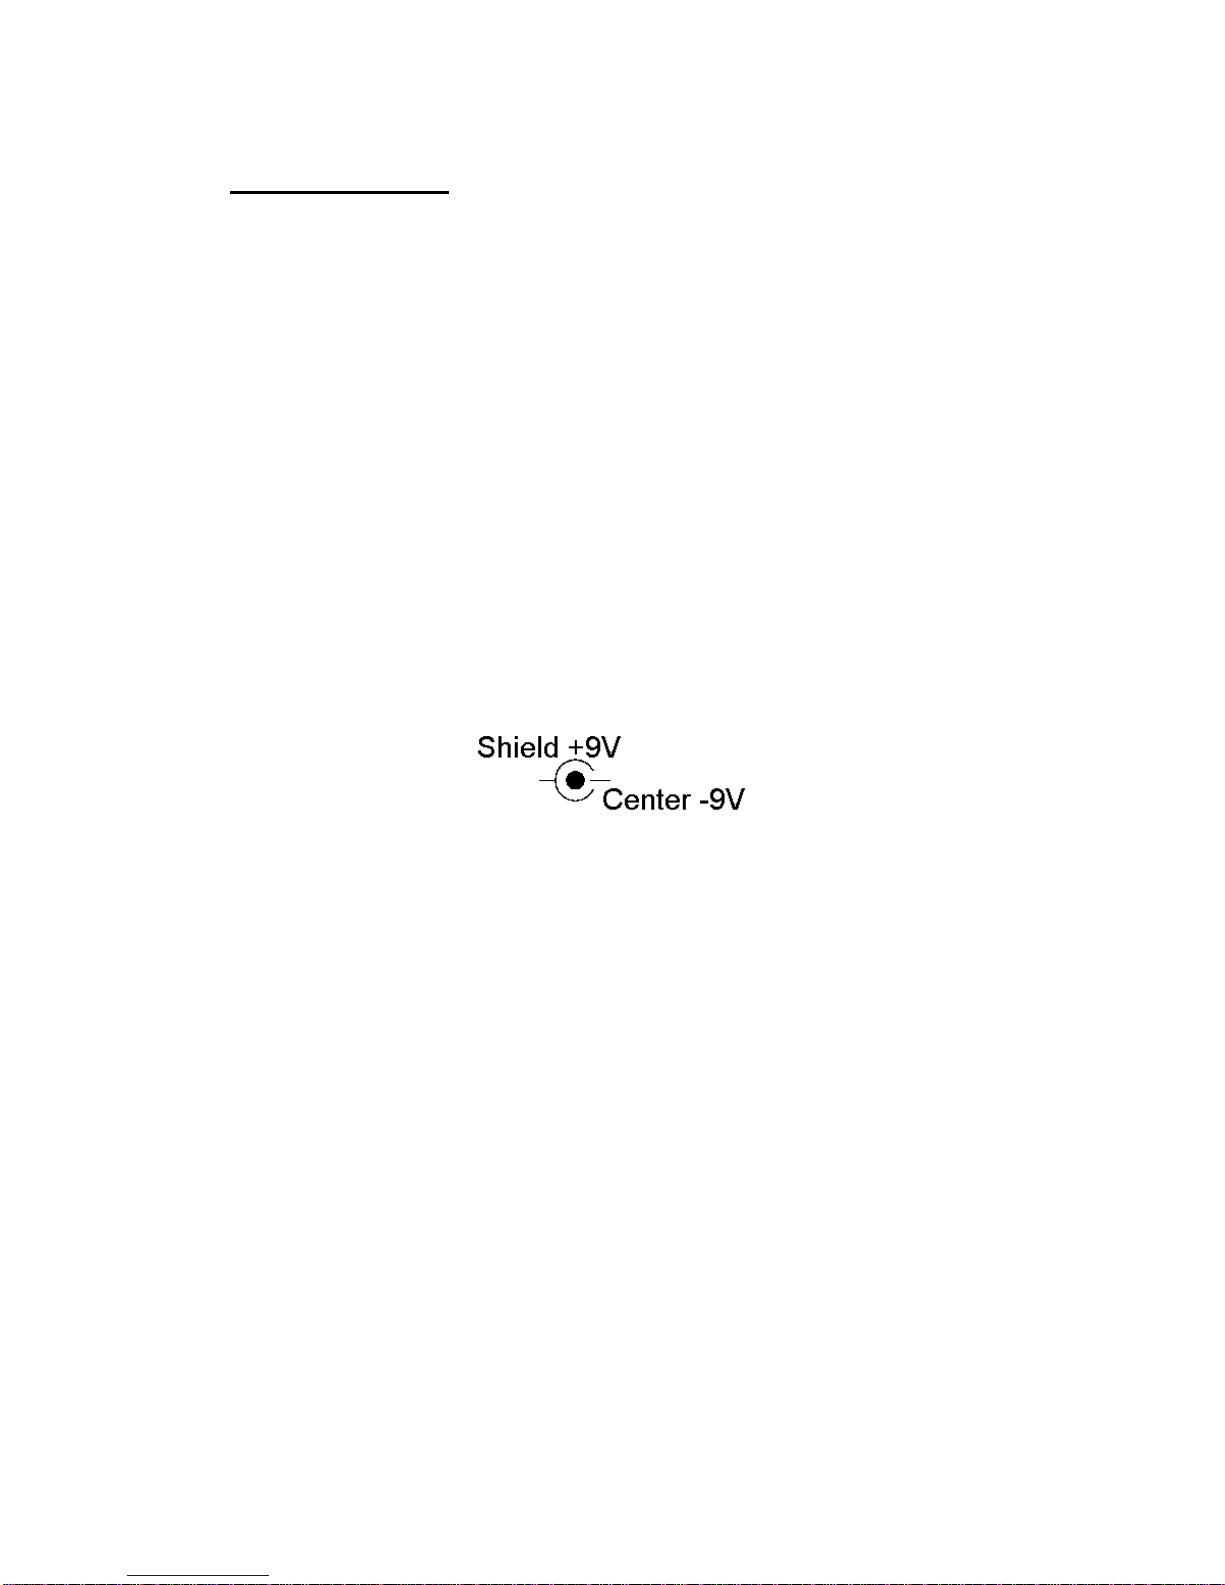
indication LEDs, input/output jacks, and a external D/C power supply connection
(for use with optional adapter). The versatile features of this unit will enable you
to create many kinds of sounds, from warm and soft sustain to hard powerful
distortion.
LIMITED WARRANTY
Brotech Electronics guarantees that every Fatpipe Pro/Blues will be free from
physical defects in material and workmanship for one year from date of purchase,
when used within the limits set forth in this user manual. Proof of purchase
required.
In no event shall Brotech Electronics liability exceed the price paid for the
product from direct, indirect, special, incidental, or consequential damages
resulting from the use of the product. Brotech makes no warranty or
representation, expressed, implied, or statutory, with respect to its products or the
contents or use of this documentation, and specifically disclaims its
merchantability or fitness for any particular purpose, other than as set forth in this
manual. Brotech Electronics reserves the right to revise or update its product,
software, or documentation without obligation to notify any individual or entity.

- 3 - - 3 -
Copyright © 2016 Brotech Electronics.
- 3 -3
All rights reserved. No part of this publication may be reproduced in any
form without the permission of Brotech Elelctronics.
IMPORTANT NOTES
When using an AC adapter, use only the specified device (see
Specifications page). Use of any other AC adapter could result in
damage, malfunction or electric shock.
POWER SUPPLY
The power requirement for this unit is indicated on the specification
page. Ensure that the voltage/current in your installation meets this
requirement. If the unit is to remain unused for an extended period of
time, unplug the power cord and/or remove the battery.
PLACEMENT
Do not subject the unit to temperature extremes (e.g., direct sunlight in an
enclosed vehicle). Avoid using or storing the unit in dusty or humid
areas, or areas that are subject to high levels of vibration.
ADDITIONAL PRECAUTIONS
● Protect the unit from severe impact.
● Should a malfunction occur, or if you suspect there is a problem,
discontinue use immediately. Contact the factory as soon as possible.
● WARNING: To avoid the risk of electric shock, unplug all
connections to the unit when changing the battery.
● Remove the battery whenever the unit is to remain unused for an
extended period of time.

- 4 - - 4 -
Copyright © 2016 Brotech Electronics.
- 4 -4
PANEL DESCRIPTION
AC Adapter Jack.
Accepts connection of an AC adapter (recommended option). Use of the
A/C adapter eliminates the risk of the internal battery running low during
a performance.
We suggest that a fresh battery be installed in the unit even if using
an A/C adapter, such that your playing won’t be interrupted, in the
unforeseen event that the adapter is accidentally disconnected.
If you are going to use an AC adapter, be sure to use the specified
unit (see Specification page). Use of any other adapter may result in
damage, malfunction, or electric shock, and void the warranty.
If you are not going to be using the unit for an extended period of
time, disconnect the AC adapter from the AC outlet.
INPUT Jack.
This jack accepts input signals coming from a guitar or another effects
unit.
The INPUT jack also serves as the power switch, Power is turned on
whenever a plug is inserted into the input jack, and is turned off
when the plug is disconnected. When not using the unit, you should
disconnect any cord connected to the INPUT jack.

- 5 - - 5 -
Copyright © 2016 Brotech Electronics.
- 5 -5
OUTPUT Jack
The output jack is used to connect the unit to an amplifier or another
effects pedal.
DISTORTION SWITCH AND LED INDICATOR
This switch is used to enable or bypass the DISTORTION circuitry. The
DISTORTION LED will illuminate when this circuit is active.
BOOST SWITCH AND LED INDICATOR
This switch is used to enable or bypass the BOOST circuitry. The BOOST
LED will illuminate when this circuit is active.
DRIVE control
This controls the depth of the distortion. Rotating the knob clockwise
creates deeper distortion and longer sustain time. Because this circuit
controls the AC gain of the first input stage, rotating the knob to the fully
CCW position will set the gain at 0, resulting in no output.
LEVEL control
This adjusts the level of the distortion. To avoid drastic volume changes,
set this knob so there is no volume difference between the effect and
straight guitar sounds.
BOOST control
This adjusts the level of the signal boost circuitry. Adjust this control to
give your solos a volume boost.
HIGH control
Active when the Distortion circuit is engaged. Rotating the knob
clockwise boosts the higher frequencies. Rotating the knob
counterclockwise cuts higher frequencies.
MID control
Active when the Distortion circuit is engaged. Rotating the knob
clockwise boosts the midrange frequencies. Rotating the knob
counterclockwise cuts midrange frequencies.
LOW control
Active when the Distortion circuit is engaged. Rotating the knob
clockwise boosts the low frequencies. Rotating the knob
counterclockwise cuts low frequencies.

- 6 - - 6 -
Copyright © 2016 Brotech Electronics.
- 6 -6
MAKING THE CONNECTIONS
Inserting a plug into the INPUT jack will automatically switch the
unit on.
Before connecting or disconnecting any patch cords, be sure all
volume controls in your system are set to minimum. This will help
prevent any damage to system components.

- 7 - - 7 -
Copyright © 2016 Brotech Electronics.
- 7 -7
OPERATING THE UNIT
1. After you have made the necessary connections, set all controls at
50%.
2. Depress the DISTORTION switch to turn the distortion effect on.
The DISTORTION indicator LED will light.
3. Adjust the depth of distortion with the DRIVE knob.
4. Adjust the volume of the distortion with the LEVEL knob. Compare
the bypassed (clean) level with that of the distortion level, and adjust
accordingly.
5. Adjust the tone of the distortion effect using the HI, MID, and
LOW controls.
6. Depress the BOOST switch to enable the boost circuitry. The
BOOST indicator LED will light.
7. Adjust the BOOST control to dial in the amount of boost desired.

- 8 - - 8 -
Copyright © 2016 Brotech Electronics.
- 8 -8
CHANGING THE BATTERY
When the indicator goes dim or no longer lights while an effect is on, it
means that the battery is nearly dead and must be replaced.
Replace the battery following the steps below.
1. Disconnect the unit from all other devices.
2. Remove the four screws on the back cover.
3. Remove the old battery from the housing, and carefully disconnect
the 9V power connector.
4. Carefully reconnect the power connector to the new battery, and
place the battery inside the housing.
*be sure to carefully observe the battery polarity (+ versus -).
5. Replace the back cover. Avoid pinching the power leads while
installing the cover, and reinstall the 4 screws

- 9 - - 9 -
Copyright © 2016 Brotech Electronics.
- 9 -9
SPECIFICATIONS
Controls LOW, MID, HIGH eq; LEVEL, DRIVE controls for
distortion; BOOST control; BOOST footswitch;
Distortion footswitch
Indicators DISTORTION and BOOST LED indicators (serves
also as battery check indicator)
Connectors INPUT jack, OUTPUT jack, AC Adapter jack (9VDC)
Nom. input level 20dBm
Input impedance >220k
Nom. output level 20dBm
Output impedance 1k
Power supply 9V battery (IEC 6LR61, NEDA/ANSI 1604A).
A/C Adapter Any A/C adapter with a regulated 9V D/C output,
100ma. The mating jack is 2.1mm, +9V on the sleeve.
Dimensions 1.94”/49.25mm H (w/knobs), 1.34”/34mm H (chassis
only) x 4.7”/119.5mm L x 3.7”/94mm W
Weight 0.772lbs (350 grams)
Accessories…….Owners manual, dry battery 9V type (6LR61/9V)
Available Option 9VD/C, A/C adapter
*0 dBm = 0.775V rms
*In the interest of product development, the specifications and/or
appearance of this unit are subject to change without prior notice.

- 10 - - 10 -
Copyright © 2016 Brotech Electronics.
- 10 -10
REGULATORY
This device complies with part 15 of the FCC Rules. Operation is
subject to the following two conditions: (1) This device may not cause
harmful interference; and (2) This device must accept any interference
received, including interference that may cause undesired operation.
Unauthorized changes or modifications to this equipment may cause
harmful interference, and void manufacturer’s warranty.
CE Mark Declaration of Conformity
73/23/EEC LVD, 89/336/EEC EMC
Manufacturer
Brotech Electronics
Product
Fatpipe Pro, Fatpipe Deluxe, Blues
Serial number
All
Product Safety
EN60950:1998, A1 thru A4
Electromagnetic Compliance
EN50081-1:1992
EN50082-1:1992
This product complies with the requirements of the Low Voltage
Directive 73/23EEC and the EMC Directive 89/336/EEC, and carries the
CE Mark accordingly
Publication FP111904
This manual suits for next models
1
Table of contents