BRU EV 5703 R User manual

MANUAL DE INSTRUCCIONES
INSTRUCTION MANUAL
ES
EN

Fig.2 - Abb.2 - Afb. 2 - Рис. 2 - Rys. 2 - Kuva 2. - 图2 - 2. ábra - Εικ. 2.
8
8
EV 5703 R

Fig.4 - Abb.4 - Afb. 4 - Рис. 4 - Rys. 4 - Kuva 4. - 图4 - 4. ábra - Εικ. 4.
Fig.5 - Abb.5 - Afb. 5 - Рис. 5 - Rys. 5 - Kuva 5. - 图5 - 5. ábra - Εικ. 5.
Fig.3 - Abb.3 - Afb. 3 - Рис. 3
Rys. 3 - Kuva 3. - 图3 - 3. ábra - Εικ. 3.
A B C D E
298 520 270 494 67
590 520 560 490 67
700 350 680 330 67
770 450 710 410 67
770 520 560 490 67
590 520 560 490 62

Fig.6 - Abb.6 - Afb. 6 - Рис. 6 - Rys. 6 - Kuva 6. - 图6 - 6. ábra - Εικ. 6.
s
d

ESTE PRODUCTO FUE CONCEBIDO
PARA UN USO DE TIPO DOMÉSTICO.EL
CONSTRUCTOR DECLINA CUALQUIER
RESPONSABILIDAD EN EL CASO DE
DAÑOS EVENTUALES A COSAS O PER-
SONAS QUE DERIVEN DE UNA INSTA-
LACIÓN INCORRECTA O DE UN USO
IMPROPIO, ERRADO O ABSURDO.
El fabricante declara que este producto
cumple todos los requisitos esenciales
sobreelmaterialeléctricodebajatensión
prescritos en la directiva 2014/35/EU y
de compatibilidad electromagnética
prescrita por la directiva 2014/30/EU.
PRECAUCIONES
- En el uso de los elementos calenta-
dores se aconseja utilizar recipientes
con fondo plano de diámetro igual o
ligeramente superior a aquel indicado
por la serigrafía.
- Evitar desbordamientos de líquido. Por
lo tanto, a ebullición completa o de to-
das formas una vez que esté caliente
el líquido, reducir la potencia.
- No dejar encendidas los elementos
calentadores vacíos o con ollas o ca-
cerolas vacías.
- Nunca usar hojas de papel de alumi-
nio o apoyar productos envueltos con
aluminio directamente sobre el plano
- Los objetos metálicos como cuchillos,
tenedores, cucharas y tapas no deben
ser puestos sobre la superficie del
plano para evitar que se calienten
- Durante la cocción con recipientes de
fondo antiadherente, sin condimentos
agregados, limitar el tiempo de preca-
lentamiento a uno o dos minutos
- La cocción de alimentos con tenden-
cia a pegarse en el fondo, comenzar a
potencia mínima para luego aumentar
revolviendo frecuentemente.
- Si la superficie de la encimera se rom-
pe, desconectar inmediatamente el
aparato de la red para evitar la posibi-
lidad de sufrir un shock eléctrico.
- Para la limpieza de la encimera no
debe usarse ningún limpiador a vapor.
- El aparato y sus partes accesibles
pueden calentarse durante su funcio-
namiento.
- Se debe tener cuidado para evitar to-
car los elementos calefactores.
- Los niños menores de 8 años deben
permanecer alejados a menos que es-
tén bajo supervisión permanente.
- Este aparato pueden utilizarlo niños
con edad de 8 años y superior y per-
sonas con capacidades físicas, senso-
riales o mentales reducidas o falta de
experiencia y conocimiento, si se les
ha dado la supervisión o instrucción
apropiadas respecto al uso del apara-
to de una manera segura y compren-
den los peligros que implica. Los ni-
ños no deben jugar con el aparato. La
limpieza y el mantenimiento a realizar
por el usuario no deben realizarlos los
niños sin supervisión.
- Puede ser peligroso cocinar con gra-
sa o aceite sin estar presente ya que
pueden resultar en fuegos. NUNCA
trate de extinguir un fuego con agua,
desconecte sin embargo el aparato y
ES

entonces cubra las llamas, por ejem-
plo, con una tapa o con una sábana.
- Peligro de fuego: no almacenar ele-
mentos en las superficies de cocción.
- Utilizar sólo protectores de encimera
diseñados por el fabricante del apa-
rato de cocción o indicado por el fa-
bricante en las instrucciones para el
uso como adecuado o protectores de
encimera incorporados en el aparato.
El uso de protectores inadecuados
puede causar accidentes.
Instale en el cableado fijo un medio
de desconexión de la red eléctrica con
una separación de contacto en todos
los polos que permita una desconexión
completa en condiciones de sobreten-
sión de categoría III, de acuerdo con la
normativa de cableado.
El enchufe o el interruptor omnipolar
tienen que ser fácilmente alcanzables
con el aparato instalado.
Este aparato no está previsto para ha-
cerlo funcionar por medio de un tem-
porizador externo o sistema de control
remoto separado.
El constructor declina cualquier res-
ponsabilidad en el caso de que lo dicho
arriba y las usuales normas contra los
infortunios no sean respetados.
Si el cable de alimentación se daña, há-
galo sustituir por el fabricante, por un
centro de asistencia técnica autorizado
o por un técnico de competencia similar,
a fin de prevenir todo tipo de riesgos.
Instrucciones para el usuario
Instalación
Todas las operaciones relativas a la instalación (conexión
eléctrica) tienen que ser efectuadas por personal cualifica-
do según las normas vigentes.
Para las instrucciones específicas véase la parte reservada
al instalador.
Utilización
ELEMENTOS CALENTADORES TOUCH CONTROL
Tecla de presión leve
Todas las operaciones pueden ser ejecutadas a través de
teclas de presión leve (sensores de tipo capacitivo) puestas
sobre la superficie frontal de la tarjeta; a cada tecla corres-
ponde un display. Cada actividad es confirmada por una
señal acústica.
TOUCH CONTROL (Fig. 2)
1 Encendido/apagado ON / OFF
2 Menos -
3 Más +
4 Circuito Doble / Triple
5 Zona de cocción
6 Display de nivel de potencia
7 Piloto doble circuito
Encendido/apagado del Touch Control
Después de la conexión a la red eléctrica, se requerirá
aproximadamente un segundo para que el touch pueda
funcionar.
Después del reset todos los displays y los LEDS centellean
durante aproximadamente un segundo. Una vez transcurri-
do este lapso todos los displays y los LEDS se apagan y el
touch queda en posición de stand-by.
Para encender el touch se debe presionar la tecla de en-
cendido (1).
Los displays de las zonas de cocción muestran un “0“. En
caso de que una zona de cocción “queme” (alta tempera-
tura), en el display aparecerá “H“ y “0“ alternativamente.
Después del encendido el touch control permanece activado
durante 20 segundos. En caso de no seleccionarse ninguna
zona de cocción, el touch control retorna automáticamente
al estado de standby.
El touch control se enciende presionando únicamente la
tecla de encendido (1).
En caso de presionarse la tecla de de encendido (1) simul-
táneamente con otras teclas no se obtendrá ningún efecto y
el touch permanecerá en stand-by.
El touch control puede apagarse en cualquier momento
mediante la tecla de encendido (1). Ello es válido incluso
en caso de que el mando haya sido bloqueado mediante el
dispositivo de seguridad para niños.
La tecla de encendido (1) goza siempre de prioridad en la
función de apagado.

Apagado automático
Una vez encendido, el touch control se apaga de modo au-
tomático después de 20 segundos de inactividad. Después
de haber seleccionado una zona de cocción, el tiempo de
apagado automático se subdivide en 10 segundos, transcu-
rridos los cuales se deselecciona la zona y, después de otros
10 segundos, el touch control se apaga.
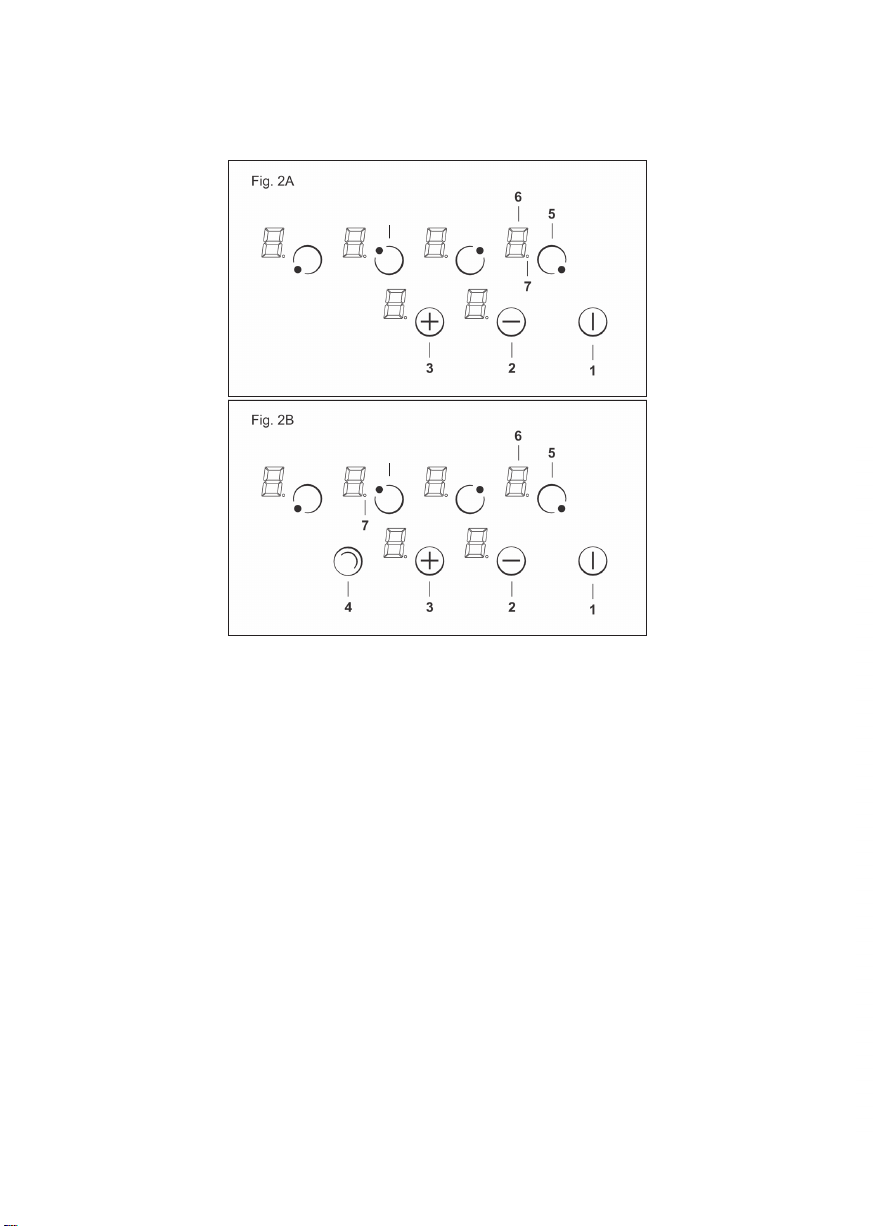
Encendido/apagado de una zona de cocción
Con el touch control encendido, será posible seleccionar la
zona de cocción presionando la tecla (5) de la zona corres-
pondiente.
El display (6) de la zona seleccionada se vuelve más brillan-
te, mientras que el resto de displays pierde luminosidad. Si
el área “quema” se visualizarán alternativamente “H” y “0”.
Presionando la tecla MÁS (3) o MENOS (2), será posible
seleccionar un nivel de potencia y la zona comenzará a
calentar.
Una vez seleccionada la zona de cocción, podrá seleccio-
narse el nivel de potencia manteniendo presionada para ello
la tecla MÁS (3); partiendo desde el nivel 1 se incrementa en
la medida de una unidad cada 0,4 segundos. Al alcanzarse
el nivel 9 no será posible efectuar otros incrementos.
Si el nivel de potencia ha sido seleccionado mediante la
tecla MENOS (2), el nivel inicial es el “9” (nivel máximo).
Manteniendo presionada la tecla, el nivel activo decrece
en la medida de una unidad cada 0,4 segundos. Una vez
alcanzado el nivel 0 no será posible efectuar ulteriores de-
crementos. Sólo presionando nuevamente la tecla MENOS
(2) o MÁS (3) será posible modificar el nivel de potencia.
Apagado de una zona de cocción
Seleccionar la zona que se desea apagar mediante la tecla
(5) correspondiente. El display (6) de la zona seleccionada
se vuelve más brillante, mientras que el resto de displays
pierde luminosidad. Presionando las teclas MÁS (3) y ME-
NOS (2) de modo simultáneo, el nivel de potencia de la zona
se coloca a 0. Como alternativa la tecla MENOS (2) puede
utilizarse para reducir el nivel de potencia hasta 0.
Si una zona de cocción “quema”, aparecerá una “H” y un
“0” alternativamente.
Apagado de todas las zonas de cocción
Presionando la tecla de encendido (1) podrá obtenerse en
cualquier momento el apagado inmediato de todas las zo-
nas. En modalidad standby aparecerá una “H“ en el display
de todas las zonas de cocción que “queman”. Todos los res-
tantes displays estarán apagados.
Nivel de potencia
La potencia de la zona de cocción dispone de 9 niveles que
aparecen indicados con los símbolos de “1“ a “9“ mediante
los displays (6) de LED de siete segmentos.
Indicador de calor residual
Indica al usuario que el vidrio se encuentra a una tempera-
tura peligrosa en caso de contacto con el área situada sobre
la zona de cocción. La temperatura es determinada según
un modelo matemático y en caso de presencia de calor re-
sidual, ello es indicado con una “H” por el correspondiente
display de siete segmentos.
El calentamiento y el enfriamiento se calculan sobre la
base de:
· El nivel de potencia seleccionado (entre “0“ y “9“)
· El período de activación.
Después de haber apagado la zona de cocción, el corres-
pondiente display mostrará “H” hasta que la temperatura de
la zona haya descendido por debajo del nivel crítico (≤ 60ºC)
según el modelo matemático.
Función de apagado automático (lím. del tiempo de fun-
cionamiento)
En relación con el nivel de potencia, en caso de no efectuarse
ninguna operación, cada zona de cocción se apaga después de
un tiempo máximo preestablecido.
Cada operación en la zona de cocción (mediante las teclas
MÁS (3) y MENOS (2) o doble zona) reinicializa el tiempo
máximo de operación de la zona devolviéndolo a su valor
inicial.
Protección en caso de encendido involuntario
· En caso de que el control electrónico detecte la presión
continua de un tecla por aprox. 10 s, se apagará automáti-
camente. El control emite una señal acústica de error para
advertir al usuario que los sensores han detectado la pre-
sencia de un objeto. Los displays muestran el código de
error “ E R 0 3 “. Si la zona de cocción “quema”, aparecerá
una “H“ en el display alternativamente con la señal de error.
· En caso de no activarse ninguna zona de cocción dentro de
los 20 segundos sucesivos al encendido del Touch, el control
retornará a la modalidad stand-by.
· Cuando el control se encuentra encendido la tecla ON/OFF
tiene prioridad respecto de todas las restantes teclas, a fin
de que el control pueda ser apagado en cualquier momento
incluso en caso de presión múltiple o continua de teclas.
· En modalidad stand-by una presión continua de teclas no
producirá ningún efecto. En cualquier caso, para poder en-
cender nuevamente el control electrónico éste deberá haber
detectado que ninguna tecla se encuentre presionada.
Bloqueo de las teclas (dispositivo de seguridad para los
niños)
• Dispositivo de seguridad para niños:
Bloqueo de las teclas:
Para activar el dispositivo de seguridad para niños después
de haber encendido el Touch se deberán presionar simultá-
neamente durante 3 segundos la tecla posterior izquierda
de selección de la zona de cocción y la tecla MENOS (2)
y, a continuación, presionar nuevamente la tecla posterior
izquierda de selección de zona. En todos los displays apare-
cerá una “L” que significa LOCKED (dispositivo de seguridad
para niños contra encendido involuntario). En caso de que

la zona de cocción “queme” la “L” y la “H” se mostrarán
alternativamente.
Esta operación deberá tener lugar dentro de los 10 segun-
dos sucesivos; no deberá presionarse ninguna otra tecla
además de aquéllas indicadas. En caso contrario, la se-
cuencia será interrumpida y la encimera no será bloqueada.
El control electrónico permanece bloqueado mientras no
sea desbloqueado por el usuario, incluso aunque mientras
tanto haya sido apagado y reencendido. Ni siquiera una re-
inicialización del touch (después de una caída de tensión)
interrumpirá el bloqueo de las teclas.
Eliminación del bloqueo de las teclas:
Después de encender el touch podrá ser desactivado el dis-
positivo de seguridad para niños. Es necesario presionar de
modo simultáneo durante 3 segundos la tecla posterior iz-
quierda de selección zona cocción y la tecla MENOS (2) y, a
continuación, únicamente la tecla MENOS (2). Si se ejecutan
todas las operaciones en el orden previsto dentro de los su-
cesivos 10 segundos, el bloqueo de las teclas será anulado
y el touch será apagado. En caso contrario, la secuencia
será considerada como incompleta, el touch permanecerá
bloqueado y se apagará después de 20 segundos.
Encendiendo nuevamente el touch mediante la tecla ON/
OFF todos los displays mostrarán “0”, los puntos decimales
centellearán y el touch quedará listo para efectuar la coc-
ción. En caso de que una zona de cocción “queme”, el “0” y
la “H” se mostrarán alternativamente.
Control de los circuitos múltiples
Encimeras sin circuito doble o triple ver Fig. 2A
Encimera con zona doble. (Fig. 2B)
La activación de una zona de cocción doble supone que se
enciendan los dos circuitos a la vez. La activación del cir-
cuito externo es indicada mediante un piloto luminoso (7) en
el ángulo inferior derecho del display. Si se desea encender
sólo el circuito interno, el circuito externo puede ser apa-
gado mediante la tecla de doble circuito (4). Presionando
nuevamente la tecla de doble circuito (4) se activará una vez
más el circuito externo, con encendido del correspondiente
punto luminoso (7).
Señal acústica (zumbador)
Durante el uso las siguientes actividades son señaladas
mediante un zumbador:
· Presión normal sobre las teclas con un sonido breve.
· Presión continua sobre las teclas durante más de 10 s con
un sonido largo intermitente.
Mantenimiento (Fig. 4)
Restos de hojas de aluminio, residuos de alimentos,
salpicaduras de grasa, azúcar o alimentos fuertemente sa-
caríficos deben ser inmediatamente removidos del plano
de cocción con un raspador para evitar daños posibles a la
superficie del plano. Sucesivamente limpiar con un produc-
to adecuado y papel de cocina, luego enjuagar con agua y
secar con un paño limpio. De ninguna manera usar esponjas
o estropajos abrasivos; evitar también el uso de detergentes
químicos agresivos o quitamanchas.
Instrucciones para el instalador
Instalación
Las presentes instrucciones están dirigidas al instalador
como guía para la instalación, regulación y mantenimiento
según las leyes y las normas vigentes. Las intervenciones
tienen que ser efectuadas siempre con el aparato desen-
chufado.
Colocación (Fig. 5)
1 Vista frontal
2 Lado frontal
El aparato ha sido estudiado para ser empotrado en un ta-
blero de trabajo como ilustrado en la figura. Preparar sobre
todo el perímetro de la superficie con la cinta impermeable
en dotación.
Conexión eléctrica
Antes de efectuar la conexión eléctrica comprobar que:
- las características de la instalación satisfagan lo indicado
en la placa de características colocada sobre el fondo de la
superficie de cocción;
- que la instalación tenga una eficaz conexión de tierra
según las normas y las prescripciones de ley vigentes. La
puesta a tierra es obligatoria por ley.
En el caso de que el aparato no tenga el cable y/o enchufe
utilizar material apto para la corriente indicada en la placa
de características y para la temperatura de trabajo. El cable
en ningún punto tendrá que llegar a una temperatura supe-
rior de 50°C sobre la temperatura ambiente.
Limitación de potencia (TN 604/A)
1. Encienda la alimentación y mantenga la placa apagada.
2. Pulse el botón de selección de la zona (8) y (5) a la vez
durante 3 segundos. Los indicadores mostrarán “P” y “S”
3. Pulse el botón (2), el indicador mostrará “E”, “P” y “S”.
4. Pulse el botón (3), el indicador mostrará “E”, “t”,“P” y
“S”.
5. Al pulsar los botones (2) y (3) conjuntamente, los indi-
cadores mostrarán el valor de la potencia máxima “XX00”.
6. Pulse el botón (3) alternativamente; puede configurar la
potencia máxima de salida en 6400 W o 3600 W alternati-
vamente.
7. Pulse los botones (2) y (3) conjuntamente de nuevo para
guardar los ajustes y salir de la configuración.
Una vez completada la configuración, la UMC recordará el
ajuste de limitación de potencia aunque se vaya la luz.
Si desconecta la alimentación o apaga la placa durante la
configuración, el valor configurado no se guardará.
Puede salir de la configuración pulsando el botón de Encen-
dido/Apagado o los botones (2) y (3) conjuntamente.

THIS APPLIANCE IS DESIGNED FOR
DOMESTIC USE ONLY. THE MANUFAC-
TURER SHALL NOT IN ANY WAY BE
HELD RESPONSIBLE FOR WHATEVER
INJURIES OR DAMAGES ARE CAUSED
BY INCORRECT INSTALLATION OR BY
UNSUITABLE, WRONG OR ABSURD
USE.
The manufacturer declares that this
product meets all the essential require-
ments for low voltage electrical material
set out in European directive 2014/35/
EU and for electromagnetic compati-
bility as required by European directive
2014/30/EU.
PRECAUTIONS
- When one makes use of heating el-
ements, we advise receptacles with
flat bottom having same diameter or
lightly higher than that of the hot area.
- Avoid overflows of liquid, therefore
when boiling has happened, or in any
case when liquid is heated, reduce the
heat supply.
- Don’t leave the heating elements on
without receptacles on the top or with
void pots and pans.
- Do not use any alluminium foil or place
any foodstuffs wrapped in alluminium
foil directly on the hob - do not place
any metal objects such as knives,
forks, spoons and lids on the hob sur-
face as they will heat up.
- When cooking in a non-stick pan with-
out seasoning, do not exceed 1-2 min-
utes’ pre-heating time.
- When cooking food that may easily
stick, start at a low power output level
and then slowly increase while regu-
larly stirring.
- If the surface of the hob is damaged,
immediately disconnect the appliance
from the mains to prevent the possi-
bility of electric shock.
- Never use a steam cleaner to clean the
hob.
- The appliance and accessible parts
may be hot during operation.
- Take care to avoid touching the heat-
ing elements.
- Children less than 8 years of age
should be kept at a safe distance un-
less continuously supervised.
- This appliance may be used by children
aged 8 or over and by persons with
reduced physical, sensory or mental
capabilities or lack of experience and
knowledge, if they are supervised and
have received suitable instructions on
safe use of the appliance and under-
stand the dangers involved. Children
must not play with the appliance. User
maintenance and cleaning should not
be carried out by children except un-
der constant supervision.
- Cooking with grease or oil may be
dangerous and cause a fire if left un-
attended. NEVER try to extinguish a
fire with water. Rather, disconnect the
appliance and then cover the flames
with a cover or sheet, for example.
- Fire hazard: do not store elements on
EN

cooking surfaces.
- Only counter top protectors designed
for use with the cooking appliance
and listed in the manufacturer’s in-
structions should be used as suitable
protection for the counter top incorpo-
rated in the appliance. Use of unsuit-
able protectors may cause accidents.
- WARNING: Accessible parts will be-
come hot when in use. To avoid burns
and scalds children should be kept
away.
Insert in the fixed wiring a mean for
disconnection from the supply mains
having a contact separation in all poles
that provide full disconnection under
overvoltage category III conditions, in
accordance with the wiring rules. The
plug or omnipolar switch must be easily
reached on the installed equipment.
This appliance is not intended to be
used via an external timer or a remote
control system.
The manufacturers decline any respon-
sibility in the event of non-compliance
with what is described above and the
accident prevention norms not being
respected and followed.
To avoid all risk, if the power cable be-
comes damaged, it must only be re-
placed by the manufacturer, by an au-
thorised service centre, or by a qualified
electrician.
User’s Instructions
Installation
All operations relative to installation (electric connection)
should be carried out by skilled personnel in conformity with
the rules in force.
As for the specific instructions see part pertaining to install-
er.
Use
TOUCH CONTROL HEATING ELEMENTS
Touch sensitive keys
All operations can be performed using touch sensitive keys
(capacitive sensors) located on the front of the control
board; each key has a corresponding display. All actions are
confirmed by an audible signal.
TOUCH CONTROL (Fig. 2)
1 ON / OFF
2 Minus -
3 Plus +
4 Double / Triple Circuit
5 Cooking zone
6 Setting level display
7 Dual circuit pilot light
Switching the Touch Control on/off
After mains voltage is applied, the touch control initialises
for approximately one second before it is ready for use.
All displays and LEDs flash for approximately one second
after resetting. Once this period is complete, all displays and
LEDs switch off and the touch control is in standby mode.
Press the ON/OFF (1) button to switch the touch control on.
The cooking zone displays indicate “0“. If a cooking zone is
in “hot“ (high temperature) mode, the display will alternate-
ly indicate “H“ and “0“.
After switching the touch control on, it will remain active for
20 seconds. If no cooking zone is selected, the touch control
automatically switches back to standby mode.
The touch control can only be switched on by pressing the
ON/OFF (1) button.
Pressing the ON/OFF (1) button at the same time as other
buttons will have no effect and the touch control will remain
on standby.
The touch control can be switched off at any time using the
ON/OFF (1) button. This is even the case when the control
has been locked by the child safety feature.
The ON/OFF (1) button always takes priority in the switching
off function.
Automatic off
Once switched on, the touch control automatically switches
off after 20 seconds of inactivity. After selecting a cooking
zone, the automatic off time is divided into 10 seconds, after
which the zone is deselected and, after another 10 seconds,
the touch control switches off.

Switching a cooking zone on/off
If the touch control is switched on, the cooking zone can
be selected by pressing the button (5) of the corresponding
zone.
The display (6) of the zone selected lights up, while the re-
maining displays are dimmed. if the cooking zone is “hot”,
“H” and “0” are alternately displayed.
Press the PLUS (3) or MINUS (2) button to select a setting
and the zone will begin to heat up.
Once the cooking zone has been selected, the setting can
be selected by keeping the PLUS (3) button pressed down.
The setting begins at level 1 and increases by 1 level every
0.4 seconds. When setting “9” is reached, the setting will
not be changed further.
If the setting level has been selected using the MINUS (2)
button, the start level is “9“ (maximum level). Keep the
button pressed down to lower the active level by 1 every
0.4 seconds. When setting “0” is reached, there will be no
further setting changed. The setting can only be changed by
pressing the MINUS (2) or PLUS (3) button again.
Switching a cooking zone off
Select the zone to be switched off using the corresponding
button (5). The display (6) of the zone selected lights up,
while the remaining displays are dimmed. Press the PLUS
(3) and MINUS (2) buttons at the same time and the setting
level of the zone is changed to 0. Alternatively, the MINUS
button (2) can be used to reduce the setting level to 0.
If a cooking zone is “hot”, “H” and “0” will be alternately
displayed.
Switching all cooking zones off
Press the ON/OFF (1) button to immediately switch off all
zones at any time. In standby mode, an “H“ is displayed in
all cooking zones that are “hot“.The remaining displays will
be switched off.
Setting level
The cooking zone can be set to 9 levels that are indicat-
ed by the numbers “1“ to “9“ on the seven-segment LED
displays (6).
Residual heat indicator
This informs the user that the glass is at a dangerous tem-
perature in the event of touching the area located around
the cooking zone. The temperature is determined by a
mathematical model and any residual heat is indicated by a
“H” on the corresponding 7-segment display.
Heating and cooling are calculated based on:
· The selected setting level (between “0“ and “9“)
· The ON/OFF time.
After switching off the cooking zone, the corresponding dis-
play will indicate “H” until the temperature in the zone has
dropped below the critical level (≤ 60°C).
Automatic off function (operating time limitation)
In terms of the setting level, if no operation occurs each
cooking zone switches off after an established maximum
time.
Each operation in the cooking zone condition (using the
PLUS (3) and MINUS (2) or dual zone) restarts the maximum
operating time of the zone by resetting it to its initial value.
Protection against unintended switching on
· If the electronic control detects a button being held down
for approx. 10 sec. it will switch off automatically. The con-
trol sends out an audible error signal to warn the user that
the sensors have detected the presence of an object. The
displays indicate error code “ E R 0 3 “. If the cooking zone
is in “hot” mode, “H“ will be indicated alternately on the
display with the error signal.
· If no cooking zone is activated within 20 seconds after
switching on the touch control, it will return to standby
mode.
· When the control is switched on, the ON/OFF button has
priority over all other button and, therefore, the control can
be switched off at any time, even when several buttons are
pressed at the same time or a button is kept held down.
· In standby mode, no effect will be caused by buttons be-
ing kept held down. However, before the electronic control
can be switched back on, it has to detect that no button is
pressed down.
Button lock (child safety feature)
• Child safety feature:
Button lock:
To activate the child safety feature after having switched on
the Touch control, press de rear left cooking zone selection
button at the same time as the MINUS button (2) for 3 sec-
onds, followed by just the rear left cooking zone selection
button. An “L” standing for LOCKED (child safety feature
preventing unintended switch on) will be indicated on all
displays. If a cooking zone is in “hot” mode, “L” and “H” will
be alternately displayed.
This operation must take place within a 10 successive
seconds and no button other than those described must be
pressed. Otherwise, the sequence will be interrupted and
the hob will not be locked.
The electronic control remains locked until it unlocked by
the user, even if it has been switched off and back on mean-
while. Not even touch control resetting (after a voltage drop)
will interrupt the button lock.
Cancelling the button lock:
After switching the touch control on, the child safety feature
can be disabled. Press the rear left cooking zone selection
button and the MINUS button (2) for 3 seconds, followed by
just the MINUS button (2). If all operations are carried out
in the right order within 10 seconds, the button lock will be
cancelled and the touch control switched off. Otherwise, the
sequence will be considered incomplete and the touch con-

trol will remain locked and will switch off after 20 seconds.
Switch the touch control back on using the ON/OFF button
and all displays will be indicate “0”, the decimal points will
flash and the touch control will be ready for cooking. If a
cooking zone is in “hot” mode, “0” and “H” will be alter-
nately displayed.
Control of multiple circuits
Hobs without double or triple circuit, see Fig. 2A
Hob with double zone. (Fig. 2B)
When a dual cooking zone is activated, the two circuits are
switched on at the same time. Activation of the external cir-
cuit is indicated by a pilot light (7) in the bottom right corner
of the display. If only the internal circuit is to be switched
on, the external circuit can be switched off using the dual
circuit button (4). Press the dual circuit button (4) again to
re-activate the external circuit and the corresponding pilot
light (7) will switch on.
Sound signal (buzzer)
The following activities are indicated by a buzzer during use:
· Normal button pressing by a short sound.
· Buttons kept pressed down for more than 10 sec. by a
long, intermittent sound.
Maintenance (Fig. 4)
By means of a scraper immediately remove any alluminium
foil bits, food spills, grease splashes, sugar marks and other
high sugarcontent food from the surface in order to avoid
damaging the hob.
Subsequently clean the surface with some towel and
appropriate product, rinse with water and dry by means of a
clean cloth. Under no circumstance should sponges or abra-
sive cloths be used; also avoid using aggressive chemical
detergents such as oven sprays and spot removers.
Installer’s Instructions
Installation
These Instructions are for the qualified technician, as a
guide to installation, adjustment and maintenance, accord-
ing to the laws and standards in force. These operations
must always be carried out when the appliance has been
disconnected from the electric system.
Positioning (Fig. 5)
1 Front view
2 Front side
The appliance can be fitted into a working area as illustrated
on the figure. Apply the seal supplied over the whole perim-
eter of the working area.
Electrical connection
Prior to carrying out the electrical connection, please ensure
that:
the plant charac- teristics are such as to follow what is
indicated on the matrix plate placed at the bottom of the
working area;
- that the plant is fitted with an efficient earth
connection, following the standards and law
provisions in force.
- The earth connection is compulsory in terms of
the law.
Should there be no cable and/or plug on the equipment, use
suitable absorption material for the working temperature
as well, as indicated on the matrix plate. Under no circum-
stance must the cable reach a temperature above 50°C of
the ambient temperature.
Power Limitation
(TN 604/A)
1. Swith on power,and keep the hob off.
2. Press the zone selecting key (5) and (8) together for 3
seconds. The the indicators will show “P” and “S”.
3. Press (2) key,indicator will show “E”, “P” and “S”.
4. Press (3) key,indicator will show “E”, “t”,“P” and “S”.
5.The press key (2) and (3) together,the indicators will show
the maximum power value“XX00”.
6. Press the key (3) alternatively,you can set the maximun
output power to 6400W or 3600W alternatively.
7. Press key (2) and (3) together again will save the setting
and exit the setting.
After finishing setting, the MCU can remember the power
limited setting even cut off the power.
If the power off or turn off the hob during setting,the setting
value will not save;
It can be Exit the setting by press the on/off ket or press the
key (2) and (3) together.


EXPERT ESPAÑA
Agrupación Detallistas Electodomésticos Federal, FADESA S.A.
C/Arte, 21 - 5ºA
28033 Madrid
Tel: (0034) 917489900
email: [email protected]
www.expert.es
Table of contents
Languages:
Popular Hob manuals by other brands

Indesit
Indesit PR 752 W/I(GR) operating instructions

Hotpoint
Hotpoint GF941 Instructions for installation and use

AYA
AYA TI05B Instructions for use

Hotpoint
Hotpoint HR 724 B H Instructions for use

Indesit
Indesit TD 641 S IX/HA TR operating instructions

Forno
Forno Alfa Qualita FCTGS5751-30 installation guide