Bryte IPX User manual

1
Bryte Tablets
From
Technology Professionals
Limited

2
Content
1 Introduction.................................................................................................................................2
1.1 Acknowledgement...............................................................................................................4
1.2 Announcements...................................................................................................................4
1.3 Safety Instruction................................................................................................................4
1.4 Abbreviation/Terminology ..................................................................................................5
2Getting Started ..........................................................................................................................5
2.1 Bryte Tablet Operation and Preparation...........................................................................5
2.2 Bryte Tablet Status and Reminder.....................................................................................5
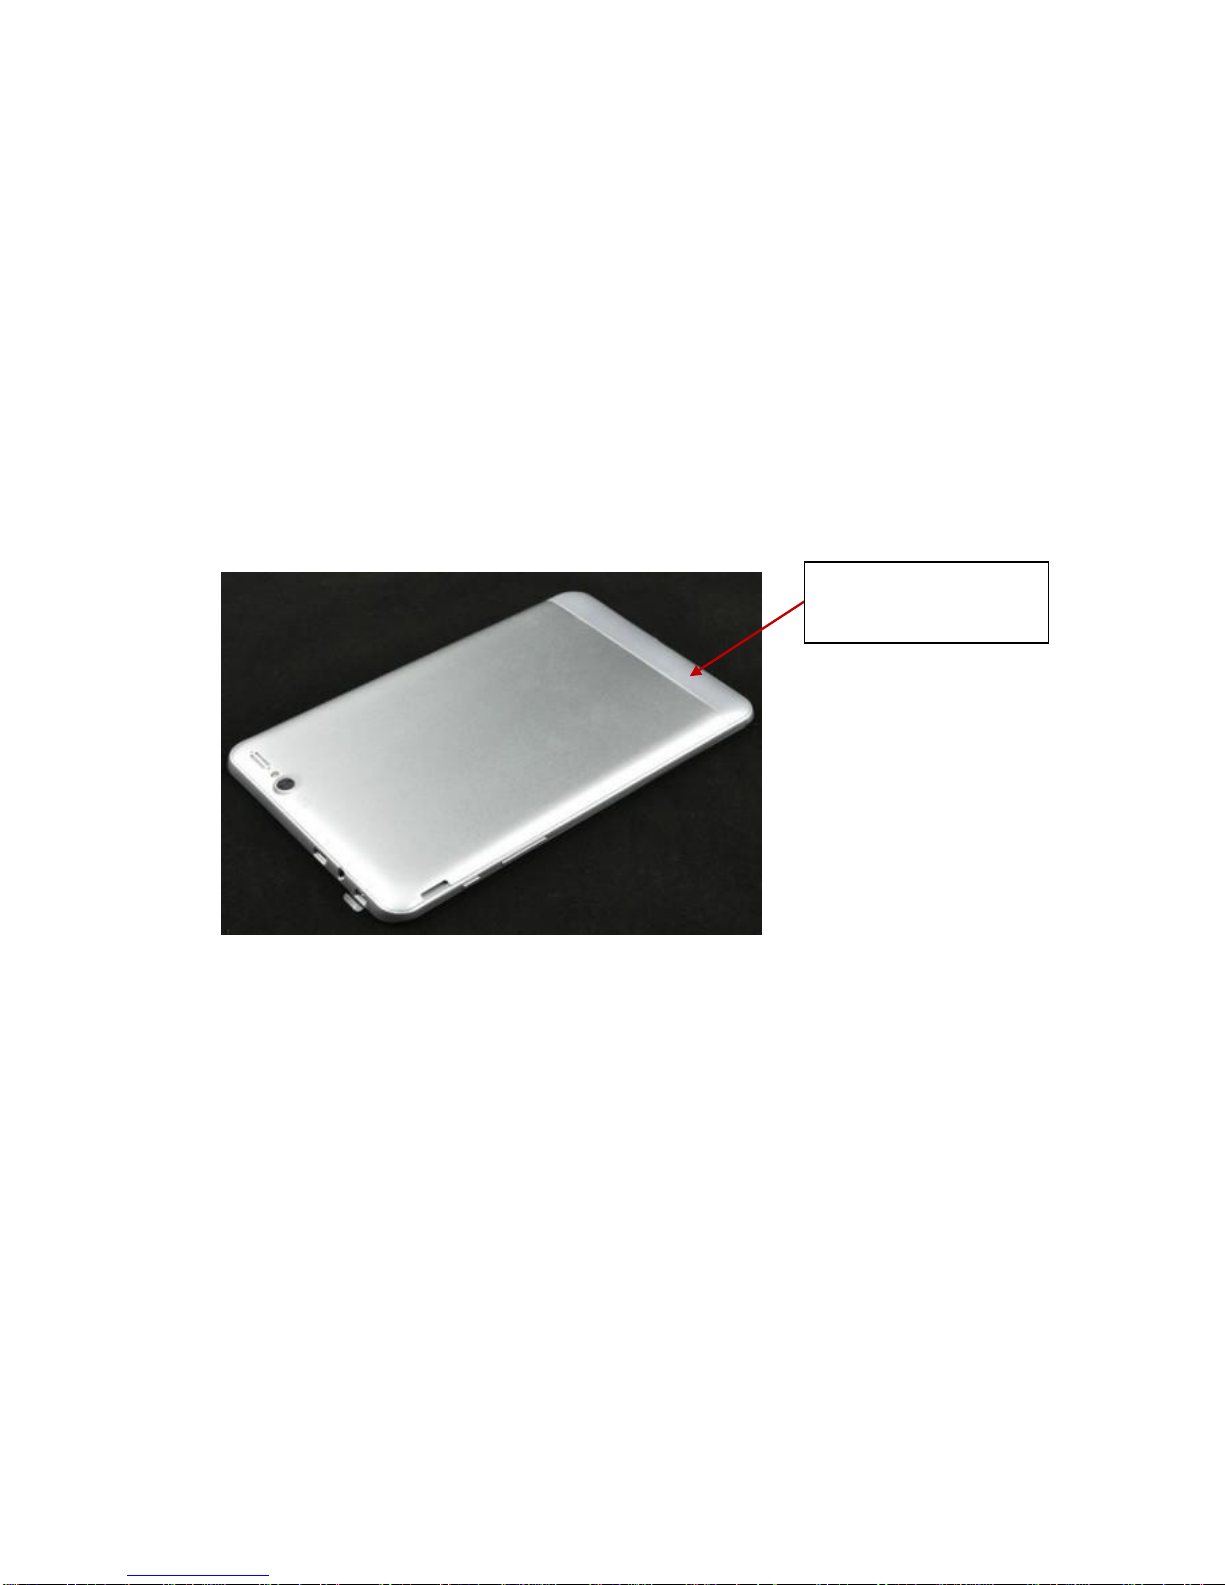
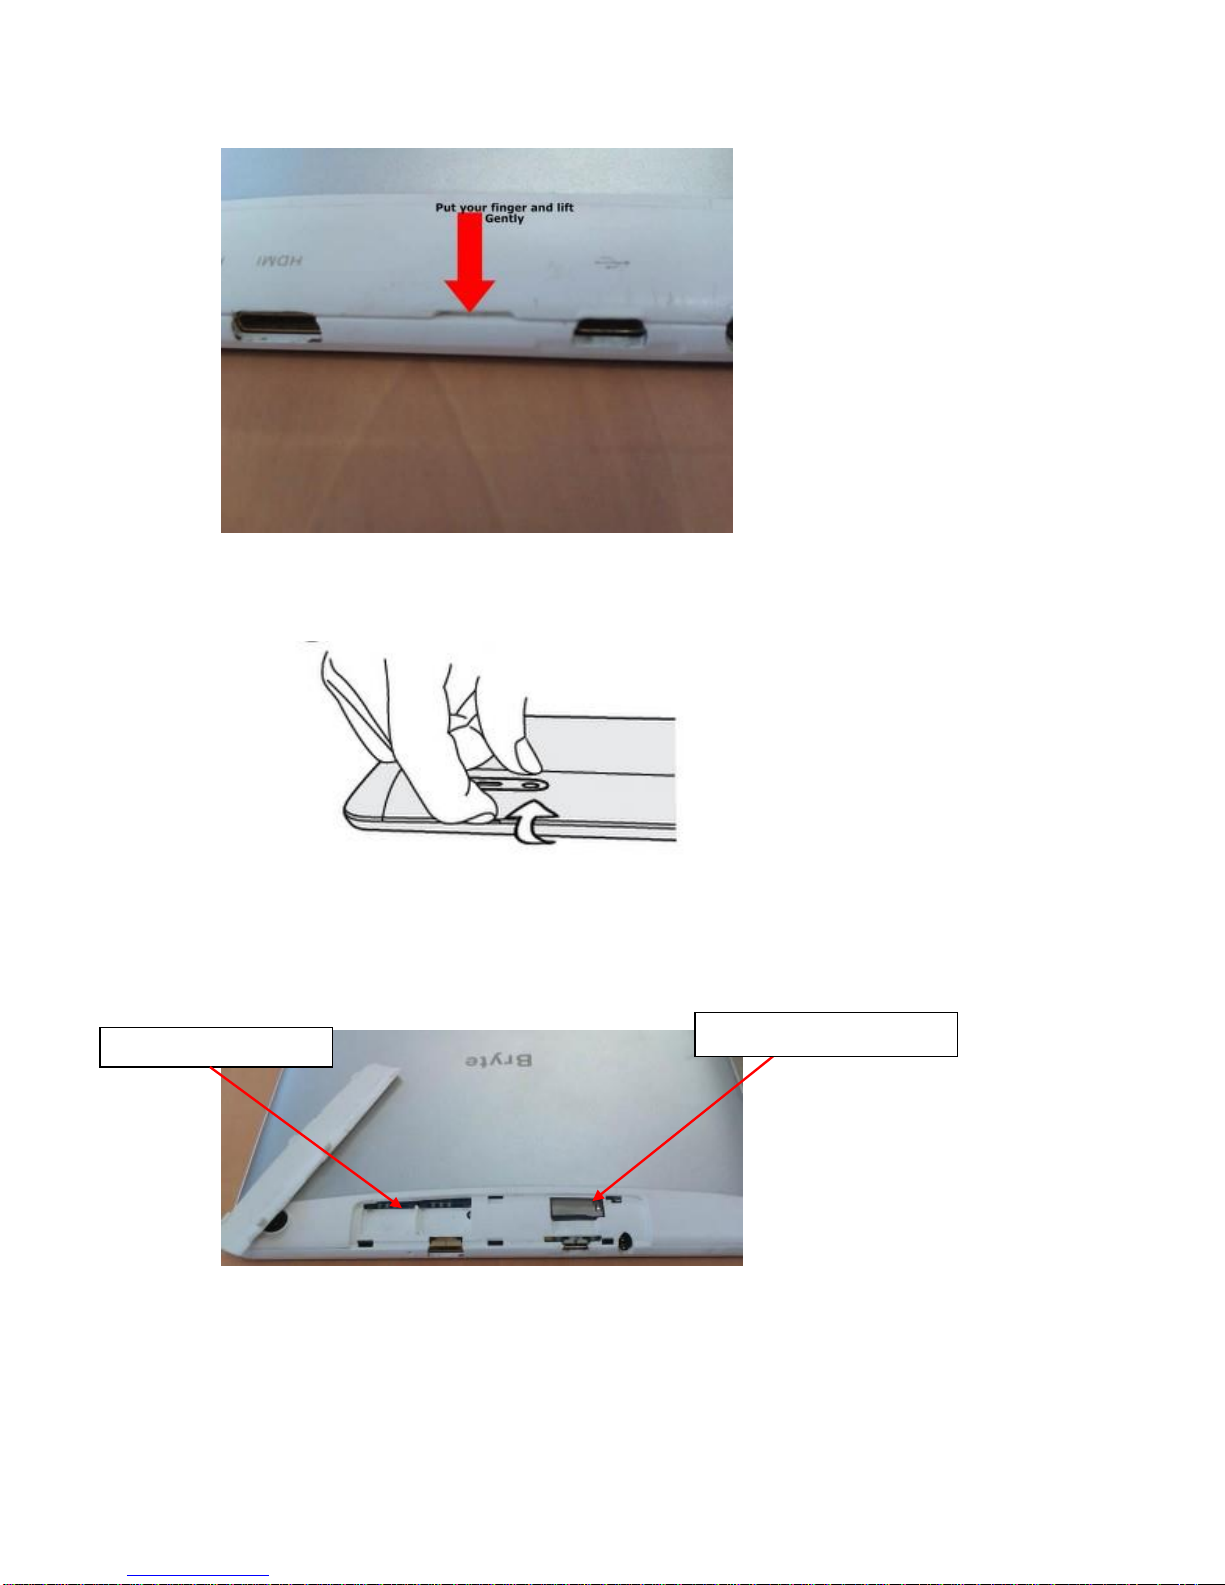
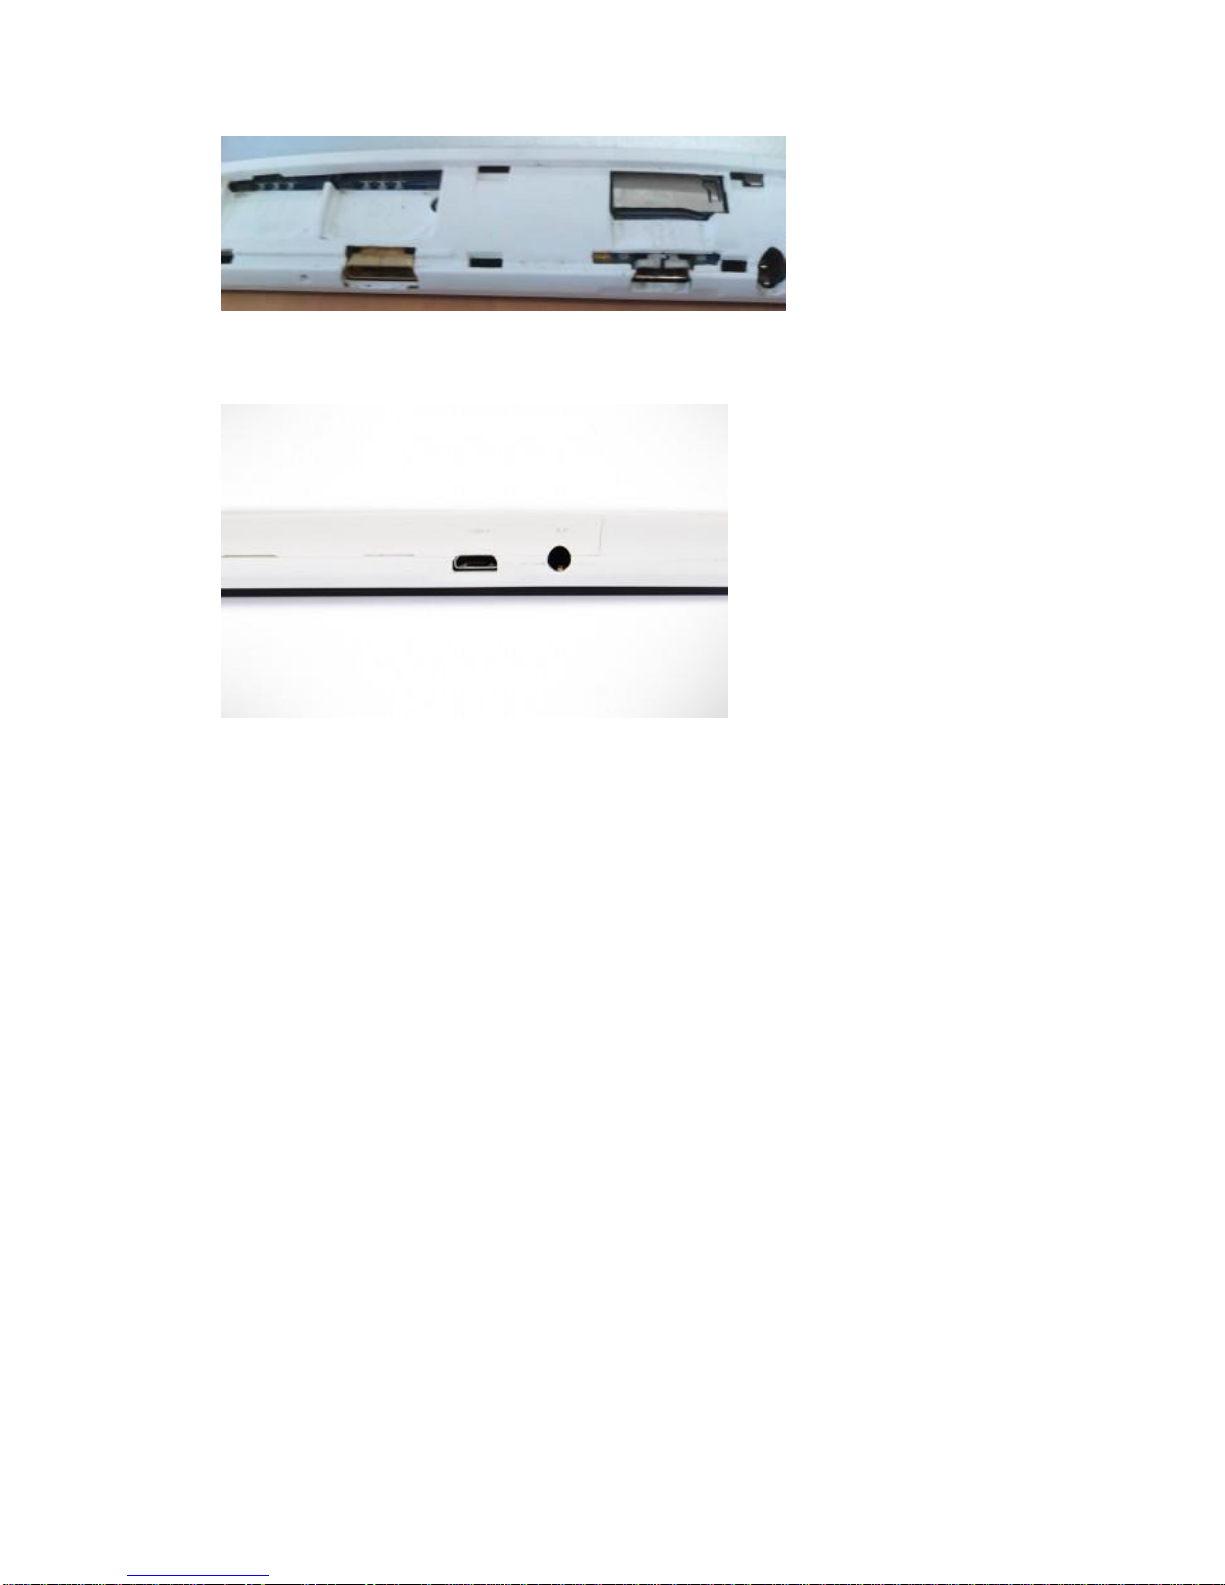
2.3 Inserting SIM Card and Memory Card (Micro SD)..........................................................6
3 Quick Start Guide........................................................................................................................9
3.1 Keys Function...................................................................................................................10
3.2 Startup and Shutdown .......................................................................................................10
3.3 Open and Close the Screen ...............................................................................................10
3.4 Usage of Touch Screen......................................................................................................11
3.5 Main Interface...................................................................................................................12
3.6 Visit Application Procedures.............................................................................................16
3.7 USB Connection ...............................................................................................................16
3.8 Words Input.......................................................................................................................17
3.9 Application Technique.......................................................................................................19
4 Basic Setting .............................................................................................................................17
4.1 SIM Card Management Management...............................................................................17
4.2 Wireless and Internet..........................................................................................................17
4.3 Bluetooth............................................................................................................................18
4.4 Data Usage Situation.........................................................................................................19
4.5 More..................................................................................................................................22
4.6 Contexual Model...............................................................................................................27
4.7 Display...............................................................................................................................29
4.8 Storage ..............................................................................................................................33
4.9 Battery...............................................................................................................................35
4.10Application......................................................................................................................36
4.11 Account and Sync............................................................................................................37
4.12 Location Service .............................................................................................................39
4.13 Security Setting...............................................................................................................41
4.14 Language and Input Method............................................................................................43
4.15 Backup and Reset............................................................................................................ 45
4.16 Date and Time................................................................................................................. 46
4.17 Fixed-time Startup and Shutdown....................................................................................47
4.18Assistance Function.........................................................................................................48
4.19 Engineer Selection...........................................................................................................48
4.20About Tablet.....................................................................................................................49
5 Multi-Media..............................................................................................................................50

3
5.1 Music.................................................................................................................................50
5.2 Video.................................................................................................................................51
5.3 Photo Gallery ....................................................................................................................51
5.4 Camera..............................................................................................................................52
5.5 FM Radio...........................................................................................................................53
6 Communication Function..........................................................................................................58
6.1 Phone.................................................................................................................................58
6.2 Text Message.....................................................................................................................58
6.3 Contact List.......................................................................................................................59
7 Internet......................................................................................................................................60
7.1 Browser.............................................................................................................................60
7.2 Email.................................................................................................................................60
8Other Application Procedures...................................................................................................65
8.1 Clock.................................................................................................................................65
8.2 Calculator..........................................................................................................................65
8.3 File Manager.....................................................................................................................66
8.4 Recorder............................................................................................................................69
9Installation of Procedures..........................................................................................................70
9.1 Installation.........................................................................................................................70
9.2 Uninstall............................................................................................................................70
10 Troubles Shooting...................................................................................................................74
11 Bryte Warranty ……………………………………………………………………………... 75

4
1 Introduction
1.1 Acknowledgement
Thanks you for purchasing one of our products. Bryte IPX Tablet is high definition tablet PC with
MT8312 MTK8382 CPU, which apply the Cortex-A9 of frequency of 1.7GHZ/2.2 GHz Quad
Core or Octa Core Processor (depending on Model) and based on Android 4.2.X Operating
System.
The Bryte Tablet is designed with superior technology and functions including WCDMA, WIFI,
BT, GPS, FM, Super IPS Technology, High resolution Camera, Retina Display, Dual
2G/3G standard SIMs, voice call powered by 3.7V/6500 mAh high capacity battery.
Your Bryte Tablet comes with in-built Bluetooth Radio and WiFi which facilitates wireless
communication between devices or connect to the internet anytime and anywhere. It is also built
with high-accuracy GPS/GPRS system for navigation and Location based Applications and
functions.
This manual systemically introduces the functions, user guide and announcements, please read this
manual carefully before using this device.
1.2 Caution
Preventive maintenance
To avoid failure of device, your Tablet, battery, charger and other accessories should
not be kept in extreme temperatures, adverse environmental or working conditions.
Please always keep the Bryte IPX Tablet dry. This is to avoid the device corrosion of
electronic circuits that may lead to short circuit and electric shock.
Keep the battery, charger and other accessories away from water and moisture.
Do not operate the device or charger with wet hand.
Do not knock, throw, bend, drop or shake the device. Rough handling can break it.
Do not open, disassemble or tamper with the device or accessories arbitrarily, as any
physical distortion or defect on the device or accessories nullifies product warranty.
1.3 Safety Instruction
Before using your Bryte IPX tablet, please read this chapter. For further instructions, please also
refer regular safety tips, materials and announcement at www.brytestore.com .
Always keep your tablet dry. Precipitation, humidity and all types of liquids or

5
moisture can contain minerals that corrode electronic circuit.
Do not use your Bryte IPX Tablet while driving.
Do not use the device in restricted areas such as Hospitals, Petrol Stations or any
environment where electromagnetic emission are not allowed.
Switch your Bryte IPX to Airplane Mode when boarding an aircraft to avoid
interference or interruption of signals.
To avoid electronic equipment failure, please shut down your Bryte IPX Tablet
when operating in a high frequency environment or near high-accuracy electronic
equipment.
Please do not open, disassemble or try to repair the device or accessories. Only
authorized and qualified agent is allowed to service, repair or disassemble the
device. Unauthorized tampering or physical damage of device may invalidate
the product’s warranty.
Please keep your tablet away from magnets, magnetic fields and magnetic
equipment, as radiation from the device may erase the data stored in the magnetic
equipment.
Do not use the device in high temperature or low temperature environment,
inflammable gas (petrol stations).
Protect the Bryte Tablet and accessories from the reach of Children. Children
should only be allowed to handle the device under the supervision of parents.
Please comply with related rules and regulations, and respect others’privacy, legal
rights and relevant laws of the country while using the Bryte Tablet.
Please strictly adhere to related instructions in the manual when using USB cable
to ensure the safety of the Bryte Tablet or PC.
Use only chargers and other accessories supplied with your device or approved by
Technology Professionals Limited. Do not connect incompatible products.
Ensure you back up your important data in your computer, Micro SD or external
memory
1.4 Abbreviation/Terminology
Abbreviation/Terminology
Full Name
Description
Bryte IPx8
Bryte 8-inches Tablet
PC Device
IPX Air screen model of Android
4.2x
Bryte IPX 9.7
Bryte 9.7-inches Tablet
PC Device
IPX Air screen model of Android
4.2x
WIFI
Wireless Fidelity
Base on IEEE 802.11b standard
wireless LAN
T F
Trans Flash
Alternative name Micro SD, super
miniature memory card

6
2 Getting Started
2.1 Bryte Tablet Operation and Preparation
Battery Charging
Before using your Bryte Tablet for the first time, charge it using the approved
charger for at least 5 hours and ensure it is fully charge it.
NOTE: If the battery is completely discharged, it may take several minutes before charging
indicator is displayed.
2.2 Bryte Tablet Status and Reminder
Notifications/Reminder icons
When reminder message pops up in your reminder window, Swipe the column down to open
the reminder list. Choose the menu you need, and confirm the information. You can close the
reminder window through clicking the column to slide up.
Please refer to below status icons:
Icon
Meaning
Icon
Meaning
New email
Airplane Mode on
USB connected
USB debugging connected
Return button
Downloading
Display recently-used
application
Home button
Battery Level
WIFI connected, internet is
available

7
Reminder board
Reminder Notification icons will display when you have an incoming mails, WIFI is
switched on , you can slide down the notification to view detailed information.
2.3 Inserting SIM Card and Memory Card (Micro SD)
Your Bryte IPX Tablet is designed to use two Standard SIM cards (Dual SIM), the size of the
SIMs depends on the model. But the procedure used in inserting the SIM card are similar.
Bryte Tablet
2.3.1 Locate the SIM Slot cover compartment Area of your Tablet (In most Models, this is the
whiteArea at the back of the tablet as shown in the figure above).
2.3.2 Locate the opening tab at the edge of the SIM slot compartment area as shown in the
picture below.
SIM Card Slot cover
compartment Area

8
2.3.3 Insert your finger into the Opening Tab and gently pull backward as shown below to open
the compartment cover.
(Please ensure you don’t exert pressure on the Screen, to avoid breakage)
2.3.4 Insert you SIM Card (Either Single or Double depending on Model), you can also install
the microSD external memory storage card in the microSD card slot on your tablet.
2.3.5 Insert you SIM Card (Either Single or Double depending on Model), you can also install
the microSD external memory storage card in the microSD card slot on your tablet.
Micro SD Memory Card Slot
SIM Card Memory Slot

9
2.3.6 Replace Back the Cover Compartment and ensure that it grip firmly.
You can now use your Bryte Tablet to make and receive calls, access the Internet via your 3G
SIM card orWi-Fi network and do much more.

10
3 Quick Start Guide
3.1 Keys Function
Keys Function Description:
Power button
Short press to sleep/wake up,
Long press to Shut-down or Startup Device.
Volume +(up)
Increase Volume
Volume -(down)
Decrease Volume
HOME button (home)
Click it at any interface to return to the main interface.
Back button(back)
Click at any interface to return to previous menu
Menu button
To Display the main menu interface.
Setting button
display recently browsed history
3.2 Startup and Shutdown
Startup
Press and hold the POWER Button for about three seconds, you can select your preferred
interface iOS or Android (if available depending on the model). Enter the unlock key or pattern if
your device screen is locked.
Shutdown
1.Press and hold the POWER Button for about three second, a shutdown dialog window
will pop up.
2.Shutdown dialog window contains Four Options: Mute mode, Airplane Mode, Reboot
and Shutdown.
3.Click Shutdown to shut down your Tablet. (Click any of the other options to switch to
the mode).

11
3.3 Switch Screen Sleep Mode
Screen will go into sleep mode when:
1. No operation is performed (device is idle) for some time, this help conserve power
thereby increasing battery life.
2. You press POWER Button (Short Press).
Activate Display when in Sleep Mode.
If the screen is in Sleep Mode, press the POWER Button once to activate screen display. The
screen will be locked , swipe to the left or draw unlock pattern to unlock, it will display as shown
in picture 3.1 below.
Picture 3.1
3.4 Using the Touch Screen
Bryte Tablet operating methods

12
You operate or activate any item in either in the main screen, menu or application in your Bryte
Tablet using any of the following methods:.
Click
When you want to use the screen keyboard typing or choose application in the main interface, you
only need to touch it (click) with your finger.
Press on
If you want to open any item( textbox or the link in the webpage), or shortcut press on the item,
for options or short- cut menu, press and hold the list (item ) to activate the menu.
Swipe or Slide
Slide or Swipe is simply to make a quick vertical or horizontal movement across the screen with
your finger. You slide to change views, display options etc.
Pull or Drag
To drag an image or icon, press and hold it and move it to the position you want..
Rotate
For most pictures, you only need to rotate your Bryte Tablet through 90 degrees to change the
screen orientation from horizontal to vertical or vice versa. For instance, when typing or watching
movies.
3.5 Home Page
Main interface is as shown in picture 3.2, below, Press and hold (long press) a blank area on
screen to activate popup windows to set wallpaper, folder, widgets, and shortcut.
You can also do this through the Setting Tool.

13
The extended home page
The home page can be extended beyond the wideness of screen to provide more space,
which you can put new-added shortcuts and widgets. Click the blank space in home page
then slide right or left to extend to the right or left of the screen. In the home page, there are
two extended pictures as the following picture,

14
Picture 3.3
The shortcut icons management in desktop (Home/Main View) application.
Create folder icon in desktop
1. Drag the icons need to be put together on one icon(can also overlay several
icons) as Picture 3.4.
2. Then click the over layed icons, the applications can be folded
Click the unnamed folder in the black box, it will pop up the hidden keyboard, the folder name
can be renamed (this is similar with Apple iOS system), the icons position can be changed through
long press.

15
Picture 3.4
To remove an icons from desktop (Home view)
1. Press and hold (Long press) the icons you want to remove, this will activate the
Remove icons on the top right corner of the screen.
2. Drag the icon to the remove icon above, till the icon become red, then remove your
finger to delete the icon.
Change the wallpaper of desktop
1.In home page, long press any blank space in the main screen, it will pop up a
window to change the wallpaper.
2.Click the gallery or wallpaper gallery to select the wallpaper.

16
3.6 Choosing/ Running Application
Click Apps Icon on any view to display all installed Apps as shown in Picture
3.6, choose the application you want to run or activate. Note, you may need to
swipe to the left to view other Apps if current View is full.
Picture 3.6
3.7 USB Connection
Bryte Tablet storage configuration
You can transfer documents or files from your Bryte Tablet to your Laptop or Desktop Computer
and vice versa. This is necessary especially if you want to back up or restore important files.
Before transferring file/documents, you have connect your Bryte Tablet to your Computer using
the USB cable:
1. Connect the Bryte Tablet and computer by USB cable, the Notification column will ask
you the mode of connection you want.
2. Open the Notification and Accept USB Connection.
3. It will as shown in the Picture 3.4, then click “Turn on USB storage ”.
4. Allow the Driver to install USB device, this may take some time and you may be
required to be connected to the internet especially if USB Driver have not been
previously installed in your computer.
5. You can now copy the files and documents you want from your Tablet to Computer or
vice versa.

17
Picture 3.7
To copy files into Tablet’s memory card
1. Connect the Bryte Tablet to computer with USB cable as stated above.
2. Accept USB Connection and allow computer connect.
3. After successful connection, Open “My Computer” in your computer, select “Removable
Disc” to access the external Memory (MicroSD Card) of your Bryte Tablet.
4. Copy the files you need into “Removable Disc” or its folders
5. After copying, click “shutdown the USB storage” configuration on your tablet to
uninstall. Then disconnect the USB cable.
Notice: When your Bryte Tablet is connected with USB cable and USB Storage is turned ON,
you will not be able to view the contents of the memory card through your Tablet. It’s only
after you detach the USB cable, that you can be able to access memory card through your
Bryte Tablet.
3.8 Typing and Editing Documents
Use the screen keyboard
When you select the text area (either words or numbers) the on-screen keyboard will be
activated. The keyboard contains the following typing options:
1. Android keyboard
2. Google Key-in

18
Choose the typing method you want
1. Click Setting procedure application.
2. Select Language and Keyboard.
3. In the text setting area will reveal all the installed words-typing methods in your
Bryte Tablet.
4. Tick the typing method you want.
Use and Switch of input method
Picture 3.8
NO
Meaning as in Picture 3.8 above
1
Switch between Capital and Small letter
2
Switch between Word and Number Mode of Text input
3
click to insert the space
①
②
③
3
⑤
④

19
4
Click to execute input
5
delete the character in the left of cursor, click and hold to delete all the
characters in the left of the cursor.
3.9 Operation Technique
Enter widgets interface
In the application interface, click widgets on the above of screen, or slide the screen, it
will switch into widgets interface. Long press any widget to create its shortcut, then
you can enter into the application through the shortcut icon.
Create application shortcut icons in the desktop
In the application interface or widgets interface, long press any icon to switch into
desktop automatically, drag and hold the icon, you can move to any position in the
desktop.
Remind: If the target position has no space, the widget won’t be add in the main
screen.

20
4 Basic Setting
4.1 SIM Management
Your Bryte Tablet is a Dual SIM device (2 SIM Cards) and you can set a default SIM for Voice
call, Video call, Data Connection, Messaging etc.
4.1-1 Voice call
Click settings in main menu; choose SIM Management, as Picture 4.1
Picture 4.1
Click voice call, choose defaulted SIM card, as Picture 4.2
Table of contents
Other Bryte Tablet manuals