Bull Outdoor W85747 User manual

I
I
MODEL Number: W85747
a
Ontario, California 91762
Instructions Manual
30" Electric Warming Drawer, Rated 120V, 60 Hz, 4 A
Electrical:
120 Volt, 60 Hz, AC Only 15- or 20- amp.
Use copper wire only. A time-delay or circuit breaker
And separate circuit is recommended.
TABLE OF CONTENTS PAGE
SAFETY INSTRUCTIONS ... ............ ..... .... ........ ........ ................ ............ ......... ........... ...... ..... ...... ...... 2
INSTALLATION INSTRUCTIONS ......... ... . ............ ..... ... ... ......... ............. .................... .... ....... ... .......... 3
OPERATING INSTRUCTIONS.......................................................................................................... 4
CLEANING & MAINTENANCE.......................................................................................................... 5
TROUBLE SHOOTING GUIDE ...... ..... ... ........... ........ .... ... ................. ........... ............. ............ ......... .... 5
PARTS LIST .. . . .. . . . . . . . . .. . . . . .. . . . . . . .
.
. . .
.
. .
. . .
.
......... ..... . . . .. . . .. .
.
. . . .
.
. . .. . . .
.
. . ... . ... ... .. . .. . . . . . . . .
. . .. .
... . . . .
.
... .. . . .. .
. .. 6
WARRANTY.................................................................................................................................... 7
READ THE FOLLOWING INSTRUCTIONS CAREFULLY AND BE SURE YOUR WARMING DRAWER IS PROPERLY INSTALLED,
ASSEMBLED AND CARED FOR. FAILURE TO FOLLOW THESE INSTRUCTIONS MAY RESULT IN SERIOUS BODILY INJURY
AND/OR PROPERTY DAMAGE. IF YOU HAVE QUESTIONS CONCERNING ASSEMBLY OR OPERATION, CONSULT YOUR
DEALER OR APPLIANCE SERVICE REPRESENTATIVE.
NOTE TO INSTALLER:
LEAVE THESE INSTRUCTIONS WITH THE CONSUMER AFTER INSTALLATION.
NOTE TO THE CONSUMER
RETAIN THESE INSTRUCTIONS FOR FUTURE REFERENCE.
Revision 05/07
1

r
SAFETY INSTRUCTIONS
Read carefully before operating your warming drawer
Electrical
requirements
AWARNING
Electrical Shock Hazard
Plug into a grounded 3-prong outlet.
Do not remove ground prong.
Do not use an adapter.
Do not use an extension cord.
Failure to follow these instructions can
result in death, fire, or electrical shock.
Important: Observe all governing
codes and ordinances.
It is the customer's responsibility:
To contact a qualified electrical
installer.
To assure that the electrical
installation is adequate and in
conformance with National Electrical
Code. ANSI/NFPA 70 -latest edition•
or CAN/CSA..C22.2 No. O..M91
CAN/CSA..C22.2 No. 0.4--04
CAN/CSA-C22.2 No. No. 64-M91
UL 1026, 5th Edition
and all local codes and ordinances.
You must have:
17] 120-volt. 60Hz. AC-only, 15- or 20-
amp., rused electrical supply.
[,l] outlet located in the cabinet as close
as possible to the warming oven.
We recommend:
Pl a time-delay fuse or circuit breaker
[,l] a separate circuit serving this
appliance only.
If codes permit and a separate ground
wire is used, it is recommended that a
qualified electrician determine that the
ground path is adequate.
C<>ples of the stondards listed may be obtained
from:
• National Fire Protection Association
One Batterymardl Park
Quincy, M3S$3ehUSetts 02261l
•• Canadian Electrical Association
176 Rexdate Boulevard
ground prong
Figure 1
3-prong
ground-type
outlel
For your personal safety, this appliance
must be grounded. This appliance is
equipped with a power supply cord
having 3-prong ground plug. To minimize
possible shock hazard. the cord must be
plugged into a mating 3-prong ground-
type outlet. grounded in accordance with
loca I codes and ordinances. See
Figure 1. If a mating outlet is not
available, it is the personal responsibility
and obligation of the customer lo have a
properly grounded 3-prong outlet installed
by a qualified electrician.
Warning -Improper connection of the
equipment-grounding conductor can
result in a risk of electric shock. Check
with a qualified electrician or serviceman
if you are in doubt as to whether the
appliance is properly grounded Do not
modify the plug provided with the
appliance -if it will not fit the outlet, have
ayroper outlet installed by a qualified
IMPORTANT SAFETY INSTRUCTIONS
WARNING: To reduce the risk of fire, electrical
shock, injury to persons, or damage when using the
warming drawer. follow basic precautions, including the
following:
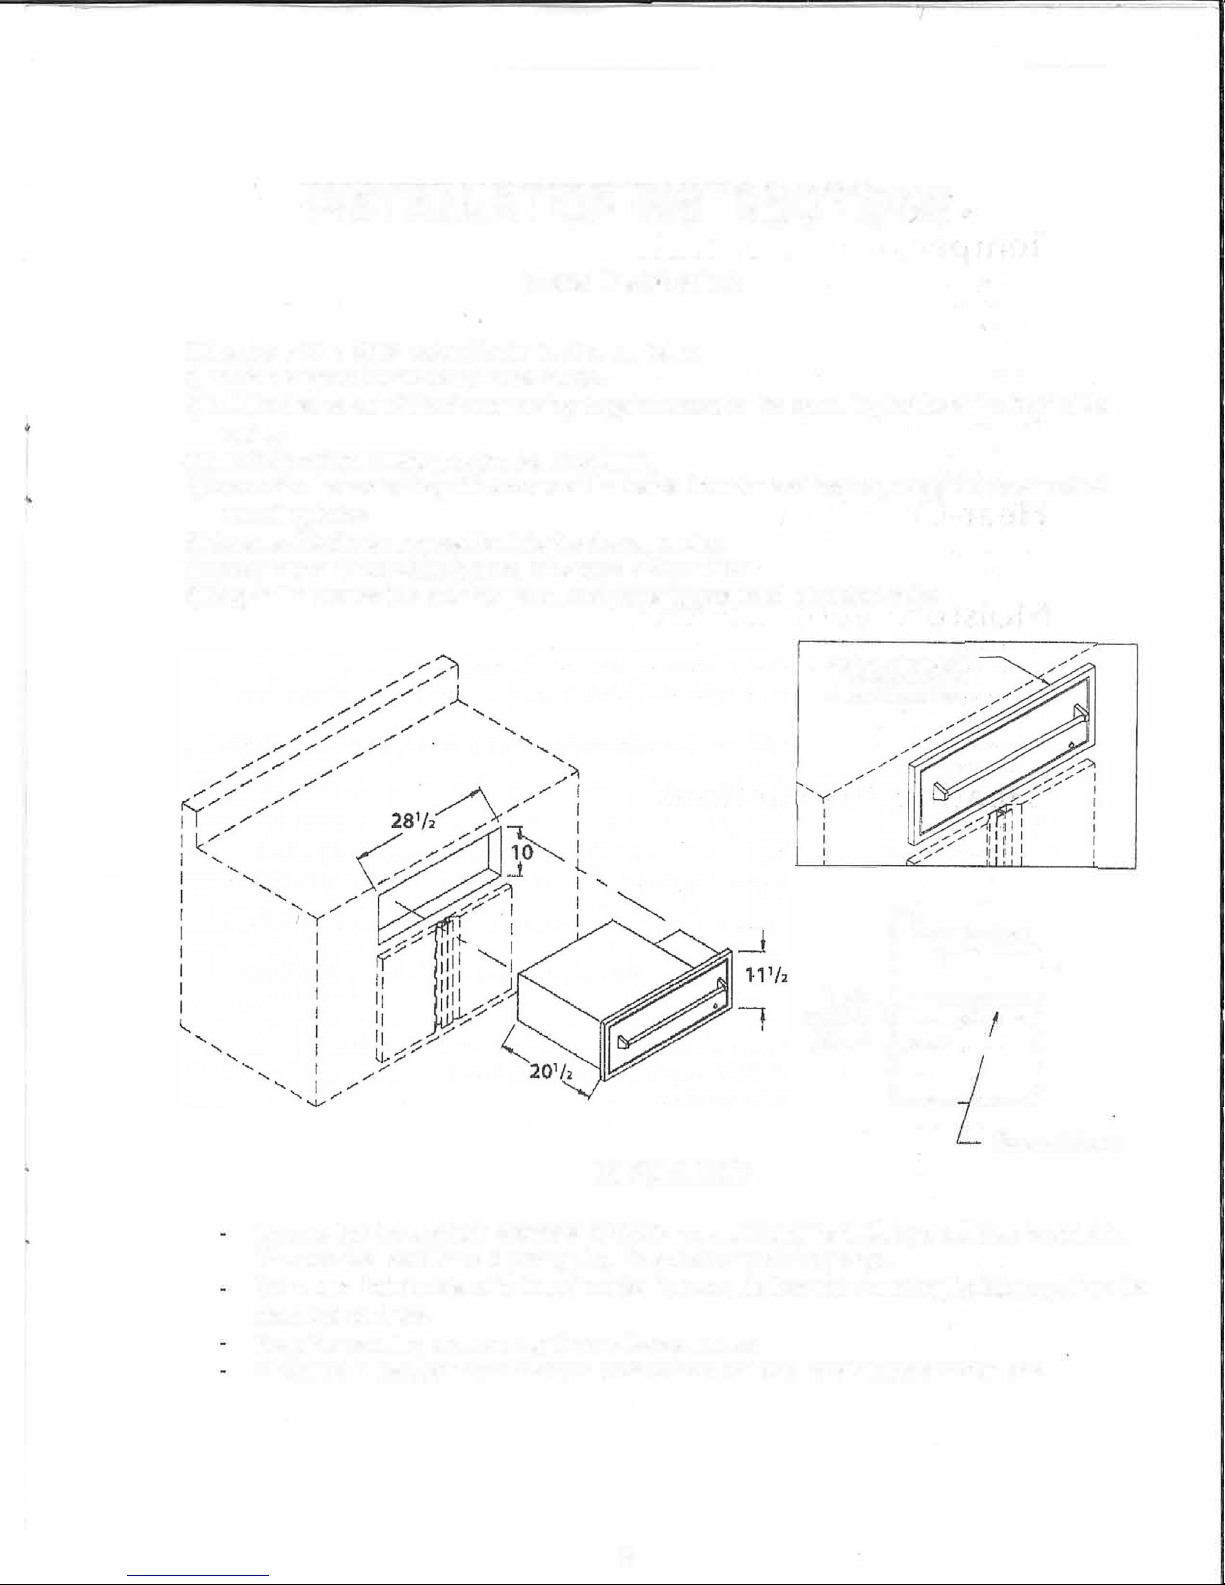
■Proper Installation -Be sure the warming drawer is
properly installed and grounded by a qualified
technician.
■Do Not Leave Children Alone -Children should not be left
alone or unattended in area where warming drawer Is In
use. They should never be allowed to sit or stand on any
part of the warming drawer.
■Wear Proper Apparel -Loose-filling or hanging garments
s11ould never be worn while using the warming drawer.
■User Servicing -Do not repair or replace any part of the
warming drawer unless specifically recommended in the
manual. All other servicing should be referred to a qualified
technician.
■Storage in Warming Drawer -Flammable materials should
not be stored In a warming drawer.
■Do Not Use Water on Grease Fires -Smother fire or flame
or use drv chemical or foam-tvoe extinauisher.
■Use Care When Opening Door -Let hat air or steam
C?P b for r moving or r pl9cing food.
■Use Only Dty Potholders -Moist or damp potholders on
hot surfaces may result in burns from steam. Do not let
potholder touch hot heating elements. Do not use a towel
or other bulky cloth.
■Do Not Heat Unopened Food Conla.ir1ers ..:.·suild:uii°of
pressure may cause container lo burst and result in injury.
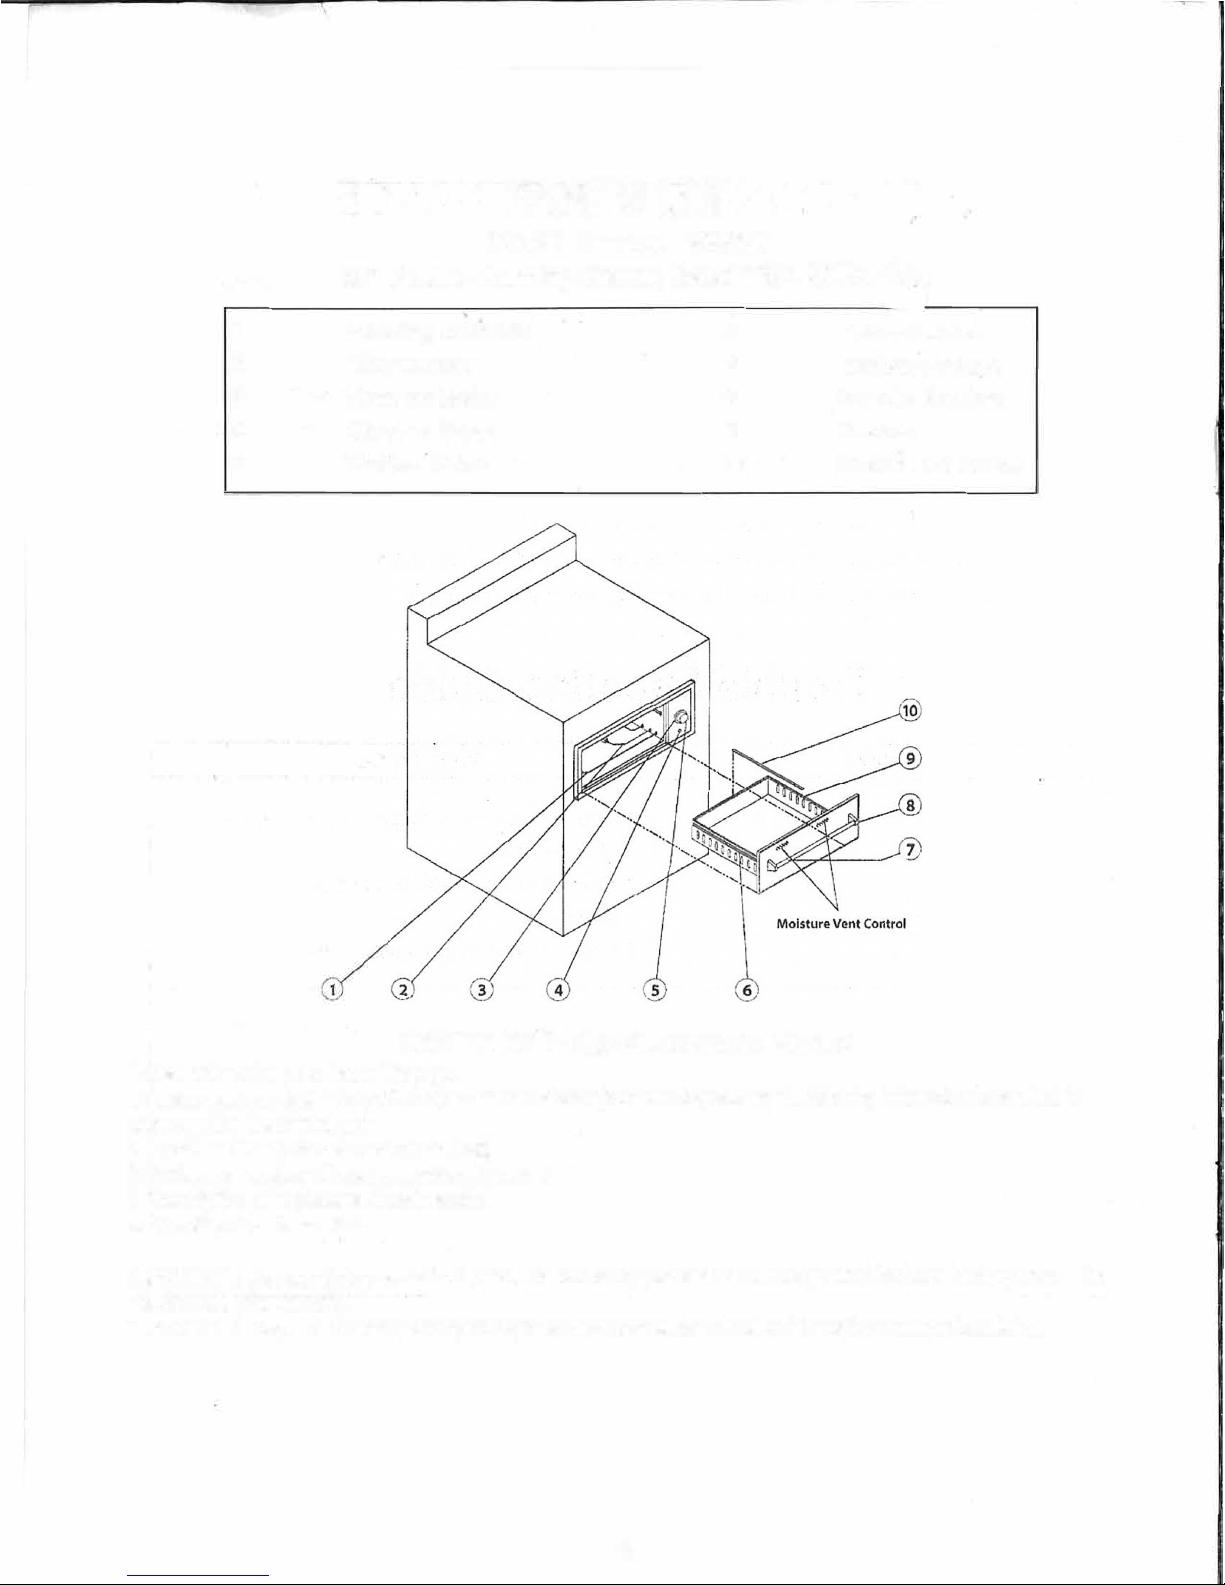
■Placement of Warming Drawer Racks -Always place
warming drawer racks in desired location white warming
drawer is cool. If rack must be moved while warming
drawer is hot, do not let potholder contact hot heating
element in warming drawer.
■DO NOT TOUCH HEATING ELEMENTS OR INTERIOR
SURFACES OF WARMING DRAWER -Heating elements
may be hot even though they are dark in color. Interior
surtaces of a warming drawer become hot enough to
cause burns. During and alter use, do not touch, or let
clothing or other flammable materials contact heating
elements or interior surtaces of warming drawer until they
have had sufficient time to cool. Other surtaces of the
warming drawer may become hot enough to cause burns -
among these surfaces are warming drawer vent openings
and surtaces near these openings and warming drawer
doors.
SAVE THESE INSTRUCTIONS
2

INSTALLATION INSTRUCTIONS
Island Installation
1) Provide a 1
O" x 28 ½" cutout to the front of the island
2) Provide support beams using metal studs.
3) Pull the drawer out of the drawer casing to gain access on the mounting holder at the front of the
casing.
4) Insert the drawer casing into the island opening.
5) Secure the drawer casing with screws at the inside front top and bottom, using the pre-punched
mounting holes.
6) Re-assemble the drawer section into the drawer casing.
7) Apply weather proof sealant along the edges of the warmer.
8) Plug-in the warmer to a weather proof, and properly grounded, electrical outlet.
IMPORTANT
Apply weather proof
sealant along the
edges of the warmer.
fr 'il
:1 lh-□
--=
-= -=-
-=-
:::;,
II
II
120 V
It-.:-___ _ _
Electric '\i;----
T
11
Outlet 1 11
II l1
II· 11
I
t!:===-===B
Support Beams
Be sure that the warming drawer is properly grounded and installed by a qualified technician.
The electrical cord has a 3 prong plug. Do not cut any of the prongs
Make sure that the island is free of cracks that would allow water or other liquids to get into the
electrical controls.
Keep the warming drawer away from water sprinklers.
When not in use, cover the island to protect from rain and harsh weather conditions.
3

OPERA TING INSTRUCTIONS
Temperature Controls
The temperature control dial Is used to select the temperature of the warming drawer. It is located on
the right hand side of the control panel and has dial settings from 1 to 1 O. The # 1 setting is the lowest
temperature, which is around 60°F, while the setting "1 O" Is the highest temperature, which is around
220°F.
The ma)orlty of foods are held between temperature settings of 5-6.
The.warming drawer should only be opened when adding or removing food. Continuous opening of
the drawer allows warm air to escape and make the food colder.
Do not use aluminum foil to line the drawer. It Is an excellent heat insulator and will trap heat beneath
It. This may affect the performance of the warming drawer and the Interior finish.
Heat On Light
The heat-on tight is located above the temperature control knob. The red light turns on when the
control knob is set and cycles "on" and •off" with the heating element as temperature Is maintained.
Moisture Vent Control
The moisture vent control is located at the top inside of
the warming drawer. It can be adjusted In any
position between "open" and "close"to maintain desired degree of moisture.
a) For
crispy foods,
slide the moisture vent control
Inward to open
the vents and allows the moisture
to escape.
b) For
moist food,
side the moisture vent control
outward to close
the vents and seal the moisture
inside the drawer
Heating Instructions
1. Dry Heat
a) The main function of the warming drawer is to hold hot cooked foods at serving temperature.
b) Place previously prepared foods directly Into the empty steam pans (no water) and set the moisture
vent control.
c) For crispy foods, slide the moisture vent control Inward to open the vents and allow the moisture
to escape.
d) Set the temperature control dial. Heat-on light will appear until the desired temperature is
reached.
2. Moist Heat
b) The warming drawer also seals moisture within the drawer to keep the food moist.
c) Put Just enough of water, approximately ½" high, In the steam pans.
d) Place the steam rack Inside the steam pan.
e) Place the food directly on the rack or use a suitable container that will fit in the steam pans. Do not
use plastic containers or utensils.
f) Slide the moisture vent control outward to close the vents and seal the moisture inside
the drawer.
g) Set
tl')e
temperature control dial. Heat-on light will appear until the desired temperature Is
reached.
h) Periodically, check the water level in the steam pans and add water when necessary.
3. Proofing Yeast Dough
a) Yeast dough can be proofed In a warming drawer.
b) Place the dough in a bowl and turn the temperature control at the lowest setting, to facilitate the
fermentation process
.
. c) Place a towel over the dough to minimize surface drying.
d) Let the dough remain In the warming drawer until it has doubled in size and a slight depression
remains when the surface Is touched gently with a finger.
4

CLEANING & MAINTENANCE
The Warming Drawer is made of welded #304 stainless steel. It is non-rusting and non-magnetic.
1. Allow the warming drawer and its accessories to cool before cleaning.
2. Remove steam pans and all accessories from warming drawer.
3. Clean all items including the drawer with the mildest cleanser. Scrub dirt with sponge.
· 4. When cleaning the front panel, always scrub in the direction of the grain. In order to maintain the
luster and highlights of polished surface, do not use abrasives when cleaning polished surfaces.
Use the mildest cleaner.
5. Do not use steel wool to clean the drawer and accessories.
6. Check out the slide rails and make sure they are clean and free from debris
7. It is highly recommended to clean the warming drawer after every use.
Trouble Shooting Guide
Problem
1. Warming drawer will not heat up.
2. Heat -on light does not come "on'
If service is required:
What To Do
1. Check if the unit is plugged in to an elec-
trical outlet.
2. Check if the temperature control dial is set
properly.
3. Check if the circuit breaker is open.
1. Call your dealer, or authorized service
agency.
2. Provide the following information:
5
a. Model number
b. Serial number
c. Date purchased
d. Name of dealer where the unit was
purchased from
Table of contents