Bullit DVD7200BT User manual

C7200G ENGLISH
USER MANUAL
DVD7200BT

DVD7200BT ENGLISH
Copyright Information
©2008 Rho-Delta Automotive & Consumer Products BV. All rights reserved. This
document may not in whole or in part be reproduced, stored in a retrieval system,
transmitted in any form or by any means, electronic, mechanical, photocopying,
recording, or otherwise, or reduced to any electronic medium or machine-readable form
without prior consent, in writing, from Rho-Delta Automotive & Consumer Products BV.
DVD7200BT and Bullit are registered trademarks of Rho-Delta Automotive & Consumer
Products BV. The logo’s, standards, software, and/or product names mentioned herein
are manufacturer and publisher trademarks and are used only for the purpose of
identification.
Disclaimer
The publishers and author assume no responsibility whatsoever for the uses made of this
material or for decisions based on its use. Further, Rho-Delta Automotive & Consumer
Products BV makes no warranties, either expressed or implied, regarding the contents of
this product, its completeness, accuracy, merchantability, or fitness for any particular
purpose. Neither the publisher nor anyone else who has been involved with the creating,
production, or delivery of the material shall be liable for any reason. Rho-Delta
Automotive & Consumer Products BV may make improvements and/or changes in the
products and/or options described in this document at any time and without notice.
All brand and product names used throughout this document are trademarks or
registered trademarks of their respective companies. The brand and product names are
used in editorial fashion only and for the benefit of such companies. No such use, or the
use of any trade name, is intended to convey endorsement or other affiliation with the
document.
Product specifications are subject to change without prior notice
www.rhodelta.nl
WEEE (Waste Electrical and Electronic Equipment Directive)
If at any time in the future you should need to dispose of this product
please note that: Waste electrical products should not be disposed of with
household waste. Please recycle where facilities exist. Check with your
Local Authority or retailer for recycling advice.
Disposing of the battery / batteries
Please check local regulations for disposal of batteries or call your local city office or your
household waste disposal service or the shop where you purchased the product.
The battery / batteries should never be placed in municipal waste. Use a battery disposal
facility in your neighborhood or community, if available.

DVD7200BT ENGLISH
Dear Customer,
Thank you for selecting our DVD7200BT. In order for you to utilize this device and all its
options, we recommend that you read the corresponding instructions in this manual before
the initial use of the device, even if you’re familiar with handling electronic devices. Please
pay particular attention to the chapter “Important safety instructions” on page 7. Store this
manual in a safe location for future reference. The descriptions and features in this manual
only serve as general information and do not represent a guarantee. In order to offer you a
product of the highest quality, we reserve the right to make possible improvements or
changes without prior notification.
Important safety instructions
Please read and strictly observe the following instructions!
- Never open the case of the car radio; it does not contain any serviceable parts! If
the case is open, there is a risk of fatality due to electric shock.
- Do not give your car radio and especially the accessories to children. Never let your
children use electrical devices without supervision. Children are not always able to
recognize potential hazards. Also keep the packaging films away from children.
There is a danger of suffocation.
- The car radio and the accompanying components may not be exposed to dripping
or sprayed water. Make sure that no containers filled with liquid, such as e.g. cups
or bottles, are placed in the vicinity of the device.
- Make sure that the display is not exposed to any bumps. This could damage the
display.
- Please familiarize yourself with the different functions of your device before you
begin driving. Excessively high volumes can pose a risk for you and other people in
traffic. Therefore always select the volume at such a level that environmental
sounds (horns, sirens, etc.) can still be perceived.
- Don’t use the car radio at an excessive volume. This poses a risk to your hearing.
- Please only perform lengthy changes of the device settings while the vehicle is
parked. Your concentration might be affected by the changes.
- Only install the device in such a manner that safe driving is assured.
- Install the device in such a manner that it doesn't impede the driver and can't injure
any of the vehicle’s occupants in the event of emergency braking.
- Don’t flip the monitor open by hand. This could damage the mechanics.
- The TFT color monitor consists of glass and liquid crystals. Don’t put any excessive
pressure on the monitor, since otherwise it might scratch, break, or sustain other
damages. In addition, the image quality might be impaired.
- Don’t touch the monitor surface with hard objects and only clean it with a soft, dry
cloth and special TFT cleaner.
- Don’t use the device for a longer period while the vehicle's engine isn't running. This
could drain the vehicle battery to the degree that the car can no longer be started. In
addition, this might reduce the lifespan of the battery.
- Don’t park your vehicle in direct sunlight for extended periods, otherwise the
temperature in the car’s interior could rise to the point that the device overheats and
causes malfunctions. If possible, cool the interior of the vehicle in order to ensure that
the device will operate properly.
- Only let the device be installed by qualified vehicle technicians.
- Before the final installation of the device into a DIN insertion compartment in the
dashboard, connect the cables and test the connections.
- Only use the accessories included in the delivery. Usage of unauthorized
components can cause damages.

DVD7200BT ENGLISH
- If you need to drill holes or make other changes for the installation, consult a
specialized workshop in your area.
- This device is designed for a vehicle power supply of 12 V with the ground on the car
body (negative pole). Check the battery voltage before installing it into a camping
vehicle, bus, or truck.
- To avoid short circuits, the battery has to be disconnected before the installation.
- Read the guidelines in this handbook for the connection of the power supply and
other options.
- Secure the installed cables with insulating tape, cable ties, or cable clamps. To
protect the cables from damage, use insulating tape when guiding them past metal
components. Place and secure all cables in such a manner that they are not in the
vicinity of movable parts, such as e.g. the parking brake, gas/brake/coupling pedals,
handle bars and seat tracks.
- Don’t place any cables in the vicinity of heat sources (e.g. near the heater ventilation),
since the insulation of the cables might get damaged and result in short circuits.
- Don’t short circuit any cables. This can result in damages to the vehicle and device.
- Never establish a power supply to other devices by removing the insulation of the
device’s power supply and connecting an additional cable. Otherwise, the maximum
power rating of the cable will be exceeded and there will be a danger of overheating.
- If you have to replace the fuse, only use an identical one with the same rating.
- The connected speakers have to be high-performance speakers with a minimum
output of 40 W and an impedance ranging from 4 to 8 ohm. If you connect speakers
with other output or impedance ratings, the speakers may burn, smoke, or sustain
other kinds of damage.
- When the device is turned on, a control signal adjoins the blue cable of the
connection A5 (ISO plug A). You can connect this to the relay of the extendable
vehicle antenna (max. 100 mA, 12 V=). If your vehicle has a wire antenna inside the
windshield, connect the blue cable A5 (ISO plug A) to the pre-amplifier of the
antenna.
- If an external audio amplifier is connected to the device, the blue cable of connection
A5 (ISO plug A) may not be connected to the power supply of the amplifier. Likewise,
you may not connect it to the power supply of an active car antenna. This poses a
risk of short circuits and malfunctions.
- Insulate unused connection cables with insulating tape. The same applies to unused
speaker cables. Otherwise there is a risk of short circuits.
- Dirt or condensed moisture on the lens of the CD/DVD drive may impede and even
prevent the playback of data carriers.
- In general, the playback of self-burned data carriers is possible, but it depends on the
used software and the settings made with it, so that there may be problems during
playback in individual cases. You can receive further information from the
manufacturer of your software.
- Additional CD data carriers can be played back just like audio CDs. It’s possible that
CD-R/CD-RW data carriers can’t be played back correctly if they were recorded by a
device other than an audio CD recorder.
- In addition, it may be the case that a data carrier (CD-R/CD-RW) recorded with an
audio CD recorder can’t be played back due to the conditional features, irregular
formats, or soiling of the data carriers.
- The information recorded on the data carrier (ID3TAG) is displayed by this device.
- After inserting a CD-RW data carrier, it takes a little longer for the playback to begin
than with regular CD or CD-R data carriers. Also read the guidelines on the sleeves
of the CD-R/CD-RW data carriers before you insert them.

Page 2 of 44 pages
DVD7200BT ENGLISH
TABLE OF CONTENTS
Important safety instructions.................................................................................................. 2
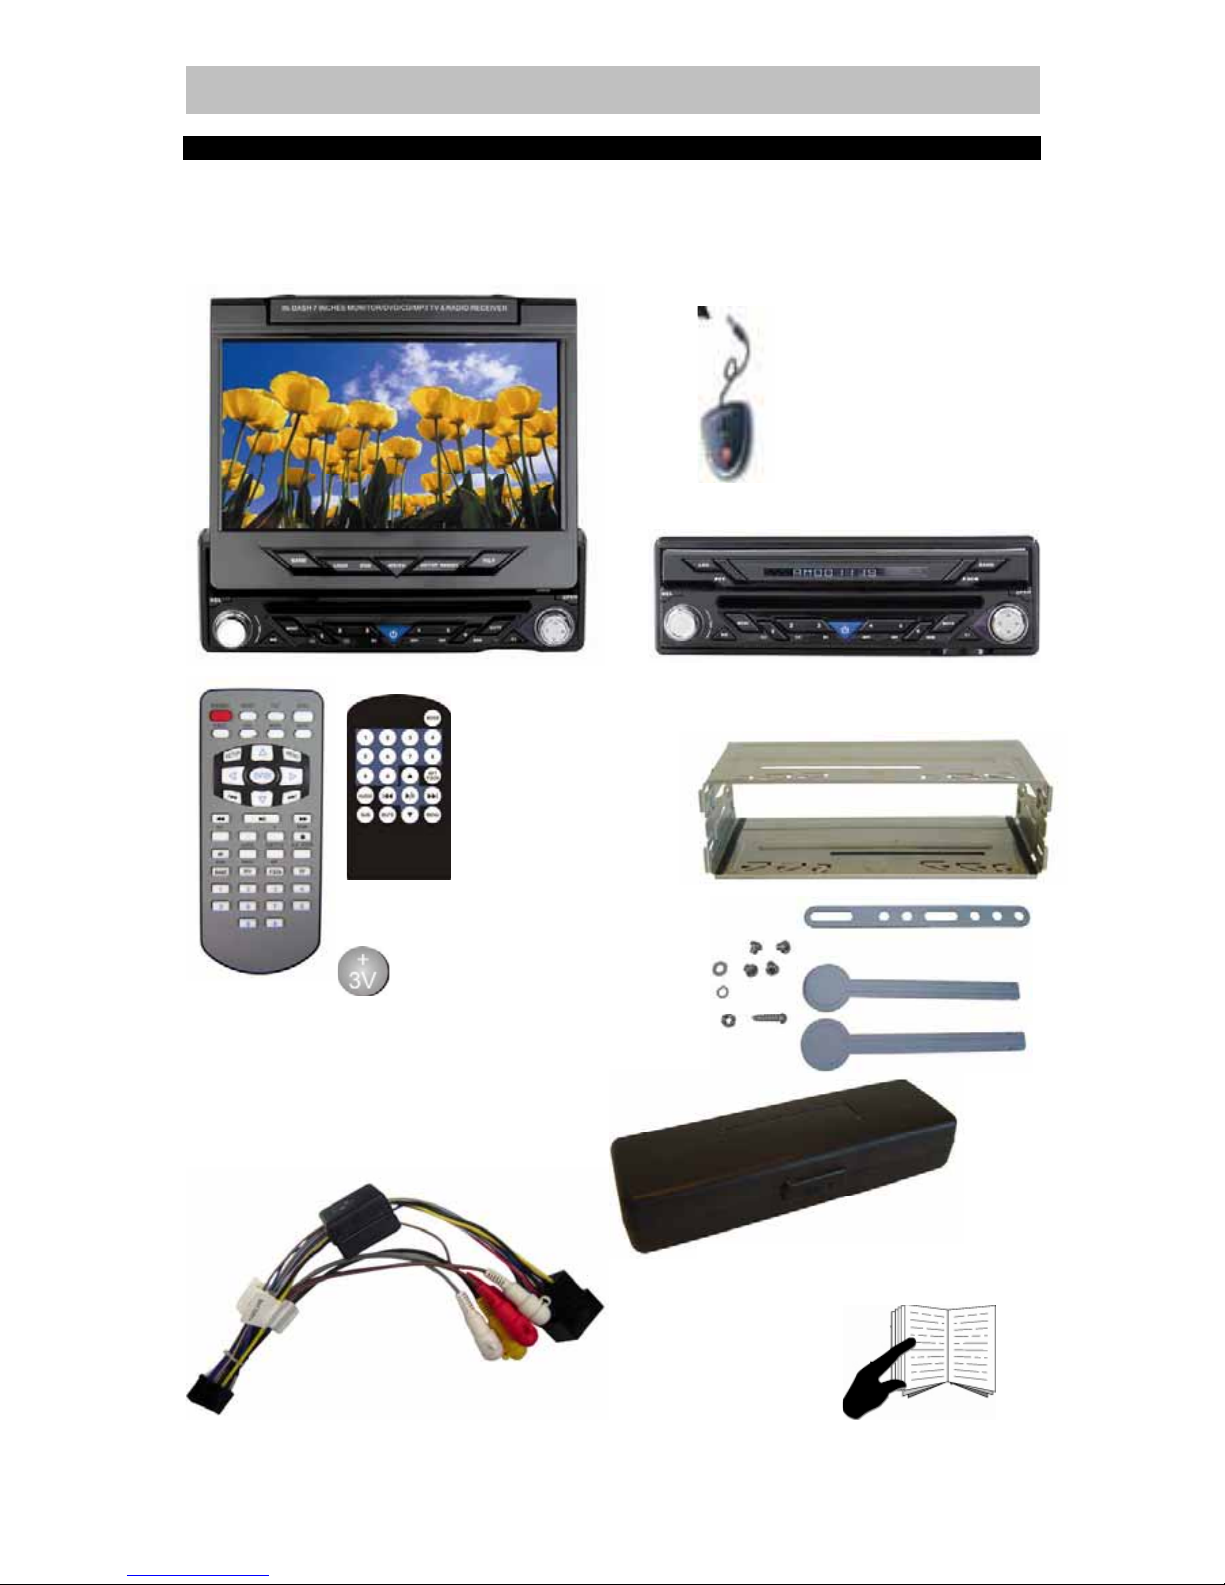
Scope of delivery................................................................................................................... 4
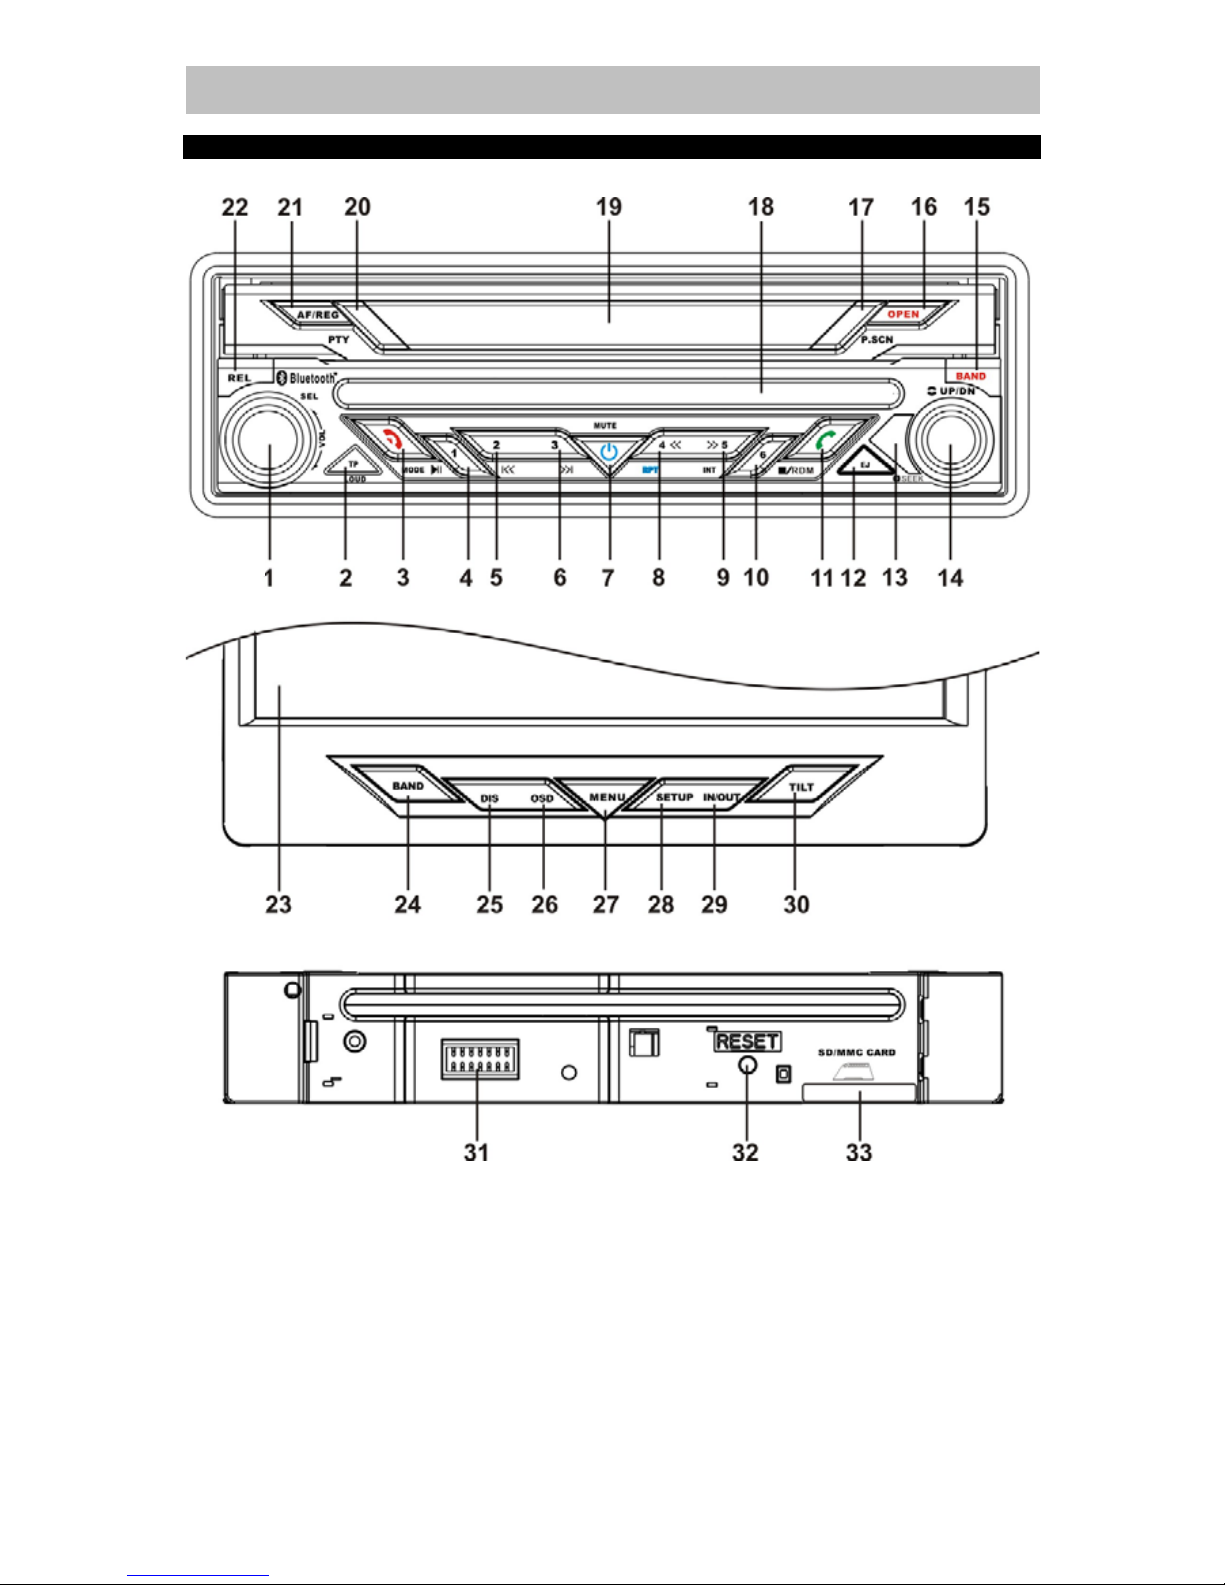
Operating unit........................................................................................................................ 5
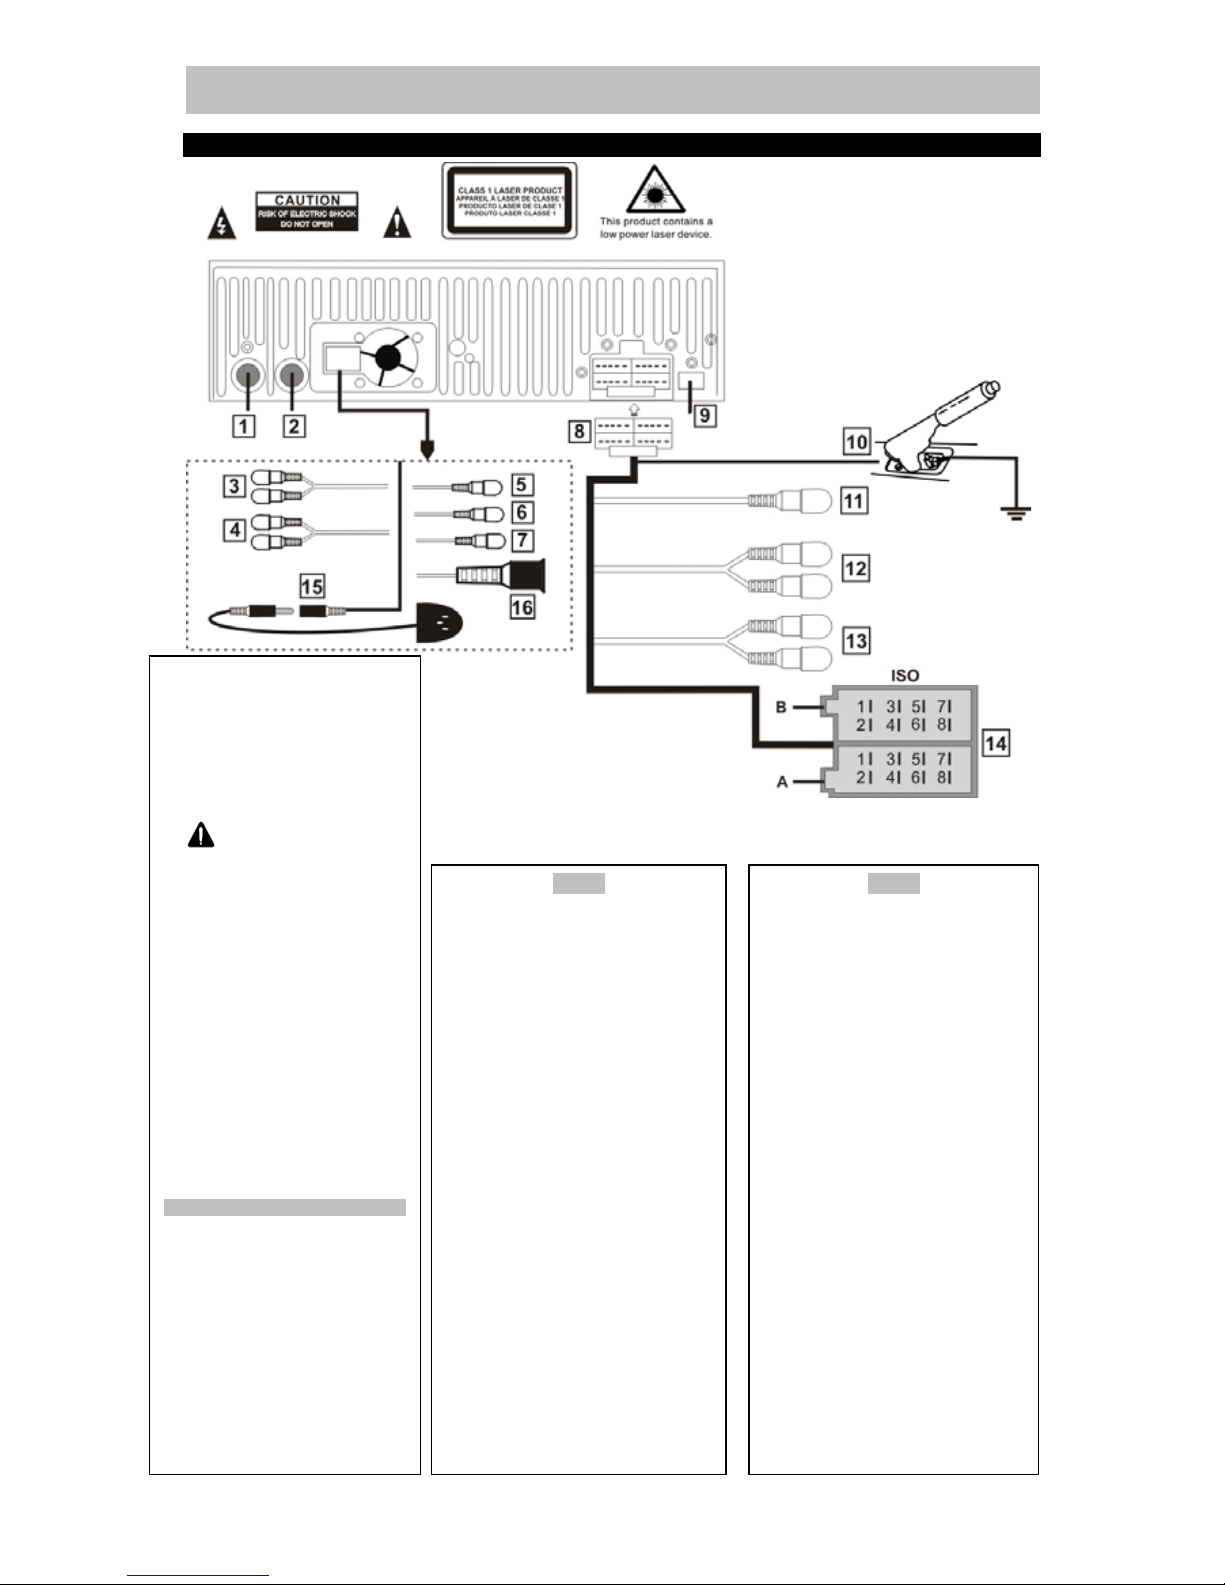
Connections DVD7200BT ..................................................................................................... 7
Installing the device............................................................................................................... 9
Operation of the monitor.......................................................................................................11
Swiveling the monitor outward..........................................................................................11
Areas sensitive to touch (touch screen)............................................................................11
Info Display ..........................................................................................................................13
Display when the monitor is open.........................................................................................13
Second playback level (dual zone) ...................................................................................14
Setup menu......................................................................................................................14
Audio menu ......................................................................................................................14
Video menu ......................................................................................................................15
RDS menu........................................................................................................................15
System menu ...................................................................................................................15
BASIC OPERATIONS ..........................................................................................................16
Insertion of the operating unit ...........................................................................................16
Removal of the operating unit (theft protection) ................................................................16
Turning on/off ...................................................................................................................16
Changing the volume........................................................................................................16
Muting the speakers .........................................................................................................17
Selection of the radio station ............................................................................................17
Selection of the wavelength range....................................................................................17
Searching for a radio station with the scanner ..................................................................17
Manual search for a radio station......................................................................................17
Storing a station with the station buttons ..........................................................................18
Storing stations with automatic station search ..................................................................18
Calling up stored stations .................................................................................................18
Checking stored stations ..................................................................................................18
LOC function ....................................................................................................................18
STMO function .................................................................................................................19
RDS .................................................................................................................................19
Traffic announcements (“TA“, traffic program, ”TP“) .........................................................19
Alternative frequencies (“AF“)...........................................................................................19
Radio reception conditions ...............................................................................................20
Enhanced Other Networks (EON).....................................................................................20
Regional programs (“REG“)..............................................................................................20
CD/DVD mode..................................................................................................................20
Selecting a CD/DVD as the program source.....................................................................20
Insert / remove DVD/CD...................................................................................................21
Playback / pause / stop ....................................................................................................21
Selecting or repeating tracks ............................................................................................21
Fast forward and rewind ...................................................................................................21
Repeating tracks (Repeat)................................................................................................21
Intro..................................................................................................................................21
Playing tracks in random sequence (Random) .................................................................22
Inserting / removing SD/MMC...........................................................................................22
Selecting SD/MMC as a program source..........................................................................22
Playing back MP3/WMA/OGG files...................................................................................22
Displaying images ............................................................................................................23
Slide show........................................................................................................................23

Page 3 of 44 pages
DVD7200BT ENGLISH
Rotating an image ............................................................................................................23
Zoom................................................................................................................................23
Thumbnail view ................................................................................................................23
AUX IN .............................................................................................................................24
Menu settings level 1........................................................................................................24
Changing the bass settings (BASS)..................................................................................24
Changing the treble settings (TREBLE)............................................................................24
Changing the volume ratio (BALANCE)............................................................................24
Changing the volume distribution (FADER) ......................................................................25
Menu settings level 2........................................................................................................25
LOC function to set the station search..............................................................................25
LOUD function for the tone setting – loudness..................................................................26
ST – MO function to switch between stereo and mono playback ......................................26
CT function to set the time of day .....................................................................................26
TAVOL function to set the volume for traffic announcements ...........................................26
EON for the automatic station switch for traffic announcements .......................................27
D/Z for the settings of the second playback level (DUAL ZONE) ......................................27
DVD device settings .............................................................................................................28
General settings ...............................................................................................................28
Audio settings...................................................................................................................29
Video settings...................................................................................................................30
Preferred settings .............................................................................................................30
Password settings ............................................................................................................31
Exiting the settings ...........................................................................................................32
Factory default settings (“RESET“)...................................................................................32
Remote Controls ..................................................................................................................33
Remote control (normal)...................................................................................................33
Remote control (Dual Zone) .............................................................................................33
Changing the battery ........................................................................................................34
RDS OPERATION AND DESCRIPTION ..............................................................................35
BLUETOOTH Operation.......................................................................................................37
Pairing ..........................................................................................................................37
Making a call.................................................................................................................37
Hang up / Reject...........................................................................................................37
Receiving calls..............................................................................................................37
Voice transfer from unit to phone and vice versa ..........................................................38
Telephone book pairing ................................................................................................38
Making a call from the phonebook ................................................................................38
A2DP (Advanced Audio Distribution Profile) .................................................................39
TECHNICAL SPECIFICATIONS ..........................................................................................40
GENERAL ........................................................................................................................40
FM / MW RADIO..............................................................................................................40
DVD PLAYER...................................................................................................................40
AUX IN .............................................................................................................................40
VIDEO..............................................................................................................................40
TFT MONITOR.................................................................................................................40
ENVIRONMENT...............................................................................................................40
NAVIGATION CONNECTION ..............................................................................................41
GPS antenna installation ..................................................................................................41
GPS main menu ...............................................................................................................42
CALIBRATION of the touch screen. .................................................................................42
SERVICE AND WARRANTY................................................................................................43

Page 4 of 44 pages
DVD7200BT ENGLISH
Scope of delivery
Note: The design and technical data are subject to change without any notification.
Illustrations are not true to scale.
1x installation frame
2x Disassembly key
+ Installation material
1x UNIT IR-Remote
Control and 1x Dual
Zone IR-Remote
control. Both with one
CR2025 3Volt cell
batter
y
.
DVD7200BT (open and closed)
This User Manual.
1x ISO cable.
1x front panel protection sleeve
1x external Microphone

Page 5 of 44 pages
DVD7200BT ENGLISH
Operating unit
A) Front view (closed)
B) Front view (monitor open)
C) Front view (with detached operating unit)
(A)
(B)
(C)

Page 6 of 44 pages
DVD7200BT ENGLISH
(1) Volume control dial (turned)
a. Settings dial for menu level 1 – VOL, BAS, TRE, BAL, FAD (if pressed for less
than two seconds)
b. Settings dial for menu level 2 - LOC - LOUD – STEREO/MONO - TIME -
TAVOL - EON – DUAL ZONE - (if pressed for more than two seconds)
c. LOC is only available in radio mode
(2) TP button to turn the traffic alert function on/off
a. Button to activate the loudness function (pressed longer than three seconds)
(3) MODE button to select sources between radio, CD/DVD (if inserted), memory card (if
inserted), rear view camera and AUX In / In BT MODE: Hang up or reject call.
(4) Station selection button 1 (radio mode)
a. Start /pause button (data carrier mode)
(5) Station selection button 2 (radio mode)
a. Previous track (data carrier mode)
(6) Station selection button 3 (radio mode)
a. Next track (data carrier mode)
(7) Button to turn the device on / off (Short press while unit is off or long press while unit
is on) or while unit is on with short press: MUTE.
(8) Station selection button 4 (radio mode)
a. Repeat track (data carrier mode)
b. if pressed longer: Quick rewind (data carrier mode)
(9) Station selection button 5 (radio mode)
a. Scan track “intro” (data carrier mode)
b. if pressed longer: Fast forward (data carrier mode)
(10) Station selection button 6 (radio mode)
a. Random playback (data carrier mode)
b. if pressed longer: Stop button (data carrier mode)
(11) Accept call / Pairing
(12) CD/DVD eject button
(13) Infrared sensor for the remote controls
(14) 5-Way multifunction button for the menu navigation to the right, left, up, down, and
confirm (pressed)
(15) BAND – Button to switch the frequency band as well as the button memory FM1 -
FM3, MW1 and MW2
(16) OPEN – Button to open and close the 7” monitor
(17) P.SCAN – Button for the automatic station scanning (short press) and the automatic
station storage (long press)
(18) CD / DVD insertion slot
(19) INFO Display
(20) PTY button to select the program style (e.g. jazz, pop, news, etc.)
(21) AF/REG button: Alternative frequency ON/OFF and REG ON/OFF (if pressed longer)
(22) Button to remove the operating unit
(23) 7” TFT monitor (touch sensitive)
(24) BAND – Button to switch the frequency band as well as the button memory FM1 -
FM3, MW1 and MW2
(25) Button to change the display information (only in data carrier mode)
(26) Button to activate the monitor menu for the playback source and device settings
(27) Button to display the DVD playback menu (only in CD/DVD mode)
(28) Button to activate the monitor menu for the DVD device settings
(29) Button to change the distance of the monitor to the installation slot
(30) Button to set the slant of the monitor (TILT)
(31) Contacts for the operating unit PLEASE DON’T TOUCH!!
(32) Reset button to restore factory default settings. Note: When the factory settings are
restored, the clock and the stored radio stations will also be reset or erased
(33) SD/MMC card slot

Page 7 of 44 pages
DVD7200BT ENGLISH
Connections DVD7200BT
1) Antenna Input (75 Ohm)
2) DVB-T TV (optional)
3) AUX Input L+R (brown)
4) Rear Output L+R (Gray)
5) Camera Input (Black)
6) Rear Video Output (Black)
7) Video Input (Black)
8) Cable connector
9) Optical 5.1CH output
10) Driver Safety wire
(Brown), has to be connected to
the parking brake or other
suitable components of the
vehicle in such a way that the
video playback of the device is
interrupted for the driver while
the vehicle is in motion. Please
consider that your insurance
coverage may be restricted or
exempted otherwise. Please
consult a specialist in your area
if you have any questions about
the connections.
11) Subwoofer Output (Black)
12) Rear Line Output (Gray)
13) Front Line Output (Brown)
14) ISO connector
15) External Microphone
16) NAVIGATION CONNECTOR
Note on ISO-A Connector:
Depending on the manufacturer, the
contacts on your vehicle connection
may be assigned differently. This is
not a defect of the device but
caused by a deviating connector pin
assignment by the manufacturer of
your vehicle. To provide a
connection that conforms to this
device, please purchase an
appropriate adapter cable from a
specialized dealer if required.
Please consult a specialist in your
area if you have any questions
about the connections..
ISO CONNECTOR
R
CA
CONNECTORS
Left = White
Right = Red
Others = Yellow
ISO-
A
A2 ORANGE Connection to the
reverse light to switch on the
rear view camera when the
reverse gear is put in.
A4 YELLOW (B+).Connection for
+12V operational voltage
(diameter at least 2.5 mm²) to
permanent plus of the vehicle.
A5 BLUE To system control
terminal of an external amplifier
or Automatic Antenna (max.
100mA / 12Vdc).
A7 RED ACC (+).Connection for
+12V trigger voltage. Connect
to ignition key of the vehicle. If
contacts A4 and A7 are
switched, the device will “forget”
the stored stations after the
ignition is turned off.
A8 GND. ( - / Ground) Attach the
connection for the ground
(diameter at least 2.5 mm) to
the ground of the vehicle.
ISO-B
FRONT SPEAKER
B3 Right + (Gray)
B4 Right – (Gray/Black)
B5 Left + (White)
B6 Left – (White/Black)
REAR SPEAKER
B1 Right + (Violet)
B2 Right – (Violet/Black)
B7 Left + (Green)
B8 Left – (Green/Black)

Page 8 of 44 pages
DVD7200BT ENGLISH
Note:
- Only use groundless loudspeakers.
- Use only loudspeakers of minimal 40Watt, using fewer watts may result in damaging your
loudspeakers at higher volumes.
- Use 4~8 (Ohm impedance) loudspeakers only; using higher or lesser impedance may
damage the unit.
- Do not use 3-cable loudspeakers and do not connect the loudspeakers minus to the car body
(GND). The DVD7200BT is using a BTL circuit and each loudspeaker must be connected with
insulated cables according the diagram.
- Loudspeaker cables and/or optional external power amplifiers must always be about 30cm
away from the antenna and/or antenna extension parts.
Connect the speakers according the following diagram, incorrect connections will damage
the unit or your loudspeakers
Correct connection
Left front - Right front | Left rear - Right rear
Incorrect connections

Page 9 of 44 pages
DVD7200BT ENGLISH
Installing the device
Note:
Please observe the following safety instructions for the connection of the device:
- Read the entire installation section before connecting the device.
- Disconnect the negative pole of the vehicle battery for the duration of the installation.
- Observe the safety instructions by the vehicle manufacturer during this task.
- If you need to drill holes for the installation, make sure that no parts of the vehicle are
damaged.
- The cross section of the positive and negative cable may not be less than 2.5 mm².
- Do not connect any of the vehicle’s plugs and cables to the radio unless you have the
appropriate specialized knowledge of this process!
- Only use the supplied cable to connect the device.
- Depending on the build of your vehicle, the installation may deviate from this
description.
- We do not assume any liability for damages caused by faulty installations or
connections, nor any subsequent damages.
- We recommend that you have the device installed by a specialized company. Then
you will have created the prerequisites for a problem-free functioning of the device. If
at any point during the installation you are unsure that you can correctly connect the
device by yourself, contact a specialist. A faulty installation may cause damages to
the device and the vehicle electronics.
1) Remove the installation frame from the device with the aid of the disassembly key, by
sliding the disassembly keys into the provided openings on the right and left side of
the device, as described in Fig A.
2) Make sure that the protrusion on the disassembly key points away from the device
during the insertion (Fig C + Fig. B.) Afterwards, the frame can be slid down over the
device towards the rear.
3) Now slide the installation frame into the installation slot provided for the car radio.
4) Now attach the installation frame by bending the installation brackets towards the
outside with a screwdriver. The frame is properly installed when it can no longer be
pulled out, yet also keeps from sliding into the installation slot.
5) Now connect the cable set and the antenna to the vehicle’s electronics corresponding
to page 6.
6) Insert the device into the installation frame until the stop.
7) The device then audibly snaps into the frame. Attach the front frame and then insert
the operating unit.
Fig. C.
Fig. B.
Fig. A.

Page 10 of 44 pages
DVD7200BT ENGLISH
8) The device is distinguished by a high degree of output. During operation, this results
in a strong heat generation. Therefore no cables or other parts may adjoin the device.
If their insulation melts, there is the risk of a short circuit or fire.
9) REMOVING: Turn off the device. Remove the operating unit and place it into the
case. Clamp off the negative pole of the vehicle battery for the duration of the
disassembly. First remove the front frame of the device by inserting a flat object (e.g.
the back of the disassembly key) between the device and the panel to the right and
left of the short side of the frame and carefully levering the panel out towards the
front. Then insert the two disassembly keys into the openings on both sides of the
front of the device and slide these until the stop. Make sure that the protrusion on the
disassembly key points away from the device during the insertion. Slowly and
carefully pull out the device. Remove the cable and antenna from the device.
10) Make sure that no vehicle cable can cause a short circuit after the device has been
unplugged.

Page 11 of 44 pages
DVD7200BT ENGLISH
Operation of the monitor
Open the monitor by briefly pressing the “OPEN” button. Now the monitor is opened
automatically and fixed in the flipped-open position. The monitor can be closed again by
pressing the “OPEN” button again. If the monitor doesn’t close as a result, it may not be in
the correct position. Then there will be the error message “ERROR – MONITOR NOT
CENTERED!!”
Note:
Before beginning to drive, please familiarize yourself sufficiently with the device and avoid
longer entries during the drive for your own safety!
Swiveling the monitor outward
To better read and operate the screen, it’s possible to swivel the monitor of the device by
about 30° to the right and left. For this, first open the monitor with the “OPEN” button as
described above. Then you can swivel the monitor by pulling it towards you carefully from the
lower right or left edge of the screen. Never use force during the process, otherwise you
might damage the device. To swivel the monitor back, just press it back into the original
position.
Areas sensitive to touch (touch screen)
The screen has features that are sensitive to the touch (touch screen). This makes it possible
to control many functions by touching the screen. In an open position there are always two
menus available. First the main menu and, in addition, the menu for the second playback
level (dual zone).
The two areas indicated above are not visible on the screen. The image merely serves for a
clearer visualization. But if you press a finger or an object against the indicated areas, the
corresponding submenu will open. The menus and their functions are addressed in the
following chapter.

Page 12 of 44 pages
DVD7200BT ENGLISH
Note:
Please only touch the screen with very light pressure and never with sharp objects.
Otherwise it might get scratched and damaged. When the monitor is being opened or closed,
no sound will be produced during this process. This is not a malfunction of the device.
For the playback of audio, video or image data, there is also another, non-visible menu
available. When touching the right edge of the screen in the area of the marked surface, the
playback will jump to the next track. When touching the left edge of the screen in the area of
the marked surface, the playback will jump to the previous track. At the lower edge of the
screen, you will reach an additional menu by means of the marked area.
You can reach the menu pictured in below by touching the field that is indicated as “MENU“
in the picture above. Then the adjoining menu is activated and makes the functions available
according to their symbols. Through “EJECT“ you can eject the CD/DVD data carrier.
Through “EXIT“ you will exit the menu and return to the display that was there prior to the
activation of the menu. The menu automatically fades out ten seconds after the last entry.

Page 13 of 44 pages
DVD7200BT ENGLISH
Info Display
Info Display when the monitor is closed Display (entire view) when the monitor is closed
MUTE The loudspeakers have been
muted LOUD The LOUDNESS function
has been activated
HIT RADIO
(Example): RDS program
name
100.60
Frequency in the FM range
PTY
A broadcast program with
program type information is
being received
TP
A broadcast program with
traffic information is being
received
EON
EON (Enhanced Other
Networks) data are being
received
2
Preset location of the
selected station on the
station buttons
LOC
The selection of local radio
stations has been activated. ST
An FM Stereo program is
being received
DISC CD/DVD has been inserted INT Beginnings of tracks are
being played (intro)
RDM Tracks are played back in
random sequence (Random) TA Readiness for traffic alerts
has been activated
AF Alternative frequency has
been activated RPT A CD track is being repeated
(Repeat)
STOP
The playback has finished.
00:28
Duration of the current track
Display when the monitor is open
To open the monitor, please press button “OPEN”. To call up the monitor menu,
please press the “OSD button”. When the monitor is open, the following setting
options and functions are available: (The function “TV MODE” is not available.)
MENU
ENTRY FUNCTION
RADIO MODE Switches to the radio mode and
reproduces the recently played station.
MEDIA MODE
DVD MODE: Switches to the DVD mode
and starts the playback of the inserted
CD/DVD data carrier.
SD CARD: Switches to the data carrier and
begins the playback of the files it contains.
CAMERA: Switches to a connected
camera and shows the image recorded by
the camera
AUX IN: Change mode to AUX Input.
TV Mode: (optional)
NAVIGATION GPS NAVIGATION
BLUETOOTH Switches to the Bluetooth menu when a
telephone is paired and connected.
DUAL Switches to the DUAL ZONE submenu.
SETUP Switches to the menu for the device
settings.

Page 14 of 44 pages
DVD7200BT ENGLISH
Second playback level (dual zone)
The device has a second playback level (dual zone). This makes it possible to
address a second playback medium. For example: listening to the radio on the front
seats and watching a DVD on the back seats. Several combination options are
available here.
MENU
ENTRY FUNCTION
DVD MODE Starts the playback of the inserted CD/DVD
data carrier.
SD CARD Starts the playback of the inserted
SD/MMC data carrier.
TV The TV function is optional for the DVB-T
tuner box
AUX IN
Switches to the video and audio input of
the device. This makes it possible to
integrate external video and audio sources.
DUAL OFF Ends the second playback level.
Setup menu
MENU
ENTRY FUNCTION
SOUND Switches to the submenu for audio
settings
DISPLAY Switches to the submenu for video settings
SYSTEM Switches to the submenu for system
settings
RDS Switches to the submenu for RDS settings
TV The TV function is on a grey surface and
not available.
CALIBRATION Switches to the submenu for the
orientation of the touch screen
Audio menu
MENU
ENTRY FUNCTION
BASS/TREBLE Setting bass/treble levels from -7 to +7
BALANCE Setting the left and right speaker ratio
from L-8 to R-8.
FADER Setting the playback ratio between the
front and rear from F-8 to R-8.
S.WOOFER Turning the subwoofer on and off
S.VOLUME
Setting the initial volume level. The
maximum volume level of the device is at
45. The initial volume level can be set
between 0 - 45. The initial volume level is
a function that protects from hearing
damage. To protect your health, leave the
initial volume at a low level and, if
necessary, adjust the playback volume
according to the external conditions.
TEL VOL Setting the initial Telephone volume level.

Page 15 of 44 pages
DVD7200BT ENGLISH
Video menu
MENU
ENTRY FUNCTION
BRIGHT Setting the screen brightness from 0 to 40
CONTRAST Setting the screen contrast levels from 0
to 40
COLOR Setting the screen color values from 0 to
40
SHARP Setting the screen playback sharpness
from 0 to 6
SCREEN Setting the side ratio during the playback.
The side ratios 16:9 and 4:3 are available.
RDS menu
MENU
ENTRY FUNCTION
AF Turning the alternative frequency function
on and off.
REGION Turning the function for regional programs
on and off.
TP Turning the traffic alert function on and off.
EON Turning the EON function on and off.
PTY Turning the PTY function on and off.
TA VOL
Setting the volume of the traffic alerts.
The volume can be selected between 0
and 45.
System menu
MENU
ENTRY FUNCTION
BEEP Turning the button sounds on and off.
TILT
The TILT function makes it possible to set
the position of the monitor. With AUTO, the
monitor is retracted when the device is
turned off. With MANUAL, the monitor
remains open when the device is turned off.
But it can be closed and opened again at
any time by pressing the “OPEN” button.
TILT RANGE
This function lets you adjust the tilt of the
monitor according to your personal
preferences. Different setting options are
available.
IN/OUT FIX
The IN/OUT FIX function allows you to vary
the distance of the monitor towards the
front or the rear so that it can be adjusted
according to your personal preferences.
NONE lets you freely choose the position.
With FIXED, you lock the monitor into a
particular position.
TIME SET A function to set the time of day.
GPS DUAL
SOUND
NAVIGATION sound on/off while in other
mode (Radio/DVD/SD/AUX-in)

Page 16 of 44 pages
DVD7200BT ENGLISH
BASIC OPERATIONS
Insertion of the operating unit
In order to activate the car radio, you first have to insert the operating unit. First slide the
operating unit in a slightly tilted position from the left into the right holder and then press it
against the casing until it audibly snaps into place. Now you can turn on the device. If the
device was turned on when the operating unit was removed, it will automatically turn on with
the last setting (radio, CD, SD/MMC, AUX IN) as soon as the operating unit is inserted again.
Removal of the operating unit (theft protection)
In order to remove the operating unit and thus protect your car radio from theft, turn off the
device with the on/off button. Now press the REL button. The operating unit then releases
from the device and you can detach it towards the front and left. Place the operating unit into
the provided case and take it with you when you leave the car.
Turning on/off
To turn on the device, briefly press the on/off button, or any other button, on the operating
unit. To turn the device off, long press the on/off button again. The device will then turn off. If
the device is activated after the ignition has been started, it will automatically turn on and off
with the ignition during subsequent operation.
Caution! When the radio is turned on, an automatic antenna that may be installed on the
vehicle will also be extended. Before driving into a car wash, you should therefore always
turn off the device in order to avoid damages to the antenna as well as the vehicle.
Changing the volume
The volume of the device can be changed with the round control dial. The current volume of
the device will be indicated on the display in the process. The volume scale ranges from 0 –
45. When the car radio is turned off, the volume is only stored if it falls below the level of the
“S.VOLUME” setting. Any volume levels exceeding this are reduced to protect hearing. The
volume for the reactivation can be set in the system menu under the “S.VOLUME” function.
Note:
- Don’t use the car radio at an excessive volume. Otherwise there is the risk that you
will permanently damage your hearing.
- Please consider that while using the device you should still be in the position of
perceiving your surroundings (warning signals, sirens, etc.).
- Please only perform lengthy changes of the device settings while the vehicle is
parked. Otherwise your concentration might be affected by the changes.

Page 17 of 44 pages
DVD7200BT ENGLISH
Muting the speakers
To mute the connected speakers, briefly press the “MUTE” button. “MUTE” will appear on the
display. To return to the original volume, press the “MUTE” button again briefly or turn the
volume control dial. The message “MUTE” will turn off and the volume will be at the same
level as before it was muted. The MUTE setting also affects the LINE outputs and disrupts
these until the function is deactivated again.
Selection of the radio station
Turn on the DVD7200BT CD/DVD car radio with the on/off button. If the device was turned
off while it was in RADIO mode, the last selected station will be heard. If the device is set to
an operation with one of the different data carriers, please press the “MODE” button until you
get to the radio function.
Radio Display with open monitor Radio display with open monitor with
activated Dual Zone
Selection of the wavelength range
FM (UKW) range: To select the FM range, briefly press the “BAND” button repeatedly until
the desired range "F1“, “F2“, or “F3“ (with a closed monitor) or "FM 1“, “FM 2“, or “FM 3“ (with
an open monitor) appear on the display along with the current frequency.
MW range: To select the MW range, briefly press the “BAND” button repeatedly until “M1” or
“M2” (with a closed monitor) or “MW 1” or “MW 2” (with an open monitor) appear on the
display along with the current frequency.
Note: After selecting a range, the station last selected in this range will be heard. When the
monitor is open, the “BAND” button on the screen is also available for the selection of the
wavelength range.
Searching for a radio station with the scanner
To set the stations, select the desired wave band with the “BAND” button. In order to begin
searching in the desired direction, briefly press the five-way multifunction button. Press the
button towards the left to diminish the search frequency or to the right to increase the search
frequency. The scanner will stop at the next available station. When the monitor is open, the
buttons and on the on-screen keyboard are also available to change the frequency.
Manual search for a radio station
In order to select a station manually, press the five-way multifunction button for about three
seconds towards the right or left. The display will indicate “MANUAL”. Now press the five-
way multifunction button towards the right to increase the frequency, or to the left to diminish
the frequency until the desired frequency is indicated on the display. The frequency will
change in 50kHz increments in the FM range. If there is no entry for about seven seconds,
the device will switch back to automatic station search. The display will indicate “AUTO”.
Table of contents
Other Bullit Car Receiver manuals