Bushranger L2600 User manual

1
STRAIGHT SHAFT BRUSHCUTTER
L2600
OPERATOR’S MANUAL

2
Thank you for buying the Bushranger™ L2600 Straight Shaft Brushcutter. This manual explains how to handle
the Brushcutter well. Before operation, please read this book carefully and understand fully, so that this manual
can be used best. Please read the manual carefully before using the machine, and save it for checking at any
moment. Specications, descriptions and illustrative material in this manual are as accurate as known
at the time of publication, but are subject to change without notice.
INTRODUCTION .............................................................................................................................
TECHNICAL DATA ..........................................................................................................................
GRAPHIC WARNINGS ....................................................................................................................
SAFETY RULES & PRECAUTIONS ...............................................................................................
DESCRIPTION .................................................................................................................................
ASSEMBLY ......................................................................................................................................
RULES FOR SAFE OPERATION ....................................................................................................
CUTTING WITH A NYLON HEAD ...................................................................................................
REPLACING/FITTING BRUSH-CUTTER LINE ..............................................................................
ATTACHING METAL BLADE ..........................................................................................................
CUTTING WITH METAL A BLADE .................................................................................................
FUEL & OIL MIXTURE ....................................................................................................................
PREPARING FOR OPERATIONS ...................................................................................................
OPERATIONS ..................................................................................................................................
MAINTENANCE & CARE ................................................................................................................
TROUBLESHOOTING .....................................................................................................................
TROUBLESHOOTING GUIDE .........................................................................................................
WARRANTY .....................................................................................................................................
IPL - BRUSHCUTTER .....................................................................................................................
SPARE PARTS - BRUSHCUTTER .................................................................................................
IPL - BRUSHCUTTER ENGINE .......................................................................................................
SPARE PARTS - BRUSHCUTTER ENGINE ...................................................................................
02
03
04
05 - 07
07 - 08
08
08 - 09
09 - 10
10
11
CONTENT
INTRODUCTION
12
12
13
13
14
15
16
17
10
18
19
20

3
TECHNICAL DATA
MODEL L2600
MAIN UNIT
Remote Type -Automatic centrifugal clutch
-Spiral bevel gear
- Solid drive shaft
Idle Speed (r/min) 2800 ± 200
Reduction Ratio 17:22
Blade Rotation Direction Counter-Clockwise (seen from the
top)
Type of Handle Double Grip - with side protection
Weight when Dry (kg) 6.5
ENGINE
Name of Engine 1E34FN
Type -Air-cooled, 2-cycle
-Vertical piston valve with a
gasoline engine
Displacement (mL) 25.4
Maximum output (kW/r/min) 0.75 / 7500
Carburettor Diaphragm type
Walbro
Ignition CDI
Method of Starting Recoil type
Fuel Used 25:1 - 95 octane
Fuel Tank Capacity (L) 0.45
Spark Plug RCJ6Y
Technical Data subject to change without notice.

4
GRAPHIC WARNINGS
As a Brush Cutter is a high-speed, fast cutting power tool, special safety precautions must be
observed to reduce the risk of personal injury. Please read this manual carefully, and be familiar with
the controls and the proper use of this unit. Know how to shut it off, and how to unhook a harnessed
unit quickly.
This graphic accompanied by the words WARNING and DANGER calls attention to
an act of condition which can lead to serious or fatal personal injury.
Read and understand the Bushranger™Straight Shaft Brushcutter Operator’s Manual
and Safety Manual.
ALWAYS wear eye and ear protection.
Always TURN OFF ENGINE and ensure the cutting tool has stopped before cleaning,
removing or adjusting the blade.
WARNING! Never modify a trimmer or cutter in any way. Improper use of any trimmer
can cause serious or fatal personal injury.
WARNING / DANGER! The engine exhaust from this Bushranger™ product contains
chemicals that could cause cancer, birth defects, and/or other reproductive harm.
Specications, descriptions and illustrative material in this manual are as accurate as known at
the time of publication, but are subject to change without notice. Illustrations may include optional
equipment and accessories, and may not include all standard equipment.

5
SAFETY RULES AND PRECAUTIONS
Proper safety precautions must be observed.
Like all power equipment this unit must
be handled carefully. DO NOT EXPOSE
YOURSELF OR OTHERS TO DANGER.
Follow these general rules. Do not permit others
to use this machine unless they are thoroughly
responsible and have read, and understand the
machine manual and are trained in its operation.
• Always wear safety goggles for eye
protection. Dress properly, do not wear
loose clothing or jewelry that could become
caught in moving parts of the unit. Safe,
sturdy, nonskid footwear should always be
worn. Long hair should be tied back. It is
recommended that legs and feet be covered
to protect from ying debris during operation
• Inspect the entire machine for loose parts
(nuts, bolts, screws, etc.) and any damage.
Repair or replace as necessary before using
the machine.
• DO NOT USE any attachment with
this power head other than the ones
recommended by our company. Serious
injury to the operator or bystanders could
result as well as damage to the machine.
• Keep the handles free from oil and fuel
• Always use proper handles and shoulder
strap when cutting.
• Do not smoke while mixing fuel or lling tank
• Do not mix fuel in an enclosed room or near
open ames. Assure adequate ventilation
• Always mix and store the fuel in a properly
marked container that is approved by local
codes and ordinances for such usage.
• Never remove the fuel tank cap while the
engine is running.
• Never start or run the engine inside a closed
room or building. Fumes from the exhaust
contain dangerous carbon monoxide
• Never attempt to make engine adjustments
while the unit is running and strapped to the
operator. Always make engine adjustments
with the unit resting on a at, clear surface
• Do not use the unit if it is damaged or poorly
adjusted. Never remove the machine’s guard.
Serious injury to the operator or bystanders
could result as well as damage to the
machine.
• Inspect the area to be cut and remove all
debris that could become entangled in the
nylon cutting head. Also remove any objects
that the unit may throw during cutting.
• Keep children away. Onlookers should be kept
at a safe distance from the work area, at least
15 metres (50 feet)
• Never leave the machine unattended.
• Do not use this unit for any job other than
those for which it is intended as described in
this manual.
• Do not overreach. Keep proper footing and
balance at all times. Do not run the unit while
standing on a ladder or on any other unstable
footing location.
• Keep hands and feet clear of the nylon cutting
head while unit is in use.
• Do not use this type of machine for sweeping
away debris.
• Do not use the unit when you are tired, ill or
under the inuence of medication, drugs or
alcohol.
• Use nylon cutting head which is free of
damage. If a stone or any other obstacle is hit,
stop the engine and check the nylon cutting
head. A broken or unbalanced nylon cutting
head must never be used.

6
• Do not store in a closed area where fuel
vapors can reach an open ame from hot
water heaters, heaters, furnaces, etc. Store
in a locked, well ventilated area only.
• To ensure safe and proper performance
of your product. Spare parts are available
from your dealer. The use of any other
accessories or attachments may cause
a potential hazard or injury to the user,
damage to the machine and void this
warranty.
• Clean the machine completely, especially,
the fuel tank, its surroundings, and the air
cleaner.
• When refueling, be sure to stop the engine
and conrm that it is cooled down. Never
refuel when the engine is running or hot.
When gasoline spills, be sure to wipe it up
completely and properly dispose of those
materials before starting the engine.
• Stay clear of other workers or bystanders by
at least 15 meters / 50 feet.
• When ever approaching an operator of
the machine, carefully get the attention of
the person/s around and conrm that the
operator stops the engine. Be careful not
to startle or distract the operator which can
cause an unsafe situation.
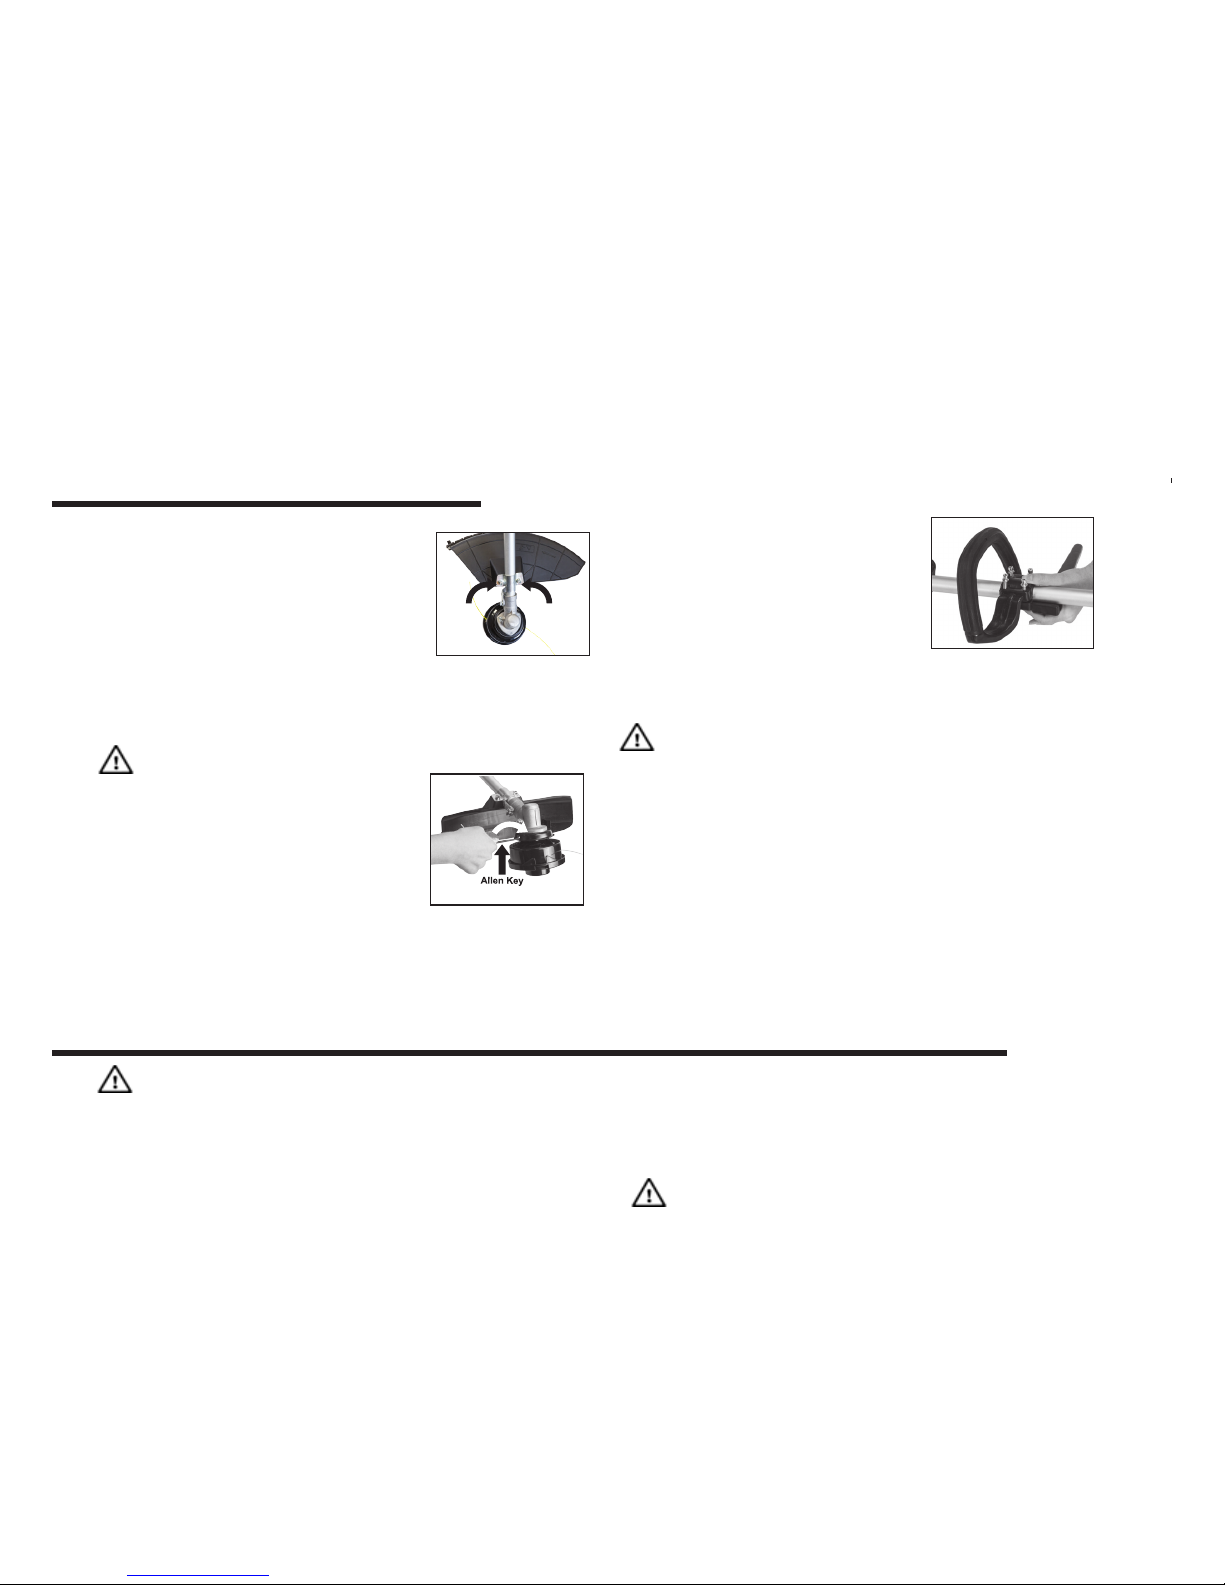
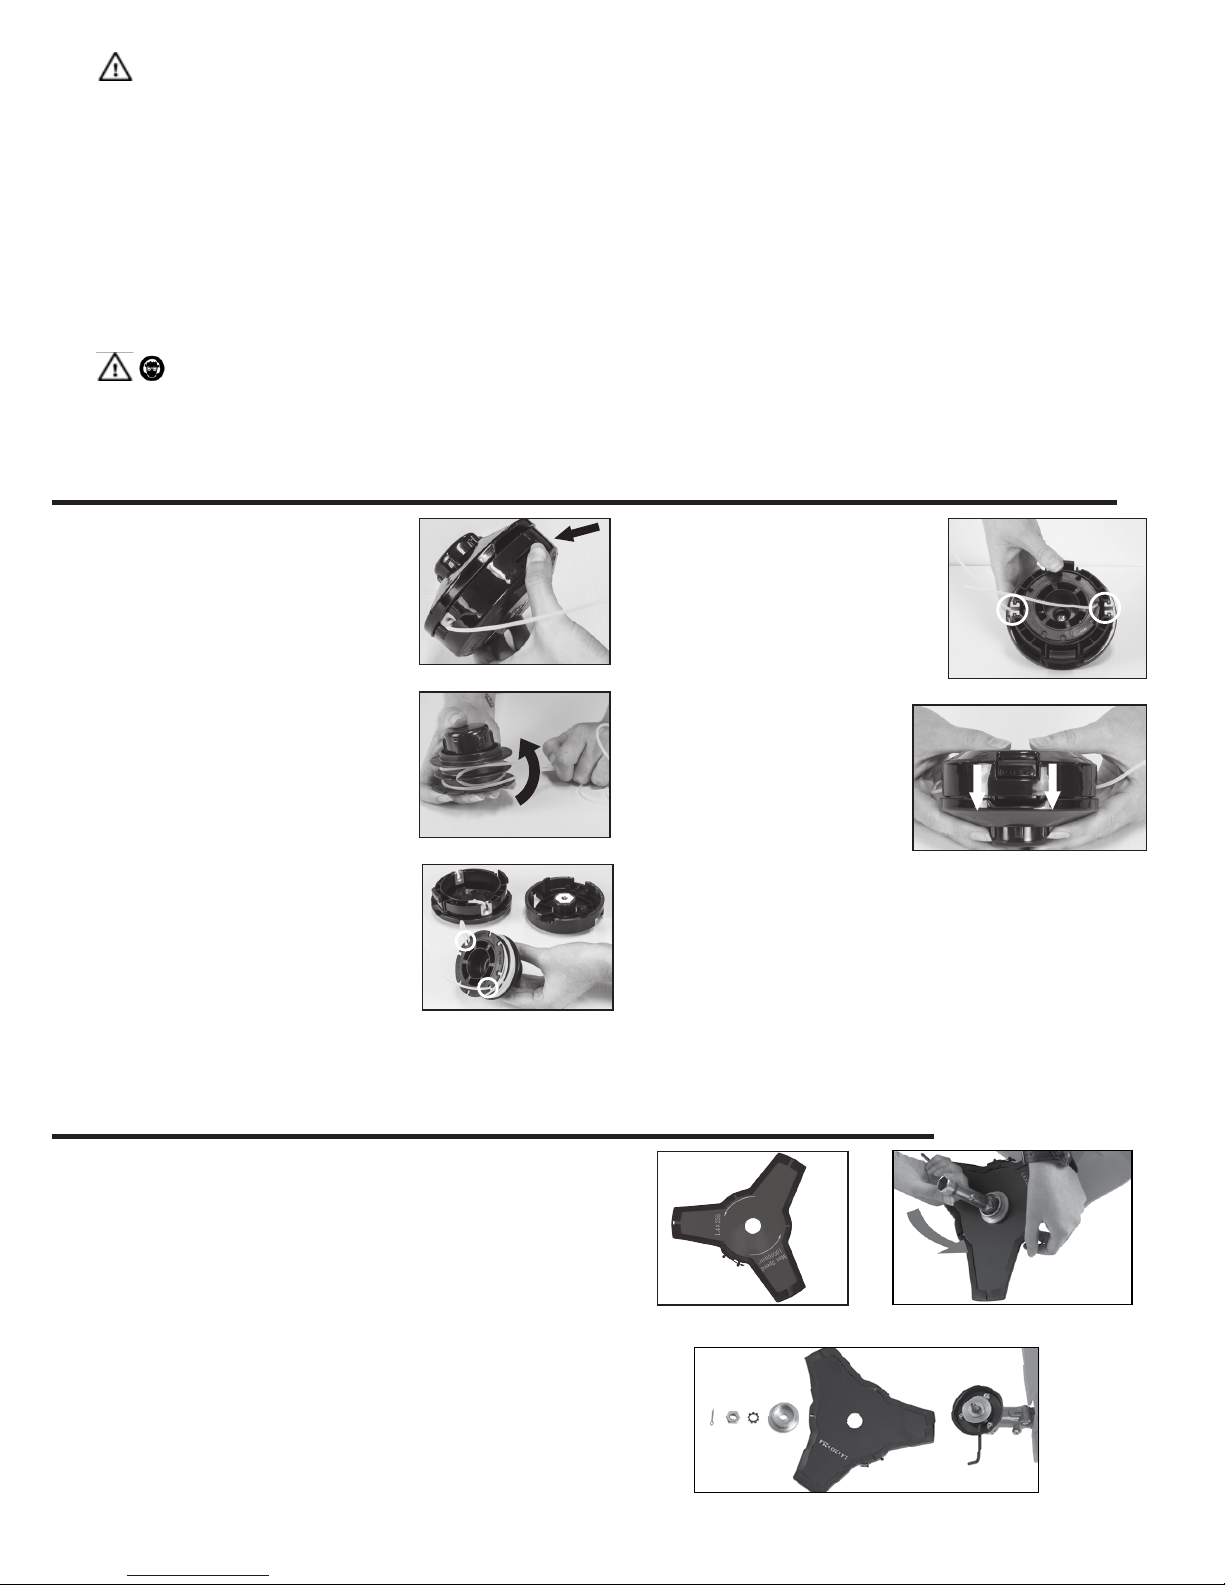
• Never touch the nylon cutting head when
ever the engine is running. If it is necessary
to adjust the protector or nylon cutting head,
be sure to stop the engine and conrm that
the nylon cutting head has stopped running
• The engine should be turned off when the
machine is moved between work areas.
• Be careful not to hit the nylon cutting head
against stones, or the ground. Unreasonable
rough operation will shorten the life of
the machine as well as create an unsafe
environment for yourself and those around
you.
• Pay attention to loosening and overheating
of parts. If there is any abnormality of the
machine, stop operation immediately and
check the machine carefully. If necessary,
have the machine serviced by a authorized
dealer. Never continue to operate a machine
which may be malfunctioning.
• In start-up or during operation of the engine,
never touch hot parts such as the mufer, the
high voltage wire or the spark plug.
• After the engine has stopped, the mufer
is still hot. Never place the machine in any
places where there are ammable materials
(dry grass, etc.), combustible gases or
combustible liquids.
• Pay special attention to operation in the rain
or just after the rain as the ground may be
slippery.
• If you slip or fall to the ground or into a hole,
release the throttle lever immediately.
• Be careful not to drop the machine or hit it
against obstacles.
• Before proceeding to adjust or repair the
machine, be sure to stop the engine and
detach the spark plug cap from the spark plug.
• When the machine is placed in storage for a
long time, drain fuel from the fuel tank and
carburetor, clean the parts, move the machine
to a safe place and conrm that the engine is
cooled down.
• Make periodic inspections to assure safe and
efcient operation. For a thorough inspection
of your machine, please contact your
Bushranger™ dealer.
• Keep the machine away from re or sparks.
It is believed that a condition called Raynaud’s
phenomenon, which affects the ngers of certain
individuals may be brought about by exposure
to vibration and cold. Exposure to vibration and
cold may cause tingling and burning sensations
followed by loss of color and numbness in the
ngers. The following precautions are strongly
recommended because the minimum exposure
which might trigger the ailment is unknown.
Mufer
Starter

7
Keep your body warm, especially the head, neck, feet, ankles, hands and wrists.
Good blood circulation by performing vigorous arm exercises during frequent work breaks. Limit the
hours of operation. Try to ll each day with jobs where operating the brush cutter or other hand-held
power equipment is not required.
If you experience discomfort, redness and swelling of the ngers followed by whitening and loss of
feeling, consult your physician before further exposing yourself to cold and vibration.
• Always wear ear protection, loud noise for long time can make hearing debase even lost hearing.
Total face and head protection must be wear to prevent damage from plummet or branch.
• Wear no-slip heavy duty work gloves to improve your grip on the brush cutter handle. Gloves also
reduce the transmission of machine vibration to your hands.
WARNING
The cutter area is still dangerous while the machine is coasting to a stop.
DESCRIPTION
Safety Manual included with unit.
Read before operating and keep for future
reference to learn proper, safe operating
techniques.
Blade -Circular blade for heavy grass,weed or
brush cutting applications. Harness, metal shield
and U-Handles required for blade operation.
Drive Shaft Assembly - Contains a
specially designed solid drive shaft.
Throttle Trigger - Spring loaded to return to idle
when released. When accelerating, squeeze
trigger gradually for best operating technique.
Do not hold trigger while starting.
Ignition Switch - “slide switch”mounted on top
of the Throttle Trigger Housing. Move switch
FORWARD to Stop, BACK to Run.
Safety Lever - Must be compressed before the
throttle is used to accelerate engine.
D-Handle - this handle can be adjusted at your
convenience for comfort.
Harness Ass’y - an attachment which hang the
machine on the operator and adjustable in length.
Air Cleaner Cover - Contains replaceable foam
element.
Fuel Tank - Contains fuel and fuel lter.
Purge Bulb - Pushing purge bulb (5 to 7 times
before starting), will remove all air and stale
fuel from fuel system and bring fresh fuel to the
carburetor.
Gearbox
Nylon Cutting
Head
Safety Guard
Throttle Trigger
Fuel Tank
Fuel Tank
Guard
Mufer
Throttle Control
Safety Lever
On/Off Switch
‘D’ Handle
Straight Shaft
Starter

8
ASSEMBLY
Installing Plastic Shield
Install the safety cover on the
shaft with the safety cover
bracket and the screws provided.
Tighten the screws after setting
the safety cover bracket at the appropriate
position. (Fig. 1 ).
WARNING / CAUTION
Installing Nylon Line Cutter
Head
• Align hole in adapter plate
with hole in shaft and install
locking tool. (Fig. 2).
• Thread cutter head onto shaft (turning it
clockwise) until it is tight. Looking from the top.
Installing Handle - Place the
upper ‘D’ handle (Fig. 3) over
the outer tube into the desired
position, then while holding the
bottom half of the handle in
place insert the 4 screws and
tighten with the allen key provided.
WARNING / CAUTION
If there is excessive vibration - stop engine
immediately.
RULES FOR SAFE OPERATION
WARNING / DANGER
All model trimmers and brush cutters can throw
small stones, metal or small objects as well as
the material being cut. Read these Rules for Safe
Operation with care.
Follow the instructions in your operators manual.
Read the operator’s manual carefully. Be
thoroughly familiar with the controls and proper
use of the unit. Know how to stop the unit and
shut off the engine. Know how to unhook
a harnessed unit quickly.
Never allow anyone to use the unit without proper
instruction. Be sure the operator wears foot, leg,
eye, face and hearing protection. Do not rely on
the debris shield on the unit to protect your eyes
from ricocheting or thrown objects. Keep the
area clear of bystanders, children and pets. Nev-
er allow children to operate or play with the unit.
WARNING / DANGER
In addition to head, eye, face and ear protectors
shoes should be worn to protect your feet and
improve your footing on slippery surfaces. Do
not wear ties, jewelry, or loose, dangling clothing
which could be caught in the unit. Do not wear
open-toed footwear, or go barefoot or bare
legged. In certain situations you must wear total
face and head protection. Pay attention to kick
back and blade thrust.
Do not allow anyone to enter the operating
Danger Zone with you.
Choke - the choke control is located on the side of the lter cover. COLD STARTS. Pull lever up to
close choke for cold starts. Push lever down for RUN position.
Debris Shield - Mounted just above the cutting attachment. Helps protect operator by deecting
debris produced during the trimming operation. Do not operate unit without shield.
Cut Off Knife Trims nylon lament to the correct length - 7” (178mm), head to end of line-when nylon
trimming head is bumped on the ground during operation, line advance. If trimmer is operated without
a cut-off knife the line becomes too long (more than 7” (178mm)) the operating speed will slow down
the engine, this will overheat or damage the engine.
Nylon Cutter Head - Contains replaceable nylon trimming line that advances when the trimmer head
is tapped against the ground while the head is turning at normal operating speed.
Attaching
Screws
Attaching
Screws
Fig. 1
Fig. 2
Fig. 3

9
CUTTING WITH A NYLON HEAD
Line head rotates in an
ANTI -CLOCKWISE direction.
The CUT-OFF KNIFE will be on
the left side of the debris shield
WARNING / DANGER
Cutting with a Nylon Head
The proper debris shield must be in place on the
unit when nylon cutting line is used. The cutting
line can ap around if too much line is exposed.
Always use the plastic debris shield with cut-off
knife when using nylon cutting heads.
For nearly all cutting, it is good to tilt the line head
so that contact is made on the part of the line
circle where the line is moving AWAY from you
and the debris shield. This results in the debris
being thrown AWAY from you. (Fig 5).
WARNING / DANGER
Tilting the head to the wrong side will shoot the
debris TOWARDS you. If the line head is held at
to the ground so that cutting occurs on the whole
line circle, debris will be THROWN at you, drag
will slow the engine down, and you will use up a
lot of line.
WARNING / DANGER
Use only quality nylon mono-lament line of
the diameter 2.4mm. Never use wire or wire
reinforced line in place of nylon trimmer line.
Load your nylon line cutting head only with nylon
trimmer line of the proper diameter. For the
Straight Shaft Brushcutter we recommend 2.4 -
2.7mm
Trimming
This is feeding the brush cutter carefully into the
material you wish to cut. Tilt the head slowly to
direct debris away from you. If cutting up to a
barrier such as fence, wall or tree, approach from
an angle where any debris ricocheting off the
barrier will y away from you. Move the line head
slowly until the grass is cut right up the barrier,
but do not jam (overfeed) the line into the barrier.
Cutting up to a wire mesh or chain linked fence be
careful to feed only up to the wire. If you go too far
the line will snap off around the wire. Cutting can
be done to cut through weed stems one at a time.
Place the brush cutter line head near the bottom
of the weed-never high up which could cause the
weed to chatter and catch the line. Rather than
cutting the weed right through, just use the very
end of the line to wear through the stem slowly.
The Danger Zone is an area 15 meters in
radius (about 16 paces) or or 50 feet. Insist
that persons in the Risk Zone beyond the
Danger Zone wear eye protection from thrown
objects. If the unit must be used where there
are unprotected people, operate at a low throttle
speed to reduce the risk of thrown objects.
Move the stop switch to “stop” position when
the engine idles. Continue to operate the unit
only when the stop switch is in good working
condition. Ensure that the cutting attachment
stops turning when the engine idles.
No persons except for operator is allowed within
a 15 metre radium of the Danger Zone. Eye,
Ear, Face, Foot, Leg and Body protection must
be worn by operator. Persons in the danger
zone and beyond Danger Zone should wear
eye protection against thrown objects. Risk
diminishes with distance from the Danger Zone.
Fig. 4
Fig. 5
Fig. 6 Fig. 7
Fig. 8 Fig. 9

10
• To ensure the line will not
unravel, slip each end into
the slot/lug on the bottom
edge of the spool (Fig.
12).
• Insert the trimmer line into
the slots located on
the side of the spool
housing (Fig. 13).
• When in the correct
position pull the line
ends further (to unlock the line from spool) out
of the housing. Then replace the securing lid
until it clicks into the base (Fig. 14).
WARNING / DANGER
Only use an approved steel blade on this Straight Shaft Brush Cutter.
Scalping and Edging (Refer to Fig. 7 & 8, page 9).
Both of these are done with the line head tilted at a steep angle scalping is removing top growth leaving
the earth bear. Edging is trimming the grass back where it has spread over a sidewalk or drive way.
During both edging and scalping, hold the unit a steep angle and in a position where the debris, and
any dislodging dirt and stones will not come back towards you even if it ricochets off the hard surface.
Although the picture shows how to edge and scalp every operator must nd the angles which suit your
body size and cutting situation.
WARNING / DANGER
Do not trim in any area where there are strands or fencing wire. Wear safety protection. Do not cut
where you cannot see what the cutting device is cutting.
REPLACING/FITTING BRUSHCUTTER LINE
• Locate and depress the
two retaining lugs that are
holding the nylon head
together. Seperate the lid
from the base and remove
the spool. (Fig. 10).
• Take approximately 4 -5
metres of good quality 2.4
or 2.7mm diameter trimmer
line. Fold in half and make a
loop. Hold the spool in one
hand and hook the line into
the slot with the other hand.
• Wind both lines anti-
clockwise on both sides
of the spool ensuring that
both lines remain in their
respective channels (Fig. 11).
ATTACHING CUTTING BLADE
• Metal Blade can only be tted to a Straightshaft
Brushcutter (Fig. 15).
• If heavy material is needed to be cut use the
supplied metal blade.
• Remove the nylon cutting head. Then t the
cutting blade as shown in the two photos
attached (Fig 15A & 15B).
• Remove nylon head opposite to tting
instructions.
Fig. 10
Fig. 11
Fig. 12
Fig. 13
Fig. 14
Fig. 15 Fig. 15A
Fig. 15B

11
There are many different types of blades, however the two most commonly used are the following.
BRUSHBLADE is used for cutting brush and weeds up to 3/4” in diameter. Only a 255mm 3-blade can
be used in this type of brush cutter, SAWBLADE is used for cutting growth
from 3/4” to 3” in diameter.
WARNING / DANGER
Use the shoulder harness at all times. Adjust both harness and harness clamp on the unit so that the
unit hangs a few inches above ground level. The cutting head and the debris shield should be level in all
directions. Harness the unit on the right side of your body.
WARNING / DANGER
Do not use a Brush Cutter for cutting trees.
WARNING / DANGER
Do not cut with dull, cracked or damaged metal blade. Before cutting growth, inspect for obstructions
such as boulders, metal stakes or strands of wire from broken fences. If an obstruction cannot be
removed, mark its location so that you can avoid it with the blade. Rocks and metal will dull or damage a
blade. Wires can catch on the blade head and ap around or be thrown into the air.
WARNING / DANGER
Ensure your Brush Cutter blade does not touch type of objects such as:
• Utility Wires • Metal Stakes • Rubber • Rocks • Masonry • Fences
NOTE
Do not use a brush blade to cut trees which exceed a diameter of (13 - 19mm).
Scything
Scything can be done in both directions, or just in one way which results in the debris being thrown
away from you. One way which results in the debris being thrown away from you. That is using the side
of the blade that it is rotating away from you. Tilt down the blade slightly on this same side.
You will be hit by some debris if you scythe in both directions SAWING This must be done with a saw
blade when the weeds are too thick and strong for scything. If kickback occurs, the blade may be dull, or
the material so thick and hard that you should use a saw blade instead of the brush blade.
Growth up to 3-inches (76mm) in diameter, which is too thick for scything, may be cut by sawing.
Sawing requires judgment on your part whether to cut on the side where the blade pulls away from you
but throws back the debris, or on the side where the debris is thrown away from you but the reaction is
push which could become a kick out (blade thrust).
Always cut on the side of the tree which will cause the tree to fall away from the unit. A kick out or bind
may result if the tree falls toward the unit and pinches the blade
Do not force the blade to cut. Do not change the angle of cut after into the wood. Avoid using any
pressure or leverage which could cause the blade to bind or crack.
CUTTING WITH A METAL BLADE
Fig. 13

12
FUEL AND OIL MIXTURE
WARNING
• Never ll the fuel tank to the very top.
• Never add fuel to the tank in a closed non-
ventilated area
• Do not add fuel to this unit close to an open
re or sparks
• Be sure to wipe off spilled fuel before
attempting to start engine
• Do not attempt to refuel a hot engine.
Fuel used for this model is a mixture of unleaded
gasoline and approved 2 stroke oil. When
mixing gasoline with two-cycle engine oil, use
only gasoline which contains NO ETHANOL or
METHANOL (Types of Alcohol) Use Branded 95
octane or higher unleaded gasoline known to be
of good quality. This will help to avoid possible
damage to engine fuel lines and other engine
parts.
Fuel
The engine requires two-stroke fuel, the mixture
ratio is 25:1. Be careful that the wrong mixture of
the fuel will cause the machine failure.
Gasoline
Use 95 octane or better gasoline.
Storing Fuel
The tank to store the fuel should be clean, anti-
static, high-temperature-resistant, re prevention
and safe.
IMPORTANT
The fuel can not be stored for long time, you
might need to change to new fresh fuel before
reusing the machine.
Non - Emissions
PREPARING FOR OPERATIONS
When mixing fuel with two cycle engine oil, use only fuel which contains no ethanol or methanol (types
of alcohol). This will help to avoid possible damage to engine fuel lines and other engine parts. Do not
mix fuel and oil directly in the fuel tank.
IMPORTANT
Failure to follow proper fuel mix instructions may cause damage to the engine.
When preparing fuel mixture, mix only the amount needed for the job you are to do. Do not use fuel that
has been stored longer than two months. Fuel mixture stored longer than this will cause hard starting
and poor performance. If fuel mix has been stored longer than this time, it should be removed and lled
with fresh mixture.
WARNING / DANGER
• Never ll the fuel tank to the very top (under 3/4 of the tank).
• Never add fuel to the tank in a closed non-ventilated area.
• Do not add fuel to this unit close to an open re or sparks.
• Be sure to wipe off spilled fuel before attempting to start engine.
• Do not attempt to refuel a hot engine.
WARNING / DANGER
The engine exhaust from this product contains chemicals known to cause cancer, birth defects, or other
reproductive harm.

13
OPERATIONS
Engine Starting and Stopping Procedures -
Starting a Cold Engine
1. Move the stop switch to
“START” position. (Fig. 16).
2. Give a gentle push on the
primer bulb repeatedly (3 -
5 times) or until fuel comes
into the primer bulb.
(Fig. 17).
3. Cold Starts: Pull lever up
to close choke position.
(Fig. 18).
4. Pull starter handle until
engine starts or sounds like
it wants to start.
5. Push choke lever down to
choke open position
(excessive cranking
with choke lever closed will cause the engine
to ood making it difcult to start).
6. Pull starter handle until engine starts.
7. Allow engine to warm up for a short time
before using.
Starting Warm Engine
1. If fuel tank was not run dry, pull the starter
one to three times and the engine should
start. Do not use choke.
2. If fuel tank was run dry, after relling repeat
steps 2 through to 7 in STARTING COLD
ENGINE.
Stopping The Engine
• Move switch to STOP position. (Fig. 16B).
• Push forward to stop.
MAINTENANCE AND CARE
Air Filter
• Accumulated dust in the air lter will reduce
engine efciency. Increase fuel consumption
and allow abrasive particles to pass into the
engine. Remove the air lter as often as
necessary to maintain in a clean condition
• Light surface dust can readily be removed by
tapping the lter. Heavy deposits should be
washed out in suitable
solvent.
• Remove lter cover
by loosening air lter
cover knob.
Adjusting Carburettor
NOTE
Do not adjust carburetor unless necessary.
If you have trouble with the carburetor, see your
local Bushranger™dealer. Improper adjustment
may cause engine damage and void warranty.
• Check the fuel lter periodically. Do not allow
dust to enter into fuel tank. Clogged lter
will cause difculty in starting the engine or
abnormalities in engine performance.
• When lter is dirty, replace the lter.
• When the inside of the fuel tank is dirty, it
can be cleaned by rinsing the tank out with
gasoline.
Check Spark Plug
• Do not attempt to remove the plug from a hot
engine in order to avoid possible damage to
the threads.
Fig. 17
Fig. 16B

14
TROUBLESHOOTING
• Clean or replace the plug if fouled with heavy oily deposits.
• Replace the plug if the center electrode is worn rounded at the end.
• Spark gap 0.6-0.7mm (.023”.028”)
• Fastening torque = 145-155kg.cm (125-135in.lb)
Transport and Handling
• Blade guard should be installed when transport, handing of the unit.
Installing Blade Guard
• Clefte the blade guard and install on the blade,then put the pin into the guard notch
• The engine should be turned off when the unit is moved between work areas
• After the engine has stopped, the mufer is still hot. Never touch hot parts such as the mufer.
• Conrm that the fuel is not leaking from tank.
Extended Storage
• Inspect, clean and repair unit if necessary.
• Remove all fuel from tank.
• Start engine - this will consume all fuel in fuel line and carburetor.
• Remove spark plug and pour one tea spoon of clean motor oil into spark plug hole of cylinder-replace
spark plug.
• Store in clean, dry, dust free area.
FAILURES such as difculty in starting engine, irregularity in functions and abnormality in performance
can normally be prevented if careful attention is paid to all operating instructions and maintenance
procedures. Should the engine not function properly, check the following:
• That the fuel system is in good condition and fuel is owing to the engine.
• The ignition system is in good condition and the spark plug, sparks correctly.
• Compression of the engine is adequate.
Failure to Start
• Dispose of fuel in tank.
• Ensure that fuel is fresh and clean.
• Check fuel lter to make sure it is clean.(Replace lter if necessary).
• Make sure air lter element is clean.
• Install new, properly gapped spark plug.
• When there is serious trouble with the unit, do not try to repair it yourself, but have your local
Bushranger™dealer do it for you.

15
TROUBLESHOOTING GUIDE
Problem Likely Cause Suggested Remedy
• Out, or almost out, of fuel.
• Spark plug dirty.
• Spark plug not connected.
• Fuel older than 3 months.
• Water in the fuel tank.
• Dirty air cleaner lter.
• Fill tank with fresh 2 stroke fuel (25:1).
• Clean or replace with a new spark plug.
• Press rmly on the terminal cover.
• Drain stale fuel and replace with fresh 2
stroke fuel.
• Contact an authorised Bushranger™
dealer.
• Clean or replace with a new
Bushranger™ air-lter.
• Blocked fuel supply.
• Fuel cap is not venting.
• Incorrect type of fuel.
• Dirty air cleaner lter.
• Ensure the fuel line is not pinched or
blocked.
• Ensure vent hole in the fuel tank cap is
clear.
• Drain tank and ll with 2 stroke fuel
(25:1).
• Clean or replace with a new
Bushranger™ air-lter.
• Dirty air cleaner lter.
• Blocked fuel cap vent holes.
• Clean or replace with a new
Bushranger™ air-lter.
• Ensure vent hole in the fuel tank cap is
clear.
• Loose line trimmer head.
• Damaged cutting blade
(straight shaft model only).
• Check and tighten bolts and nuts
accordlingly.
• Replace cutting blade.
Engine does not start
Engine stops often
Engine looses power
Too much vibration

16
WARRANTY
1. Australian Consumer Law (REG. 90):
The benets to the consumer given by this warranty are in addition to other rights and remedies of the
consumer under a law in relation to the good or services to which this warranty relates.
Our goods come with guarantees that cannot be excluded under the Australia Consumer Law. You are
entitled to a replacement or refund for a major failure and for compensation for any other reasonably
foreseeable loss or damage. You are also entitled to have the good repaired or replaced if the goods fail to
be of acceptable quality and the failure does not amount to
major failure.
The text above applies notwithstanding anything else
expressed or implied to the contrary in this warranty document.
Powerup Lawn Care
a division of
Roy Gripske & Sons Pty. Ltd
11 Sodium St, Narangba QLD 4504
Telephone: 1300 363 027
Fax: 1800 332 213
For more information please visit our website:
poweruplawncare.com.au

17
Brushcutter
IPL - BRUSHCUTTER

18
Engine
SPARE PARTS - BRUSHCUTTER
Ref
No.
PartNo.DescriptionQty RefNo.PartNo.DescriptionQty
1-1 61270030004GEARCASEASS'Y 1
36
02010010009
OUTERTUBE(26X1.5X1500MM)
1
1-2 03120020002CIRCLIP 1
37
02020060006
DRIVESHAFTSOLID(1540MM)
1
1-3 03120010001CIRCLIP 1
38
02040010006
OIL-BEARING
8X14X14)
6
1-4 03090010074BEARING6000-2RS/P5 2
39
02080020006
RUBBERCOVER
6
1-5 02020090158PINION 1
40-40
61270090004
HANDLEASS'Y
1
1-6 03020030014SCREWM5×25 1
40-41
03010010048
SCREWM5X35
4
1-7 03020030021BOLTM6×12 2
40-42
70030160079
HANDLETOPHALF
1
1-8 70070010031GEARCASE 1
40-43
70030160031
HANDLEBOTTOM/PROTECTOR
1
1-9 02020160725SAFETYGUARD 1
44-44
61270040093
THROTTLELEVELASS'Y
1
1-1003020020018SCREWM5×10 3
44-45
03010040072
SCREWM5X14
4
1-1103090010072BEARING6000/P5 1
44-46
03010060053
SCREW
2
1-1202020090159GEAR 1
44-47
70030070249
RIGHTSIDETHROTTLECOVER
1
1-1302020090157GEARSHAFT 1
44-48
70030070364
SAFETYLEVER
1
1-1403090010073BEARING6002-2RS/P5 1
44-49
02050040126
THROTTLECABLE
1
1-1503120020001CIRCLIP 1
44-50
70030070363
THROTTLETRIGGER
1
1-1602020100020HOLDERA 1
44-51
02020110045
THROTTLESPRING
1
1-1702020100012HOLDERB 1
44-52
02050050289
STOPSWITCH
1
1-1803040050014WASHER10 1
44-53
03030060008
LOCKNUT
2
1-1903030010008LEFTHANDNUTM10×1.25 1
44-54
70030070256
LEFTSIDETHROTTLECOVER
1
1-2003060020004SPLITPIN2×16 1
44-55
02120030007
TUBE(8X12X210MM)
1
21-2161270020010CLUTCHCOMP. 1
44-56
03030010004
NUTM6
2
21-2202020050040CLUTCHDRUMCOMP. 1
57
70080120256
SAFETYGUARDASSY
1
21-2303120020004CIRCLIP 1
58
70030030895
SAFETYGUARD
1
21-2403090010012BEARING6202-2RS/P5 1
59
70030180649
SHIELD
1
21-2503120010005CIRCLIP 1
60
03010040025
SCREWST4.2×13
2
21-2670070060032CLUTCHCASE 1
61
02020070102
BLADECG31EBS.3-1
1
21-2702080020104RUBBERANTIVIBRATIONCOVER 1
62
02080020110
BLADEGUARD
1
21-2803010010056SCREWST5×14 1
63
02020160712
SAFETYGUARDBRACKET
1
21-2903010010058SCREWST5×25 2
64
02060040165
METALBLADE
1
21-3070070080038CLAMPA 1
65
02050220009
NYLONCUTTERHEAD
1
21-3170070080039CLAMPB 1
66
02050060020
HARNESSASS'Y
1
3203010010060SCREWM6×20 6
FUEL/OILMIXINGBOTTLE
N/A
3370030180133HARNESSCLAMP 1
TOOL1
N/A
3470030160007CLAMP 1
TOOL2
N/A
3503020020012SCREWM5×20 1
TOOL3
N/A

19
Engine
IPL - BRUSHCUTTER ENGINE

20
SPARE PARTS - BRUSHCUTTER
Ref
No.PartNo.DescriptionQty
Ref
No.PartNo.DescriptionQty
1 03010110008SCREWM5×14 1
33
70030030164
GUIDEPLATE
1
2 70030031116ENGINECOVER 1
34
03040020012
WASHERGB/T97.14
1
3 03020020055BOLTGB/T9074.4M4X12 1
35
02070010048
SPACER,HOUSING
1
4 03010010062CYLINDERBOLTSM5×20 4
36
02050030229
IGNITION,COIL
1
5 70070130032CYLINDER 1
37
03020020054
BOLTGB/T9074.4M4X20
2
6 03130010013SPARKPLUGRCJ6Y 1
38
02050050213
STOPWIRE
1
7 02070010032GASKET,CYLINDER 1
39
02080030042
RUBBERINSULATOR
1
8 02020020003RING,PISTON 2
40
02070010162
GASKET,MUFFLER
1
9 02010020005PISTON 1
41
02050010015
MUFFLER
2
1002020150002THRUSTWASHER 2
42
03050010008
INSULATORGB/T938
1
1102020010004GUDGEONPIN 1
43
03040020018
WASHERGB/T97.18
1
1202020030017CIRCLIP 2 4403010010077MUFFLERBOLTM5X55(12.92
1303090020018NEEDLE,BEARING 1
45
02070010019
GASKET,CYLINDERSIDE
1
1402020120023CRANKSHAFTCOMP 1
46
70030020016
INLETMANIFOLD
1
1503090010028BEARINGGB/T2766001/P5 2
47
03020020012
INLETMANIFOLDBOLTM5X20
2
1603100010009OILSEAL12X22X7 2
48
02070010071
GASKET,CARBIESIDE
1
1703060010002LOCATINGPIN 4
49
02700010005
CARBIEWALBRO
1
1870070050038REARCRANKCASE 1
50
70080120007
AIRCLEANERBACKINGPLATE
1
1902050100015STARTERPAWLASSY 1
51
03020020044
BOLTSGB/T9074.4M5X55
2
2002050070090STARTERASSY 1
52
02090010011
AIRFILTERELEMENT
1
2103010080028STARTERSCREWM4X16 5
53
70030040225
AIRCLEANERCOVER
1
2203070010001FLYWHEELKEY3X3.7X12 1
54
02110030079
AIRCLEANERCOVERSCREW
1
2302070010119GASKET,CRANKCASE 1
55
02110020026
FUELTANKCAPASSY
1
2470070050039FRONTCRANKCASE 1
56
61330010017
INLETFUELLINE
1
2503010010058 CRANKCASEBOLTM5X25 4
57
61330010018
OUTLETFUELLINE
1
2602050030020FLYWHEEL 1
58
02050120002
FUELFILTER
1
2703030020003 FLYWHEELNUTGB6171M8X1 1
59
03020020027
BOLTGB/T9074.4M5X16
3
2803040050052SPACERWASHER6X15X1.2 2
60
03040050022
GROMMET5X15X1
1
2902050160002CLUTCHASSY 2
61
70050030176
FUELTANK
1
3003040050042WASHER 2
62
02070010217
WASHER
1
3102020130001CLUTCHSTEPBOLTS 2
63
02080030025
GROMMET
1
3270070030026FLYWHEELCOVER 2
64
02020160894
FUELTANKPROTECTOR
1
Table of contents
Other Bushranger Brush Cutter manuals