BXB Electroics WMP-2100 User manual

2
A. Table of Contents
A. Table of Contents........................................................................................... 2
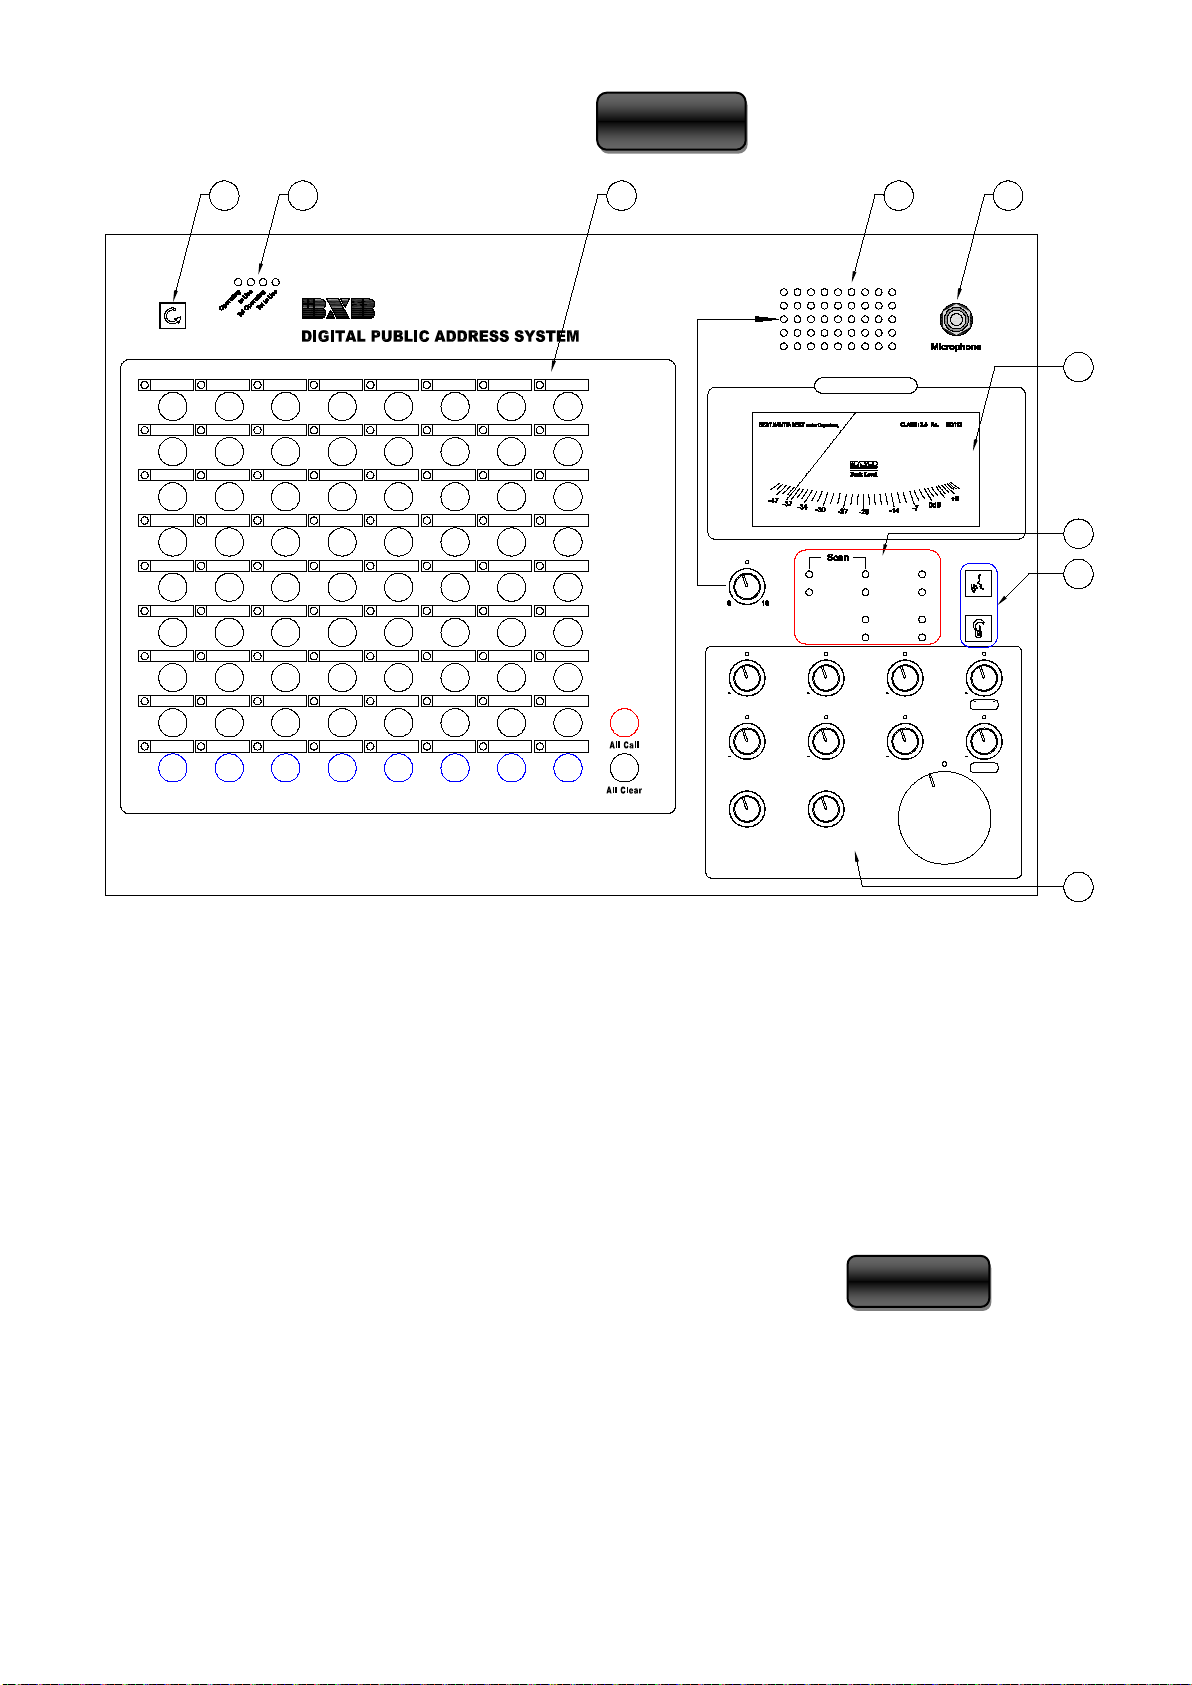
B. Front panel description.................................................................................. 3
C. Operate instruction ....................................................................................... 5
1. Re-Start ......................................................................................................... 5
2. Working status LED indicators........................................................................ 5
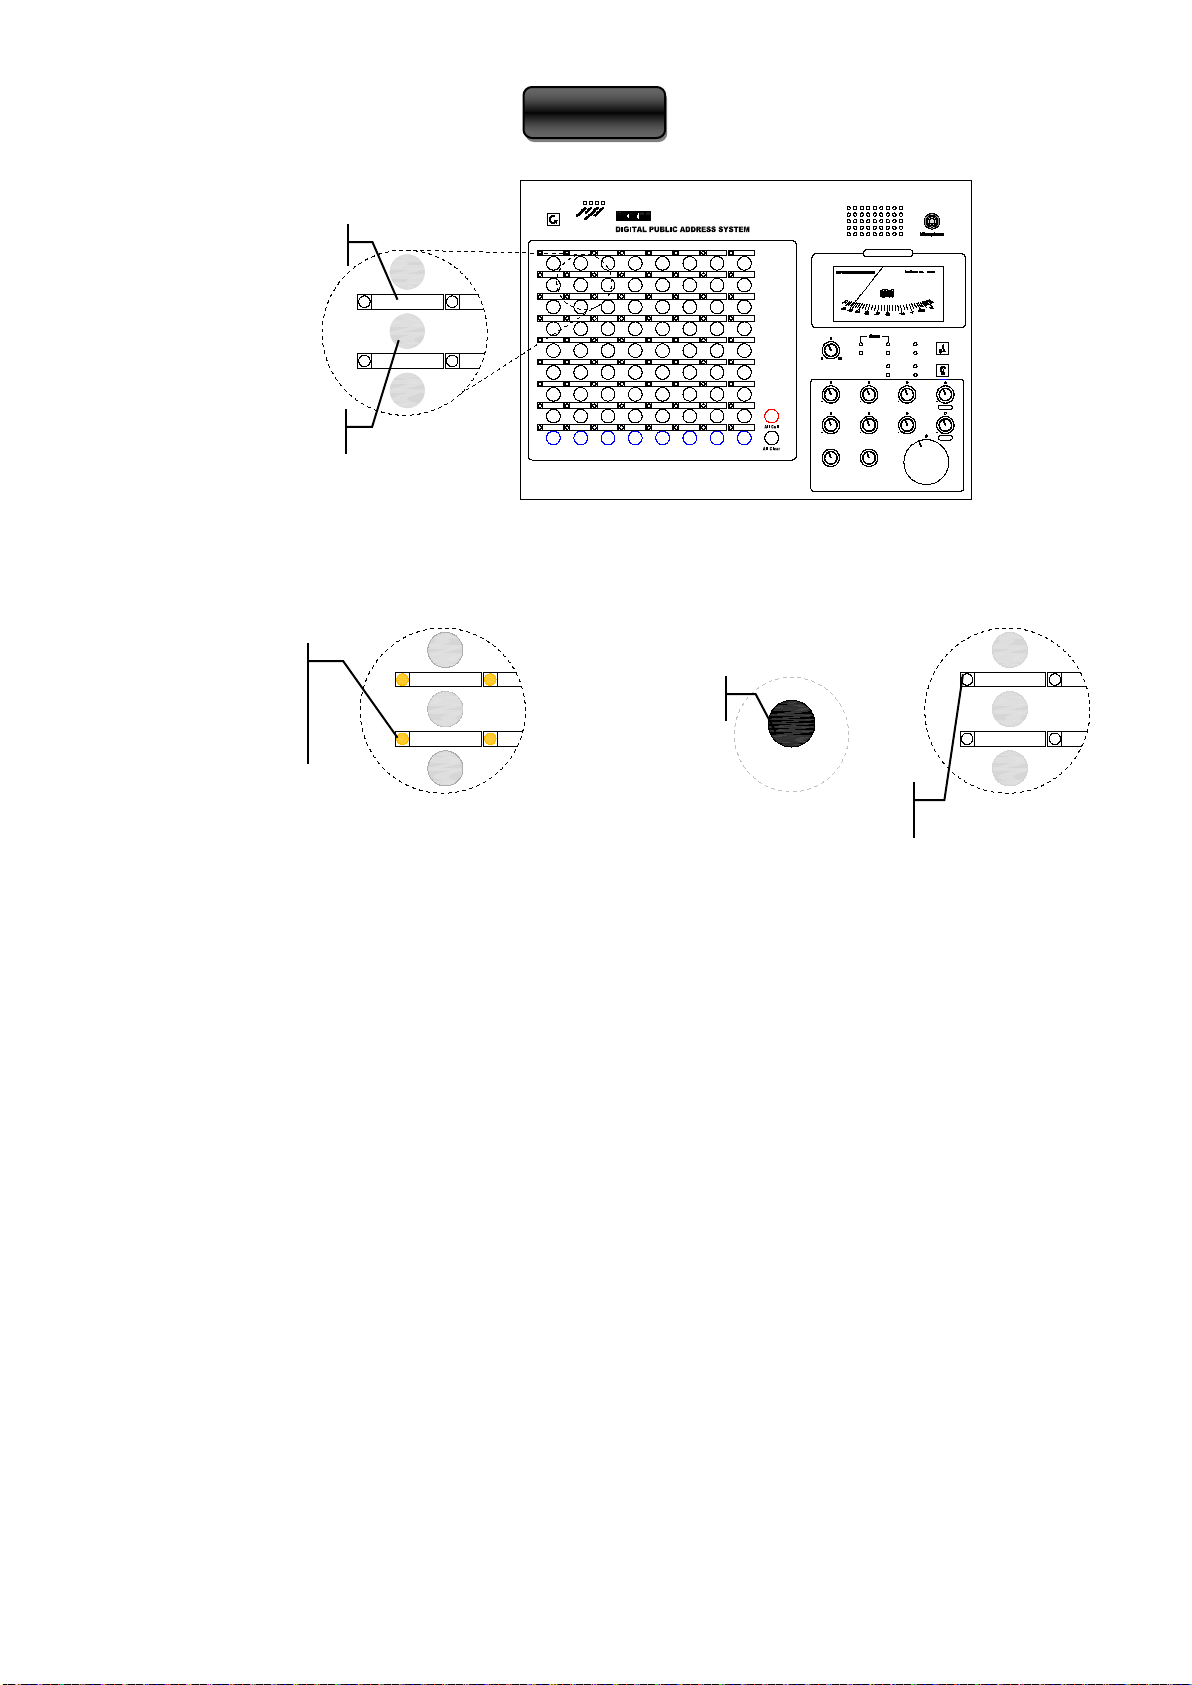
3. All Call and All Clear....................................................................................... 6
4. Single zone broadcasting ............................................................................... 7
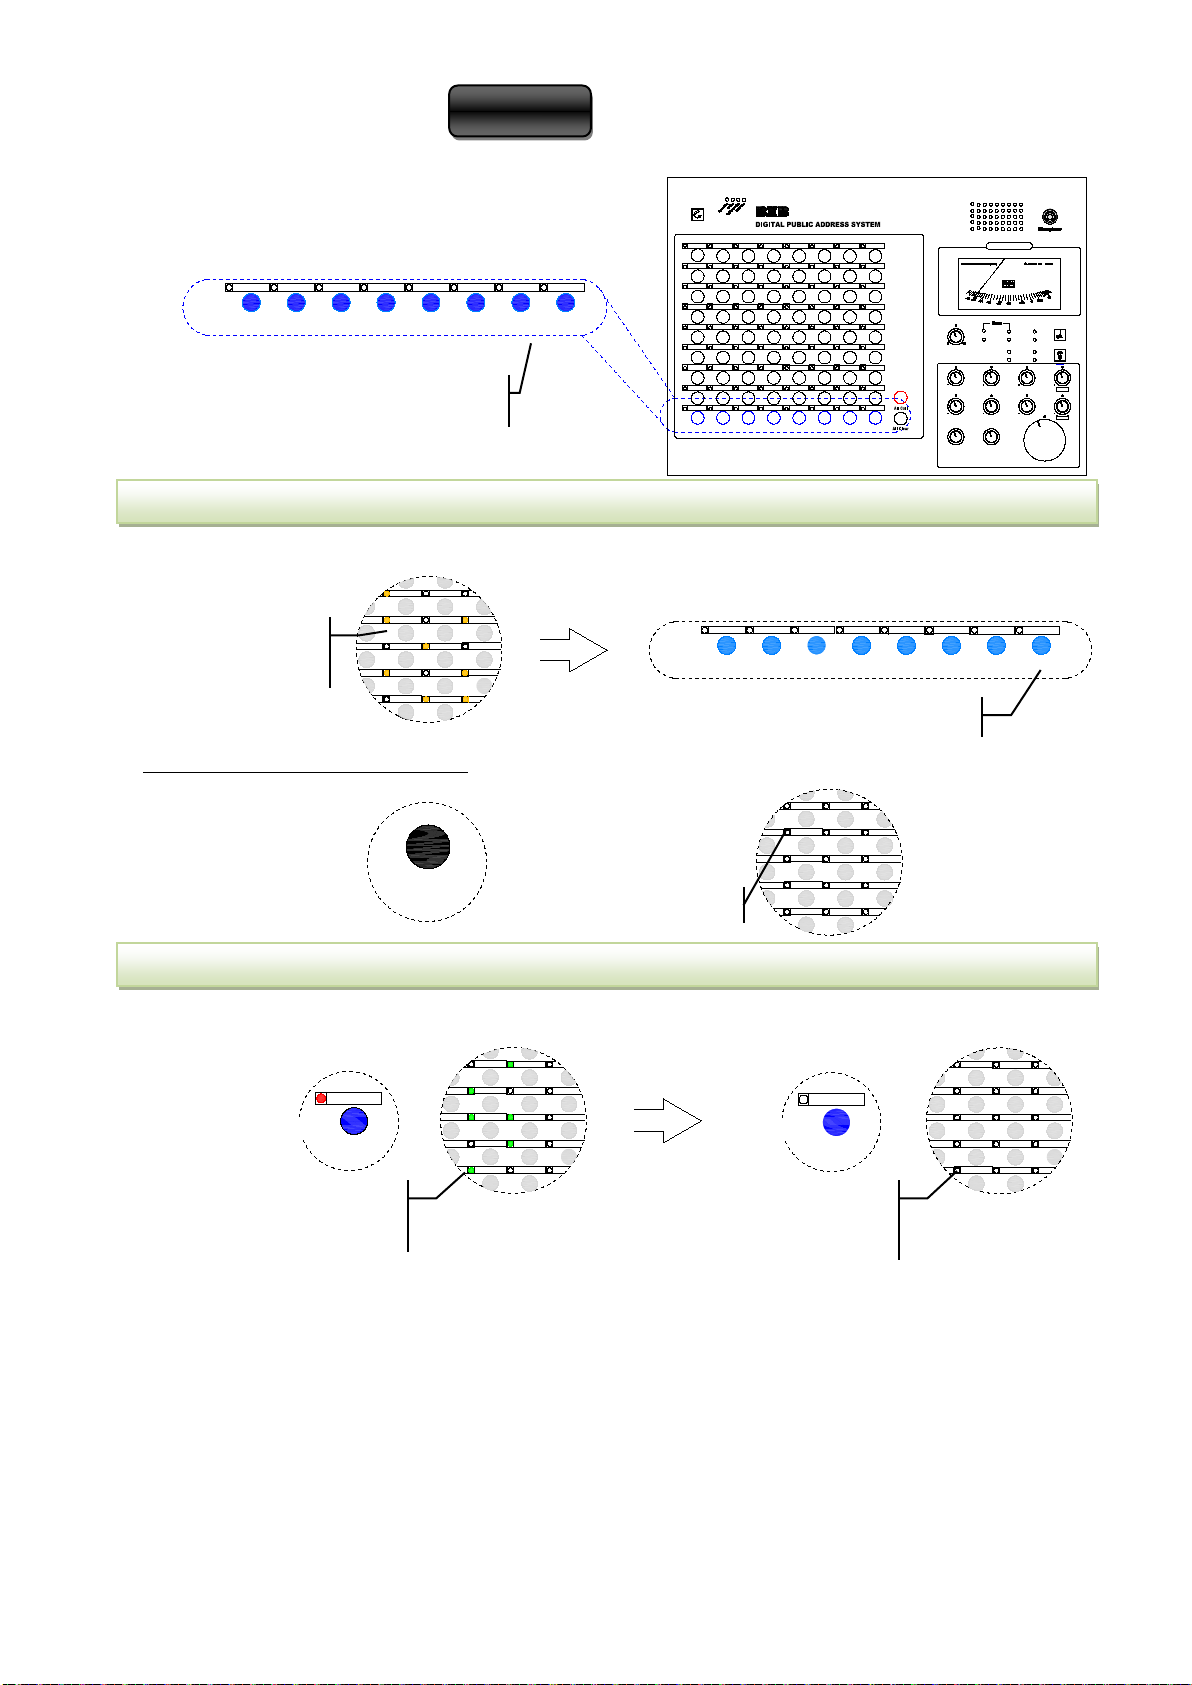
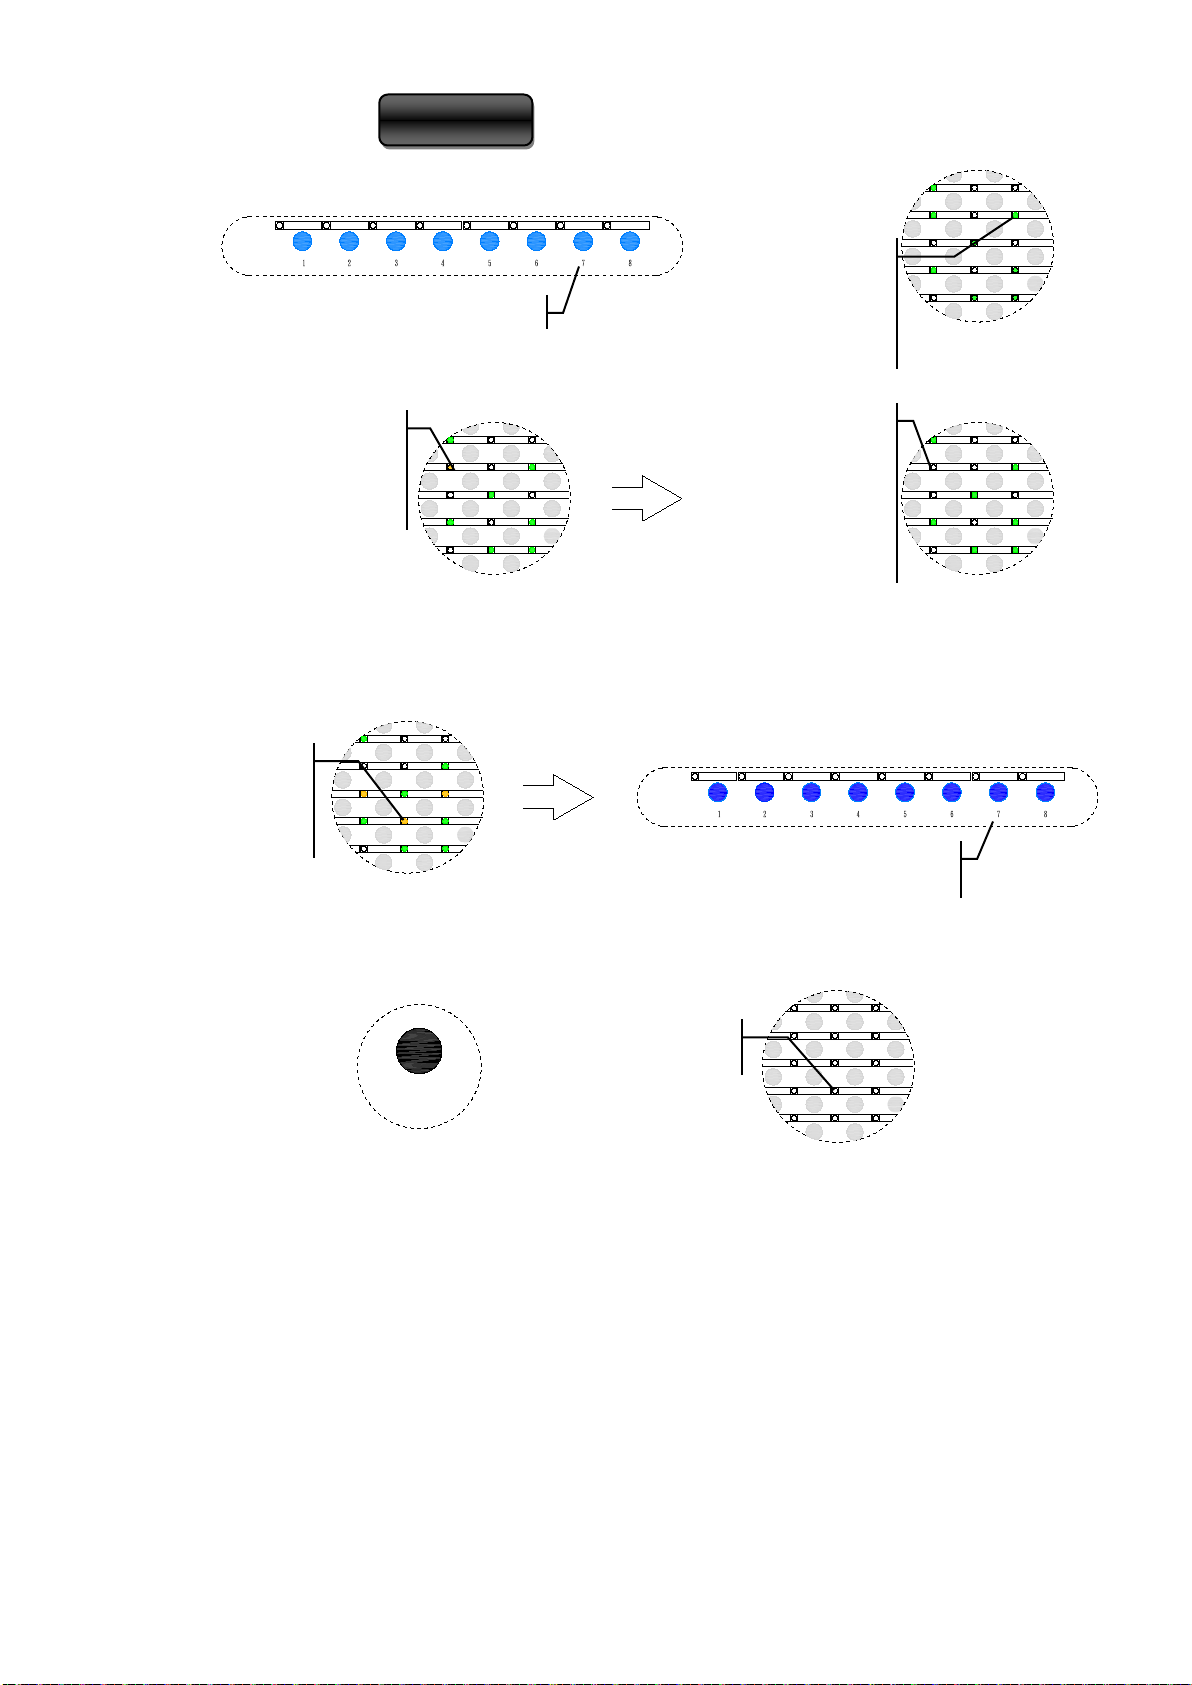
5. Group broadcasting ....................................................................................... 8
6. Reset groups.................................................................................................. 9
7. Monitor and Intercom function ................................................................... 10
8. Pre-mixer volume control ............................................................................ 11
9. Multi-function operating ............................................................................. 12
10. Identification and Solution for Remote Call back ......................................... 13
11. Security Alarm ............................................................................................. 14
12. Scan remote status ...................................................................................... 15
13. Emergent Broadcasting backup system ........................................................ 16
14. Reset ........................................................................................................... 16
15. Telephone broadcasting............................................................................... 17
16. Group broadcasting table ............................................................................ 18

3
B. Front panel description
○
1 Re-Start button
○
2 Working status LED indicators
○
3
Blue buttons:Eight groups broadcasting and multi-function buttons
White buttons:64 buttons designed for broadcasting and intercom, above each there is a
three-colored LED light to indicate current status.
Red button:All Call
Black button:All Clear or enable multi-function
○
4 Monitor speaker: Volume can be adjusted by Monitor Level knob
○
5 6.3Ø Microphone input: Microphone volume can be adjusted by Mic4 volume control
○
6 Luminous volume meter
○
7
Scan-Auto:Automatically scan Remote Decoders.
Advanced operation buttons:
Scan-Manual:Manually scan Remote Decoders.
Pass:All Call when decoders malfunction.
1 2 345
6
7
9
8
WMP-2100
A B CH
G
FED
Group
2
1
3
4
5
6
7
8
Mic 1 Mic 2 Mic 3 Mic 4
Aux 1 Aux 3Aux 2 Aux 4
TrebleBass
Master
Re-Start
Voice Level
Auto Manual Pass
30 SEC Reset
Monitor Level
010 010 010 010
010 010 010 010
-10 +10 -10 +10
0 10
Video(1)
Video(2)

4
30 SEC:The security warning (beep sound) will stop in thirty seconds
Reset:Reset to factory setting
○
8
Monitor output sounds
Monitor and Intercom buttons
Intercom function
○
9
Mic1~Mic4:6.3 Ø Microphone volume knobs, Mic1 has priority to broadcast
Pre-mixer volume control
Aux1~Aux4:Adjust Aux1~Aux4 volume. Aux1 is reserved for telephone broadcasting.
Master:Adjust master volume
Treble:Adjust treble volume
Bass:Adjust bass volume

5
C. Operate instruction
1. Re-Start
When main control unit malfunction due
to unknown reasons, press Re-Start to
start again.
The problem usually results from
instable voltage input. Installation of
voltage regulator equipment is
recommended to prevent the problem.
2. Working status LED indicators
WMP-2100
A B CH
G
FED
Group
2
1
3
4
5
6
7
8
Mic 1 Mic 2 Mic 3 Mic 4
Aux 1 Aux 3Aux 2 Aux 4
TrebleBass
Master
Re-Start
Voice Level
Auto Manual Pass
30 SEC Reset
Monitor Level
010 010 010 010
010 010 010 010
-10 +10 -10 +10
010
WMP-2100
A B CH
G
FED
Group
2
1
3
4
5
6
7
8
Mic 1 Mic 2 Mic 3 Mic 4
Aux 1 Aux 3Aux 2 Aux 4
TrebleBass
Master
Re-Start
Voice Level
Auto Manual Pass
30 SEC Reset
Monitor Level
010 010 010 010
010 010 010 010
-10 +10 -10 +10
010
Operating (red):The main control unit detects signals automatically when pressing any broadcast
buttons, including single area, all call …etc. The LED flashes red if they work properly.
In Use (green):The LED flashes green either when broadcasting or 8 groups of multi-function are in
progress.
Tel Operating (red):Telephone broadcasting light. “In Use”light flashes green when user picks up
telephone. “Tel Operating”flashes red when choosing broadcast areas on keypad.
Tel In Use (red):After choosing broadcast areas, press # to broadcast. The LED flashes red when
phone broadcasting is in progress.
Video

6
3. All Call and All Clear
All Call
Clear
All Call
Clear
WMP-2100
A B CH
G
FED
Group
2
1
3
4
5
6
7
8
Mic 1 Mic 2 Mic 3 Mic 4
Aux 1 Aux 3Aux 2 Aux 4
TrebleBass
Master
Re-Start
Voice Level
Auto Manual Pass
30 SEC Reset
Monitor Level
010 010 010 010
010 010 010 010
-10 +10 -10 +10
010
WMP-2100
A B CH
G
FED
Group
2
1
3
4
5
6
7
8
Mic 1 Mic 2 Mic 3 Mic 4
Aux 1 Aux 3Aux 2 Aux 4
TrebleBass
Master
Re-Start
Voice Level
Auto Manual Pass
30 SEC Reset
Monitor Level
010 010 010 010
010 010 010 010
-10 +10 -10 +10
010
WMP-2100
A B CH
G
FED
Group
2
1
3
4
5
6
7
8
Mic 1 Mic 2 Mic 3 Mic 4
Aux 1 Aux 3Aux 2 Aux 4
TrebleBass
Master
Re-Start
Voice Level
Auto Manual Pass
30 SEC Reset
Monitor Level
010 010 010 010
010 010 010 010
-10 +10 -10 +10
010
All zones broadcasting
Clear selected zones
1. Press All Call (red button) to broadcast and all LEDs on the main control unit will turn on and
indicate green.
Press the red button(All Call)
All LEDs will turn
on and indicate green
2. Press All Clear (black button) to finish broadcasting. All LEDs will turn off.
Press the black button (Clear)
All LEDs will turn off
Video

7
4. Single zone broadcasting
Clear
WMP-2100
A B CH
G
FED
Group
2
1
3
4
5
6
7
8
Mic 1 Mic 2 Mic 3 Mic 4
Aux 1 Aux 3Aux 2 Aux 4
TrebleBass
Master
Re-Start
Voice Level
Auto Manual Pass
30 SEC Reset
Monitor Level
010 010 010 010
010 010 010 010
-10 +10 -10 +10
010
Blank for zone title
Single zone select button
1. Press buttons of preferred zones
S
tart to broadcast
when the orange
LEDs turn on
Lights will turn off when finish broadcasting
2. Done broadcasting
Press All Clear
Select one or more zones you want to broadcast. You can start broadcasting when LEDs
turn on and indicate orange.
Each button has a three-colored LED light which shows different messages when lit, the
colors are as follows…
Green:Groups or All Call broadcasting
Orange:Single zone broadcasting、intercom、calling status signal
Red:Access system or Security alarm signal
Zone number:Main control unit A01~H08、Extension control unit 1 A09~H16、Extension
control unit 2 A10~H24. Upon every button has 4×18 mm blank to stick the zone names.
Video

8
5. Group broadcasting
Group
ABCDEFGH
Group
1
Group
1
Clear
1
Group
23 4 5 6 7 8
WMP-2100
A B CH
G
FED
Group
2
1
3
4
5
6
7
8
Mic 1 Mic 2 Mic 3 Mic 4
Aux 1 Aux 3Aux 2 Aux 4
TrebleBass
Master
Re-Start
Voice Level
Auto Manual Pass
30 SEC Reset
Monitor Level
010 010 010 010
010 010 010 010
-10 +10 -10 +10
010
Group buttons (blue)
Group setting
1. Select zones
The LEDs will turn on
and indicate orange
Group setting and broadcasting (blue)
2. Press one blue button for three seconds and
you will hear three long beeps.
Group broadcasting
1. Press the preseted group button
The LEDs will turn on
and indicate green
Press group button to finish
and
the LEDs will turn off
2. Press the group button again to finish broadcasting
WMP-2100 supports 8 groups of group broadcasting and every Extension control unit supports
8 groups as well. Therefore, you can have 24 groups at most. Please refer to instructions above
for group setting.
The groups are named in alphabetical order (from left to right):
Main control unit starts from A to H (1~8 groups);1st extension control unit starts from A to H
(9~16 groups), 2nd extension control unit starts from A to H (17~24 groups). When
broadcasting, press the presented group button to start.
3. Press clear button to clear the zones (Finish setting by pressing Clear)
All LEDs will turn off
Video

9
6. Reset groups
Clear
Group
Group
1. Press Group button(s) you want to make changes. (add/remove
zones)
Groups broadcasting/ setting (blue)
Preset zone
LEDs
will
turn on and
indicate green
2. Select the zones which you want to remove
When being pressed
the first time,
the LED will
turn on and indicate
orange to reconfirm
When being pressed
the second time,
the
LED will
turn off,
shows the zone has
been removed
3. Select the desired zones to add in. Then press the group button for three seconds.
You will hear three long beeps.
The LEDs will
turn
on and indicate
orange
Groups broadcasting/setting (blue)
4. Press “All Clear”to finish setting and all LEDs will turn off
All LED will turn off
There is no need to reset control unit when add/remove zones from the groups. You can
add/remove as many times as you need.
When broadcasting, simply press preset group buttons to start.
Video

10
7. Monitor and Intercom function
WMP-2100
A B CH
G
FED
Group
2
1
3
4
5
6
7
8
Mic 1 Mic 2 Mic 3 Mic 4
Aux 1 Aux 3Aux 2 Aux 4
TrebleBass
Master
Re-Start
Voice Level
Auto Manual Pass
30 SEC Reset
Monitor Level
010 010 010 010
010 010 010 010
-10 +10 -10 +10
010
Select single zone to enable intercom
Intercom is enabled when
the LED turns on
and
indicates orange.
1. Select the desired zone to enable
Intercom is enabled when
the LED turns on
and
indicates orange.
2. Press the same zone again to disable
intercom
Intercom is
disabled as
LED
turns off
1. Press and it will light up orange. Select the desired zone to enable intercom and
the green LED will be on simultaneously. Press again to disable intercom and the
light will be off. Press to enable monitoring (ex: MIC, CD, Tape) and it will light up
orange. To disable monitoring, press again and the light will be off.
2. Monitor and intercom functions can be played by built-in speaker. The volume can be
adjusted by “Monitor Level”.
Video

11
8. Pre-mixer volume control
Mic 1 Mic 2 Mic 3 Mic 4
Aux 1 Aux 3Aux 2 Aux 4
TrebleBass
Master
WMP-2100
A B CH
G
FED
Group
2
1
3
4
5
6
7
8
Mic 1 Mic 2 Mic 3 Mic 4
Aux 1 Aux 3Aux 2 Aux 4
TrebleBass
Master
Re-Start
Voice Level
Auto Manual Pass
30 SEC Reset
Monitor Level
010 010 010 010
010 010 010 010
-10 +10 -10 +10
010
Microphone
Mic 1 has priority for broadcasting
Mic 2 ~ Mic 4 adjust Mic2~Mic4
Aux
Aux 1
adjust volume of
phone broadcasting
Aux 2 ~ Aux 3
: adjust
Aux2~Aux3 volume
Bass: adjust bass volume
Treble: adjust treble volume Master:
adjust Master volume
Control microphone volume
a. Adjust Mic1~Mic4 volume
b. Mic 1 has priority for broadcasting
c. Mic 4: volume adjustment for Mic 4 (both front panel and rear panel).
Aux 1 is for adjusting phone broadcasting volume. Aux 2~Aux 4 are for adjusting Aux2~Aux4
volume.
Bass : adjust bass volume;Treble : adjust treble volume
Master:adjust Master volume

12
9. Multi-function operating
Group
Clear
Group
Clear
H
G
FE
D
BC
A
Group
HGFEDB CA
HGFEDB CA
WMP-2100
A B CH
G
FED
Group
2
1
3
4
5
6
7
8
Mic 1 Mic 2 Mic 3 Mic 4
Aux 1 Aux 3Aux 2 Aux 4
TrebleBass
Master
Re-Start
Voice Level
Auto Manual Pass
30 SEC Reset
Monitor Level
010 010 010 010
010 010 010 010
-10 +10 -10 +10
010
Button to enable
multi-function
Eight multi-function
control buttons
These 8 multi-function buttons control remote equipments, such as turning on/off projector, PTZ
(pan/tilt/zoom) of a video camera and light switching…etc. Instructions are shown as below:
Press All Clear for three seconds and the LEDs on 8 blue buttons will turn on
Press “All clear”
for
three seconds
8 multi-function buttons can be customized
Select a zone and the
LED
will
turn on and indicate
orange. After that, press
a
multi-
function button to
control.
Multi-function are enabled when all LEDs turn on
Select a desired zone to control by pressing one of the blue multi-function buttons
Only one area is allowed to be controlled at a time (the last selected is the area to be
controlled.)
We highly recommend clearing the present area before controlling the next area.
Press All Clear for three seconds and wait until all LEDs turn off to disable the multi-function.
Video

13
10. Identification and Solution for Remote Call back
WMP-2100
A B CH
G
FED
Group
2
1
3
4
5
6
7
8
Mic 1 Mic 2 Mic 3 Mic 4
Aux 1 Aux 3Aux 2 Aux 4
TrebleBass
Master
Re-Start
Voice Level
Auto Manual Pass
30 SEC Reset
Monitor Level
010 010 010 010
010 010 010 010
-10 +10 -10 +10
010
1. When remote call back button is pressed
When 30 SEC is activated, call
back signal will stop in 30 seconds
Calling zone LED will
be
flash
ing orange with rapid
beeps while remote call
back
button is activated
2. When pressing the button with flashing LED
The beeps will stop and orange
LED will stop flashing. You can
speak with remote person at this
time.
Finish intercom as LED turns off
3. Press the same button to finish
To provide request information of intercom/ call for help, a return call signal is transmitted by
remote decoder to main control unit. The instruction as below:
1. The remote decoder transmits a requested signal to main control unit as remote call button is
pressed.
2. The LED upon the triggered zone on main control unit will be flashing orange with rapid beeps.
3. Press the requested zone button on main control unit to enable intercom.
Call back signal will
stop
in 30 seconds when
this
function is enabled.
Addition
You can also set up the unit to stop beeping
in 30 seconds automatically when remote
zone call back is enabled.
Video

14
11. Security Alarm
WMP-2100
A B CH
G
FED
Group
2
1
3
4
5
6
7
8
Mic 1 Mic 2 Mic 3 Mic 4
Aux 1 Aux 3Aux 2 Aux 4
TrebleBass
Master
Re-Start
Voice Level
Auto Manual Pass
30 SEC Reset
Monitor Level
010 010 010 010
010 010 010 010
-10 +10 -10 +10
010
1. When security alarm is triggered
The LED of the zone will
be flashing red and you
can hear rapid beeps
2.Enable monitor/ deterrence by pressing the
triggered zone
Red LED will keep flashing
while the beeps stop
3.Press the same zone again to cancel
The alarm is canceled when LED turns off
Remote zones are capable to be integrated with infrared modules or electronic magnetic locks to
build sets of security alarms. The instructions are shown as below.
1. When any remote zone is broken in, the remote decoder will transmit security signal to the main
control unit.
2. The LED of the zone will be flashing red with rapid warning beeps
3. Press the zone (white button) on main control unit to implement monitoring or determent.
4. To disable security signal, press the same zone again.
Video

15
12. Scan remote status
WMP-2100
A B CH
G
FED
Group
2
1
3
4
5
6
7
8
Mic 1 Mic 2 Mic 3 Mic 4
Aux 1 Aux 3Aux 2 Aux 4
TrebleBass
Master
Re-Start
Voice Level
Auto Manual Pass
30 SEC Reset
Monitor Level
010 010 010 010
010 010 010 010
-10 +10 -10 +10
010
Auto and Manual scan
Scan manually
Scan automatically
Through this function the unit can detect and show status of remote zones. For example, to
examine whether remote security system or lighting is on/off; to remotely switch on/off lighting
or activate/deactivate security system.
Permanent Green:Remote security system is off; remote lighting is off.
Flashing Red:Remote Decoder is not installed/ not exist / broken.
Permanent Orange:Remote security system is on; remote lighting is on.
Manual scan:LED will turn on when enabled. Meanwhile, you will hear one long and five
short beeps. N.C. status of remote decoder will be shown when pressing any
zone. To cancel, press Manual (LED will turn off) to return to normal mode.
Auto scan:LED will turn on when enabled. Meanwhile, you will hear one long and four short
beeps. 192 remote decoders and N.C status will be automatically be scanned
and shown. While scanning, rapid beeps will be played. To cancel, press Auto
(LED will turn off) to return to normal mode.
Video

16
13. Emergent Broadcasting backup system
14. Reset
WMP-2100
A B CH
G
FED
Group
2
1
3
4
5
6
7
8
Mic 1 Mic 2 Mic 3 Mic 4
Aux 1 Aux 3Aux 2 Aux 4
TrebleBass
Master
Re-Start
Voice Level
Auto Manual Pass
30 SEC Reset
Monitor Level
010 010 010 010
010 010 010 010
-10 +10 -10 +10
010
Pass
WMP-2100
A B CH
G
FED
Group
2
1
3
4
5
6
7
8
Mic 1 Mic 2 Mic 3 Mic 4
Aux 1 Aux 3Aux 2 Aux 4
TrebleBass
Master
Re-Start
Voice Level
Auto Manual Pass
30 SEC Reset
Monitor Level
010 010 010 010
010 010 010 010
-10 +10 -10 +10
010
Reset
Press Pass (LED will turn on) to
broadcast to all areas when main
control unit malfunctions due to
unknown reasons.
This function is to deal with malfunction result from being struck by lightning or other unknown
reasons. By pressing Pass, you can broadcast to all.
Reset all setting to factory setting
The LED on Reset button will be flashing for about six seconds. You can hear one long and two
short beeps and then rapid beeps to show that the Main control unit is rested to factory setting
(the LED will turn off)
Video
Video

17
WMP-2100
A B CH
G
FED
Group
2
1
3
4
5
6
7
8
Mic 1 Mic 2 Mic 3 Mic 4
Aux 1 Aux 3Aux 2 Aux 4
TrebleBass
Master
Re-Start
Voice Level
Auto Manual Pass
30 SEC Reset
Monitor Level
010 010 010 010
010 010 010 010
-10 +10 -10 +10
010
WMP-2100
A B CH
G
FED
Group
2
1
3
4
5
6
7
8
Re-Start
WMP-2100
A B CH
G
FED
Group
2
1
3
4
5
6
7
8
Re-Start
15. Telephone broadcasting
Single zone Table
It’s available for telephone to broadcasting to single zone, groups or All zones. The process is shown as
below:
Telephone broadcasting table:
1. Select available line from the PSTN (public switched telephone network)/ Dial designated line
code on the phone. As pressing the key which represents telephone broadcasting, WMP-2100
will be turned on.
2. Press the numbers of desired zones or group. It’s available from single zone, group, or all call.
(Press " * " key to clear incorrect code and re-enter; previous selected areas will not be
canceled.)
3. After selecting the zones and press (#), you are ready to broadcast (the chime will be played
prior to broadcasting).
4. When finish broadcasting, simply hang up the phone and you will hear the chime again. After
that, WMP-2100 will be turned off.
Video

18
16. Group broadcasting table
Press 999All 192 zones are on〈ALL CALL〉
Press 000Clear all the areas on the control units
Press (*)Cancel the incomplete number but not limited to correct combination you have entered.
Groups broadcasting table:
Groups Enable groups Disable groups
1st Group 901 001
2nd Group 902 002
3rd Group 903 003
4th Group 904 004
5th Group 905 005
6th Group 906 006
7th Group 907 007
8th Group 908 008
9th Group 909 009
10th Group 910 010
11th Group 911 011
12th Group 912 012
13th Group 913 013
14th Group 914 014
15th Group 915 015
16th Group 916 016
17th Group 917 017
18th Group 918 018
19th Group 919 019
20th Group 920 020
21st Group 921 021
22nd Group 922 022
23rd Group 923 023
24th Group 924 024
★Notice:Please press “#” after entering the combinations for
broadcasting; otherwise the channels of voice will not be
outputted.
Video
Video
This manual suits for next models
1
Table of contents