ByronStatics KBB-250 Manual

1
care & instruction manual
For household and indoor use only
Please read and retain these instructions for future reference
CD/AM/FM
KBB-250

2
1 SAFETY
•
FOR HOUSEHOLD AND INDOOR USE ONLY
•
PLACE THE APPLIANCE ON A FLAT, STABLE SURFACE WITH ADEQUATE VENTILATION AND AWAY
FROM OTHER SOURCES OF HEAT. MINIMUM DISTANCES AROUND THE APPLIANCE FOR ADEQUATE
VENTILATION IS 15CM. DO NOT COVER OR RESTRICT VENTILATION OPENINGS.
•
KEEP THE APPLIANCE AND ITS CORD OUT OF REACH OF CHILDREN LESS THAN 8 YEARS.
•
DO NOT ALLOW CHILDREN TO USE THE APPLIANCE WITHOUT SUPERVISION.
•
FULLY UNWIND THE CABLE BEFORE PLUGGING IN AND ENSURE THE CABLE IS POSITIONED AWAY
FROM AREAS WHERE IT IS LIKELY TO GET DAMAGED OR CAUSE A TRIP HAZARD.
•
DO NOT OPERATE THE APPLIANCE IF DAMAGED OR AFTER IT MALFUNCTIONS. IN THE EVENT THE
SUPPLY CORD IS DAMAGED, IT MUST ONLY BE REPLACED BY A QUALIFIED SERVICE ENGINEER,
WITH A SUITABLY APPROVED PART.
•
DO NOT PULL ON THE CABLE TO DISCONNECT FROM MAINS SUPPLY.
•
KEEP APPLIANCE, CABLE AND PLUG DRY AND AWAY FROM AREAS WHERE IT IS LIKELY TO GET
SPLASHED. AVOID USING IN HOT, HUMID ENVIRONMENTS.
•
DO NOT PLACE ITEMS WITH NAKED FLAMES OR CONTAINERS WITH LIQUIDS ON THIS APPLIANCE.
•
SWITCH OFF AND UNPLUG WHEN NOT IN USE AND BEFORE CLEANING OR SERVICING THE
APPLIANCE. SERVICING OF THIS APPLIANCE MUST ONLY BE CARRIED OUT BY A QUALIFIED
ELECTRICIAN.
•
ALWAYS ENSURE THE MAINS PLUG IS READILY UNPLUGGABLE – DO NOT USE WITH ‘LOCKABLE’
SOCKETS OR PERMANENTLY WIRE TO MAINS.
The lightning flash with arrowhead s
y m b o l , w i t h i n a n e q u i l a t e r a
l
triangle, is intended to alert
the
user to the presence of
uninsulated
d a n g e r o u s v o lt a g e " w i th i n th
e
product's enclosure that may be
of
sufficient magnitude to constitute
a
risk of electric shock to persons
WARNING
The exclamation point within a
n e q u i l a t e r a l tr i a n g l e i
s
intended to alert the
user to
the p res ence of im
portant
operating and
maintenance
(servicing) instructions in
the
literature accompanying
the
appliance.
RISK OF ELECTRIC SHOCK
DO NOT OPEN
T O R E D U C E T H E R I S K O F E
L EC T R IC S H O CK , D O N O
T
REMO VE CO VER ( OR
BACK)
NO USER-SERVICEABLE
PARTS
INSIDE. REFER SERVICING
TO
Q U A L I F I E D S E R V I C E
PERSONNEL.
LASER SAFETY
This unit employs an optical laser beam system in the CD
mechanism, designed with built-in safeguards. Do not
attempt to disassemble, refer to qualified service personnel.
Exposure to this invisible laser light beam may be harmful to
the human eye.
THIS IS A CLASS-1 LASER PRODUCT. USE OF
CONTROLS, OR ADJUSTMENTS OR PROCEDURES
OTHER THAN THOSE SPECIFIED HEREIN, MAY RESULT
IN HAZARDOUS LASER LIGHT BEAM EXPOSURE.
INVISIBLE LASER RADIATION
WHEN OPEN AND INTERLOCK
FAILED OR DEFEATED.
AVOID DIRECT EXPOSURE TO
LASER BEAM.

3
2. PARTS
1.
Function Switch
2.
Volume control
3.
CD door
4.
Band Switch(AM/FM)
5.
Tuning Control
6.
Carry Handle
7.
CD door open / close point
8.
LED display
9.
CD Repeat button
10.
CD Skip Down () button
11.
CD Program button
12.
CD Stop button
13.
CD Skip Up () button
14.
CD Play/ Pause ( ) button
15.
Program indicator
16.
Power Indicator
17.
FM antenna
18.
Aux/Line-in Jack
19.
AC power cord socket
20.
AC power cord (not shown)

4
3
BATTERY OPERATION
To use the appliance with batteries ensure that the AC power cord is NOT inserted into the back of the
appliance and install batteries (not included) into the battery compartment.
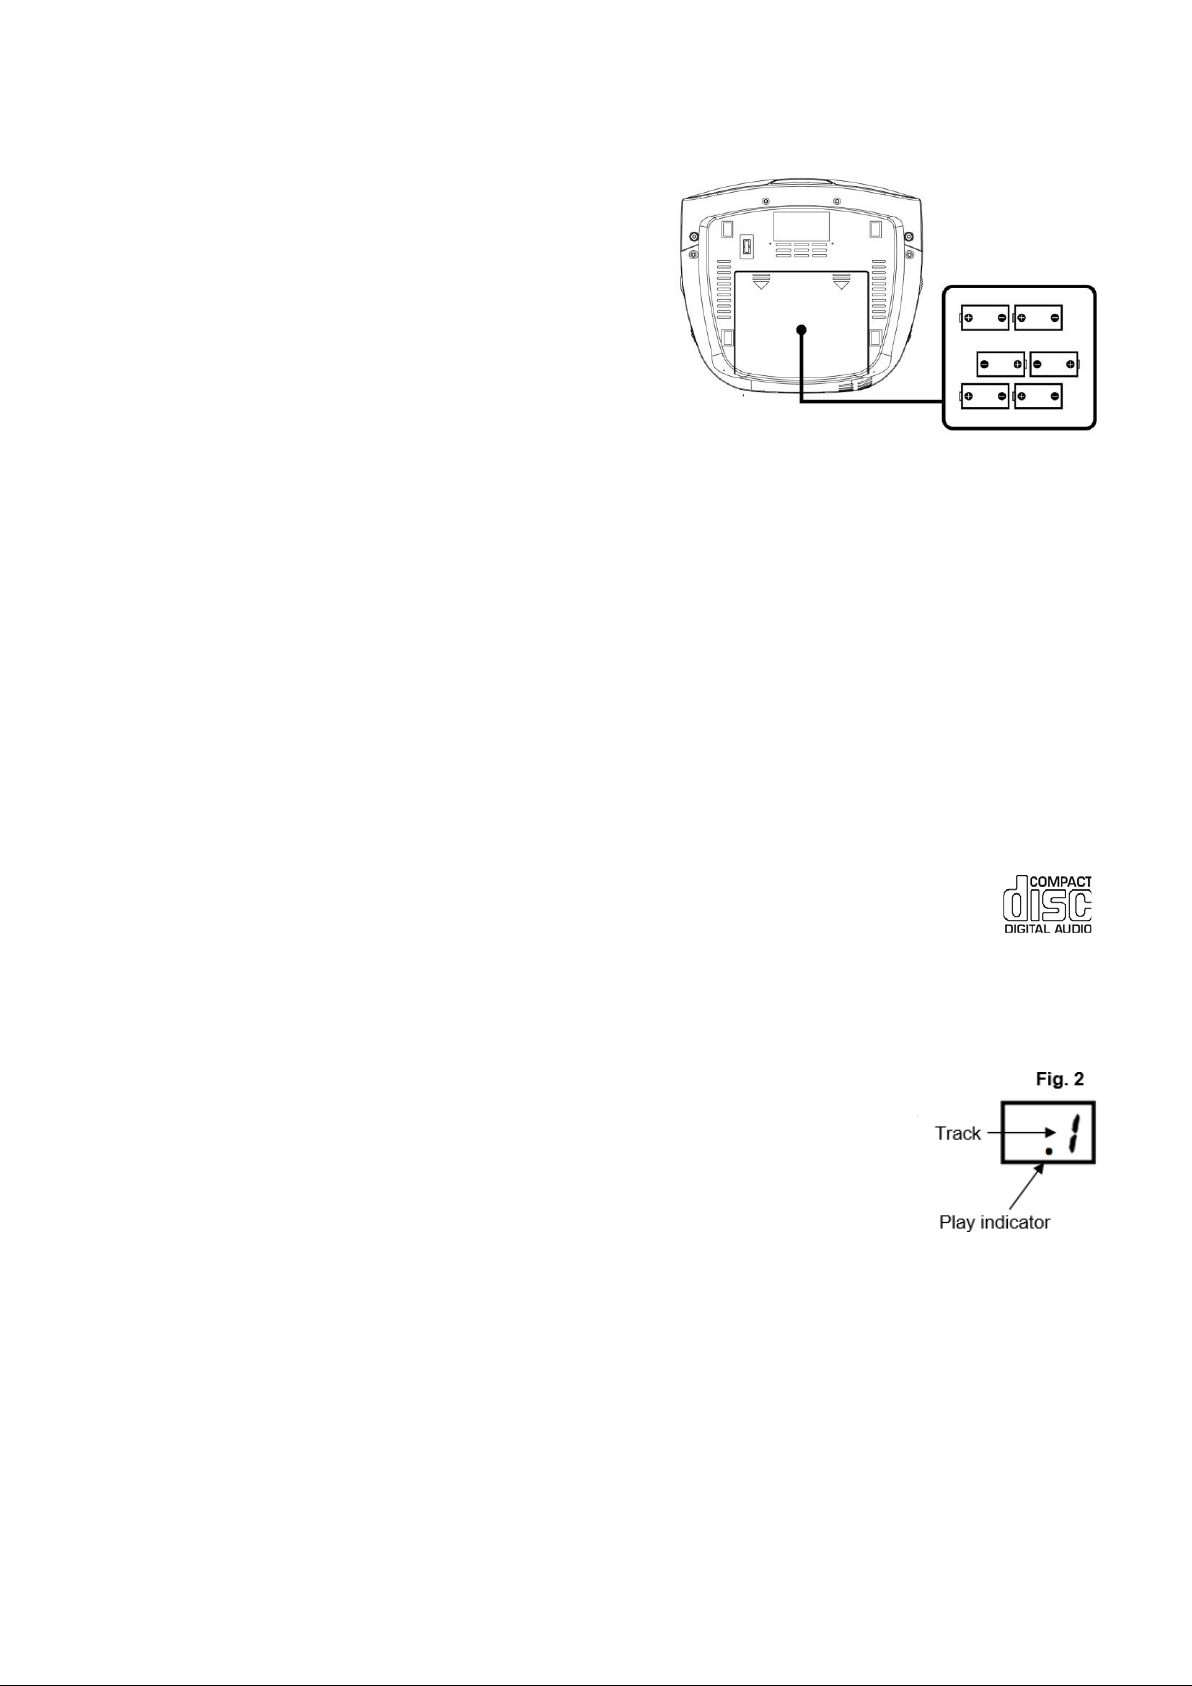
Slide off the battery compartment cover from
underneath the unit (see Fig. 1).
Insert 6 x C/LR14 1.5V heavy-duty alkaline batteries
in accordance with the diagram in the battery
compartment. Take care to observe the correct
polarity (+/ -).
Refit the battery compartment cover.
Do not expose the batteries or the installed batteries
to excessive heat (e.g. fire, sunshine or position
close to radiators etc.).
BATTERY SAFETY AND DISPOSAL
•
CAUTION – Danger of explosion if batteries are incorrectly fitted / replaced.
•
Only use ‘C’ 1.5V batteries in this appliance.
•
Be sure to insert batteries correctly taking care to observe the correct polarity (+ and -).
•
Use only batteries of the same or equivalent type as recommended.
•
Do not recharge non-rechargeable batteries.
•
Remove rechargeable batteries from appliance before recharging.
•
Never mix old and new batteries (replace all batteries at the same time).
•
Never try to dismantle batteries.
•
Do not short-circuit the supply terminals.
•
Always remove exhausted or dead batteries from the product.
•
Remove batteries from the product before extended storage.
•
Dispose of batteries responsibly at local authority household waste recycling facility.
•
DO NOT dispose of batteries in a fire as the batteries may explode.
4.
MAINS OPERATION
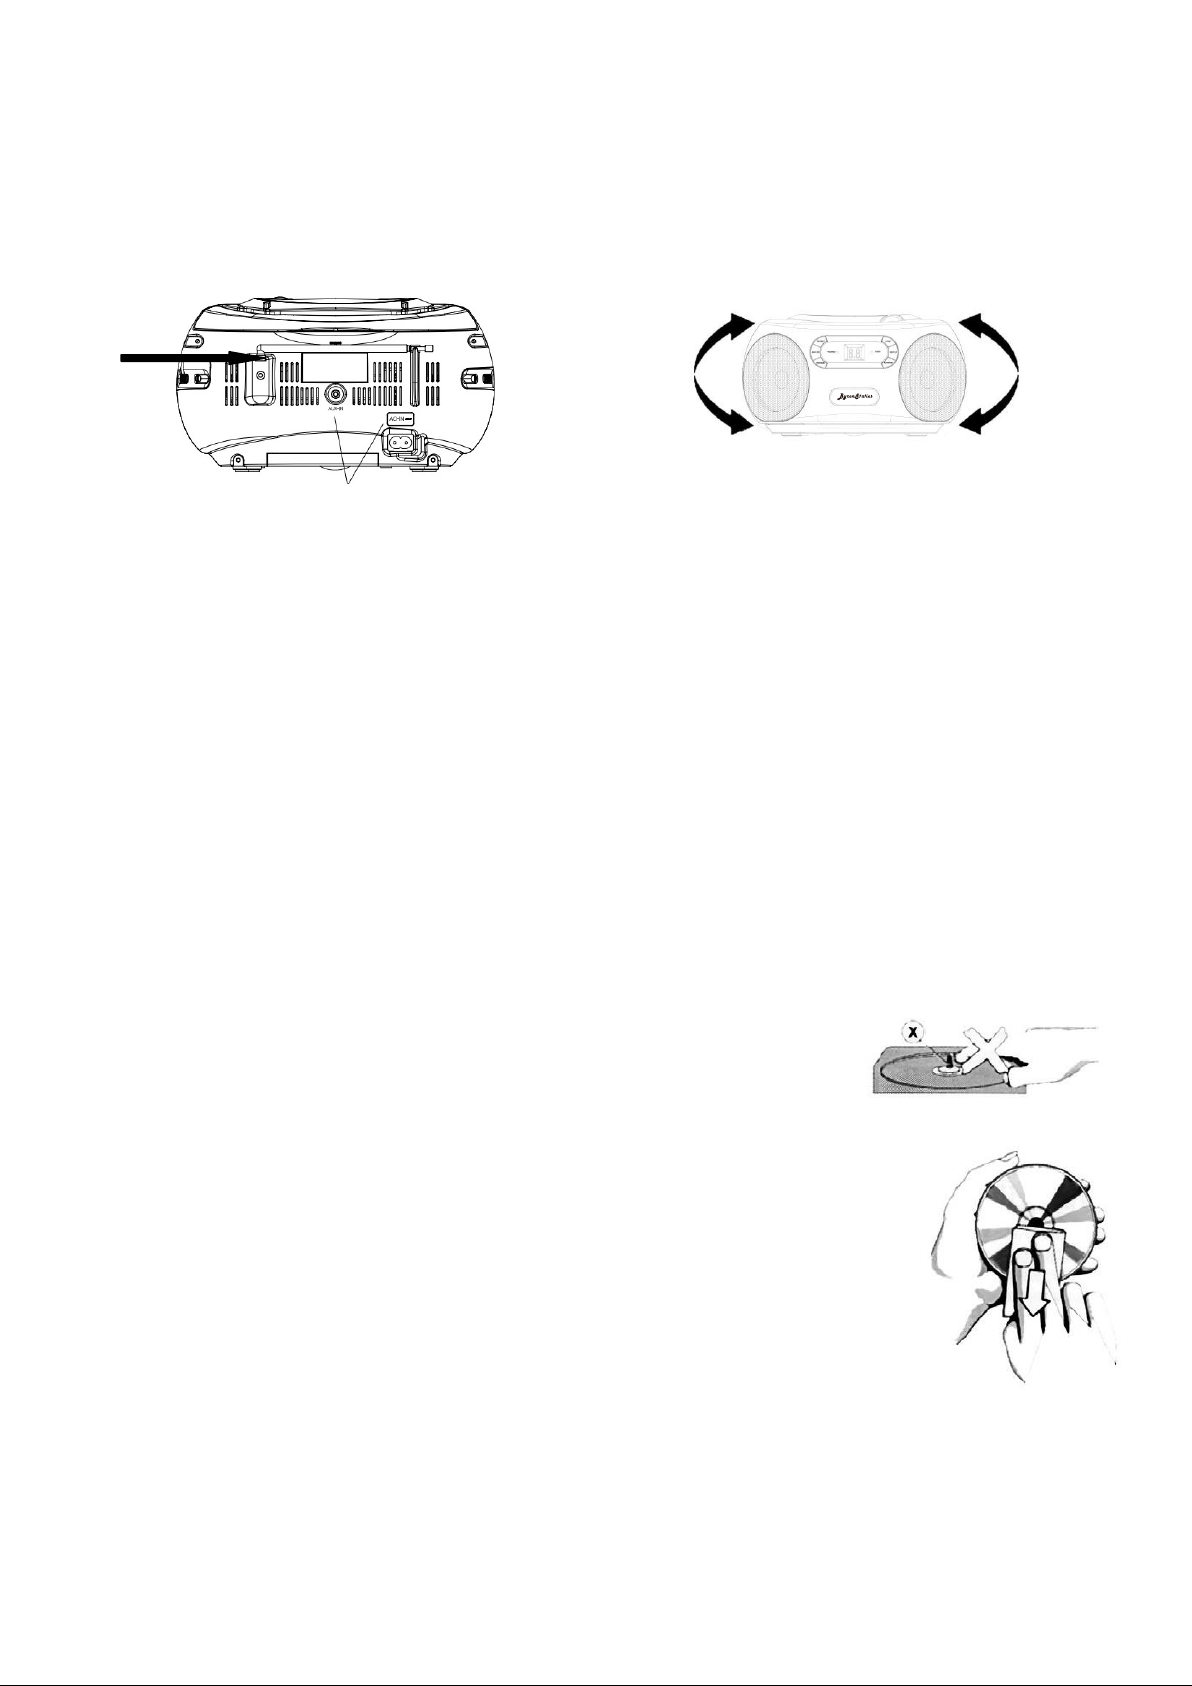
Fit the AC power cable into the AC power cable socket at the rear of the appliance and plug into the mains.
5.
USING THE CD PLAYER
The appliance is suitable to play compact discs bearing the identification mark shown. Whilst
it can also read and play CD-R and CD-RW discs, the playability may be affected by the type
of software used to create the discs and the quality and condition of the blank media. This is
not an indication of a problem with the unit. MP3 discs cannot be played.
Remove the adhesive tape on the CD door, lift the CD door at the CD open / close point and remove the
protective card.
Slide the function switch to the CD/AUX IN position, the display will illuminate.
Insert a disc (label side up) and gently close the CD door. The display will initially show a flashing ‘--’
followed by the total number of tracks for that disc after a few seconds.
If the disc is upside down or damaged the display will still show a flashing ‘--’ followed
by ‘no’. If no disc has been inserted the display will also show ‘no’.
To start the music, press the PLAY/PAUSE button. After a few seconds the music
will start to play, the display will show the track being played (1) and the play indicator
‘.’ will illuminate in the display (fig. 2).
Adjust the volume to the desired level by rotating the volume control knob.
To pause the music, press the PLAY/PAUSE button. The play indicator will flash in
the display to show that the unit is in pause mode.
To resume play, press the PLAY/PAUSE button again, the music will start to play and track number will stop
flashing.
To stop the playing the disc, press the CD STOP button and the display will show the total number of tracks
on the CD.
To turn off the unit at any time, move the function switch to the OFF position.
Fig. 1

5
6.
USING THE CD PLAYER - SKIP AND SEARCH FUNCTIONS
This function allows the beginning of a track, or a particular point in a track to be located during play.
To move forward to the next track, press the SKIP UP button. Repeat the action to move to each
successive track. The display will show the track selected and this function works in play, pause and stop
modes.
To move back to the start of the current track, press the SKIP DOWN button. Press again to move back to
the previous track. The display will show the track selected and this function works in play, pause and stop
modes.
To search forward or backwards for a particular point in a track, press and hold either SKIP (UP or DOWN)
button to move in the desired direction. When the point in the track has been located, release the button to
resume normal play.
Fig. 3
indicator will illuminate and be static in the display and all tracks will replay
continuously.
7.3 To stop the repeat function, press the REPEAT button a third time and the repeat
indicator will disappear.
Repeat indicator
8.
USING THE CD PLAYER - PROGRAMMED (MEMORY) PLAY FUNCTION
This function allows up to 20 tracks to be programmed into the memory and be played in a specific order.
During stop mode, press the PROGRAM button, ‘01’ will flash in the display.
Using the SKIP (UP or DOWN) buttons move forward or back until the desired track is shown on the display.
Press the PROGRAM button again to store the track into the memory. The display will now show a flashing
‘02’ to indicate that it is ready to program the second track.
Repeat the above step until all the desired tracks have been stored. When the maximum number of
programmed tracks has been reached the display will show a static 1.
When programming is completed, press the PLAY/PAUSE button to start the play. The display will show
the track being played and the play indicator will flash to show that the CD is in program play mode.
When all the tracks have finished playing, the programmed play will stop, the total number of tracks on the
CD will be shown but the play indicator will continue to flash to indicate that it is programmed. Programmed
play can be restarted by pressing the PLAY/PAUSE button again.
To replace a track in the programmed sequence, press the PROGRAM button, wait a few seconds for the
player to scroll through the track numbers programmed until a flashing ‘01’ is shown and then press the
PROGRAM button repeatedly until the position number is shown (e.g. 02) then use the SKIP (UP or DOWN)
button to select the desired track and press the PROGRAM button to accept and overwrite the track.
To add a track at the end of the programmed sequence press the PROGRAM button (as described in step
8.6), to move to the end of the sequence then use the SKIP (UP or DOWN) buttons to locate the new track
and press the PROGRAM button a final time to accept. For example if three tracks have been programmed
and a fourth is required, press the PROGRAM button four times, then select the new track number with the
SKIP (UP or DOWN ) buttons and press the PROGRAM button again to accept.
To clear the programmed tracks, press the STOP button, open the CD door or turn off the power.
7.
USING THE CD PLAYER - REPEAT PLAY FUNCTION.
This function allows the same track or all tracks to be played repeatedly.
7.1
To repeat the SAME track, press the REPEAT button ONCE during play. The repeat
indicator (fig. 3) will illuminate and flash in the display and the track playing will play
Track
continuously.
7.2
To repeat ALL tracks, press the REPEAT button TWICE during play mode. The repeat

6
9.
USING THE RADIO
Slide the function switch to ‘RADIO’, fully extend the telescopic antenna and select the waveband by sliding
the radio band switch to the desired waveband (AM or FM).
Turn the tuning knob to select the station of choice. The radio frequency scale (window adjacent to tuning
knob) will show the approximate wavelength selected.
If FM reception is poor try moving the antenna for better reception (fig. 4). If AM reception is poor try
rotating the whole unit (fig. 5) or moving it to a different position.
Fig. 4 Fig. 5
Adjust the volume to the desired level by rotating the volume control knob.
To turn off the unit at any move the function switch to OFF.
10.
USING THE AUX IN FUNCTION
Auxiliary analogue audio equipment (e.g. smartphone, media player) can be connected and amplified via the unit.
Connect the auxiliary equipment using a 3.5mm stereo jack cable (not supplied) into the AUX IN socket at
the rear of the main unit.
Slide the function switch to ‘CD/AUX IN’. Note that the CD player will be disconnected when the AUX jack
is inserted.
Press the PLAY button on the auxiliary equipment and adjust the volume to the desired level using the
volume control knob, and the controls on the auxiliary equipment.
To stop this function, slide the function switch to OFF and unplug the jack.
11.
CARE AND MAINTENANCE
Cleaning the appliance
•
Wipe external surfaces with a soft cloth. If the cabinet is very dirty, unplug from the mains supply and use a
damp cloth soaked in a weak solution of washing up liquid and water. Allow to dry thoroughly before reusing.
Cleaning the CD lens
A dirty lens will cause the sound to skip and if very dirty the CD player may not work. Remove the CD and
clean the lens as follows:-
•
Using a camera lens brush/blower, blow on the lens a couple of times to
remove loose dust before wiping lightly with the brush. Blow on the lens once
more.
•
If the lens has fingerprints on it use a dry cotton swab.
•
Do not touch the lens.
Caring for discs
To obtain the best sound from compact discs treat with care. Dirty, scratched
or warped discs will cause broken or intermittent sound.
•
Store discs in their original cases and avoid using in dusty environments
•
When holding the disc, take care not to touch the playing surface.
•
Do not place the discs in warm or sunny locations.
•
Never write on the playing surface of the disc or on the label surface with a
ballpoint pen. Do not stick labels onto discs.
•
Wipe any dust or fingerprints form the disc using a soft cloth. Wipe from the
centre of the disc to the outside and never in a circular motion. Do not use
conventional record cleaners, anti static agents, benzene, thinners or solvents.

7
12.
TROUBLESHOOTING GUIDE
Observation
Potential cause / solution
The unit does not work on AC
Does the socket that is being used have power?
Has the unit entered ‘power save’ mode? See note in section 5 or 10 for
action to be taken.
The unit does not work on
batteries
Has the AC lead been removed from the back of the unit?
Are the batteries correctly inserted (right way round)?
Are the batteries exhausted?
No sound Is the volume control set at MIN?
AUX IN – has the volume on the auxiliary device been set to minimum?
Radio reception weak FM signal – extend or adjust the position of FM antenna.
AM – adjust the position or move the whole unit.
Disc does not rotate / play Is the disc inserted correctly? If upside down the display will show ‘no’
Is the lens dirty?
Has the function switch been moved to ‘CD/AUX IN’?
Has the PLAY/PAUSE button been pressed?
Is a jack inserted in the AUX IN socket? To select CD, unplug the jack.
Is an MP3 CD being played? This unit will not play MP3 CD’s
Disc skipping Clean the disc and lens.
If cleaning does not work the disc may have a defect.
13.
TECHNICAL SPECIFICATION
Rated voltage AC
DC (battery)
Power consumption
Audio output
Radio frequency
Operating conditions
Operating position
120V~ 60Hz
9V (1.5V x 6 C)
10W
1W x 2 RMS
FM 87.5 - 108MHz
AM 520 – 1710 KHz
Temperature: -5°C to 35°
C Humidity 5% to 90%
Horizontal
14.
RECYCLING ELECTRICAL PRODUCTS
You should now recycle your waste electrical goods and in doing so help the environment.
This symbol means an electrical product should not be disposed of with normal household waste. Please
ensure it is taken to a suitable facility for disposal when finished with.
Visit www.recycle-more.co.uk, click on “bank locator” and enter your postcode to find your nearest
recycling site.
Any support you need, anything you feel like to share, You are more than welcome to contact us.
Table of contents