C. Crane CC RADIO SOLAR User manual

CCRadio Solar Page 1
INSTRUCTION
MANUAL
PLEASE READ ALL THE INSTRUCTIONS
COMPLETELY BEFORE USE AND SAVE
THIS MANUAL FOR FUTURE REFERENCE

CCRadio Solar Page 3
CAUTION
• Before turning the unit on, set your volume control to a low setting.
• Slowly increase the sound until you can hear it comfortably and clearly without distortion.
• Long-term exposure to loud sounds may cause hearing damage. It is best to avoid high volume levels
when using headphones/earbuds, especially for extended periods.
For your future reference:
Serial No. (Found inside battery compartment) ________________________________________________
Date of purchase________________________________________________________________________
Name & address of dealer_________________________________________________________________
Unpacking
The box should contain the CCRadio Solar radio, (1) Auxiliary In cable, (1) USB 2.0 Charging cable,
warranty card and user manual. If anything is missing or damaged, please contact your dealer immediately.
We recommend that you keep the packaging in the unlikely event your radio may need servicing.
Owners Record/Unpacking

CCRadio Solar
Page 4
The CCRadio Solar is likely the rst emergency radio that doesn’t look like one. The idea simmered at
C. Crane for over ve years while 10 prototypes were designed. It has an oversized AM antenna for superior
long distance reception. FM reception is good thanks to the latest chip technology. The solar panel is
oversized to help keep the battery charged.
It is simple to use if you prefer to keep it that way, but there are some hidden features listed underneath the
battery compartment cover. The radio is initially delivered set to “low power” consumption to conserve the
battery. While the radio is “ON”, Press the number “1” and “5” keys simultaneously and the radio will switch to
high audio power. The special rubber shell is oil and ultra-violet resistant to yellowing over time.
Please consult the manual on how to charge your phone. Crisis hint: If all power lines and the phone system
are down, use texting to send a message with your cell phone. It requires very little power and a text
message can often get through to your loved ones when a normal phone call will not connect.
SAFETY INSTRUCTIONS - READ BEFORE OPERATING EQUIPMENT - SAVE THESE INSTRUCTIONS
Read and understand all safety and operating instructions before the radio is operated.
Heat: Never put the radio in direct sunlight in an unventilated area or behind glass like a car’s interior. The
appliance should be away from heat sources such as radiators, heat registers, stoves, or other appliances
that produce heat.
If the radio is left unattended and unused for long periods of time, remove the batteries. The batteries may
leak and damage furniture or your radio.
Introduction/Safety Instructions

CCRadio Solar Page 5
Safety Instructions
PLEASE READ BEFORE USING THE RADIO
• Please fully charge the internal battery before use.
• We recommend the internal battery to be fully depleted and fully recharged every 6 months if the radio has
not been used. This will help maintain optimal battery life.
•.Keep these precautions and instructions where all who will use this radio will read them.
Please read IMPORTANT SAFETY INSTRUCTIONS before use. It is important to read and understand
all instructions.
WARNING: To prevent re or electric shock hazard do not expose this product to rain or moisture.
CAUTION
RISK OF ELECTRIC SHOCK
DO NOT OPEN
CAUTION: To reduce the risk of electric shock, do not remove the
radio back. No user serviceable parts inside. Refer servicing to
qualied service personnel.
THE LIGHTNING FLASH AND ARROWHEAD WITHIN THE TRIANGLE IS A WARNING SIGN
ALERTING YOU OF “DANGEROUS VOLTAGE” INSIDE THE RADIO.
THE EXCLAMATION POINT WITHIN THE TRIANGLE IS A WARNING SIGN ALERTING YOU OF
IMPORTANT INSTRUCTIONS ACCOMPANYING THIS RADIO.
w
w

CCRadio Solar
Page 6
Safety Instructions
READ BEFORE OPERATING EQUIPMENT
SAVE THESE INSTRUCTIONS
To prevent damage to your radio or possible injury to you or others, read these safety precautions and in-
structions entirely before applying power to the radio. Keep these precautions/instructions where all who use
this radio will read them.
1) COMMON CARE
Check the radio and any accessories regularly. Do not use the radio if there is any sign of damage. Only
operate in accordance with the instructions in this manual. Only use attachments or accessories specied
by C. Crane. Note: If the radio is unused for more than 6 months, we recommend winding the crank for at
least 30 seconds to keep the battery healthy. Thereafter we recommend charging the battery fully before
returning to storage.
2) DISCONNECT THE RADIO IN CASE OF MALFUNCTION
We recommend charging with a computer or usb wall adapter with at least 1000ma power output for best
performance. Use only the recommended adapter. Otherwise it may damage the radio or cause a re or
electric shock.
3) KEEP OUT OF REACH OF CHILDREN
Dropping the radio can cause damage or injury. Keep the AC Adapter cord in a position so someone
cannot trip and cause the radio to fall.
w
w
w w

CCRadio Solar Page 7
4) KEEP AWAY FROM WATER AND MOISTURE
Keep the radio dry. Liquids and moisture can damage the radio. If a liquid leaks into the radio do not
operate and seek a qualied service shop.
5) KEEP AWAY FROM EXTREME TEMPERATURES
Extreme temperatures can damage the radio. Do not leave or use the radio where it can be subjected to
high temperatures such as the inside of a car.
Caution: Some windows may intensify the sun’s eect on your radio, causing melting or a potential re
hazard.
6) DO NOT ATTEMPT TO SERVICE RADIO
Refer all service work to a qualied service shop when the radio does not appear to operate normally,
exhibits a change in performance or the radio has received damage. Never open the radio as this may
expose you to dangerous voltages and this will void all warranties.
7) OUTSIDE ANTENNAS OR CABLES
Outside antennas or cables that create a potential hazard should not be used with this radio unless
installed by qualied personnel.
Safety Instructions
w
w
w
w

CCRadio Solar
Page 8
Table of Contents
Owners Record/Unpacking.............................
Introduction/Safety Instructions.......................
Getting Started..............................................
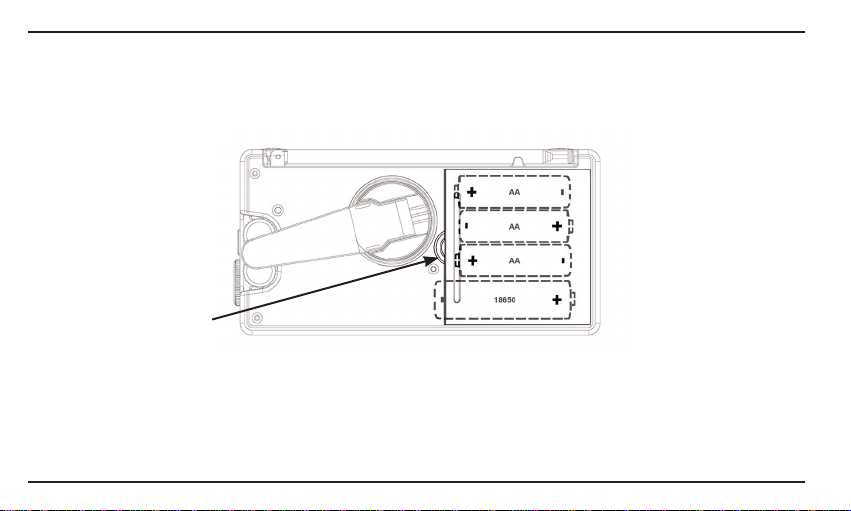
Installing the Batteries.....................................
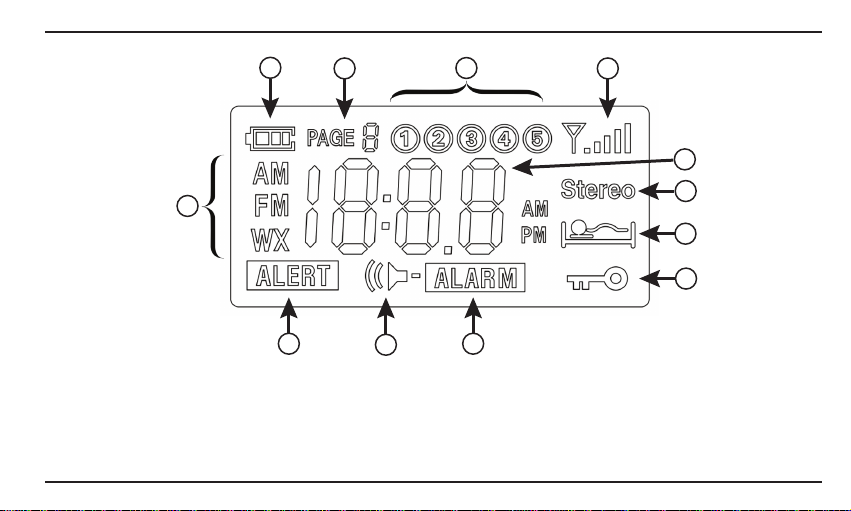
Display Screen Identication...........................
Powering the Radio.........................................
Setting the Sleeptimer......................................
Tuning Up/Down..............................................
Change Bands/Set Weather Alert....................
Adjust Volume..................................................
Saving a Station to Memory.............................
Display Light....................................................
Earphone Jack................................................
AUX Input Jack...............................................
Radio Power/Charging Jack...........................
Battery Selection Switch.................................
Flashlight........................................................
Lock Radio......................................................
Phone Charger Jack (USB)...............................
Setting the Clock...............................................
Setting the Alarm...............................................
Disable Beep.....................................................
Designate Frequency or Clock..........................
Activate 9 or 10 kHz Tuning..............................
Enable High Power Audio Mode........................
Activate 1 kHz AM Tuning Steps........................
Activate Narrow AM Filters.................................
Reset to Factory Defaults...................................
Change Memory Pages.....................................
Troubleshooting Guide....................................
Specications....................................................
3
4
9
10
11
12
12
12
12
12
14
14
16
16
16
16
17
17
18
19
20
21
21
22
22
23
23
24
24
25
27

CCRadio Solar Page 9
Power using the Solar Panel - Place the solar panel in direct sunlight. It is best to angle the solar panel
so that it is pointed directly at the sun. Do not charge the radio in a hot area like a car. To charge the internal
Li-ion battery with the solar panel, it is best to leave the radio OFF. Eight hours of direct sunlight should
provide about 10 to 14 hours of playtime at medium volume, depending on sun intensity. Set the “Battery
Selection Switch” to Li-ion to play. (See Page 14).
Power by Winding - Unfold the Dynamo Crank from the back of the radio and rotate in either direction.
Proper winding speed is about 2 rotations per second or greater. After 90 seconds of winding the radio will
play for about 8-13 minutes. This varies depending on the winding speed, volume level and band selection.
Note: If the Li-ion battery has been fully depleted (less than 3.3 volts) for many days (or depleted by the
ashlight) then it may take extra winding before the battery will power the radio again (greater than 3.3 volts).
Power by AC Charging Adapter (optional accessory not included) - Connect the AC charging adapter to a
120Volt/60Hz wall power outlet and to the Micro-USB charging jack on the side of the radio beneath the
rubber ap. This adapter can remain plugged into the radio for continuous power but there may be added
noise or interference while listening to the AM radio band. We recommend listening to the AM radio band
with power adapter unplugged for best reception. To fully charge the included Li-ion battery, keep the power
adapter connected for about 8 hours.
Power using “AA” Batteries - When using “AA” Alkaline batteries the radio should play at normal volume for
about 40 hours. When using nickel metal hydride (NiMH) rechargeable “AA” batteries, about 35 hours of play
can be expected. This radio will not charge “AA” batteries. NOTE: Do not use Lithium type “AA” batteries.
Getting Started
JI

CCRadio Solar
Page 10
Getting Started
INSTALLING “AA” OR “18650” BATTERIES
1) Position the radio face down on a soft surface to protect it.
2) Remove the Battery Cover using your ngernail or a small tool.
3) Insert (3) “AA” cell batteries (optional) or one (1) 18650 Li-ion battery (included) into the compartment as
indicated. (Do not use Lithium “AA” size batteries). Be sure the negative (-) end of each battery is against
the spring.
4) Replace the battery cover. You are now ready to operate your radio.
Press and lift the
area indicated

CCRadio Solar Page 11
Radio Identication
ABCD
E
F
G
H I
J
K
L
A) Battery Icon
B) Page Number (for station
memories)
C) Station Memories 1 - 5
D) Reception Signal Strength
E) Band Indicator (AM, FM, Weather)
F) Frequency/Time
G) Beep ON/OFF
H) Alert is activated
I) Alarm is activated
J) Stereo FM reception
K) Sleep Timer is activated
L) Lock Switch is activated
(buttons are disabled)

CCRadio Solar
Page 12
Radio Identication
1. Power button / Sleep Timer
To turn the radio “ON” just press and release the red button. To use the Sleep Timer, press and hold the red
button. The Sleep Timer will automatically shut o the radio after the set amount of time expires. The display
will cycle through minutes 120, 90, 60, 45, 30, 15, and OFF. Release the power button to activate the sleep
setting you desire. The radio will remember your last Sleep Timer setting the next time you activate it.
2. Tuning Buttons
Press once quickly to tune to the next frequency increment. Press and hold for 1-second to automatically tune
to the next strong station. Hold continuously to cycle through the whole band.
3. Change Bands and Set Weather Alert
Press and release the BAND button to cycle between FM, AM, and Weather. The BAND button can also be
used to set the weather alert. When the weather alert is activated it will monitor the selected weather channel
for NOAA weather alerts. When a NOAA alert is issued (on the selected weather channel) the CC Solar
Survivor will beep and provide important information. To activate the NOAA Weather Alert, press and hold
“Band” button for more than 3 seconds. Continue holding to select how long the alert will be activated for (4hr,
8hr, and 16hr). Release the button to make your selection. The display light will ash once every few seconds
to remind you that the NOAA Weather Alert is “ON”. To turn the alert “OFF”, hold the Band button for three
seconds until “OFF” is displayed and beep is heard, then release the button.
4. Volume Control
Rotate to adjust volume.

CCRadio Solar Page 13
Radio Identication
Front View
6

CCRadio Solar
Page 14
5. Station Memory Buttons 1 - 5
Save your favorite stations to memory buttons. To save a station, press and hold any memory button for 2
seconds while the station is playing. To play a saved station, press the same button once quickly.
6. Display Light
The LCD Display light will stay enabled for 10 seconds after each button press. If the radio is plugged into
continuous power you can keep the display light on continuously while the radio is on. For this, press and
hold the POWER and LIGHT button until the display cycles to your desired brightness and then release. See
drawing Page 12.
Radio Operation

CCRadio Solar Page 15
Radio Operation
7
10
8
9
11
Left
Side View
Right
Side View

CCRadio Solar
Page 16
7. Earphone Jack
To listen using earphones, connect your earphones to the lower round jack behind the rubber cover. When
earphones are plugged in, stereo sound can be heard from strong FM stations oering stereo sound. Weak
FM stations, all AM stations, and Weather stations will be received in mono sound.
8. AUX Input Jack
To use the CCRadio Solar as a speaker for your device, connect a 1/8” stereo patch cable (included), with
one end of the patch cable to your device’s audio output jack (or a headphone jack) and the other end to the
Aux input jack (upper round jack under the rubber cover) of the CCRadio Solar. The radio will
automatically detect when a device is plugged-in and change to AUX input mode. High power audio mode will
always be used with AUX input for best sound quality.
9. Radio Power/Charging Jack
Connect any Micro-USB cable for continuous power or to charge the radio battery. You will notice some noisy
interference while listening to the AM Radio band with power connected. For continuous power usage we
recommend our optional low noise AC Power Adapter.
10. Battery Selection Switch
Please see Page 6 for opening the battery compartment and inserting batteries.
The CCRadio Solar uses one 3.7V Lithium-ion 18650 rechargeable battery (included). This battery will give
you about 300-500 full charge and discharge cycles and play the radio for about 40-50 hours on low power
mode. It is replaceable at ccrane.com. You might want to charge and keep a second battery for backup
power. Optionally three “AA” alkaline batteries can be used to power the radio as an alternative source of
power. If using alkaline batteries then you will need to ip the switch “up” under the rubber ap to “AA”.
Radio Operation

CCRadio Solar Page 17
Radio Operation
11. Flashlight
Located on the left side of the
CCRadio Solar is a ashlight
consisting of one super bright LED.
To turn the ashlight on, press the
“Light” button once and release.
The “Light” button will glow in the
dark to help you locate the radio in a
power outage.
12. Lock Radio
Press and hold the BAND and
POWER buttons at the same
time for two seconds to disable all
buttons. Repeat to enable all buttons
again. While the buttons are locked
the VOLUME knob will continue to
work as normal.
Lock Radio. Press and hold both buttons for two seconds
to lock radio.
12
11
Top View

CCRadio Solar
Page 18
13. Phone Charger Jack (Standard USB Port)
In an emergency, you may need to power your cell phone to make an important call. Cranking the radio for
just 90 seconds should give you enough time to make a few quick calls. This, of course, will depend on the
make and model of your cell phone. Attach your phone’s charging cable (not included) to the fullsize USB port
located under the rubber ap on the right side of the radio. To begin charging, press and hold the “Light” but-
ton for 2 seconds. You will notice the battery icon on the screen moving to indicate that charging has begun.
Your phone should also indicate that it is charging. If your phone or device will not accept the radio charge,
then try fully powering o your device and try again. When the radio battery is fully depleted then charging will
stop.
Inputs and switch are
under the rubber cover
on Right Side of radio
13
Radio Operation
Right
Side
View
i©
!~I
jmi
c(Q)

CCRadio Solar Page 19
Radio Operation
Setting the Clock
1. With the power OFF, press and hold
memory button #1 for two seconds.
Release.
2. While the Hour is ashing, press the Up
or Down Tuning buttons until the hour
and AM/PM time is correct.
3. Press and release memory button #1 to
adjust the minutes. Cycle minutes using
the Up or Down Tuning buttons.
4. Press and release memory button #1
again after the time is set correctly. Memory Button #1
(Hold for 2 seconds to enter Clock Set mode).
Up/Down
Tuning Buttons

CCRadio Solar
Page 20
Setting the Alarm
1. With the power OFF, press and hold
memory button #2 for two seconds.
Release.
2. While the Hour is ashing, press the Up or
Down Tuning buttons until the hour and
AM/PM time is correct.
3. Press and release memory button #2 to
adjust the minutes. Cycle minutes using
the Up or Down Tuning buttons.
4. Press and release memory button #2
again after the time is set correctly. To
disable the alarm, press and hold memory
button #2 for two seconds.
Memory Button #2
(Hold for 2 seconds to enter Alarm Set mode).
Up/Down
Tuning Buttons
Radio Operation

CCRadio Solar Page 21
Radio Operation
Disable Beep Sound
1. With the power OFF, press and hold memory
button #3 for two seconds. All beeps are disabled
except ALARM and WX ALERT.
2. Repeat sequence to enable beep again.
Designate Frequency or Clock while Listening to
the Radio
1. With the power OFF, press and hold memory button
#4 for two seconds. “C” will appear on the screen
indicating that the Clock will show while listening to
radio (after 10 seconds).
2. Repeat sequence to display Frequency instead. “F”
will appear on the screen to indicate that the
Frequency will show when listening to the radio.
Memory Button #3
(Hold for 2 seconds to disable beep).
Memory Button #4
(Hold for 2 seconds).
Table of contents
Other C. Crane Portable Radio manuals

C. Crane
C. Crane WERK Pocket Radio Chest Harness User manual

C. Crane
C. Crane CCRadio-SWP User manual

C. Crane
C. Crane CC Pocket User manual

C. Crane
C. Crane CCRadio plus User manual

C. Crane
C. Crane Radio User manual

C. Crane
C. Crane CCRadio SW User manual

C. Crane
C. Crane CCRadio SW User manual

C. Crane
C. Crane CC Pocket User manual

C. Crane
C. Crane CC Skywave User manual

C. Crane
C. Crane CCRadio User manual