C. Crane Radio User manual

I STRUCTIO MA UAL
PLEASE READ ALL THE I STRUCTIO S
COMPLETELY BEFORE USE
A D SAVE THIS MA UAL
FOR FUTURE REFERE CE.
Pocket Radio

Before Use
Please read IMPORTA T SAFETY
I STRUCTIO S on pages 23-25 before
use. It is important to read and understand
all instructions. Keep these precautions
and instructions where all who use this
radio will read them.
WAR I G: TO PREVENT IRE OR ELEC-
TRIC SHOCK HAZARD, DO NOT EXPOSE
THIS PRODUCT TO RAIN OR MOISTURE.
THE LIGHTNING LASH AND ARROW-
HEAD WITHIN THE TRIANGLE IS A
WARNING SIGN ALERTING YOU O
“DANGEROUS VOLTAGE” INSIDE THE
RADIO.
CAUTION: TO REDUCE THE RISK O ELEC-
TRIC SHOCK, DO NOT REMOVE THE RADIO
BACK. NO USER SERVICEABLE PARTS
INSIDE. RE ER SERVICING TO QUALI IED
SERVICE PERSONNEL.
THE EXCLAMATION POINT WITHIN
THE TRIANGLE IS A WARNING SIGN
ALERTING YOU O IMPORTANT
INSTRUCTIONS ACCOMPANYING
THIS RADIO.
Ꮨ
Ꮨ
CAUTIO
RISK OF ELECTRIC
SHOCK DO OT OPE

CC SW Pocket Page 3
For your future reference:
Serial No.
(found inside battery compartment)
Date of Purchase
Name & Address of Dealer
The box should contain the CC SW Pocket,
carry pouch and this manual. If anything is
missing or damaged, please contact your dealer
immediately. We recommend you keep the box
in the unlikely event your radio needs to be
serviced.
Unpacking
Copyright
©
2007-2011 by
C. Crane Company, Inc.
1001 Main St, ortuna, CA 95540
Phone: 1-800-522-8863 Web: ccrane.com
All rights reserved. No part of this booklet may
be reproduced, in any form or means whatsoever,
without permission in writing from
C. Crane Company, Inc.

Page 4 CC SW Pocket
Quick Start
1.
Slide
K
(pg. 10) “SENSITIVITY”
switch to “DX” position.
2.
Install two AA batteries in the
g
battery compartment, paying close
attention to orientation of the batter-
iesʼ + and – ends.
3.
Turn on the radio by pressing the
Q
POWER button.
4.
Adjust
Y
“VOLUME”
5.
Select band by pressing the
O
BAND button
6.
Use the
W
“TUNING” knob to
locate a station or by directly
entering a frequency:
a) irst, select the
O
BAND you
want
b) press the
P
“ REQ” UENCY”
button
c) Enter the frequency on the
{
keyboard.

CC SW Pocket Page 5
Table of Contents
Unpacking ............................................... 3
Quick Start ............................................... 4
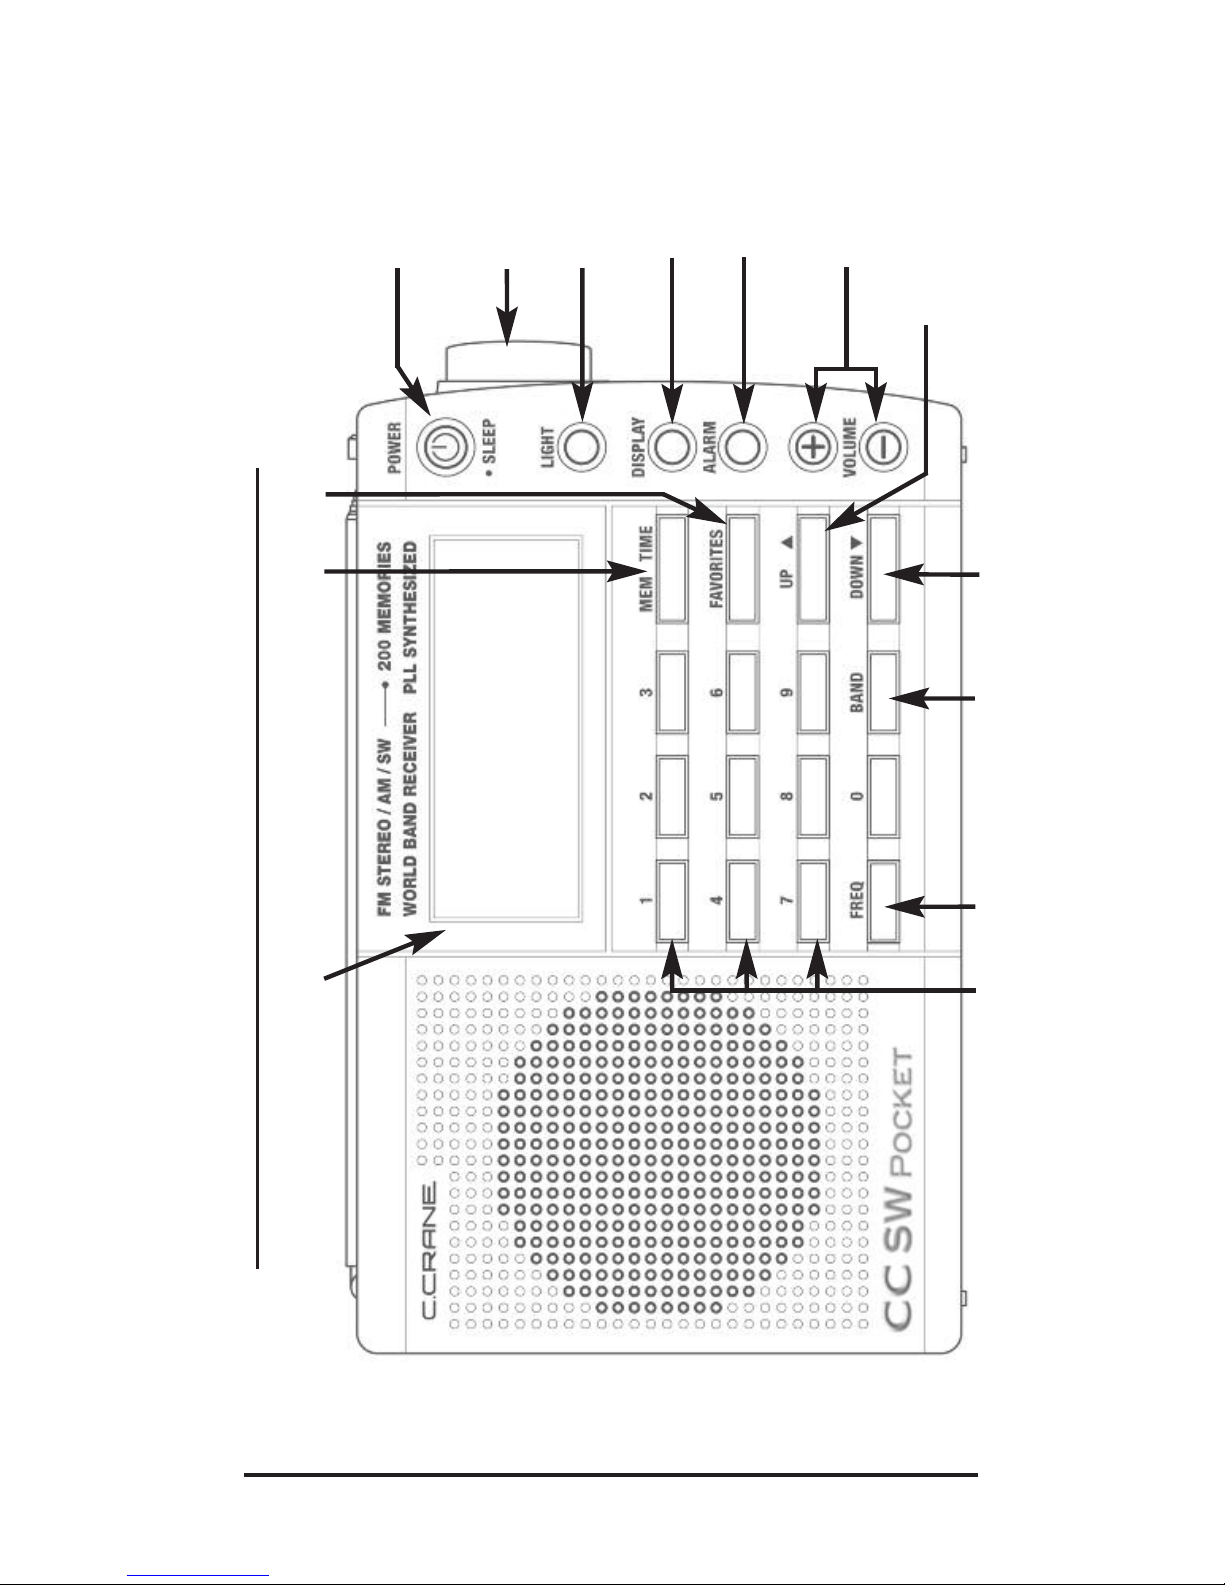
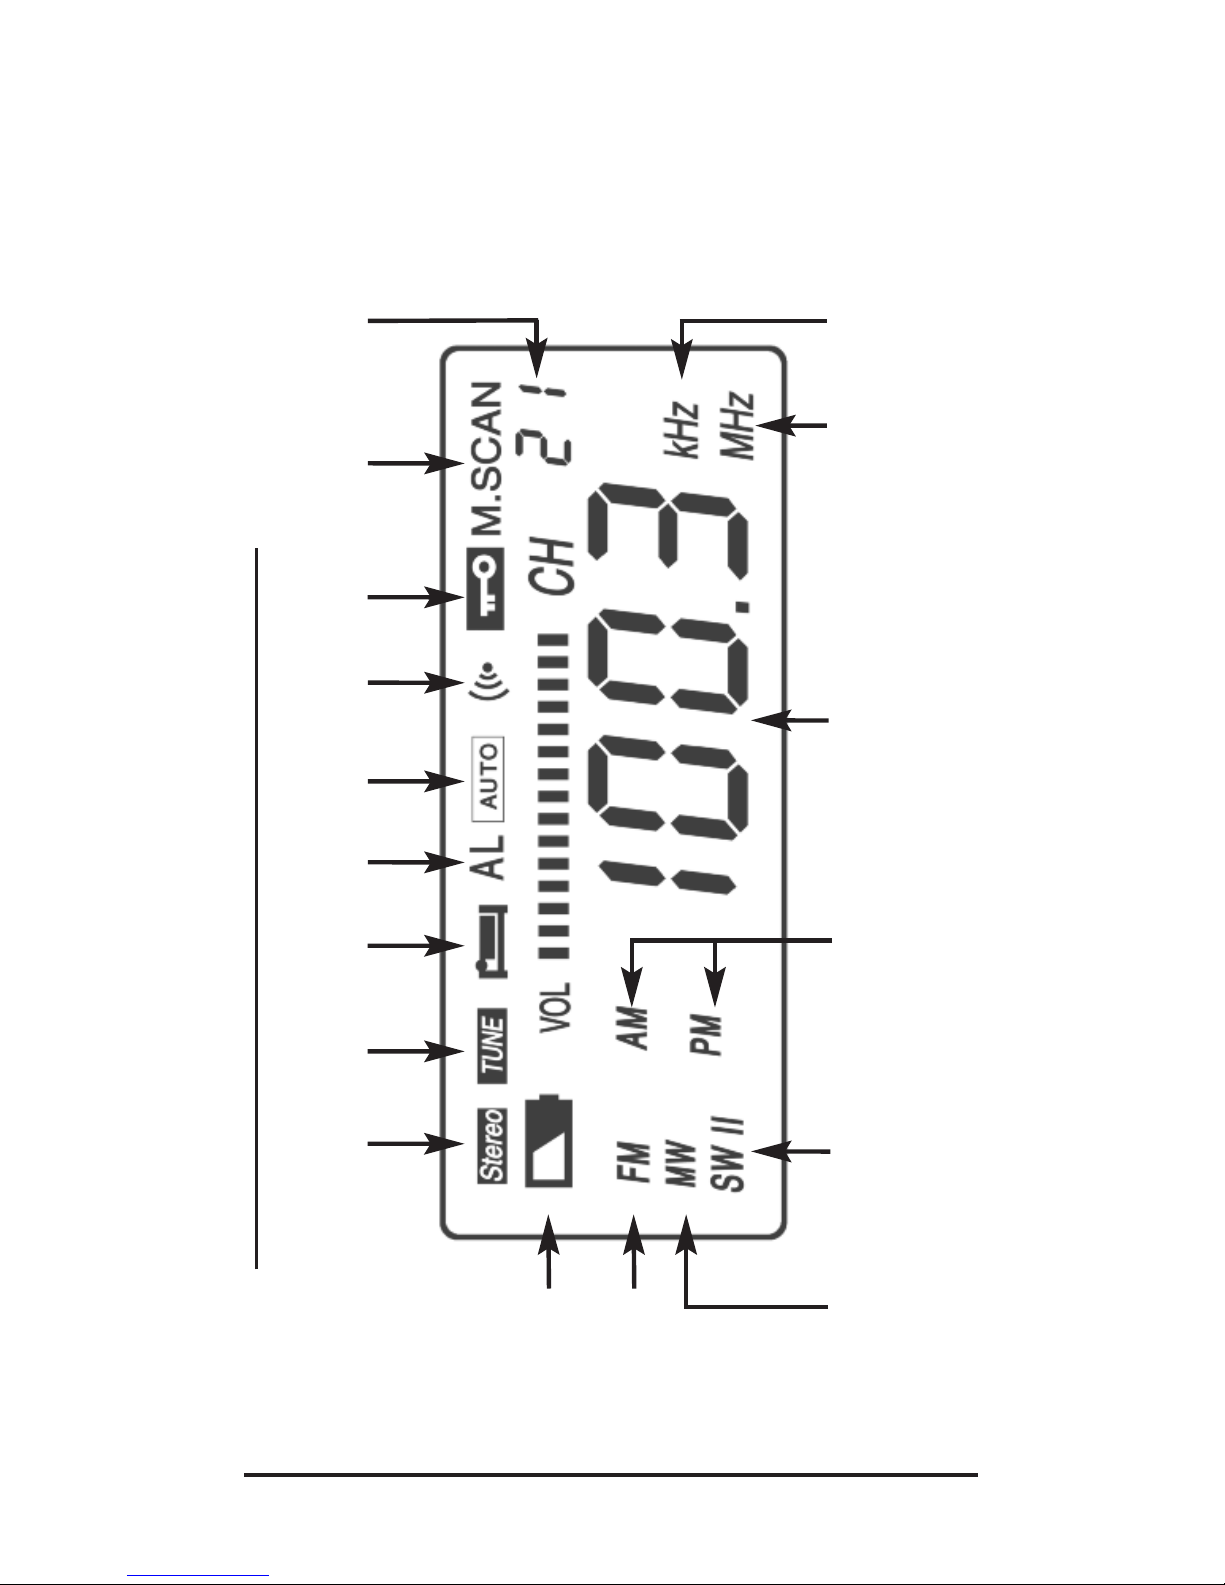
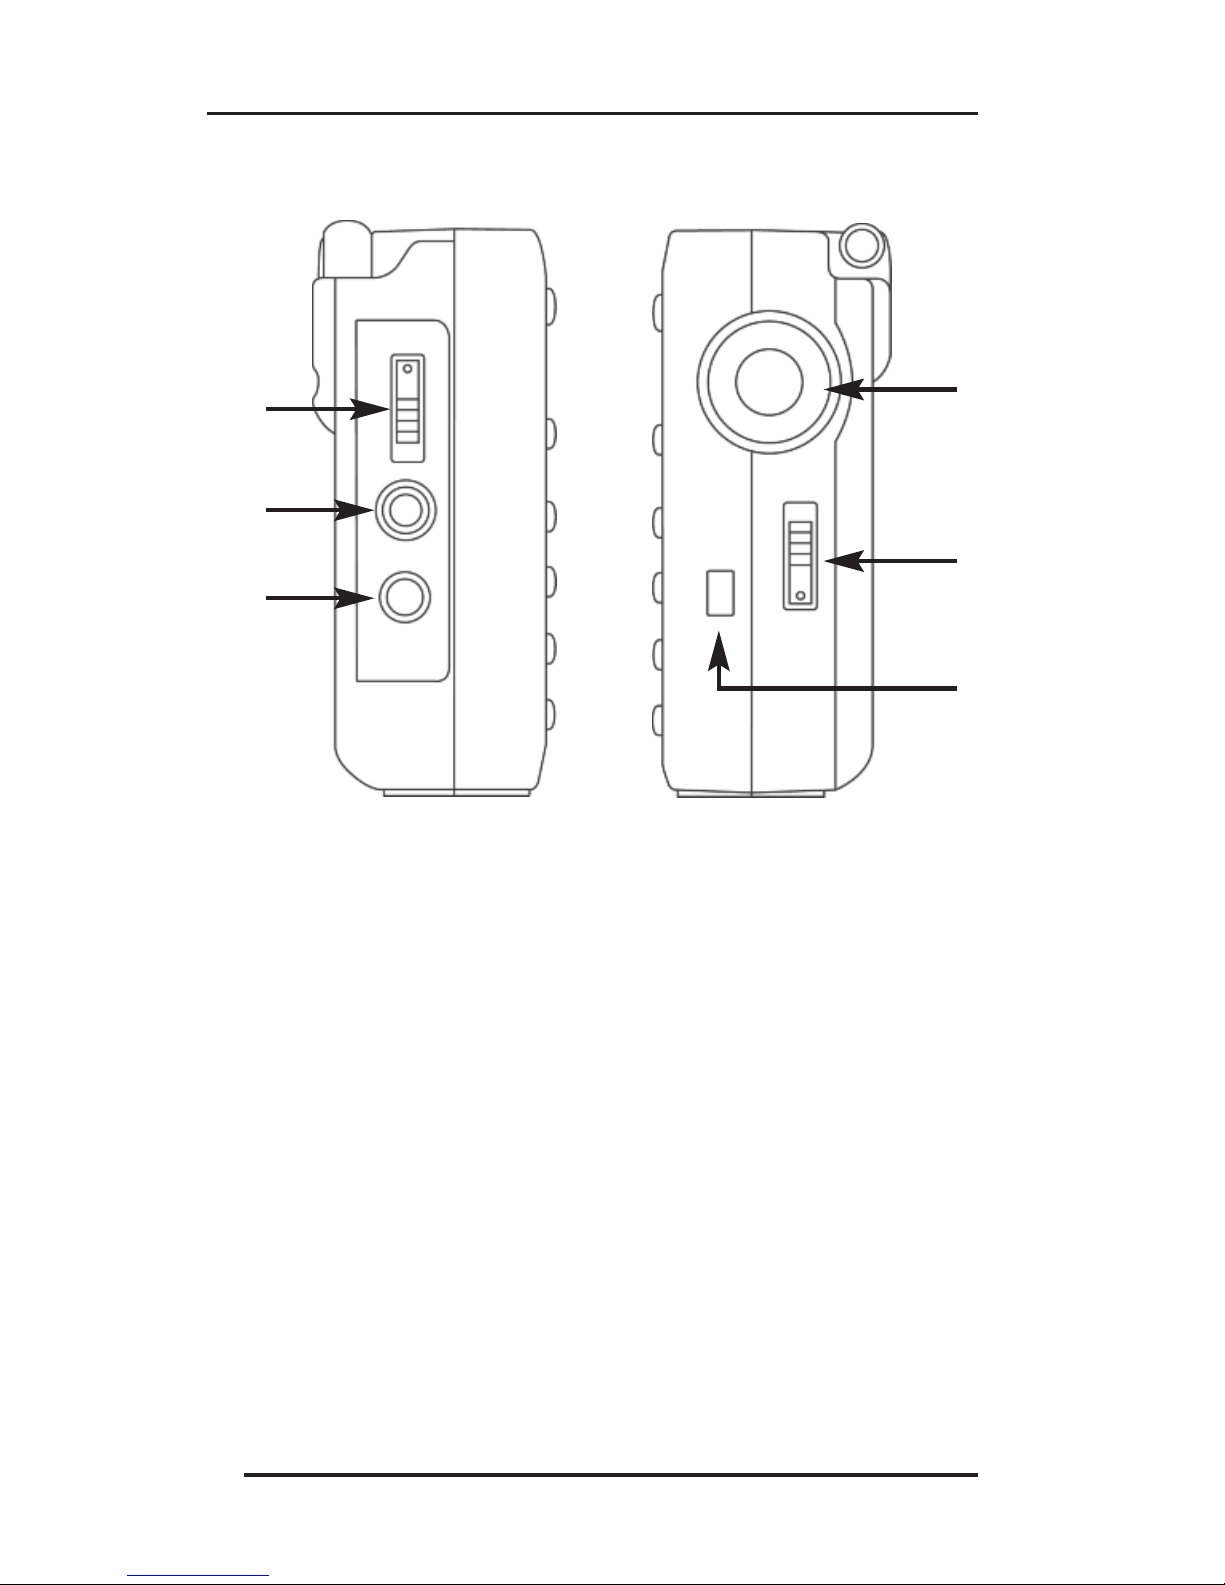
Radio Identification ........................... 6-11
Features and Operation Explained
Introduction ............................ 12
Power Sleep Button ............... 12
Tuning Knob ........................... 13
Light ........................................ 14
Display Button ..................... 14
Setting the Alarm .................. 15
Up and Down Buttons ........... 16
Band Button .......................... 16
Frequency Button .................. 16
0-9 Keys ................................. 17
Setting Clock Time ................ 18
Saving Stations to Memory ... 18
Favorites ................................ 19
Performance Tips ........................... 19-20
Troubleshooting Guide .......................... 21
Specifications ......................................... 22
Power Adapter ...................................... 22
Safety Instructions ........................... 23-25
Shortwave Tips ................................. 26-27
Station Log ........................................ 28-31

Page 6 CC SW Pocket
Radio Identification — Front View
Q
W
E
q
R
T
w
Y
U
I
O
P
{
}

CC SW Pocket Page 7
O
BAND, Change Bands,
•
9-10 kHz steps
P“
REQ” UENCY, Press to enter
requency
{
0-9 KEYS, Direct requency
and Memory access
}
LCD Display
q
MEMORY, TIME SET Button
w
AVORITES, Tune
Memories only
Q
POWER and SLEEP Timer
W
TUNING Knob
E
LIGHT Button
R
DISPLAY, Time, requency,
Alarm, AM Step, 12/24 Hour
T
ALARM, (De)Activate Alarm,
Set Alarm Time
Y
VOLUME, Up and Down
U
UP , requency, Time,
Memory Tune
I
DOWN , requency, Time,
Memory Tune
<
>

Page 8 CC SW Pocket
Radio Identification — LCD Display
e r t y u i o [
]G D A
SF
J
H

CC SW Pocket Page 9
]
kHz indicates Kilohertz while in AM
and SW bands only
A
MHz indicates Megahertz in M band
S
Time or requency display
D
AM/PM show while in 12 hour
time format
F
SWI or SWII, indicates Shortwave I
or Shortwave II
G
MW indicates “AM” in U.S.
(medium wave)
H
M indicates radio is in M band
J
BATTERY flashing indicates batteries
are low
e
M STEREO indicator, displays
only when headphones are used
r
TUNE indicator means a
station or noise is high
t
SLEEP UNCTION indicator
y
AL means alarm is active
u
AUTO, Radio alarm or goes to
Buzzer, if radio is already “on”
i
BUZZER indicates buzzer
type alarm
o
LOCK switch is “on”
M.SCAN ( AVORITES), tunes
memorized stations only
[
Indicates memory channel num-
ber 00-199 for Memory Stations

Page 10 CC SW Pocket
Radio Identification — Sides
K
DX - LOCAL switches Sensitivity of SW
and M bands
L
EARPHONE jack
:
DC Power Jack, 3 Volts, Tip Negative
a
TUNING KNOB adjusts requency,
Time, Presets
s
BASS - NORMAL Switch, select for
best sound
d
LOCK, press to lock, hold for 1 second
to unlock
K
L
:
a
s
d

CC SW Pocket Page 11
Radio Identification — Back
fWHIP
ANTENNA used for M and
SW bands
g
BATTERY COMPARTMENT
LOCATION, insert 2 “AA” batteries
h
RESET HOLE for resetting radio
(located on bottom of radio)
f
g
h

Page 12 CC SW Pocket
Features and Operation Explained
Introduction
The CC SW Pocket is the perfect size for
packing around. It is unusually good at pick-
ing up stations. Audio is clear for its size,
while taking as long as 70 hours to wear
down a set of two AA batteries. Using the
Tuning knob can be wearisome as it is with
any small radio. The SWP has a novel way
to zip around the bands to your favorite sta-
tions. “ AVORITES” (Memory Scan) can be
used to quickly access all of your AM/ M and
SW stations rapidly and across bands with-
out pressing buttons. We encourage you to
learn how to memorize a station (page 18).
You can then use the “ AVORITES” button
and the Tuning Knob to quickly scan your
memory presets.
POWER • SLEEP Button
When you press and release the “POWER”
button the first time, you will see “on” dis-
played for about two seconds. Press the
“POWER” button again to turn the radio off.
To change to a “SLEEP” setting, press
“POWER” again during the short time the
“on” is displayed. It will first show “90” min-
utes and then decrease by five minutes for
Q

CC SW Pocket Page 13
Features and Operation Explained
each successive press. You have a choice of
“on”, and from 90 minutes down to 5 minutes
by 5-minute steps. Stop on the setting you
desire and it will be remembered for your
convenience each time you turn the radio
“on” again. If you select any one of the sleep
settings, except “on”, the SLEEP symbol
will be displayed while the radio is “on”.
When “on” is selected, the radio will simply
turn on and off each time the power button is
pushed.
Pressing the “POWER • SLEEP” button while
the radio is operating on any of the SLEEP
settings will turn the radio off.
TU I G K OB
Turn the Tuning Knob while the radio is on to
tune to a different frequency.
When setting the clock or alarm, it is also a
good way to change the time, rather then
using the up and down buttons.
The Tuning Knob also works when you have
your favorite stations in memory. You can
press “ AVORITES” and use the tuning knob
to quickly access your memorized station.
See page 19 for
w
“ AVORITES”.
W

Page 14 CC SW Pocket
LIGHT
Pressing the “LIGHT” button will give you
about eight seconds of light on the display.
DISPLAY button
The DISPLAY button works in two ways:
1. When the radio is “on” the LCD display
normally shows the frequency. Pressing
the “DISPLAY” button will toggle the dis-
play through “ALARM TIME”, “TIME” of
day, and “SLEEP” timer status. It will show
the minutes left on the “SLEEP” timer or
“on” if the sleep timer is not being used.
2. When the radio is “off” the LCD display
normally shows the time of day. Pressing
the “DISPLAY” button will toggle the dis-
play through “ALARM TIME”, tuning steps
for AM, and your choice of 12 or 24 hour
clock format. While the radio is “off”, you
can change from 12 hour to 24 hour clock
format by holding the “DISPLAY” button
for five seconds. Change it back using the
same method. See
O
“BAND” button on
page 16 to change tuning steps for AM.
Features and Operation Explained
E
R

CC SW Pocket Page 15
SETTI G THE ALARM
You can activate or deactivate the alarm if
the radio is “on” or “off”. Pushing the
“ALARM” button once sets the alarm to
and the “radio” alarm. (The radio will
alarm on the last station listened to.) A sec-
ond push of the “ALARM” button sets the
alarm to “buzzer” . A third press of the
“ALARM” button turns off both icons and the
radio will not alarm. Press the “Power” button
to stop the alarms when they come on. The
alarm will not work if headphones are
plugged in.
Set the alarm time with the radio “off”.
Press and hold the “ALARM” button for two
seconds. Use the Tuning Knob to set the
hours, press the “ALARM” button again and
set the minutes. You must press the
“ALARM” button again when done to confirm
the “ALARM” time.
If the alarm is set to “AUTO” and you happen
to have the radio “on” at the alarm time, then
the buzzer will automatically come on, too.
Features and Operation Explained
T
VOLUME
This is easy, up +and down -.
Y

Page 16 CC SW Pocket
Features and Operation Explained
UP and DOW Buttons
These buttons can be used to tune the radio
one step at a time or “press and hold” to
scan for the next strong station.
The buttons can also be used when setting
the time or to scroll through memorized sta-
tions while in
w
AVORITES (Memory
Scan) mode.
BA D button
Pressing the “BAND” button with the radio
“on” changes bands in order: M, AM, SW1,
and SW2.
With the radio “off”, the “BAND” button can
be pressed and held for five seconds to
change the AM tuning steps from 10 to 9
kHz. The U.S. uses 10 kHz. Most of the rest
of the world uses 9 kHz steps. It could be
important to change the AM step rate if you
use the “Up” and “Down” button to scan for
stations and you happen to be in a foreign
country.
“FREQ”UENCY Button
This is used to directly enter a frequency.
You must be in the radio band of your choice
before you enter a frequency. AM and SW is
<
<
O
I
U
P

CC SW Pocket Page 17
Features and Operation Explained
straightforward. Press “ REQ” and enter the
AM or SW frequency using the numbered
keys. or M you must enter a last digit. To
enter 100.3 M you must press “ REQ” and
then press 1-0-0-3.
0-9 KEYS
These are used to directly enter a frequency
or memory channel. See
P
“FREQ”UENCY
button for direct entry.
While in
w
AVORITES (Memory Scan)
mode you can also enter the channel number
of a station you memorized. There is a pro-
gramming quirk, however. Because there are
200 channels, you must key in 3 digits for
each number. Channel “00” through “9” must
be entered with a “00” in front of the channel
number. Channel numbers 10 through 19
must have a “0” entered in front of the chan-
nel number. Example: Channel “1” must be
entered as 0-0-1.
{
LCD DISPLAY
Learning the features and the corresponding
display icons can make your radio easier to
use.
}

Page 18 CC SW Pocket
Features and Operation Explained
SETTI G CLOCK TIME/
SAVI G A STATIO TO MEMORY
The Memory/Time SET key works in two
ways:
1. Setting the Clock:
When the radio is “off” press and hold
for one second until “Hour” flashes. You
have eight seconds to set the hour. Use
either the Tuning Knob or “UP” and
“DOWN” buttons. Press again to set the
minutes. Press a third time to confirm
when done. You can change from 12 hour
to 24 hour clock format by holding the
“DISPLAY” button for five seconds.
2. Saving a Station:
When the radio is “on” the key is used to
store a station into memory. irst, tune to
a station or frequency you want. Press
“MEM T.SET and will blink in the
upper right corner of the LCD display.
Rotate the Tuning Knob to the memory
channel where you want to store the sta-
tion. The memory channels are numbered
from “00” to “199”. Press “MEM T.SET”
again to finalize the memorized station.
There is a log in the back of this manual
on pages 28-31 to help you organize your
q

CC SW Pocket Page 19
Performance Tips
While excellent for fine tuning, the Tuning
Knob moves in only 1 kHz steps. Using the
AVORITES (Memory Scan) to dial right to
your stations is a fast and easy method
(above). You also have the ability to directly
enter a frequency. See Shortwave Tips on
page 26.
or best AM reception, rotate the radio for
the clearest audio. If radio noise is present,
try moving the radio to a better location so
the noise decreases. Many times this is only
Features and Operation Explained
stations. Your memories will not be lost
when batteries go dead or if you reset the
radio.
FAVORITES (Recalling Saved Stations)
Pressing the “ AVORITES” key allows you to
tune the stations you have previously saved
in memory. You can use the Tuning Knob,
“Up” and “Down” buttons, or 0-9 Keys to go
from one saved station to another. This can
save you much time if you are familiar with
the stations in your area. There is no other
function to this button. Press “ AVORITES”
again to go back to regular tuning.
w

Page 20 CC SW Pocket
Performance Tips
a few inches or feet away. In a hotel room, try
putting it in a window sill.
or M, the telescopic antenna “up full” usu-
ally gives best reception. The antenna can
also be rotated and shortened until the best
signal is received.
Always fully extend the telescopic antenna for
the best Shortwave reception. SW reception
can easily be improved with the addition of a
very simple antenna. A portable SW antenna
available from C. Crane works well for travel.
Also, any insulated small diameter wire can
be wound around the whip antenna and
extended out 20' to 60'. The wire can be
mounted on the inside of an outside wall or
out a window and along the top of a non-
metal fence. Simple experimentation with the
antenna wire location is the best way.
Most of the time, leave the DX-LOCAL switch
set on DX, unless you are receiving an overly
strong station. This can keep the strong sta-
tion from overdriving the radio and also help
in listening to a weaker station that is next to
a strong station.
The buttons can be somewhat hard to press.
Check the LCD display to confirm that you
have pressed it hard enough to register.
Other C. Crane Portable Radio manuals

C. Crane
C. Crane CC Pocket User manual

C. Crane
C. Crane CC Pocket User manual

C. Crane
C. Crane CC Observer User manual

C. Crane
C. Crane CC RADIO SOLAR User manual

C. Crane
C. Crane CCRadio-EP User manual

C. Crane
C. Crane WERK Pocket Radio Chest Harness User manual

C. Crane
C. Crane CCRadio plus User manual

C. Crane
C. Crane CCRadio-SWP User manual

C. Crane
C. Crane CCRadio SW User manual

C. Crane
C. Crane CC Skywave User manual