manuals.online logo
Brands
  1. Home
  2. •
  3. Brands
  4. •
  5. CAC / BDP
  6. •
  7. Heat Pump
  8. •
  9. CAC / BDP 018 User manual

CAC / BDP 018 User manual

This manual suits for next models

6

Popular Heat Pump manuals by other brands

Daikin RXL12QMVJU Service manual

Daikin

Daikin RXL12QMVJU Service manual

AIREDALE BluCube CUR092V16-1CO-0 Installation and maintenance manual

AIREDALE

AIREDALE BluCube CUR092V16-1CO-0 Installation and maintenance manual

Calyenty RBH 125 Customer's manual

Calyenty

Calyenty RBH 125 Customer's manual

GRE HPGI50 owner's manual

GRE

GRE HPGI50 owner's manual

Carrier 30XW Installation, operation and maintenance instructions

Carrier

Carrier 30XW Installation, operation and maintenance instructions

Hayward SUMHEAT HP5131DT3 Installation instructions manual

Hayward

Hayward SUMHEAT HP5131DT3 Installation instructions manual

REMKO SQW 400 Electrical wiring

REMKO

REMKO SQW 400 Electrical wiring

Sanyo SAP120FCH Service manual

Sanyo

Sanyo SAP120FCH Service manual

Daikin EHYHBH05AA Operation manual

Daikin

Daikin EHYHBH05AA Operation manual

Panasonic WH-SDF03E3E5 Design handbook

Panasonic

Panasonic WH-SDF03E3E5 Design handbook

Airxcel 45000 Series Installation, operation and maintenance instructions

Airxcel

Airxcel 45000 Series Installation, operation and maintenance instructions

Mitsubishi Electric PUZ-SWM60VAA Service manual

Mitsubishi Electric

Mitsubishi Electric PUZ-SWM60VAA Service manual

Dimplex LI 16I-TUR Installation and operating instruction

Dimplex

Dimplex LI 16I-TUR Installation and operating instruction

Carrier WSHP Open v3 Integration guide

Carrier

Carrier WSHP Open v3 Integration guide

Mitsubishi Electric EHSE-YM9EC Service manual

Mitsubishi Electric

Mitsubishi Electric EHSE-YM9EC Service manual

TGM CTV14CN018A Technical manual

TGM

TGM CTV14CN018A Technical manual

Carrier 38MGQ Series installation instructions

Carrier

Carrier 38MGQ Series installation instructions

Kokido K2O K880BX/EU Owner's manual & installation guide

Kokido

Kokido K2O K880BX/EU Owner's manual & installation guide

manuals.online logo
manuals.online logoBrands
  • About & Mission
  • Contact us
  • Privacy Policy
  • Terms and Conditions

Copyright 2025 Manuals.Online. All Rights Reserved.

Installation Instructions
NOTE: Read the entire instruction manual before starting the
installation.
TABLE OF CONTENTS
PAGE NO.
SAFETY CONSIDERATIONS ..................... 1
INSTALLATION RECOMMENDATIONS ............ 2
CHECK EQUIPMENT & JOBSITE ................. 2
LOCATION /CLEARANCE ....................... 2
APPLICATION CONSIDERATIONS ................ 3
Earth Coupled (Geothermal) Systems .............. 3
Well Water Systems ............................ 4
MOUNTING VERTICAL UNITS ................... 7
MOUNTING HORIZONTAL UNITS ................ 7
CONDENSATE DRAIN ............................ 7
DUCT SYSTEM .................................. 8
PIPING ......................................... 8
ELECTRICAL ................................... 9
Thermostat Connections ......................... 9
SAFETY DEVICES AND UPM CONTROLLER ....... 9
SEQUENCE OF OPERATION ...................... 11
Cooling Mode ................................. 11
Heating Mode ................................. 11
HEAT RECOVERY PACKAGE ..................... 13
SYSTEM CHECKOUT ............................ 14
UNIT START-UP ................................. 14
MAINTENANCE ................................. 14
TROUBLESHOOTING ............................ 15
FLUID PRESSURE DROP TABLE .................. 17
TEMPERATURE RISE/FALL TABLE ............... 18
REFRIGERANT PRESSURE RANGES TABLE ....... 19
BLOWER PERFORMANCE TABLE ................ 20
Information in these installation instructions pertains only to GB
series units.
SAFETY CONSIDERATIONS
Improper installation, adjustment, alteration, service, maintenance,
or use can cause explosion, fire, electrical shock, or other
conditions which may cause death, personal injury, or property
damage. Consult a qualified installer, service agency, or your
distributor or branch for information or assistance. The qualified
installer or agency must use factory-authorized kits or accessories
when modifying this product. Refer to the individual instructions
packaged with the kits or accessories when installing.
Follow all safety codes. Wear safety glasses, protective clothing,
and work gloves. Use quenching cloth for brazing operations.
Have fire extinguisher available. Read these instructions
thoroughly and follow all warnings or cautions included in
literature and attached to the unit. Consult local building codes and
current editions of the National Electrical Code ( NEC ) NFPA 70.
In Canada, refer to current editions of the Canadian electrical code
CSA 22.1.
Recognize safety information. This is the safety-alert symbol
When you see this symbol on the unit and in instructions or
manuals, be alert to the potential for personal iniury. Understand
these signal words; DANGER, WARNING, and CAUTION. These
words are used with the safety-alert symbol. DANGER identifies
the most serious hazards which will result in severe personal iniury
or death. WARNING signifies hazards which could result in
personal iniury or death. CAUTION is used to identify unsafe
practices which would result in minor personal iniury or product
and property damage. NOTE is used to highlight suggestions
which will result in enhanced installation, reliability, or operation.
ELECTRICALSHOCK HAZARD
Failure to follow this warning could result in personal
iniury or death.
Before installing, modifying, or servicing system, main
electrical disconnect switch must be in the OFF position.
There may be more than 1 disconnect switch. Lock out and
tag switch with a suitable warning label.
EXPLOSION HAZARD
Failure to follow this warning could
result in death, serious personal iniury,
and/or property damage.
Never use air or gases containing
oxygen for leak testing or operating
refrigerant compressors. Pressurized
mixtures of air or gases containing
oxygen can lead to an explosion.
UNIT OPERATION AND SAFETY HAZARD
Failure to follow this warning could result in personal iniury
or equipment damage.
Puron® refrigerant systems operate at higher pressures than
standard R-22 systems. Do not use R-22 service equipment
or components on Puron® refrigerant equipment.
CUT HAZARD
Failure to follow this caution may result in personal injury.
Sheet metal parts may have sharp edges or burrs. Use care and
wear appropriate protective clothing and gloves when
handling parts.
INSTALLATION RECOMMENDATIONS
The GB Water-to-Air Heat Pumps are performance certified to
American Heating and Refrigeration Institute (AHRI) ISO
Standard 13256-1. All GB Water-to-Air Heat Pumps conform to
UL1995 standard and are certified to CAN/CSA C22.1 No 236 by
Intertek-ETL. The Water-to-Air Heat Pumps are designed to
operate with entering fluid temperature between 20°F to 90°F in
the heating mode and between 30°F to 120°F in the cooling mode.
Safety devices are built into each unit to provide the maximum
system protection possible when properly installed and maintained.
IMPORTANT: 50 ° Min. EWT (entering water temperature) for
well water applications with sufficient water flow to prevent
freezing. Antifreeze solution is required for all closed loop
applications. Earth Coupled (Geothermal) applications should have
sufficient antifreeze solution to protect against extreme conditions
and equipment failure. Frozen water coils are not covered under
warranty.
IMPORTANT: This product should not be used for temporarily
heating or cooling during construction. Doing so may effect the
unit's warranty.
UNIT OPERATION HAZARD
Failure to follow this caution may result in equipment
damage or improper operation.
Discharge air configuration change is not possible on Heat
Pumps equipped with Electric Heat Option.
Check Equipment and Job Site
Movinu and Storage
If the equipment is not needed for immediate installation upon its
arrival at the job site, it should be left in its shipping carton and
stored in a clean, dry area. Units nmst only be stored or moved in
the normal upright position as indicated by the :'UP" arrows on
each carton at all times.
EQUIPMENT DAMAGE HAZARD
Failure to follow this caution may result in equipment damage.
If unit stacking is required for storage, stack units as follows:
Do not stack units larger than 6 tons!
Vertical units: less than 6 tons, no more than two high.
Horizontals units: less than 6 tons, no more than three high.
Inspect Equipment
Be certain to inspect all cartons or crates on each unit as received at
the job site before signing the freight bill. Verify that all items have
been received and that there are no visible damages; note any
shortages or damages on all copies of the freight bill. In the event
of damage or shortage, remember that the purchaser is responsible
for filing the necessary claims with the carrier. Concealed damages
not discovered until after removing the units from the packaging
must be reported to the carrier within 24 hours of receipt.
Location /Clearance
Locate the unit in an indoor area that allows easy removal of the
filter and access panels, and has enough room for service personnel
to perform maintenance or repair. Provide sufficient room to make
fluid, electrical, and duct connection(s). If the unit is located in a
confined space such as a closet, provisions nmst be made for return
air to freely enter the space. On horizontal units, allow adequate
room below the unit for a condensate drain trap and do not locate
the unit above supply piping.
[]NIT OPERATION HAZARD
Failure to follow this caution may result in equipment
damage or improper operation.
These units are not approved for outdoor installation;
therefore, they must be installed inside the structure being
conditioned. Do not locate in areas that are subject to
freezing.
[]NIT DAMAGE AND/OR OPERATION HAZARD
Failure to follow this caution may result in equipment
damage and/or improper equipment operation.
It is extremely important to take the proper precautions to
insure that the heat pump unit is installed in the proper
location and that measures have been taken to prevent
rupturing the water coil due to freezing conditions.
Frozen water coils are not covered under the limited
product warrant,v.
APPLICATION CONSIDERATIONS
Earth Coupled (Geothermal) Systems
Closed loop and pond @plications require specialized design
knowledge. No attempt at these installations should be made unless
the dealer has received specialized training.
Anti-freeze solutions are utilized when low evaporating conditions
are expected to occur. Refer to the Flow Center installation
manuals for more specific instructions.
10
Fig. 1 - Earth Coupled Application
EARTH COUPLED APPLICATION
1. LINE VOLTAGE DISCONNECT (UNIT)
2. FLEX DUCT CONNECTION
3. LOW VOLTAGE CONTROL CONNECTION
4. LINE VOLTAGE CONNECTION (UNIT)
5. PIT PORTS
6. VIBRATION PAD
7. CONDENSATE DRAIN
8. GROUND LOOP CONNECTION KIT
9. GROUND LOOP PUMPING PACKAGE
10. POLYETHELENEWITH INSULATION
11. LINE VOLTAGE DISCONNECT (ELECTRIC
HEATER)
A14161
Well Water Systems
IMPORTANT: Table 1 must be consulted for water quality
requirements when using open loop systems. A water sample must
be obtained and tested, with the results compared to the table.
Scaling potential should be assessed using the pH/Calcium
hardness method. If the pH is <7.5 and the calcium hardness is
1<100 ppm, the potential for scaling is low. For numbers out of the
range listed, a monitoring plan must be implemented due to
probable scaling.
Other potential issues such as iron fouling, corrosion, erosion and
clogging must be considered. Careful attention to water conditions
must be exercised when considering a well water application.
Failure to perform water testing and/or applying a geothermal heat
pump to a water supply that does not fall within the accepted
quality parameters will be considered a mis-application of the unit
and resulting heat exchanger failures will not be covered under
warranty. Where a geothermal system will be used with adverse
water conditions, a suitable plate-frame heat exchanger MUST be
used to isolate the well water from the geothermal unit.
Proper testing is required to assure the well water quality is suitable
for use with water source equipment.
In conditions anticipating moderate scale formation or in brackish
water, a cupronickel heat exchanger is recommended. Copper is
adequate for ground water that is not high in mineral content.
In well water applications, water pressure must always be
maintained in the heat exchanger. This can be accomplished with
either a control valve or a bladder type expansion tank.
When well water is used exclusively for supplying water to the
heat pump, the pump should operate only when the heat pump
operates. A 24 volt double pole single throw (DP/ST) contactor
(Fig. 2) can be used to operate the well pump with the heat pump.
(_ POWER SUPPLY
UNIT II [
TEs_T_NALII L
[
DP/ST RELAY
POWER TO PUMP
A14166
Fig. 2 - 24 volt DP/ST Contactor
When two or more units are supplied from one well, the pump can
be wired to operate independently from either unit (see Fig. 3). An
up-sized VA transformer may be required in either case.
(_ POWER SUPPLY
TE# "', ALII' II I 20P;STq
STRIP II ,-.d-_e"'_-_l RELAYS_r'-:" "_
t t _ POWER
TO PUMP
Fig. 3 - DP/ST Independent Wiring A14167
11
6
7
WELL WATER APPLICATIONS (50°F EWT MIN.)
1. LIN E VOLTAGE DISGON NECT (U NIT)
2. FLEX DUCT CONNECTION
3. LOW VOLTAGE CONTROL CON NECTION
4. LIN E VOLTAGE CONN ECTION
5. VIBRATION PAD
6. PIT PORTS
7. HOSE KITS (Optional)
8. BALL VALVES
9. SOLENOID VALVE SLOW CLOSING
10. CONDENSATE DRAIN CON N ECTION
11. PRESSURETANK
12. LIN E VOLTAGE DISCON NECT (ELECTRIC H EATER)
NOTE: SEE FIGURE #3 FOR CONDENSATE DRAIN CONNECTION
Fig. 4 - Well Water Application
A14159
Pressure/temperature ports are recommended in both the supply
and return lines for system flow balancing. The water flow can be
accurately set by measuring the water-to-refrigerant heat
exchangers water side pressure drop. See the unit specification
sheets for the water flow and pressure drop information in the back
of this manual.
The discharge water from the heat pump is not contaminated in any
manner and can be disposed of in various ways depending on local
codes (i.e. discharge well, dry well, storm sewer, drain field,
stream, pond, etc.)
When using a single water well to supply both domestic water and
the heat pump care must be taken to insure that the well can
provide sufficient flow for both. In well water applications a slow
closing solenoid valve must be used to prevent water hammer.
Solenoid valves should be connected across Y and C on the
interface board for all. Make sure that the VA draw of the valve
does not exceed the contact rating of the thermostat.
Pressure/temperature ports are recommended in both supply and
return lines for system flow balancing. Water flow can be
accurately set by measuring the water-to-refrigerant heat
exchangers water side pressure drop. See specification sheets for
water flow vs. pressure drop information in the back of this
manual.
UNIT OPERATION HAZARD
Failure to follow this caution may result in equipment
damage or improper operation,
Water piping exposed to extreme low ambient
temperatures is subject to freezing.
UNIT OPERATION HAZARD
Failure to follow this caution may result in equipment
damage or improper operation.
Discharge air configuration change is not possible on Heat
Pumps equipped with Electric Heat Option,
Table 1 - Water Quality Requirements for Open-Loop Geothermal Heat Pump System
Parameter HX Material Closed Recirculating Open Loop and Recirculating Well
pH/Calcium Hardness All pH <7.5 and Ca Hardness <100ppm
Method
6.0 - 7.5
Ryznar Stability Index All -- If > 7.5 minimize steel pipe use
-0.5 to +0.5
If <-0.5 minimize steel pipe use.
Langelier Saturation Index All -- Based upon 150°F HWG and Direct well,
84°F Indirect Well HX
<0.2 ppm (Ferrous)
Iron Fe2 (Ferrous) All -- If Fe2. (ferrous) >0.2 ppm with pH 6-8, 02<5 ppm check
(Bacterial Iron Potential) for iron bacteria
<0.5 ppm of Oxygen
Iron Fouling All -- Above this level deposition will occur
6 - 8.5 6 - 8.5
pH All Monitor/treat as needed Minimize steel pipe below 7 and no open tanks with pH <8
At H S>0.2 ppm, avoid use of copper and copper nickel
piping or HXs. Rotten egg smell appears at 0.5 ppm level.
Hydrogen Sulfide (H2S) All -- Copper alloy (bronze or brass) cast components are OK
to <0.5 ppm
Ammonia ion as hydroxide,
chloride, nitrate and sulfate All -- <0.5 ppm
compounds
Maximum Allowable at Maximum Water Temperature
50°F 75°F 100°F
Copper -- <20 ppm NR NR
Maximum Chloride Levels cupronickel -- <150 ppm NR NR
304 SS -- <400 ppm <250 ppm <150 ppm
316 SS -- <1000 ppm <550 ppm <375 ppm
Titanium -- >1000 ppm >550 ppm >375 ppm
_i _ ........
<10 ppm of particles and a <10 ppm (<1 ppm "sandfree" for re-injection) of particles
Particulate Size and All maximum velocity of 1.8 m/s. and a maximum velocity of 1.8 m/s. Filtered for maximum
Erosion Filtered for maximum 841 mi- 841 micron [0.84 mm. 20 mesh] size. Any particulate that
cron [0.84 mm 20 mesh] size is not removed can potentially clog components
NOTES:
Closed recirculating system is identified by a closed pressurized piping system.
Recirculating open wells should observe the open recirculating design considerations.
NR - application not recommended
"--" No design Maximum
INSTALLATION
MOUNTING VERTICAL UNITS
GB Vertical units up to five tons are available in left or right air
return configurations. Vertical units should be mounted level on a
vibration absorbing pad slightly larger than the base to nfininfize
vibration transmission to the building structure. It is not necessary
to anchor the unit to the floor. See Fig. 5.
CONDENSATE DRAIN
IMPORTANT: If equipped with float style condensate
overflow switch, final adjustment must be made in the field.
CONDENSATE DRAIN
CONNECTION
VENT (OPTIONAL)
O O
I TRAP DOWN
2" MIN.
SLOPE DOWN
MIN.1/8" PER FOOT
Vl BRATI0 N
PAD
'_ FULL SIZE
Fig. 5 - Vibration Absorbing Pad
A14151
MOUNTING HORIZONTAL UNITS
While horizontal units may be installed on any level surface strong
enough to hold their weight, they are typically suspended above a
ceiling by threaded rods. The manufacturer recommends these be
attached to the unit corners by hanger bracket kits (see Fig. 6). The
rods nmst be securely anchored to the ceiling. Refer to the hanging
bracket assembly and installation instructions for details.
A14165
Fig. 6 -Hanger Bracket Kit
IMPORTANT: Horizontal units installed above the ceiling
must conform to all local codes. An auxiliary drain pan, if
required by code, should be at least four inches larger than the
bottom of the heat pump.
Plumbing connected to the heat pump must not come in direct
contact with joists, trusses, walls, etc. Some applications require an
attic floor installation of the horizontal unit. In this case, the unit
should be set in a full size secondary drain pan on top of a
vibration absorbing mesh.
The Secondary drain pan prevents possible condensate overflow or
water leakage damage to the ceiling.
The secondary drain pan is usually placed on a plywood base
isolated from the ceiling joists by additional layers of vibration
absorbing mesh.
In both cases, a 3/4"drain connected to this secondary pan should
be run to an eave at a location that will be noticeable. If the unit is
located in a crawl space, the bottom of the unit must be at least 4"
above grade to prevent flooding of the electrical parts due to heavy
rains.
A14118
Fig. 7 -Condensate Drain
A drain line nmst be connected to the heat pump and pitched away
from the unit a minimum of 1/8" per foot to allow the condensate
to flow away from the unit,
IMPORTANT: This connection must be in conformance with
local plumbing codes. A trap must be installed in the
condensate line to insure free condensate flow. Heat Pumps are
not internally trapped.
A vertical air vent is sometimes required to avoid air pockets (see
Fig. 7). The length of the trap depends on the amount of positive or
negative pressure on the drain pan. A second trap must not be
included.
The horizontal unit should be pitched approximately 1/4" towards
the drain in bot directions to facilitate condensate removal (see Fig.
8).
/.
A14152
Fig. 8 -Horizontal []nit Pitch
DUCT SYSTEM
A supply air outlet collar and return air duct flange are provided on
all units to facilitate duct connections. Refer to the individual
Product Data for physical dimensions of collar and flange.
NOTE: Supply air duct and return air duct flanges are shipped
unfolded with unit.
A flexible connector is recommended for supply and return air duct
connections on metal duct systems. All metal ducting should be
insulated with a minimum of one inch duct insulation to avoid heat
loss or gain and prevent condensate from forming during the
cooling operation.
Application of the unit to uninsulated duct work is not
recommended as the unit's performance will be adversely affected.
UNIT OPERATION HAZARD
Failure to follow this caution may result in improper
equipment operation.
Do not connect discharge ducts directly to the blower
outlet.
The factory provided air filter must be removed when using a filter
back return air grill. The factory filter should be left in place on a
free return system.
If the unit will be installed in a new installation which includes new
duct work, the installation should be designed using current
ASHRAE procedures for duct sizing.
If the unit is to be connected to existing duct work, a check should
be made to assure that the duct system has the capacity to handle
the air required for the unit application.
If the duct system is too small, larger duct work should be installed.
Check for existing leaks and repair.
The duct system and all diffusers should be sized to handle the
designed air flow quietly. To maximize sound attenuation of the
unit blower, the supply and return air plenums should be insulated.
There should be no direct straight air path through the return air
grille into the heat pump. The return air inlet to the heat pump must
have at least one 90 degree turn away from the space return air
grille. If air noise or excessive air flow are a problem, the blower
speed can be changed to a lower speed to reduce air flow. Refer to
Table 2 for ECM motor speeds and settings.
UNIT OPERATION AND SAFETY HAZARD
Failure to follow this warning could result in personal iniury
and/or death as well as equipment damage.
Always disconnect power to the unit before changing motor
speed to prevent electrical shock and/or damage to the motor.
PIPING
Supply and return piping must be as large as the unit connections
on the heat pump (larger on long runs).
UNIT OPERATION HAZARD
Failure to follow this caution may result in improper
equipment operation.
Never use flexible hoses of a smaller inside diameter than
that of the fluid connections on the unit.
GB units are supplied with either a copper or optional cupronickel
condenser. Copper is adequate for ground water that is not high in
mineral content.
NOTE: Proper testing is recommended to assure the well water
quality is suitable for use with water source equipment. When in
doubt, use cupronickel.
In conditions anticipating moderate scale formation or in brackish
water, a cupronickel heat exchanger is recommended.
Both the supply and discharge water lines will sweat if subjected to
low water temperature. These lines should be insulated to prevent
damage from condensation.
All manual flow valves used in the system must be ball valves.
Globe and gate valves must not be used due to high pressure drop
and poor throttling characteristics.
EQUIPMENT DAMAGE
OPERATION HAZARD AND/OR UNIT
Failure to follow this caution may result in equipment
damage and/or improper operation.
Never exceed the recommended water flow rates as serious
damage or erosion of the water-to-refrigerant heat
exchanger could occur.
Improper heat exchanger water flow due to piping, valve
arrangement or improper pump operation is hazardous to
the unit and constitutes abuse which will void the heat
exchanger and compressor warranty.
Always check carefully for water leaks and repair appropriately.
[]nits are equipped with female pipe thread fittings. Consult
Product Data for sizes.
NOTE: Teflon tape sealer should be used when connecting water
piping connections to the units to insure against leaks and possible
heat exchanger fouling.
Flexible hoses should be used between the unit and the rigid
system to avoid possible vibration. Ball valves should be installed
in the supply and return lines for unit isolation and unit water flow
balancing.
No unit should be connected to the supply or return piping until
the water system has been completely cleaned and flushed to
remove any dirt, piping chips or other foreign material. Supply and
return hoses should be connected together during this process to
ensure the entire system is properly flushed. After the cleaning and
flushing has taken place the unit may be connected to the water
loop and should have all valves wide open. Do not over-tighten
connections.
Table 2-GB Motor CFM Selection (Constant Torque ECM Motor)
GB018 1/3 MED .... -
GB024 1/3 ' ::;: MED ' 2,
GB030 1/3 MED .... -
GB036 3/4 MED .....
GB042 ' 3/4 MED -
G B048 3/4 _W MED _
GB060 1 MED 2:
ELECTRICAL
ELECTRICALSHOCK HAZARD
Failure to follow this warning could result in personal
iniury or death.
Before installing, modifying, or servicing system, main
electrical disconnect switch nmst be in the OFF position.
There may be more than 1 disconnect switch. Lock out and
tag switch with asuitable warning label.
[]NIT OPERATION HAZARD
Failure to follow this caution may result in equipment
damage and/or improper operation.
• Field wiring must comply with local and national
electrical codes.
• Power to the unit must be within the operating voltage
range indicated on the unit nameplate.
• On three-phase units, phases must be balanced within
2%.
• Operation of unit on improper line voltage or with
excessive phase imbalance will be hazardous to the unit,
constitutes abuse, and may void the warranty.
Properly sized fuses or HACR circuit breakers must be installed for
branch circuit protection. See unit nameplate for maximum fuse or
breaker size.
The unit is provided with a concentric knock-out for attaching
common trade sizes of conduit, route power supply wiring through
this opening. Flexible wiring and conduit should be used to isolate
vibration and noise from the building structure.
Always connect the ground lead to the grounding lug provided in
the control box and power leads to the line side of compressor
contactor as indicated on the wiring diagrams.
THERMOSTAT CONNECTIONS
Thermostat wiring is connected to a 7 position low voltage
ternfinal block in the electrical box. The thermostat connections
and their functions are as follows:
Y Compressor Operation
G Fan
O Reversing Valve (energized in cooling)
C Transformer 24 VAC Common - 3 Connections
R Transformer 24 VAC Hot
If the unit is being connected to a thermostat with a malfunction
light, this connection is made at the unit alarm output,
IMPORTANT: If the thermostat is provided with a
malfunction light powered off of the common (C) side of the
transformer, a jumper between "R" and "COM" terminal of
"ALR" contacts must be made.
IMPORTANT: If the thermostat is provided with a
malfunction light powered off of the hot (R) side of the
transformer, then the thermostat malfunction light connection
should be connected directly to the (ALR) contact on the unit's
UPM board.
SAFETY DEVICES AND UPM
CONTROLLER
©/
U j
©
.....il
2 = Lpc
3=FREI
4 = CON
5 = BRN
,,Q
,:, o I!}l}{ii£!}?,
0:! 0:!
I_, I:! I11 I_1 I:1 FII
: I:1 i'ilnl ]
___ ___ [)
® ©@@ @
(I) Board Power Indicator
(2) UPM Status LED Indicator
(3) Water Coil Freeze Protection
Temperature Selection [R30]
(4) Air Coil Freeze Protection
Temperature Selection
(5) UPM Board Settings
(6) Water Coil Freeze Connection
(7) Air Coil Freeze Connection
(8) LCD Unit Display Connection
(9) 24VAC Povv-er Input
A14120
(I0) Compressor Contact Output
(11) High Pressure Svv-itch Connection
(12) Call for Compressor Y1
(13) Low-Pressure Svv-itchConnection
(14) 24VAC Power Common
(15) Condensate Overflow- Sensor
(16) Dry Contact
(17) UPM Ground Standoff
Fig. 9 -Safety Device and UPM Controller
Each unit is factory provided with a Unit Protection Module
(UPM) that controls the compressor operation and monitors the
safety controls that protect the unit (see Fig. 9).
Safety controls include the following:
• High pressure switch located in the refrigerant discharge line and
wired across the HPC ternfinals on the UPM
• Low pressure switch located in the unit refrigerant suction line
and wired across ternfinals LPCI and LPC2 on the UPM.
• Freeze protection sensor, mounted close to condensing water coil
(see Fig. 10), monitors refrigerant temperature between
condensing water coil and thermal expansion valve. If
temperature drops below or remains at freeze linfit trip for 30
seconds, the controller will shut down the compressor and enter
into a soft lockout condition. The default freeze linfit trip is 26°F,
however this can be changed to 15°F by cutting the R30 resistor
located on top of DIP switch SWI.
• The condensate overflow protection sensor is located in the drain
pan of the unit and connected to the "COND" ternfinal on the
UPM board. ...............................................................i}
A14156
Fig. 10 - Freeze Protection Sensor Location
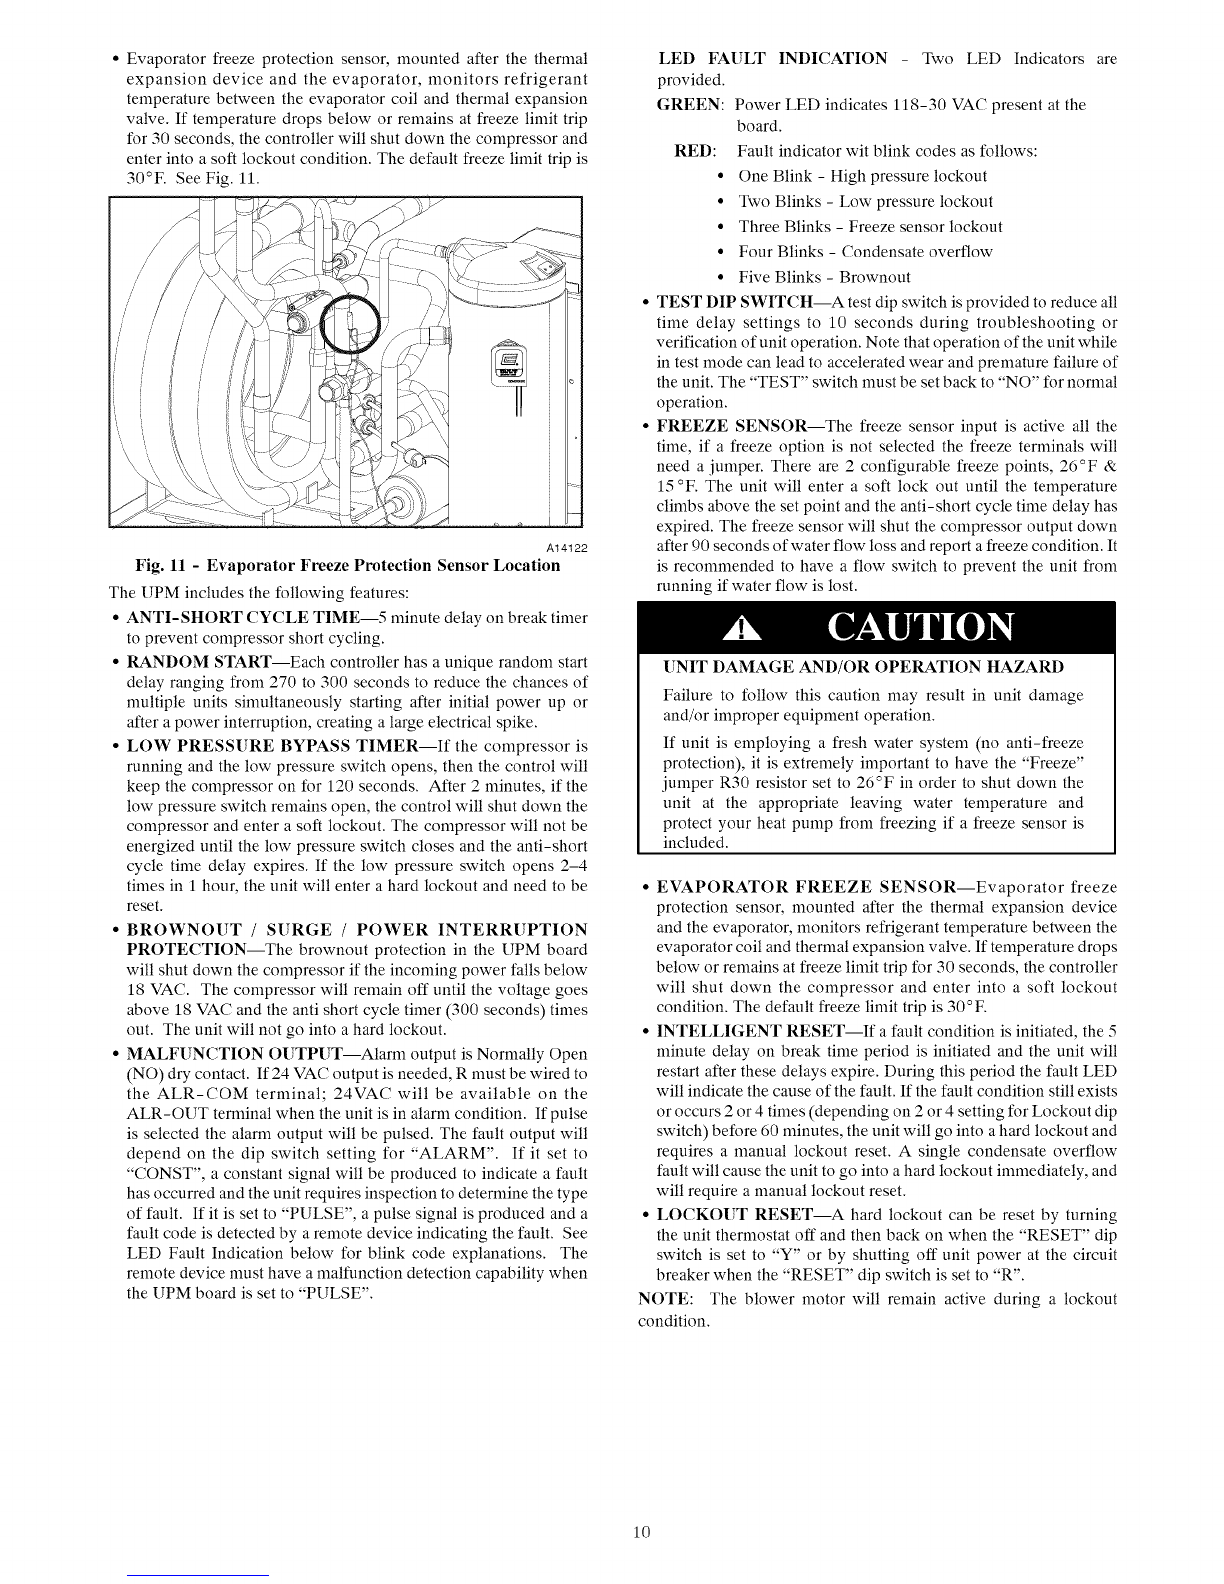
• Evaporator freeze protection sensor, mounted after the thermal
expansion device and the evaporator, monitors refrigerant
temperature between the evaporator coil and thermal expansion
valve. If temperature drops below or remains at freeze limit trip
for 30 seconds, the controller will shut down the compressor and
enter into a soft lockout condition. The default freeze limit trip is
30°F. See Fig. 11.
A14122
Fig. 11 - Evaporator Freeze Protection Sensor Location
The UPM includes the following features:
• ANTI-SHORT CYCLE TIME--5 minute delay on break timer
to prevent compressor short cycling.
• RANDOM START--Each controller has a unique random start
delay ranging from 270 to 300 seconds to reduce the chances of
multiple units simultaneously starting after initial power up or
after a power interruption, creating a large electrical spike.
• LOW PRESSURE BYPASS TIMER--If the compressor is
running and the low pressure switch opens, then the control will
keep the compressor on for 120 seconds. After 2 minutes, if the
low pressure switch remains open, the control will shut down the
compressor and enter a soft lockout. The compressor will not be
energized until the low pressure switch closes and the anti-short
cycle time delay expires. If the low pressure switch opens 2-4
times in 1 hour, the unit will enter a hard lockout and need to be
reset.
• BROWNOUT /SURGE /POWER INTERRUPTION
PROTECTION--The brownout protection in the UPM board
will shut down the compressor if the incoming power falls below
18 VAC. The compressor will remain off until the voltage goes
above 18 VAC and the anti short cycle timer (300 seconds) times
out. The unit will not go into a hard lockout.
• MALFUNCTION OUTPUT--Alarm output is Normally Open
(NO) dry contact. If24 VAC output is needed, R must be wired to
the ALR-COM terminal; 24VAC will be available on the
ALR-OUT terminal when the unit is in alarm condition. If pulse
is selected the alarm output will be pulsed. The fault output will
depend on the dip switch setting for "ALARM". If it set to
"CONST", a constant signal will be produced to indicate a fault
has occurred and the unit requires inspection to determine the type
of fault. If it is set to "PULSE", a pulse signal is produced and a
fault code is detected by a remote device indicating the fault. See
LED Fault Indication below for blink code explanations. The
remote device must have a malfunction detection capability when
the UPM board is set to "PULSE".
LED
provided.
GREEN:
FAULT INDICATION -Two LED Indicators are
Power LED indicates 118-30 VAC present at the
board.
RED: Fault indicator wit blink codes as follows:
• One Blink - High pressure lockout
• Two Blinks - Low pressure lockout
• Three Blinks - Freeze sensor lockout
• Four Blinks - Condensate overflow
• Five Blinks - Brownout
TEST DIP SWITCH--A test dip switch is provided to reduce all
time delay settings to 10 seconds during troubleshooting or
verification of unit operation. Note that operation of the unit while
in test mode can lead to accelerated wear and premature failure of
the unit. The "TEST" switch must be set back to "NO" for normal
operation.
FREEZE SENSOR_The freeze sensor input is active all the
time, if a freeze option is not selected the freeze terminals will
need a jumper. There are 2 configuraMe freeze points, 26°F &
15 °F. The unit will enter a soft lock out until the temperature
climbs above the set point and the anti-short cycle time delay has
expired. The freeze sensor will shut the compressor output down
after 90 seconds of water flow loss and report a freeze condition. It
is recommended to have a flow switch to prevent the unit from
running if water flow is lost.
UNIT DAMAGE AND/OR OPERATION HAZARD
Failure to follow this caution may result in unit damage
and/or improper equipment operation.
If unit is employing a fresh water system (no anti-freeze
protection), it is extremely important to have the "Freeze"
jumper R30 resistor set to 26°F in order to shut down the
unit at the appropriate leaving water temperature and
protect your heat pump from freezing if a freeze sensor is
included.
• EVAPORATOR FREEZE SENSOR--Evaporator freeze
protection sensor, mounted after the thermal expansion device
and the evaporator, monitors refrigerant temperature between the
evaporator coil and thermal expansion valve. If temperature drops
below or remains at freeze limit trip for 30 seconds, the controller
will shut down the compressor and enter into a soft lockout
condition. The default freeze limit trip is 30°F.
• INTELLIGENT RESET--If a fault condition is initiated, the 5
minute delay on break time period is initiated and the unit will
restart after these delays expire. During this period the fault LED
will indicate the cause of the fault. If the fault condition still exists
or occurs 2 or 4 times (depending on 2 or 4 setting for Lockout dip
switch) before 60 minutes, the unit will go into a hard lockout and
requires a manual lockout reset. A single condensate overflow
fault will cause the unit to go into a hard lockout immediately, and
will require a manual lockout reset.
•LOCKOUT RESET--A hard lockout can be reset by turning
the unit thermostat off and then back on when the "RESET" dip
switch is set to "Y" or by shutting off unit power at the circuit
breaker when the "RESET" dip switch is set to "R".
NOTE: The blower motor will remain active during a lockout
condition.
10