Cairn 4810 User manual

OWNER’S
MANUAL
481O Integrated amplifier
Durability by evolution
cairn
MULTI
SOLUTIONS

Introduction
cairn
Congratulations, you own a unique device!
This 2-channel integrated amplifier offers all the customisation you need to match
with your system.
You can add a lot of features and benefits, without affect the sound quality; the
Cairn & Ezo staff wish you will spend a pleasant time using
MULTI
SOLUTIONS system for plug & play modules offers advantages without any
compromise.
481O.
CE Declaration of conformity
FCC notice
Cairn declare that this product is in conformance with the Low Voltage Directive 73/23/EEC.
The conformity of the designated product with the provisions of directive number 73/23/EEC (LVD) is proved by full compliance
with the following standards:
Standard EN60065 (1993) test type: Marking, ionizing, heating under normal conditions, shock hazards under normal operating
instructions, insulation requirements, fault conditions, mechanical strength, parts connected to the mains supply, components,
terminal cords, electrical connections and mechanical fixings.
The conformity of the designated product with the provisions of directive number 89/336/EEC (EMC) is proved by full
compliance with the following standards:
Standard number Date of issue Test type
EN55013 1994 Conducted emissions
EN55013 1994 Absorbed emissions
EN60555-2 1987 Hamonics
EN60555-3 1987 Voltage fluctuations
EN55020 1994 Immunity
NOTE: This equipment has been tested and found to comply with the limits for a Class B digital device, pursuant to Part 15 of the
FCC Rules. These limits are designated to provide reasonable protection against harmfull interference in a residential
installation. This equipment generates, uses, and can radiate radio frequency energy and, if not installed and used in
accordance with the instructions, may cause harmfull interference to radio communications. However, there is no garantee
that interference will not occur in a particular installation.
If this equipment does not cause harmful interference to radio or television reception, which can be determinated by turning
the equipment off and on, the user is encouraged to try to correct the interference by one or more of the following measures:
-Increase the separation between the equipment and receiver.
-Connect the equipment into an outlet on a circuit different from that to which the receiver is connected.
-Consult the dealer or an experienced radio/TV technician for help.
Release 1.04

Table of contentsTable of contents
1. Unpacking - advices ..........................................................................................
2. Rear panel .........................................................................................................
3. Front panel .........................................................................................................
4. Remote control ...................................................................................................
5. Starting
6. Description of the menus
7. Special features
8. Installing an option
1.1 Unpacking ....................................................................................................
1.2 Care considerations ......................................................................................
2.1 Description ...................................................................................................
2.2 Connections..... ............................................................................................
3.1 Description ...................................................................................................
3.2 Using the buttons ..........................................................................................
3.3 Navigation help....... .....................................................................................
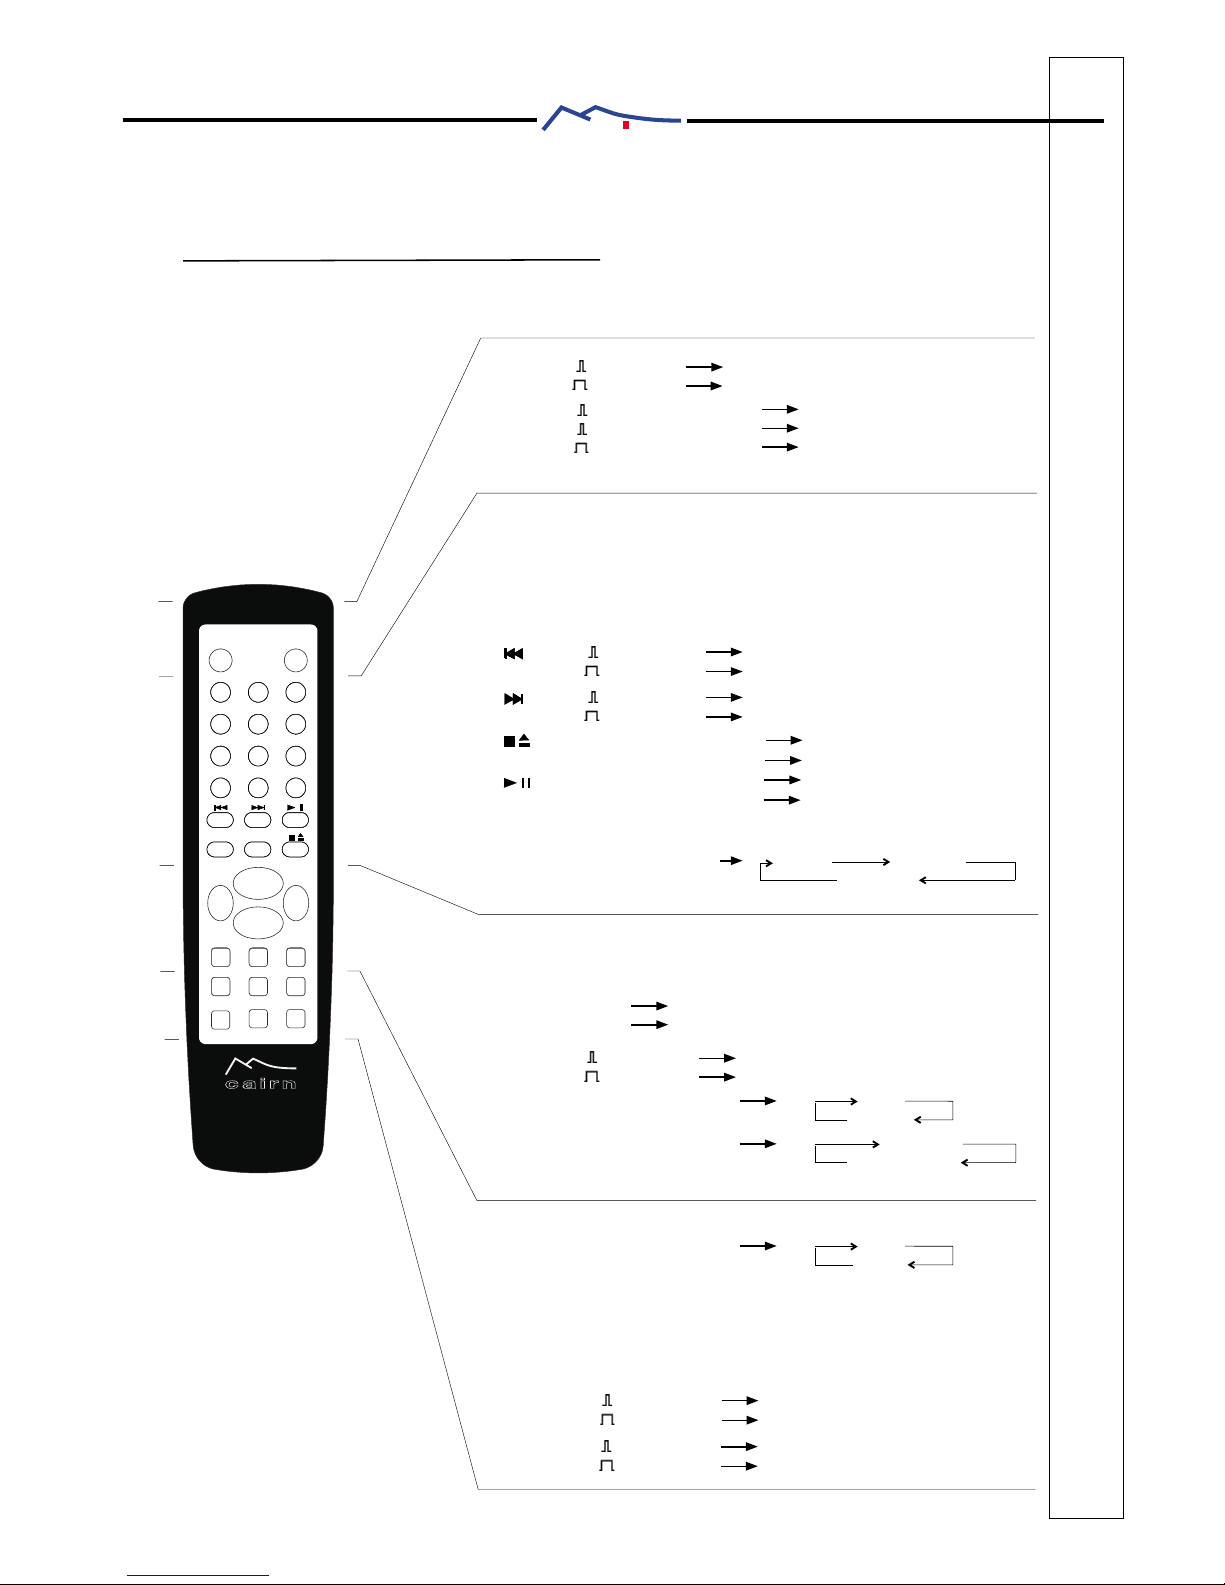
4.1 Description ....................................................................................................
4.2 Using
5.1 Starting
5.2 Source selection
6.1 Main screen
6.2 Source setup
6.3 Heaphone setup
6.4 Speakers setup
6.5 Sleep setup
6.6 General setup
6.7 Options setup
6.8 Factory settings
6.9 Info
7.1 Volumes
.............................................................................................................
.........................................................................................................
...........................................................................................
..................................................................................................
.................................................................................................
...........................................................................................
..............................................................................................
...................................................................................................
...............................................................................................
................................................................................................
.............................................................................................
................................................................................................................
........................................................................................................
7.2 Monitoring .....................................................................................................
7.3 Short circuit/overload protection ...................................................................
7.4 Software updating .........................................................................................
...............................................................................................................
....................................................................................
..................................................................................................
.............................................................................................
9. Specifications .....................................................................................................
Annex 1 - Volume and decibel ...............................................................................
cairn
1
1
1
2
3
4
5
6
2
4
12
7
7
8
12
12
9
9
9
13
13
13
14
15
15
16
17
17
17
17
18
19
20
17

cairn
1
1.1 Unpacking
Place your in a dry place, with no direct sun exposure.
Sun rays could damage the device.
4810
List of supplied furnitures::
-Power cord (Europa or U.S.)
-Remote control unit 33 keys
-Cells 2x1.5V AAA size (in the remote control unit)
-Hexagonal wrench
1.2 Care considerations
-Before removing mains supply, take care to turn the device in sleep mode
because overvoltage could damage it.
-Do not use extension lead between the outlet and the device.
-Unauthorised opening of the device cancel the manufacturer warranty.
-Do not cover the air cooling
-Put the device far from source.
-Do not introduce anything into the device.
DO NOT REMOVE THE COVER, SHOCK HAZARD.
THE DEVICE IS DELIVERED WITH A POWER CORD MATCHING WITH THE ELECTRICAL
STANDARDS OF THE COUNTRY OF DESTINATION.
THE DEVICE NOT CONTAIN ANY COMPONENT THE USER CAN REPARE HIMSELF.
IN CASE OF TROUBLESHOOTING, PLEASE CONTACT YOUR REGISTERED DEALER.
USE THE SAME TYPE OF FUSE AS THE ORIGINAL.
DO NOT EXPOSE TO MOISTURE..
Maintenance
WARNING
grid.
warmth
DOES
First, unplug your product from the AC plug. A chamois leather slightly moistened
with water is sufficient for cleaning your CD player. Do not use cleaning agents
containing moistened airits, ammoniac or abrasives. Do not try to clean the inside
of the product.
1. Unpacking - advices1. Unpacking - advices

2. Rear panel2. Rear panel
cairn
2
2.1 Description
1
Speaker OUT (Minimal impedance of the loudspeakers: 2 Ohm)
12 12
3
4
5
6
7
8
9
10
11
1
Main supply connector
2
Fuse (5A time-lag)
3
4
RS-232 Slave (Communication wih a PC)
5
Headphone connector (Jack 6.35mm)
6
Preamplifier output
7
RS-232 Master (Communication with another Cairn device)
Monitor output
8
9
Analog inputs (An1 to An4)
10
A.M. Antena (For RADIO option, 2 wires)
11
F.M. antenna (For RADIO option, 75 Ohm)
12
Monitor input

2.2 Connections
543 210
-Ensure that the device is totally disconnected from mains.
-If you own ome options, plug them into the . For RADIO option, you must plug
it to connector 0, but for the others options, you can plug them to connectors 1 to
5.
For certain uses of the option, you may be advised to put an option into a precise
connector. You will find this information in the documentation delivered with the
option.
You can request your reseller to make these operations.
481Os
-Connect your analog surces to connectors marked “An1” to “An4” on the rear
panel.
-Connect your loudspeakers to the connectors marked “Speaker Out”.
-If you own a device equipped with a RS-232 connector, link it “Slave” connector
to the “Master” connector of .
-Link your to the main supply with the furnitured cord.
We recommend the use of cables for your audio connections; this cables
have been especially designed to match with all Cairn devices.
Note: For the connections of the Inputs/Outputs of your options, please refer to the
documentation delivered with the option.
481O
481O
XO
ONLY PLUG RADIO OPTION HERE!
3
cairn
4810 main card
2. Rear panel2. Rear panel

3. Front panel3. Front panel
4
cairn
3.1 Description
Left Button
(Short push) “Enter” validate an action
(Long push) “Esc” escape from an action or a menu
(Rotation) “Navigation” navigate through a menu, modify a parameter
Right button
(Short push) “ON” turn on the device
(Long push) “OFF” turn off the devie
(Rotation) “Volume” change volume level
Display
White LED on blue background display
Two luminosity levels adjustable.
Infrared sensor - ligths
Remote control sensor
Remote control action received (blue light)
Main supply (red light)
12
34
1
2
3
4

3. Front panel3. Front panel
cairn
5
3.2 Using the buttons
Example:
1)Staring
Short push
The device is now
Turned on:
2)Volume change
Rotation
The volume has
changed:
3)Turn off the device
Long push
Navigation / validation
-Short push : validate an action
-Long push : escape
-Rotation : navigate through a menu,
, edit a parameter
Example:
1)Enter a menu
Main screen:
Rotation to change
the menu:
New screen:
2)Enter/Escape from a menu
Short push
To enter
Now you are in:
Long push to
escape:
Now you returned to
Previous menu
volume/ power
-Short push : turn on the device
-long push : turn off the device
-Rotation : change the volume

3.3 Navigation help
3. Front panel3. Front panel
6
cairn
You can go down
You can go up
Up and down possible
Speaker out selected:
Headphone out selected:
Monitor activated:
In accordance with your selections, you can either activate the loudspeaker output
“Speaker Out”, or the heaphone output “Heaphone”. In both cases, you can also
enable the monitoring (record monitoring). recall your current
configuration in the main screen:
Three icons
While you navigate you will se arrows on the upper left corner of the screen. It
illustrates your position in a menu.

4. Remote control4. Remote control
7
cairn
4.1 Description
+++
STORE FREQ -
MONO FREQ+
BALANCE MUTE TAPE
VOL -
VOL+
IN- IN+
FILTER REPEAT
0LEVEL - LEVEL+
123
DISPLAY POWER
456
789
PRESET+
PRESET-
POWER : (short push) ON
(long push) OFF
DISPLAY : (short push, display on) Informations scroll
(short push, display off) Display turns on
(long push) Display turns off
1 à 9 : Access to Track 1 to 99
Example: Track 23 press 2 then 3
LEVEL-/+ : Output level adjustment
minimal level = minimal quality
maximal level = maximal quality
: (short push) Previous track
(long push) Fast backward
: (short push) Next track
(long push) Fast forward
: push while disc playing Stop playing
push while disc stopped Eject the disc
: push while disc stopped Play
push while disk playing Pause
FILTER : Digital filter adjustment
REPEAT : Repeat traks
Consecutive pushs 1 track all tracks
no repeat
VOL+/- : Volume adjustment
IN+/- : Source selection
CH+ Next source
CH- Previous source
BALANCE : (short push) Right +
(long push) Right -
MUTE : consecutive pushs Mute
Unmute
TAPE : consecutive pushs Monitoring
No monitoring
MONO : consecutive pushs Mono
Stereo
PRESET +/- : Next/Previous station in the list
FREQ+ : (short push) next frequency
(long push) station scan
FREQ- : ( ) previous frequencyshort push
(long push) station scan
STORE : Store urrent frequency in the first empty position in the list
C
O
M
M
O
N
C
D
P
L
A
Y
E
R
A
M
P
L
I
T
U
N
E
R

4. Remote control4. Remote control
8
cairn
4.2 Using
To be more easy to use, the remote control unit give direct access to the evice
parameters, there is no navigation.
It is divided in four parts: Common, CD player, Amplifier, Tuner (See section 4.1 for
details).
Two key are common to all airn devices:
Because short push and long pushs are distinguished, it is easier to turn on and off
all cairn devices at the same time (It is impossible to turn on a device and turn off
another one with the same push).
Turn off the device to avoid bad handling.
Use two 1.5 Volt cells size AAA (or LR03).
NOTE: For more details about the informations displayed by the “DISPLAY” key,
please refer to section 6.9.
Replacing the cells
-The “DISPLAY” key displays some inofrmations.
Consecutive pushs make scroll different screens.
-The “POWER” key controls every device at the same
time.
A short push turn them all on, while a long push turn them
all off.

In chapter 2 you have connected your .
Each time you turn on , the evice scans the option connectors and the RS-232
ports to detect the options and other devices linked to it.
If you have connected a new option into, or a Fog3 to the connector “Master” of
, the menu is updated to match with your new configuration.
For example, if you have connected a DAC option, you will see in the audio
connector list some new audio connector like “DAC coax1”, “DAC coax2” and
“DAC opt”.
Then you can create some sources that use these connectors.
NOTE: If you turn off your device unconnecting it from main supply without having
put it in sleep mode, the last changes will not be stored. Because has a low
consumption when powered off, you should use the right button to turn it off
481O
481O
481O
481O
5.1 Starting
5.2 Source selection
A source setup consists in associating a name (the source name) with an audio
connector of
Automated source setup:
-Navigate to “Factory settings” menu, selct “Restore sources” then validate.
-Go back to main screen:
481O
481O
.You can set up your sources automatically or manually
detects the options and others detectable sources.
A source is created for each device detected, and a default connector is
associated.
5. Starting5. Starting
cairn
9

Now you can use the sources that has created.
E.g.: A fog3 has been connected to “Master”
Connector of
By default, the source “Fog CD” has been associated with analog connector “An1” of
.
Each source created from a MULTI SOLUTION option is associated ith the default
connector of this option.
If you want to change the audio connector you can just edit the source associated
and change the “audio connector” parameter (You can refer to section 6.2)..
481O
481O
481O:
Manual source setup:
Navigate to “source setup” menu, select “create” (or “edit” if you want to modify an
existing source).
The “name” parameter is highlighted, if you push the “Enter” button of the front panel,
you can change the name of the source by rotation of the left button.
To select the next character,push the left button. Come back to previous letters, make
long pushs.
Enter
2x Enter
Enter
Navigation
3x Esc
NOTE: To go back to the previous menus, you can keep the left button pushed.
5. Starting5. Starting
cairn
10
123
4
6
5

-Select “audio connector” and by rotation of the left button, change the connector
you want to associate with your source.
-Select “level” to change the relative level of the source (default is 0.0dB).
-Go back to the beginning of the menu to set up your others sources.
Enter Navigation
Enter Navigation
3x Esc
-You can delete a source. Select the source to delete, enter the “menu source”, select
“edit” and then go to “remove” button on the menu. Validate.
Enter
Navigation
Enter
123
45
67
5. Starting5. Starting
11
cairn
-If you own the VIDEO option, the same way is used to select a video connector.
NOTE: To change the source while you are in the “edit” menu of “source setup” you
can use the “CH+” and “CH-” keys of the remote control.
Enter
Navigation
Enter

6.1 Main screen
The main screen is the screen displayed when the device has just been powered
on.
It shows the current source selected, the monitoring state, and the output
selected (headphone or speakers).
When the selected source is the tuner, other menus are added, like the sation list,
stereo/mono mode etc... You have within arm’s reach all tuner menus
NOTE: To have a description of the menus added for RADIO option, please refer to
the documentation delivered with the option.
For more informations about the recording monitor, please refer to section 7.2
Navigation
Navigation
1
2
3
6.2 Source setup
The “source setup” menu allows you to edit,create, or remove sources.
The parameters of a source are the name, the connector associated, and a
relative volume level.
Enter
6. Description of the menus6. Description of the menus
cairn
12

6.3 Headphone setup
The “Headphone setup” menu allows you to activate or disactivate the
headphone output. While Heaphone outputs are activated, the “Speaker out”
outputs are no more activated, and the Balance is equalized.
You can also set up a relative volume level for the headphone output.
NOTE: For more details about relative volumes, please refer to section 7.1
6.4 Speaker setup
The “Speaker setup” menu allows you to set up the Left/Right balance.
In front of each channel the name of the connector marked on the rear panel is
written in parenthesis.Wen you set up the balance via the remote control, you
change the level of the RIGHT channel without affecting the others channels
NOTE: If you own the ANALOG4CH option, you can set up in this menu the levels of
6.5 Sleep setup
You can activate or diactivate the “sleep” function.
When ativated, the device will turn off automatically after a delay you have set up.
If you enter the menu while “sleep” is activated, you will see the remainning
time before shut down.
No activated: Activated:
6. Description of the menus6. Description of the menus
cairn
13

6.6 General setup
a) Region setup
Choose your language (French or English).
b) Display setup:
Set up the display luminosities.
The display is in high luminosity when a user command is received (by remote
control or front panel button).
It turns to low luminosity after a delay you can specify.
You can can activate the “idle logo”, if activated, the device will display
C) Time & date setup:
Set up the clock parameters
-Display mode
-Time
-Date
d) Alarm setup:
When alarm is turned on, the device will turn on by itself at the time and with the
source you have specified.
You can set up an alarm time for all days of the week.
Alarm stopped: Alarm on:
:
“”
instead of turning in low luminosity mode.
(am pm mode or 24h mode)
481O
6. Description of the menus6. Description of the menus
cairn
14

6.7 Options setup
e) Automatic setup:
You can specify the time the device can stay “on” with any user operation.
Each time a user operation is detected, the program reloads the counter.
You can specify the volume soft ramp parameters, that is to say the time the
volume takes to go from mute to the normal volume.
This prevents the volume from being low then very high suddenly.
In this menu you will see the list of the options you have connected that require some
parameter to set up.
Ex: If you own a DAC option, you will see this screen:
If you enter the “DAC” menu, you will see the parameters you can et up for the DAC
5.7 Factory settings
You can restore either the sources of the system, or the whole system.
If you plug a new option and you restore only the sources, 481O will create the
sources for this option.The restoration of the whole system will initialize all parameters
at the value specified in the factory.
6. Description of the menus6. Description of the menus
cairn
15

6.8 Info
If you push the “DISPLAY” key of the remote control unit, or if you select “INFO” menu
you will see informations on the display.
If you make consecutives pushs, the information screens will scroll.
Ex: If you have selected the RADIO source (tuner option) you will see (in order of
appearence) the RADIO info screen, the time & date info screen and then the
software release number.
6. Description of the menus6. Description of the menus
cairn
16
Display
Display

When you make a rotation of the right button, you change the main volume.
For each source (and also for the headphone) you can set up a relative volume
based on the main volume.
You can set it from -6dB to +6dB different from the main volume.
Finally this serves to equalize the volumes of all source to be at same level at output of
If an overload is detected (too much current output to your speakers) the level will be
automatically decreased by steps of 0.5dB, and a message indicates overload.
Software will be released on www.cairn-ezo.com when available.
1-Disconnect from mains.
2-link connector “Slave” of to a free COM port of your computer via a standard
Rs232 cable (9 pins).
3-Run software on your computer, select the right COM port from the list.
4-Click the update button.
5-Connect to mains, the update starts.
481O
481O
481O
481O
481O
481O
481O
481O
481O
481O
481O
.
allows you to monitor a recording.
Follow these steps:
-Connect the source to record to one of the inputs.
-Connect your recorder input to the “Tape Out” output of .
-Connect your recorder output to the “Tape In” input of .
-In the main screen, select the source to record, and activate the monitor.
-Now you listen the output of your recorder.
is protected against short circuit and overload.
If a short circuit is detected (As a wire between speaker outs)
will mute, open the output relay, and a message will be displayed.. You will have
to remove the short circuit, and power off then on for the message disappears.
7.1 Special features7.1 Special features
cairn
17
7.1 Volumes
7.2 Monitoring
7.4 Software update
7.3 Short circuit protection
Table of contents