CALEFFI Legiomix 2.0 Mounting instructions

Software di gestione per mis elatore LEGIOMIX 2.0
Management software for LEGIOMIX 2.0 mixer
Steuersoftware für Mis her LEGIOMIX 2.0
Logi iel de gestion pour mitigeur LEGIOMIX 2.0
Software voor beheer van het LEGIOMIX 2.0 -mengventiel
I
Code 600002
H0003548
www.caleffi.com
© Copyright 2018 Caleffi
EN
DE
FR
NL
MANUALE DI ISTRUZIONE SOFTWARE
INDICE/CONTENTS/
INHALTSVERZEICHNIS/
SOMMAIRE/ INHOUD
Installazione software Caleffi
Installat on of Caleff software
Installat on der Caleff -Software
Installat on du log c el Caleff
Installat e software van Caleff
5
Avvertenze
Warn ngs
H nwe se
Avert ssements
Waarschuw ngen
4
Installazione cavo USB - RS-485
Installat on of USB - RS-485 cable
Installat on m t USB - RS-485-Kabel
Installat on du câble USB - RS-485
Installat e USB - RS-485-kabel
2
SOFTWARE INSTRUCTION MANUAL
SOFTWARE-BEDIENUNGSANLEITUNG
MANUEL D’UTILISATION DU LOGICIEL
GEBRUIKERSHANDLEIDING VAN DE SOFTWARE

Installazione avo USB RS-485
In confezione è presente il cavo convertitore USB - RS-485, il quale dovrà essere collegato alla scheda CS179 (attraverso
l’utilizzo dei passacavi o pressacavi), dopo aver rimosso l'alimentazione del dispositivo e in conformità alle normative
vigenti, come indicato nelle seguenti figure:
Installation of USB - RS-485 able
The pack contains the USB - RS-485 converter ca le, which must e connected to the CS179 oard (using ca le glands or
ca le clamps), after having disconnected the device from the electric supply and in compliance with current regulations,
as shown in the following figures:
Installation mit USB RS-485-Kabel
Das USB - RS-485-Adapterka el ist im Lieferumfang enthalten und muss, wie in den folgenden A ildungen gezeigt, nach
dem Trennen der Spannungsversorgung des Gerätes und in Ü ereinstimmung mit den geltenden Vorschriften an die
CS179-Karte angeschlossen werden (Ka eldurchführungen oder Ka elverschrau ungen verwenden):
Installation du âble USB RS-485
Le câ le convertisseur USB - RS-485 (fournit) doit-être connecté à la carte CS179 (à l’aide de passe-câ les ou de serre-
câ les). Pour effectuer ces opérations, il est nécessaire de mettre le dispositif hors tension comme le montrent les
figures ci-après :
Installatie USB RS-485-kabel
De verpakking evat de USB - RS-485-converterka el, die op de CS179-kaart moet worden aangesloten (met ehulp van
ka elgeleiders of ka elklemmen), nadat de stroomtoevoer naar het toestel is afgesloten en volgens de geldende
wetgeving, zoals in de onderstaande af eeldingen is weergegeven:
RS-485 DATA - (B)
RS-485 DATA + (A)
2

Una rete di comunicazione RS-485 dovrebbe essere realizzata in conformità alle prescrizioni di
standard EIA RS-485 (qualsiasi altra configurazione è a discrezione dell’operatore che la realizza).
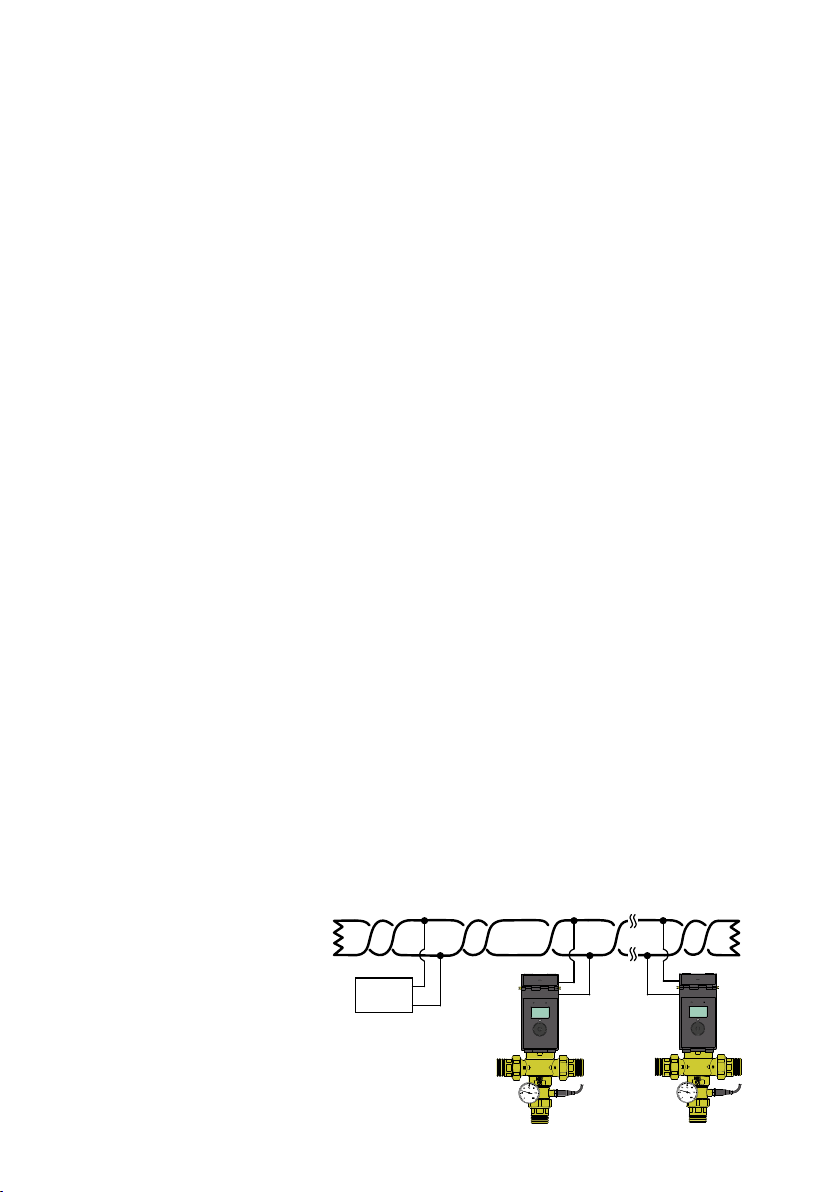
È importante l’utilizzo di un cavo a due fili intrecciato, inoltre per garantire una qualità di trasmissione
ottimale:
- Utilizzare un cavo BUS con impedenza di circa 120 Ohm.
- Collegare una resistenza terminale, con la stessa impedenza del cavo, a ciascuna estremità del cavo S-485.
- Mantenere la lunghezza dei rami più corta possibile.
- Utilizzare cavi schermati.
An RS-485 communication network must be created in compliance with the prescriptions of
standard EIA RS-485 (any other configuration is at the discretion of the operator making the
configuration in question).
It is essential to use a two-wire twisted cable; moreover, to guarantee optimal transmission quality:
- use a BUS cable with impedance of around 120 Ohm;
- connect a terminal resistor having the same impedance as the cable at each end of the S-485 cable;
- keep each branch connection as short as possible;
- use shielded cables.
Ein RS-485-Kommunikationsnetzwerk sollte in Übereinstimmung mit den Anforderungen des EIA
RS-485 Standards aufgebaut werden (jede andere Konfiguration liegt im Ermessen des
Betreibers).
Es ist wichtig, ein Twisted-Pair-Kabel zu verwenden und auch für eine optimale Übertragungsqualität zu
sorgen:
- Buskabel mit einer Impedanz von ca. 120 Ohm verwenden.
- Einen Abschlusswiderstand mit der gleichen Impedanz wie das Kabel an jedem Ende des S-485-Kabels anschließen.
- Zweige so kurz wie möglich halten.
- Abgeschirmte Kabel verwenden.
Réaliser un réseau de communication RS-485 conformément aux prescriptions du standard EIA
RS-485 (toute autre configuration sera décidée par l’opérateur qui la réalise).
Nous préconisons l’utilisation d’un câble à deux fils tressés afin de garantir une qualité de transmission
optimale :
- Utiliser un câble BUS avec impédance de 120 Ohms environ.
- Brancher une résistance terminale présentant la même impédance que le câble, à chaque extrémité du
câble S-485.
- Les longueurs de câbles doivent être le plus court possible.
- Utiliser des câbles blindés.
Een RS-485-communicatienetwerk moet tot stand worden gebracht volgens de voorschriften van
de EIA RS-485-standaards (elke andere configuratie is naar goeddunken van degene die de
configuratie instelt).
Het is belangrijk om een gevlochten tweeaderige kabel te gebruiken. Ga voor een optimale
transmissiekwaliteit bovendien als volgt te werk:
- Gebruik een usb-kabel met een impedantie van ongeveer 120 Ohm.
- Sluit een eindweerstand met dezelfde impedantie als de kabel op elk uiteinde van de S-485-kabel aan.
- Houd de lengte van de aftakkingen
zo kort mogelijk.
- Gebruik afgeschermde kabels.
MASTER
IN / OUT
3

Avvertenze
N.B. : L’installazione del dispositivo LEGIOMIX 2.0 deve essere eseguita da parte di personale qualificato
specializzato in accordo con la vigente normativa.
Se il dispositivo non è installato, messo in servizio e mantenuto correttamente secondo le istruzioni contenute
in questo manuale, potrebbe non funzionare correttamente e porre l’utente in pericolo.
ATTENZI NE: ischio di shock elettrico. Dispositivo con tensione elettrica 230 V (ac).
Togliere l’alimentazione elettrica prima di effettuare interventi tecnici.
Warnings
N.B. : The LEGIOMIX 2.0 device must be installed by qualified personnel in accordance with current regulations.
If the device is not installed, commissioned and serviced correctly in accordance with the instructions provided
in this manual, it may not work properly and may endanger the user.
IMP RTANT: isk of electric shock. Device with 230 V (ac) electric supply.
Cut off the electric supply before carrying out any technical operations.
Hinweise
N.B. : Die Installation des Mischers LEGIOMIX 2.0 hat nach den geltenden Vorschriften durch einen Fachbetrieb zu erfolgen.
Falls die Installation, Inbetriebnahme und Wartung des Gerätes nicht strikt nach den Anweisungen der
vorliegenden Anleitung erfolgen, können Funktionsstörungen auftreten, die eine Gefahr für den Benutzer darstellen.
ACHTUNG: Stromschlaggefahr. Armatur mit elektrischer Spannung 230 V (ac).
Vor technischen Eingriffen muss die elektrische Stromversorgung getrennt werden.
Avertissements
N.B. : L’installation du dispositif LEGIOMIX 2.0 doit-être réalisé par un opérateur qualifié et conformément à la
règlementation nationale et aux normes en vigueur.
Si le dispositif n’est pas installé, mis en service et entretenu correctement selon les consignes présentes dans
ce manuel, il peut ne pas fonctionner correctement et mettre l’utilisateur en danger.
ATTENTI N : isque de choc électrique. Le dispositif fonctionne avec une tension de 230 V (ac).
Mettre le dispositif hors tension avant toute intervention technique.
Waarschuwingen
NB : De installatie van het LEGIOMIX 2.0 -toestel moet door gekwalificeerd gespecialiseerd personeel worden
geïnstalleerd in overeenstemming met de geldende normen.
Als het toestel niet correct volgens de instructies in deze handleiding geïnstalleerd, in werking gesteld en
onderhouden wordt, functioneert het mogelijk niet naar behoren en kan het daardoor de gebruiker in gevaar
brengen.
LET P: Gevaar voor elektrische schokken. Toestel met elektrische spanning 230 V (ac).
Schakel de elektrische voeding uit, alvorens technische werkzaamheden uit te voeren.
4

Installazione Software
Collegare il cavo convertitore USB - S-485 al dispositivo LEGIOMIX 2.0 e alla porta USB del proprio PC.
Alimentare il dispositivo. Il software viene fornito su supporto USB FLASH PEN (in confezione).
- Creare sul disco fisso del computer una cartella nominandola LEGIOMIX 2.0.
- Copiare nella cartella LEGIOMIX 2.0 il contenuto della USB FLASH PEN.
- Aprire la cartella LEGIOMIX 2.0 e cliccare sull’icona LEGI MIX2.EXE per avviare il programma.
Software installation
Connect the USB - S-485 converter cable to the LEGIOMIX 2.0 device and to the USB port of your PC.
Power on the device. The software is supplied on a USB FLASH PEN (in the pack).
- Make the folder LEGIOMIX 2.0 on the computer hard disk.
- Copy the contents of the USB FLASH PEN to the LEGIOMIX 2.0 folder.
- Open the folder LEGIOMIX 2.0 and click on the icon LEGI MIX2.EXE to launch the program.
Software-Installation
Verbinden Sie das USB - S-485-Adapterkabel mit dem LEGIOMIX 2.0 und dem USB-Port Ihres PCs.
Armatur mit Strom versorgen. Die Software der Schnittstelle LEGIOMIX wird auf USB FLASH PEN (in der
Packung) geliefert.
- Auf der Festplatte des Computers einen Ordner mit dem Namen LEGIOMIX 2.0 erstellen.
- Den Inhalt des USB FLASH PEN in den Ordner LEGIOMIX 2.0 kopieren.
- Ordner LEGIOMIX 2.0 öffnen und auf das Symbol LEGI MIX2.EXE klicken, um das Programm zu starten.
Installation du logiciel
Connecter le câble convertisseur USB - S-485 au dispositif LEGIOMIX 2.0 et au port USB de l’ordinateur.
Brancher le dispositif à l’alimentation électrique Le logiciel est disponible sur clé USB (fournit).
- Créer un dossier sur le disque dur de l’ordinateur en le nommant LEGIOMIX 2.0.
- Copier le contenu de la clé USB dans le dossier LEGIOMIX 2.0.
- Ouvrir le dossier LEGIOMIX 2.0 et cliquer sur l’icône LEGI MIX2.EXE pour lancer le programme.
Installatie van de software
Sluit de USB - S-485-converterkabel op hetLEGIOMIX 2.0-toestel en op de usb-poort van uw pc aan.
Voorzie het toestel van stroom. De software wordt geleverd op een USB FLASH PEN-drager (in de verpakking).
- Maak op de harde schijf van de computer een map aan met de naam LEGIOMIX 2.0.
- Kopieer in de map LEGIOMIX 2.0 de inhoud van de USB FLASH PEN.
- Open de map LEGIOMIX 2.0 en klik op het symbool LEGI MIX2.EXE om het programma te starten.
5
Operating System USB port
Windows 7 2.0
Requisiti minimi di sistema: / Minimum system requirements: / Minimale Systemanforderungen: /
Conditions minimales requises par le système : / Minimale systeemvereisten:

Dopo aver completato l'inserimento dei dati di anagrafica dell'impianto, premere il pulsante Select per accedere
alla seconda schermata.
After having completed the input of plant identification data, press the Select button to go to the second screen.
Nach der vollständigen Eingabe der Anlagendaten Schaltfläche Select betätigen, um zum zweiten Bildschirm
zu gelangen.
Après avoir saisi les données d’identification de l’installation, appuyer sur Select pour accéder à la deuxième
page.
Druk na het invoeren van de gegevens van de installatie op de knop Select om naar het tweede scherm te gaan.
Selezionando la porta COM ed selezionando il numero del dispositivo collegato si accede al Software.
Selecting the COM port and the number of the connected device will cause the program to open.
Für den Zugriff auf die Software COM-Port und Nummer der angeschlossenen Armatur auswählen.
Sélectionner le port COM et le numéro du dispositif connecté pour accéder au logiciel.
Selecteer voor toegang tot de software de COM-poort en het nummer van het aangesloten toestel.
6

Menù STAT IMPIANT / PLANT STATUS menu / Menü ANLAGENSTATUS /
Menu ÉTAT INSTALLATI N / Menu STATUS INSTALLATIE
1) Fasce orarie ricircolo
1) Recirculation time bands
1) Zeitschaltung Zirkulation
1) Phases horaires pour le bouclage
1) Tijdvakken recirculatie
3) Porta COM
3) COM port
3) COM-Port
3) Port COM
3) COM-poort
2) Impostazioni
2) ettings
2) Einstellungen
2) Réglages
2) Instellingen
4) Ingressi e uscite
4) Inlets and outlets
4) Ein- und Ausgänge
4) Entrées et sorties
4) Ingangen en uitgangen
7) Impostazione tipologia disinfezione
7) Disinfection type set-up
7) Einstellung Desinfektionstyp
7) Choix du programme de désinfection
7) Instelling type desinfectie
6) Lettura continua
6) Continuous reading
6) Kontinuierliches Lesen
6) Lecture continue
6) Continue aflezing
5) Id BU
5) Id BU
5) Id BU
5) Id BU
5) Id BU
9) Menù
9) Menu
9) Menü
9) Menu
9) Menu
8) Attivazione e impostazione disinfezione
8) Disinfection enabling and set-up
8) Aktivierung und Einstellung der Desinfektion
8) Activation et configuration désinfection
8) Inschakeling en instelling desinfectie
1
2 3 4 5
7
6
8
9
7

12
11
10
Menù PARAMETRI DISINFEZI NE / DISINFECTI N PARAMETERS menu /
Menü DESINFEKTI NSPARAMETER / Menu PARAMÈTRES DÉSINFECTI N /
Menu DESINFECTIEPARAMETERS
Menù C MANDI / C NTR LS menu / Menü BEFEHLE / Menu C MMANDES / Menu BEDIENINGEN
14
13
16
15
8

10) Parametri disinfezione
10) Disinfection parameters
10) Desinfektionsparameter
10) Paramètres désinfection
10) Desinfectieparameters
12) Temperatura massima impianto
12) Plant maximum temperature
12) Max. Anlagentemperatur
12) Température maximale de l’installation
12) Maximale temperatuur installatie
11) Parametri shock termico
11) Thermal shock parameters
11) Thermoschock-Parameter
11) Paramètres choc thermique
11) Parameters thermische shock
13) Attivazione/disattivazione disinfezione
13) Disinfection enable/disable
13) Aktivierung/Deaktivierung Desinfektion
13) Activation/désactivation désinfection
13) Inschakeling/uitschakeling desinfectie
15) Attivazione/disattivazione zero
15) Zero enable/disable
15) Aktivierung/Deaktivierung Zero
15) Activation/désactivation remise à zéro vanne
15) Inschakeling/uitschakeling nulstand
16) Attivazione/disattivazione fondo scala
16) Full scale enable/disable
16) Aktivierung/Deaktivierung Max- tellung
16) Activation/désactivation étalonnage
16) Inschakeling/uitschakeling schaalbereik
14) Attivazione/disattivazione shock termico
14) Thermal shock enable/disable
14) Aktivierung/Deaktivierung Thermoschock
14) Activation/désactivation choc thermique
14) Inschakeling/uitschakeling thermische shock
Menù REP RT ST RICI / HIST RIC REP RTS menu / Menü HIST RIE / Menu EXP RTATI N
HIST RIQUE / Menu VERZICHTSRAPP RTEN
Tramite il seguente sottomenù si ha la possibilità di esportare i dati funzionali giornalieri.
Use the following submenu to export the daily operating data.
Über das folgende Untermenü können die täglichen Funktionsdaten exportiert werden.
Le sous-menu suivant permet d’exporter les données fonctionnelles quotidiennes.
Met het volgende submenu kunnen de dagelijkse functionele gegevens worden geëxporteerd.
18
19
9

In entrambe le ricerche, selezionando la data si accede al report, come nella seguente schermata.
In both searches, selecting the data provides access to the report, as shown in the following screen.
In beiden Suchvorgängen führt die Auswahl des Datums zum Zugriff auf den Bericht, wie im nachstehenden
Bildschirm gezeigt.
Pour les deux types de recherche, sélectionner la date pour accéder au rapport, comme le montre la page suivante.
Door in beide controleschermen het gegeven te selecteren wordt het rapport geopend, zoals in het volgende
scherm.
10

20
22
21
18) Ricerca giornaliera di disinfezione (Il
giorno colorato di verde ne indicherà
un esito positivo di disinfezione)
18) Daily disinfection search (The day
shown in green denotes a positive
disinfection result)
18) Desinfektionssuche täglich (Ein grün
hinterlegter Tag bedeutet erfolgreichen
Abschluss der Desinfektion)
18) Recherche de désinfection par jour (Le
jour en vert indique un résultat de
désinfection positif.)
18) Dagelijks controle desinfectie (De
groen gekleurde dag geeft aan dat de
desinfectie met succes is uitgevoerd)
19) Ricerca giornaliera di temperatura e
eventi
19) Daily search for temperature and
events
19) Temperatursuche täglich und
Ereignisse
19) Recherche de température et
évènements par jour
19) Dagelijks controle temperatuur en
gebeurtenissen
20) Esportazione
20) Export
20) Export
20) Exportation
20) Export
22) Dettaglio fascia oraria
22) Time band details
22) Detail Zeitraum
22) Détail phase horaire
22) Detail tijdvak
21) Eventi registrati
21) Recorded events
21) Aufgezeichnete Ereignisse
21) Évènements enregistrés
21) Geregistreerde gebeurtenissen
11

12
Other CALEFFI Water Pump manuals
Popular Water Pump manuals by other brands

Super Ego
Super Ego TP40-S Directions for use

DROPSA
DROPSA SUMO II Series User and maintenance manual

Graco
Graco 24H689 instructions

ITT
ITT Bornemann SLH-4U operating instructions

SFA
SFA SANIPUMP macerator OPERATING AND INSTALLATION Manual

Ingersoll-Rand
Ingersoll-Rand ARO PM30 C02 Series Operator's manual

Wilden
Wilden PS 8 Stallion Metal Engineering, operation & maintenance

Ingersoll-Rand
Ingersoll-Rand ARO 670098 Operator's manual

Sagola
Sagola Mack 150 instruction manual

Brinkmann
Brinkmann KTF16 Series operating instructions

Discount Equipment
Discount Equipment MAYCO ST-70 Parts and operation manual

REXROTH
REXROTH A4VG Repair manual