Quick Start
Guide
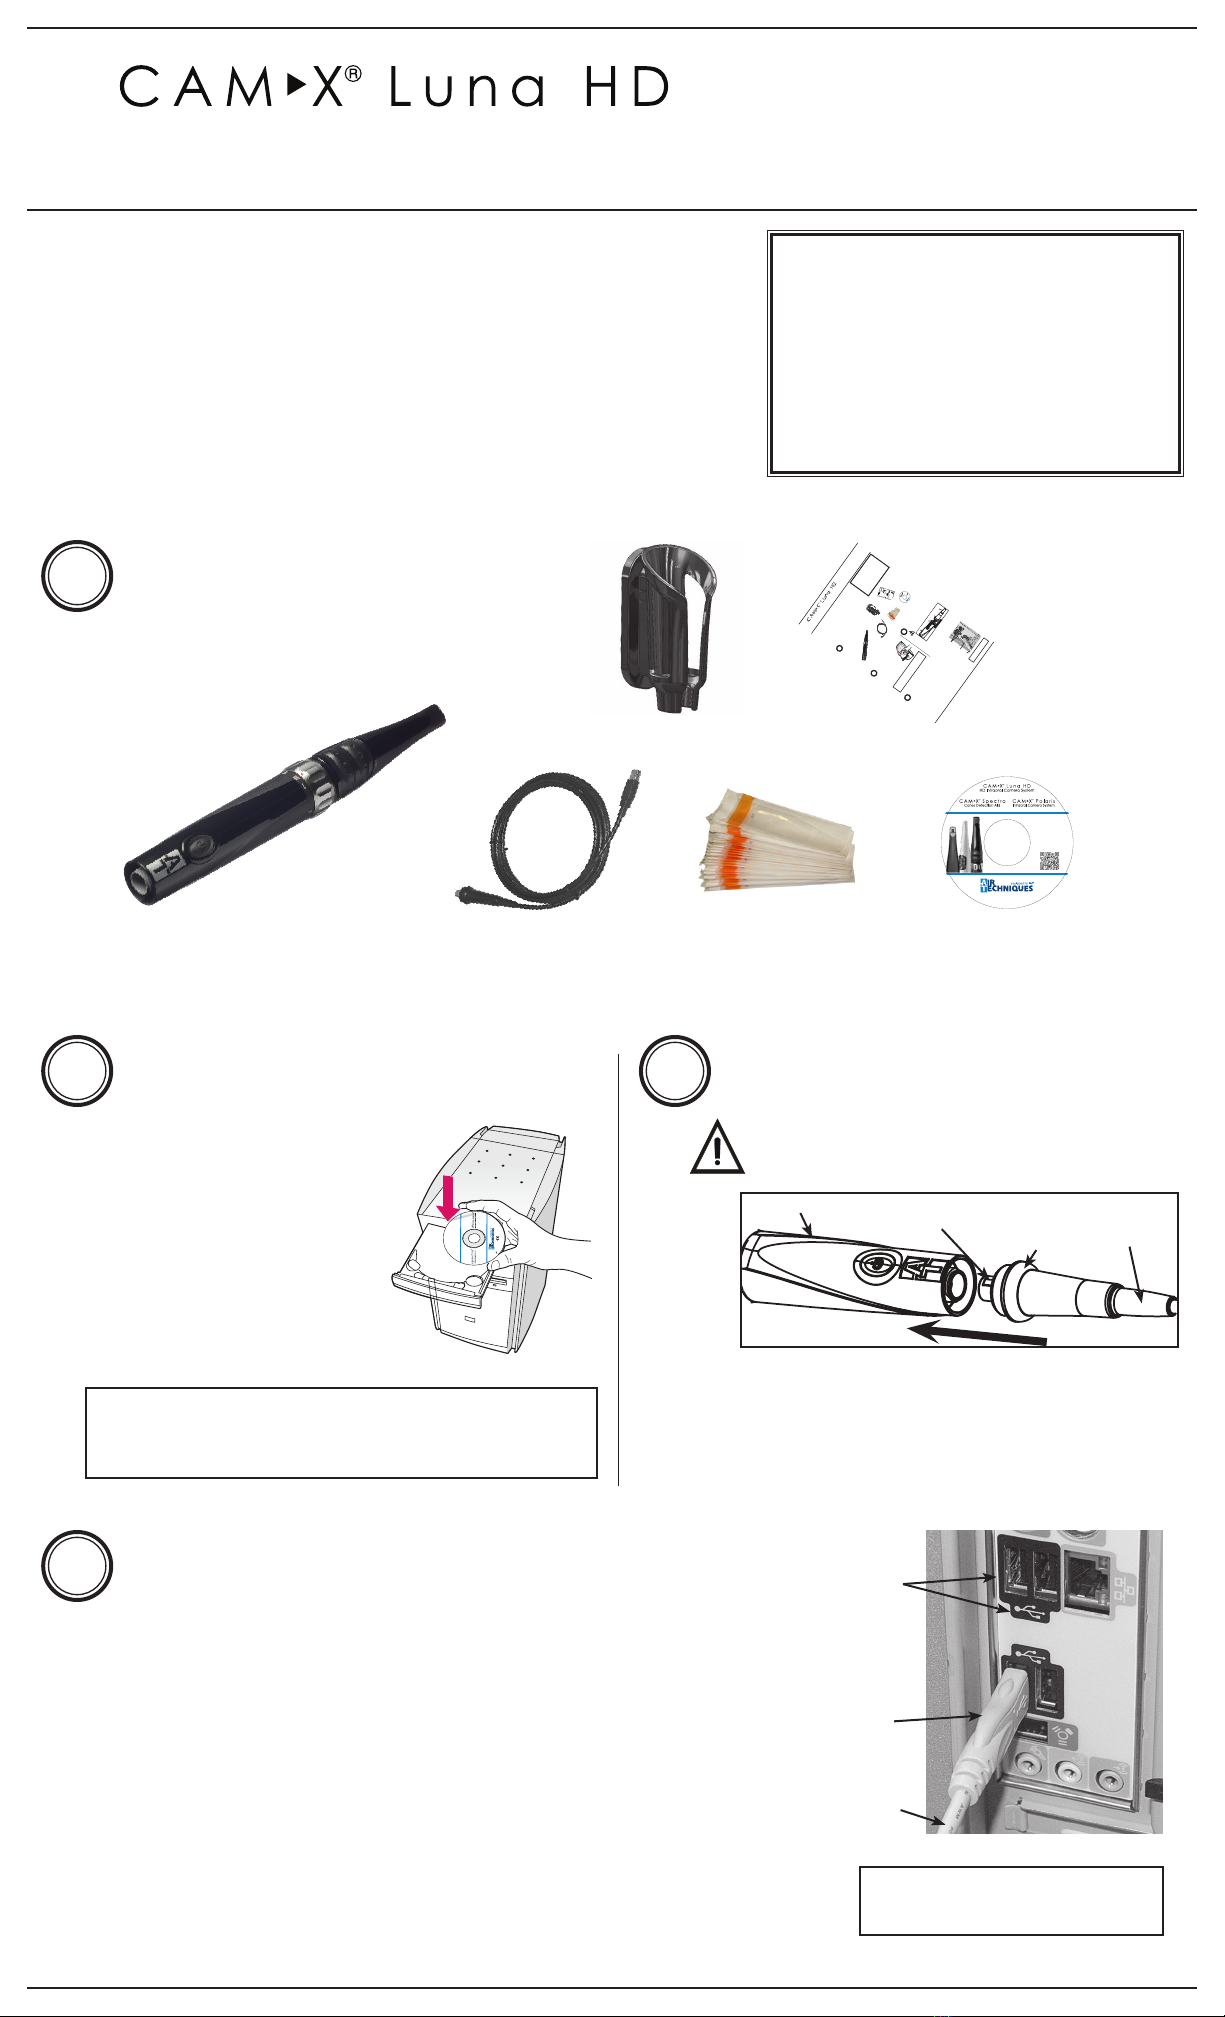
1Components
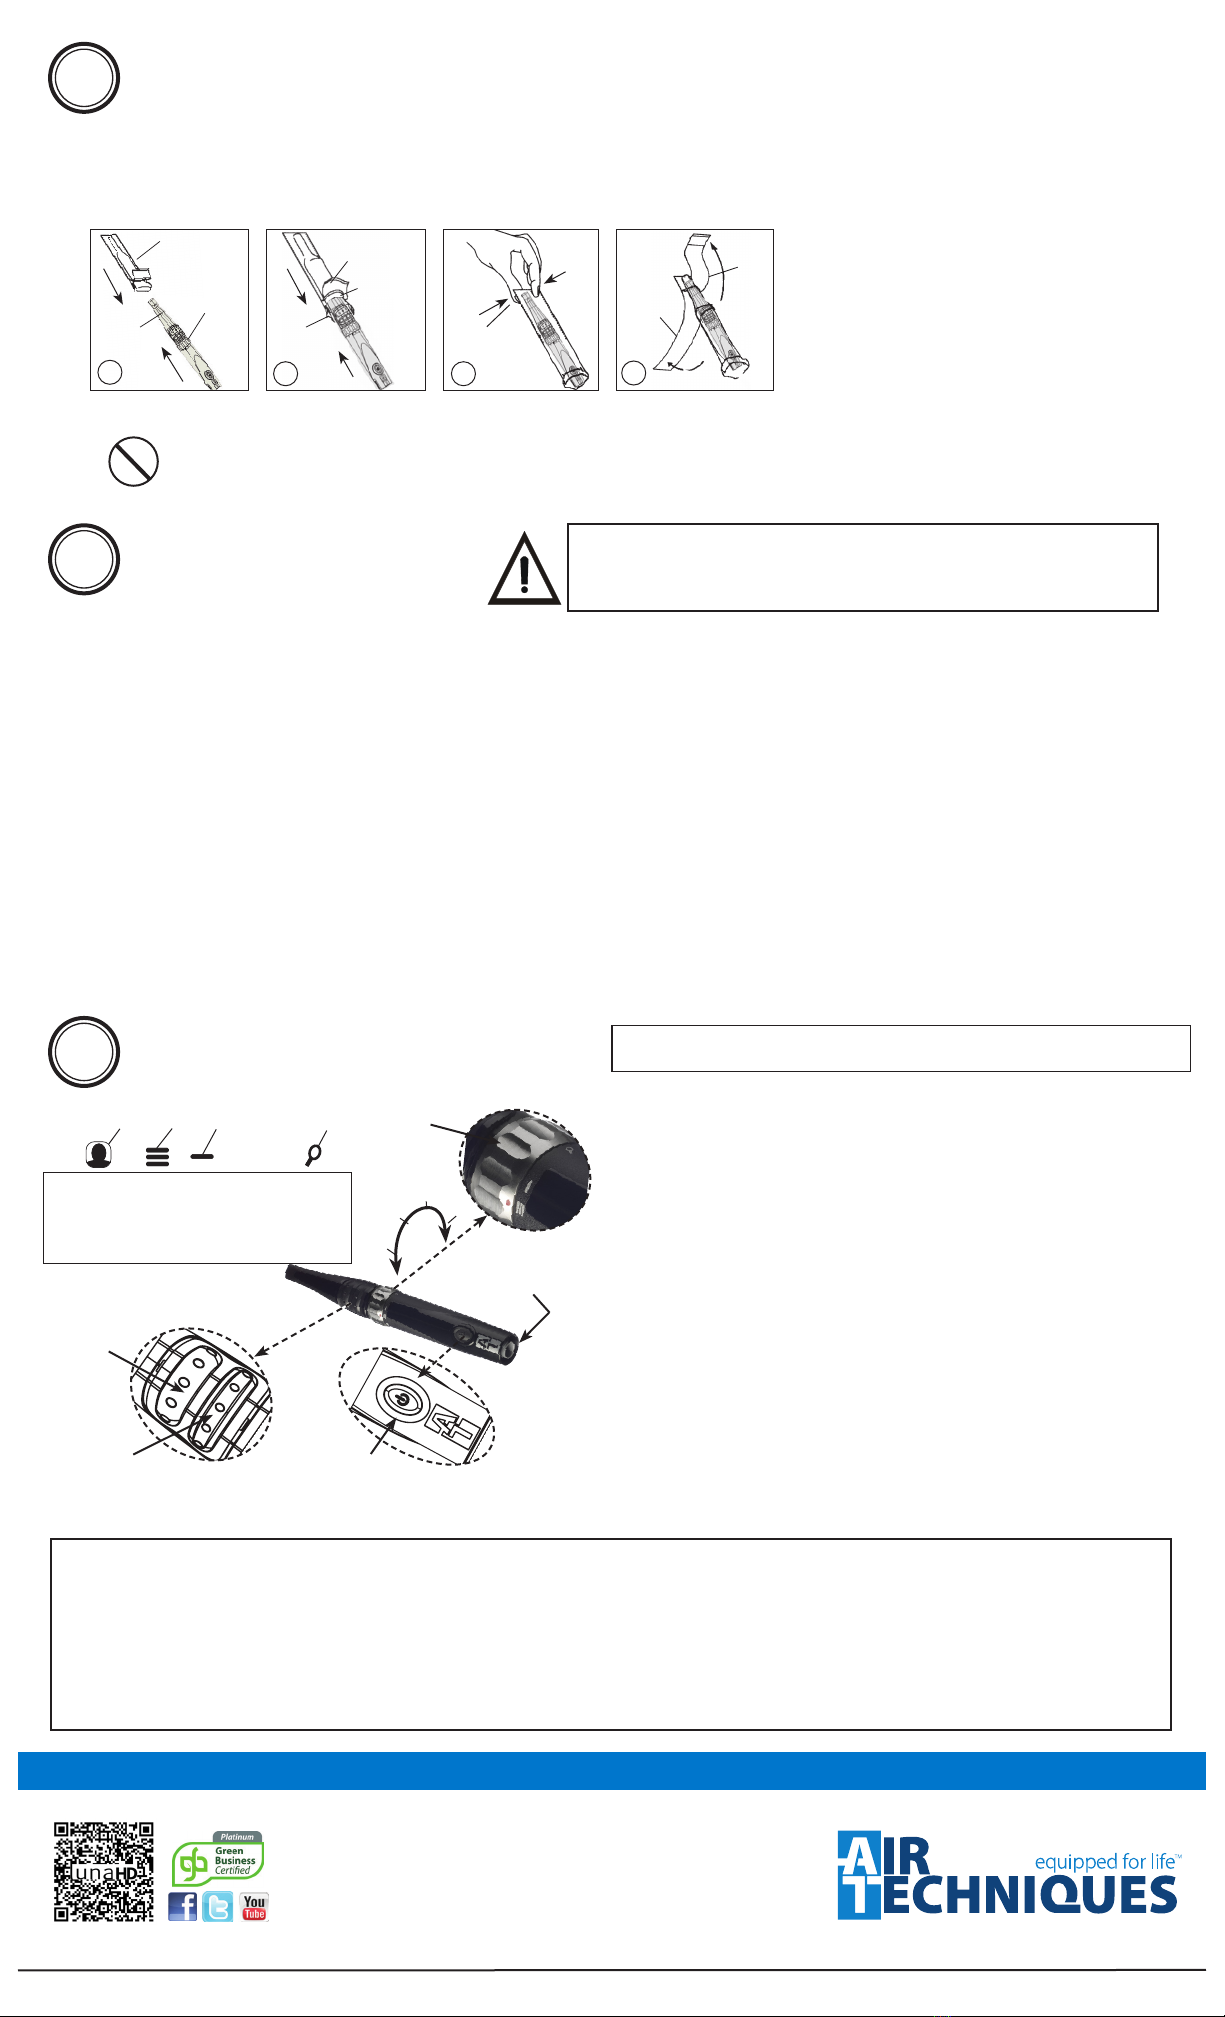
1. Using the black molded connector end of the Handpiece
Cable, align the connector key with the keyway of the
Handpiece connector.
2. Insert straight into Handpiece connector until it securely snaps
into place.
Handpiece Connection
Do not twist or turn the Handpiece Cable connec-
tor. The connector is keyed and mates straight on
with Handpiece connector.
Software Installation
Note: If the startup screen does not appear, double-click
My Computer, double-click the CD drive and then
double-click Autorun.exe.
Luna HD Camera Handpiece
Handpiece Holder
with Wall Mount
Disposable Camera
Sheaths Sample Pack
Melville, NY U.S.A.
Includes:
►Operator's Manuals
• Spectra
• Polaris
• Luna HD
►Software Installation and
Conguration Guide
►Acrobat Reader
►Installation Program
Disk P/N G1415 Rev L
Software Drivers
and Utilities Disk
USB 2.0 Cable,
10 Feet
23
Connector
Key
Handpiece Quick
Disconnect
Collar Handpiece
Cable
USB Interface Connections
IMPORTANT:
Use a High Power (500 mA) USB 2.0 Port Only
1. Connect the USB Type A connector side of the Handpiece Cable to any
available USB 2.0 high speed, high power port on your Computer System.
2. Always make sure to use the same USB port whenever re-connection of the
USB cable is necessary.
3. A self-powered USB hub can be used to extend the handpiece cable length.
4. Do not use a BUS - powered hub or extension cable.
USB Type A
Connector
Handpiece
Cable
4Typical Computer
USB 2.0 Ports
Note: Desktop computer shown.
Laptop can be used.
Thank You and Congratulations
on your purchase of Luna HD, the latest
high definition camera in the dental video imaging product line from Air
Techniques, a leading manufacturer of dental equipment since 1962.
Luna HD offers the flexible benefits of USB Plug-N-Play technology that is easily
integrated into any practice. The lightweight one-piece handpiece is extremely
maneuverable and produces crisp, clear images.
This document provides brief information to help you get started using your
Luna HD for the first time.
Please refer to the Operator’s Manual PDF file on the Drivers and Utilities
Disk for detailed information.
Online Warranty Registration.
Quickly
register your new Luna HD online. Just
have the product model and serial numbers
available. Go to the Air Techniques web site,
www.airtechniques.com, click the Warranty
Registration link and complete the form.
Registration ensures a record for the warranty
period and helps to keep you informed of product
updates and other valuable information.
High Definition Intraoral Video Camera System
Quick Start Guide
Q u i c k S t a r t
Guide
1
Components
1. Using the black molded connector end of the Handpiece
Cable, align the connector key with the keyway of the
Handpiece connector.
2. Insert straightinto Handpiece connectoruntil it securelysnaps
intoplace.
Ha n d p i e c e Co n n e c t i o n
Do nott wistor turn the Handpiece Cable connec-
tor. The connector is keyed and mates straighton
withHandpiece connector.
So f t w a r e In s t a l l a t i o n
Before connecting Luna HD to your
computer or attempting to use it for
the first time, run the Setup program
on the Drivers and Utilities Disk.
This CD contains the necessary
device drivers to communicate with
theimaging software installed on the
user’s computer.
Note: Ifthe startupscreen doesnot appear,double-clickMy
Computer, double-clicktheCDdrive and then dou-
ble-click Autorun.exe.
LunaHD Camera Handpiece
Handpiece Holder
with WallMount
Disposable Camera
Sheaths Sample Pack
USBDeviceDrivers
DemonstrationProgram
andUtilities
AdobeAcrobatReader
Rev
.A
DiskP/NG1415
HighDefinitionIntraoralVideoCameraSystem
Operator’sManual
Software Drivers
and Utilities Disk
USB 2.0 Cable,
10 Feet
23
Connector
Key
Handpiece Quick
Disconnect
Collar Handpiece
Cable
US B In t e r f a c e Con n e c t i o n s
IMPORTANT:
Use a High Power (500 mA) USB 2.0 Port Only
1. Connect the USB Type A connector side of the Handpiece Cable to any
available USB 2.0 high speed, high power port on the user supplied
Computer System.
2. Always make sure to use the same USB port whenever re-connection of the
USB cable is necessary.
3. A self-powered USB hub can be usedto extend the handpiece cable length.
4. Do not use a BUS - powered hub or extension cable.
USBType A
Connector
Handpiece
Cable
4
TypicalComputer
USB2.0 Ports
Note: .nwohsretupmocpotkseD
Laptopcanbeused.
Thank You and Congra tulations
on your purchase of Luna HD, the
latesthigh definition camera in the dental video imaging product line from Air
Techniques,a leading manufacturer of dental equipment since 1962.
Luna HDoffers the flexible benefitsof USB Plug-N-Play technologythat i s easily
integrated into any practice. The lightweight one-piece handpiece is extremely
maneuverable and produces crisp, clearimages.
This documentprovides brief information to help you get started using your
LunaHD for the first time.
Please refer to theOperator’s Manual PDF file on the Drivers and Utilities
Disk fordetailed information.
Online WarrantyRegistration.
Quickly
register your new Luna HD online. Just
have the product model and serial numbers
available. Go to the Air Techniques web site,
www.airtechniques.com, click the Warranty
Registration .mrofehtetelpmocdnaknil
Registration ensuresa record for the warranty
periodandhelps to keepyou informedof product
updatesand other valuable information.
High Definition Intraoral Video Camera System
QuickStar t
Guide
1
Components
1.Usingtheblackmoldedconnectorendof the Handpiece
Cable,aligntheconnectorkeywith the keyway of the
Handpiececonnector.
2.InsertstraightintoHandpiececonnectoruntilitsecurelysnaps
intoplace.
HandpieceConnection
DonottwistorturntheHandpieceCableconnec-
tor.Theconnectoriskeyedandmatesstraighton
withHandpiececonnector.
SoftwareInstallation
BeforeconnectingLunaHDtoyour
computerorattemptingtouseitfor
thefirsttime,runtheSetupprogram
ontheDriversandUtilitiesDisk.
ThisCDcontainsthe necessary
devicedriverstocommunicatewith
theimagingsoftwareinstalledonthe
user’scomputer.
Note:Ifthestartupscreendoesnotappear,double-clickMy
Computer,double-clicktheCDdriveandthendou-
ble-clickAutorun.exe.
LunaHDCameraHandpiece
HandpieceHolder
withWallMount
DisposableCamera
SheathsSamplePack
QuickStartGuide
Q
u
ic
k
S
ta
rt
G
u
id
e
I
ntrao
ralV
ideoCa
m
er
a
Sy
stem
Th
e
P
DFv
ersiono
f
Op
er
at
o
r’
sMan
u
al
fo
r
P
o
la
risi
s
i
n
c
lud
e
d
o
n
t
h
e
CD
.
A
lso
in
cl
u
d
e
d
are
U
SB
D
evi
c
e
D
r
iver
s,
D
em
o
n
s
tr
a
tion
Pr
og
ram
a
n
d
U
ti
l
ities
a
n
d
Ad
o
b
e
Acro
b
at
Reader
A
u
t
h
o
rize
d
ima
g
in
g
s
o
f
tw
a
r
e,p
u
r
ch
ased
f
r
o
m
y
o
u
rd
e
ale
r
o
r
o
ther
co
mpan
y
,
m
u
s
t
b
e
in
st
a
l
l
e
d
o
n
th
e
co
m
p
u
t
e
r
in
o
r
d
er
to
o
p
e
rat
e
P
o
lar
i
s
.
M
ake
su
re
thatth
ec
o
mp
u
terme
ets
a
llr
eq
u
i
r
ement
s
n
ecessa
r
y
tos
u
p
p
or
tth
ePo
l
a
ris
.S
ee
M
ini
m
u
m
Co
m
pu
ter
S
y
s
te
m
R
equ
ir
ements
i
n
t
h
eI
ns
t
r
u
c
t
i
on
Man
ual.
1Compon
e
n
t
s
1
.
Using
th
e
b
lac
k
mo
ld
e
d
con
n
e
ctor
end
o
f
t
h
eH
andpiece
Cab
le,
a
lign
t
h
e
co
n
ne
ct
o
r
ke
y
w
i
t
h
th
e
keyw
a
y
o
ft
h
e
Ha
n
d
p
iece
co
n
necto
r
.
2.
I
ns
e
rt
s
t
rai
g
ht
i
n
t
o
H
an
d
p
i
e
ce
c
o
n
ne
c
t
o
r
u
n
t
i
l
it
s
e
cure
l
y
sn
a
p
s
int
o
pl
ace.
H
an
d
p
i
ece
C
onne
c
t
io
n
Dono
t
t
w
i
s
to
r
t
u
r
n
t
h
e
Ha
n
dp
i
ece
Cable
connector
.
T
h
e
co
n
n
e
ct
or
i
s
key
e
d
a
n
d
m
a
te
s
st
ra
i
gh
t
on
w
i
th
H
a
nd
pi
ec
e
conn
e
cto
r
.
So
ft
w
areI
n
st
a
l
l
at
io
n
Be
fore
c
onn
ectin
g
Po
la
r
i
s
to
y
o
u
r
c
o
mp
u
te
ror
att
empt
i
n
g
t
o
us
e
it
fo
r
t
he
f
irsttim
e
,
r
u
n
t
h
e
Se
t
u
ppro
gram
o
nth
e
D
r
iv
e
rs
a
n
d
U
tilitiesDis
k.
T
his
C
D
con
t
a
ins
th
e
n
e
c
e
ss
a
r
y
d
evic
e
d
r
iv
ers
t
oc
o
m
m
u
n
ic
a
t
e
wit
h
t
h
e
i
m
a
g
in
g
s
o
ft
w
a
r
ein
s
ta
lle
d
on
t
h
e
us
e
r
’s
c
o
mputer.
N
ot
e:
If
th
e
s
ta
r
tup
s
c
ree
nd
oes
n
ot
ap
pear,
d
o
u
bl
e-clic
k
My
C
om
p
u
t
e
r
,
d
ou
bl
e
-click
th
eCD
d
r
i
ve
a
n
d
th
e
n
d
ouble-cli
ck
A
u
t
orun
.ex
e
.
S
c
a
n
XSw
if
t
I
n
s
t
a
l
l
a
t
i
o
n
&
O
p
e
r
at
M
a
n
u
a
l
D
i
s
k
P
/
N
G
8
0
9
5
R
e
v
.
A
M
a
r
c
h
2
0
1
3
D
i
s
k
P
o
la
r
is
Ca
m
era
Han
d
pie
ce
Q
u
i
ckSt
artG
u
i
d
e
D
is
p
o
s
a
b
le
Ca
m
era
C
ove
rs
Sam
p
lePa
c
k
Q
u
i
ck
S
ta
rt
Gu
i
d
e
QuickS
tart
I
n
s
t
r
u
ct
io
ns
Di
g
i
t
a
l
I
m
a
g
i
n
g
Sys
t
e
m
©AirT
e
ch
niques,
IncCopy
rig
ht
2013•
P/N
G8013,Re
v.A•M
ay201
3
Corp
orate
H
ea
d
q
u
ar
t
e
rs
129
5
W
al
t
Whitma
n
Ro
a
d|
Mel
vi
lle,N
e
w
Yor
k117
47
-3062
|P
h
one:
+
1-
8
0
0-2
47
-
8
3
2
4
|
F
ax
:
+
1
-8
8
8
-
2
4
7
-
8
4
8
1
Wes
t
e
rn
F
a
c
ili
t
y
2
91Bo
nn
i
e
L
a
ne,
S
u
it
e
10
1
|
C
o
r
o
n
a
,
C
A
9
2
88
0-
28
0
4
|
Ph
o
n
e
:
+
1
-
8
0
0
-
2
4
7-
8
32
4
|
F
a
x:
+
1
-
9
5
1
-89
8
-
7
6
4
6
w
ww
.
air
t
ec
h
niq
ues
.co
m
Sc
a
n
Q
R
Co
d
e
f
or
mo
re
ab
o
ut
S
c
a
nX
.8
S
i
z
e
#
2
Ima
g
e
P
late
s
(
2
Packs
of
4p
lat
es
)
4
S
i
ze
#
0
I
m
a
g
e
Plat
es(2P
a
c
ks
of
2
p
l
a
tes)
4
S
ize
#1
I
m
a
g
e
P
l
a
t
es
(
2
Pac
k
s
o
f
2
p
l
a
te
s
)
Ba
rr
i
e
r
En
ve
l
o
pe
s
S
i
ze#0
(B
o
x
o
f
1
0
0
)
S
iz
e
#
1
(B
o
x
o
f
100)
Si
ze#
2
(B
o
x
o
f
30
0)
Qu
ic
k
S
t
ar
t
In
s
t
r
u
c
t
i
o
ns
M
ai
n
S
c
a
n
X
S
w
i
ft
A
s
s
emb
ly
w
ith
S
ize
#
2
In
le
t
G
u
id
e
In
s
t
a
ll
e
d
2
PS
P
C
le
a
n
ing
W
ip
e
S
a
mp
l
e
Pac
k
s
S
can
X
S
wiftI
n
sta
lla
t
io
n&
O
pe
ra
ting
M
anu
al
D
is
k
P
/N
G
8
09
5
R
ev
.A
M
ar
c
h
20
13
D
is
k
S
a
mp
le
C
le
a
n
i
ng
S
hee
t
U
S
B
Ca
bl
e
2
4
V
D
C
P
o
w
e
r
Sup
p
l
y
A
d
a
p
te
r
S
ca
n
X
S
wi
ft
In
stall
ation
&
Opera
ting
M
a
nu
al
Disk
P/
N
G
8
0
95
R
e
v.A
M
a
rch
20
13
D
i
s
k
C
D
D
is
k
&
Tra
i
n
in
g
D
VD
C
he
c
k
D
e
li
vere
d
C
om
p
on
e
nt
s
1
I
n
s
tall
D
e
v
i
c
eD
r
ive
r
s
2
De
v
ic
e
D
r
i
v
e
rI
n
s
ta
l
lat
io
n
.
Before
c
onn
ec
ting
Sca
n
X
to
yo
u
r
comp
u
ter
o
ra
tte
mpti
ng
to
u
s
e
i
t
f
o
r
t
h
e
fi
r
st
time,
r
u
n
the
Setu
ppr
og
ramon
t
h
e
D
r
iver
s
a
n
d
U
t
i
li
t
ie
s
D
isk
.
Th
i
sCD
c
o
nta
in
sthen
eces
s
a
ry
d
e
vic
e
dr
iver
stoc
om
mu
nicate
with
th
ei
magi
ng
so
ftwa
re
inst
alled
on
th
e
co
m
pu
te
r
.
N
o
te:
If
t
h
e
s
t
a
r
tu
p
s
c
r
ee
n
d
o
e
s
n
o
t
ap
p
e
a
r
,
do
u
bl
e
-
c
l
i
c
k
My
C
ompu
ter
,
do
uble
-clic
k
theCD-ROMi
con
and
t
h
e
n
d
o
u
b
le
-
cl
i
c
k
D
:
\
Au
to
r
u
n.e
x
e
.
N
o
t
e
:
A
u
th
o
r
iz
ed
ima
g
in
g
s
o
ft
w
a
r
e
,
p
u
rc
ha
s
e
d
f
r
o
m
y
our
d
e
a
l
e
r
o
r
o
t
h
e
r
c
o
m
pa
n
y,
m
u
st
b
e
i
n
st
a
l
l
e
d
o
n
the
c
o
m
p
u
t
e
r
i
n
o
r
de
r
to
o
p
e
r
a
t
e
th
e
S
c
a
nX
S
wi
ft
.
Sc
anX
Sw
iftI
ns
ta
llat
ion
&
Op
era
tM
anua
l
D
iskP/NG8
095
R
ev
.A
M
arch2013
D
i
s
k
So
ftwa
re
CD
&
T
r
ainin
g
V
id
e
o
U
SB2.0
C
a
ble
,10
F
e
e
t
23
C
o
nne
c
tor
Ke
y
H
a
ndpi
e
c
e
Quic
k
Disconnec
t
C
ol
larH
a
ndpie
ce
Ca
ble
U
S
B
I
nte
r
f
ac
e
C
onnec
tions
I
M
P
O
R
T
ANT
:
UseaHi
gh
Po
we
r
(5
0
0
m
A)
U
SB
2
.
0
P
o
r
tOnl
y
1.
C
o
n
n
e
ct
t
h
e
USB
T
yp
e
A
conn
e
cto
rsid
e
of
th
e
Ha
n
dp
ie
c
e
C
ab
le
t
o
a
n
y
availab
leUSB2.0h
ig
h
s
p
ee
d
,
hig
h
p
owe
r
p
o
r
t
o
n
th
e
u
s
e
rsu
p
p
l
ie
d
C
o
m
p
u
t
e
rSys
t
e
m
.
2
.
A
l
ways
m
a
ke
s
ure
to
u
s
e
t
h
e
s
a
m
e
USB
p
o
r
t
w
h
en
e
v
e
rre
-co
n
n
ect
io
n
o
fthe
U
S
Bc
a
blei
s
n
e
c
es
s
a
ry
.
3.
A
s
e
l
f
-
p
o
we
r
ed
US
B
h
u
b
can
b
e
u
s
ed
t
oext
en
dthe
handp
i
ece
cab
le
le
n
gt
h
.
4
.D
o
not
u
s
e
a
B
US
-
po
w
er
e
d
h
u
b
or
ex
t
e
n
s
io
n
c
able.
US
B
T
ypeA
Connec
tor
H
a
n
dpiec
e
Cabl
e
Typic
a
l
C
o
mput
e
r
U
S
B
2.0
P
orts
4
US
B
Device
D
riv
er
s
D
e
m
ons
trat
io
nP
r
ogra
m
a
nd
U
t
ilit
ies
Ad
obeA
cro
b
a
tR
ea
d
e
r
R
e
v
.A
DiskP/
N
G1
415
H
igh
De
fin
itio
n
Intra
ora
lVide
oCa
me
ra
S
y
s
tem
Ope
r
a
to
r
’
s
M
anu
al
SoftwareDrivers
andUtilitiesDisk
USB2.0Cable,
10Feet
23
Connector
Key
Handpiece Quick
Disconnect
CollarHandpiece
Cable
USBInterfac e Connections
IMPORTANT:
UseaHighPower(500mA)USB2.0PortOn ly
1.ConnecttheUSBTypeAconnectorsideof the Handpiece Cable to any
availableUSB2.0highspeed,highpower port on the user supplied
ComputerSystem.
2.AlwaysmakesuretousethesameUSBportwheneverre-connection of the
USBcableisnecessary.
3.Aself-poweredUSBhubcanbe used to extend the handpiece cable
length.
4.DonotuseaBUS-poweredhubor extension cable.
USBTypeA
Connector
Handpiece
Cable
4
TypicalComputer
USB2.0Ports
Note:
.
n
wo
hs
ret
upmoc
po
t
k
s
e
D
Laptopcanbeused.
ThankYouandCongratulations
onyourpurchaseofLunaHD,thelat-
eststandarddefinitioncamerainthedentalvideoimaging product line f rom
AirTechniques,aleadingmanufacturerofdentalequipmentsince 19 62.
LunaHDofferstheflexiblebenefitsofUSBPlug-N-Playtechnologythat is easily
integratedintoanypractice.Thelightweightone-piecehandpieceis extremely
maneuverableandproducescrisp,clearimages.
Thisdocumentprovidesbriefinformationtohelp you get start ed using your
LunaHDforthefirsttime.
PleaserefertotheOperator’sManualPDF file o n the Drivers and Uti lities
Diskfordetailedinformation.
OnlineWarrantyRegistration.
Quickly
registeryournewLunaHDonline.Justhave
.elbaliav
a
s
r
ebmunlaires
d
nale
d
omtc
u
dor
p
eht
GototheAirTechniqueswebsite,www.airtech-
niques.com,clicktheWarrantyRegistrationlink
andcompletetheform.Registrationensuresa
recordforthewarrantyperiodandhelpstokeep
youinformedofproductupdatesandothervalu-
ableinformation.
HighDefinitionIntraoralVideoCameraSystem
Before connecting Luna HD or
attempting to use it for the first time,
device drivers must be installed
to communicate with the imaging
software installed on your computer.
Refer to the Software Installation and
Configuration Guide as needed and
run the Setup program on the Drivers
and Utilities Disk.