CameoGear CAMEOGRIP User manual

often understated, always essential
CAMEOGRIP
user guide
CameoGrip is a retro-style, electronic handgrip that
can control camera and lens functions for cameras
that support the LANC remote control protocol, as
well as Sony cameras with a Multi-Terminal port.
It can be mounted three ways: Bolex-style under a
small camera, as a handgrip on an over-the-shoulder
camera, or on a pan-arm grip using a third party
clamp.
Features
Grip •Aluminum Spine
•Stainless steel knob and screw
•ABS housing
Controls •2 axis joystick for controlling zoom
and iris (depending on camera and lens
compatibility)
•Run/Stop button to start/stop recording
•2x programmable buttons
Connector •1x 8-pin Hirose connector for
connecting to camera
•MicroUSB connector for firmware
updates
1

Connecting CameoGrip to Your Camera
Every CameoGrip includes a cable with a Hirose 8-pin
connector on one side and either a Multi-Terminal
or LANC connector on the other.
Connect the Hirose side of this cable to the female
Hirose connector on the back of the grip. Ensure
that the connectors are lined up properly in order
to prevent pin damage – when the connector is
properly oriented it will connect with very little
resistance. Once the connector is inserted, gently
turn the barrel to secure the cable.
2
connecting cameogrip to your camera
Connect the other side of the cable to the
camera. If used with a LANC-based camera,
the plug is a 2.5mm round connector and will
connect to a jack, likely labeled “Remote” on
the camera. If used with a Sony Alpha camera,
the plug will be a Multi-Terminal connector,
which looks very similar to a Micro-USB plug.
e jack on the camera may be labeled
“MULTI” or “CHG”.
e CameoGrip will automatically detect
the camera and power itself via the same
connection.

3
mounting to your camera
CameoGrip can be mounted three dierent ways:
Bolex Style Shoulder Mounted On a Tripod Pan Arm
CameoGrip can be
used under a light-
weight camera.
Use the thumbwheel
to screw the grip’s
1/4-20 thread into
the bottom of the
camera.
Use the included
rosette adapter
to attach to an
ARRI-standard
rosette.
Attach to a tripod pan
arm via the Rosette
Adapter using a
third-party rosette
clamp, such as
Wooden Camera’s
Tripod Head Pan Bar.

joystick & function buttons
Joystick Functions
Controlling Zoom Press the joystick forward on the x-axis in order to zoom in. Press the
joystick backward in order to zoom out.
Controlling Iris Press the joystick upward or downward to open or close the iris on
LANC-based cameras. Note that dierent cameras will interpret the iris
commands dierently, so what may open the iris on a Sony camera will
close it on a Canon camera.
Note: e direction and axes of the joystick functions can be reassigned using the CameoGrip Updater
soware, which runs on a Windows PC or Mac. Just connect the CameoGrip to the computer using its
USB port.
Button Functions
Controlling Recording Run/stop or recording can be controlled using the red button on the front
of the CameoGrip. Press the button once to initiate recording and then
push the button again to stop recording.
Programmable Buttons ese buttons are pre-assigned to USER 3 and USER 4 for most LANC
cameras, including the Sony FS-series, Canon C-series and Panasonic
EVA1 cameras. Dierent functions can be assigned to the buttons using
the camera’s on-board menu system. On Sony Alpha series cameras, the
buttons trigger a photo and focus assist.
Note: Dierent LANC functions can be assigned to these buttons using the CameoGrip Updater
soware.
4

using cameogrip updater soware
e CameoGrip Updater soware, as well as CameoGrip firmware
updates, can be downloaded from:
www.cameogear.com/cameogrip
Aer installing the CameoGrip Updater, connect the CameoGrip
to your computer using the included USB cable. Run the soware,
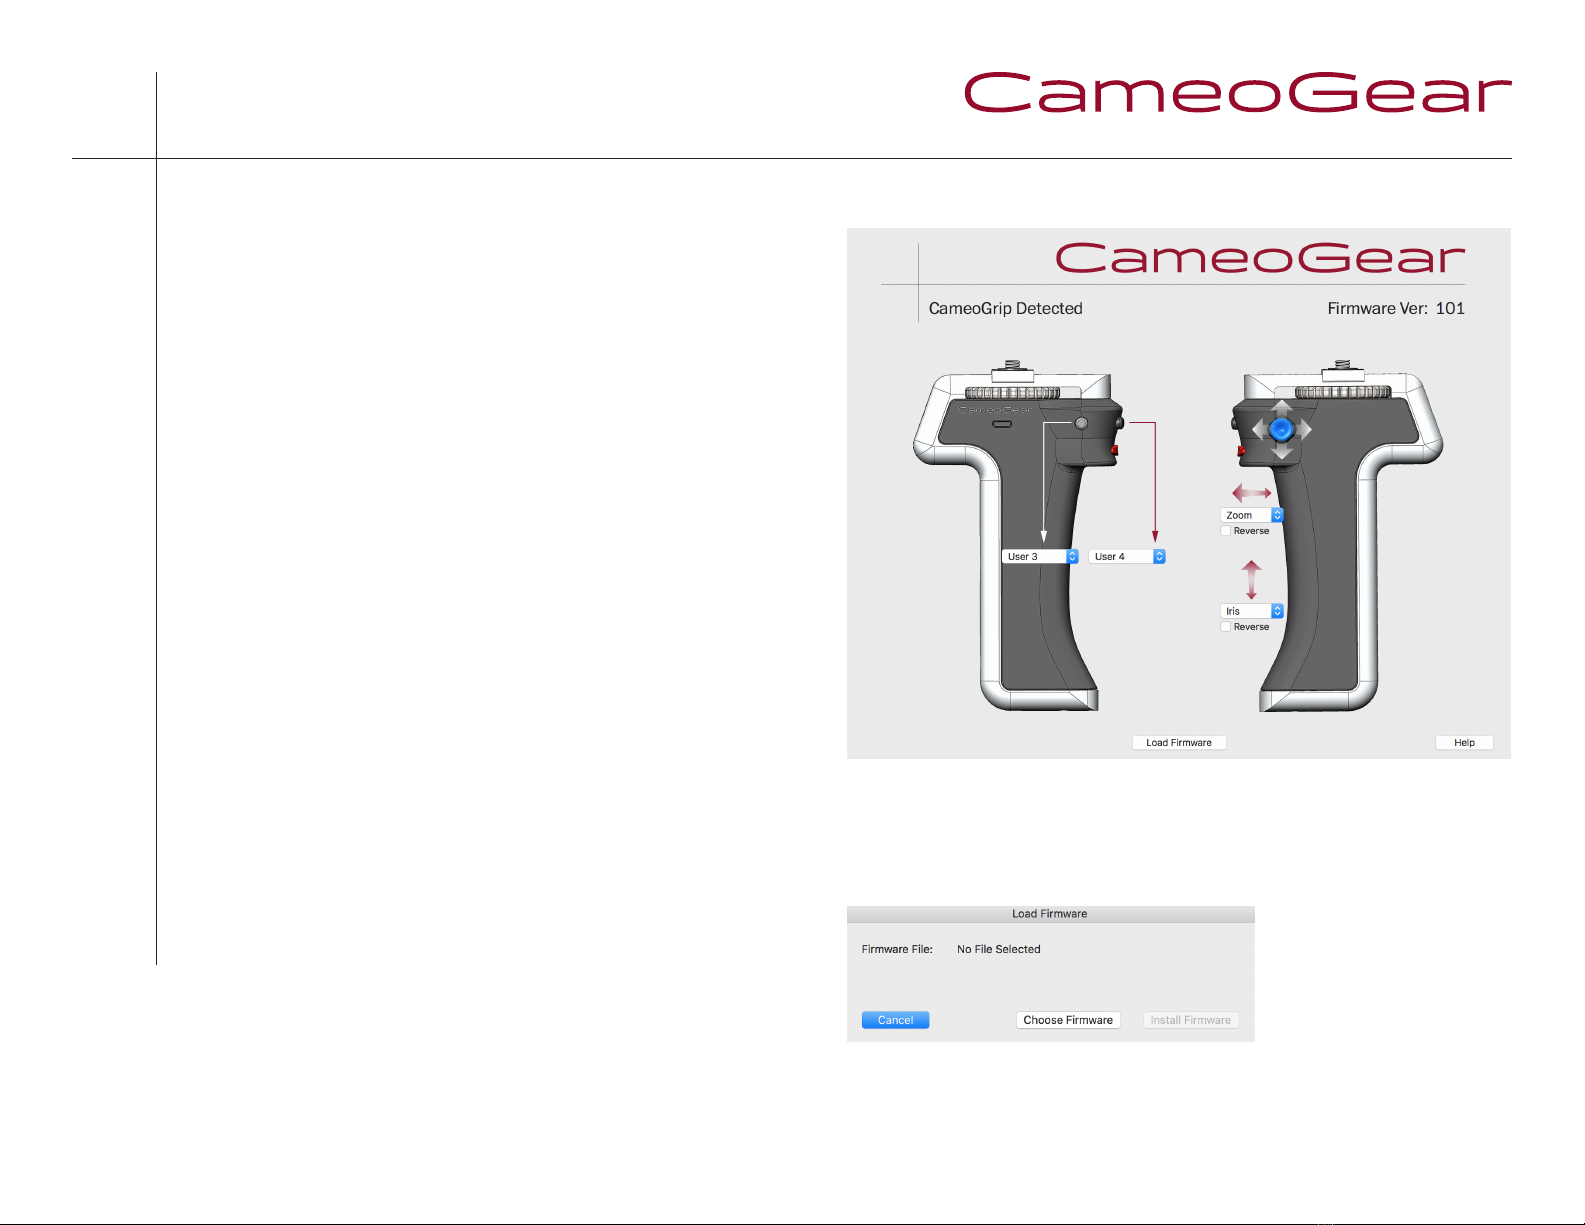
and it will detect the CameoGrip and display a window similar to
the one shown (fig. a).
e current firmware version will be displayed in the top right
corner of the window (NB: version 101 is the minimum version
supported by the soware). e four dropdown menus show the
functions currently assigned to the 2 programmable buttons and
2 axes of the joystick. Select a new function from any menu,
and it will immediately be assigned to the corresponding button
or joystick axis on the grip. Checking the “Reverse” checkbox
for either joystick drop down will reverse the direction of the
corresponding function.
To load new firmware onto the CameoGrip, first download the update file from
the CameoGear site. en click the “Load Firmware” button in the soware.
e following window will appear:
Press the “Choose Firmware” button, navigate to the downloaded firmware file and
press the “Install Firmware” button.
5
ank you for purchasing the CameoGrip.
If you have any questions, please do not hesitate
to contact us at info@cameo-gear.com.
fig. a

warranty
6
AbelCine* warrants all CameoGear products to be free of defects
in materials and workmanship for a period of one year from the
date of purchase.
is warranty does NOT cover:
Damage or malfunction resulting from accident, misuse, abuse
or neglect
Failure to follow the supplied instructions
Repair or attempted repair by a third party
Adjustment, disassembly or modification of the unit
In case of a warranty claim, contact info@cameo-gear.com
*CameoGear products are manufactured by AbelCine. 01.28.19
Table of contents